
Simple encoding techniques have existed for thousands of years. While you might assume that the massive computing capacity of modern computers has made simple ciphers extinct, this is not the case. Simple encoding techniques are often used to disguise content so that it is not apparent that it is human-readable or to transform data into a different character set.
Simple ciphers are often disparaged for being unsophisticated, but they offer many advantages for malware, including the following:
They are small enough to be used in space-constrained environments such as exploit shellcode.
They are less obvious than more complex ciphers.
They have low overhead and thus little impact on performance.
Malware authors who use a simple cipher don’t expect to be immune to detection; they’re simply looking for an easy way to prevent basic analysis from identifying their activities.
One of the first ciphers ever used was the Caesar cipher. The Caesar cipher was used during the Roman Empire to hide messages transported through battlefields by courier. It is a simple cipher formed by shifting the letters of the alphabet three characters to the right. For example, the following text shows a secret wartime message encrypted with the Caesar cipher:
ATTACK AT NOON
DWWDFN DW QRRQ
The XOR cipher is a simple cipher that is similar to the Caesar cipher. XOR means exclusive OR and is a logical operation that can be used to modify bits.
An XOR cipher uses a static byte value and modifies each byte of plaintext by performing a
logical XOR operation with that value. For example, Figure 13-1 shows how the message ATTACK AT NOON would be encoded using an XOR with the byte 0x3C. Each character is
represented by a cell, with the ASCII character (or control code) at the top, and the hex value of
the character on the bottom.

Figure 13-1. The string ATTACK AT NOON encoded with an XOR of 0x3C
(original string at the top; encoded strings at the bottom)
As you can see in this example, the XOR cipher often results in bytes that are not limited to printable characters (indicated here using shaded cells). The C in ATTACK is translated to hex 0x7F, which is typically used to indicate the delete character. In the same vein, the space character is translated to hex 0x1C, which is typically used as a file separator.
The XOR cipher is convenient to use because it is both simple—requiring only a single machine-code instruction—and reversible.
A reversible cipher uses the same function to encode and decode. In order to decode something encoded with the XOR cipher, you simply repeat the XOR function with the same key used during encoding.
The implementation of XOR encoding we have been discussing—where the key is the same for every encoded byte—is known as single-byte XOR encoding.
Imagine we are investigating a malware incident. We learn that seconds before the malware starts, two files are created in the browser’s cache directory. One of these files is an SWF file, which we assume is used to exploit the browser’s Flash plug-in. The other file is named a.gif, but it doesn’t appear to have a GIF header, which would start with the characters GIF87a or GIF89a. Instead, the a.gif file begins with the bytes shown in Example 13-1.
Example 13-1. First bytes of XOR-encoded file a.gif
5F 48 42 12 10 12 12 12 16 12 1D 12 ED ED 12 12    _HB.............
AA 12 12 12 12 12 12 12 52 12 08 12 12 12 12 12    ........R.......
12 12 12 12 12 12 12 12 12 12 12 12 12 12 12 12    ................
12 12 12 12 12 12 12 12 12 12 12 12 12 13 12 12    ................
A8 02 12 1C 0D A6 1B DF 33 AA 13 5E DF 33 82 82    ........3..^.3..
46 7A 7B 61 32 62 60 7D 75 60 73 7F 32 7F 67 61    Fz{a2b`}u`s.2.ga
We suspect that this file may be an XOR-encoded executable, but how do we find out? One strategy that works with single-byte encoding is brute force.
Since there are only 256 possible values for each character in the file, it is easy and quick enough for a computer to try all of the possible 255 single-byte keys XORed with the file header, and compare the output with the header you would expect for an executable file. The XOR encoding using each of 255 keys could be performed by a script, and Table 13-1 shows what the output of such a script might reveal.
Table 13-1 shows the first few bytes of the a.gif file encoded with different XOR keys. The goal of brute-forcing here is to try several different values for the XOR key until you see output that you recognize—in this case, an MZ header. The first column lists the value being used as the XOR key, the second column shows the initial bytes of content as they are transformed, and the last column shows whether the suspected content has been found.
Table 13-1. Brute-Force of XOR-Encoded Executable
XOR key value | Initial bytes of file | MZ header found? |
|---|---|---|
Original |
| No |
XOR with 0x01 |
| No |
XOR with 0x02 |
| No |
XOR with 0x03 |
| No |
XOR with 0x04 |
| No |
XOR with 0x05 |
| No |
... | ... | No |
XOR with 0x12 |
| Yes! |
Notice in the last row of this table that using an XOR with 0x12 we find an MZ header. PE files begin with the letters MZ, and the hex characters for M and Z are 4d and 5a, respectively, the first two hex characters in this particular string.
Next, we examine a larger portion of the header, and we can now see other parts of the file, as shown in Example 13-2.
Example 13-2. First bytes of the decrypted PE file
4D 5A 50 00 02 00 00 00 04 00 0F 00 FF FF 00 00    MZP.............
B8 00 00 00 00 00 00 00 40 00 1A 00 00 00 00 00    ........@.......
00 00 00 00 00 00 00 00 00 00 00 00 00 00 00 00    ................
00 00 00 00 00 00 00 00 00 00 00 00 00 01 00 00    ................
BA 10 00 0E 1F B4 09 CD 21 B8 01 4C CD 21 90 90    ........!..L.!..
54 68 69 73 20 70 72 6F 67 72 61 6D 20 6D 75 73    This program mus
Here, we see the words This program mus. This is the
start of the DOS stub, a common element within an executable file, which provides additional
evidence that this is indeed a PE file.
Brute-forcing can also be used proactively. For example, if you want to search many files to check for XOR-encoded PE files, you could create 255 signatures for all of the XOR combinations, focusing on elements of the file that you think might be present.
For example, say we want to search for single-byte XOR encodings of the string This program. It is common for a PE file header to contain a string such
as This program must be run under Win32, or This program cannot be run in DOS. By generating all possible permutations
of the original string with each possible XOR value, we come up with the set of signatures to search
for, as shown in Table 13-2.
Table 13-2. Creating XOR Brute-Force Signatures
XOR key value | “This program” |
|---|---|
Original |
|
XOR with 0x01 |
|
XOR with 0x02 |
|
XOR with 0x03 |
|
XOR with 0x04 |
|
XOR with 0x05 |
|
... | ... |
XOR with 0xFF |
|
Look again at the encoded file shown in Example 13-1. Notice how blatant the XOR key of 0x12 is, even at just a glance. Most of the bytes in the initial part of the header are 0x12! This demonstrates a particular weakness of single-byte encoding: It lacks the ability to effectively hide from a user manually scanning encoded content with a hex editor. If the encoded content has a large number of NULL bytes, the single-byte “key” becomes obvious.
Malware authors have actually developed a clever way to mitigate this issue by using a NULL-preserving single-byte XOR encoding scheme. Unlike the regular XOR encoding scheme, the NULL-preserving single-byte XOR scheme has two exceptions:
If the plaintext character is NULL or the key itself, then the byte is skipped.
If the plaintext character is neither NULL nor the key, then it is encoded via an XOR with the key.
As shown in Table 13-3, the code for this modified XOR is not much more complicated than the original.
In Table 13-3, the C code for the original XOR function is shown at left, and the NULL-preserving XOR function is on the right. So if the key is 0x12, then any 0x00 or 0x12 will not be transformed, but any other byte will be transformed via an XOR with 0x12. When a PE file is encoded in this fashion, the key with which it is encoded is much less visually apparent.
Now compare Example 13-1 (with the obvious 0x12 key) with Example 13-3. Example 13-3 represents the same encoded PE file, encoded again with 0x12, but this time using the NULL-preserving single-byte XOR encoding. As you can see, with the NULL-preserving encoding, it is more difficult to identify the XOR encoding, and there is no evidence of the key.
Example 13-3. First bytes of file with NULL-preserving XOR encoding
5F 48 42 00 10 00 00 00 16 00 1D 00 ED ED 00 00    _HB.............
AA 00 00 00 00 00 00 00 52 00 08 00 00 00 00 00    ........R.......
00 00 00 00 00 00 00 00 00 00 00 00 00 00 00 00    ................
00 00 00 00 00 00 00 00 00 00 00 00 00 13 00 00    ................
A8 02 00 1C 0D A6 1B DF 33 AA 13 5E DF 33 82 82    ........3..^.3..
46 7A 7B 61 32 62 60 7D 75 60 73 7F 32 7F 67 61    Fz{a2b`}u`s.2.ga
This NULL-preserving XOR technique is especially popular in shellcode, where it is important to be able to perform encoding with a very small amount of code.
Now imagine that you find the shellcode within the SWF file. You are disassembling the shellcode in IDA Pro, and you want to find the XOR loop that you suspect exists to decode the associated a.gif file.
In disassembly, XOR loops can be identified by small loops with an XOR instruction in the middle of a loop. The easiest way to find an XOR loop in IDA Pro is to search for all instances of the XOR instruction, as follows:
Make sure you are viewing code (the window title should contain “IDA View”).
Select Search ▶ Text.
In the Text Search dialog, enter
xor, select the Find all occurrences checkbox, and then click OK. You should see a window like the one shown in Figure 13-2.
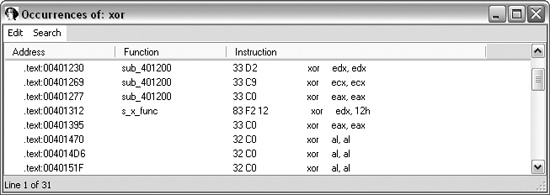
Just because a search found an XOR instruction does not mean that the XOR instruction is being used for encoding. The XOR instruction can be used for different purposes. One of the uses of XOR is to clear the contents of a register. XOR instructions can be found in three forms:
XOR of a register with itself
XOR of a register (or memory reference) with a constant
XOR of one register (or memory reference) with a different register (or memory reference)
The most prevalent form is the first, since an XOR of a register with itself is an efficient
way to zero out a register. Fortunately, the clearing of a register is not related to data encoding,
so you can ignore it. As you can see in Figure 13-2, most of the
listed instructions are an XOR of a register with itself (such as xor
edx,edx).
An XOR encoding loop may use either of the other two forms: an XOR of a register with a
constant or an XOR of a register with a different register. If you are lucky, the XOR will be of a
register with a constant, because that will confirm that you are probably seeing encoding, and you
will know the key. The instruction xor edx, 12h in Figure 13-2 is an example of this second form of XOR.
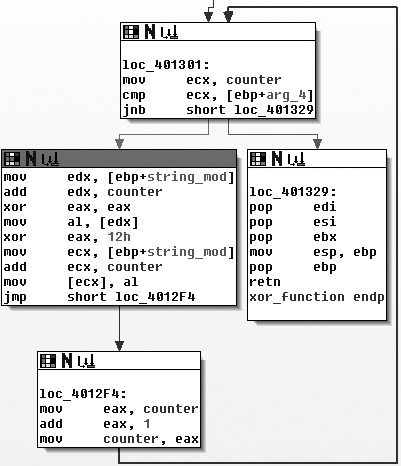
One of the signs of encoding is a small loop that contains the XOR function. Let’s look
at the instruction we identified in Figure 13-2. As the IDA Pro
flowchart in Figure 13-3 shows, the XOR with the 0x12
instruction does appear to be a part of a small loop. You can also see that the block at loc_4012F4 increments a counter, and the block at loc_401301 checks to see whether the counter has exceeded a certain length.
Given the weaknesses of single-byte encoding, many malware authors have implemented slightly more involved (or just unexpected) encoding schemes that are less susceptible to brute-force detection but are still simple to implement. Table 13-4 briefly describes some of these encoding schemes. We won’t delve into the specifics of each of these techniques, but you should be aware of them so that you can recognize them if you see them.
Table 13-4. Additional Simple Encoding Algorithms
Base64 encoding is used to represent binary data in an ASCII string format. Base64 encoding is commonly found in malware, so you’ll need to know how to recognize it.
The term Base64 is taken from the Multipurpose Internet Mail Extensions (MIME) standard. While originally developed to encode email attachments for transmission, it is now widely used for HTTP and XML.
Base64 encoding converts binary data into a limited character set of 64 characters. There are a number of schemes or alphabets for different types of Base64 encoding. They all use 64 primary characters and usually an additional character to indicate padding, which is often =.
The most common character set is MIME’s Base64, which uses A–Z, a–z, and 0–9 for the first 62 values, and + and / for the last two values. As a result of squeezing the data into a smaller set of characters, Base64-encoded data ends up being longer than the original data. For every 3 bytes of binary data, there are at least 4 bytes of Base64-encoded data.
If you’ve ever seen a part of a raw email file like the one shown in Example 13-4, you have seen Base64 encoding. Here, the top few lines show email headers followed by a blank line, with the Base64-encoded data at the bottom.
Example 13-4. Part of raw email message showing Base64 encoding
Content-Type: multipart/alternative;
    boundary="_002_4E36B98B966D7448815A3216ACF82AA201ED633ED1MBX3THNDRBIRD_"
MIME-Version: 1.0
--_002_4E36B98B966D7448815A3216ACF82AA201ED633ED1MBX3THNDRBIRD_
Content-Type: text/html; charset="utf-8"
Content-Transfer-Encoding: base64

SWYgeW91IGFyZSByZWFkaW5nIHRoaXMsIHlvdSBwcm9iYWJseSBzaG91bGQganVzdCBza2lwIHRoaX
MgY2hhcHRlciBhbmQgZ28gdG8gdGhlIG5leHQgb25lLiBEbyB5b3UgcmVhbGx5IGhhdmUgdGhlIHRp
bWUgdG8gdHlwZSB0aGlzIHdob2xlIHN0cmluZyBpbj8gWW91IGFyZSBvYnZpb3VzbHkgdGFsZW50ZW
QuIE1heWJlIHlvdSBzaG91bGQgY29udGFjdCB0aGUgYXV0aG9ycyBhbmQgc2VlIGlmIHThe process of translating raw data to Base64 is fairly standard. It uses 24-bit (3-byte) chunks. The first character is placed in the most significant position, the second in the middle 8 bits, and the third in the least significant 8 bits. Next, bits are read in blocks of six, starting with the most significant. The number represented by the 6 bits is used as an index into a 64-byte long string with each of the allowed bytes in the Base64 scheme.
Figure 13-4 shows how the transformation happens. The top line is
the original string (ATT). The second line is the hex
representation of ATT at the nibble level (a
nibble is 4 bits). The middle line shows the actual bits used to represent
ATT. The fourth line is the value of the bits in each particular
6-bit-long section as a decimal number. Finally, the last string is the character used to represent
the decimal number via the index into a reference string.

The letter A corresponds to the bits 01000001. The first 6 bits of the letter A (010000) are converted into a single Base64-encoded letter Q. The last two bits of the A (01) and the first four bits of the letter T (0101) are converted into the second Base64-encoded character, V (010101), and so on.
Decoding from Base64 to raw data follows the same process but in reverse. Each Base64 character is transformed to 6 bits, and all of the bits are placed in sequence. The bits are then read in groups of eight, with each group of eight defining the byte of raw data.
Let’s say we are investigating malware that appears to have made the two HTTP GET requests shown in Example 13-5.
Example 13-5. Sample malware traffic
GET /X29tbVEuYC8=/index.htm
User-Agent: Mozilla/4.0 (compatible; MSIE 7.0; Windows NT 5.1)
Host: www.practicalmalwareanalysis.com
Connection: Keep-Alive
Cookie: Ym90NTQxNjQ

GET /c2UsYi1kYWM0cnUjdFlvbiAjb21wbFU0YP==/index.htm
User-Agent: Mozilla/4.0 (compatible; MSIE 7.0; Windows NT 5.1)
Host: www.practicalmalwareanalysis.com
Connection: Keep-Alive
Cookie: Ym90NTQxNjQ
With practice, it’s easy to identify Base64-encoded content. It appears as a random selection of characters, with the character set composed of the alphanumeric characters plus two other characters. One padding character may be present at the end of an encoded string; if padded, the length of the encoded object will be divisible by four.
In Example 13-5, it appears at first as if both the URL path and
the Cookie are Base64-encoded values. While the Cookie value appears to remain constant, it looks like the attacker is
sending two different encoded messages in the two GET
requests.
A quick way to encode or decode using the Base64 standard is with an online tool such as the
decoder found at http://www.opinionatedgeek.com/dotnet/tools/base64decode/. Simply enter the Base64-encoded content into the top window and click the button
labeled Decode Safely As Text. For example, Figure 13-5 shows what happens if we run the Cookie value through a Base64 decoder.
Remember how every three characters from the input becomes four characters in the output, and
how the four-character output blocks are padded? How many characters are in the Cookie string? Since there are 11, we know that if this is a Base64
string, it is not correctly padded.
Technically, the padding characters are optional, and they are not essential to accurate decoding. Malware has been known to avoid using padding characters, presumably to appear less like Base64 or to avoid network signatures. In Figure 13-6, we add the padding and try again:
Apparently, the attacker is tracking his bots by giving them identification numbers and Base64-encoding that into a cookie.
In order to find the Base64 function in the malware, we can look for the 64-byte long string typically used to implement the algorithm. The most commonly used string adheres to the MIME Base64 standard. Here it is:
ABCDEFGHIJKLMNOPQRSTUVWXYZabcdefghijklmnopqrstuvwxyz0123456789+/
Because an implementation of Base64 typically uses indexing strings, code that contains Base64 encoding will often have this telltale string of 64 characters. The Base64-indexing string is typically composed of printable characters (or it would defeat the intent of the algorithm), and can therefore be easily eyeballed in string output.
A secondary piece of evidence that can be used to confirm the use of a Base64-encoding algorithm is the existence of a lone padding character (typically =) hard-coded into the function that performs the encoding.
Next, let’s look at the URI values from Example 13-5. Both strings have all the characteristics of Base64 encoding: a restricted, random-looking character set, padded with = to a length divisible by four. Figure 13-7 shows what we find when we run them through a Base64 decoder.

Obviously, this is not standard Base64 encoding! One of the beautiful things about Base64 (at least from a malware author’s point of view) is how easy it is to develop a custom substitution cipher. The only item that needs to be changed is the indexing string, and it will have all the same desirable characteristics as the standard Base64. As long as the string has 64 unique characters, it will work to create a custom substitution cipher.
One simple way to create a new indexing string is to relocate some of the characters to the front of the string. For example, the following string was created by moving the a character to the front of the string:
aABCDEFGHIJKLMNOPQRSTUVWXYZbcdefghijklmnopqrstuvwxyz0123456789+/
When this string is used with the Base64 algorithm, it essentially creates a new key for the encoded string, which is difficult to decode without knowledge of this string. Malware uses this technique to make its output appear to be Base64, even though it cannot be decoded using the common Base64 functions.
The malware that created the GET requests shown in Example 13-5 used this custom substitution cipher. Looking again at the
strings output, we see that we mistook the custom string for the standard one, since it looked so
similar. The actual indexing string was the preceding one, with the a character
moved to the front of the string. The attacker simply used the standard algorithm and changed the
encoding string. In Figure 13-8, we try the
decryption again, but this time with the new string.
