
To exercise the functionality of your subject malware as much as possible, you must simulate all network services on which the malware relies. For example, malware commonly connects to an HTTP server to download additional malware. To observe this activity, you’ll need to give the malware access to a Domain Name System (DNS) server to resolve the server’s IP address, as well as an HTTP server to respond to requests. With the custom network configuration just described, the machine providing services should be running the services required for the malware to communicate. (We’ll discuss a variety of tools useful for simulating network services in the next chapter.)
Sometimes you’ll want to connect your malware-running machine to the Internet to provide a more realistic analysis environment, despite the obvious risks. The biggest risk, of course, is that your computer will perform malicious activity, such as spreading malware to additional hosts, becoming a node in a distributed denial-of-service attack, or simply spamming. Another risk is that the malware writer could notice that you are connecting to the malware server and trying to analyze the malware.
You should never connect malware to the Internet without first performing some analysis to determine what the malware might do when connected. Then connect only if you are comfortable with the risks.
The most common way to connect a virtual machine to the Internet using VMware is with a bridged network adapter, which allows the virtual machine to be connected to the same network interface as the physical machine. Another way to connect malware running on a virtual machine to the Internet is to use VMware’s Network Address Translation (NAT) mode.
NAT mode shares the host’s IP connection to the Internet. The host acts like a router and translates all requests from the virtual machine so that they come from the host’s IP address. This mode is useful when the host is connected to the network, but the network configuration makes it difficult, if not impossible, to connect the virtual machine’s adapter to the same network.
For example, if the host is using a wireless adapter, NAT mode can be easily used to connect the virtual machine to the network, even if the wireless network has Wi-Fi Protected Access (WPA) or Wired Equivalent Privacy (WEP) enabled. Or, if the host adapter is connected to a network that allows only certain network adapters to connect, NAT mode allows the virtual machine to connect through the host, thereby avoiding the network’s access control settings.
Peripheral devices, such as CD-ROMs and external USB storage drives, pose a particular problem for virtual machines. Most devices can be connected either to the physical machine or the virtual machine, but not both.
The VMware interface allows you to connect and disconnect external devices to virtual machines. If you connect a USB device to a machine while the virtual machine window is active, VMware will connect the USB device to the guest and not the host, which may be undesirable, considering the growing popularity of worms that spread via USB storage devices. To modify this setting, choose VM ▶ Settings ▶ USB Controller and uncheck the Automatically connect new USB devices checkbox to prevent USB devices from being connected to the virtual machine.
Taking snapshots is a concept unique to virtual machines. VMware’s virtual machine snapshots allow you save a computer’s current state and return to that point later, similar to a Windows restore point.
The timeline in Figure 2-5 illustrates how taking snapshots works. At 8:00 you take a snapshot of the computer. Shortly after that, you run the malware sample. At 10:00, you revert to the snapshot. The OS, software, and other components of the machine return to the same state they were in at 8:00, and everything that occurred between 8:00 and 10:00 is erased as though it never happened. As you can see, taking snapshots is an extremely powerful tool. It’s like a built-in undo feature that saves you the hassle of needing to reinstall your OS.

After you’ve installed your OS and malware analysis tools, and you have configured the network, take a snapshot. Use that snapshot as your base, clean-slate snapshot. Next, run your malware, complete your analysis, and then save your data and revert to the base snapshot, so that you can do it all over again.
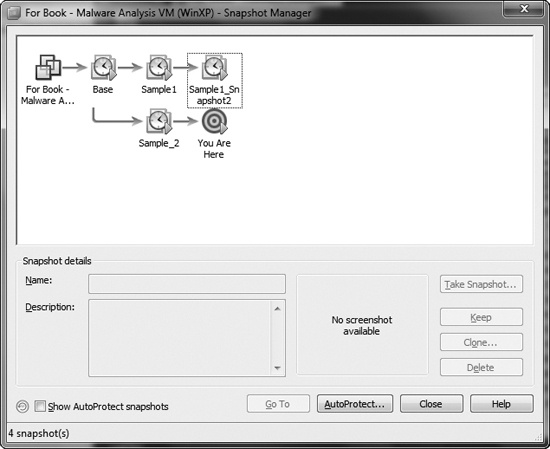
But what if you’re in the middle of analyzing malware and you want to do something different with your virtual machine without erasing all of your progress? VMware’s Snapshot Manager allows you to return to any snapshot at any time, no matter which additional snapshots have been taken since then or what has happened to the machine. In addition, you can branch your snapshots so that they follow different paths. Take a look at the following example workflow:
When you return to your virtual machine, you can access either snapshot at any time, as shown in Figure 2-6. The two machine states are completely independent, and you can save as many snapshots as you have disk space.
One drawback of using snapshots is that any work undertaken on the virtual machine is lost when you revert to an earlier snapshot. You can, however, save your work before loading the earlier snapshot by transferring any files that you want to keep to the host OS using VMware’s drag-and-drop feature. As long as VMware Tools is installed in the guest OS and both systems are running Windows, you should be able to drag and drop a file directly from the guest OS to the host OS. This is the simplest and easiest way to transfer files.
Another way to transfer your data is with VMware’s shared folders. A shared folder is accessible from both the host and the guest OS, similar to a shared Windows folder.