CHAPTER 28
Getting Started
INTRODUCTION
This chapter describes some core elements of Excel's Visual Basic for Applications (VBA). A good familiarity with this is essential for anyone wishing to progress beyond basic level financial modelling applications. The text focuses on the topics that we consider to be the most important. We aim to enable the reader who is a beginner with VBA to rapidly become familiar with core operations and to be able to write and use some simple, yet practical and robust code. In particular, we focus on subroutines and user-defined functions: subroutines consist of sequences of tasks or processes, whereas user-defined functions perform bespoke calculations that may not be available as Excel functions. Other areas of VBA, such as user forms and class modules, are not covered in this text. In this way, we hope to have created a text that is accessible for the beginner whilst still being of high value when applied to many real-life modelling situations.
This chapter attempts to present only those concepts which are essential to getting started and to demonstrate the core concepts; topics concerning the writing of more general and robust code are covered later in the text. The first section of this chapter provides an overview of the main uses of VBA. The second section presents some core building blocks and key operations.
Note that in this Part of the text, we use the term “Excel” (or “pure Excel”) to refer to the traditional part of Excel where no VBA is involved (i.e. consisting of the workbook, worksheet grid, functions, and so on). Also, whereas the term “macro” is often used to refer to VBA, we will generally use to refer to subroutines or other procedures (and not for user-defined functions, for example).
MAIN USES OF VBA
The main uses of VBA can be summarised as:
- Automating tasks.
- Creating user-defined functions.
- Detecting and reacting to Excel or model events.
- Enhancing or managing the user interface.
- Developing generalised applications.
This section provides a brief description of each, with much of the rest of the text devoted to the first two topics.
Task Automation
Tasks that need to be repeated (in similar form) many times can be automated to enhance efficiency. Typical areas include:
- Manipulation of data sets. This could include operations to clean underlying data or to consolidate data together.
- Database queries and extraction. This includes where database queries need to be run multiple times, especially in cases where the use of multiple database criteria ranges would be inconvenient.
- Resolving circular references through iteration.
- Running scenarios. Especially in cases where a model contains a circular reference that is resolved using a macro, the running of multiple scenarios will generally also require a macro.
- Running simulations. The use of (Monte Carlo) simulation is a generalisation of scenario modelling, in which many scenarios are generated automatically using random sampling of probability distributions.
- Running Excel's GoalSeek or Solver several times.
Creating User-defined Functions
User-defined (or user-created) functions can be very powerful in many circumstances. Here, we simply note that the main advantages that may be achieved include to perform calculations that are cumbersome to create and modify in Excel, to reduce the size of the model interface in Excel, to increase flexibility in the structure of a model, and to create easily reuseable logic and more transparency in the calculations. Later in this chapter, we provide a simple introductory example. More detailed coverage and further practical examples are provided in Chapter 33.
Detecting and Reacting to Model Events
In some contexts, it is required to detect changes that happen to, or within, a workbook, and to respond to these in some way. This could include:
- Automatically running a macro whenever the workbook is opened, if data is changed, or if some other workbook event has happened, including:
- Ensuring that the user is always automatically taken to the main model (or some other) worksheet when the workbook is opened.
- Showing a Disclaimer statement when the workbook is opened.
- Finding the cell whose value was changed most recently.
- (Automatically) running a macro when any cell in the input range is changed.
- Highlighting the row and column of any cell whenever one double-clicks on it.
Enhancing or Managing the User Interface
VBA can be used to enhance the user interface. The simplest types of interactions are message boxes (MSgBox) and input boxes (InputBox). More sophisticated examples include user forms (UserForm), which can take input from a user in a structured process, ensure the integrity of the input data or create a database with the inputted data.
Application Development
The Excel-VBA environment is surprisingly powerful and flexible for the development of “full blown” applications. These may integrate various capabilities, such as enhancing the user interface, accessing data in other applications (such as Access), manipulating data, performing calculations and generating reports and charts.
It is also fairly easy to produce add-ins, especially for code that is frequently used or is required to be accessed from a number of workbooks. This can be shared easily, and also password-protected.
Whilst the systematic creation and use of add-ins is beyond the scope of this text, it is worth noting that that they can be created simply by saving the original workbook with an .xlam file extension when using Excel's Save As feature.
CORE OPERATIONS
In this section, we cover the basic elements relating to the main areas of generating and running VBA code:
- Showing the Developer tab on Excel's toolbar.
- Accessing the Visual Basic Editor.
- Recording macros.
- Writing code and adapting recorded code.
- Running code.
- Creating code by writing rather than recording it.
To work with VBA, it is usually most convenient to have Excel's Developer tab shown (which is usually not the case in Excel's default shipping). This can be achieved under the Excel Options menu, although the precise way to do it is specific to the version. Figure 28.1 shows the process of invoking the Developer tab in Excel 2016, and Figure 28.2 shows the resulting Excel toolbar. FIGURE 28.1 Invoking the Developer Tab FIGURE 28.2 The Developer Tab The Visual Basic Editor (VBE) is required to write or modify code. It can be accessed using the Visual Basic button on the Developer tab (or the short-cut Alt+F11). By default, the FIGURE 28.3 Core Elements of the Visual Basic Editor The Note that it is often convenient to use a vertically split screen simply by resizing each of the Excel and the VBE windows, and arranging them side by side. The recording of macros is the process whereby one instructs Excel to capture a record of all changes made to the Excel environment as one is working. The recording process can be carried out by using the Record Macro button on the Developer tab to start the process (see Figure 28.2) and then using the Stop Recording Macro button (which shows only once the recording process has started) when finished. Some points to bear in mind are:
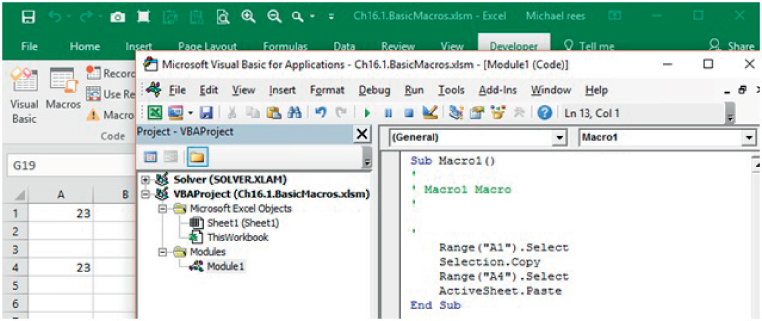
Figure 28.4 shows the VBE and displays the code that results from recording a macro as a Copy/Paste operation is conducted (in which Cell A1 is copied to Cell A4). FIGURE 28.4 Recording A Copy/Paste Operation Although many beginners start by recording code (and indeed often use such code in their final models), generally it is rare that code created by recording is sufficiently general, efficient or robust. Typically, recorded code would need adaptation, such as:
Thus, the main (most valid) reason for recording code is as a means to facilitate the finding of the correct syntax for specialised operations (such as capturing the VBA-equivalent of Excel short-cuts, refreshing a PivotTable, running GoalSeek or Solver, and so on). In other words, the results of the recording are used to provide insight into a functionality, from which the specifically relevant instructions are derived. Note also that many aspects of VBA simply cannot be recorded, and so must be written: these include loops, conditional statements (and many other aspects of controlling execution) and using functions. As a rule, to have robust and effective VBA code, one will need to write most of it from scratch (or copy and adapt it from somewhere else), complemented by occasionally referring to and adapting recorded code. As shown in Figure 28.4, where code is generated by recording Excel operations, a code module will be inserted automatically (and if one already exists, new recorded code will be placed within that). However, when writing code from scratch, it will be necessary to ensure that there is a code module available within the appropriate workbook ( Some core points are worth noting in this respect:
The code window should also appear once the module is inserted; if not, When writing code, some points to bear in mind are:
Before running any VBA macros, it is important to realise that in general there is no undo feature. Thus, code which alters the Excel worksheet in some way (such as overwriting existing data or formulae) can cause problems if it has not been checked first. Therefore, before running any code, it is often worthwhile to keep a back-up of the file, or at least to check before saving the file that the macro has not produced any errors. Macros (or sub-routines) can be run in several ways:
Before running code completely, it is usually worth running some simple checks:
Whilst the use of these step-through and break-point techniques is usually sufficient for simple code, other debugging and robust code-writing techniques may be required or recommended in general practical examples. The later chapters in this Part (especially Chapter 31) cover these in detail. Note that the fact that code can perform operations without crashing is not the same as the code being free of errors or of meeting its functionality requirements! This is the same as in Excel, where the fact that a formula calculates without returning an error message does not mean that the model is correct. In addition, as a general rule, the types of possible errors that can occur in VBA are usually more varied and potentially subtler than in Excel.Adding the Developer Tab to Excel's Toolbar


The Visual Basic Editor
Project Explorer and the Properties windows should be displayed within the VBE; if not, they are accessible under the VBE View menu (see Figure 28.3).
Project Window shows a list of open workbooks in the user's environment, and so will be different for each user and vary from one working session to another.Recording Macros
Typical Adaptations Required When Using Recorded Code
Writing Code
Project); this can be achieved by selecting the workbook name within the Project Window and using Insert/Module.
ThisWorkbook and Sheet are “object modules” and are reserved for procedures relating to workbook and worksheet events, and should not be used to place general purpose code. For example, the ThisWorkbook module can be used to write code that will execute whenever the workbook is opened (see later for an example). Class Module and UserForm module possibilities are also beyond the scope of this text.
Sub followed by a name (such as Sub FirstCode()); the words End Sub appear automatically. The empty brackets after the name indicate that the subroutine has no parameters associated with it. Many subroutines are task sequences which do not require arguments, although some may (the code in Figure 28.4 shows a similar example).Function followed by a name and argument list in brackets; the words End Function will appear automatically.Procedure box can be used to rapidly move between them. One may choose to split the code across several modules in order both to increase transparency and to ease navigation. For example, subroutines could be placed in one (or several modules) and functions in another. In such cases, it can be useful to give an appropriate name to each module by using the Name box within the Properties window.View/Code can be used to display it. The code within any module can be made visible by double-clicking on the name of the module.
Tools/Options/Editor menu in VBE can be used to alter the tab width (when using several levels of indenting, the default tab width of four spaces is often too wide).Code window, the typing of a full stop after an object will result in a drop-down menu appearing, which presents the available list of menu items relating to that object. For example, by typing Range("A1"). one sees the menu items that are relevant to a range, such as Range("A1").Activate to make A1 the active cell, Range("A1").ClearContents to clear the contents of Cell A1, and Range("A1").Value to refer to its value (the value is also the default property of a range, so Range("A1") would be interpreted as referring to the value).Running Code
Run/Run Sub). A macro can also be called from another macro, so that, in more complex situations, embedded or sequential structures can be created in order to modularise the code into smaller components.User Form.Debugging Techniques
Debug/Compile menu will often find basic errors of syntax or consistency.Debug/Step Into). This will often highlight the location of fundamental errors that prevent complete code execution. When stepping through, a few points are worth bearing in mind:
Debug/Run to Cursor can be used to run from the beginning to the position of the cursor; this can be useful if one believes that the code up to that point is working and one wishes to double-check by running it.Debug/Toggle Breakpoint. The code can then be run to the breakpoint by using F5 (assuming it is error-free up to that point) and thereafter using F8 to step through the subsequent lines individually.MsgBox x) can be used to return the value of a variable at that line in the code. It can be commented out (using an apostrophe) or deleted when no longer needed.Run/Break and Run/Reset buttons can be used to halt code execution and break out, such as if one is caught in a long or endless loop (Excel's Task Manager can be used as a last resort).Help menu can be accessed from the toolbar or using F1 from within VBE.
SIMPLE EXAMPLES
This section provides some simple examples of code which illustrate many of the points covered earlier in the chapter. We show examples of:
- Taking a value from an Excel cell and using it in VBA code.
- Using named Excel ranges to make the communication between Excel and VBA more robust.
- Placing a value from VBA code into an Excel range.
- Replacing a Copy/Paste operation with an assignment statement.
- Creating a simple user-defined function.
When running code in the example files, it will be necessary to enable the macros in them. This can be done either on an individual basis (in response to the security warnings that are likely to appear), or by temporarily enabling all macros using the Macro Settings within the Trust Centre options (on the Excel Options menu), or by setting the folder containing the files as a trusted location using the Add Trusted Locations option.
Example: Using Excel Cell Values in VBA
The file Ch28.1.ExcelToVBA.1.xlsm contains an example of code which reads the values from two Excel cells into VBA, multiplies them, and displays the result to the user in a MessageBox (see Figure 28.5).

FIGURE 28.5 Simple Example of Using Values from Excel in VBA
The code used is:
Sub MRTakeNumberFromExcel()i = Range("C2")j = Range("C3").Valuek = i * jMsgBox kEnd Sub
Note the following:
- The Excel cell ranges are referred to in a way which uses cell references as text fields (i.e.
Range("C2"),notRange(C2)). Therefore, such text fields would not adjust automatically if a row were introduced at the top of the worksheet, and the code would not work as anticipated; this is one reason why the use of named ranges for Excel cells will be more robust (see later). - The = sign is not a statement of mathematical equality; rather it is an operation which assigns the item on the right to the item on the left. This is similar to other computing languages, and indeed also to Excel, where (for example) when working in Cell B5, the typing of =B2 will assign the contents of B2 into B5.
- The default property within VBA of a single Excel cell is its value. Therefore, the
.Valuestatement used in the second assignment operation is not required here. However, it is generally more robust and transparent to explicitly state which property of a cell is required (e.g. its format, text colour or font size), since VBA code can be used to conduct operations based on many properties of cells and ranges. - Where the range referred to is a multi-cell range, the
.Valueproperty would generally be necessary for the code to execute correctly.
Figure 28.6 shows the results of running this code, displaying a message box (MsgBox)of the result.

FIGURE 28.6 Results of Running Some Simple Code, with the Message Box Displayed
Example: Using Named Excel Ranges for Robustness and Flexibility
To make the above procedure more robust, it would help if the Excel cell ranges were given names. This would allow the individual cells to be moved elsewhere (or a new row inserted above them, or columns before them) without affecting the results.
Figure 28.7 shows the names that are given in this example using Excel's Formula/Name Manager menu.
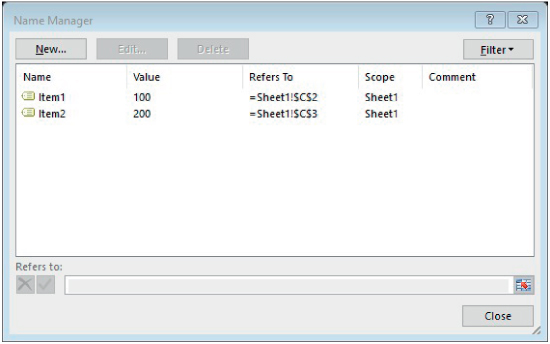
FIGURE 28.7 Creating Named Ranges in Excel
The VBA code can then be adapted as follows:
Sub MRTakeNumberFromExcel()i = Range("Item1")j = Range("Item2").Valuek = i * jMsgBox kEnd Sub
Note that:
- If the name of a range is modified in the Excel workbook, then it will also need to be changed in the VBA code. The link is not automatic, as the VBA code encloses the name in parenthesis, as for a text field. (Once again, this contrast to Excel formulae, where the name used is modified automatically.)
- In auditing a model that contains VBA code, it is advisable to inspect any VBA code before changing the Excel part of the model in any way (introducing rows, columns, changing named ranges or other operations could all create unintended changes).
- It can be useful to use the F3 short-cut key to create a list of Excel named ranges, which can then be copied into VBA code to avoid spelling mistakes. (Chapter 30 shows an example of a macro which can be used to list all the named ranges within a workbook, as an alternative.)
Once these changes are made to the code, new rows and columns could be introduced into Excel, as desired, and the code should run correctly.
The file Ch28.2.ExcelToVBA.2.xlsm is provided so that the reader can experiment with this.
Example: Placing a Value from VBA Code into an Excel Range
In the above example, values were placed from code into an Excel worksheet. The process can be used in the opposite sense (i.e. in which variables that are used in the code take their values from an Excel worksheet).
The file Ch28.3.VBAtoExcel.xlsm contains a simple example; the number 100 is assigned to the value of the cell that has been given the Excel named range ValItem (Cell C2); Figure 28.8 shows the result.
Sub MRAssignl()Range("ValItem").Value = 100End Sub
FIGURE 28.8 Result of Running a Simple Macro to Assign Values from VBA into Excel
Example: Replacing Copy/Paste with an Assignment
As a rule, it will be much more computationally efficient to use assignment operations instead of Copy/Paste. The difference in speed between the two becomes much clearer when the operations are performed many times in sequence.
The file Ch28.4.Assign.xlsm shows an example of how assignment can be used to place the value of one cell (named range) into another without explicitly selecting the cells, or using a Copy/Paste operation (see Figure 28.9).
Sub MRAssignl()Range("ValCopied").Value = Range("ValOrig").ValueEnd Sub
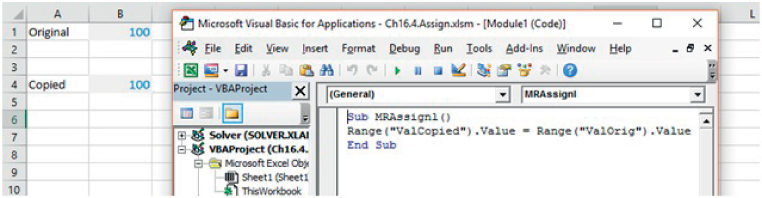
FIGURE 28.9 Results of Assignment Operation Instead of Copy/Paste
Example: A Simple User-defined Function
Functions are distinguished from subroutines in that they can only provide a result in an Excel cell or range (for array functions). As for Excel functions, the link between a function's parameters and the result of the calculations is “live”. By contrast, subroutines can perform procedures (including returning a value into an Excel cell), but are not live linked to the input assumptions, so need to be re-run if the value of these assumptions were to change.
The file Ch28.5.UDFSimple.xlsm shows a simple example (see Figure 28.10). Note that user-created functions can be accessed in Excel by direct typing (provided they have the default scope of Public), or by using the Formula/Insert Function menu (where they will be listed under the user-defined category). To facilitate the direct typing approach, the author generally names all his functions so that the first two letters are those of his initials (i.e. MR…); such nomenclature also helps to identify (when auditing a model) whether a function is an Excel one or has been written as a bespoke function.
Function MRMULTIPLYUS(x, y)Z = x * yMRMULTIPLYUS = ZEnd Function
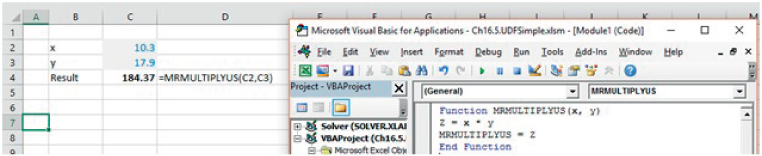
FIGURE 28.10 Simple Example of a User-defined Function
Note that the code must contain a return statement (before End Function) which explicitly assigns the value of the calculation to the function's value (a frequent error is to omit the return statement when writing the initial code).
Of course, as is the case when using other VBA procedures, user-defined functions have the disadvantage that the model may be less transparent to users who are not familiar with them. Their use can nevertheless be a powerful tool in the right circumstances, as discussed in more detail in Chapter 33.
Example: Displaying a Message when a Workbook is Opened
A simple example of event-driven code is that of automatically displaying a message whenever a workbook is opened. The key point is that a specific subroutine using the reserved word Workbook_Open() must be placed within the ThisWorkbook code module.
The file Ch28.6.WorkbookOpenDisclaimer.xlsm contains a simple example. Figure 28.11 shows a screen-clip. Note that in this example, the worksheet in Excel that contains the disclaimer is named “Disclaimer”, and has been given the code name ModelDisclaimer in VBA. Thus, the code activates that worksheet and then displays a message box to the user (the message box could also display the text of the disclaimer, as an additional option or as an alternative).
Sub Workbook_Open()With ThisWorkbookModelDisclaimer.ActivateMsgBox ("Please read the disclaimer in the Disclaimer worksheet")'MsgBox ("…or you could write the Disclaimer text here …")End WithEnd Sub

FIGURE 28.11 Displaying a Message when a Workbook is Opened
Note also that procedures can be run whenever a workbook is closed using the subroutine Workbook_Close, which is also a reserved word that must be placed in the ThisWorkbook code module.
Sub Workbook_Close()'Write code to run hereEnd Sub