
Directory services are widespread throughout major computer networks. A Lightweight Directory Access Protocol (LDAP) directory is an example of this type of service. LDAP directories are special databases that usually contain usernames, passwords, common names, e-mail addresses, business addresses, and other attributes. Organizations first used directory services to facilitate the distribution of address books and user information. Since that time, directory services have grown to take on roles as the central repositories for all user information and authentication services. Applications are developed with the ability to authenticate against directory services, further enhancing their importance within an organization.
In this chapter, we are going to show you how to install and configure an OpenLDAP server. We are also going to talk about extending your OpenLDAP directory server by adding your own schema. We will show you how to design the access control lists to secure your installation, as well as how to manage your LDAP server via command-line tools and a web-based GUI. Finally, you’ll see how to integrate your LDAP server with your existing network and applications, including the ability to implement single sign-on services and Apache web authentication.
Directory services implementations can be complicated. While installation is simple, they are often intricate to configure securely. OpenLDAP does not have a commercially supported version, but even the simplest question to the OpenLDAP mailing list is regularly answered by senior engineers and designers of the project (which is an enormous help and absolute credit to their dedication). That said, you would be well served by purchasing a book dedicated to the subject before you begin your installation to further your understanding of this software. We would like to recommend to you the following:
Checking the technical support page if you require expert support: www.openldap.org/support/
Deploying OpenLDAP by Tom Jackiewicz (Apress, 2004)
Mastering OpenLDAP: Configuring, Securing, and Integrating Directory Services by Matt Butcher (Packt Publishing, 2007)
Tip
The OpenLDAP web site also contains a good administration guide and FAQ at www.openldap.org .
Overview
In this chapter we will be exploring OpenLDAP and using it as an authentication service. We can use it as a single sign-on service for any authentication mechanisms that support LDAP. It can be used to centrally hold identity information for all our users, including usernames, passwords, e-mail addresses, and other user and group information. In this chapter we are going to take you through the following:
Installing and setting up the OpenLDAP service
Explaining schemas and creating an attribute that we can use as a filter to check for active and inactive users
Adding users to our LDAP service
Securing the service to protect sensitive data with access control lists
Using the LDAP tools such as ldapmodify, ldapadd, and ldapsearch
Setting up a web GUI to manage LDAP
Performing single sign-on with SSSD and LDAP
Implementing web authentication with LDAP
You can search, add, modify, delete, and authenticate against entries in your LDAP service. These actions are restricted with access lists, and different users can have different access rights. There is an authentication process that happens in this initial phase that determines access level, and this is called binding. This can be done by a user on behalf of another user or anonymously depending on how you configure your access lists. Once this is done, we can get access to the entries in the service.
Read on and we will explain what LDAP is and give you an understanding of the components that make up the LDAP service.
What Is LDAP ?
Lightweight Directory Access Protocol is used to access X.500-based directory services derived from the Directory Access Protocol (DAP) . X.500 is a set of protocols that outline how user information should be stored and how that information should be accessed. LDAP resulted from the Directory Access Protocol not having TCP/IP capabilities.
Note
For more information on the X.500 OSI protocol, please see http://en.wikipedia.org/wiki/X.500 .
Several common types of directory services exist, and they are all derived from the X.500 DAP OSI model . Examples of some common ones are these: Microsoft’s Active Directory, Red Hat’s Directory Services, and Oracle Directory Server Enterprise Edition.
In this chapter, we will be concentrating on the commonly used and robust OpenLDAP server. OpenLDAP was forked from the original project originally designed by the University of Michigan and now continues through the work of a community of engineers and developers from the OpenLDAP project ( www.openldap.org/project/ ).
Note
An alternative recommendation, though not explored in this book, is the FreeIPA project. It allows you to manage identities (user accounts and the like), perform policy authorization such as Kerberos policies for DNS and sudo, and create mutual trusts between other identity services (such as Microsoft AD). You can view more information about it at https://www.freeipa.org/page/Main_Page . There is also a good write-up on migrating from OpenLDAP to FreeIPA at https://www.dragonsreach.it/2014/10/12/the-gnome-infrastructures-freeipa-move-behind-the-scenes/ .
The X.500 DAP OSI model describes some fundamental concepts to which LDAP complies. First, you need to have a single directory information tree (DIT) . This is a hierarchical organization of entries. Each of these entries requires a distinguished name (DN) . The DN of an entry consists of the relative distinguished name (RDN) and the ancestor entries that it belongs to. Figure 16-1 shows the basic relationships between DIT, DN, and RDN.

Figure 16-1. DITs, DNs, and RDNs
The DIT is the directory tree, and in this case it has the root DN of dc=com. There are several ways to define your root and main branches. Some people choose a layout based on their DNS domains, as we have here, and some people use geographic locations, such as o=US, o=AU, or o=DE, as their root. In our case, we choose to use the DNS naming standard as we are not overly concerned about the geographic locations of our organization. We can always introduce the LocalityName attribute further down the tree if we want, as we have with the compB branch where we specify a locality of l=Amsterdam. Some thought should be given to how you want to lay out your directory structure, but ultimately you want it to be as simple and easy to understand as possible.
Tip
It is important to define a standard way of naming your branches and describing your organization now and stick to it.
The branches are used to organize your information into logical groups. These logical groups are called organizational unitsand represented as ou. You can group whatever you like together, but the main organizational units you will normally see in your LDAP tree are People, Groups, and Machines. You store everything to do with your people under ou=people, your user groups under ou=groups, and your nonhuman assets under ou=Machines (also commonly named ou=hosts). Organizational units can hold other organizational units and can be as complicated as you want them to be, although we again recommend simpler as better when it comes to designing your DIT.
The DN is a unique entry under the root, which is made up of the RDN and its ancestors. You can see in Figure 16-1 that we have a DN of cn=Angela Taylor,ou=people,dc=example,dc=com. It is made up of the RDN cn=Angela Taylor and the ancestors of ou=people, dc=example, and dc=com. Likewise, ou=people,dc=example,dc=com is a DN for the People organizational unit, and ou=people is an RDN of it.
Each DN entry is made up of object classes and attributes that describe that entry. The object classes describe what attributes must be present or are allowed to be present. The classes may support other classes in order to provide extended attributes to them. These attributes are described by the RDN value. Classes and attributes must be defined in a schema and must be unique.
A schemais set of definitions that describe the data that can be stored in the directory server. The schema is used to describe the syntax and matching rules for an available class and attribute definitions. If you find your organization is not properly described by the available schema files, you can create your own schema file for your company if you want. Once you have created your schema file, you then include it in your OpenLDAP configuration files.
It is common for organizations to require certain attributes to describe your users or your internal systems that are not provided in the schema files supplied. In this case, you will make your own object classes and attributes in your own schema file. When creating your schema file, you must remember to make the names for your object classes and attributes unique.
It is good practice to add a prefix to all your created attributes and classes to make sure they are unique. Suppose we wanted to add an attribute ourselves that would allow us to know when a user has been disabled. In this instance, we could define an “active” attribute for our example company as exampleActive. We could then use exampleActive to enable and disable entries by setting it to TRUE or FALSE.
Here’s how this would look in an LDAP entry:
dn: uid=user1,ou=people,dc=example,dc=comuid: user1exampleActive: TRUE
Once this attribute is added to an entry in LDAP, we can use filters to search for all instances of exampleActive = TRUE in our LDAP directory, which would speed up the results for active users. This is just an example of how you can use your own schema definitions; there may be other ways to achieve the same outcome.
Note
The OpenLDAP Administrator’s Guide has an explanation of how to create your schema files here: www.openldap.org/doc/admin24/schema.html .
OpenLDAP can use a variety of back ends. By default, OpenLDAP uses the Memory Mapped Database (MDB), which is based on the Lightning Memory Mapped Database (LMDB) . The LMDB was developed by Symas, a software organization founded by many, if not all, the core OpenLDAP development team. It is extremely fast and scalable, with databases holding millions of records. It is optimized for reading, searching, and browsing. OpenLDAP can use other databases as the back end if you desire.
Note
You can read more about LMDB at https://symas.com/products/lightning-memory-mapped-database/ .
General Considerations
Ubuntu and CentOS offer different releases of OpenLDAP. Both CentOS and Ubuntu offer a recent OpenLDAP 2.4 release. The following are some of the features it supports:
MirrorMode and MultiMaster replication
Proxy sync replication
Expanded documentation
LDAP version 3 extensions
LDAP chaining operation support
No use of copy control support
LDAP dynamic directory services (RFC 2589)
Added overlays for greater functionality
If you were seeking support for MultiMaster replication capabilities (i.e., the ability to have more than one LDAP master directory service), MultiMaster enhances redundancy of your LDAP installation.
You can also make use of overlays. Overlays give OpenLDAP advanced functionality to alter or extend the normal LDAP behavior. Overlays such as the Password Policy (ppolicy) overlay enable password controls that are not provided in the base code of OpenLDAP. The ppolicy overlay allows you to set things such as password aging and minimum character length.
You will also need to decide what kind of authentication methods you are going to support in your organization. OpenLDAP supports two authentication methods, simple and SASL. The simple method has three modes of operation.
Anonymous: No username or password is supplied.
Unauthenticated: A username but no password is supplied.
Username/password authentication: A valid username and password must be provided.
Of the SASL method , the OpenLDAP Administrator’s Guide says you need an existing working Cyrus SASL installation to provide the SASL mechanism. This is not entirely true, depending on the mechanism of SASL you want to implement. You can set up PLAIN/LOGIN and DIGESTMD5 mechanisms pretty easily. However, you must have Cyrus SASL installed. SASL provides the following mechanisms:
PLAIN/LOGIN
DIGESTMD5
GSSAPI (Kerberos v5)
EXTERNAL (X.509 public/private key authentication)
Note
SASL (PLAIN/LOGIN, DIGESTMD5) requires clear-text passwords to be used in the userPasswd attribute. Whether this is good or not for security is heavily debated. One side of the argument goes something like this: “Once I access your database, I’ve got access to all your passwords.” The counter to this is, “If you’ve got access to my database, the game is over anyway. At least I’m not sending passwords over the wire where they can be intercepted.”
You can read more about these different authentication methods at the following pages in the OpenLDAP Administrator’s Guide:
Implementation
Before we show you how to install the OpenLDAP server on our example system, we need to go over a few details of the implementation.
We will set a CNAME in our DNS that will point ldap.example.com to the headoffice.example.com record or define some other DNS A record to the host on which we are installing our LDAP server. See Chapter 10 for instructions on DNS.
We are not using any replication of our directory service. Replication is where we can have more than one LDAP server on our network sharing all or part of our LDAP data and answering client requests. It takes additional configuration to enable this.
Let’s view just one piece of our network. Suppose that we have a web server on our network and we want to make sure only people from a certain group within our organization are able to access it. Normally, we would need to add a complicated login mechanism to our web site, have some kind of user database to store the information, and so on. With our Apache web server, we can use the Apache LDAP module to get our web server to use an LDAP server to authenticate requests. Without this authentication, the web site will not be accessible. We can also have other services authenticating against our OpenLDAP directory server. In Figure 16-2, you can see how we would authenticate our web servers.
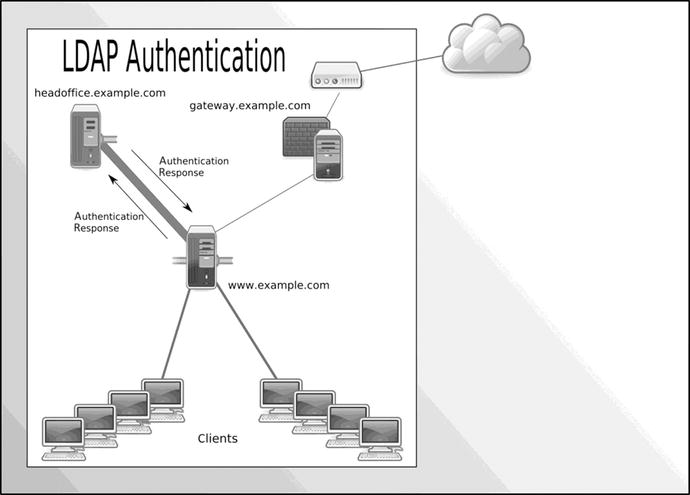
Figure 16-2. LDAP authentication of web services
Figure 16-2 presents a simple diagram showing a web server using LDAP to authenticate our desktop or Internet clients to web services (the LDAP service and the web service can be on the same host if you do not have the necessary hardware resources). When a request is received by a web site, the user making the request requires validation before access is granted. An authentication request is sent to the LDAP service on headoffice.example.com. If the user is validated, the LDAP server sends the response to the web service, and the user can access the site.
Many of the services that we have described in this book can be made to use an LDAP service. This allows you to centralize your authentication services on the one host, reducing complexity, increasing authentication security, and providing a central repository for all your staff details.
We are going to show you how to set up both your LDAP service and authentication for an Apache web service.
Installation
OpenLDAP is available on both CentOS and Ubuntu via their online repositories. Again, for OpenLDAP, subtle differences exist between the two distributions, and we’ll detail them next.
CentOS Installation Guide
We will now take you through the installation of an OpenLDAP server on our CentOS host. The binaries are available from the CentOS repositories, and you can install them via the yum command or via the Package Manager GUI. We will install them via the yum command as follows:
$ sudo yum install openldap openldap-clients openldap-serversThis installs the necessary files for configuring, running, and managing the LDAP server. The openldap package installs the base packages required to allow the host to integrate with the OpenLDAP server. The openldap-clients package installs the tools to manage and query the LDAP server. The openldap-servers package installs the necessary files to run an OpenLDAP server.
Ubuntu Installation Guide
To install OpenLDAP on an Ubuntu host, we require the ldap-utils package and the slapd package to be installed. The following command will install these packages:
$ sudo aptitude install ldap-utils slapdWhen you issue this command, the slapd package will ask you to provide a password for your root LDAP user. You can enter your password and proceed with the installation. If you do not want to supply one, you can just press the Enter key twice (we will show you how to create a password in the upcoming “Configuration” section). Once installed, the ldap-utils package will install the files needed to manage and search your LDAP directory. The slapd package installs the necessary files to run and configure your LDAP directory.
The client configuration packages are auth-client-config (PAM and NSS profile switcher) and ldap-auth-client (metapackage for LDAP authentication along with ldap-auth-config). You may want to install these too.
Configuration
We are going to show you how to configure an LDAP directory service. The LDAP server is called SLAPD. We are going to show you how to configure that service.
OpenLDAP uses a dynamic runtime configuration to manage SLAPD , meaning that it configures itself via its own DIT (directory tree). That means that SLAPD configuration changes can be done dynamically through changing records in the DIT using the standard tools used to change other LDAP records, with commands such as ldapmodify.
In our example, we’ll configure our SLAPD on our Ubuntu host; some of the directory paths will be different for CentOS. For CentOS hosts, the configuration directory is called /etc/openldap instead of /etc/ldap that you will find on Ubuntu hosts. Both distributions store the databases in /var/lib/ldap.
For example, the configuration files for OpenLDAP on a CentOS host are stored in /etc/openldap/.
$ sudo ls -l /etc/openldap/total 12drwxr-xr-x. 2 root root 85 Oct 26 12:46 certs-rw-r--r--. 1 root root 121 Mar 31 2016 check_password.conf-rw-r--r--. 1 root root 365 Oct 3 13:47 ldap.confdrwxr-xr-x. 2 root root 4096 Oct 26 12:46 schemadrwx------. 3 ldap ldap 43 Oct 26 12:46 slapd.d
Secrets are stored in the certs directory. The configuration file specifically for the configuration of LDAP clients is ldap.conf. The schema directory contains the schema files for our ldap service. In there you will find .schema files and .ldif files. The LDIF files are LDAP interchange format files, a special format to specify data changes in LDAP . In the slapd.d directory you will find the files comprising the SLAPD DIT. We will explain these as we go through the chapter.
Requirements
Prior to configuring OpenLDAP we are going to set up a few requirements. We need to create a TLS certificate and key and a DNS name entry.
The first step is to create the DNS record. Authentication systems like LDAP are not normally exposed to the public and if they are they can be subjected to external attacks. For this reason we would not normally provide a public IP address. For your external offices that need to authenticate against the service we recommend you use the private VPN for access.
This OpenLDAP service is going to be installed on our headoffice.example.com host. We are going to provide our DNS server with the CNAME record to point ldap.example.com to headoffice.example.com. We need to be on our DNS server and issue the following command:
$ sudo nsupdate -k /etc/bind/ddns_update.key> server localhost> update add ldap.example.com 8600 CNAME headoffice.example.com> send> quit$ host ldap.example.comldap.example.com is an alias for headoffice.example.com.headoffice.example.com has address 192.168.0.1
Since this points to an internal private IPv4 address, we will not be able to use Let’s Encrypt to create our TLS certificate and will have to use our own private CA. Clients that connect to our LDAP server will need to have the CA root certificate installed.
First, create a new directory called /etc/ldap/certs and then change the permissions on it.
$ sudo mkdir /etc/ldap/certsWe will create the key and the CSR on our ldap.example.com host and run the following from inside the /etc/ldap/certs directory:
$ sudo openssl req -new -newkey rsa:4096 -nodes -keyoutldap.example.com.key -out ldap.example.com.req
Go ahead and sign the request like we did in Chapters 11 and 15 by our private CA. We then need to add the public cert that is produced to the /etc/ssl/certs directory along with the root CA if it is not already there, cacert.pem.
When the certificates are installed into the certs directory , we should change the ownership and permissions to the following:
$ sudo chown openldap:openldap –R /etc/ldap/certs$ sudo chmod 600 /etc/ldap/certs/ldap.example.com.key
The user running the LDAP service on CentOS is ldap and would need to be used in the previous chown command.
Configuring SLAPD
With the requirements in place, we can now get on to configuring our OpenLDAP server. When we installed our slapd packages and were asked for the administrator password on Ubuntu, the basic OpenLDAP server was configured, installed, and started (on CentOS you will have to start the slapd service prior to running this command).
In Listing 16-1 we have the output of the ldapsearch command. This command is part of the suite of commands used to interact with the LDAP server (or any LDAP server). In this example, we have passed in the –Q argument to ldapsearch to enable SASL quiet mode (as we are using elevated sudo privileges). The three Ls (-LLL) all have a meaning. Having one means print in the LDIF format; the other two reduce the output. The –H argument is the URI we want to attach to, ldapi:///, which is saying, connect to local LDAP server via the Unix socket on the local host. With this we can pass the UID and GID of the user to the LDAP server for authentication. Next, -b defines the search base; we are searching in the cn=config DIT for each dn (or distinguished name) by using dn as a filter.
Listing 16-1. Viewing the Default Configuration
$ sudo ldapsearch -Q -LLL -Y EXTERNAL -H ldapi:/// -b cn=config dndn: cn=configdn: cn=module{0},cn=configdn: cn=schema,cn=configdn: cn={0}core,cn=schema,cn=configdn: cn={1}cosine,cn=schema,cn=configdn: cn={2}nis,cn=schema,cn=configdn: cn={3}inetorgperson,cn=schema,cn=configdn: olcBackend={0}mdb,cn=configdn: olcDatabase={-1}frontend,cn=configdn: olcDatabase={0}config,cn=configdn: olcDatabase={1}mdb,cn=config
In Listing 16-1 you can also see we have passed the –Y option. This specifies the SASL authentication mechanism we want to use. EXTERNAL here says use the localhost’s authentication in this case. We pass the root user’s UID and GID via the Unix socket to LDAP for authentication. The default installation allows local root access to the installed LDAP server.
Then in Listing 16-1 we have the list of global directive DNs that are in the cn=config global configuration DIT. You can see that the global DIT is comprised of the root cn=config, and then the DNs are nested under that, like in Figure 16-3.
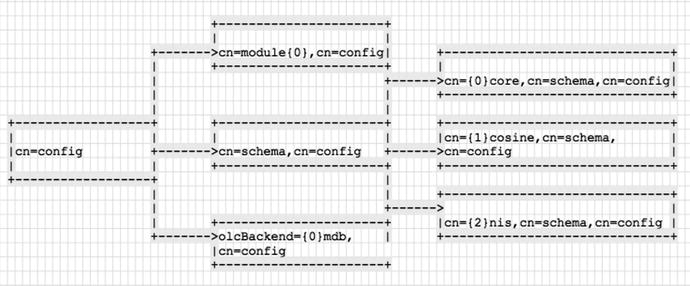
Figure 16-3. cn=config DIT
You can see from Listing 16-1 and Figure 16-3 that the LDAP schema, cn={1}cosine,cn=schema,cn=config, is found under the cn=schema DN, which is found under cn=config. The {1} denotes an index of the schema DN .
Also, in Listing 16-1 there are several other global directives like olcBackend and olcDatabase. These, as their names imply, describe the back-end data storage.
dn: olcBackend={0}mdb,cn=configdn: olcDatabase={-1}frontend,cn=configdn: olcDatabase={0}config,cn=configdn: olcDatabase={1}mdb,cn=config
To get a full listing, or a backup, of the cn=config DIT, you can issue the following command:
sudo ldapsearch -Q -LLL -Y EXTERNAL -H ldapi:/// -b cn=config > slapd.ldifWe have used the same command as previously but have removed the dn filter from the end and directed the output to the slapd.ldif file. If you look at that file, you will see how the directives have been configured.
Looking at the first declaration, we have the DN for cn=config. It has an ObjectClass of olcGlobal, which is the object class that defines the global DIT. You can also see that we can declare the common name (cn:), an arguments file for slapd (olcArgsFile:), log level (olcLogLevel:), process ID (olcPidFile:), and threads to use (olcToolThreads:).
The olcToolThreads directive tells the slapd daemon to use only one CPU to run indexes on. If you have more than one CPU, you can set this to a higher number, but not higher than the number of CPUs you have. Other performance settings can be turned on, including olcThreads, olcTimeLimits, olcSockBuffMaxIncoming, and olcSockBuffMinIncoming.
Tip
Another tuning nob you can turn is the number of entries that are returned from an ldapsearch in one hit, olcSizeLimit.
Every time you declare a DN you will need to provide the object class (or classes) it belongs to. That object class will have attributes it takes. So, the olcGlobal object class has the olcArgsFile as an attribute, and this will be described in the schema file .
Defining LogLevels
In the olcGobal object class we can define our logging. By default it is set to none. This is a keyword, but this can also be expressed as a number (or even in hexadecimal), as described in Table 16-1.
Table 16-1. Additive Logging Levels
Level | Keyword/Description |
|---|---|
-1 | (any) Turns on all debugging information. This is useful for finding out where your LDAP server is failing before you make your logging level more fine-grained. |
0 | Turns all debugging off. This is recommended for production mode. |
1 | (0x1 trace) Traces function calls. |
2 | (0x2 packets) Debugs packet handling. |
4 | (0x4 args) Provides heavy trace debugging (function args). |
8 | (0x8 conns) Provides connection management. |
16 | (0x10 BER) Prints out packets sent and received. |
32 | (0x20 filter) Provides search filter processing. |
64 | (0x40 config) Provides configuration file processing. |
128 | (0x80 ACL) Provides access control list processing. |
256 | (0x100 stats) Provides connections, LDAP operations, and results (recommended). |
512 | (0x200 stats2) Indicates stats log entries sent. |
1024 | (0x400 shell) Prints communication with shell back ends. |
2048 | (0x800 parse) Parses entries. |
16384 | (0x4000 sync) Provides LDAPSync replication. |
32768 | (0x8000 none) Logs only messages at whatever log level is set. |
The log level is important to help debug your installation. To be honest, to the new user it can be very confusing as to what is being reported. However, the logging level is additive, and you can get finer-grained detail in the logs. In a production environment, we recommend setting this value to 0 and, if you want, using the audit overlay to monitor what is happening to your installation (an overlay being a software module that can hook into the back end to provide particular information, in this case an audit trail).
We will like to set our logging level to 480. This will show search filters, configuration file processing, access controls, and connection information in our logs. As mentioned, the Loglevel setting is additive, meaning you can enable more logging by adding the values of the things you want to log. As you may have already worked out, our Loglevel of 480 comprises the level 32 (search filter), 64 (configuration processing), 128 (access control list processing), and 256 (connections and LDAP operations results). This is a good setting while we are setting up our LDAP service, as it provides a nice level of information. If we get stuck, we can change Loglevel to -1 to turn on debugging, which turns on all logging features. Also, remember that in a production environment, you would normally want to have Loglevel set at 0. To set Loglevel, you can also list the hexadecimal numbers on one line to achieve the same result; in this case, we would set the log level to Loglevel 0x20 0x40 0x80 0x100.
Modifying the LogLevel Configuration with ldapmodify
Let’s modify LogLevel to our wanted level. To do that we will use the ldapmodify command. This takes similar arguments to the ldapsearch command we used previously. We are going to provide a file called loglevel.ldif to the command, which will look like this:
dn: cn=configchangetype: modifyreplace: olcLogLevelolcLogLevel: 480
To modify an attribute, we need to provide the dn value we want to modify (dn: cn=config), the type of change (changetype: modify), the attribute we want to replace (replace: olcLogLevel), and finally the attribute we are setting (olcLogLevel: 480).
Now, let’s use ldapmodify to modify the logging attribute.
$ sudo ldapmodify -Q -Y EXTERNAL -H ldapi:/// -f loglevel.ldifTo confirm that this has been set, we can issue the ldapsearch command again to verify.
$ sudo ldapsearch –Q -LLL -Y EXTERNAL -H ldapi:/// -b cn=config cn=configdn: cn=configobjectClass: olcGlobalcn: configolcArgsFile: /var/run/slapd/slapd.argsolcPidFile: /var/run/slapd/slapd.pidolcToolThreads: 1olcLogLevel: 480
Great, there we have our requested log setting. As we have set this attribute, any other SLAPD configuration attribute can be set in a similar way.
Adding Modules
In the slapd.ldif file we have the modules section. Modules are added to the configuration to provide access to certain functionality.
dn: cn=module{0},cn=configobjectClass: olcModuleListcn: module{0}olcModulePath: /usr/lib/ldapolcModuleLoad: {0}back_mdb
Here we are declaring the path in which to find our modules, olcModulePath: /usr/lib/ldap. We have one module that is loaded, back_mdb, which is the hierarchical Memory Mapped database we spoke of earlier.
We want to also enable the ppolicy overlay module. The ppolicy module allows us to have greater control of the passwords in our database via password expiry and other password control features. If we check the module path described earlier, we can verify that the required files are in there.
$ ll /usr/lib/ldap/pp*-rw-r--r-- 1 root root 39328 May 11 17:11 /usr/lib/ldap/ppolicy-2.4.so.2.10.5-rw-r--r-- 1 root root 948 May 11 17:11 /usr/lib/ldap/ppolicy.la
To load the policy, we are going to create a file called ppolicy_module.ldif and use ldapmodify to add it.
dn: cn=module{0},cn=configchangetype: modifyadd: olcModuleLoadolcModuleLoad: ppolicy.la
When we execute the ldapmodify command, you can see we are now asking it to add the module ppolicy.la. If we now do an ldapearch filtering only for those DNs that contain the object class olcModuleList, we see the following:
$ sudo ldapsearch -H ldapi:// -Y EXTERNAL -b "cn=config" -LLL -Q "objectClass=olcModuleList"dn: cn=module{0},cn=configobjectClass: olcModuleListcn: module{0}olcModulePath: /usr/lib/ldapolcModuleLoad: {0}back_mdbolcModuleLoad: {1}ppolicy.la
We will add further to the ppolicy overlay configuration when we load our LDIFs into the OpenLDAP database in the “Password Policy Overlay” section.
Setting Suffix, RootDN, and RootPW
We are now going to configure the back-end database that will hold our DIT. We can change the default database back end if we wanted, and there are several options here. Normally, you will choose the default mdb. The other types you can choose from (ldap, ldif, metadirectory, perl, etc.) are used for proxying your LDAP server.
Note
For more information on the choices for back-end databases available to you, please see the online documentation: www.openldap.org/doc/admin24/backends.html .
To view the current database settings, we can issue the following ldapsearch:
$ sudo ldapsearch -H ldapi:/// -Y EXTERNAL -b "olcDatabase={1}mdb,cn=config" -LLL -Qdn: olcDatabase={1}mdb,cn=configobjectClass: olcDatabaseConfigobjectClass: olcMdbConfigolcDatabase: {1}mdbolcDbDirectory: /var/lib/ldapolcAccess: {0}to attrs=userPassword by self write by anonymous auth by * noneolcAccess: {1}to attrs=shadowLastChange by self write by * readolcAccess: {2}to * by * readolcLastMod: TRUEolcDbCheckpoint: 512 30olcDbIndex: objectClass eqolcDbIndex: cn,uid eqolcDbIndex: uidNumber,gidNumber eqolcDbIndex: member,memberUid eqolcDbMaxSize: 1073741824olcSuffix: dc=nodomainolcRootDN: cn=admin,dc=nodomainolcRootPW: {SSHA}EEyEuYme4zBPYbRzHc+l4rApfvrXjXnV
The default for our database type is defined here: olcDatabase: {1}mdb. You can declare more than one database instance. The next detail we configure is the top of the DIT, the suffix, and a user that will have full access to it, like a root user.
Note
If you configured your OpenLDAP server when you installed it on your Ubuntu server, you won’t need to do this step.
Here we will create a file called db.ldif that has the following contents:
dn: olcDatabase={1}mdb,cn=configchangetype: modifyreplace: olcSuffixolcSuffix: dc=example,dc=com-replace: olcRootDNolcRootDN: cn=admin,dc=example,dc=com-replace: olcRootPWolcRootPW: {SSHA}QN+NZNjLxIsG/+PGDvb/6Yg3qX2SsX95
The olcSuffix directs queries for dc=example,dc=com to this database instance. Because there are already values for these attributes, we are using the replace directive in our LDIF file, for example: replace: olcRootPW. You can have more than one suffix declared here. The olcRootDN is the root user, who has full access to database; the password is declared in olcRootPW. You can create a password using the slappasswd command as follows:
$ sudo slappasswdThe password that is printed can then be copied and pasted to olcRootPW like earlier. Before we apply this LDIF, we will view our indexes.
Creating Indexes
Next, we can set our indexes. Indexes are used to speed up searches on the database. You can view the current indexes on your database by running the following:
$ sudo ldapsearch -H ldapi:/// -Y EXTERNAL -b "olcDatabase={1}mdb,cn=config" -LLL –Q olcDbIndexolcDbIndex: objectClass eqolcDbIndex: cn,uid eqolcDbIndex: uidNumber,gidNumber eqolcDbIndex: member,memberUid eq
As a rule, you should index what your clients are commonly going to search for. An e-mail client’s address book may search for the common name, or cn, when it looks for people’s names to populate its address book entries. In such a case, you would want to have an index of the cn attribute optimized for substrings, sub. Table 16-2 lists the common types of indexes available.
Table 16-2. Common Index Types
Type | Description |
|---|---|
sub | Useful for optimizing string searches that contain wildcards like cn=Jane* |
eq | Useful for optimizing searches for exact strings like sn=Smith |
pres | Useful for optimizing searches for object classes or attributes, like objectclass=person |
approx | Useful for optimizing searches for sounds-like searches, like sn∼=Smi* |
Other index types are available, and you can read about them on the slapd.conf man page. We want to index the objectclass, cn, and uid, which we know will be commonly searched when users try to authenticate. In the previous code, you can see that we are already indexing these things. We are going to add an index to an attribute we will create shortly called exampleActive. We will add the following to our db.ldif:
add: olcDbIndexolcDbIndex: exampleActive pres,eq
Let’s now go ahead and use ldapmodifyto apply our db.ldif changes.
$ sudo ldapmodify -Q -Y EXTERNAL -H ldapi:/// -f db.ldifNote
You can read more about the configuration engine database here: www.openldap.org/doc/admin24/slapdconf2.html .
Listing, Adding, and Creating a Schema
A schema provides the structure of your object’s classes and attributes to the SLAPD server. While not the same as a database schema, the LDAP schema describes the object classes and attributes your LDAP server will hold, much like a database schema would describe tables and rows. You can view the currently loaded schemata with the following ldapsearch:
$ sudo ldapsearch -Q -LLL -Y EXTERNAL -H ldapi:/// -b cn=schema,cn=config dndn: cn=schema,cn=configdn: cn={0}core,cn=schema,cn=configdn: cn={1}cosine,cn=schema,cn=configdn: cn={2}nis,cn=schema,cn=configdn: cn={3}inetorgperson,cn=schema,cn=config
The top dn is cn=schema,cn=config, and that is the parent of our schemata. We then have some default schemata that are provided by our installation. The core schema provides such object classes as the dcObject (dc) and organizationalUnit (ou). The cosine schema provides the dNSDomain object class and host attribute. The nis schema provides user account objects and attributes, such as posixAccount and shadow password settings. The inetorgperson holds other various employee-related objects and classes. You may or may not use objects and attributes that these provide.
To see all the schemata available to you, you can list the /etc/ldap/schema directory. For example, we can see that in that directory the ppolicy.schema and ppolicy.ldif files for the ppolicy schema are present.
$ ls /etc/ldap/schema/pp*/etc/ldap/schema/ppolicy.ldif /etc/ldap/schema/ppolicy.schema
The ppolicy.ldif file has been derived from the ppolicy.schema file for us. We are going to add our ppolicy.ldif schema to our SLAPD. We do that by using the ldapadd command. It takes similar arguments to ldapsearch and ldapmodify.
$ sudo ldapadd -Q -Y EXTERNAL -H ldapi:/// -f /etc/ldap/schema/ppolicy.ldifadding new entry "cn=ppolicy,cn=schema,cn=config"
Let’s see if that has been loaded.
$ sudo ldapsearch -Q -LLL -Y EXTERNAL -H ldapi:/// -b cn=schema,cn=config dndn: cn=schema,cn=configdn: cn={0}core,cn=schema,cn=configdn: cn={1}cosine,cn=schema,cn=configdn: cn={2}nis,cn=schema,cn=configdn: cn={3}inetorgperson,cn=schema,cn=configdn: cn={4}ppolicy,cn=schema,cn=config
There you can see that our ppolicy schema has been added at index {4}. Remember that index number as we are going to need it when we add our own schema. Let’s see how we create and add our own schema.
Creating Our Schema
We will create a file called /etc/ldap/schema/exampleactive.schema. In this schema file, we will include a simple class and attribute that we will use to indicate whether a user account is active or not.
To get started, let’s look at how to declare an object class in the schema. The following appears in the core.schema file in the schema directory:
objectclass ( 1.3.6.1.4.1.1466.344 NAME 'dcObject'DESC 'RFC2247: domain component object'SUP top AUXILIARY MUST dc )
This is one of the main object classes that will be included in the DIT. We need to declare what type of entity we are using, and for an object class we start with objectclass ( schema detail ). Whitespace is important when declaring your object classes and attributes, and there must be a space inside the ( ) at each end. An object class declaration should follow this format:
objectclass ( <OID> NAME <name> DESC <description> SUP <parent class> <class type> <MUST|MAY> attritubutes )The number you see, 1.3.6.1.4.1.1466.344, is the private enterprise number (PEN) , or object identifier (OID) , which is a unique series of numbers for identifying objects; if you are familiar with things like SNMP, you should recognize this as they use the same OID concept.
Note
You can register for your own OID or PEN at the Internet Assigned Numbers Authority (IANA) web site: http://pen.iana.org/pen/PenApplication.page .
The object class is given a name, dcObject, and a description (DESC). The next line tells you that this will inherit the object class SUP top. The SUP stands for superior, and top means that this object class has no parent object class; it is the highest in the object class hierarchy. Other subsequent object classes may use this object class as their SUP, or inherited, object class.
The AUXILIARY indicates the type of object class. There are three types of object classes.
AUXILIARY: Allows you to add attributes to the entry but not create an entry
STRUCTURAL: Allows you create a valid entry
ABSTRACT: The base object from which other object classes can be defined; top is an ABSTRACT example
The MUST dc says that if this object is declared in the directory server, the attribute dc must also be added. Attributes that are not mandatory but available to the object class can be declared as MAY.
Note
The full details of declaring object classes are contained in this RFC: www.rfc-editor.org/rfc/rfc4512.txt . A quick explanation of extending your schemata can be found here: www.openldap.org/doc/admin24/schema.html .
Attributes have certain rules also. They must be declared in the schema, and the same attribute can be included in one or more object class. Also, by default, attributes are MULTI-VALUE, meaning we can have more than one value declared for our DN. The common example is e-mail address; a user can have more than one e-mail address. Other attributes are declare SINGLE-VALUE and can be declared only once, like the users’ password.
Attributes can be hierarchical and can inherit the properties of its parent. They are expressed differently to object class hierarchies in these ways:
They are not terminated with a top.
The absence of the SUPerior definition indicates the end of the hierarchy.
The common example of attribute inheritance is the name attribute. The name attribute is the parent of common name (cn), given name (gn), and surname (sn).
Let’s take a look at our own schema file that we have created, /etc/ldap/schema/exampleactive.schema:
# $Id$attributetype ( 1.1.3.10 NAME 'exampleActive'DESC 'Example User Active'SINGLE-VALUEEQUALITY booleanMatchSYNTAX 1.3.6.1.4.1.1466.115.121.1.7)objectclass ( 1.1.1.2 NAME 'exampleClient'SUP top AUXILIARYDESC 'Example.com User objectclass'MAY ( exampleActive ))
In these two schema objects, we have two OIDs, which we made up. The ones in this example may conflict with other existing schema files and are for demonstration only. To avoid this, so we would normally apply for our own PEN. We’ll pretend we did so and that we received an OID of 1.3.6.1.4.1.111111, where 1.3.6.1.4.1 is the IANA arc, or node, and 111111 is the special number that distinguishes our company from other companies. We can now use our OID in place of the ones in the preceding schema.
Caution
As we mentioned, we have made up the 1.3.6.1.4.1.111111 OID for the purpose of this demonstration. Please do not make up numbers or use this OID in your production environment. You should really get your own PEN ; otherwise, you risk having conflicts and things breaking. For more information on OIDs and LDAP, please also view the following: www.zytrax.com/books/ldap/apa/oid.html .
attributetype ( 1.3.6.1.4.1.111111.3.1.1 NAME 'exampleActive'DESC 'Example User Active'SINGLE-VALUEEQUALITY booleanMatchSYNTAX 1.3.6.1.4.1.1466.115.121.1.7 )objectclass ( 1.3.6.1.4.1.111111.3.2.1 NAME 'exampleClient' SUP top AUXILIARY DESC'Example.com User objectclass'MAY ( exampleActive ))
Once you have a PEN or an OID, you can divide it into useful segments (also called nodes or arcs). Generally, you can use an OID for not only LDAP schema objects but also for things like SNMP MIBs. As you can see, we have branched off 1.3.6.1.4.1.111111.3 for our LDAP schema definitions. Under that, we will place all our object class definitions under 1.3.6.1.4.1.111111.3.2 and our attributes under 1.3.6.1.4.1.111111.3.1.
Note
Assigning 1.3.6.1.4.1.111111.3.1 and 1.3.6.1.4.1.111111.3.2 to LDAP classes and attributes is completely arbitrary. You can choose whatever numbering scheme you desire.
Our attribute exampleActive can only ever be declared once, so we will make it a SINGLE-VALUE. If we try to declare this attribute more than once for a particular DN, we will get a violation error.
We set the exampleActive attribute to be a Boolean match, meaning it can be either true or false. Setting this attribute to TRUE will mean that our account is active. Setting it to FALSE will mean the account is inactive. We can index this attribute, which will again speed up our searches. This is why we added the following in our db.ldif earlier:
olcDbIndex: exampleActive pres,eqThe exampleClient object class defines that we may have the exampleActive attribute present (as indicated by MAY) when we include that object class in our DN entry. If we wanted to enforce its presence, we can specify MUST instead. The object class is of type AUXILARY and has the superclass defined by SUP top. The default object type is STRUCTURAL. You must have one STRUCTURAL object class in your entries, and you cannot have two STRUCTURAL object classes pointing to the same parent or superior class.
Note
You can find the RFC that describes the LDAP schema files at www.rfc-editor.org/rfc/rfc4512.txt .
Adding Our Schema
To add our schema, we need to go through the following process:
Convert our schema to LDIF via slaptest
Edit the output in preparation for inputting the schema
Add that into our SLAPD via ldapadd
To convert the schema file into LDIF , we use the slaptest command. The slaptest command is useful for converting the text-based schema files to LDIF format.
We will pass the /etc/ldap/schema/exampleactive.schema into slaptest, and the output file will be generated in a temporary SLAPD config directory.
First create a temporary directory to hold our converted files.
$ sudo mkdir /etc/ldap/ldif_converted && cd /etc/ldapIn this directory we will now create a file called schema_load.conf in the old slapd.conf format that will be used to direct the slaptest command to read in our schema file. It has the following contents:
include /etc/ldap/schema/exampleactive.schemaNow we can use that as the input file to our slaptest command.
$ sudo slaptest –f schema_load.conf –F ldif_convertedThis creates an LDIF-formatted file.
/etc/ldap/ldif_converted/cn=config/cn=schema/cn={0}exampleactive.ldifIf you get the following error:
58180fbb schema/exampleactive.schema: line 1 attributetype: Missing closing parenthesis before end of inputthis indicates that there are whitespace errors in the schema file. You can put your declarations on a single line, without carriage returns, and take note of white spacing. Here’s an example:
attributetype ( attribute detail )objectclass ( object detail )
We are going to edit the LDIF file that has been outputted using our vi editor and using sudo to elevate our privileges.
# AUTO-GENERATED FILE - DO NOT EDIT!! Use ldapmodify.# CRC32 39f1bf5adn: cn={0}exampleactiveobjectClass: olcSchemaConfigcn: {0}exampleactiveolcAttributeTypes: {0}( 1.3.6.1.4.1.111111.3.1.1 NAME 'exampleActive' DESC 'Example User Active' EQUALITY booleanMatch SYNTAX 1.3.6.1.4.1.1466.115.121.1.7 SINGLE-VALUE )olcObjectClasses: {0}( 1.3.6.1.4.1.111111.3.2.1 NAME 'exampleClient' DESC 'Example.com User objectclass' SUP top AUXILIARY MAY exampleActive )structuralObjectClass: olcSchemaConfigentryUUID: 53a98d60-3432-1036-9ae2-35c34321a848creatorsName: cn=configcreateTimestamp: 20161101035217ZentryCSN: 20161101035217.399551Z#000000#000#000000modifiersName: cn=configmodifyTimestamp: 20161101035217Z
We need to remove the lines that are in bold, like from structuralObjectClass: olcSchemaConf to modifyTimestamp: 20161101035217Z and the top two # lines. Next, you can see the following line:
dn: cn={0}exampleactiveRemembering that the {0} refers to the index, if we try to load this DN, we will conflict with any existing schema that has cn={0}, which, going back to our ldapsearchoutput, is the core schema. When we add the ppolicy schema, we said to remember the index number ({4}), and now we need to add one to it to make sure our indexes don’t conflict.
dn: cn={5}exampleactiveThen we will save that file to /etc/ldap/schema/exampleactive.ldif. You can now use the ldapadd command to add the created LDIF into our SLAPD server.
$ sudo ldapadd -Q -Y EXTERNAL -H ldapi:/// -f schema/exampleactive.ldifadding new entry "cn={5}exampleactive,cn=schema,cn=config"
We will use the exampleactive.schema file when we declare our users in the “LDIFs and Adding Users” section of this chapter.
Access Control Lists
Every connection that accesses your LDAP server has to be given specific access to various parts of the tree if you want it to be secure. The default access for OpenLDAP is read, and you will want to lock this down if you store secret such as passwords. You can specify from where you accept connections, the level of security, or the encryption that connection must have to gain access, right down to the branch or attribute that you allow access to. You also have several levels of access that you can then grant to the requesting connection: manage, write, read, search, and auth.
Listing Access Controls
Access controls are attached to the database configuration. To see the current access control lists, we need to execute the following:
$ sudo ldapsearch -H ldapi:/// -Y EXTERNAL -b "olcDatabase={1}mdb,cn=config" -LLL -Qdn: olcDatabase={1}mdb,cn=configobjectClass: olcDatabaseConfigobjectClass: olcMdbConfigolcDatabase: {1}mdbolcDbDirectory: /var/lib/ldapolcSuffix: dc=example,dc=comolcAccess: {0}to attrs=userPassword by self write by anonymous auth by * noneolcAccess: {1}to attrs=shadowLastChange by self write by * readolcAccess: {2}to * by * readolcLastMod: TRUE...
In the previous lines, you can see the access lists. They begin with olcAccess and have been assigned an index number, {0}. We can view index {0} as follows:
(access) to attrs=userPasswordby self writeby anonymous authby * none
This allows a user to write to their own userPassword attribute, and the anonymous user can authenticate. Everything else cannot do anything (by * none).
How to Define Access Control Lists
You will see documentation for access control lists in “old slapd.conf” style and in dynamic or LDIF format. In the older format, you will have the access directive leading the access list. In the LDIF format, you will have the index number.
In its most basic form, access is given using the following syntax:
[access|{n}]to what [ by who [ access-level ] [ control ] ]what is an entity in the LDAP database, who is the client requesting the information, and access-level is the level of access you want that client to have on it. control specifies how the list is processed after this entry and is optional.
Note
In this section, when we show the access list directive, from this point we will ignore the access directive or index number. The final access list will be in LDIF format.
In the following simple example, we give read access to everything in our DIT.
to *by * read stop
You can use the wildcard * to allow general unrestricted access. The access control here indicates any user has read access to anything. Next is a control statement that tells slapd to stop processing any other directives. Order is important in your access control list, with directives of a higher order being processed before those of a lower order. When you give a privilege or access level, it implies all the previous ones. For example, read access automatically grants the preceding disclose, auth, compare, and search access levels, including read access rights. Table 16-3 lists the access levels you can assign to a request for access to an entity.
Table 16-3. Access Privileges
Access | Privileges |
|---|---|
none | Allows no access at all |
disclose | Allows no access but returns an error |
auth | Enables bind operations (authenticate) |
compare | Allows you to compare the entity |
search | Allows you to search that part of the DIT |
read | Allows read access |
write | Allows write access |
manage | Allows all access and the ability to delete entities |
When you choose none, you are denying all access to the entity without returning an error to the requestor. This helps prevent information leakage of what is and what isn’t in your DIT. The disclose access, unlike none, will return an error to the requesting client.
Defining who
Looking further at requesting access to an entity, you need to know who is requesting the access. There can be more than one who declaration, each using certain keywords. These keywords can be combined with a style qualifier, which can be something like regex or exact. The regex style refers to a regular expression that can be used to match various parts of a DN. It is more costly in processing your access control list.
Tip
See the OpenLDAP Administrator’s Guide for tips on using regular expressions as well other topics we are discussing here: www.openldap.org/doc/admin24/access-control.html .
It is always less costly, in processing terms, yet more precise to describe exactly what you would like to give access to and to whom. Here’s an example:
to dn.subtree=ou=people,dc=example,dc=comby dn.exact="cn=admin,ou=meta,dc=example,dc=com" read
Here we are again granting read access to everything under the organizational unit People. We are being specific and defining that this access be granted only to the DN cn=admin,ou=meta, dc=example,dc=com.
Defining what to grant access to can get tricky. Several standard methods are available for granting access. You can use the following:
dn.basedn.onedn.subtreedn.children
To explain how these relate to the objects we are working on, we will borrow an example from the OpenLDAP Administrator’s Guide. Imagine we have the following lists:
0: dc=example,dc=com1: cn=Manager,dc=example,dc=com2: ou=people,dc=example,dc=com3: uid=jsmith,ou=people,dc=example,dc=com4: cn=addresses,uid=jsmith,ou=people,dc=example,dc=com5: uid=ataylor,ou=people,dc=example,dc=com
When we try to work on parts of the DIT, we can declare the scope of our pattern matches.
dn.base="ou=people,dc=example,dc=com" match 2;dn.one="ou=people,dc=example,dc=com" match 3, and 5;dn.subtree="ou=people,dc=example,dc=com" match 2, 3, 4, and 5; anddn.children="ou=people,dc=example,dc=com" match 3, 4, and 5.
Declaring the right scope will capture the right part of the DIT tree. As you can see, the scope dn.base will just reference the level of the declared tree, ou=people,dc=example,dc=com. The scope of dn.one will act on the immediate part of the tree after ou=people,dc=example,dc=com.
The dn.subtree scope will act on everything under ou=people,dc=example,dc=com and itself, whereas dn.children will work on everything under ou=people,dc=example,dc=com.
Defining who by Filters
In LDAP, you can use filters, which are a means of weeding out undesirable data and leaving behind the exact results you want. In access control lists, you can use filters to be more specific about what you are granting access to. Take a look at the following line:
to dn.subtree="ou=people,dc=example,dc=com" attrs="userPassword"by dn.exact="cn=admin,ou=meta,dc=example,dc=com" writeby * none
In this example, we have declared we would like this to apply to everything under and including ou=people,dc=example,dc=com and to any attribute called userPassword that might be found under there. In this case, the attribute userPassword is the filter. We are giving the admin user write access to the userPassword, and everything will be silently refused.
The man pages are excellent resources for further information on access control lists, and the OpenLDAP Administrator’s Guide is also very good: www.openldap.org/doc/admin24/access-control.html .
Defining Our Access Control Lists
We’ll now take you through the access control list we are going to use in our example.com LDAP DIT. This is what we want to do:
We want users to change their own passwords and bind.
We want to create a meta users group that can bind on behalf of users.
We want an admin group to able to manage the user’s entries.
We are going to give our system root user manage access to our DIT. This can be removed at a later stage, but it provides us with access in the event we get something wrong in our access lists. This is the same access as the default provided on the cn=config database.
to *by dn.exact=gidNumber=0+uidNumber=0,cn=peercred,cn=external,cn=auth manageby * break
This says the root user (uid 0, gid 0) is allowed to manage the whole DIT (to *). We then break processing and go to the next access list. This user, as we have spoken of before, is authenticated by an external provider (the system authentication, or PAM). When we provide -Y EXTERNAL, LDAP will allow access to the UID and GID 0 (or the root user) without prompting for authentication itself.
Next we are defining access to our password information . As we have previously mentioned, the access control lists are read and implemented from top to bottom. It is important to keep the sensitive access control lists at the top so that they are not overridden by a higher entry.
In this section, we have restricted access to the users’ password information, stored in the attributes userPassword, shadowLastChange, entry, and member throughout the DIT. entry is a special pseudo-attribute that we must specify to access an entry, and member is to access group memberships.
We are going to allow only the administrators to have special access. The webadmin user will be used to bind to our LDAP server from our web server so that our web users can authenticate. We only allow access to these attributes by connections with a TLS security strength factor (tls_ssf) equal to or greater than 128. We will explain ssf further in the “Securing SLAPD with TLS” section of this chapter, but for now, the tls_ssf specifies the minimum TLS key size required to access these attributes, meaning we will allow access to these attributes only if they have an adequately secured transport layer.
Note
We will explain security strength factors shortly. You can use other options to restrict access to your attributes, like specifying a peer name or domain from which to accept connections. For more information on this and access control lists in general, please see www.openldap.org/doc/admin24/access-control.html .
We are granting anonymous auth access; that is, clients need not bind (or authenticate) to our LDAP server to authenticate. There are three ways to authenticate; one is to not provide a username or password (anonymous), another is to provide only a username, and the other is to provide a username and password. Anonymous is not particularly recommended without strict access conditions. Anonymous should never be used if your LDAP server is publicly available on the Internet.
Note
You can use a user and password to initially authenticate against the LDAP server to perform a bind operation (authenticate a user). We will show you how to do this when we authenticate with Apache later in this chapter.
Anonymous auth is required for how we implement single sign-on services, which we will explain later in the “Single Sign-On: Centralized Linux Authentication” section of this chapter. We have secured anonymous to auth only if it has a TLS security strength factor (tls_ssf) of 128. We also give users the ability to change their own password details by allowing self write access.
The last line in Listing 16-2 is important. It is a control statement to prevent access further down the access list.
Listing 16-2. Access List for Sensitive Attributes
olcAccess: {1}to attrs=userPassword,shadowLastChange,entry,memberby dn.exact="cn=webadmin,ou=meta,dc=example,dc=com" tls_ssf=128 authby anonymous tls_ssf=128 authby group.exact="cn=admins,ou=groups,dc=example,dc=com" tls_ssf=128 writeby self tls_ssf=128 writeby * tls_ssf=128 searchby * none stop
by * none stopIt says any other user (*) has no access (none) and then stop processing further.
As we have said, order is important. When an access request comes into your LDAP host, the access control list is parsed, and if a match is found, access is either granted or denied. You can speed your access requests by putting your access control list in order of most requested access to least. You want all those common requests to be toward the top of your access control list and the less common requests closer to the bottom. Assume for this example some meta userswill have access to various parts of our directory server and that these users will have the most commonly requested access requests. That is why we have our access controls dealing with the meta usersgroup toward the top of the list just below our user passwords entry.
The branch ou=meta holds the users that we use to proxy our authentication to our directory server. We don’t always require a user to bind directly to our directory server, but sometimes we want them to still authenticate against it, such as when we are performing web authentication. You have already seen that we have granted auth access to the user password entries to webadmin. Now we are declaring the ability of those DNs to see their own information.
to dn.children="ou=meta,dc=example,dc=com"by dn.exact="cn=webadmin,ou=meta,dc=example,dc=com" readby group.exact="cn=admins,ou=groups,dc=example,dc=com" writeby self read
We allow write access to this organizational unit by the cn=admins group, in which we will put our system administrator user and read access by the meta users themselves. This prevents the users defined under the ou=meta organizational unit from being able to change any of their own entries, and this gives greater security to those users.
Next, we grant access to everything under the ou=people branch, bearing in mind that we have already defined access to the user password attributes earlier in the access control list. The earlier access definition will override any access we detail here for the previously defined attributes. The administrator accounts require at least read access, and we have given the admins group write access. We will want the admins group to also change details from time to time. The webadmin user just requires read access only. We give read access to the entry itself with the self keyword.
to dn.children="ou=people,dc=example,dc=com"by dn.exact="cn=webadmin,ou=meta,dc=example,dc=com" readby group.exact="cn=admins,ou=groups,dc=example,dc=com" writeby self writeby users read
You may have different requirements in your network, and it is quite common to have the self access as write instead. This setting will give the users the ability to change their own attribute details that define their personal information, whereas read access does not.
In the following code, we grant access to the ou=groups branch where we will hold all our group information.
to dn.children="ou=groups,dc=example,dc=com"by dn.exact="cn=webadmin,ou=meta,dc=example,dc=com" readby group.exact="cn=admins,ou=groups,dc=example,dc=com" writeby anonymous read
As you can see, this is similar to the ou=people branch with the same administrator accounts having the same access. However, we have allowed authenticated users the ability to read the groups by specifying users read.
Next, we have the ou=hosts organizational unit. Some people name this unit machines, but the choice is yours. It will hold all your host information, IP addresses, locations, and so forth. We have used the scope of subtree, and there is minimal write access granted to everything except the cn=admins group.
to dn.children="ou=hosts,dc=example.com"by group.exact="cn=admins,ou=groups,dc=example,dc=com" writeby anonymous read
Here the cn=admins group will require write access. We give anonymous clients, which are clients that have not made a bind connection (nonauthenticated), read access. Various applications can make use of the ou=hosts organizational unit including such applications as Samba.
The final rule we will have is a blanket denial rule . This will enforce the rejection of all other access. This is basically superfluous, as anything not granted explicit access will be denied; however, it shows the end of your access control list set and prevents any access control lists that might be present below it being read in by mistake.
to * by * none stopThe wildcards here match everything, meaning that any access sort is denied, and all further processing is stopped by the stop option in the control field. Other processing controls available are break and continue.
The break control option will, on a match, stop further processing in that access control group and jump to the next. The continue option , after a match, will continue processing further down the access control group, allowing for incremental privileges to be granted. The stop option just immediately stops any further processing and is the default control. Listing 16-3 shows our complete access control list.
Note
The listing of olcAccess: directives you see in Listing 16-3 are separated onto different lines only for clarity of this documentation. If you have any errors about white spacing, try putting each directive on a single line.
Listing 16-3. The Complete Access Control List
dn: olcDatabase={1}mdb,cn=configchangetype: modifyreplace: olcAccessolcAccess: {0}to *by dn.exact=gidNumber=0+uidNumber=0,cn=peercred,cn=external,cn=auth manageby * break-add: olcAccessolcAccess: {1}to attrs=userPassword,shadowLastChange,entry,memberby dn.exact="cn=webadmin,ou=meta,dc=example,dc=com" tls_ssf=128 authby anonymous tls_ssf=128 authby group.exact="cn=admins,ou=groups,dc=example,dc=com" tls_ssf=128 writeby self tls_ssf=128 writeby * tls_ssf=128 searchby * none stop-add: olcAccessolcAccess: {2}to dn.children="ou=meta,dc=example,dc=com"by dn.exact="cn=webadmin,ou=meta,dc=example,dc=com" readby group.exact="cn=admins,ou=groups,dc=example,dc=com" writeby self read-add: olcAccessolcAccess: {3}to dn.children="ou=people,dc=example,dc=com"by dn.exact="cn=webadmin,ou=meta,dc=example,dc=com" readby group.exact="cn=admins,ou=groups,dc=example,dc=com" writeby self writeby users read-add: olcAccessolcAccess: {4}to dn.children="ou=groups,dc=example,dc=com"by dn.exact="cn=webadmin,ou=meta,dc=example,dc=com" readby group.exact="cn=admins,ou=groups,dc=example,dc=com" writeby anonymous read-add: olcAccessolcAccess: {5}to dn.children="ou=hosts,dc=example.com"by group.exact="cn=admins,ou=groups,dc=example,dc=com" writeby dn.exact="cn=webadmin,ou=meta,dc=example,dc=com" search-add: olcAccessolcAccess: {6}to * by * none
There are some things to note about updating access control lists. In Listing 16-3 we see we are using the LDIF format to add these access lists. Let’s take the first section and explain it.
dn: olcDatabase={1}mdb,cn=configchangetype: modifyreplace: olcAccessolcAccess: {0}<access list>-add: olcAccessolcAccess: {1}<access list>
The first line is the DN, the main config database in this case, we want to work on. The second line is the change type, which is modify. For the first index element {0} we need to use the replace modify type. For the access lists after that, we need to add the lists. When working with dynamic access lists and ldapmodify, there are some rules to remember.
If you replace an index element, you need to load in the full access list.
You can append to the end of the access list only with an add directive.
The access list is read from first to last.
We can now put these access list directives into a file called access.ldif and then use ldapmodify to apply them.
$ sudo ldapmodify -H ldapi:/// -Y EXTERNAL -f access.ldifWe will explain how to search test these shortly.
Working with the slapd Daemon
You can run your slapd daemon in two ways: with the slapd.d configuration engine (dynamic configuration) or without it. As mentioned previously, the configuration engine enables the SLAPD configuration to be changed on the fly using LDIF syntax and LDAP commands.
The other way is to load in a slapd.conf file that has the older style directives. We saw an example of the slapd.conf syntax when we included our exampleactive.schema file to convert it to LDIF format.
Both ways are supported, but running with the old-style slapd.conf will be deprecated, so we don’t recommend starting slapd with it. You can convert your old-style slapd.conf into the dynamic LDIF configuration engine by issuing the following command (SLAPD cannot be already running):
$ sudo slapd -f slapd.conf -F slapd.d -u openldap -g openldapThis is similar to our slaptest command we ran previously. You will notice that this is being run in the foreground, and you can see whether there are any problems when it tries to start. For CentOS hosts, you would use -u ldap -g ldap for the user that runs OpenLDAP instead of -u openldap, which is for Ubuntu hosts. Then -f slapd.conf points to the configuration file we want to read in, and -F points to the slapd.d directory, which will hold the LDIF files for your configuration engine.
When your slapd instance starts, you will see that the slapd.d directory now contains several files and directories. These files contain the LDAP settings you have specified in slapd.conf and other included files in an LDIF file format.
Note
You can see more about managing the configuration of your OpenLDAP server at https://help.ubuntu.com/lts/serverguide/openldap-server.html .
For troubleshooting, it can often be useful to run the SLAPD daemon in debug mode in the foreground to see exactly what the service is doing. To do that, you would issue the following (on Ubuntu, use –u ldap and –g ldap for CentOS):
$ sudo slapd -F /etc/ldap/slapd.d -d -1 -u openldap -g openldap -h ldapi:///You can manually start or stop an SLAPD server service using the following on either CentOS or Ubuntu:
$ sudo systemctl start slapd$ sudo systemctl stop slapd
You can then check the status of the daemon with the following:
$ sudo systemctl status slapdYou can enable at boot with the following:
$ sudo systemctl enable slapdOnce the service is started, you can tail the journal logs to see any logging information.
$ sudo journalctl -xfe -u slapdYou can use the logs to monitor and solve problems with your access requests.
Securing SLAPD with TLS
Because LDAP can often contain sensitive data, it is a good precaution to make sure that the data transferred between your LDAP clients and your LDAP server is encrypted. LDAP can be used for things like address books, but it can also be used to store more sensitive data such as passwords, employee details, and so on.
We can configure Transport Layer Security (TLS) to secure our transport over the wire. TLS is used for encrypting communications between our server and its clients. We will create an LDIF file to add these records.
dn: cn=configchangetype: modifyadd: olcTLSCACertificateFileolcTLSCACertificateFile: /etc/ldap/certs/cacert.pem-add: olcTLSCertificateFileolcTLSCertificateFile: /etc/ldap/certs/ldap.example.com.cert-add: olcTLSCertificateKeyFileolcTLSCertificateKeyFile: /etc/ldap/certs/ldap.example.com.key-add: olcTLSVerifyClientolcTLSVerifyClient: allow
Here we create a certificate file from our private key and add the details. The issuing certificate file is added to the cacert.pem file. We have also specified allow for TLSVerifyClient. This means that we will verify any client certificates presented to us during the TLS exchange but not fail if we can’t verify the certificate. Other options are never, allow, try, and demand. try and demand will fail connections for unverified certificates.
We apply tls.ldif with ldapmodify like before.
$ sudo ldapmodify -Q -Y EXTERNAL -H ldapi:/// -f tls.ldifWe can validate that we can still use the root user to query the LDAP server and view our TLS entries.
$ sudo ldapsearch -H ldapi:/// -Y EXTERNAL -b "cn=config" -LLL -Q |grep TLSolcTLSCACertificateFile: /etc/ldap/certs/cacert.pemolcTLSCertificateFile: /etc/ldap/certs/ldap.example.com.certolcTLSCertificateKeyFile: /etc/ldap/certs/ldap.example.com.key
We will not be able to issue ldapsearch requests against the ldap:/// URI until we make some adjustments to the /etc/ldap/ldap.conf file. We will do that in the next section (in the earlier section we used the Unix socket ldapi:///).
Working with SSF
We will now talks about the security strength factor directive, or ssf. We can define the minimum security strength we allow for our connections and specify higher-security-strength communications for more sensitive roles.
For example, if we had a sec.ldif file like that shown next, it describes the factors of security we require for certain connection types:
dn: cn=configchangetype: modifyadd: olcSecurityolcSecurity: ssf=128 update_ssf=256 simple_bind=128 tls=256
The ssf=128 setting describes the overall security strength factor we require for our service based on the encryption key size. Higher key sizes imply greater encryption strength.
If we define the ssf security in the global DIT , it is defined for all other DITs. We have set it to 128, which is reasonable, and we can restrict more sensitive DITs with stronger security requirements. The update_ssf=256 setting describes the overall security strength required for directory updates, and the simple_bind=128 setting is the required security factor for simple_bind operations. The ssf values are as follows:
0 (zero) implies no protection.
1 implies integrity protection only.
56 allows DES or other weak ciphers.
112 allows triple DES and other strong ciphers.
128 allows RC4, Blowfish, and other strong ciphers.
256 allows AES, SHA ciphers.
The default is 0. You can combine them in your access control lists to control what those connections can access, depending on the security strength of the connection.
We are not going to apply this configuration at present, but we have already secured our sensitive user data with ssf_tls=128 in our access control list.
We now have to set up our LDAP client with our TLS certificate details if we want to make adjustments to user passwords or other sensitive data.
Setting Up Your LDAP Client
Ubuntu and CentOS both use the ldap.conf file to configure system-wide LDAP defaults for clients (there is also another method using the sssd program that we will discuss in the “Single Sign-On: Centralized Linux Authentication” section). Applications that use the OpenLDAP libraries will use these files to get the LDAP details. You will find Ubuntu’s file in the directory /etc/ldap and CentOS’s in /etc/openldap.
Note
It is important that you don’t get this confused with the file provided by the libnss-ldap file, which is also called ldap.conf and can be found here on both distributions: /etc/ldap.conf. This file is for configuring user and host information for your system, while /etc/(open)ldap/ldap.conf is used by the OpenLDAP tools such as ldapmodify, ldapadd, etc.
You will need to edit your ldap.conf file by adding the following lines of text. In our case, we are going to cheat a little and not worry about setting up client SSL certificates for our LDAP clients. If this host was being used to replicate our LDAP server, we would definitely ensure that both the server and client had SSL verification enabled. Check the man page for ldap.conf for details.
URI ldap://ldap.example.com/BASE dc=example,dc=comTLS_CACERT /etc/ldap/certs/cacert.pemTLS_REQCERT demand
The URI points to our LDAP server. The BASE is the default base DN for LDAP operations. TLS_CACERT points to our CA certificate file, which will contain our example.com CA certificate. On some clients you may have installed the CA cert into the default location of /etc/ssl/certs. The demand we specify in the TLS_REQCERT field means that we will try to verify the certificate, and if it cannot be verified, we cancel the connection (this is the default). Other options are try, which means the connection will continue if no certificate is provided, but if a bad certificate is provided, the connection is stopped immediately; allow, which means that if the certificate provided is bad, the session can continue anyway; and never, which means your host will not request or check the server certificate before establishing the connection.
If you were looking at a CentOS host, you would most likely find your SSL CA certificate in the /etc/pki/tls/certs directory.
LDAP Management and Tools
So how do you manage entries with LDAP? Several tools are available for just this purpose. Using the command line, you can add entries from text files, search for existing entries, and delete entries. The text files are required to be in a format called LDIF. The format of the LDIF file is as follows:
dn: <dn entry>objectclass: <objectclass to be included>attribute: <attribute value described in an objectclass>
It is generally a good idea to create separate LDIF files for the different sections you are dealing with. For example, everything under ou=people,dc=example,dc=com can be in people.ldif, and everything under ou=groups,dc=example,dc=com can be in groups.ldif. Alternatively, for fresh LDAP servers, you can have all your entries in the one file, but be wary that in LDAP servers with existing entries, you will get errors if you try to add an existing entry again. You can use the # symbol at the start of each line of an entry to comment out that entry in your LDIF file in such cases. LDIF files can be used by the LDAP tools by using the –f filename option that we will detail in the following sections.
The other way to manage entries is to use one of the many GUI tools that are available. We will show how to install and configure a web-based GUI in the “LDAP Account Manager: Web-Based GUI” section.
LDIFs and Adding Users
At the top of the DIT sits the rootDN. The DIT starts with the declaration of the dcObject class. The following is a snippet of the LDIF text file we will use to populate our LDAP server:
dn: dc=example,dc=comobjectclass: dcObjectobjectClass: organizationdc: exampleo: example
This declares that we are going to create the rootDN dc=example,dc=com. According to the dcObject object class in the core.schema on Ubuntu, we must include the dc attribute. Let’s look at the object class declaration from the core.schema file:
objectclass ( 1.3.6.1.4.1.1466.344 NAME 'dcObject'DESC 'RFC2247: domain component object'SUP top AUXILIARY MUST dc )
You can see how we use the preceding object class in the declaration of the DN: dc=example, dc=com. We specify the dc attribute as we are directed to use, indicated by the MUST clause in the object definition. Remember, this is an AUXILLARY object class and cannot be used to create an entry. We need a STRUCTUAL object class, and organization is such a class. It requires the o attribute for organization. We will add this entry when we add our users in the next section. This should be the first entry you add to your LDAP server.
It should be noted here that depending on if you are using Ubuntu, rootDN may already exist. You can find out by running the following:
$ sudo ldapsearch -D "cn=admin,dc=example,dc=com" -b "dc=example,dc=com" –ZZ -H ldap://ldap.example.com –W# example.comdn: dc=example,dc=comobjectClass: topobjectClass: dcObjectobjectClass: organizationo: exampledc: example
If this is the case, do not include this in users.ldif or you will get an error like the following when you try to add it:
adding new entry "dc=example,dc=com"ldap_add: Already exists (68)
Next, we want to set up the users in our organization, so we will now declare our people organizational unit. We could separate this section into a new file for just our people entries if we wanted.
dn: ou=people,dc=example,dc=comobjectclass: organizationalUnitou: people
You can see that the LDIF format requires the declaration of the DN, followed by the object classes we want to use and the attributes. Each declaration should be separated by a blank line. The order of declaration is also important; you can’t create a user in ou=people,dc=example,dc=com until that organizational unit is created. The object class organizationalUnit requires that we declare the ou attribute as we have here, ou: people.
Now we are going to add a user, jsmith.
dn: uid=jsmith,ou=people,dc=example,dc=comobjectclass: topobjectclass: personobjectclass: posixAccountobjectclass: exampleClientcn: Jane Smithsn: Smithuid: jsmithuidNumber: 1000gidNumber: 1000exampleActive: TRUEhomeDirectory: /home/jsmithuserPassword: {SSHA}IZ6u7bmw12t345s3GajRt4D4YHkDScH8
So, let’s look at the DN first. You can see that we declare our DN using the uid attribute. We could have used a couple variations here other than uid=jsmith: cn=Jane Smith or [email protected]. Which of these you end up using on your system depends on what you think will be best for your server (keeping indexes in mind), and you should be aware that these must be unique (SINGLE-VALUE).
Next, we have to declare the object class top and person. The top object class, an ABSTRACT superclass, is required to provide the other object classes and is used to terminate the hierarchy.
The person object class provides the sn (surname) and cn (common name) attributes. Let’s quickly view the schema for this object class.
objectclass ( 2.5.6.6 NAME 'person'DESC 'RFC2256: a person'SUP top STRUCTURALMUST ( sn $ cn )MAY ( userPassword $ telephoneNumber $ seeAlso $ description ) )
The parent of the person object class is top (SUP top), and it is a STRUCTURAL object class, meaning that its attributes can form an entry in the DIT. For the person class, we MUST provide a cn and an sn entry. We MAY provide userPassword, telephone, seeAlso, and description.
It is optional to include the posixAccount and exampleClient object classes. The object class posixAccount will provide the attributes useful for Unix/Linux hosts such as userPassword, uid, uidNumber, gidNumber, and homeDirectory. The exampleClient object class that we created in the schema section provides the exampleActive attribute, which we can use to activate and deactivate our users. Please note that the attribute value for Boolean attributes such as exampleActive must be uppercase, and because it is an SINGLE-VALUE attribute, we can declare it only once.
We’ll now add groups as an organizationalUnit so that we can make use of groups to manage access to our users. Again, we can create a new LDIF text file for our groups.
dn: ou=groups,dc=example,dc=comobjectclass: topobjectclass: organizationalUnitou: groups
You can see that creating the organizational unit for groups is similar to the way we declared the people organizational unit earlier. As required by the schema definition, we have used and declared the ou attribute to name our DN. Next, we declare the group admins that we will use to group our administrators.
dn: cn=admins,ou=groups,dc=example,dc=comobjectclass: topobjectclass: groupOfNamescn: adminsmember: uid=ataylor,ou=people,dc=example,dc=com
We declare a group list with the groupOfNames object class, which allows us to just add members. We could have also used the posixGroup object class, which would allow us to use gidNumbers as well. We can add as many members to the group as we like by adding member: DN on a separate line.
Now we can look at adding our details to the LDAP database. To do so, we will use the ldapadd tool that comes with OpenLDAP.
Adding Users from LDIF Files
The LDAP tools all share a common set of options that you can provide to connect to your LDAP server. The OpenLDAP client tools can be used to connect to other LDAP servers provided by other software manufacturers. Table 16-4 lists the common options that are available to most LDAP tools.
Table 16-4. Common LDAP Tool Options
Option | Description |
|---|---|
-x | Performs a simple bind. |
-v | Specifies verbose output. |
-W | Prompts for a password. |
-f | Points to an input file, which can be a different type under a different tool context. |
-D | Specifies the DN to bind as. This DN must have proper access rights to work on the entries. |
-Z | Tries using TLS to make the LDAP connection. ZZ indicates that use of TLS must be successful before continuing with the connection. |
-Y | Specifies the SASL authentication mechanism to connect to your LDAP server. You must have SASL configured to use this option. |
-X | Specifies the SASL authzid, or the requested authorization ID for a SASL bind. |
-U | Specifies the SASL authcid, or the authentication ID for a SASL bind. |
-b | Specifies the base DN. Instead of querying the whole tree, you can specify a base to start from, like ou=people,dc=example,dc=com. |
-s | Indicates the scope of the search query . Can be either base, one, sub, or children. |
Most commonly you will use the –D option to specify the user you are binding as to make a query or modification and will use the -xW option to perform a simple bind and be prompted for a password (as opposed to a SASL bind –Y). Some of the options we have shown in Table 16-4 will not be available to all LDAP tools. The syntax of the LDAP tool commands usually looks like this:
ldaptool <options> filter entry Several LDAP tools are available. The main ones are ldapadd, ldapmodify, ldapsearch, and ldapdelete, and as we said, they all share some or all of the common options shown previously. For the exact options available, please refer to the man pages for those tools. We are going to give you examples of how to use these commands and options in the upcoming next sections.
Adding users to our LDAP server is easy now that we have created our LDIF file. Let’s look at the complete LDIF file. As we have mentioned, we need to add the dc entry, or the top level of our DIT, at the top of this file (remember to remove it from the file if it already exists). If you are adding hundreds of users, you may want to use a script or program that handles the existing users (or LDAP errors generated from trying to re-add an existing user or DN).
$ sudo cat users.ldifdn: dc=example,dc=comobjectclass: dcObjectobjectclass: organizationalUnitdc: exampleou: exampledn: ou=people,dc=example,dc=comobjectclass: organizationalUnitou: peopledn: uid=jsmith,ou=people,dc=example,dc=comobjectclass: topobjectclass: personobjectclass: posixAccountobjectclass: exampleClientcn: Jane Smithsn: Smithuid: jsmithuidNumber: 1000gidNumber: 1000exampleActive: TRUEhomeDirectory: /home/jsmithuserPassword: {SSHA}IZ6u7bmw12t345s3GajRt4D4YHkDScH8dn: uid=ataylor,ou=people,dc=example,dc=comobjectclass: topobjectclass: personobjectclass: posixAccountobjectclass: exampleClientcn: Angela Taylorsn: Tayloruid: atayloruidNumber: 1002gidNumber: 1000exampleActive: TRUEhomeDirectory: /home/atayloruserPassword: {SSHA}PRqu69QU5WK5i8/dvqQuvFXo0xJ74OFGdn: ou=meta,dc=example,dc=comobjectclass: organizationalUnitobjectclass: topou: metadn: cn=webadmin,ou=meta,dc=example,dc=comobjectClass: organizationalRoleobjectclass: simpleSecurityObjectuserPassword: {SSHA}KE0JMvJjYjQ/9lpigDCbLla5iNoBb8O8dn: ou=groups,dc=example,dc=comobjectclass: topobjectclass: organizationalUnitou: groupsdn: cn=staff,ou=groups,dc=example,dc=comobjectclass: topobjectclass: posixGroupgidNumber: 1000cn: staffdn: cn=admins,ou=groups,dc=example,dc=comobjectclass: topobjectclass: groupOfNamescn: adminsmember: uid=ataylor,ou=people,dc=example,dc=comdn: ou=hosts,dc=example,dc=comobjectclass: topobjectclass: organizationalUnitou: hosts
We are now going to add our users using the file users.ldif. The ldapadd tool is versatile and takes many options. The way we will use it is as follows:
$ sudo ldapadd -D "cn=admin,dc=example,dc=com" -ZZ -H ldap://ldap.example.com-xWv -f users.ldif
The ldapadd command can use the SASL authentication method or the simple method. As we have mentioned earlier, if you have SASL set up, you can bind without sending the password across the wire, with the simple authentication method the password is sent to be verified on the LDAP server, so it should be sent over a secure transport like TLS. The -x will make ldapadd use the simple method. -W tells ldapadd that we want to be prompted for a password. -v is to be verbose in its information. When you specify -D, you give the username you want to bind with. In this case, we are using the cn=admin,dc=example,dc=com user, and as you may remember, this is the rootDN we added to the SLAPD server earlier. The -h switch is the hostname, ldap.example.com. -Z tells the command to use STARTTLS, or make a TLS connection to the LDAP host, but if you have TLS already set in /etc/ldap/ldap.conf or /etc/openldap/ldap.conf, your command will fail. Finally, -f indicates the file we want to use to add our users, users.ldif.
The options you use here are the same for all the other LDAP tools; see the man page for more details. When you issue this command, you will get something like this:
jsmith@ldap:/etc/ldap$ ldapadd -xWv -D cn=admin,dc=example,dc=com-h ldap.example.com -Z -f users.ldifldap_initialize( ldap://ldap.example.com )Enter LDAP Password:add objectclass:toppersonexampleClientposixAccountadd cn:Jane Smithadd sn:Smithadd uid:jsmithadd uidNumber:1000add gidNumber:1000add exampleActive:TRUEadd homeDirectory:/home/jsmithadd userPassword:{SSHA}IZ6u7bmw12t345s3GajRt4D4YHkDScH8adding new entry "uid=jsmith,ou=people,dc=example,dc=com"modify complete
If successful, you will see a “Modify complete” message. If something goes wrong, you will receive an error on the console output, and you can use journalctl to further examine the log entries produced.
$ journalctl –xe –u slapdRemember to adjust your LogLevel entry like described previously if you are not seeing enough detail in the logs.
Searching Your LDAP Tree
Now that we have some entries in our LDAP database, we can search it to make sure we can return useful information. Let’s look at ways we can search our LDAP directory.
$ ldapsearch -xvW -H ldap://ldap.example.com -ZZ-D cn=admin,dc=example,dc=com-b ou=people,dc=example,dc=com -s sub'(&(&(objectclass=person)(uid=jsmith))(exampleActive=TRUE))' cn
The arguments we use for the search are similar to the ones we use for the ldapadd command. We first specify that we are performing a simple bind with verbose output, and we want to be prompted for a password, -xvW. -h declares the host we want to connect to, and -Z says try to make a connection using TLS (a -ZZ would mean to confirm that the TLS connection was successful before proceeding). Angela Taylor is a user that we have put in cn=admins,ou=groups,dc=example,dc=com; remember that we have given write access to all entries under ou=people,dc=example,dc=com through our access control list. We have just added the user Jane Smith to our LDAP directory, and we will conduct a search to look at her details.
In our ldapsearch command, you can see we include a filter to make use of indexes and to reduce our search response time. We know that all user entries have the object class person. As we explained, in our slapd.conf file all object classes are indexed, so choosing one that you know is in the entity you are looking for will speed your searches. The uid attributes are also indexed, so we also want to filter on the uid of the entry we are looking for. Our search filter looks like this:
(&(&(objectclass=person)(uid=jsmith))(exampleActive=TRUE)),These are read inside out; let’s take the first part.
&(objectclass=person)(uid=jsmith)This means to filter on entries where the object class is person AND uid is jsmith. The second part looks like this:
(&(<first match>)(exampleActive=TRUE))Here we match on the first match AND that the account is active, as indicated by exampleActive=TRUE. The & operator indicates that we are searching for one AND the other. We can also use the | symbol to indicate we want to search for one OR the other.
We specify the base of the DIT tree we wish to start searching from, -b ou=people, dc=example,dc=com, and the scope of our search is -s sub, or everything under it. And finally, we are searching for Jane’s common name, or cn. The results of this search will look like the following:
ldap_initialize( ldap://ldap.example.com )filter: (&(&(objectclass=person)(uid=jsmith))(exampleActive=TRUE))requesting: cn# extended LDIF## LDAPv3# base <ou=people,dc=example,dc=com> with scope subtree# filter: (&(&(objectclass=person)(uid=jsmith))(exampleActive=TRUE))# requesting: cn## jsmith, People, example.comdn: uid=jsmith,ou=people,dc=example,dc=comcn: Jane Smith# search resultsearch: 3result: 0 Success# numResponses: 2# numEntries: 1
Here you can see that we have returned the DN we were looking for and the common name for that entry. Next, let’s look at deleting entries.
Deleting Entries from Your LDAP Directory
The other thing you are going to want to do often is delete entries in your LDAP directory. To delete entries, use the ldapdelete command. Again, this takes the same arguments as ldapadd and ldapsearch. For deleting more than one entry, you can input a text file, or you can delete entries individually. Assume we have the following entries in a new users.ldif file, and we want to delete them.
uid=jbob,ou=people,dc=example,dc=com uid=tbird,ou=people,dc=example,dc=comWe can now add these two entries to a file called deluser.ldif and then run the ldapdelete command with the -f argument as follows:
ldapdelete -xvW -D uid=ataylor,ou=people,dc=example,dc=com-h ldap.example.com -Z -f deluser.ldifldap_initialize( ldap://ldap.example.com )deleting entry "uid=jbob,ou=people,dc=example,dc=com"deleting entry "uid=tbird,ou=people,dc=example,dc=com"
As a result, these entries are no longer in our directory and have been deleted.
Note
OpenLDAP is case insensitive, meaning that uid=jsmith,ou=people,dc=example,dc=com is treated the same as uid=jSmith,ou=people,dc=example,dc=com. Trying to add two Jane Smiths, one with a lowercase s and one with an uppercase S, will return a duplicate error.
Password Policy Overlay
Setting the password policy overlay allows us greater control over password aging and change history. Overlays, as explained earlier, provide extra functionality for your OpenLDAP server. We want to set our password aging to 7776000 (90 days in seconds) and our password history to 3, meaning we will store the previous three passwords supplied by users so they can’t keep using the same one. The password will need to have a minimum of eight characters.
Adding Our PPolicy Overlay
It is time to add our Password Policy overlay. An overlay, as previously mentioned, provides certain additional functionality not normally supplied by the OpenLDAP server. In this case, we are declaring the ppolicy overlay, which helps manage our passwords.
We are going to create a file called ppolicy.ldif with the following contents:
dn: ou=policies,dc=example,dc=comobjectClass: organizationalUnitou: policiesdn: olcOverlay={0}ppolicy,olcDatabase={1}mdb,cn=configobjectClass: olcOverlayConfigobjectClass: olcPPolicyConfigolcOverlay: {0}ppolicyolcPPolicyDefault: cn=default,ou=policies,dc=example,dc=comolcPPolicyHashCleartext: FALSEolcPPolicyUseLockout: TRUEolcPPolicyForwardUpdates: FALSE
First you can see that we create an organizationalUnit, a way of collecting similar items in our DIT, called ou=policies,dc=example,dc=com. This provides the structure to place our default polices that we will define later.
The ppolicy overlay provides certain functions that allow you to better control password security on your LDAP server. OpenLDAP itself provides no password management features, such as password expiry and password history. This overlay allows you to declare a policy or associate different policies with different parts of the DIT tree. Here we declare a default policy with the DN cn=default,ou=Policies,dc=example,dc=com. We also declare that we want to use the lockout feature of the ppolicy. This allows us to send a message back to the requesting client if it is locked out. This can provide information to attackers who will then know whether a username exists or not, so you might want to turn this off. We also turn off HashCleartext and ForwardUpdate at this stage.
We now have to define the actual policy that sets the values we want to enforce on our password regime. To do that, we will need to add the following LDIF to our LDAP server:
dn: cn=default,ou=policies,dc=example,dc=comobjectClass: topobjectClass: deviceobjectClass: pwdPolicycn: defaultpwdAttribute: userPasswordpwdMaxAge: 7776000pwdExpireWarning: 6912000pwdInHistory: 3pwdCheckQuality: 1pwdMinLength: 8pwdMaxFailure: 4pwdLockout: TRUEpwdLockoutDuration: 1920pwdGraceAuthNLimit: 0pwdFailureCountInterval: 0pwdMustChange: TRUEpwdAllowUserChange: TRUEpwdSafeModify: FALSE
We have now added the password policy to our LDAP server, and it has some basic settings like password age (90 days in seconds) and passwords in history (3). This overlay will now make all password accounts comply with the password policy.
We will use ldapadd to apply this ppolicy.ldif file. In this instance, since we are modifying the SLAPD database config, we will use the powers of the local root user to make this change:
$ sudo ldapadd -H ldapi:/// -Y EXTERNAL -f ppolicy.ldifNote
See the man slapo-ppolicy page for more details on the Password Policy overlay.
Testing Your Access Control Lists
From time to time, you will run into permission issues because of incorrectly functioning access control lists. There is a tool you can use to test your ACLs called slapacl. This tool tests access to attributes and object classes by the DN you want to grant access to. For example, if we want to make sure that the DN cn=webadmin,ou=meta,dc=example,dc=com, which is the user we use to bind our web services during authentication, has auth access to the userPassword attribute of our user Angela Taylor, we would issue the following:
sudo slapacl -F /etc/ldap/slapd.d-b uid=ataylor,ou=people,dc=example,dc=com-D cn=webadmin,ou=meta,dc=example,dc=com-o tls_ssf=128-v userPassword/auth
The slapacl command requires sudo access. You need to specify the slapd config directory you want to test against with -F /etc/ldap/slapd.d on an Ubuntu host; on a CentOS host, you would need to use the /etc/openldap/slapd.d directory. The -b uid=ataylor,ou=people,dc=example,dc=com DN is the DN we want to test our access on. -D cn=webadmin,ou=meta,dc=example,dc=com is the DN that we want to confirm has auth access to the DN of uid=ataylor,ou=people,dc=example,dc=com. The –o allows us to provide options that are related to slapd access. In this case, since we need to mimic our TLS security strength factor, we add the tls_ssf=128. The –v is for verbose. We specify the attribute and authentication level we want to test, in this case the attribute userPassword against the access auth. As you know, we need at least auth access for the DN cn=webadmin,ou=meta,dc=example,dc=com to authenticate with userPassword. If we are successful, we will get the following result:
authcDN: "cn=webadmin,ou=meta,dc=example,dc=com"auth access to userPassword: ALLOWED
This confirms that the line in our access control list is working like we expect.
olcAccess: {1}to attrs=userPassword,shadowLastChange,entry,memberby dn.exact="cn=webadmin,ou=meta,dc=example,dc=com" tls_ssf=128 auth
We’ll test to see whether we can get write access to the same attribute to confirm that our access control list doesn’t have a security hole in it.
sudo slapacl -F /etc/ldap/slapd.d-b uid=ataylor,ou=people,dc=example,dc=com-D cn=webadmin,ou=meta,dc=example,dc=com-o tls_ssf=128-v userPassword/writeauthcDN: "cn=webadmin,ou=meta,dc=example,dc=com"write access to uid: DENIED
This is as we expect: we should be denied everything but auth access and below. You can also pass in other options that allow you to test access against such things as peernames and ssf.
One of the other useful ways to figure out what is going on with your access control lists, which can be hard to get right, is to have the following in your access control list while you are testing:
access to * by * searchYou can combine this with modifying the logging configuration in your SLAPD, changing your log level to something like this:
olcLogLevel: 416This will show the search filter and the access control list processing as well as connection management and configuration file processing. You can use the journalctl command to access the logs. When a request comes in, it will produce output like the following:
$ journalctl –xe –u slapdslapd[1350]: conn=1011 op=2 SRCH base="ou=people,dc=example,dc=com" scope=2 deref=0 filter=”(&(objectClass=person)(uid=jsmith))"slapd[1350]: conn=1011 op=2 SRCH attr=uid...<snip>...slapd[1350]: => access_allowed: read access to "uid=jsmith,ou=people,dc=example,dc=com" "uid" requestedslapd[1350]: => acl_get: [1] attr uidslapd[1350]: => acl_mask: access to entry "uid=jsmith,ou=people,dc=example,dc=com", attr "uid" requestedslapd[1350]: => acl_mask: to value by "uid=ataylor,ou=people,dc=example,dc=com", (=0)slapd[1350]: <= check a_dn_pat: gidNumber=0+uidNumber=0,cn=peercred,cn=external,cn=authslapd[1350]: <= check a_dn_pat: *slapd[1350]: <= acl_mask: [2] applying +0 (break)slapd[1350]: <= acl_mask: [2] mask: =0slapd[1350]: => dn: [3] ou=people,dc=example,dc=comslapd[1350]: => acl_get: [3] matchedslapd[1350]: => acl_get: [3] attr uidslapd[1350]: => acl_mask: access to entry "uid=jsmith,ou=people,dc=example,dc=com", attr "uid" requestedslapd[1350]: => acl_mask: to value by "uid=ataylor,ou=people,dc=example,dc=com", (=0)slapd[1350]: <= check a_dn_pat: cn=webadmin,ou=meta,dc=example,dc=comslapd[1350]: <= check a_group_pat: cn=admins,ou=groups,dc=example,dc=comslapd[1350]: <= acl_mask: [2] applying write(=wrscxd) (stop)slapd[1350]: <= acl_mask: [2] mask: write(=wrscxd)slapd[1350]: => slap_access_allowed: read access granted by write(=wrscxd)slapd[1350]: => access_allowed: read access granted by write(=wrscxd)
The first line shows the search string of the request, SRCH base="ou=people,dc=example,dc=com" scope=2 deref=3 filter="(&(objectClass=*)(uid=jsmith))", and we are looking for the attribute UID.
The output also shows the user making the request, uid=ataylor,ou=people,dc=example,dc=com. You can see the process of the request for access starts with a search of ou=people,dc=example,dc=com and then the final acceptance for the search (and read), via the check a_group_pat: cn=admins,ou=groups,dc=example,dc=com, and that gives ataylor write access.
With a combination of logs, the slapacl and ldapsearch tools, and the useful OpenLDAP mailing list, you can achieve intricate access control lists. Let’s look at the other tools you can use to manage your LDAP servers, including the ldapsearch tool we just mentioned.
Backing Up Your LDAP Directory
Text-based files are great for building or restoring your LDAP directory. Once your directory is implemented, we suggest that you set up a script that might regularly output your LDAP database into a text file and save it. In Chapter 14, we introduced you to the Bareos backup server and showed you how to use the Client Run Before Job and Client Run After Job options when we backed up our MySQL database. You can do a similar thing with the LDAP database, as shown in Listing 16-4.
Listing 16-4. slapcat LDIF Dump
#!/bin/bashcase $1 instart)slapcat -b dc=example,dc=com -l /var/lib/ldap/backup.ldifif [ $? -eq 0 ] ; thenecho "backup successful"elseecho "backup failed"exit 1;fi;;stop)if [ -e /var/lib/ldap/backup.ldif ] ; thenrm -f /var/lib/ldap/backup.ldifif [ $? -eq 0 ] ; thenecho "removal of file successful"elseecho "failed to remove file"exit 1;fifi;;esacexit 0
To get a perfect backup, you would want to stop the OpenLDAP directory server before you run the command in Listing 16-4; however, this is not always possible, and hot backups are preferable over no backups at all.
You use the slapcat command to dump the LDAP database to a file on disk using the Client Run Before Job script. You then get Bareos to back it up; Bareos can delete it by running the Client Run After Job script (see Listing 16-5).
Listing 16-5. The Job Definition for Bareos Backup Service
Job {Name = ldap.example.comClient = ldap-fdEnabled = yesJobDefs = "DefaultLinux"Client Run Before Job = "/usr/local/bin/ldap_backup start"Client Run After Job = "/usr/local/bin/ldap_backup stop"}
This is based on the proviso that you have your LDAP backup script installed in /usr/local/bin on your ldap.example.com host.
Restoring your LDAP database is then simply a matter of restoring the file on your host and running the slapadd command with the following parameters (OpenLDAP should be shut down for this process):
$ slapadd -b dc=example,dc=com -F /etc/ldap/slapd.d -l restored.ldif.backup.fileHere we have restored our LDAP database to how it was when we performed the last save. Because LDAP has no write-ahead logs, you cannot replay your most recent updates to your LDAP directory server like you can in a fully featured transactional relational database, so regular backups are important. We suggest at minimum you make backups nightly.
Managing your directory server via text files can get tiresome. Luckily, we have a solution if you’re one of those who prefer a web-based GUI to do all the fiddly work for you, and we’ll discuss this next.
LDAP Account Manager: Web-Based GUI
Several tools are available to manage your LDAP directories. We have decided to focus on one of them in this book, LDAP Account Manager (LAM). This is a web-based GUI that can take some of the administrative pain away from updating text files. It is available in two versions: a free version and an enterprise version that requires a fee. If you discover you do not like using this tool, you might want to try some of the others that exist, such as the following:
phpldapAdmin: http://phpldapadmin.sourceforge.net/
web2ldap: https://web2ldap.de/web2ldap.html
LDAPAdmin: https://github.com/ibv/LDAP-Admin (Linux version)
Some of these are old, and some more are recent. OpenLDAP hasn’t changed very much over the years, so you are free to try any you choose. We chose to show you LAM because it is designed not only to manage LDAP but also to provision user accounts. It allows you to create users based on templates that are easy to follow. It is also flexible enough to allow you to integrate your Samba user administration if you choose to do so.
Installation and Configuration
LAM is available for download with Ubuntu from its online repositories. It is a few releases old, and if you are looking for a more recent version, you can get the .deb packages from the web site’s download page ( https://www.ldap-account-manager.org/lamcms/releases ) or from the Debian repository.
For LAM, you will need a version of PHP installed on your host higher or equal to 5.2.4.
To install it, you issue the following:
$ sudo aptitude install php-mcrypt php-zip ldap-account-manager apache2At the time of writing, the version provided in the Ubuntu repository (5.2-1ubuntu1) does not support the default PHP (7.x) installed with Xenial. The solution is to install the .deb package first from the download page and manually install it similar to how we will do it with CentOS.
For CentOS hosts you have to download the Fedora/CentOS RPMs from the web site ( https://www.ldap-account-manager.org/lamcms/releases ). This will link to a SourceForge download, and you can get a copy to the direct link (removing the mirror information from the URL). Then use yum to install the package like in this example:
$ sudo yum install -y httpd php php-ldap php-xml$ sudo yum install -y http://downloads.sourceforge.net/project/lam/LAM/5.5/ldap-account-manager-5.5-0.fedora.1.noarch.rpm
The CentOS installation puts all the LAM files under /usr/share/ldap-account-manager. All the configuration files are installed under /var/lib/ldap-account-manager/config/.
LAM is fairly easy to configure. On Ubuntu, some configuration files are installed into /etc/ldap-account-manager. You will find an example configuration for your Apache web server and the configuration file, /etc/ldap-account-manager/config.cfg, containing the default username and password for your LAM installation.
$ sudo vi /etc/ldap-account-manager/config.cfg# password to add/delete/rename configuration profilespassword: {SSHA}tj1yDeQfLJbmISXwh8JfjMb2ro3v5u44# default profile, without ".conf"default: lam
In the config.cfg file, you can see we have set our own password to {SSHA}tj1yDeQfLJbmISXwh8JfjMb2ro3v5u44 (be careful with your ownership and permissions). We also need to change the following file to add our own LDAP directory details. First, we make a copy of the file /var/lib/ldap-account-manager/config/lam.conf. We then make the changes in bold to the /var/lib/ldap-account-manager/config/lam.conf file.
$ sudo vi /var/lib/ldap-account-manager/config/lam.conf# LDAP Account Manager configuration# server address (e.g. ldap://localhost:389 or ldaps://localhost:636)ServerURL: ldaps://ldap.example.com# list of users who are allowed to use LDAP Account ManagerAdmins: cn=admin,dc=example,dc=com# password to change these preferences via webfrontendPasswd: somepassword# suffix of tree viewtreesuffix: dc=example,dc=com# maximum number of rows to show in user/group/host listsmaxlistentries: 30# default language (a line from config/language)defaultLanguage: en_GB.utf8:UTF-8:English (Great Britain)# Number of minutes LAM caches LDAP searches.cachetimeout: 5# Module settingsmodules: posixAccount_minUID: 1000modules: posixAccount_maxUID: 30000modules: posixAccount_minMachine: 50000modules: posixAccount_maxMachine: 60000modules: posixGroup_minGID: 1000modules: posixGroup_maxGID: 20000modules: posixGroup_pwdHash: SSHAmodules: posixAccount_pwdHash: SSHA
In the first section of this file, we add the details for our LDAP directory including the connection details, tree information, Posix UID, GID, and machine numbers. The UID and GIDs are used when we create new users in the LAM interface; they will be incremented in those ranges listed previously.
# List of active account types.activeTypes: user,group,hosttypes: suffix_user: ou=people,dc=example,dc=comtypes: attr_user: #uid;#givenName;#sn;#uidNumber;#gidNumbertypes: modules_user: person,posixAccount,shadowAccount,exampleClienttypes: suffix_group: ou=groups,dc=example,dc=comtypes: attr_group: #cn;#gidNumber;#memberUID;#descriptiontypes: modules_group: posixGrouptypes: suffix_host: ou=hosts,dc=example,dc=comtypes: attr_host: #cn;#description;#uidNumber;#gidNumbertypes: modules_host: account,posixAccount# Access rights for home directories scriptRights: 750
In the last section of the file, we detail the account types we want to enable in the activeTypes section and the LDAP branches that house these. The LAM administration tool will use these details to create the user accounts for us in our LDAP server.
Adding the Apache Virtual Host for LAM
We are going to add an Apache virtual host to our web server to host our LAM site. In Chapter 11, we showed you how to set up an Apache virtual host. The web service can run on any host; it does not have to be on the same host as the LDAP server, but in our example, this will be the case. We have chosen to house this site on our host with the IP address 192.168.0.1 and DNS name of ldap.example.com, also known as headoffice.example.com.
Note
Our headoffice.example.com host may now be overloaded with secure virtual hosts (https), and we may have to choose a nonstandard port, like 8443, to run our ldap.example.com web site. Alternatively, we could run it on a completely different host.
On our Ubuntu host, we will have the following configuration: the main sections of this virtual host have been provided by the LAM package and can be found in /etc/ldap-account-manager/apache.conf. We are going to include this file in our VirtualHost information. The VirtualHost will be placed in /etc/apache2/sites-available and will be called ldap.example.com.conf. On CentOS, we would include the file in the /etc/httpd/conf.d/ directory.
$ sudo vi /etc/apache2/sites-available/ldap.example.com.conf<VirtualHost 192.168.0.1:443>ServerName ldap.example.comSSLEngine onSSLCertificateFile /etc/ldap/certs/ldap.example.com.certSSLCertificateKeyFile /etc/ldap/certs/ldap.example.com.keySSLCACertificateFile /etc/ldap/certs/cacert.pemLogFormat "%v %l %u %t "%r" %>s %b" comonvhostCustomLog /var/log/apache2/ldap.example.com_access.log comonvhostErrorLog /var/log/apache2/ldap.example.com_error.logLoglevel debugInclude /etc/ldap-account-manager/apache.conf</VirtualHost>
We have created a VirtualHost enclosed between the <VirtualHost> </VirtualHost> tags. In this VirtualHost we have added our TLS/SSL keys pointing to our /etc/ldap/certs directory and have created separate log files in the /var/log/apache2 directory to aid diagnosis of any problems relating to this VirtualHost.
We have included (Include /etc/.../apache.conf) the Apache configuration file provided by the LAM package. This allows that package to be managed by the package manager and updated accordingly.
On Ubuntu we need to enable the site and make sure SSL is also enabled. We do that with the following:
$ sudo a2ensite ldap.example.com.conf$ sudo a2enmod ssl
On CentOS hosts, there is a lam.apache.conf file placed in the /etc/httpd/conf.d/ directory. You may like add the VirtualHost directives in our Ubuntu example into a copy of this file to include the SSL and logging directives. If you don’t, the LAM GUI will be available from http://ldap.example.com/lam . Refer to Chapter 11 for more information on managing CentOS virtual hosts.
Next, we start the Apache web server and point our browser at https://ldap.example.com/lam . We are now presented with the login page for the LAM configuration tool, as shown in Figure 16-4.

Figure 16-4. LAM login page
In the top right notice the LAM configuration link. This is used to perform general maintenance on the LAM configuration tool. On the login page, you will be asked for the password you have added to /var/lib/ldap-account-manager/config.cfg. Here you can change the general login settings as well as the password for your manager.
The admin user you can see in Figure 16-4 refers to the rootDN we specified in /var/lib/ldap-account-manager/config/lam.conf. When we enter the password for our rootDN, we are presented with the users we have already configured, as shown in Figure 16-5.

Figure 16-5. Front page of the LAM web GUI
We are now going to create a new user using the standard profile . Profiles serve as templates for creating users. We start by clicking the New User button to bring up the page shown in Figure 16-6.

Figure 16-6. Creating a new user
We now need to click the Personal tab and fill out the details required there. The only details we will enter in the Personal tab are first name, last name, and description (see Figure 16-6); you can, of course, add as much detail as you want.
In the Unix tab, we fill in the details required to add a Unix/Linux account, as shown in Figure 16-7. If we do not enter a UID number, one will be generated for us according to the limits we specified in the lam.conf file. We are attaching users to the staff group, and we can add more, providing the groups already exist, by clicking the “Edit groups” button.
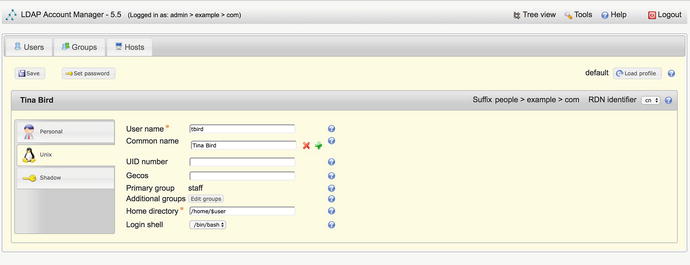
Figure 16-7. Linux(Unix) details
Prior to the enabling the Shadow section, we need to enable the shadow extension. Once this is done, you will see the screen in Figure 16-8.
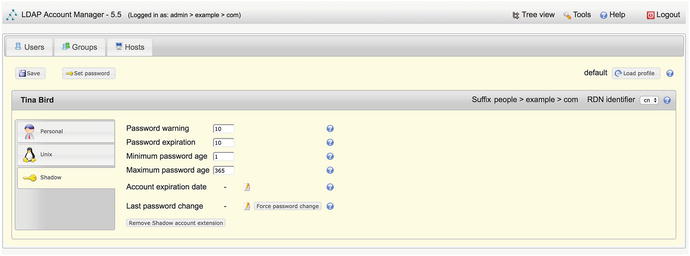
Figure 16-8. Shadow details
In the Shadow tab, we will leave the defaults as is. You can see these defaults in Figure 16-9.

Figure 16-9. User add complete
To finish creating our user, we go back to the Main tab and click the Create Account button. We then see a confirmation screen like the one in Figure 16-9 indicating a successful operation.
As you can see in Figure 16-10, our new user, tbird, has been created.
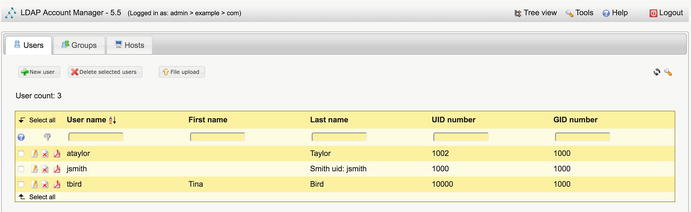
Figure 16-10. Listing the new user
You can use LAM to add and remove group and host entries in your LDAP directory, which we will leave you to explore further on your own. Remember, LAM is not the only LDAP management tool. If you do not like this LDAP management client for managing your LDAP service, we suggest you try one of the other clients we mentioned earlier.
For further documentation on configuring LAM, please visit the following:
Integration with Other Services
The main aim of deploying an LDAP server is to be able to integrate different services that require authentication with a single authentication service. We want to use the same usernames and passwords across as many of our services as possible. This provides us with the ability to better manage user administration and allows us to set common password management policies across all our services, which provides greater security.
Our first step will be to centralize our Linux authentication so that all our Linux desktops and servers share the same authentication credentials. Next, we will show how to add LDAP authentication to web services. Lastly, we will show how a web-based application can use LDAP for its authentication services as well.
Single Sign-On: Centralized Linux Authentication
We are now going to show you how to centralize your user accounts on your Linux hosts. Having several Linux hosts with several user accounts on each can become cumbersome to manage. Passwords can get out of sync, and you might not remove users when they leave your company from all your hosts, creating potential security risks. To simplify this kind of user management, you could centralize your authentication service by pointing your Linux hosts to your LDAP server. To show you how to do that, we will first go through installing the necessary software and then examine the files used in the configuration. The good thing is that you should be able to use the authentication tools provided by your distribution to configure the necessary files that make single sign-on work.
We are going to need a modification to our access lists. There are certain entries that we will need anonymous access. When we authenticate against our LDAP server, we need to first access certain entries. There are two ways to do this; the first is with a bind DN and password, like a proxy, that will bind and get access to the entries, and the second is with anonymous bind, where no bind is done (remember that bind is another word for authentication). If we use a proxy bind DN, we need to set a password in clear text on every host that connects. In this exercise, we have chosen not to do that.
There are several other authentication methods you could choose to use instead of simple authentication. You can set up authentication with SASL or Kerberos if you wanted, and we talked about these authentication methods in Chapter 13.
The access control list now looks like this. You will see the changes in bold; we have given anonymous the ability to read certain attributes that are looked up during authentication and have given auth access to the userPassword attribute. We have also prevented users from changing certain attributes that they shouldn’t have write access to, such as uidNumber, homeDirectory, and so on.
dn: olcDatabase={1}mdb,cn=configchangetype: modifyreplace: olcAccessolcAccess: {0}to *by dn.exact=gidNumber=0+uidNumber=0,cn=peercred,cn=external,cn=auth manageby * none break-add: olcAccessolcAccess: {1}to attr=entry,member,objectClass,uid,uidNumber,gidNumber,homeDirectory,cn,shadowWarning,modifyTimestampby group.exact="cn=admins,ou=Groups,dc=example,dc=com" tls_ssf=128 writeby dn.exact="cn=webadmin,ou=meta,dc=example,dc=com" tls_ssf=128 readby anonymous tls_ssf=128 readby self tls_ssf=128 read-add: olcAccessolcAccess: {2}to attrs=userPasswordby dn.exact="cn=webadmin,ou=meta,dc=example,dc=com" tls_ssf=128 authby group.exact="cn=admins,ou=Groups,dc=example,dc=com" tls_ssf=128 writeby self tls_ssf=128 writeby anonymous tls_ssf=128 authby * none stop-add: olcAccessolcAccess: {3}to dn.children="ou=People,dc=example,dc=com"by dn.exact="cn=webadmin,ou=meta,dc=example,dc=com" readby group.exact="cn=admins,ou=Groups,dc=example,dc=com" writeby self writeby users read-add: olcAccessolcAccess: {4}to dn.children="ou=Groups,dc=example,dc=com"by dn.exact="cn=webadmin,ou=meta,dc=example,dc=com" readby group.exact="cn=admins,ou=Groups,dc=example,dc=com" write-add: olcAccessolcAccess: {5}to dn.children="ou=meta,dc=example,dc=com"by dn.exact="cn=webadmin,ou=meta,dc=example,dc=com" readby group.exact="cn=admins,ou=Groups,dc=example,dc=com" writeby self read-add: olcAccessolcAccess: {6}to dn.children="ou=Hosts,dc=example.com"by group.exact="cn=admins,ou=Groups,dc=example,dc=com" writeby dn.exact="cn=webadmin,ou=meta,dc=example,dc=com" search-add: olcAccessolcAccess: {7}to * by * none
Setting Up sssd
To authenticate against an LDAP server from our Linux clients, we will install a package called sssd. It is designed as a daemon that will authenticate against a wide range of authentication services, including LDAP.
On Ubuntu, you need these packages installed:
$ sudo aptitude install sssdOn CentOS, of course, you would use YUM to install the same package name. They also take the same configuration. We need to create a file called /etc/sssd/sssd.conf. This file needs to have the 0600 permission set.
This file itself will have the following contents:
[sssd]config_file_version = 2services = nss, pamdomains = LDAP[domain/LDAP]cache_credentials = trueid_provider = ldapauth_provider = ldapldap_uri = ldap://ldap.example.comldap_search_base = dc=example,dc=comldap_id_use_start_tls = trueldap_tls_reqcert = demandldap_tls_cacert = /etc/ssl/certs/cacert.pemchpass_provider = ldapldap_chpass_uri = ldap://ldap.example.comentry_cache_timeout = 6ldap_network_timeout = 2ldap_group_member = uniquememberldap_pwdlockout_dn = cn=ppolicy,ou=policies,dc=example,dc=comldap_access_order = lockout
The main directives in this file can be found in man sssd.conf and sssd-ldap. But the first section tells sssd that we are going to use nss and pam to run our LDAP domain. In the LDAP domain section we have the provider for id and auth and then the connection details including TLS settings and password policy details.
When Linux looks for a piece of information such as a host or a password, it checks a file called /etc/nsswitch.conf for where to find that information. The nsswitch.conf file will need to be updated with the following information to tell it to use sssd for passwd, group, and shadow files; this is the information required to log in.
passwd: files sssgroup: files sssshadow: files sssgshadow: fileshosts: files mdns4_minimal [NOTFOUND=return] dnsnetworks: filesprotocols: db filesservices: db files sssethers: db filesrpc: db files# pre_auth-client-config # netgroup: nisnetgroup: nis ssssudoers: files sss
We have the information we seek on the left, and then we have where to look for that information on the right and the order to look for it. For example, when we require information that is normally contained in the /etc/passwd file (like username), we first look in that file. If the username is not found in the file, we then query the sssd daemon (or sss). The same applies for group and shadow.
The next part we need to update is the PAM authentication modules. We need to allow us to use sss(d) for authentication via PAM. On Ubuntu we do that by changing the following (we have removed the comments from the example):
/etc/pam.d/common-authauth [success=3 default=ignore] pam_unix.so nullok_secureauth [success=2 default=ignore] pam_sss.so use_first_passauth [success=1 default=ignore] pam_ldap.so use_first_passauth requisite pam_deny.soauth required pam_permit.so/etc/pam.d/common-passwordpassword requisite pam_pwquality.so retry=3password [success=3 default=ignore] pam_unix.so obscure use_authtok try_first_pass sha512password sufficient pam_sss.so use_authtokpassword [success=1 user_unknown=ignore default=die] pam_ldap.so use_authtok try_first_passpassword requisite pam_deny.sopassword required pam_permit.sopassword optional pam_gnome_keyring.so/etc/pam.d/common-accountaccount [success=2 new_authtok_reqd=done default=ignore] pam_unix.soaccount [success=1 default=ignore] pam_ldap.soaccount requisite pam_deny.soaccount required pam_permit.soaccount sufficient pam_localuser.soaccount [default=bad success=ok user_unknown=ignore] pam_sss.so/etc/pam.d/common-sessionsession [default=1] pam_permit.sosession requisite pam_deny.sosession required pam_permit.sosession optional pam_umask.sosession required pam_unix.sosession optional pam_sss.sosession optional pam_ldap.sosession optional pam_systemd.sosession required pam_mkhomedir.so skel=/etc/skel umask=0022
These files should be updated for you when you have installed sssd on Ubuntu, and we will not need to change them. You will note that at the end of the common-session file we are allowing authenticated users to make their own home directories and populate them with the contents of /etc/skel.
On CentOS you may have to add these pam directives to /etc/pam.d/system-auth yourself. They are slightly different but basically the same for both distributions.
auth required pam_env.soauth sufficient pam_fprintd.soauth sufficient pam_unix.so nullok try_first_passauth sufficient pam_sss.so use_first_passauth requisite pam_succeed_if.so uid >= 1000 quiet_successauth required pam_deny.soaccount required pam_unix.soaccount sufficient pam_localuser.soaccount sufficient pam_succeed_if.so uid < 1000 quietaccount [default=bad success=ok user_unknown=ignore] pam_sss.soaccount required pam_permit.sopassword requisite pam_pwquality.so try_first_pass local_users_only retry=3 authtok_type=password sufficient pam_unix.so sha512 shadow nullok try_first_pass use_authtokpassword sufficient pam_sss.so use_authtokpassword required pam_deny.sosession optional pam_keyinit.so revokesession required pam_limits.so-session optional pam_systemd.sosession [success=1 default=ignore] pam_succeed_if.so service in crond quiet use_uidsession optional pam_mkhomedir.so skel=/etc/skel umask=0022session required pam_unix.so
We discussed configuring PAM in Chapter 5, but we are going to talk about it some more in the “How PAM Works” section coming up.
Now that we have PAM and sssd configured, we only need to make sure that we can connect to the LDAP server from the client. In our sssd.conf file, we specified the ldap_tls_cacert. We need to make sure that we have /etc/ssl/certs/cacert.pem installed in the correct location; otherwise, we will be rejected from the LDAP server.
Once we have placed cacert.pem in the correct place, we can test to see whether we can query the LDAP server for users.
$ grep ataylor /etc/passwdOn our host, this returns no result, meaning that the user ataylor has not been created, but we did create her in our LDAP configuration. We are going to use a command called getent to query the passwd file and the sssd (as directed by our configuration in nsswitch.conf; getent is a tool for querying those entries).
$ getent passwd ataylorataylor:*:1002:1000:Angela Taylor:/home/ataylor:
We have been returned the user details for Angela Taylor, including the UID/GID and home directory information. This means we can talk and return information from our LDAP server successfully.
The next step is to prove that we can log in as her. To do that, we are going to use the su command, or superuser command. This command allows you to sign in as the root user or into another account. When we issue this command, we will be asked to provide Angela’s password.
jsmith@au-mel-ubuntu-2:∼$ su - ataylorPassword:ataylor@au-mel-ubuntu-2:∼$
Here we have successfully signed into a user that exists only in LDAP. A home directory has been created as we signed in for the first time. Now any LDAP user can sign into our hosts and have their home directories created.
We can further refine our sssd.conf file to filter for certain users, like only if they have exampleActive set to TRUE.
ldap_access_filter = (exampleActive=TRUE)If you are using the Ubuntu Unity desktop, you will need to make a change to the following file to allow other users to log in from the desktop:
/usr/share/lightdm/lightdm.conf.d/50-unity-greeter.conf[Seat:*]greeter-session=unity-greetergreeter-show-manual-login=true
This will allow you to see a screen like in Figure 16-11 after a reboot of your Ubuntu desktop. After you enter your username, you’ll enter your password, as shown in Figure 16-12.
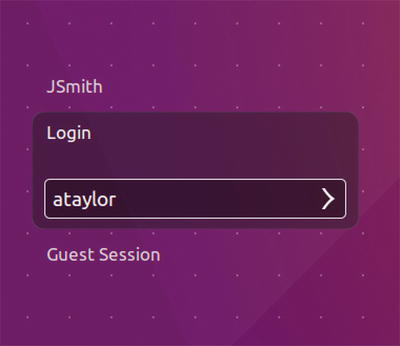
Figure 16-11. Logging in via LDAP to the desktop
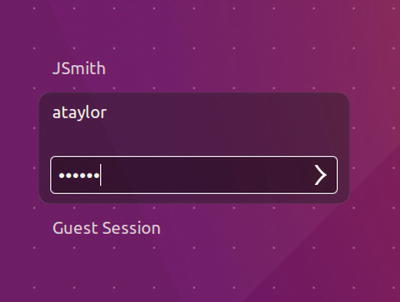
Figure 16-12. Providing the LDAP password
You will be able to provide an LDAP username and password with CentOS too, without having to configure anything special.
How PAM Works
As explained in Chapter 5, Linux can use Pluggable Authentication Modules (PAM) to authenticate services against your LDAP service. PAM provides authentication, authorization, and password-changing abilities for hosts against LDAP servers. PAM is configured via the files located in the /etc/pam.d directory. As described in Chapter 5, the main PAM file on your CentOS host is the /etc/pam.d/system-auth file. Listing 16-6 shows an example of the settings required to establish LDAP authentication on your host.
Listing 16-6. PAM Settings for system-auth on CentOS
auth required pam_env.soauth sufficient pam_fprintd.soauth sufficient pam_unix.so nullok try_first_passauth sufficient pam_sss.so use_first_passauth requisite pam_succeed_if.so uid >= 1000 quiet_successauth required pam_deny.soaccount required pam_unix.soaccount sufficient pam_localuser.soaccount sufficient pam_succeed_if.so uid < 1000 quietaccount [default=bad success=ok user_unknown=ignore] pam_sss.soaccount required pam_permit.sopassword requisite pam_pwquality.so try_first_pass local_users_only retry=3 authtok_type=password sufficient pam_unix.so sha512 shadow nullok try_first_pass use_authtokpassword sufficient pam_sss.so use_authtokpassword required pam_deny.sosession optional pam_keyinit.so revokesession required pam_limits.so-session optional pam_systemd.sosession [success=1 default=ignore] pam_succeed_if.so service in crond quiet use_uidsession optional pam_mkhomedir.so skel=/etc/skel umask=0022session required pam_unix.so
This file is generated for you, and you should not have to alter it yourself unless there is a good reason. You can see from Listing 16-6 that the file is made up of four independent management groups: auth, account, password, and session.
Take a look at the following line, which is an example of the auth management group:
auth sufficient pam_sss.so use_first_pass This group authenticates the user usually by some password challenge-response mechanism. The sufficient control value says that if this module is successful, consider the user authenticated. pam_sss.so is the PAM shared object to be used, the code that determines how a user is authenticated. Lastly, use_first_pass is the optional syntax that says instead of asking for your password again, use the first one provided by one of the higher modules in the stack.
On Ubuntu hosts, the corresponding files are common-auth, common-password, common-session, and common-account in the /etc/pam.d directory.
Note
You can read more about PAM in the System Administrator’s Guide here: www.linux-pam.org/Linux-PAM-html/Linux-PAM_SAG.html .
The other file central to PAM authenticating against an LDAP service is /etc/nsswitch.conf. This file requires the passwd, group, and shadow keywords to have these values:
passwd: files ldapgroup: files ldapshadow: files ldap
As we have explained, these tell PAM what authentication databases to use and the order in which to use them. So when we are looking for information we would normally find in /etc/passwd, we would first use the files on the host and then use LDAP. The same goes for group and shadow. The PAM and nsswitch.conf files should be configured for you by the authentication configuration tools provided by your distribution.
Note
When using different authentication services, you may have to map certain attributes. Mapping of attributes is done when the authentication service requires a certain attribute that is not normally provided with OpenLDAP, say, an attribute required by an AD server. You’ll find the Red Hat docs for doing this at https://access.redhat.com/documentation/en-US/Red_Hat_Enterprise_Linux/7/html/Windows_Integration_Guide/sssd-ad-integration.html .
LDAP and Apache Authentication
Let’s now look at how we get our web server to use our LDAP server to authenticate clients. When clients try to access the https://ldap.example.com web site, they will be required to enter their LDAP username and password before they gain access. We will do two things to our web server to achieve this: make all our communications with our web server secure by enabling SSL on our web host and add the LDAP details to the ldap.example.com virtual host.
Note
Chapter 11 discussed Apache virtual hosts.
We will assume this is being run from the ldap.example.com host and that there is no other Apache service running on it.
Next, let’s examine the changes we will make to our ldap.example.com virtual host file.
$ sudo vi /etc/apache2/sites-available/ldap.example.com.confLDAPTrustedGlobalCert CA_BASE64 /etc/ldap/certs/cacert.pemLDAPTrustedMode TLS<VirtualHost 192.168.0.1:443>ServerName ldap.example.comSSLEngine onSSLCertificateFile /etc/ldap/certs/ldap.example.com.certSSLCertificateKeyFile /etc/ldap/certs/ldap.example.com.keySSLCACertificateFile /etc/ldap/certs/cacert.pemLogFormat "%v %l %u %t "%r" %>s %b" comonvhostCustomLog /var/log/apache2/ldap.example.com_access.log comonvhostErrorLog /var/log/apache2/ldap.example.com_error.logLoglevel debug<Location /lam >AuthType BasicAuthName "LDAP example.com"AuthBasicProvider ldapAuthLDAPBindAuthoritative onAuthLDAPURL ldap://ldap.example.com/ou=people,dc=example,dc=com?uid?subAuthLDAPBindDN cn=webadmin,ou=meta,dc=example,dc=comAuthLDAPBindPassword <thewebadminpasswordincleartext>Require valid-userRequire ldap-group cn=admins,ou=groups,dc=example,dc=com</Location>Include /etc/ldap-account-manager/apache.conf</VirtualHost>
Note
On CentOS hosts, this file can be found in /etc/httpd/conf.d/vhost.conf, depending on how you manage your virtual hosts on CentOS.
Inside the <VirtualHost> tags, we have added a Location directive . The Location directive says that any URI matching /lam will now trigger the following configuration, prompting the user to authenticate against LDAP:
AuthType BasicAuthName "LDAP example.com"AuthBasicProvider ldapAuthLDAPBindAuthoritative onAuthLDAPURL ldap://ldap.example.com/ou=people,dc=example,dc=com?uid?subAuthLDAPBindDN cn=webadmin,ou=meta,dc=example,dc=comAuthLDAPBindPassword Zf3If7AyRequire valid-userRequire ldap-group cn=admins,ou=groups,dc=example,dc=com
We have set AuthType to Basic and AuthName to LDAP example.com. AuthType defines the method of authentication, and you have a choice between Basic and Digest. LDAP authentication requires Basic. AuthName is the name in the authentication window that pops up.
AuthBasicProvider ldap defines the server we are going to use, in this case the LDAP server, to provide our authentication mechanism. We indicate that we want the LDAP server to be the authoritative service to accept or decline access by specifying AuthzLDAPAuthoritative on. Next is the LDAP URL we are going to use for our authentication service, AuthLDAPURL ldap:// ldap.example.com/ou=people,dc=example,dc=com?uid?sub. It specifies the base of our searches, ou=people,dc=example,dc=com; the attribute we are interested in, uid; and the scope of our searches, sub. Here you can now see where we are using the cn=webadmin,ou=meta,dc=example,dc=com meta account, which will bind to our LDAP server with the password also provided. You don’t have to provide the password as clear text; if it makes you uncomfortable, you can try these other methods as well:
Finally, we specify that we require a valid user, and the authenticating user must also belong to the LDAP group cn=admin,ou=groups,dc=example,dc=com.
Note
To find out more on LDAP and Apache authentication, read the following: https://httpd.apache.org/docs/2.4/mod/mod_authnz_ldap.html .
Before we proceed, we will need to make sure that the modules are added to our web host, and on Ubuntu we would do the following:
$ sudo a2enmod authnz_ldap$ sudo a2enmod ldap$ sudo a2enmod ssl
For CentOS, we need to make sure that the packages mod_ssl and mod_ldap are installed; this will create the file in the conf.modules.d directory.
$ cat /etc/httpd/conf.modules.d/01-ldap.conf# This file configures the LDAP modules:LoadModule ldap_module modules/mod_ldap.soLoadModule authnz_ldap_module modules/mod_authnz_ldap.so
We need to now restart our Apache service (restart apache2 for Ubuntu).
$ sudo systemctl restart httpdWe use our web browser now to connect to the LAM web GUI at the following address: https://ldap.example.com/lam .
In Figure 16-13, you can see the authentication challenge provided by Apache. We have entered the uid of ataylor, whom we know is a member of the cn=admins,ou=groups,dc=example,dc=com group, which is required by our Apache configuration.

Figure 16-13. The Apache request for username and password
You should now be able to access LAM , and you should see the successful login in the Apache logs.
...authorization result of Require ldap-group cn=admins,ou=groups,dc=example,dc=com......auth_ldap authenticate: accepting ataylor.......authorization result of Require valid-user : granted...
This shows that the LDAP server is authenticating our request using the username ataylor and testing that this user is a member of the cn=admin,ou=groups,dc=example,dc=com group. This level of detail is provided by the debug logging option in the virtual host LogLevel directive.
Summary
In this chapter, we discussed what a directory server is and how the entries are organized in the directory information tree. We showed you how to configure and install an OpenLDAP directory server and populate it with user accounts and management accounts. We discussed schemata, indexes, and access control lists. We showed you how to use the various client tools provided by OpenLDAP to query and manage the LDAP server. You can now set up a web GUI to manage your LDAP directory and integrate LDAP into your network and existing applications.
You should now be able to do the following:
Install and configure OpenLDAP on Ubuntu and CentOS hosts
Understand and configure access control lists
Query and manage your LDAP directory
Install and configure the LAM web GUI
Set up single sign-on for Linux to LDAP
Configure Apache web server to use LDAP authentication to authenticate client access
Directory services, as we have said, can play a central part in your network, and there are many things about this topic we have not even touched on in this chapter. We recommend that you purchase a book dedicated to the subject, read the online documentation at www.openldap.org , and use the mailing lists to help you further your knowledge in this area.
In the next chapter, you will read about performance monitoring and optimization.