Getting to Know the Pro Tools LE Software
So what are the main features in Pro Tools LE and how should you get familiar with these? You will need to know about the various Edit Modes, how to zoom the display, which Tool to use for which task, how the rulers work, how scrolling works, and how to find your way around the software and the waveform display in general. Working ‘hands-on’ with the software as much as possible is the best way to learn how to use any software, of course. But you can use this chapter to get an overview of the software environment, familiarize yourself with the main windows, and take a peek inside all the menus.
Pro Tools LE Overview
Pro Tools LE software lets you record and play back up to 32 mono digital audio tracks, depending on your computer’s capabilities, and has comprehensive editing and mix automation features. Sessions can include up to 256 MIDI tracks, 128 Auxiliary Input tracks, 64 Master Fader tracks and 128 audio tracks – although only 32 audio tracks can be played back at the same time. But other tracks in your Session will play when any of the first 32 tracks have no audio playing. The higher ordered tracks take precedence over the lower ordered tracks, so if the first 32 tracks all have audio playing throughout the Session, no other tracks will be able to play. But if some of these tracks have gaps containing no audio regions, then a corresponding number of lower-ordered tracks will be able to play audio in those places. You can have up to five inserts and ten sends per track and you can use up to 32 internal mix busses. Sessions can use 16-bit or 24-bit audio resolution, at sample rates that depend on the capabilities of your hardware.
The Edit and Mix windows are the main Pro Tools work areas. Depending on which phase of your project you are in or what type of project you are working on, you may prefer to work with just the Mix or just the Edit window.
tip
You can show or hide the Mix and Edit windows using the Windows menu or by pressing Command-Equals (=) on Macintosh, or Control-Equals (=) in Windows to switch between the two windows.
The Transport controls are available in a separate window or can be revealed in the Edit window by selecting them in the View menu.
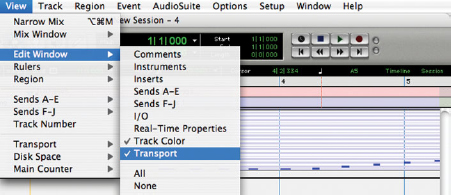
Fig. 3.1 – Revealing the Transport controls in the Edit window.
Track Priority and Voice Assignment
Pro Tools LE and M-Powered restrict the number of playback ‘voices’ to 32, although the Pro Tools software allows for additional audio tracks beyond that fixed number of voices – up to a maximum of 128.
When the number of tracks exceeds the number of available voices, tracks with lower priority may not be heard. Tracks with higher positions (leftmost in the Mix window or topmost in the Edit window) have priority over tracks in lower positions in a session. To change a track’s priority all you need to do is to drag the track by its Track Name button until it is lower or higher in the Edit window or to left or right in the Mix window. Alternatively, you can drag the track name in the Show/Hide Tracks List to a higher position in the list. Tracks at the top of this list have higher priority than those below.
You can also adjust the relative priority of tracks by freeing up the voices of some of the tracks, making these available to other tracks in the session. One way to free up the voice of a track is to set the track to have ‘no output’ and remove any send assignments. A faster way is to click and hold the Voice Selector popup of the track and set this to ‘off’.
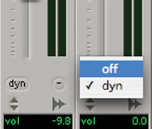
Fig. 3.2 – Voice Selector popup has two settings: ‘dyn’ or ‘off’. Here, the left track is set to ‘dyn’ and the right track is about to be set to ‘off’.
note
Pro Tools LE automatically takes care of voice management in the background, dynamically allocating voices as necessary. Each track’s voice assignment can be turned off or can be dynamically allocated. When you turn a track’s voice assignment off, this voice is automatically re-allocated to another track if needed; in other words it is ‘dynamically allocated’.
A third way to free up a track’s voice is to totally deactivate the track. There are two ways to do this. If you click and hold the Track Type icon, a popup selector appears that lets you make the track inactive when you select and highlight this. The Track Type icon on an audio track, for example, looks like a double arrowhead pointing to the right.
tip
An even faster way to deactivate the track is by holding the Command and Control keys (Start and Control keys for Windows) while clicking its Track Type icon in the Mix window.
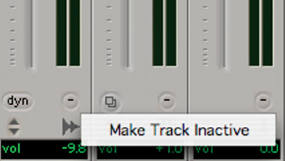
Fig. 3.3 – Click and hold the track icon to reveal a popup selector that lets you make the track inactive when you select and highlight this – or simply Command-Control-click on the icon.
The Mix Window
The Mix window lets you balance all your levels, pan the sounds to create a stereo effect, and apply signal processing as needed. There are five insert ‘slots’ available for each track. Each slot can be used either to hook up external processors (an outboard EQ, compressor, or whatever) or to insert a software plug-in. A range of software plug-ins is provided with Pro Tools LE and you can buy additional plug-ins from Digidesign or from third party suppliers. The Mix window also features comprehensive automation facilities, including both ‘snapshot’ and real-time automation with four real-time automation modes: Read, Touch, Latch, and Write.
Plug-ins
There are two formats of plug-ins that can be used with LE and M-Powered systems. Real-Time AudioSuite (RTAS) plug-ins can be inserted into the Pro Tools mixer to process audio in real time using the host computer’s CPU.
AudioSuite plug-ins can be used for non-real time processing of audio regions to create new files.
The more RTAS plug-ins you use in a session, the greater the impact this will have on aspects of your system’s performance such as maximum track count, number of available voices, the density of edits possible, and latency in automation and recording.
To allow creative processing, the list of RTAS plug-ins includes D-Verb, Mod Delay II, EQ III, EQ II, Dynamics II, and Pitch. Other RTAS plug-ins are provided for more technical tasks, including Signal Generator, Time Adjuster, Trim, Click, Dither, and POW-r Dither.
AudioSuite plug-ins are used to process and modify audio files on disk, rather than non-destructively in real time. Depending on how you configure a non-RTAS plug-in, it will either create an entirely new audio file, or alter the original source audio file.
For creative processing, the list of AudioSuite plug-ins includes EQ III, EQ II, Dynamics II, D-Verb, Chorus, Flanger, Multi-Tap Delay, Ping-Pong Delay, Time Compression/Expansion, Pitch Shift, and Reverse. More technical processes include Invert, Duplicate, Delay, Normalize, Gain, Signal Generator, and DC Offset Removal.
Tracks
In the Mix window, tracks appear as mixer channel strips with controls for signal routing, input and output assignments, volume, panning, record enable, automation mode, and solo/mute. From the View menu you can choose whether or not to display the Sends, Inserts, and Instrument controls in the Mix (or Edit) window.
Inserts
Pro Tools lets you use up to five Inserts on each audio track, Auxiliary Input, Instrument Track, or Master Fader. Each insert can be either a software plug-in or an external hardware device.
Sends
You can also use up to ten Sends on each track. Sends let you route signals across internal busses or to audio interface outputs so that one plug-in or one external signal processor can be used to process several tracks at once. There are two sets of sends (labeled A–E and F–J) that can optionally be displayed in the Mix (and Edit) window. You might use the first set to send to effects (such as reverb) that you wish to apply to several tracks, and use the second set to send cue mixes to musicians – routing these from your Pro Tools hardware interface to suitable headphone amplifiers.
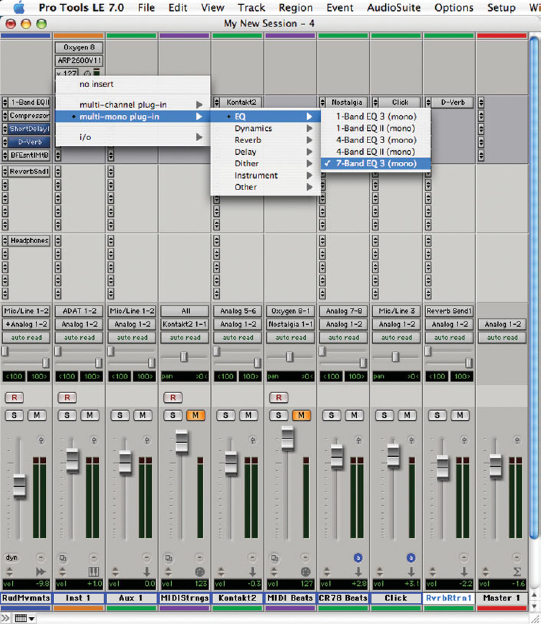
Fig. 3.4 – Pro Tools LE Mix window.
I/O Selectors
Track Input and Output Selector popups are located just above the Pan controls on each channel strip. The Track Input Selector popups let you choose the input source for Audio and Instrument tracks and Auxiliary Inputs. Track input can come from your hardware interface or from an internal Pro Tools bus – or from a plug-in.
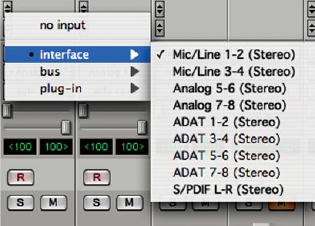
Fig. 3.5 – Track Input Selector popup.
The Track Output Selector popups let you route the audio from each track to your choice of available outputs or bus paths.
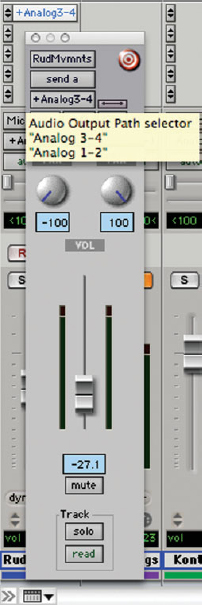
Fig. 3.6 – Multiple assignments for a Send’s Audio Output Path.
Pro Tools Audio tracks, Instrument Tracks and Auxiliary Inputs can have multiple track output and send assignments chosen from the actual paths and resources available on your system (although Master Faders can only be assigned to a single path).
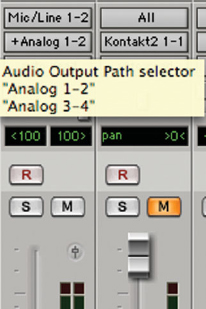
Fig. 3.7 – Multiple assignments for a track’s Audio Output Path.
Assigning to multiple paths is an efficient way to route an identical mix to other separate outputs, for simultaneous monitor feeds, headphone mixes, or other situations where a parallel mix is needed.
To assign an extra output, hold the Control key (Start key in Windows), open the Output Selector and select your additional output.
A ‘+’ sign is added to the Output Selector legend to remind you that this track has more than one output assigned, and you can add as many additional outputs as there are available on your system.
If you also hold the Option (Alt) key at the same time as the Control (Start) key, the additional output will be added to all tracks (apart from Master Faders and MIDI tracks, of course).
tip
You can use the same procedure to add additional output assignments to the track Sends.
The Edit Window
The Edit window provides a timeline display of audio, as well as MIDI data and mixer automation for recording, editing, and arranging tracks. As in the Mix window, each track has controls for record enable, solo, mute, and automation mode.
Using the View menu options, you can also reveal the input and output routing assignments, the Inserts, the Sends, the Instrument controls, the MIDI Real-Time properties, the Comments, or any combination of these – which makes it possible to work with just the Edit window for most of the time.

Fig. 3.8 – Pro Tools LE Edit window.
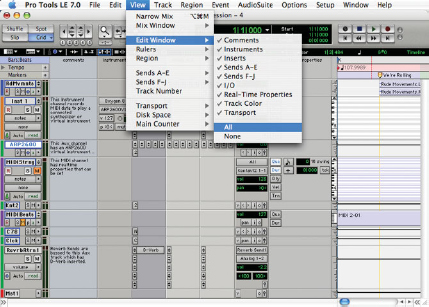
Fig. 3.9 – Edit window showing all optional views.
The Edit window lets you display the audio and MIDI data in a variety of ways to suit your purpose and you can edit the audio right down to sample level in this one window.
The Edit Modes
Understanding the area at the top of the Edit window is fundamental to knowing how to operate Pro Tools.
At the left there are four buttons to let you select the Edit Mode:
Slip Mode is the basic mode to use by default. In this mode, you can freely move regions forwards and backwards in time in the Edit window.
In Grid Mode, movements are constrained by whichever Grid settings you have made – Bars:Beats, Mins:Secs, or whatever.
In Shuffle Mode, when you move a region, it will automatically snap to the region before it – perfectly butting up to this.
And in Spot Mode, a Spot Dialog appears whenever you click on a region. This lets you specify exactly where the region should be placed on the timeline – ideal for ‘spotting’ effects to picture.

Fig. 3.10 – Screenshot shows the Edit Mode and Zoom buttons, the various Tools, the Location Indicators and the Event Edit Area to the right of this, with popup selectors for the Views and Rulers, Grid and Nudge values underneath.
Zoom Buttons
To the right of the Edit Mode buttons, there are various arrow buttons that let you zoom the display vertically or horizontally. The horizontal zoom arrows work for both audio and MIDI regions. To zoom audio regions vertically, use the first pair of up and down arrow buttons. To zoom MIDI regions vertically, use the second pair.
Underneath these zoom arrows there are five small Zoom Preset buttons that store preset zoom levels. You can use these as handy shortcuts to particular zoom levels: just set the zoom level you want, then Command-click (Mac) or Control-click (Windows) on any of the five buttons to store the current zoom level.
Choose Your Tool
To the right of the Zoom buttons you will find six Tool buttons. The first is the Zoomer Tool. You can use this to zoom the display either vertically or horizontally.
The next button is the Trimmer tool. Use this to lengthen or shorten regions. You can also choose to apply Time Compression/Expansion directly in the Edit window, or to apply the Scrub feature prior to trimming regions. Select these modes using the popup that appears when you click on this tool.
To the right of this is the Selector Tool that lets you use the cursor to select areas within the Edit window.
To the right again is the Grabber Tool – the one with the ‘hand’ icon. You can use this to move regions around in the Edit window. You can also use the Grabber to automatically separate an edit selection and move it to another location or another track using its Separation Mode.
note
The Grabber Tool also offers a third mode – the Object mode – that you can enter using the popup that appears when you click on the Grabber Tool. This ‘Object Grabber’ lets you select non-contiguous regions on one or more tracks. Just take a look at Fig. 3.11 to see an example of a ‘non-contiguous’ selection of three regions, all on different tracks. By the way, ‘non-contiguous regions’ in this context basically means regions that are not next to each other.
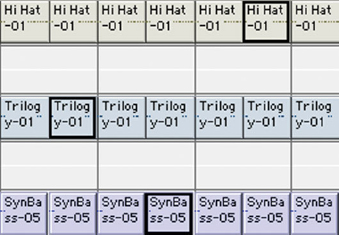
Fig. 3.11 – A Selection of non-contiguous regions in the Edit window.
tip
These three tools (Trimmer, Selector, Grabber) can be combined using the Smart Tool button below these to link them together. Depending on where you point your mouse in the Edit window, one or other of these tools will become active – saving you having to click on these tools individually when you want to change to a different tool.
To the right of the Grabber Tool is the Scrub Tool that lets you ‘scrub’ back and forth over an edit point while you are trying to hear the exact position of a particular sound – rather like moving a tape back and forth across the playback head in conventional tape editing.
The sixth tool is the Pencil that you can use to redraw a waveform to repair a pop or click. Alternate Pencil modes are available that constrain drawing to lines, triangle, square, or random shapes.
Repairing Waveforms using the Pencil Tool
One of the most common repairs that you may want to make is to remove a pop or click from an audio file. Pops and clicks typically look like a sudden sharp spike in the waveform. You can use the Pencil tool to redraw the waveform data to remove any such unwanted spikes.
note
As this form of edit permanently alters the audio file, you should work on a copy of the audio file until you become very skilled with this type of edit. A convenient way to do this is to use the AudioSuite Duplicate plug-in.
Step 1. Locate the click or pop by listening carefully and by looking along the waveform.
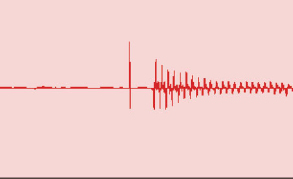
Fig. 3.12 – The sharp spike just before the wanted audio waveform is an unwanted click.
Step 2. The Pencil tool only becomes active when the Edit window is zoomed into sample level, so you need to zoom in when you have located the click or pop. Don’t forget that you can always recall zoom levels using the Zoom Preset buttons or using Memory Locations.
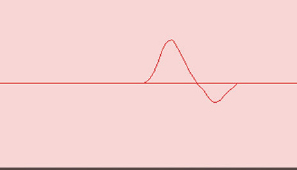
Fig. 3.13 – Zoom in until you can see the click at sample level.
Step 3. Choose the Pencil tool and use this to redraw the waveform to remove the click. It can take a little getting used to, so if you mess up at first, you can use the Undo command to undo the edit and try again.
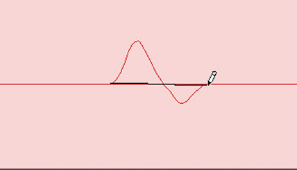
Fig. 3.14 – Redrawing the waveform.
Step 4. Audition the audio region to check that the click has been successfully removed. You may still hear a small disturbance to the sound when you solo the audio, but this should not be audible within a mix.
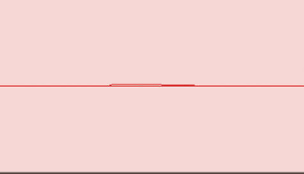
Fig. 3.15 – Waveform with click removed.
Location Indicators
Located centrally at the top of the Edit window you will find the Main and Sub Location Indicators with the Event Edit area to the right of these. The Location Indicators show you where you are in your session in terms of Bars:Beats, Mins:Secs or whatever you have chosen to display here. The Event Edit Area lets you define selections by typing the Start and End points, for example – and also serves to display these.
note
If you select a MIDI note using the Grabber or Pencil Tools, an additional area appears to the right of the Event Edit area to display the selected MIDI note with its associated MIDI On and Off velocities.

Fig. 3.16 – Main and Sub Location Indicators and Event Edit Area with a MIDI note displayed at the right of the display.
Edit window controls and displays
Running underneath the Mode and Zoom buttons, Tool buttons and Location Indicators, there is a further selection of controls and displays. Here you will find popup selectors for the Views and Rulers at the left.
Immediately to the right of these you will find the Linearity Display Mode popup. This lets you choose between Linear Tick (Bars:Beats) Display and a Linear Sample (absolute) Display.
To the right again, five more buttons provide fast access to commonly used features:
The Tab to Transients button lets you automatically locate the cursor to the next transient while editing waveforms.
The Commands Keyboard Focus button enables keyboard command shortcuts.
The Link Timeline and Edit Selection button lets you link or unlink Edit and Timeline selections.
The Link Track and Edit Selection button also does what it says: with this highlighted, when you select a region in the Edit window, the track becomes selected as well. If you then select another track, Pro Tools selects the corresponding region (to the region selected in the first track) in that track – because the Track and Edit selection features are linked.
The button to the right of this lets you enable or disable Mirrored MIDI Editing. Mirrored MIDI Editing is useful when you edit a region containing MIDI notes and you want these edits to apply to every MIDI region of the same name.
To the right of these buttons there are displays for the Grid and Nudge values followed by a display area that tracks the position of the cursor. This area also displays cursor values such as the MIDI note when the cursor is moved vertically within a MIDI track or the Volume level in dB when the cursor is moved vertically within a Master track.
Keyboard Focus
Depending on which Keyboard Focus is enabled, you can use the keys on your computer’s keyboard to select regions in the Region List, enable or disable Groups, or perform an edit or play command.
note
There are three types of Keyboard Focus, but only one of these can be active at a time, so when you engage one Keyboard Focus it will disable the one previously engaged.
tip
You can choose the Keyboard Focus by holding Command-Option (Mac) or Control-Alt (Windows) while you press 1 for the Commands, 2 for the Region List, or 3 for the Group List.
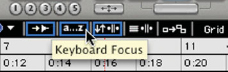
Fig. 3.17 – Commands Keyboard Focus.
Commands Keyboard Focus When the Commands Keyboard Focus is selected, a wide range of single key shortcuts for editing and playback become active on your computer’s keyboard. To see these commands listed, choose ‘Keyboard Shortcuts’ from the Pro Tools Help menu.
tip
When the Commands Keyboard Focus is disabled, you can still use the keyboard shortcuts by pressing the Control key (Mac) or Start key (Windows) at the same time as the shortcut key.
Region List Keyboard Focus When the Keyboard Focus is selected by clicking the a–z button in the Regions List, audio regions, MIDI regions, and Region Groups can be located and selected in the Region List by typing the first few letters of the region’s name.
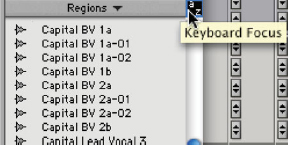
Fig. 3.18 – Enabling the Region List Keyboard Focus.
Group List Keyboard Focus When the Keyboard Focus is selected by clicking the a–z button in the Edit Groups list, you can enable or disable the Mix and Edit Groups by typing the Group ID letter (a, b, c, etc.) on your computer keyboard when using either the Mix or Edit window.
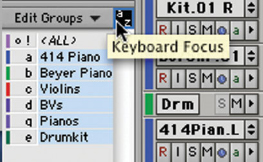
Fig. 3.19 – Enabling the Group List Keyboard Focus.
The Rulers
At the top of the tracks display in the Edit window Pro Tools LE can show ‘ruler’ tracks running above the audio and MIDI tracks.
Timebase Rulers can be set to Bars:Beats, Mins:Secs, or Samples. These determine the format of the Main counter and provide the basis for the Edit window Grid.
![]()
Fig. 3.20 – Timebase Rulers.
If you have DV Toolkit installed, additional timebase rulers become available for Timecode and for Feet + Frames. These can be used in Spot mode to spot audio to picture.
![]()
Fig. 3.21 – Time code and Feet + Frames Rulers.
Ruler tracks are also available to display Meter events, Marker events and Tempo events, and the Tempo ruler can be ‘opened’ to reveal the Tempo Editor.

Fig. 3.22 – ‘Conductor’ Track Rulers for Meter, Markers and Tempo, with the Tempo Editor revealed.
The View menu lets you choose which rulers to have visible in your project, allowing you to have all ‘on’ or ‘off’ or any combination that you like.
Scrolling Options
There are three scrolling options in Pro Tools LE. The first of these, ‘None’, is self-explanatory. ‘After Playback’ leaves the window where it is when you start playback and scrolls the view to the new position after you stop playback. ‘Page’ scrolling moves the view a page at a time as is necessary to keep the playback cursor in view at all times.
Playback Cursor Locator
The Playback Cursor Locator lets you locate the playback cursor when it is off-screen. For example, If scrolling is not active (set to ‘None’), when you stop playing back, the Playback Cursor will be positioned somewhere to the right, off the screen – if it has played past the location currently visible in the Edit window. Also, if you manually scroll the screen way off to the right, perhaps to check something visually, then the Playback Cursor will be positioned somewhere to the left off the screen.
To allow you to quickly navigate to wherever the Playback Cursor is positioned on-screen, you can use the Playback Cursor Locator button.
note
The Playback Cursor Locator button only appears under certain conditions:
It will appear at the right edge of the Main Timebase Ruler after the playback cursor moves to any position after the location visible in the Edit window.
It will appear at the left edge of the Main Timebase Ruler if the playback cursor is located before the location visible in the Edit window.
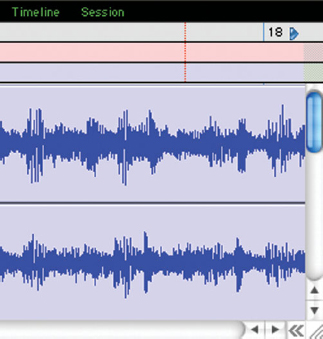
Fig. 3.23 – The Playback Cursor Locator, the small blue arrowhead, can be seen at the top right in the Main Timebase Ruler (which is displaying bar location 18 in this example).
A click on the Playback Cursor Locator immediately moves the Edit window’s waveform display to the Playback Cursor’s current on-screen location – saving you lots of time compared with any other way of finding this location.
note
The Playback Cursor Locator is red when a track is record enabled and blue when no tracks are record enabled.
The Transport Window
In standard view, the Transport window just has a row of buttons providing controls for Online, Return To Zero, Rewind, Stop, Play, Fast Forward, Go to End, and Record.
The View menu lets you show Counters and MIDI Controls as well. The top row of MIDI controls includes buttons for Wait for Note, Metronome Click, Countoff and MIDI Merge. The Main Counter shows your choice of Bars:Beats, Mins:Secs, or Samples. (With DV Toolkit installed it can also display Timecode or Feet + Frames.)
You can also switch the Transport window to its Expanded display. This adds a Sub-counter underneath the main counter, along with Conductor, Meter, and Tempo controls in the MIDI section. A small slider lets you manually adjust the tempo or, alternatively, you can enable the Tempo track by clicking on the ‘conductor’ button.
Underneath the Transport controls, the Expanded window adds Pre- and Post-Roll settings, start, end, and length indicators for Timeline selection, and a Transport Master popup selector.

Fig. 3.24 – Pro Tools LE Transport Window Expanded and showing the Counters and MIDI Controls.
tip
To start and stop playback, simply press the Spacebar on your computer keyboard.
Pro Tools LE Menus
One of the best ways to get familiar with software is to find out what is available in the various menus. Many of the menu items also have equivalent keyboard commands that you can use instead of selecting from the menus. Using the keyboard commands is faster, but until you have memorized these, there is no reason not to select from the menus.
tip
Each time you select a menu item, notice whether there is a keyboard command that will let you do this more quickly. Over time, this will help you to memorize these keyboard commands.
Pro Tools Menu
On the Mac, there is an extra menu at the left of the menu bar. This Pro Tools LE 7.0 menu contains the Quit, Show All and Hide commands and lets you access the standard OSX Services and the Pro Tools Preferences. There is no equivalent menu to this for Windows.
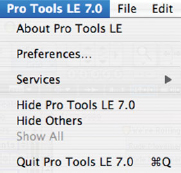
Fig. 3.25 – Pro Tools Menu.
File Menu
The File menu contains the usual ‘New’, ‘Open’, ‘Close’, ‘Save’ and ‘Save As…’ file commands along with a ‘Revert To Saved’ command that lets you close your current session and open the last saved version. A recently added command lets you send your file via Digidesign’s DigiDelivery Internet file transfer service. You can also ‘Bounce’ your audio to Disk or to QuickTime Movie. Lots of file Import options are provided and you can export MIDI files.
Pro Tools 7.0 lets you import a wide range of file types including MP3, REX, ACID and AAC audio, including audio with AAC, MP4, and M4a file extensions.
note
Pro Tools cannot import protected AAC or MP4 files with the M4p file extension. These files are protected under the rules of digital rights management, and cannot be imported.
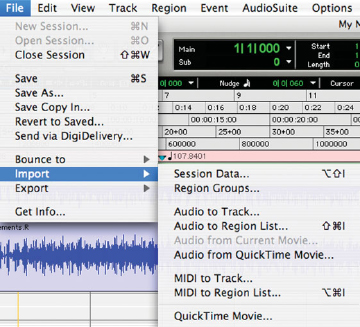
Fig. 3.26 – Pro Tools LE File Menu showing Import options sub-menu.
note
If you have the DigiTranslator or DV Toolkit options installed, you can also export your sessions or selected tracks as OMF/AAF files.
The Import Session Data dialog lets you bring in several useful types of data from any other Pro Tools Session files. You may have a percussion track in one song that you can use again in another song, or perhaps you have a Tempo or Meter map that you want to use again, or a set of Markers/Memory locations.
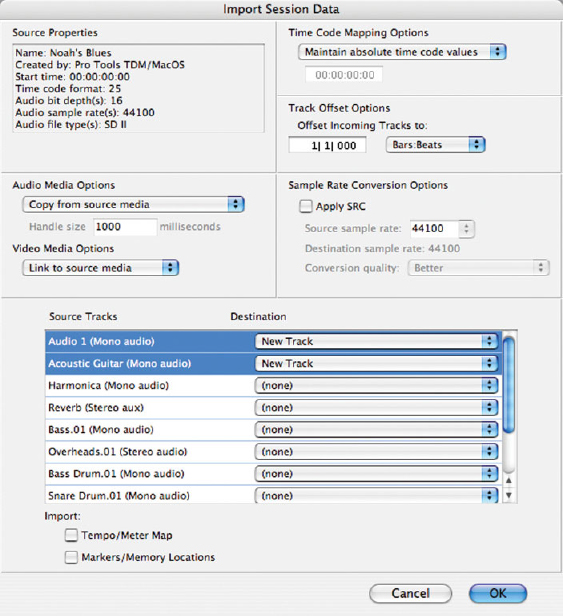
Fig. 3.27 – Import Session Data dialog.
Edit Menu
The Edit menu features a range of Cut and Paste editing commands. Some of the most useful commands, such as Repeat and Shift, Strip Silence or Insert Silence, Trim and Separate region are located here.
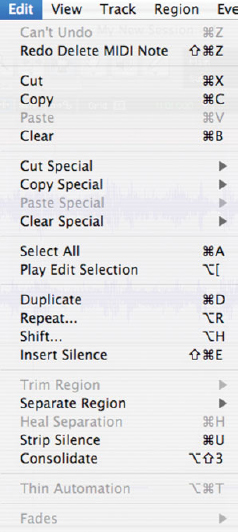
Fig. 3.28 – Pro Tools LE Edit Menu.
View Menu
The View menu lets you customize the displays to suit the way you prefer to work. So, for example, you can make the mixing channels narrow so that more fit across your screen, and you can choose whether to display the Comments, I/O, Inserts and Send views independently in the Mix and Edit windows.
You can choose which Rulers to display in the Edit window and whether the Main Counter will show Bars and Beats, Minutes and Seconds, or Samples (and Time Code or Feet and Frames if DV Toolkit is installed).
Region-related commands let you choose what to display in the regions and for each set of sends you can choose whether to display all five Send assignments or just the parameters for one individual send (A–E or F–J) from the set.
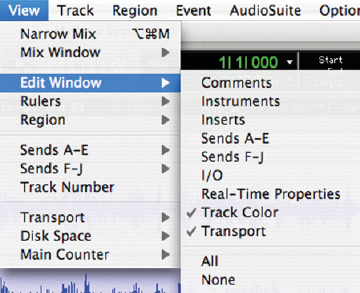
Fig. 3.29 – Pro Tools LE View Menu.
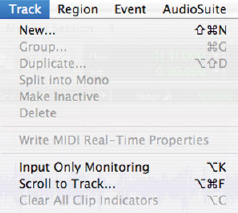
Fig. 3.30 – Pro Tools LE Track Menu.
Track Menu
The Track menu gathers all track-related commands into one place. This is where you can create new tracks, group, duplicate, split, or delete tracks. Other items let you Clear All Clip Indicators, toggle Input Only Monitoring on and off, Scroll to a particular Track, and Write MIDI Real-Time Properties.
One of the most useful of these is ‘Duplicate…’ which opens the Duplicate Tracks dialog box. This lets you choose how many duplicate copies of a track to make and select which properties of the original track will be copied to the duplicates.
Properties include the active Edit playlist currently visible in the original track; the Alternate Playlists (any other hidden Edit playlists from the original track); the automation from the original track; all the Insert and plug-in assignments; all the Sends and send assignments; and the Group Assignments (all the Mix and Edit Group assignments).

Fig. 3.31 – Duplicate Tracks dialog.
Region Menu
The Region menu contains commands that you will frequently apply to selected regions, such as Mute, Lock, Capture, and Quantize to Grid.
If you are working on dance music you will frequently use the ‘Loop…’ command to open the Region Looping dialog that lets you loop MIDI or audio regions.
For example, you might have a 4, 8, or 16-bar region that you want to repeat a certain number of times, or even throughout your song.

Fig. 3.32 – Pro Tools LE Region Menu.

Fig. 3.33 – A 16-bar MIDI Region.
Select the Region and choose ‘Loop…’ from the Region menu. The Region looping dialog will let you repeat the region however many times you like, or you can repeat to fill a specific number of bars or until the end of the Session or next Region.
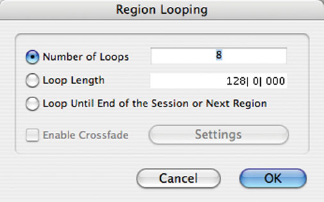
Fig. 3.34 – Region Looping dialog.
In this example I chose to loop (i.e. repeat) the region 8 times to fill 128 bars. Each repeated 16 bars is a copy of the original 16 bars and these are identified as looped regions by a small arrow turning back on itself, located in the bottom right-hand corner of the region, referred to as the Loop Icon.

Fig. 3.35 – 16-bar region looped to fill 128 bars.
If you need to edit the loop, you can use the Unloop command to switch the 128-bar looped region back to the original unlooped 16-bar region, make your edits, then remake the long loop.
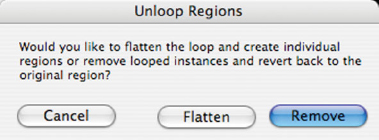
Fig. 3.36 – Unloop Regions dialog.
You also get the option to ‘Flatten’ the loop. In this case the looped regions are changed into normal regions that can each be edited individually without affecting the others – and the Loop icon is removed.

Fig. 3.37 – ‘Flattened’ Loops.
You may be wondering what the difference is between this way of repeating regions and the traditional way using the Edit menu’s Repeat and Duplicate commands. The short answer is that Looping does gives you some extra flexibility – and those of you who have worked with Cubase or Logic may feel more at home with this way of working.
Event Menu
The Event menu gathers together the Time, Tempo, and MIDI operations windows under the first three sub-menus. The Time Operations window lets you define meter, click, and song start options by choosing commands from the popup menu at the top of the window to Change Meter, Insert Time, Cut Time, or Move Song Start. Similarly, the Tempo Operations window lets you define tempo events over a range of time and the MIDI Operations window provides several commands for changing MIDI data over a range of time.
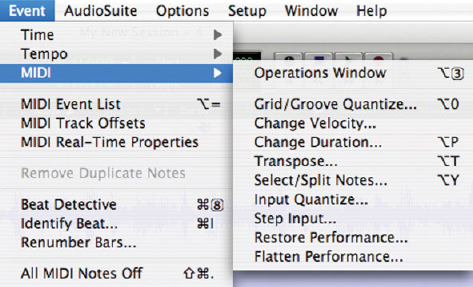
Fig. 3.38 – Pro Tools LE Event Menu.
Other Event menu commands let you open the MIDI Event List and access the Track Offsets and Real-Time Properties windows. You can also access the Identify Beat and Renumber Bars dialogs, and Beat Detective. The last item lets you issue the All MIDI Notes Off command that stops stuck notes from sounding.
AudioSuite Menu
The AudioSuite menu lets you access Digidesign’s standard non-RTAS plug-ins, including D-Verb, various delays, Eqs, and dynamics processors.
When you apply any of these to an audio selection, the audio is processed to produce a new file on disk with the effect applied to it:
1. Select some audio in the Edit window and choose a plug-in from the AudioSuite menu.
2. While you are making your settings you can click on the ‘preview’ button to audition the effect and click the bypass button on and off to A/B the results.
3. When you are happy with the settings, click the ‘process’ button to create a new processed file.
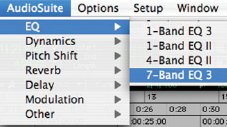
Fig. 3.39 – Pro Tools LE AudioSuite Menu.
tip
If you select ‘Use in Playlist’, the processed file will replace the unprocessed file on the timeline in the Edit window.
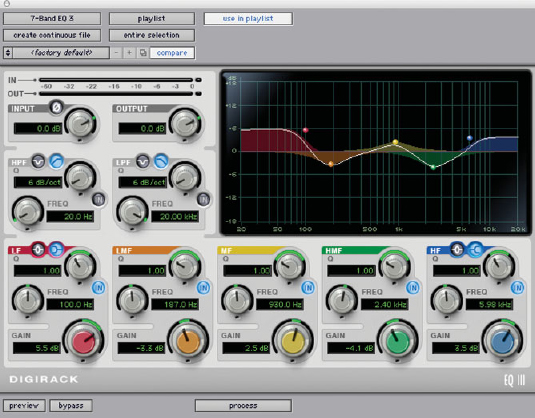
Fig. 3.40 – 7-Band EQ 3 AudioSuite Plug-in.
Options Menu
The Options menu is concerned with operational aspects. So, for example, you can choose the Record mode (Destructive, Loop, or QuickPunch), set the Scrolling options, enable Pre/Post-Roll, Loop Playback, and so forth.
Mirror MIDI Editing deserves a special mention. If you edit a region while this option is enabled, your edits will automatically be applied to any and every other MIDI regions with the same name.
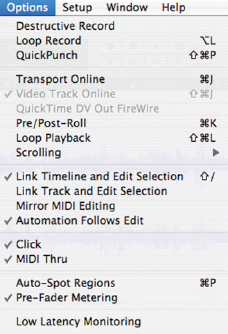
Fig. 3.41 – Pro Tools LE Options Menu.
tip
Take the flattened loops in Fig. 3.37, for example. If you edit a note in any one of these 16-bar regions while Mirror MIDI Editing is enabled, the same edited note will appear in all the others. And if you re-select all these regions after making the edit you can turn these back into looped regions using the Region menu’s Loop command – typing 1 for the number of loops.
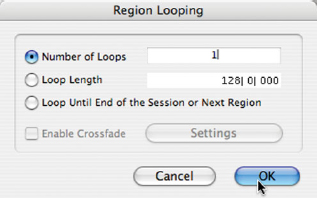
Fig. 3.42 – Re-looping the regions.
Setup Menu
The Setup menu lets you access the Hardware Setup, Playback Engine, Disk Allocation, Peripherals, I/O Setup, and Preferences dialogs.
You can use the Hardware Setup dialog to configure your hardware interface or interfaces then use the Playback Engine dialog to tweak the settings for your computer system.
The Disk Allocation dialog lets you select folders on your disk drives to which individual tracks will be recorded.
The Peripherals dialog has ‘tabs’ along the top that let you select from four pages. The Synchronization and Machine Control settings are located here, along with settings for MIDI Control surfaces such as the Command|8 and Ethernet Control surfaces such as the Control 24.
The I/O Setup lets you configure the inputs and outputs, inserts and buses on your interfaces and rename these to reflect their usage if you wish.
QuickTime Movie Offsets can be set and you can access the Session setup window and various MIDI setup dialogs, the Click and the Preferences dialogs.
If you have DV Toolkit installed, three additional items appear in the Setup menu that you can use with time code when working to picture (See Appendix 2).
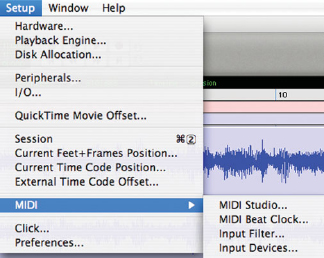
Fig. 3.43 – Pro Tools LE Setup Menu.
Window Menu
The Window menu lets you show or hide the different windows, as necessary. Most of these can be opened using keyboard commands that you will get used to over time as you work with the software.
The Undo History gets a special mention at this point. This is a ‘life-saver’ for anyone learning to use Pro Tools LE – or even expert users who change their minds about an earlier edit for creative reasons. The Undo History window lets you view a list of undoable and redoable operations since you opened the Session. It can even display the time of day that you made each edit, so you can always take your session back to the state it was in at a particular time.
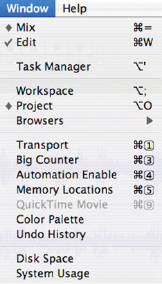
Fig. 3.44 – Pro Tools LE Window Menu.
Help Menu
Finally, there is a Help menu. This contains links to the most often-used documentation in Acrobat format, such as the Reference Guide and the Plug-ins Guide.
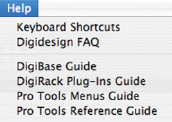
Fig. 3.45 – Pro Tools LE Help Menu.
Browser, browser, browser…
As with any software, when you work with Pro Tools LE regularly you are going to generate a lot of files on your disk drives. To help you keep track of all these and find your way around your disk drives, including any networked drives, Pro Tools LE has three types of so-called DigiBase browsers – the Workspace browser, the Volume browser, and the Project browser. These browsers are essentially databases that can be used for searching, sorting, auditioning and importing audio, MIDI, and session files.
The Workspace browser provides access to all your mounted disk volumes, as well as the folders and files they contain. The Workspace browser lets you work with files similarly to the way you would in the Macintosh Finder – finding, copying and deleting files and creating folders.
If you double-click on a volume in the Workspace browser, a Volume browser opens in a new window. The Volume browser lets you manage the files on your local and any networked volumes, allowing you to conveniently view, audition and import individual items.
note
Volumes are partitions on hard disk drives, network storage devices, or CDROMs. Like the volumes of a book, hard drives can be arranged as one or more volumes or sections. So, just as you might browse through a book volume, you can use Pro Tools LE’s Workspace, Project and Volume Browsers to browse through your disk volumes to see what you have stored there.
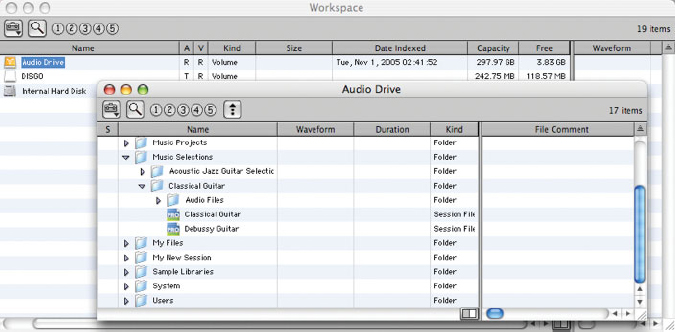
Fig. 3.46 – Workspace Browser with the Audio drive’s Volume Browser open in front of it showing the files and folders on disk.
The Project Browser shows all the files being used in your current session. This is particularly useful when you have a large project with lots of files – some of which may be stored on disk drives other than the drive where your project is stored. You can use this browser to check where the audio files are actually stored on disk, how big they are, what duration they are, when they were created and so forth.
tip
You can audition files in any browser any time you like by simply clicking on the small speaker icon next to the small waveform display.
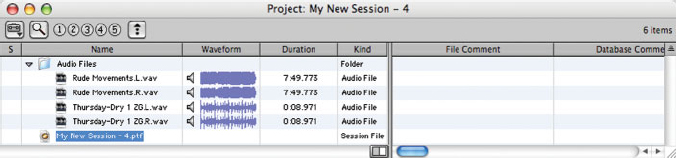
Fig. 3.47 – The Project Browser showing a Session file and its accompanying Audio Files.
You can drag and drop items from these browsers directly onto the Timeline or Regions List of your current Pro Tools session. You can also use these browsers to manage various Pro Tools tasks that can be carried out in the background – or to find missing files.
The Task Window
The Task window lets you view and manage all the tasks that Pro Tools LE frequently has to carry out such as copying and converting files, searching for files, indexing files and creating fades. These tasks occur in the background, and you can continue to record, edit and mix while these are being taken care of ‘behind the scenes’. You can use the Task window to check on progress, pause, or cancel background these tasks as necessary. To open the Task Window, choose Task Manager from the Window menu.
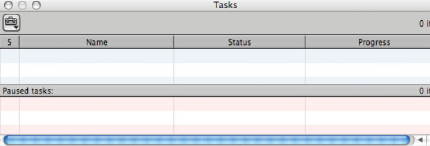
Fig. 3.48 – The Task Window.
The Relink Window
Sometimes, a Pro Tools LE Session file loses track of its associated media files. This can happen if you re-configure your computer and its data storage systems, for example.
When you next open the Session, if it cannot find all the files it expects, you are presented with an option to ‘Manually Find and Relink’ the missing files. If you choose this option, the Relink window will open to let you relink the Session to the media files.
If the Session is already open and you know that there are missing files that need to be relinked you can access the Relink window from the Project window.
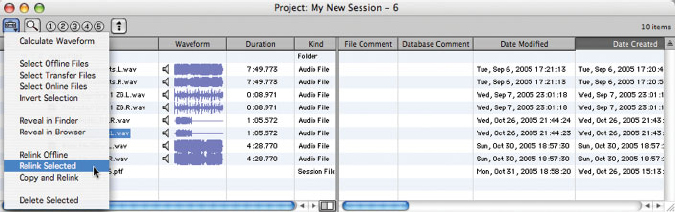
Fig. 3.49 – Project Browser with the local Browser menu open to reveal the Relink Selected command.
Open the Project window from the Window menu, select an audio file that needs relinking, then choose Relink Selected from the Browser menu to open the Relink window.
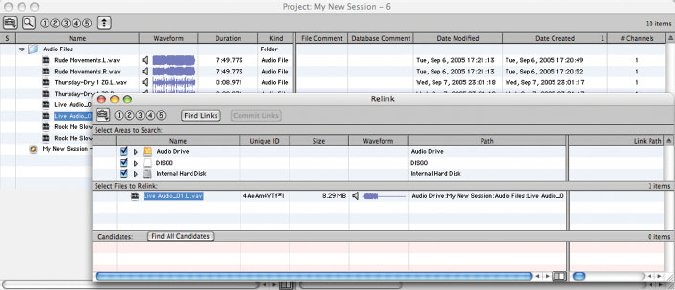
Fig. 3.50 – The Relink Window.
You can pretty much follow the instructions in this window to relink files. Typically, you select the files to relink, press a button to ‘Find All Candidates’ that may be the missing files, wait for Pro Tools to find the files, then approve which of the found files (if any) to relink. A separate DigiBase Guide PDF file is supplied with Pro Tools LE that explains all about the DigiBase browsers.
Drag and Drop Features
Pro Tools lets you drag and drop audio, MIDI, region group, REX, and ACID files from the desktop to the Timeline or Region List. You can also drag and drop a Pro Tools session file to the Timeline to open the Import Session Data dialog.
If you select one or more regions from the Regions List and drag these to the Timeline, Pro Tools will either place them into a single track or each region into its own new track, depending on the Timeline Drop Order that you choose.
At the bottom of the Region List, the Timeline Drop Order submenu offers two choices: ‘Top to Bottom’ and ‘Left to Right’.
When Top to Bottom is enabled, regions spread top to bottom, creating new tracks for each region.
When Left to Right is enabled, regions spread across the single destination (drop) track or a newly created track.
Audio files can also be dragged from any DigiBase browser to a plug-in window to quickly load samples into plug-ins, such as Digidesign Synchronic.
You can also drag and drop MIDI data from a plug-in to the Timeline, Track List, or to the Region List – if the plug-in supports this feature.
What this chapter has covered
You should now have a basic understanding of what the Pro Tools LE software looks like and what it can do in terms of how many tracks it has and so forth.
You should have familiarized yourself with the three main windows (Edit, Mix, and Transport) and with the main features of these windows.
You should know which modes and which tools are available and how to find your way around in the Edit window.
After reading through the menus section you should have a reasonable idea of which menu to go to if you want to change the view or to add a new track or whatever.
You should understand what the browsers are and how to use the drag and drop features.
Don’t expect that you will remember all this stuff straight away, especially if you are new to Pro Tools – or even if you are upgrading from a previous version. It will always depend on how much time you spend working with the software and how motivated you are to get a handle on all this stuff.