Mixing
Overview
Mixing is an art – not a science. There are no rules to this game that cannot – and have not been – broken. Nevertheless, there are various aspects that most mix engineers generally agree on.
The single most important activity is balancing the levels of the individual instruments and voices against one another. I cannot stress how crucial this balancing is. A recording can be completely transformed when you adjust or re-adjust the balance between the instruments – for better or for worse.
If you are mixing a song, the lead vocal is usually going to be the most important element in the mix. Similarly, if it is an instrumental, the featured lead instrument – trumpet, guitar, saxophone or whatever – becomes the most important element. You must make sure that the lead stands out, stays at a consistent and audible level throughout, and sounds great, using a combination of EQ, compression, reverb, delays, and other effects as appropriate. Some engineers like to start by working on the lead vocal or instrument first, before bringing in the rest of the instruments.
In many forms of popular music, the rhythm section is almost as important, and in dance music it is sometimes as important or even more important than the lead. If this is the case, you will probably want to mix the rhythm section first before bringing in the vocals.
Once you have a rough balance with the vocal ‘sitting’ nicely on top of the rhythm section, you might want to add in various other elements: backing vocals, percussion, brass, strings, synthesizers, or other instruments.
You might also want to consider leaving some of the mix elements out in the earlier parts of the song so that the arrangement ‘builds’ in a more interesting way than if you hear everything straight away. You can mute these elements then unmute them where they are needed.
Panning the various instruments to different positions within the stereo space also helps to develop a more interesting mix. For example, it is usual to place the bass drum and bass guitar dead centre in the mix – although this was not the case during the first few years of stereo mixing when the entire rhythm section might be panned hard left with brass and strings panned hard right and the vocals occupying the whole of the central space. Arguments rage between producers as to whether the drum kit should be panned so that the listener hears it as the drummer would or as a member of the audience would. Strings, woodwinds, and brass are often panned as in the standard orchestral layout as heard from the audience with high strings left, low strings right, horns left, brass right, and woodwinds centre. But, again, there are no rules – it is a question of the preference of the producer.
You may want to use three or more reverb units, plus delay units, and harmonizers to help to blend the instruments together and to help to create the illusion that separately overdubbed musicians are all playing together on the recording. You can use harmonizers on backing vocals, on electric piano ‘pads’, on guitar solos – anywhere that you want to add depth to your mix. A little slapback echo always seems to help a vocal to stand out in the mix, and judicious use of different reverb types helps to build a more interesting ‘sound picture’ for your mix.
There was a time when several pairs of hands were needed on the mixing console to carry out a complex series of mix manoeuvres in real time before the advent of mix automation. Automated mixing makes life much easier. By recording the fader movements, you can set up your mix while concentrating on just a couple of faders, then on the next pass, work on a different pair of faders, and so on until you have your mix balanced the way you want it. And it is just as easy to automate the pans and mutes, vary the EQ, shorten or lengthen the reverb decay, or apply changes to other effects during the course of the mix.
Finally, you may want to create a long, smooth fadeout at the end of the song, ideally using a physical fader to control the Master Fader in Pro Tools. You can do this using the mouse onscreen, and you can certainly achieve excellent results by drawing in the automation curve by hand. But nothing beats the feel of a high-quality fader under your finger as you feel out your final fade…
Monitoring
One of the most important things to attend to is your monitoring system – you have to be able to hear what you are doing properly. This means making sure that you are sitting in the ‘sweet spot’ at one of the three corners of an equilateral triangle with the left and right speakers positioned at the other corners facing you, and with the tweeters at about the same height as your ears.
You should make sure that the amplifiers have more than enough power to reproduce sound at the highest listening levels you intend to use without significant distortion and that the speakers have as ‘flat’ a response as possible over as wide a range as possible. So-called ‘nearfield’ monitors (such as the ubiquitous Yamaha NS10’s) that sit on stands, on desktops, or on the mixing console’s meter bridge, will never be full-range speakers – because they have to be relatively small. This means that they will not be able to reproduce the bottom octave properly as their response will roll off significantly below, say, 100 Hz. This is why mastering studios, for example, use large, full-range monitors to make sure that the mastering engineer can hear all the frequencies correctly.
It is always a good idea to listen to your mixes on the kinds of speakers in the kinds of environments that will ultimately be used by your audience. So you might take your mixes out to a club, or play them in your car, or try them on your living room system – you get the idea. And don’t forget to check your mixes in mono – especially if you want them to sound right on radio, TV, or film where mono playback is still sometimes encountered.
Monitoring Levels
There are no standard monitoring levels observed in music recording studios – unlike in film dubbing theatres, where the Society of Motion Picture and Television Engineers (SMPTE) has established a Sound Pressure Level (SPL) of 85 dB as a standard. This is referenced to an electrical signal level of –18 dBFS, which is the standard Operating Level recommended for digital systems by the Audio Engineering Society (AES). I have been at sessions in music studios that use monitoring levels well up into the 90’s of decibels of SPL – or even more than 100 dB. Even relatively short exposure times to such high levels can make your ears ‘sing’ due to temporary threshold shift. Nevertheless, you may wish to check out the sound of some loud instruments that you have recorded at somewhere near to their original sound levels. And instruments such as the trumpet or snare drum can easily reach levels of over 100 dB, so it can be useful to have a monitoring system capable of reproducing such realistic levels.
Many engineers like to mix on small ‘nearfield’ monitors at quite low levels at somewhere between, say 65 and 75 dB SPL. This makes it easier to tell whether the lead vocal or lead instrument can be heard properly at all times and whether other important elements such as the bass guitar and snare drum are at the right levels in relation to the lead. It also means that the mix should sound great when played back on domestic speakers after the record is released to the public. Of course, you can always check how it sounds from time-to-time at much louder volumes or on larger speakers.
Metering
Each Pro Tools track has its own metering running vertically next to the track’s fader. These meters let you see at a glance what the individual signal levels are and what the summed signal levels are at the Master Faders. On audio tracks, the meters show the levels of the signal being recorded or played back from the hard drive. On Auxiliary Inputs, Instrument tracks, and Master Faders, the meters indicate the level of the signal being played through the channel output(s). Signal present is indicated by a green colour that turns to yellow when the level reaches 6 dB or less below full scale. Each meter also has a Clip Indicator at the top that lights up red if clipping occurs.
These meters show levels in dBs relative to the nominal (zero) operating level. So what’s all this about? Let’s look at some of the concepts involved. The meters used in Pro Tools systems are similar to the ‘VU’ or ‘Volume Units’ meters used in analogue audio systems in that they represent an average measure of the signal levels that corresponds reasonably well with the way the human ear perceives the volume of the reproduced audio. They do not reveal the peak levels of the audio signals, which may be 12 or more dBs higher than the average levels. Because these peak levels are typically very short in duration they are often referred to as ‘transients’, meaning that they pass quickly.
note
The nominal Operating Level is the 0 VU level that is used as the standard input and output level for signals entering and leaving the system. This level may be set differently in different audio systems, and is typically set some way below the maximum level that the system can handle.
In practice, signals passing through a system may be lower or higher than the nominal operating level. If signals are much lower than 0VU, these transients may get too close to the background noise floor that exists in most systems – which may mask some elements of the wanted sound. On the other hand, if signals passing through the system get much higher than 0 VU the transients may exceed the maximum allowable level and the sound will become distorted.
To allow for the transients to pass undistorted while using VU style metering, audio systems use the concept of ‘headroom’. In analogue systems, for example, the 0VU level is set such that signal peaks may reach 12 dB (or more) above 0 VU before distortion occurs. And a characteristic of analogue systems such as tape recorders is that the distortion is mild at first, so even higher levels can be used before obnoxious distortion is heard.
In the case of digital systems, including Pro Tools, the Audio Engineering Society (AES) standard is to set the nominal (normal) Operating Level at 18 dB below the ‘0dB Full Scale’ or ‘0dBFS’ level which represents the maximum allowable signal level in the system. If any signals exceed this 0dBFS level they will be ‘clipped’ to this level on input to the system, distorting the signal extremely unpleasantly. Notice that the headroom available in these digital systems is 18 dB, which is much greater than with most analogue systems.
note
The difference between the nominal Operating Level and the level of background noise inherent in the system (often called the ‘noise floor’) is referred to as the ‘signal-to-noise ratio’. Typically, digital systems have a much lower noise floor than analogue systems. As a consequence, you are more likely to hear quiet sounds such as rattles or squeaks from musical instruments or drum kits, or breathing or other sounds made by musicians, that you may not have noticed with analogue recordings where these low-level sounds may have been masked by the general background noise, tape hiss, and so forth.
If you connect your Pro Tools system to any analogue devices, such as mixers, tape recorders, or effects devices, you must make sure that the nominal Operating Level of your Pro Tools system matches the nominal Operating Levels of these devices. In other words, if the meters in Pro Tools read 0 dB the meters in any connected equipment should read 0VU.
To check that connected equipment is lined up correctly, you can insert the Real-Time AudioSuite (RTAS) Signal Generator plug-in into one of the Master Fader Inserts, generate a test ‘tone’ such as a 1 kHz sine wave at 0 dB, and see whether the meters on connected equipment match this.
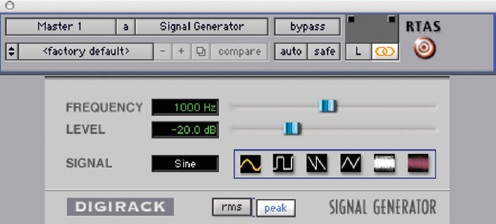
Fig. 10.1 – Using the Signal Generator plug-in to generate a test tone.
Alternatively, you can use the Signal Generator AudioSuite plug-in to generate a 1 kHz sine wave at any suitable level, for example –20 dB. You can either record this ‘tone’ just before you mix onto tape or into a separate digital file that you supply along with your mixes. This can then be used as a reference tone that other equipment can be aligned to in order to establish the correct value for 0VU.
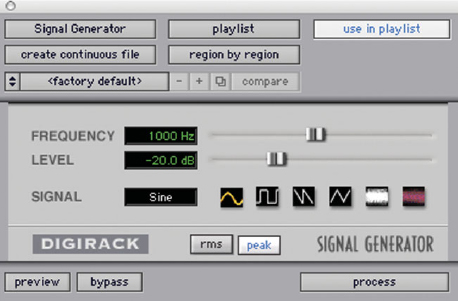
Fig. 10.2 – Using the Signal Generator AudioSuite Plug-in to generate a test tone.
If you are connecting your Pro Tools system digitally to external devices such as mixers, DAT recorders, effects units, and so forth, as long as these use the same digital standards, then signal levels sent from Pro Tools will produce the same meter readings on the destination devices and vice versa.
note
Theoretically, the dynamic range of a 16-bit digital system is 96 dB while that of a 24-bit system is 144 dB. The dynamic range is the range between the minimum and maximum signal levels that the system can handle.
Fat Meters
When you are mixing you may prefer to use the ‘fat’ meters instead of the normal ‘thin’ meters in the Mix (and Edit) windows.
tip
A useful keyboard command lets you easily switch between normal and ‘fat’ meters: hold the Command (Start), Option (Alt) and Control keys and click on any of the meters.
Master Fader Tracks
Although it is possible to create a Pro Tools Session that does not have any Master Faders, that just has audio tracks routed directly to audio interface outputs, it is normal practice to have at least one stereo Master Fader track to control the audio before it is routed to the audio interface’s main stereo outputs. This Master Fader can then be used to fade out the level at the end of a mix pass.
Sessions may have additional Master Fader tracks to control audio feeds to headphone circuits for the musicians, or to control effects send levels to external effects units, or for other similar purposes.
To set up a Master Fader as a stereo master level control:
Step 1. Choose ‘New…’ from the Track menu to open the ‘New Tracks’ dialog and create one new stereo Master Fader.

Fig. 10.3 – Creating a new Master Fader.
Step 2. Set the outputs of all the audio tracks in the session to the main output path (e.g. outputs 1–2 of your primary audio interface) and set the panning for each track.
Step 3. Set the output of the Master Fader to the main output path.
Master Faders allow you to use up to five post-fader inserts. You would typically use these to insert EQ, compressor or limiter plug-ins, or a dither plug-in on your master mix.
Multiple Output Assignments
As an alternative to using multiple Master Faders to output audio to different physical output paths, it is possible to directly assign Pro Tools audio, Auxiliary Input, or Instrument tracks directly to multiple output paths.
Assigning track outputs to multiple paths lets you efficiently route an identical mix to simultaneous monitor feeds, headphone mixes, or wherever this may be needed.
To add an additional output assignment to an existing track output assignment, Control-click (Mac) or Start-click (Windows) as you select the additional output path in the track’s Output Path selector. A plus sign (+) is added to the name of the assigned output to indicate that the track has multiple output assignments.

Fig. 10.4 – Master Fader with 4-Band EQ, compressor, limiter, POWr dither, and Signal Generator Inserts.

Fig. 10.5 – Multiple track output assignment indicated by the plus (+) sign.
If you hold the Option key (Mac) or Alt key (Windows) as well, the additional output assignment will be added to all tracks. And if you also hold the Shift key, the additional output assignment will be added to all selected tracks.
Making Tracks Inactive
When you start mixing your tracks in Pro Tools, you need to ‘husband’ your DSP resources very carefully with all but the simplest of sessions. For example, if the session includes one or more tracks that may not be included in the mix, it is best to make these tracks inactive until and unless you decide to use them.
It is possible to set Track outputs to ‘No Output’, but this does not free the associated DSP resources. Inactive outputs do not consume resources for mixer connections, but any assigned plug-ins on the track continue to use their required DSP resources. You can, of course, free up the DSP used by the plug-ins by making the plug-ins inactive.
A simpler way to deal with the situation is to make the whole track inactive – which frees up the DSP used for both mixing and for the plug-ins. Each track has an icon to identify the track type located just below the track meter. This icon also serves as a popup selector that you can use to make the track inactive (and vice versa). Inactive tracks are ‘greyed out’ so that you can see at a glance that they are inactive.
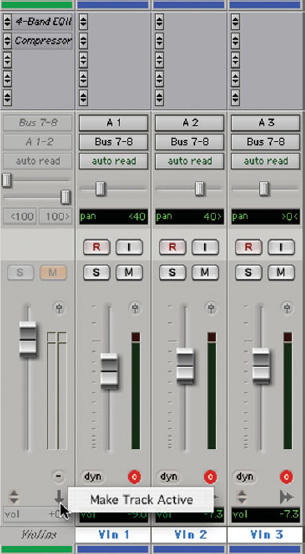
Fig. 10.6 – Make an inactive track active (or vice versa) by selecting from the popup selector underneath the track meters.
In the example shown in the accompanying screenshot, with three violin tracks submixed into an Auxiliary track, it would also make sense to make the individual violin tracks inactive as well as the Auxiliary track if the violins are not going to be used in the mix.
Grouping Tracks
At the start of your mixing session, if you have not already done so, it makes sense to group particular sets of tracks together. For example, you might have a set of several drum tracks, or a set of brass instruments or strings, or maybe a set of three or four guitar parts. When you have decided on the relative balances between the individual members of these sets you will almost certainly want to adjust the overall balances of these sets of instruments within your mix.
Grouping the members of the sets together lets you move one fader from the group and have the other group members follow exactly. And if you need to make selections and use cut and paste or make other edits, these will apply to all members of the grouped set of instruments. For example, if you press the Solo or Mute buttons for any member of the Group, the whole Group will become soloed or muted.
To create a Group:
Step 1. Select the tracks of interest, Shift-clicking to add to your selection without losing your previous selection.
Step 2. Choose ‘Group…’ from the Track menu or Press Command-G (Mac) or Control-G (Windows) to open the New Group dialog.
Step 3. Name the group, select a Group ID, and choose whether to apply the group to both Edit and Mix windows or just one of these.
Step 4. Click OK to create the new group.
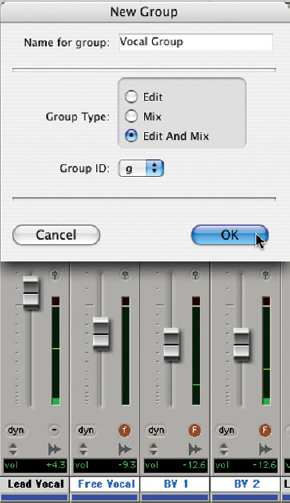
Fig. 10.7 – Grouping Tracks.
Pro Tools has 26 memory locations that can be used to store Groups, each of which is identified by a letter of the alphabet. You can turn Groups on or off simply by pressing the appropriate letter on your computer keyboard: with the Keyboard Focus feature enabled, simply type the Group ID letter (any of the lowercase keys, a–z) on your computer’s keyboard. The Keyboard Focus is always enabled in the Mix window, but in the Edit window it is disabled by default, so you need to specifically enable the Key Focus if you want to use this feature. To enable the Edit Groups List Keyboard Focus you just click on the small ‘a–z’ button in the upper right corner of the Edit Groups List.
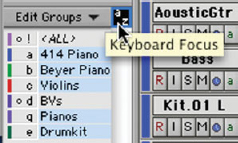
Fig. 10.8 – Edit Groups List just after clicking on the ‘a–z’ button to enable the Keyboard Focus.
tip
If you need to adjust one fader within a Group, simply hold the Control key (Mac) or Start key (Windows) on your computer keyboard and you can tweak this on its own. When you let go of the key, you have the Group back in operation again.
Track Output Windows
Pro Tools provides dedicated Output windows for track outputs. To open a track Output window you simply click the Output Window button which you will find a little way above the track meter to the right of the fader on each channel strip. The track Output window provides an alternative, clearer display for setting the various track output parameters: the level faders and rotary pan controls, mute, solo, and Automation mode buttons.
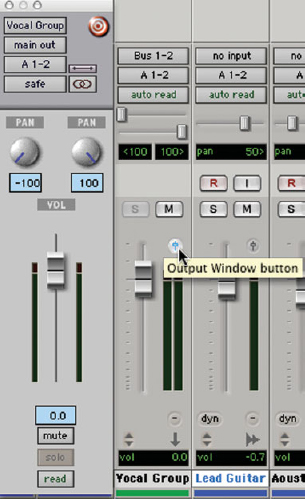
Fig. 10.9 – Here you see the Vocal Group track’s Track Output Window at the left with the Mix window visible to the right of this. The cursor is about to click on the Output Window button (which will close/open the Track Output Window).
Track Output windows have a red ‘target’ button that you can use to keep the window open while you open other output windows. Click on this and it will turn from red to grey – and this window will stay open when you open another window. To keep each new window open you need to click in its target button as well. Having lots of these Track Output windows open uses up a lot of screen space, but can be useful at times.
Using Auxiliary Tracks
Although Auxiliary tracks cannot playback audio from disk, they can be used for a variety of useful purposes in Pro Tools. The most basic use is, perhaps, to feed inputs from external sources such as synthesizers or effects units connected to your hardware interface into your mix.
A more typical use for Auxiliary tracks is to accept output signals via internal busses from a group of tracks to form a submix that you can control using one fader. You can then apply effects and processing to this submix using just the one set of Inserts on the Auxiliary track instead of applying these individually to each track within the group. So, for example, you might submix the drums, the vocals, or any other logical groupings of instruments.
Pro Tools lets you insert up to five inserts on each Auxiliary Input track. Each insert can be either a software plug-in or can be an external hardware device hooked up to the insert via your Pro Tools hardware interface. Some Instrument plug-ins (such as Virus Indigo) also accept audio from the track input, so you can also use these as signal processing plug-ins. Both plug-ins and hardware inserts route the signal from the track through the effect and automatically return it to the same track.
To create a submix using an Auxiliary track:
Step 1. Create a new stereo Auxiliary track.
Step 2. Select an available bus pair as the input to this Auxiliary track.
Step 3. Route the outputs of the audio tracks that you want to submix to this same bus pair so that they form the input to the Auxiliary track.
Step 4. Balance the levels and set the pans to create the submix.
Step 5. Insert and apply plug-in or external hardware effects to the Auxiliary track as desired.

Fig. 10.10 – Violins submixed to an Auxiliary track via bus paths 7 and 8 with EQ and compression plug-ins applied to the submix via the Auxiliary track’s inserts.
In this arrangement, the balance between the processed and unprocessed signals is controlled by the plug-in’s (or by the external hardware’s) wet/dry controls. The contributing track faders control the balance within the submix while the Auxiliary Input track fader controls the output levels of all the tracks routed to it.
tip
You can always bounce a submix to disk to free up the voices from the contributing tracks for use by other tracks.
note
Using track outputs to assign tracks to bus paths to feed an Auxiliary track is the preferred submixing configuration when you want to use dither or other mastering processing, in which case you do not want unprocessed audio to be heard at the same time as the processed signals. If you used Sends to route signals to the Auxiliary track instead of using the track outputs to route signals to the Auxiliary track, the unprocessed audio would still be routed via the track outputs to the main stereo mix outputs so you would hear this as well as the processed audio from the Auxiliary track.
Using Sends
Another way to route signals in the Pro Tools mixer is by using the Sends. As their name implies, these let you send signals from a track to a destination of your choice. Sends are to be found on most professional mixers and the way they are implemented in Pro Tools is particularly flexible.
You can insert up to 10 sends (labeled A–E and F–J) on each audio track, Auxiliary Input, or Instrument track. These can be set as pre- or post-fader and the send levels, mute status (and send pan status with stereo sends) are fully automatable.
Sends are displayed in the Mix and Edit windows according to the options you select in the View menu for Sends A–E and Sends F–J. If you are using five or fewer sends, you only need to display and use Sends A–E. If you need more than five Send Assignments, then you can use Sends F–J as well. You can choose to display all five Assignments in each group to give you an overview, or you can display the level, pan, mute and pre/post-fade buttons and send level meter for any of the individual sends to see more detail.
The default view shows the five Assignments. You can select individual Send Views from the View menu or you can Command-click (Mac) or Control-click (Windows) on the Send Selector to switch the display (on all tracks) to show the details of that individual Send.
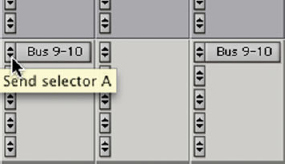
Fig. 10.11 – Default Assignments View in the Sends section of the Mix window showing Send A assigned to bus pair 9–10.
Individual Send Views (such as Send A) display all the controls of an individual send in the sends area of both the Mix and Edit windows, providing full access to all controls for that send on all tracks.
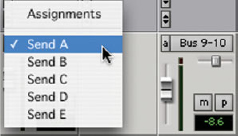
Fig. 10.12 – Individual Send A displayed in the Sends section of the Mix window.
tip
If you want to switch the display back to showing the Assignments view when you are displaying sends in an individual Send View (such as the Send A View), just Command-click (Mac) or Control-click (Windows) on the Send selector and select ‘Assignments’ from the popup that appears.
The Send level and mute controls can be set to follow Mix groups, allowing you to adjust multiple send controls from a single set of controls. To set this up, you need to open the Automation Preferences window and tick the options for ‘Send Mutes Follow Groups’ and ‘Send Levels Follow Groups’. With these options selected, if you adjust the Send Level or change the Mute status on any track within a group, the Send Level and Mute status for all tracks within that group will follow these changes.
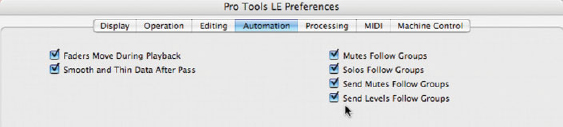
Fig. 10.13 – Selecting ‘Send Mutes Follow Groups’ and ‘Send Levels Follow Groups’ in the Automation Preferences window.
You can also open individual Output windows for each send. These are similar to the track Output windows. These output windows present all the Send controls in a convenient strip so that you can set the send level, pan, and mute controls, solo the track or change the track automation status, ‘safe’ the send to prevent it from being accidentally automated, and select its pre/post-fader status.
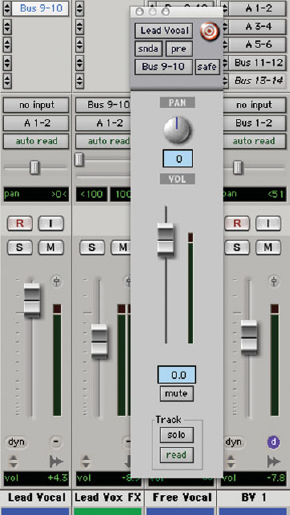
Fig. 10.14 – Pro Tools Mixer showing Sends A–E in Assignments View with the Output window open for the Lead Vocal Send.
Sends can be assigned to any available output or bus paths in mono or stereo by clicking on and holding the Audio Output Path selector.
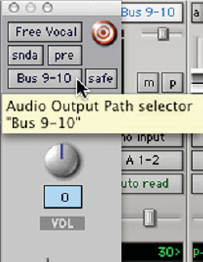
Fig. 10.15 – Audio Output Path selector.
The popup Audio Output Path selector then lets you assign the Send to any of the outputs on your hardware interface or to any of the internal bus paths.
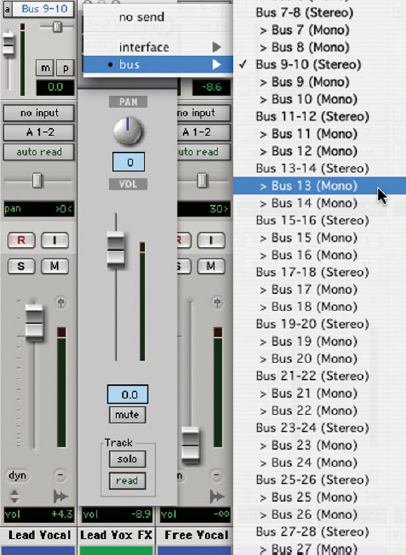
Fig. 10.16 – Assigning a send to a mono bus path.
Why not label your buses using the I/O Setup window? If you know you will always be using a particular bus pair as inputs to an Aux channel with a reverb inserted across it, you can label this ‘Reverb’ or some other suitably descriptive name. This will make it easy to select the correct bus when you are routing tracks to this reverb.
Automating Sends
To enable you to control the levels and placement of effects with the greatest precision during your mix sessions, Pro Tools lets you automate the level, mute, and pan settings for the sends.
Step 1. Check that the send level and/or send mute and/or send pan is enabled in the Automation Enable window.
Step 2. Make sure that the Automation mode for each track with sends that you want to automate is set to Write for your first automation pass.
Step 3. Make sure that the sends are currently visible on your tracks using the View menu to select Sends A–E (and Sends F–J if you are using these).
Step 4. Open the Output window for the send you want to automate by clicking on the send, or display the individual view for the send in the Mix or Edit window.
Step 5. Play the session and move the controls you want to automate.
Step 6. Click Stop when you have finished.
Returns
If you send signals from a track to some destination, you will usually want to return the signals to your mix from that destination. You can return signals routed using Sends back via Auxiliary Inputs or Instrument tracks (or Audio tracks) into your mix.
note
Signals routed via Sends are usually monitored and processed using an Auxiliary Input or Instrument track because you will lose one of your available ‘voices’ if you use an Audio track for this purpose.
If the Sends are routed to an audio track, the audio being sent can be recorded onto that audio track. However, any audio signals being routed via busses can always be bounced to disk by choosing these busses as the bounce source in the ‘Bounce To Disk’ dialog. So, if you want to record the audio returning from these Sends to your hard disk so that you can use the newly created audio files elsewhere in your session, or even in another project, it is more efficient to use the Bounce To Disk feature instead.
Send and Return Submixing for Effects Processing
The most typical use of Send and Return submixing via the internal busses is to let you add reverb, delay, or other similar effects to a group of tracks (or perhaps even to all of the tracks).
Send and Return bussing lets you use a real-time plug-in or a hardware insert as a shared resource for all the tracks included in the submix.
In the example shown, the Lead Vocal and Free Vocal tracks are routed to the Lead Vox FX Auxiliary track via Send A along bus pair 9–10. The audio sent to the Auxiliary track is then processed using the Slap Delay and D-Verb plug-ins.
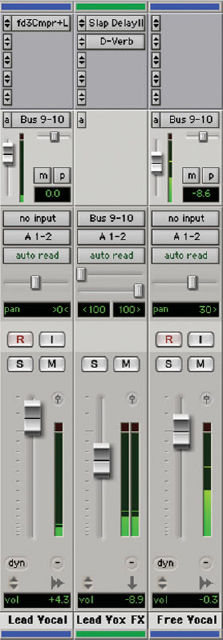
Fig. 10.17 – Lead Vocal and Free Vocal tracks routed to the Lead Vox FX Auxiliary track via Send A along bus pair 9–10 for processing using Slap Delay and D-Verb plug-ins.
In this configuration, the wet/dry balance in the mix is controlled using the Lead Vocal and Free Vocal track faders to set the dry level and using the Lead Vox FX Auxiliary Input fader to set the wet (effect return) level. Note that the plug-in (or hardware) effect is normally set to 100% wet in this configuration.
When the Send is set to pre-fader (the default), the amount of effect is controlled both by the level of the Send Level fader and by the level of the Return fader – which, in this case, is the Auxiliary Input’s main volume fader.
If the Send is set to post-fader, the audio track’s main fader controls how much audio reaches the Send before the audio is routed via the Send Level fader along the bus to the Auxiliary track. As with pre-fade Sends, the amount of effect that you hear is also controlled by the level of the Return fader (the Auxiliary Input’s main volume fader).
Often you will want to solo tracks when setting up your Auxiliary channels with effects to process these tracks. It can be inconvenient to have to remember to solo the Auxiliary track as well as the individual track or tracks that are being bussed to that Aux channel. A ‘solo safe’ feature lets you ‘warn’ the Aux channel to switch into solo as soon as any of the tracks being bussed to this are switched into solo. To enable this solo safe mode, simply Command-click (Mac) or Control-click (Windows) on the Solo button on the Auxiliary channel and this will turn a darker shade of grey. Now when you solo any track being bussed to this, you will hear the output of the Aux channel as well – without having to click on its solo button. I usually leave my Aux channels in this mode throughout my mixing sessions.
Automation
You can automate virtually every function in Pro Tools. Just choose an automation write mode from the popup and play the track. When you move any faders or other controls, your ‘moves’ will be recorded. It is as simple as that.
Specifically, Pro Tools lets you automate volume, pan, and mute controls for audio, Auxiliary Input, and Instrument tracks, along with Sends and realtime plug-in controls. Master Fader tracks only support volume and plug-in automation. MIDI and Instrument tracks support MIDI volume, pan, and mute automation.
When you stop playback, you can view and edit these automation ‘moves’ graphically in the Edit window. It is very easy to make or edit your automation ‘moves’ in the Edit window by setting control points or ‘breakpoints’ manually on the automation line using the Grabber tool – positioning these to achieve the effects you want. And you can make the changes extremely accurately if you zoom in far enough.
When you first create a track it defaults to Auto Read mode and puts a single automation breakpoint at the beginning of each automation playlist display. You can move a fader (or any other automation control) and the initial breakpoint will move to this new value and stay there until you move the fader again.
tip
If you want to permanently store the initial position of the fader or other control you can manually place a second breakpoint after the initial breakpoint at the value you want. Alternatively, you can simply put the track in Auto Write mode and press Play – then press Stop a short time later. If you look at the automation playlist display you will see that this action has inserted a second breakpoint at the time you pressed Stop. Now, if you inadvertently move the control later, it will always return to this value when in Auto Read mode.
The way Pro Tools handles mutes and plug-in bypasses is very neat. Hold the Mute or Bypass button while in any automation writing mode and the Mute or Bypass will be enabled for as long as you hold this down. If you want to clear any of these, just do another automation pass and hold the button again where you want to clear it. To make this even easier, the Mute button, for example, will become highlighted whenever you are passing though a muted section so when you see this you will know where your muted sections are.
The best way to fully understand how the automation works is to write some and look at the automation playlist display to see what breakpoints have been inserted. How do you do this? It’s easy. In the Edit window, use the popup Track View selector in the middle of the controls at the left of each track to switch from the waveform display to display the automation type you are interested in – volume, pan, or whatever. Here you will see a line with breakpoints where you have written automation. The first thing you will probably want to do is to delete any breakpoints that are obviously in the wrong positions. You can drag the breakpoints to new positions, but if the new position is not close by, it is quicker to delete one breakpoint and insert a new one using the Grabber tool. This turns the cursor into a pointing finger when you are in one of these displays. Click on the automation graph line and a new breakpoint will be inserted. To remove a breakpoint you can Option-click (Mac) or Alt-click (Windows) on it.
tip
If you want to remove several breakpoints it is quicker to change to the Selector tool and drag across the range of breakpoints you want to remove from the graph line to select these – then hit the Delete or Backspace key.
Creating Automation
Let’s run through the basic steps to create automation in real time.
Step 1. First you need to make sure that the automation type that you want to record – volume, pan, mute, plug-in automation, send volume, send pan, or send mute – is enabled. Open the Automation Enable window where you will see buttons for each of these. When they are highlighted, the automation type is enabled.
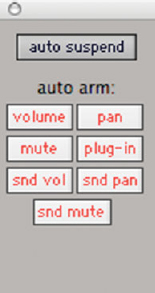
Fig. 10.18 – Automation Enable window.
note
To suspend writing of all automation on all tracks, click the Auto Suspend button. To suspend writing of a specific type of automation on all tracks, click the button for that automation type.
Step 2. If you want to automate a plug-in, you will also need to enable the individual plug-in parameters that you want to automate. Open the plug-in window and you will see a button marked Auto.
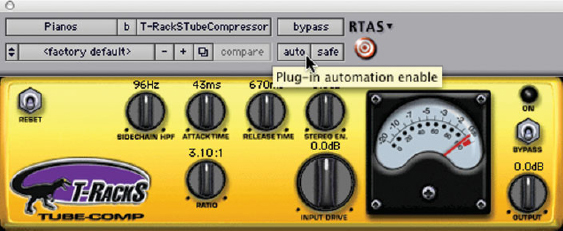
Fig. 10.19 – A DigiRack plug-in window showing cursor about to click on the Auto button.
Step 3. Click on the plug-in’s Auto button to bring up a dialog box where you can choose from the list of automatable parameters for that plug-in.
Step 4. Select a parameter such as Bypass on the left and click ‘Add’ to add it to the list of parameters to be automated on the right.
Step 5. OK the dialog to make your chosen parameters active.

Fig. 10.20 – Plug-in Automation window.
As an alternative to using the Plug-In Automation window, you can enable individual plug-in controls directly from the plug-in’s window by Command-Option-Control-clicking (Mac) or Control-Alt-Start-clicking (Windows) on the control. There is also a shortcut to enable all parameters for a single plug-in in one step. First make sure that the plug-in window is open for the plug-in you want to automate. Then Command-Option-Control-click (Mac) or Control-Alt-Start-click (Windows) on the Auto button at the top of the plug-in window.
Step 6. The next step is to put the appropriate tracks in an automation writing mode – choosing Auto Write, Touch, or Latch mode.
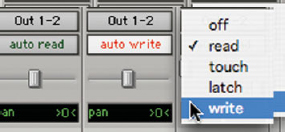
Fig. 10.21 – Selecting an Automation mode.
note
An Automation Safe button is provided in the plug-ins, Track Output and Send Output windows. You can enable this if you want to protect any existing automation data from being overwritten – a wise move to make once you are happy with the way your automation is working.
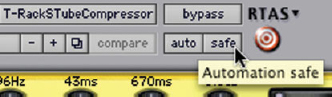
Fig. 10.22 – The Automation Safe button.
Step 7. Once you have everything set up correctly, just hit Play and move your controls as you like – then hit Stop. When you next play back, Pro Tools remembers all the moves you have made on enabled controls. It’s as simple as that.
Step 8. Normally you will choose Auto Write mode for your first pass and use Auto Touch or Auto Latch modes to make further adjustments. Start playing back from wherever you like and simply move the control where you want to make your changes. New data will only be written when you actually move the control – the original data will not be altered anywhere else.
To edit automation once it has been recorded, you can rewrite new data over the previous data, or edit the automation graphically or using the cut, copy, paste, or delete automation data commands.
Automation Write Modes
Auto Write does what it says – it lets you write automation data when you move any control until you stop playback – erasing any previous data up to this point.
Auto Write mode automatically switches to Auto Touch mode when you stop, ready for a second pass to fine-tune your automation pass. In Auto Touch mode, automation is only written when you actually operate any of the controls – and the control will return to its previously automated position when you let go, at a rate that you can set using the AutoMatch Time and Touch Timeout settings in the Automation Preferences window.
note
The Automation Preferences window also has an ‘After Write Pass, Switch To’ preference that lets you choose which Automation mode Pro Tools will automatically switch to after an automation pass in Write mode. This lets you choose to switch to Touch or Latch mode, or to stay in Write mode by selecting No Change.
In Touch mode, touch-sensitive fader control surfaces such as the Digi 002, Command | 8, or the Mackie HUI start writing automation as soon as you touch them. With other control surfaces in Touch mode, writing of automation does not begin until the fader hits the pass-through point, or the previously automated position. Once you reach the pass-through point with the fader, or with a non-touch-sensitive rotary control, writing of automation begins and continues until you stop moving the fader.
Auto Latch mode works pretty much the same way, the difference being that the control doesn’t return to its previously automated position when you let go of the control – it stays where you left it until you hit Stop. (However, at this point where you hit Stop, the automation value will change instantly to the previous value.) Latch mode is particularly useful for automating pan controls and plug-ins on non-touch sensitive rotary controls, since it does not time out and revert to its previous position when you release a control. If you complete your automation pass right to the end of the track, the control will stay wherever you last positioned it until the end of the track.
You can write automation on more than one track at a time by selecting an Automation write mode for each track that you want to automate.
tip
If you are writing automation in Touch mode with Loop Playback enabled, automation will automatically stop being written when you reach the end of the looped selection. At the beginning of each subsequent loop pass you need to touch or move the control again to start writing new data.
Automation Playlists
Every Pro Tools track contains a separate automation playlist for each automatable control. You can choose which one of these to display in the Edit window by clicking on the Track View selector.
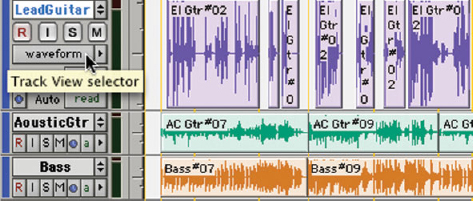
Fig. 10.23 – Clicking on the Track View selector.
This lets you choose between the Waveform or Blocks, Volume, Pan automation or Mute automation, Send automation parameters, or Plug-in automation parameters if you have any sends or plug-ins in use.
note
Bear in mind that you won’t see any plug-in automation parameters listed here unless you have also enabled these parameters for automation in the plug-in itself.
On Auxiliary Input and Instrument tracks the parameters include Volume, Mute, and Pan.
MIDI tracks work slightly differently and only offer automation for MIDI Volume, MIDI Pan, and Mute. Also, on MIDI and Instrument tracks you can display and edit other continuous MIDI controller data such as mod wheel, breath controller, foot controller, or sustain.

Fig. 10.24 – Choosing a display mode using the Track View selector popup.
There will be occasions during your mixing sessions when you will want to suspend the automation so that you can hear what is going on more clearly and make new decisions about the mix. You can suspend automation for the whole Session using the Auto Suspend button in the Automation Enable window, but, more often, you will want to suspend automation for specific controls. To do this, set the Track View selector in the Edit window to show the automation playlist for the control you want to suspend then Command-click (Mac) or Control-click (Windows) the control name in the Track View selector. To indicate that the control is suspended, its control name becomes italicized.
tip
To suspend automation for all controls, Command-Shift-click (Mac) or Control-Shift-click (Windows) the name of any control in the Track View selector. To suspend automation for a specific control on all tracks, Command-Option-click (Mac) or Control-Alt-click (Windows) the name of the control in the Track View selector.
note
Enabling and suspending any automation (other than Pan automation) from the Edit window affects all members of any applicable Edit Groups. You can override this group behaviour so that you only affect the track you are working with by Control-clicking (Mac) or Start-clicking (Windows) the control name.
Editing Automation Data
The Edit menu has four special commands (Cut Special, Copy Special, Paste Special, and Clear Special) that you can use to move or clear different types of automation data and MIDI controller data between tracks, sends, and plug-ins.
Using these commands you can just edit the automation and MIDI controller data without affecting any associated audio or MIDI notes. You can also edit automation and MIDI controller data without having to change Track Views, and the Paste Special command lets you copy one data type to another (e.g. Left Pan data into the Right Pan playlist).
The Cut Special and Copy Special commands let you cut or copy just the automation data from the current selection (without associated audio or MIDI notes) and place it in memory to paste elsewhere. Sub-menus let you choose between All Automation (which affects all automation or MIDI controller data whether shown or not), Pan Automation (which affects only pan automation or MIDI pan data whether shown or not), or Plug-In Automation (which affects only the plug-in automation that is currently being displayed).
When you have automation data in the computer’s clipboard memory, the Paste Special commands become active. There are three choices in the sub-menu that let you paste the automation data into another region without affecting any associated audio or MIDI notes:
‘Repeat to Fill Selection’ pastes the automation data repeatedly until it fills the entire selection range, which is very useful for creating repeated drum patterns, for example.
tip
Another situation where ‘Repeat to Fill Selection’ neatly solves a problem is when you have used the Region menu’s Loop command to create repeated aliases of a region selection. The problem here is that the repeated regions do not include any automation that applied to the source region. To quickly sort this out, select the original automation in the source track and use the Edit menu’s Copy Special command to copy the automation you are interested in (All, Pan, or Plug-in). Then use the Selector tool to highlight the loop aliases (or any other regions) that you want to apply this automation data to and use the ‘Repeat to Fill Selection’ command to paste the automation data to all the loop aliases.
‘Merge’ lets you add the pasted data to any existing automation data of the same type in the destination selection. You might use this, for example, if you like the pitch bend on a particular synth and want to use this on another synth.
‘To Current Automation Type’ pastes the automation data or MIDI controller data from the clipboard to the selection and, as necessary, changes the data to match the current automation or MIDI controller type. So, for example, you could copy Left Pan data into the Right Pan playlist. What you cannot do is to paste MIDI controller data to automation data or vice versa.
The Clear Special commands let you clear just the automation data from the current region – leaving any audio or MIDI note data untouched. Again, a sub-menu lets you choose between clearing All Automation or MIDI controller data (whether shown or not), only Pan Automation or MIDI pan (whether shown or not), or only the Plug-in Automation that is currently being displayed.

Fig. 10.25 – Using the Clear Special command to remove all the automation from the selected automation playlists.
Thinning Automation
When you create automation data in real time, Pro Tools creates many more breakpoints than you actually need. If the automation curve is relatively smooth, just a few breakpoints will suffice to represent your automation moves with a great deal of accuracy. Each breakpoint uses up some of the available random access memory (RAM) and CPU time and a point can be reached on a busy session where this impacts badly on the efficiency of your system.
To alleviate this situation, Pro Tools provides two different ways to thin automation data and remove unnecessary breakpoints: the ‘Smooth and Thin Data After Pass’ option and the Thin Automation command.
When the ‘Smooth and Thin Data After Pass’ option is selected in the Automation Preferences page, Pro Tools automatically thins the automation breakpoint data after each automation pass. You can also choose the amount of thinning that will be applied. The default setting of ‘Some’ works well in most situations, but you may still find it necessary to use the Thin command to remove even more breakpoints.
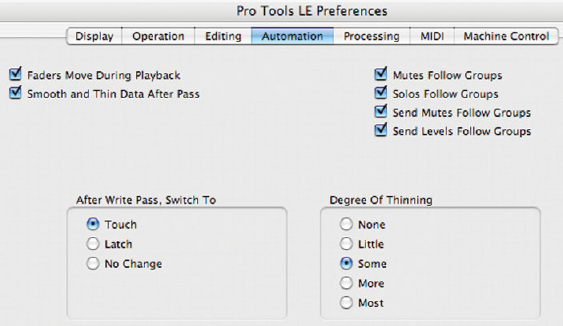
Fig. 10.26 – Automation Preferences with the ‘Smooth and Thin Data After Pass’ option selected and the ‘Degree of Thinning’ set to ‘Some’.
The Edit menu’s Thin Automation command lets you selectively thin areas in a track where the automation data is too dense. When you use the Thin Automation command, the degree of thinning that is currently selected in the Automation Preferences page is applied to the data, so you may need to change this. As with any trial and error process in Pro Tools, you can always use the Undo command if the thinning that you apply does not sound good when you audition the results.
To use the Thin Automation command:
Step 1. Click the Track View selector in the Edit window to display the automation type you want to thin.
Step 2. Choose the Selector tool and highlight just the automation data you want to thin, or use the Select All command to select all the data.
Step 3. Choose the Thin command from the Edit menu to thin the selected automation.
Creating Automation using the mouse
The simplest and most accurate way to create automation using the mouse is with the Grabber tool. When this tool is selected and you move the mouse over any displayed automation type in the Edit window, the cursor turns into a pointing finger. When you click on the automation line this inserts a breakpoint.
To remove a breakpoint you can Option-click (Mac) or Alt-click (Windows) on the breakpoint. If you want to remove several breakpoints it is quicker to change to the Selector tool and drag across the range of breakpoints you want to remove from the graph line to select these – then hit the Delete or Backspace key.
tip
To move all the automation breakpoints in the track up or down while preserving their relative levels, choose the Trimmer tool then drag this up or down in the automation playlist at any point after the last automation breakpoint. To move the automation breakpoints in a particular section of a track up or down while preserving their relative levels, choose the Selector tool first and drag the mouse to highlight the range of interest. Then choose the Trimmer tool, point the mouse anywhere along the line of selected breakpoints and drag the whole line upwards or downwards.
Fig. 10.27 – Inserting automation breakpoints using the Grabber tool.
You can also use the Pencil tool to create automation by drawing directly in the automation playlist. The default Freehand Pencil tool inserts a series of breakpoints as you drag the mouse in the automation playlist.
Fig. 10.28 – Drawing automation breakpoints using the Pencil tool.
If you click and hold the Pencil tool selector, a popup menu appears with options that let you draw straight Lines with a single breakpoint at each end; or Triangles that consist of a sawtooth pattern repeating at a rate based on the current Grid value with a single breakpoint at each extreme; or Squares with patterns that repeat according to the current Grid value; or Random patterns. The Triangle pattern can be useful to control continuous functions, and the Square pattern is typically used to control switched functions such as Mute or Bypass.
tip
Since the Pencil tool draws these shapes using the current Grid value, you can use it to perform panning in tempo with a music track, or on frame scene changes when working in post-production.
The Final Mix
Having done all your preparation very thoroughly, the final balancing session can be relatively easy. In the early stages of your mixing session, you will have chosen most of the elements you want to work with and you will have set up the effects you want to use. It can take some time to set up sends to external effects units and Auxiliary tracks with chains of plug-ins to process the drums, the vocals, and the various instruments – especially if you are looking for that ‘special’ reverb sound or combination of delays, or if you are trying to find the right EQ settings and pan positions to make particular instruments ‘sit’ properly in your mix, or stand out as features. With a typical pop song, you should allow at least half a day to get everything more or less in place. Then you might take a break for half an hour or so before coming back to do the final balancing of levels and tweaking of effects. Here you should be concentrating on the most important tracks – typically the lead vocal and any featured solo instruments.
tip
Don’t forget how easy it is to loop playback of any section that you want to hear over and over again during your mix session: select a range of time by dragging the mouse through the timeline ruler and choose Loop Playback from the Options menu (or just hit Command-Shift-L (Mac) or Control-Shift-L (Windows) on your computer keyboard) then hit Play.
Make sure that all the tracks you are not using are hidden and made inactive, and set the rest to the minimum track height – leaving the lead vocal or solo instrument, and any other tracks that you want to tweak during your mixes, at medium or large track heights. It is also a good idea to display the Volume or other important Automation curves in the chosen tracks so that you can see clearly what is going on and so that you can manually adjust these at any stage during the mix session.
If you are familiarizing yourself with Pro Tools LE for the first time, it is worth taking a look at the Filtered Dream demo session that is supplied with the software to see how a session that has already been mixed looks. And don’t forget that you can always clear the automation (an ideal opportunity to try out the Clear Special command) from the playlists in the Filtered Dream demo and make your own mix of this session.
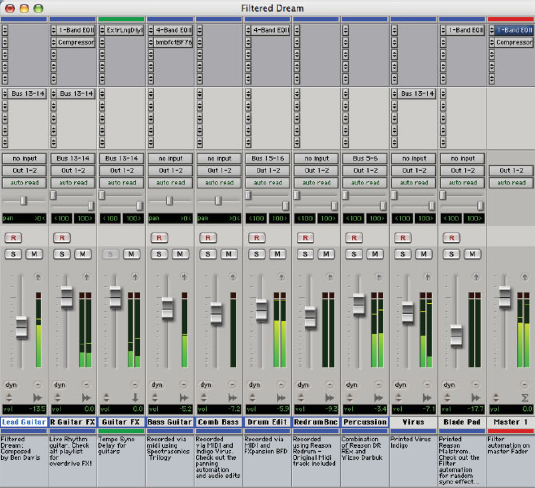
Fig. 10.29 – Mix window showing the Filtered Dream demo session.
If you are using the real-time automation features for your mix, you will start out in Auto Write mode. You probably won’t get all your moves correct during the first pass, so you can use the Auto Touch or Latch modes to refine the sections that need changing.
Even if I start out using real-time automation, I usually end up going into the Edit window to manually edit the automation breakpoints to achieve exactly the right result. In this window it is so easy to see exactly where the vocal and instrumental phrases lie and to edit the automation curves to do exactly what you want them to do.
Take a look at the screenshot of the Filtered Dream demo session that is supplied with Pro Tools LE 7. I have arranged this with the MIDI tracks that were used to create the audio for the Trilogy Bass, Blade Pad and Redrum tracks hidden, and with the tracks set to sensible track heights with the Volume Automation playlists revealed.
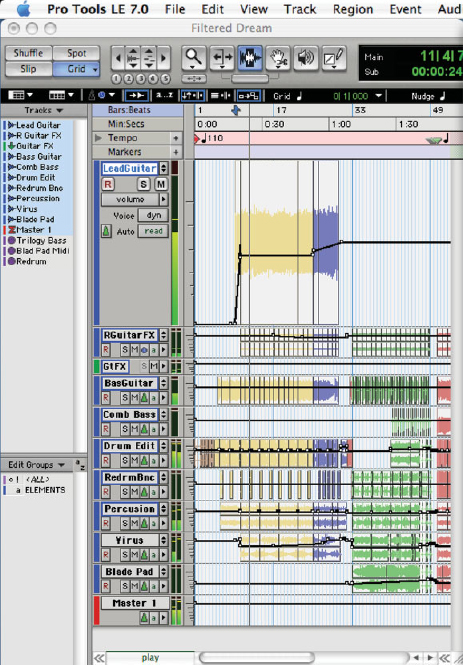
Fig. 10.30 – Edit window showing the Filtered Dream demo session ready to mix.
Mixdown
Once you have your mix sounding the way you want it, you will usually want to record this as a stereo ‘master’. You have various options here. The first is to connect your main stereo outputs to a stereo mastering recorder such as a DAT machine, DVD- or CD-recorder, or even to a 1/2″ analogue tape recorder.
Alternatively you can create a stereo file on disk – either using the Bounce to Disk command in Pro Tools, or by recording the final mix to a pair of tracks in the same Pro Tools session – assuming you have these tracks available.
You can bounce to disk or record to new tracks anytime during your session if you want to ‘print’ (i.e. record) effects to disk so that you can free up your DSP to apply more plug-ins, or if you want to create submixes to use as loops or as ‘stems’ for post-production or whatever.
As the manual explains it, ‘Printing effects to disk is the technique of permanently adding real-time effects, such as EQ or reverb, to an audio track by bussing and recording it to new tracks with the effects added. The original audio is preserved, so you can return to the source track at any time. This can be useful when you have a limited number of tracks or effects devices.’
Although you can hear the bounce as it is being created, you can’t adjust any controls during a ‘Bounce to Disk’. So you should only use ‘Bounce to Disk’ if you need to convert the bounced files or if you don’t want or need to interact with any mixer controls during the bounce.
If you want to be able to adjust the mixer controls in real time while the files are being written, you should record to new tracks.
note
Random access media (such as hard disks, optical disks or other computer data drives) can produce a true digital copy of your data, because every bit value is maintained. Sequential media (such as DAT tapes) use error correction schemes to fix the occasional bad data that is received in a digital transfer. These corrections are deviations from the actual data, and with successive reproductions, represent a subtle form of generation loss. You can avoid this loss by creating and maintaining your master mixes on random-access digital media (such as a hard drive) and transferring them to sequential digital media (such as DAT tapes) only as needed.
Recording to a Stereo Mastering Recorder
Using the main stereo analogue line outputs from your Pro Tools interface, you can record your master mixes onto analogue mastering recorders, such as 1/4″ or 1/2″ tape recorders. In this case there is no need to convert sample rates or bit-depths or to add dither, as the D/A converters will convert the digital audio to analogue audio (with very little loss of quality) no matter which sample rate or bit-depth you are using.
Although it is usually best to create digital master mixes as files on hard disk, Pro Tools also lets you record your master mixes digitally, direct to any AES/EBU-equipped or S/PDIF-equipped digital recorder such as a DAT or CD-Recorder. Note that these are 16-bit digital systems, so if you have been working at 24-bit resolution, you will inevitably lose some quality.
Pro Tools LE systems support 24-bit input and output and use 32-bit floating point mixing and processing internally. This allows you to exchange digital audio data with other 24-bit recording systems without any bit-depth conversion.
Bounce to Disk
The Bounce to Disk command writes the current session (if you have not made any selection), or the Edit or Timeline selection, as new audio files to disk. Any available output or bus path can be selected as the bounce source and sample rate, bit depth, and other conversion processes can be applied during or after the bounce.
Basically, you mute everything but the tracks you want to bounce, make sure that all the levels, pans and any effects and automation are the way you want them to be, assign the outputs from all the tracks to the same pair of outputs, then select the Bounce command from the File menu to open the Bounce dialog.
note
Audio coming from external inputs cannot be recorded during a ‘Bounce to Disk’, so if you need to include any external inputs in your bounce, these must be recorded to new audio tracks first. Also, when Low Latency Monitoring is enabled, only audio tracks are included with the Bounce to Disk command – Auxiliary Input and Instrument tracks are ignored. To include these, you need to disable Low Latency Monitoring before the Bounce to Disk.
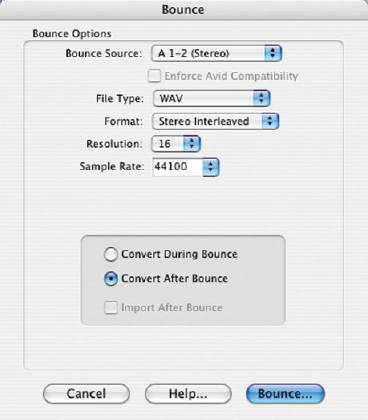
Fig. 10.31 – Bounce to Disk dialog.
In the Bounce dialog, the first popup lets you choose the Bounce Source. This source can be taken from any of the audio outputs or busses actually in use in your system.
note
Don’t forget to choose your bounce source to match the output assignments on your session. The source selection defaults to outputs 1/2 and you may be using a different output pair in your session. If you do forget, there will be no audio in your bounced file.
The File Type popup lets you select from Broadcast WAVE (BWF), Audio Interchange File Format (AIFF), Sound Designer II (SDII), MPEG-1 Layer 3 (MP3), QuickTime, Sound Resource (or MXF format if you have DigiTranslator installed).
note
MXF (Material Exchange Format) files include both video and audio data, and are designed for interchange of audio-visual material with associated data and metadata. Advanced Authoring Format (AAF) and Open Media Framework (OMF) sequence format files can refer to MXF media files, or have MXF media files embedded within them. Pro Tools with DigiTranslator supports AAF embedded sequences.
The MPEG-1 Layer 3 compression format (MP3) is used for streaming and downloading audio over the Internet, and for playback on portable devices. The MP3 encoder provided as an install option with Pro Tools works for 30 days after which you are expected to buy it from the online DigiStore at www.digidesign.com.
Pro Tools systems running on Windows can also create Windows Media format (.wma, .wmv, or .asf) files containing audio, video, or script data.
File format options include summed mono, multiple mono, and interleaved stereo. If you intend to import the files back into Pro Tools you should choose mono or multiple mono files. Interleaved stereo files can be used by other software such as BIAS Peak which you may use for any final edits or processing, or by CD-burning software such as Toast or Jam. Resolutions available include 8-bit for multimedia work, 16-bit for CD distribution and 24-bit for high-quality digital audio systems. All the standard sample rates from 44.1 up to 192 kHz are available.
You can also choose whether to convert during or after the bounce. I often choose to convert after the bounce even though this takes longer, as it leaves the processor free to concentrate on one task at a time – bouncing then converting. You can select the option to Import After Bounce if you want to use the new tracks in your session after the bounce – or leave this unchecked if you simply want to create master mixes on disk that you will assemble and check later.
When you hit Bounce, you will be presented with a Save dialog box where you can name your new file(s) and choose where to save these.
The Bounce to Disk command uses all the available voices from your session and all audible tracks will be included in the bounce – including tracks that ‘pop through’ when other tracks are not using their voices. Muted tracks do not appear in the bounce. All the read-enabled automation is applied along with all plug-ins that are in use and any processing that is being applied via hardware inserts.
Bear in mind that the bounced mix will be exactly the length of any selection you have made in the Timeline or Edit window – which should be linked. If you want to include any reverb trails or other effects which ‘hang over’ at the end of the track you will need to select additional time to accommodate this. If you don’t make any selection, the bounce will be the length of the longest audible track in your session.
So when should you use Bounce to Disk and when should you record your mix to new tracks in your session? If you have totally automated your mix, or if you have no free tracks available in your session, then Bounce to Disk is the best option. However, some engineers may still prefer to do a manual fade at the end or to tweak faders or other controls on-the-fly during the final mix-down. In this case, recording to new tracks or to an external recorder are the best ways to go.
Recording to Tracks
Recording your mix to new audio tracks is just the same as recording any other input signals into Pro Tools. Obviously, you need to have sufficient free tracks, free voices and bus paths available. The beauty of this technique (compared with Bounce to Disk) is that you can add live input to your mix or adjust volume, pan, mute, and other controls during the recording process.
Once you have your mix set up with the levels, pans, plug-in processing, and routing all sorted out, you are ready to record your new tracks containing your mix, submix, or stem. Simply record-enable the new tracks, click Record in the Transport window, then click Play in the Transport window to begin recording – which will begin from the location of the playback cursor. Recording will continue until you press Stop or punch out of recording – unless you have selected a particular section.
It can help save a little time later if you select exactly the length of audio that you want to record to these new files. Even if you place the playback cursor exactly at the start of the audio you are unlikely to be able to stop recording at exactly the right moment. To make a selection, link the Edit and Timeline selection using the command in the Operations menu and drag the selection cursor over the length you want to encompass.
Don’t forget to select some extra time at the end of your selection to accommodate reverb tails, delays, or any other effects that may still be sounding after the audio has finished as the new recording will stop automatically immediately at the end of your selection.
And don’t be too keen to select too close to the start point either. It is always better to include a bit more than you think you will need in your selection – you may need to edit some ‘room tone’ that you find there to fill a gap somewhere else, or to analyze some noise that is there so that you are better able to extract this noise from the rest of the session.
When to Use Dither
Whenever you change the bit-depth of digital recordings you need to apply dither to reduce quantization error that can become audible, particularly when fading low-level signals. Dither does this ‘trick’ by actually introducing very low-level random noise that, counter-intuitively, increases the apparent signal-to-noise ratio. Typically, you will apply dither if you are bouncing a mix to a file on disk that uses a lower bit-depth than your session.
Two plug-ins are supplied for this purpose – POW-r Dither and Dither. The POW-r Dither plug-in offers 16-bit and 20-bit resolutions along with three choices for Noise Shaping – Types 1, 2, and 3. The Dither plug-in has 16-, 18-, and 20-bit options to cater for all possible scenarios but only features one standard Noise Shaping type.
note
Noise Shaping shifts the noise introduced by the dithering process to frequencies around 4 kHz where this low-level noise is likely to be masked by the audio program material.
If you are mastering from a 24-bit session to a 24-bit digital recorder or to analogue tape via 24-bit D/A converters, there is no need to apply dither. The 20-bit option is provided for compatibility with some digital devices that use this format. On the other hand, if you are mastering to a 16-bit medium – whether this be a file on disk or an external recorder – you should apply dither. You may be seduced into thinking that if the original session is 16-bit you don’t need to dither to another 16-bit medium – but you would be wrong. Although 16-bit sessions save their data to 16-bit files, they are actually processed internally while the session is running at higher bit rates – 32-bit floating point for Pro Tools LE systems. So it doesn’t matter whether you are running a 16-bit or a 24-bit session – you should still dither when mastering to 16-bits.
tip
Dither is not automatically applied when you use the Bounce to Disk command – so you need to insert and apply the Dither plug-in on your Master Fader before your bounce if you want to create a dithered file. Bear in mind that if you do not apply dither and you choose to convert to a lower resolution, say from 24-bit to 16-bit, during or after a Bounce to Disk, the resultant file will be converted by truncation that is the low-order bits will simply be ‘thrown away’ and quantization noise may become audible.
What you have learned
After completing this chapter you should know much more about how to set up your monitor speakers, what monitoring levels to use and how to meter levels in Pro Tools.
You will be aware of how to set up Master Faders and use multiple output assignments.
You will also be aware of how you can make tracks inactive and why you would want to do this, how to group tracks, and how to use the track Output windows.
There are many ways that you can use Auxiliary tracks and Sends to route audio around the Pro Tools mixer. You should now be aware of the different options available for yo to use.
Automation is another important facility that is available while mixing. You should now be familiar with the features that Pro Tools offers.
This chapter also explains the pros and cons of bouncing tracks versus recording tracks to disk when making your ‘master’ mixes.