Editing Audio
Overview
One of the best things about Pro Tools is its incredibly flexible and accurate audio editing capabilities. Digital audio editing has allowed audio editors to develop their techniques significantly since the days of magnetic tape editing. The fact that edits can be made without affecting the original audio permanently (so-called ‘non-destructive’ editing) allows editors to be fearless when it comes to trying out creative ideas. The speed with which edits can be made and the accuracy – down to sample level in the case of Pro Tools – has also raised the stakes creatively.
‘Destructive’ editing changes the original audio – which is fine if this is what you really want to do. But it makes lots more sense to use non-destructive editing to make your edits with no fear of losing original audio – and you can always create a new audio file containing the edited audio if you want to gather it all together in one file for any reason (maybe to export it later). Destructive editing only really makes sense on a hard disk system if you are running short of space on your hard disks to record to. And given the relatively cheap price per gigabyte of hard disks these days, most people should be able to afford to buy enough hard disk space for their needs – without having to resort to destructive recording.
Non-destructive editing simply rearranges the order in which parts of the original audio are played back, skipping some parts completely and repeating others as required. These parts or bits of the original audio are referred to as ‘regions’ within the audio file. The default situation is for a region to encompass the whole of the audio file. You then define smaller regions within that file so you can repeat these, use them elsewhere in your session, or whatever. These regions are always shown in the Regions List that can be revealed or hidden at the right-hand side of the Pro Tools Edit window and can be used as many times as you like in your session without them using up any more hard disk space.
Pro Tools tracks can be regarded as ‘playlists’ or ‘edit decision lists’, because they typically contain one or more regions placed along the timeline. In other words, the track lists the regions in the order that you wish them to play back. Or you could say that the track lists the edits that you have made to your recordings so that they play back the way you want them to. When the audio is presented as a waveform that scrolls from left to right along a ‘timeline’ as it plays back, it is often referred to as a playlist. In Pro Tools, MIDI data can also be presented alphanumerically in a vertically scrolling list called the MIDI Event List. Audio is presented this way in many other digital editors, in which case the list is typically referred to as the Edit Decision List or EDL. Pro Tools does not have an alphanumeric audio event list or EDL – an unfortunate omission in my opinion as it can be far easier and quicker to make certain types of edits by typing alphanumerically into an EDL.
Audio Regions in Pro Tools can be displayed in several ways in the tracks, depending on what suits your purpose. The default is to show a representation of the analogue waveform ready for you to edit this, but you can simply display regions as blocks, for example, which can sometimes be less confusing to move around onscreen. The default display for MIDI Regions is to show the notes graphically, ready for you to edit these.
Non-real-time Digital Signal Processing can be applied to audio regions in Pro Tools by selecting a region and choosing a processor from the AudioSuite menu. Here you can reverse the audio region (try this for a Jimi Hendrix effect on your next guitar solo), or shift the pitch (try this on voices for ‘Chipmunk’ or ‘Darth Vader’ effects). Or you can change the level, apply EQ, compression, reverb, delay, modulation, or other effects.
Basic Editing
There are several basic concepts that you need to be familiar with as a Pro Tools editor. Let’s start with the most basic editing commands.
Cut, Copy, Paste, and Clear Commands
Pro Tools has some similarities with word-processing and graphics software. For example, the way that the computer expects you to work is to select something first and then to issue a command that says what you want to do with whatever you have selected – either using keyboard commands or using the mouse, pointer, and menus. Once you have selected a region, for example, you can use the Cut, Copy, Paste, and Clear commands to rearrange and edit the material in your tracks.
You can select a region or regions using the Time Grabber tool or you can select a range along a track using the Selector tool. You can also work across multiple tracks. You can then use the Cut command to remove whatever you have selected from the Edit window and put this selection into the Clipboard ready to paste it elsewhere. The Clipboard is a temporary storage area in the computer’s RAM (random access memory). You can use the Copy command to copy your selection into the Clipboard ready to paste elsewhere, without removing the original selection from the Edit window. You can use the Paste command to put the contents of the Clipboard into the Edit window at the Edit insertion point, overwriting any material that is already there. If you simply want to remove your selection without putting it into the Clipboard, use the Clear command instead.
Special Cut, Copy, Paste, and Clear Commands
Pro Tools also has four ‘special’ Edit menu commands that you can use for editing automation playlists (e.g. volume, pan, mute, or plug-in automation) on audio, Auxiliary Input, Master Fader, and Instrument tracks.
Cut Special, Copy Special, and Clear Special each have three sub-menu selections. These let you edit all the Automation or just the Pan Automation (whether the data is showing in the track or not), or just the Plug-in Automation on its own (when this is showing in the track).
The Paste Special command also has three sub-menu selections, the most useful of which is the ‘Repeat to Fill Selection’ command. This allows you to automatically fill a selection with audio regions or data much more quickly than by manually duplicating the regions.
tip
To use the ‘Repeat to Fill Selection’, simply cut or copy an audio region so that it is in the Pro Tools software’s Clipboard (i.e. temporarily stored into RAM), then make a selection in the Edit window and use the command to fill this selection. The Batch Fades window automatically opens to let you apply crossfades between the pasted regions.
Making an Edit Selection using the Edit Selection Indicators
You can use the Edit Selection indicators at the top of the Edit window to specify Edit selections numerically. Let’s see how to do this:
Step 1. The Edit Selection indicators use whichever time format you have selected for the Main Time Scale, so if you want to work with Bars and Beats, you should make sure that you have selected this first.

Fig. 9.1 – Setting the time format for the Main Time Scale Counter.
Step 2. Click with the Selector tool in the track you want to select.
Step 3. Click in the Start field at the top of the Edit window.
Step 4. Type in the start point for the selection and press the Forward Slash key (/) to enter the value and automatically move to the end field.
Step 5. Type in the end point for the selection.
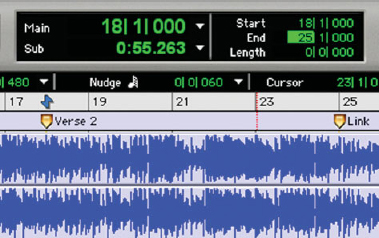
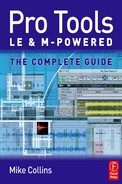
Fig. 9.2 – Edit window showing the End point (Bar 25) typed into the Edit Selection Indicators’ End field.
Step 6. Press Enter to accept the value and you will see the Edit Selection made.

Fig. 9.3 – Edit window showing the Edit Selection made using the Edit Selection Indicators.
tip
The above method can also be used to enter start and end values in the Transport window.
Working with Multiple Tracks
To make edits across multiple tracks or all tracks, you must select the tracks first. The easiest way to do this is to drag the insertion cursor across the tracks you want to select, dragging upwards or downwards to include adjacent tracks and dragging horizontally to define the time range.
Step 1. Choose the Selector tool.
Step 2. Point your mouse at any track of interest in the Edit window.
Step 3. Click and hold the mouse button, then drag horizontally to select a region.
Step 4. Without letting go of the mouse button, drag vertically upwards or downwards to select additional tracks of whatever type.
Step 5. Once you have made your selection, you can let go of the mouse button.
After you have made a selection and let go of the mouse button, if you change your mind and want to extend the selection to include more tracks or to shorten or lengthen the selection, press and hold the Shift key while you drag using the Selector tool. If you click in the Edit window without holding the Shift key, you will lose your original selection.
To select and edit all the tracks simultaneously, you can either drag with the Selector tool in any of the Timebase rulers with the Timeline and Edit Selections linked, or you can enable the ‘All’ edit group.
If you expect that you will be making the same edits to several tracks at once, you can group these tracks together so that edits applied to one will apply to all. Typically you might do this with your drum tracks, or with a brass section or a set of guitar tracks.
note
If a group of tracks in the Edit window contains some tracks that are hidden (i.e. de-selected in the Tracks show/hide list at the left of the Edit window), these will not be affected by any edits made to the members of the group that are visible in the Edit window.
To paste to multiple tracks, engage the Selector tool then place the insertion point in each of the destination tracks by Shift-clicking in them. If you want to place the insertion point into all tracks, click in any of the Timebase rulers.
note
Whenever you paste multiple types of data, whatever data has been copied is automatically pasted into the correct type of playlist.
Master Views
When you are working with data from multiple tracks, there are several things to keep in mind. For instance, if any of the selected tracks is set to a Master View, any edits you make will not only affect the audio or MIDI data on the track, they will also apply to any automation or controller data on the track.
So, when you are in a Master View, cutting an audio region also cuts any volume, pan, mute, send, or plug-in automation that is also on the track – saving you from having to individually cut data from each automation playlist on the track. Similarly, when an Auxiliary Input or Master Fader track is displayed in its Master View, any edits performed apply to all automation data in the track.
note
When Audio tracks are set to display either Waveform or Blocks, they are said to be in a Master View. When MIDI or Instrument tracks are set to display Regions, Blocks, or Notes (when using the Selector tool), these tracks are said to be in a Master View. When Auxiliary inputs are set to display Volume, this is regarded as the Master View, and Master Fader tracks (which can only display Volume) are always considered to be in Master View.
Other Track Views
In any other track view with automation data displayed on the selected tracks, edits only affect the type of automation data displayed in each track.
For example, if track 1 displays Pan automation, track 2 displays Volume automation, and track 3 displays Mute automation, the Cut command cuts only pan data from track 1, volume data from track 2, and mute data from track 3.
tip
Pro Tools lets you override this behaviour temporarily by pressing and holding the Control (Macintosh) or the Start key (Windows) while you choose the Cut, Copy, or Paste commands, enabling you to copy all types of automation on all selected tracks.
The Edit modes
Pro Tools has four Edit modes – Slip, Shuffle, Spot, and Grid – that can be selected by clicking the corresponding button in the upper left of the Edit window. You can also use the function keys on your computer keyboard, F1 (Shuffle), F2 (Slip), F3 (Spot), and F4 (Grid), to select the mode. The Edit mode that you have chosen affects the ways that regions may be moved or placed, how commands like Copy and Paste work, and how the various Edit tools (Trim, Selector, Grabber, and Pencil) work.
Slip Mode
The default mode that you should normally work in is the Slip mode. It is called Slip mode because it lets you move regions freely within a track or to other tracks and allows you to place a region so that there is space between it and other regions in a track.
In Slip mode, if you use the Cut command to remove a selection before the end of the last region on a track, it leaves an empty space where the data was removed from the track. You should also be aware that regions are allowed to overlap or completely cover other regions in Slip mode.
Shuffle Mode
In Shuffle mode, if you place two or more regions into a track, they will automatically snap together with no gap in between.
If you have an existing track that contains two or more regions with gaps between them, you can close the gaps by selecting Shuffle mode and using the Time Grabber tool to push a region in the direction of the previous region.

Fig. 9.4 – Selecting and moving a region in Shuffle mode.
As soon as you let go of the mouse, the gap between the two regions is closed, leaving them ‘stuck together’.

Fig. 9.5 – The region that you moved automatically attaches itself to the previous region in Shuffle mode.
So, if you want a region that you are moving around in the Edit window to automatically butt up against the previous region, with no overlap and with not even the smallest gap between them, you can use Shuffle mode. If you are in Slip Mode or even in Grid Mode you have to be careful to avoid overlapping the regions, and you will have to zoom in to see what you are doing. Consequently, placing regions accurately in these modes takes more time.
By the way, it is called ‘Shuffle’ mode because if you use the grabber to drag a region placed earlier in a playlist to a later position (or vice versa), the other regions will shuffle (i.e. move) their positions around to accommodate this re-positioning of the region. Similarly, if you use the Cut command to remove a selection before the end of the last region on a track, the regions to the right of the cut move to the left, closing the gap. Also, if you paste data anywhere before the end of the last region on a track, all regions beyond the insertion point move to the right to make room for the pasted material.
tip
Be careful to return to Slip or Grid mode as soon as you have made your moves in Shuffle mode – it is all too easy to accidentally move a region and have Shuffle mode shuffle your regions to somewhere they shouldn’t be. And if you don’t notice this at the time it happens you may not be able to use even the multiple Undo feature to get back to where you were.
Spot Mode
Spot mode was originally designed for working to picture, where you often need to ‘spot’ a sound effect or a music cue to a particular Society of Motion Picture and Television Engineers (SMPTE) time code location.
The way this works is that you select Spot mode and then click on any region in the Edit window, or drag a region from the Region List or from a DigiBase browser into the Edit Window. The Spot dialog comes up and you can either type in the location you want or use the region’s time stamp locations for spotting.
There are actually two time stamps that are saved with every region. When you originally record a region it is permanently time-stamped relative to the SMPTE start time specified for the session. Each region can also have a User Time Stamp that can be altered whenever you like using the Time Stamp Selected command in the Regions List popup menu. If you have not specifically set a User Time Stamp, the Original Time Stamp location will be set here as the default.
note
If you have the optional DV Toolkit for Pro Tools LE installed, you can capture an incoming Time Code address and spot the region to this.
tip
Spot mode can also be very useful when editing music projects in Pro Tools – particularly if you move a region out of place accidentally. Using Spot Mode you can always return a region to where it was originally recorded. Also, as long as you remember to set a User Time Stamp if you rearrange regions to locations other than where they were first recorded, you can always return regions to these locations.
For example, if you move a region by accident, using Spot Mode would be an ideal way to put it back to exactly where it came from.

Fig. 9.6 – Edit window showing a Region accidentally moved from its original position.
Step 1. Put the software into Spot mode by clicking on the Spot mode icon at the top left of the Edit window.
Step 2. Select the Grabber tool.
Step 3. Click on the region to bring up the Spot dialog.
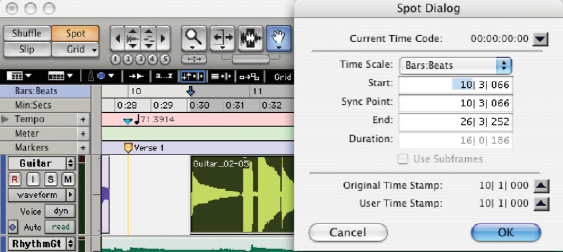
Fig. 9.7 – Using the Spot Dialog to return a Region to its original position.
Step 4. If the Region has been moved from the position at which it was originally recorded, the current Start position displayed in the Spot Dialog will be different from the Original Time Stamp position shown in the dialog. You can either type the correct Start position or (even quicker) just click the upwards-pointing arrow next to the Original Time Stamp to put this value into the Start position field.
Fig. 9.8 – Click the Original Time Stamp arrow to enter this location into the Start field in the Spot Dialog.
note
If you have deliberately moved the Region since recording it and have taken the trouble to enter a User Time Stamp in the Regions List for the moved region, you should enter the User Time Stamp into the Start field instead.
Step 5. When you click ‘OK’ in the Spot Dialog, the region will be moved back to the location where it was originally recorded.
Fig. 9.9 – Edit window showing Guitar Region back in its original position.
Grid Mode
Grid mode lets you constrain your edit selection to gridlines that correspond to a grid value that you can choose to suit your purpose. Grid mode is particularly useful if you are editing pattern-based music that starts and ends cleanly at regular boundaries, such as bars or beats. You can choose the Grid size using the Grid value popup menu located above the Timebase Rulers and the tracks in the Edit window.
tip
If you press and hold the Control and Option keys (Mac) or the Start and Alt keys (in Windows) you can use the plus (+) and minus (−) keys on the numeric keypad to increment or decrement the Grid size.
The Grid size can be based on a time value using the Main Time Scale; or, if Follow Main Time Scale is deselected, another time format can be used for the Grid size. To make the Grid lines visible in the Edit window, just click on the currently selected Timebase ruler name (the one highlighted in blue) to toggle these on and off.
tip
You can temporarily suspend Grid mode and switch to Slip mode by holding down the Command key (the Control key in Windows), which is very useful while you are trimming regions, for example.
Grid mode can be applied either in an Absolute or Relative way. In Absolute Grid mode, regions are ‘snapped’ onto Grid boundaries when you move them – so regions can never be placed in between the currently applicable Grid boundaries. This is what you normally expect and want Grid mode to do and is the default behaviour.
Relative Grid Mode lets you edit regions that are not aligned with Grid boundaries as though they were. For example, in 4/4 time signature, if a region’s start point falls between beats and the Grid is set to 1/4 notes, dragging the region in Relative Grid mode will preserve the region’s position relative to the nearest beat.
In a music recording, for example, a musician may have deliberately played a note just before the beginning of a new bar. If you separate this note into its own region, then use the Grabber tool to move it earlier or later by an exact number of beats using the Absolute Grid mode, the region’s start position will be ‘snapped’ exactly onto the new beat position, and will not sound as the musician intended it to.
If you choose Relative Grid mode and set a suitable Grid value that allows sufficient time before the bar, then when you move the region containing the note along the Grid, it ‘snaps’ to positions that preserve the note’s original positioning just a little before the beat.
To select Relative Grid mode, click and hold the Grid button, move the mouse to where it says ‘Relative Grid’, then let go.

Fig. 9.10 – Selecting Relative Grid Mode.
As you can see from the screenshot below, the guitar note is played just a little before the beginning of Bar 51 in this example – 42 ticks earlier, to be precise.
The Grid is set, in this example, to 60 ticks, representing a 64th note. Notice that this is just a little more than 42 ticks before Bar 51, so you can see a blue grid line a little to the left of the region.

Fig. 9.11 – Note positioned 42 ticks before Bar 51.
With Relative Grid mode selected, when you use the Grabber tool to slide the region to right or left along the Timeline, the region snaps to start positions that are exactly 42 ticks (in this example) before the new bar position, thus preserving the note’s original positioning relative to the bar positions.
In the example below, I dragged the region earlier by one 64th note grid position in Relative Grid Mode and as you can see from the screenshot, it is now positioned a little (exactly 42 ticks in this example) before the last 64th note of Bar 50.
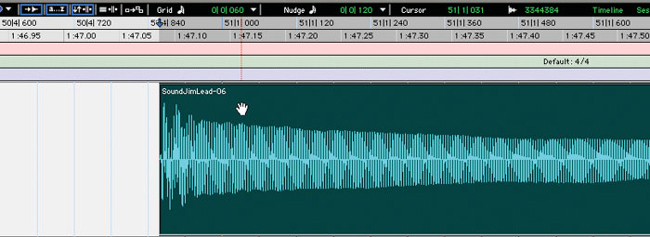
Fig. 9.12 – Note dragged back along the Timeline in Relative Grid mode to a position exactly one 64th note earlier.
Dragging the region in Absolute Grid mode would have only allowed me to position the start of the region containing the note exactly onto a 64th note. When I do this, as you will see from the accompanying screenshot, the note starts exactly on a 64th note grid position – which in this instance would sound wrong.
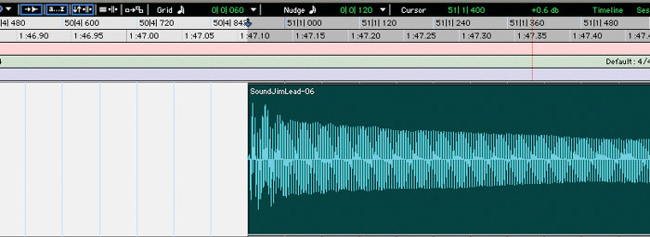
Fig. 9.13 – Note dragged back along the Timeline in Absolute Grid mode to a 64th note grid position.
Making Timeline Selections
To make a Timeline selection (as opposed to an Edit selection among the tracks), you can either type your selection into the Transport window or drag with the Selector or Time Grabber tool in any Timebase ruler.
The Timeline selection is indicated in the Main Timebase ruler by blue Playback Markers, which turn red if a track is record-enabled. The start, end, and length for the Timeline selection are displayed in the corresponding fields in the Transport window.
You can also set the Timeline selection by dragging the Playback Markers. Using either the Selector or Time Grabber tool, drag the Start Playback Marker (the down arrow) to set the start point and drag the End Playback Marker (the up arrow) to set the end point.
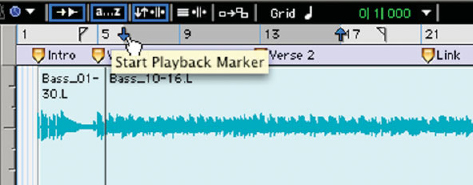
Fig. 9.14 – Setting the Timeline Selection by dragging the Playback Markers.
tip
If you want to constrain the selection to the current Grid value, set the Edit mode to Grid.
If you press the Option key (Mac) or the Alt key (Windows), you can drag either the Start or End Playback Marker and the whole Timeline selection will move forwards or backwards along the Main Timebase ruler as you drag.

Fig. 9.15 – Dragging the Timeline Selection while holding the Option (Alt) key to move the whole Timeline selection.
If the Timeline and Edit selection are unlinked, you can drag either the Start or End Edit Marker (not the Playback markers) while holding the Option (Alt) key and the whole Edit selection will move backwards or forwards along the Timeline as you drag.

Fig. 9.16 – Dragging the Edit Selection while holding the Option (Alt) key to move the whole Edit selection.
Linked Timeline and Edit Selections
With the Timeline and Edit selections linked, any time you make an Edit selection in a track or tracks, a corresponding selection is automatically made in the Timebase Rulers. This is the default behaviour.
To link the Timeline and Edit selections, select Link Timeline and Edit Selection from the Options menu or click the Link Timeline and Edit Selection button in the Edit window so that it becomes selected (outlined in blue).
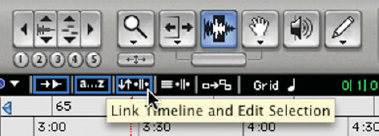
Fig. 9.17 – The Link Timeline and Edit Selection button.
With the Timeline and Edit selections linked, when you make an edit selection in a track the same time range automatically becomes selected in the Timebase Rulers and a small blue arrow is placed at each side of the selected range.
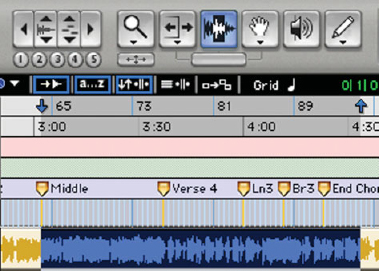
Fig. 9.18 – Edit window showing a highlighted Edit selection in a track with the corresponding Timeline selection made in the Timebase rulers.
tip
Press Shift-Forward slash (/) to toggle ‘Link Timeline and Edit Selection’ on and off.
Unlinked Timeline and Edit Selections
When you unlink the Timeline and Edit selections, you can make different selections in the Edit display and in the Timeline above the Edit display.
To make a Timeline Selection, choose the Selector tool and drag the cursor along the Main Timebase Ruler to set the playback and recording range.
tip
You can edit this selection by dragging the blue arrows that appear in the Timebase Ruler to mark the beginning and end of your Timeline selection.
You can enter the Start and End locations into the Edit Selection indicators at the top of the Edit window, or you can choose the Selector tool and drag the cursor across the Edit window to make an Edit selection.
tip
You can edit this selection by dragging the black brackets that appear in the Timebase Ruler to mark the beginning and end of your Edit selection.
So why would you want to unlink the Timeline and Edit selections? Take a look at the screenshot below in which the Timeline selection is defining the range to be looped during playback while a MIDI region within the loop is selected for editing. During playback, the Edit selection can be nudged, quantized, or transposed while the loop plays back without interruption – which is just fine and dandy!
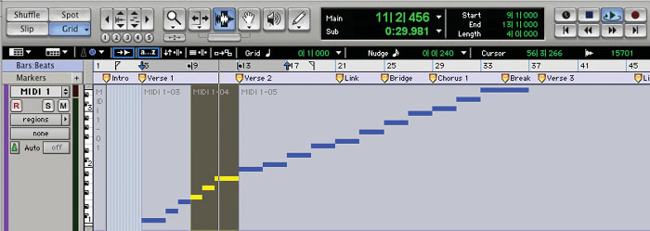
Fig. 9.19 – Timeline selection defines the playback loop while the Edit selection in the MIDI track can be moved or otherwise edited during playback.
Here’s another example. Say you are working to picture and you want to find or audition some audio material that is at a completely different location than the current Timeline selection. Again, you will find it extremely useful to be able to unlink the Timeline and Edit selections. Take a look at the screenshot below to see the Edit window with completely different Timeline and Edit selections.
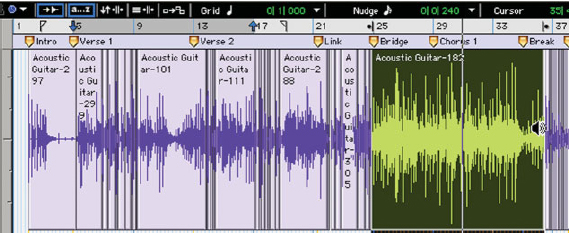
Fig. 9.20 – Different Timeline and Edit selections in the Edit window.
In the Edit menu there is a command to Play Edit Selection instead of playing the Timeline Selection (which is what happens when you use the normal Play command or hit the Spacebar). The current Timeline Selection stays in place when you play the Edit selection using this command, so you can search through the Edit window, selecting and auditioning regions of potential interest until you find material that you like. Then you can then go back to the Timeline selection and place the material that you have found within the context of the scene.
The Playback and Edit Markers
Timeline selections are indicated in the Main Timebase ruler by Playback Markers. These appear as blue arrows normally and as red arrows when any track is record enabled.
If you have entered and enabled Pre- or Post-Roll amounts in the Transport window, these will be indicated in the Main Timebase Ruler by a pair of green flags. If you disable the Pre- and Post-Roll amounts, these will still be indicated, but the flags will be coloured white.
Take a look at the screenshot below to see how the Edit window might look with the Timeline and Edit selections linked and with Pre- and Post-Roll amounts set and enabled. Notice that the Edit selection is represented in the Main Timebase Ruler by the blue Playback Markers that also indicate the Timeline Selection. In this example the Main Timebase Ruler is set to Bars:Beats.

Fig. 9.21 – Blue Playback Markers and Green Pre- and Post-Roll flags indicate the Timeline Selection and the Pre- and Post-Roll Selection, respectively.
Take a look at the screenshot below to see how the Edit window might look with the Timeline and Edit selections unlinked and different selections made in the Timebase Ruler and waveform display. When the Timeline and Edit selections are unlinked, Edit selections are displayed in the ruler with Edit Markers, which appear as black brackets.
In this example, a track’s Record Enable button has been engaged so that we can see how the Playback Markers look in red. At the bottom right, you can see the Edit selection in the waveform display and the two black brackets in the Main Timebase ruler above this. In the middle of the screenshot you can see the Timeline selection indicated by the red arrows in the Main Timebase ruler.
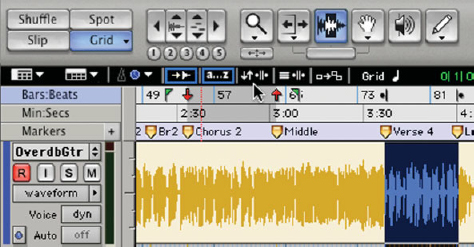
Fig. 9.22 – Red Playback Markers indicate the Timeline Selection while black brackets indicate where the Edit Selection is.
Linked Track and Edit Selections
With the Track and Edit selections linked, if you make an edit selection within a track or across multiple tracks, each associated track will automatically become selected, with the track names highlighted.
To link Track and Timeline selections, select Link Track and Edit Selection from the Options menu or click the Link Track and Edit Selection button near the upper left of the Edit window so that it becomes outlined in blue.
In the screenshot below, you can see that the ‘Link Track and Edit Selection’ button is active, and an Edit Selection has been made in the Edit window’s waveform display. This has caused the track names at the left of the Edit window to become highlighted, indicating that these tracks have become selected.

Fig. 9.23 – Edit window with Link Track and Edit Selection active, with an Edit selection just made in the waveform display, and with the track names at the left highlighted to indicate that these have just been automatically selected.
So why might you want to do this? Well, it can be very useful to have the tracks selected when you are editing waveforms and automation data so that you can quickly apply track-level commands such as Track View toggle, or change track heights, and have the command apply to all tracks you are working on.
Finding your way around the Edit window
If you are new to Pro Tools you will have to spend some time getting used to working in the Edit window. You will need to be comfortable and familiar with several keyboard commands and menu items and with the buttons at the top of the Edit window. You will need to know how to loop playback, how to control screen scrolling, and lots more stuff like this. So let’s get started with some of this stuff right now!
Track View Toggle
If you press Control-minus on the Mac (Start-minus in Windows) on your computer keyboard (using the minus (−) symbol on the QWERTY keyboard, not the minus symbol on the numeric keyboard found at the right-hand side of some keyboards), this toggles the Track View between Waveform and Volume.

Fig. 9.24 – Track View switched to show Volume View.
Zoom Toggle
The Zoom Toggle button in the Edit window lets you define a zoom state (with separate track heights for audio and MIDI track views) and toggle between it and the current zoom state.
When the Zoom Toggle button is enabled, the Edit window switches to display the stored zoom state. If you then make any changes to the Zoom Toggle parameters, these will automatically be stored in the zoom state. When Zoom Toggle is disabled, the Edit window reverts to the last zoom state.
To set up the Zoom Toggle state:
Step 1. Click on the Zoom Toggle button to select and highlight it.
Step 2. Adjust the Zoom Toggle parameters, that is, the Track Heights, the Edit window view (e.g. Waveform, Volume, or other automation view), the Grid settings, and the Audio and MIDI zoom levels.
Step 3. When you have chosen settings for the Zoom Toggle state that suit the type of edits you want to make, click the Zoom Toggle button once more to de-select it and return to your previous zoom settings.
Step 4. Now, when you make another edit selection, you can simply click the Zoom Toggle button to recall the stored zoom state.

Fig. 9.25 – Zoom Toggle button enabled to switch the display to the stored Zoom Toggle state.
Getting used to Zooming around
Pro Tools lets you zoom around in the display in various ways, which you can choose according to the style you prefer. You can click on the Zoom buttons to zoom vertically or horizontally, or you can use the Zoom tool.
The Zoom Tool lets you zoom in and out around a particular area within a track using either its Normal Zoom mode or the Single Zoom mode.
To zoom horizontally in Normal Zoom mode, just drag along the track with the Zoom tool selected. To zoom both horizontally and vertically at the same time, press the Command key (Mac) or Control key (Windows) while you drag.
The Single Zoom mode automatically re-selects the tool that you were using previously after it zooms the display.
If you press and hold the Command and Control keys (Mac) or Control and Alt keys (Windows) then move your mouse cursor into the Ruler area in the Edit window, you can zoom in without having to select the Zoom tool first. If you just click once at any position in the ruler, the display zooms in one level, and if you drag across a range in the Ruler, the display will zoom in around this range.
Continuous Zooming
With the Zoom tool selected, you can zoom in or out continuously by holding the Control (Mac) or Start (Windows) modifier key on the computer keyboard while you drag vertically or horizontally in the Edit window. Drag up to zoom in vertically, drag down to zoom out vertically, drag to the right to zoom in horizontally, or drag to the left to zoom out horizontally.
For example, look at how the display changes between the two screenshots below as the Zoom tool is dragged horizontally to the right while holding the modifier key.
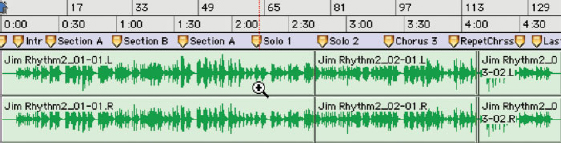
Fig. 9.26 – Before dragging the Zoom tool horizontally to the right while holding the modifier key.
Notice that the display zooms in smoothly and continuously as you drag to the right horizontally – so you see a smaller section of the waveform with a higher resolution of detail.
Notice also that all the tracks in your session are zoomed horizontally at the same time.

Fig. 9.27 – After dragging the Zoom tool horizontally to the right while holding the modifier key.
Now let’s look at how the display changes as the Zoom tool is dragged vertically upwards while holding the modifier key.
tip
If you want all the audio tracks to zoom vertically, press the Shift key as well as the Control (Mac) or Start (Windows) modifier key.

Fig. 9.28 – Before dragging the Zoom tool vertically upwards while holding the modifier key.
Notice that the display zooms in smoothly and continuously as you drag vertically upwards – making the waveform larger and easier to see.

Fig. 9.29 – After dragging the Zoom tool vertically upwards while holding the modifier key.
tip
When you have settled on a zoom level that you like to work with, you can save this into any of the five Zoom Preset buttons below the Zoom Tools. Set the zoom level first, then just click and hold any of the Zoom Preset buttons and choose Save Preset from the popup selector that appears.
Looped Playback
There are lots of times when you will want to loop playback during your editing sessions. For example, if you are editing a selection that you intend to repeat to form a larger section, you will find it very useful to loop this selection before you repeat it to make sure that it loops without any glitches. For instance, you might take a 4-bar ‘groove’ section and repeat this four times to form a 16-bar chorus section.
If you do hear a glitch at the loop point, this probably means that the length of the selection is not exactly right, so you should adjust the start and/or end of the selection until it does loop without glitching.
When Loop Playback is enabled in the Options menu, a loop symbol appears in the Play button in the Transport window and the selected range in the Edit window repeats when you playback. You can also enable Loop Playback by Control-clicking (Mac) or right-clicking (Windows) on the Play button in the Transport window.
tip
If you select the range to loop using the Selector tool in the Edit window, then you should enable ‘Link Timeline and Edit Selection’ so that the same time range is automatically selected in the Edit window and in the Timebase Ruler.
Scrolling Options
There are just two scrolling options for the Edit window in Pro Tools LE and M-Powered: Scroll After Playback and Page Scroll. Scroll After Playback does what it says – not moving the display until you hit Stop. The Page Scroll option keeps the display stationary until playback reaches the right-most side of the page, then it quickly changes the display to show the next section (i.e. page) of the waveform that will fit within the Edit window. It keeps on doing this until you stop playback.
note
The playback position jumps back to the position you started playing from when you stop or pause playback, unless you enable the ‘Timeline Insertion Follows Playback’ in the Operation Preferences window.
Timeline Insertion Follows Playback
With ‘Timeline Insertion Follows Playback’ enabled in the Operation Preferences dialog, when you press play, then stop or pause, then press play again, Pro Tools ‘picks up where it left off.’ In other words, when you stop, the insertion point ‘parks itself’ at that point – instead of returning to the position it was at when you first pressed play.
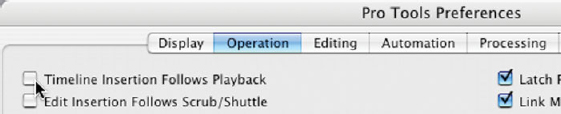
Fig. 9.30 – Setting the ‘Timeline Insertion Follows Playback’ Preference.
There is a keyboard command to enable or disable this preference. Just press the ‘n’ key to toggle the Timeline Insertion Follows Playback preference on and off.
tip
It is all too easy to press the ‘n’ key on your computer keyboard by accident. So if Pro Tools is not operating the way you want it to, just hit the ‘n’ key again to change this preference back to the way you want it.
Useful Shortcuts
You will probably want to adjust the track heights during your editing session and there are a couple of useful shortcuts that you should learn. To change all the track heights at the same time, simply hold the Option (Alt) key while you change any one of the track heights. A shortcut when you want to change one track or group of tracks is to put the insertion cursor into the track, hold the Control (Start) key, then press the Up or Down arrow keys to choose the track height.
To quickly switch audio tracks between Waveform and Volume view, hold down the Control key and press the minus (‘–’) key on the computer keyboard.
To scroll the Edit (or Mix) window one ‘page’ or ‘screen’ to the right or the left, hold the Option (Alt) key and press the Page Up or Page Down buttons on your computer keyboard. On the Mac, these keys have an upwards or downwards pointing arrow with two short horizontal lines across the stem of the arrow.
You can also toggle the display to simultaneously increase the height of the track to Large and to zoom the display to encompass the selection by clicking Control-E (Mac) or Start-E (Windows). Take a look at the screenshots below to see how this works.
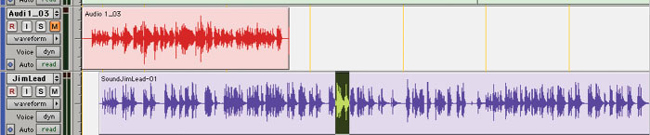
Fig. 9.31 – Edit window showing two tracks set to Medium height and with an Edit selection.

Fig. 9.32 – Edit window after switching the display to make the track height Large and to encompass the Edit selection.
Finding the ends of the selection
If you have made a selection in the Edit window and then you zoom in to fine-tune your edit points, the display will zoom in around the start point of the selection. If you want to jump to the end point, you can use the right arrow key on the computer keyboard to move the display so that the right-hand edge of the selection, that is, the end point, is in the centre of the screen. To get back to the start point of the selection, just hit the left arrow.
To see how this works:
Step 1. Make a selection in the Edit window then zoom the display in horizontally so that the end of the selection is no longer visible.
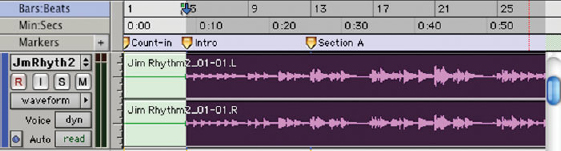
Fig. 9.33 – Edit window showing the start point of the Edit selection.
Step 2. Press the right arrow key on the computer keyboard. The end point of the selection is moved to the centre of the Edit window.

Fig. 9.34 – Edit window showing the end point of the Edit selection centred in the Edit window.
Step 3. Press the left arrow key to get back to the start point of the selection again.
Working with Regions
Regions are the basic building blocks for arranging audio and MIDI in Pro Tools so you need to make sure that you know how these are created, edited, and arranged. The Pro Tools Reference Guide covers this thoroughly, so I recommend that you keep this to hand during your editing sessions until you become completely familiar with the software.
When you record new audio or import existing audio files, Pro Tools creates a Region that plays back the entire file when placed into a playlist on a track. Very often you will use the Trimmer tool to remove some audio from the start or end of the recording. This creates a new Region in the playlist that is shorter than the original region, and this new region also appears in the Region List.
In fact, new regions are often created automatically when you make edits to existing regions. For example, if you use the Clear command to remove a section from within a region, the sections on either side of this form new regions. If you use the Cut command instead, the section you are cutting is placed onto the Clipboard and a new region representing this section is also added to the Region List.
The Region menu contains commands that you will frequently apply to selected regions, such as Mute/Unmute, Lock/Unlock, Group and Ungroup, Capture… and Quantize to Grid, most of which are fairly self-explanatory.
The Capture… region command defines a selection as a new region and adds it to the Region List. From there, the new region can be dragged to any existing tracks.
You can also create new regions using the Separation Grabber tool. Using the Separation Grabber saves you the trouble of separating the region first.
Make a selection using the Selector tool. Then select the Separation Grabber tool from the popup selector that appears when you press and hold the Grabber tool’s button. Take a look at the screenshot below to see how this might look.

Fig. 9.35 – Choosing the Separation Grabber tool.
When you have selected the Separation Grabber tool, you will see a small pair of scissors appear on the ‘hand’ to remind you that the Separation Grabber is currently selected. Now you can drag your selection to a new location within the same track or on another track. The selection is automatically separated from its ‘parent’ region and a new region containing this selection is created. As usual, new regions are also created from the material outside the original selection. Take a look at the screenshot below to see how this might look.
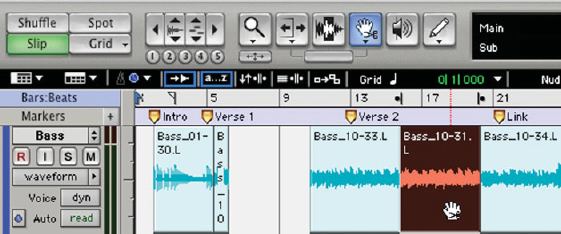
Fig. 9.36 – Using the Separation Grabber tool to separate a selection from a region and move this new region to a new location.
tip
If you want to leave the original region intact, press the Option key (Mac) or the Alt key (Windows) while you drag the selection to the new location. A new region containing the previous selection is created and placed at the new location. The original region remains intact.
The Edit menu also has commands that affect regions, such as Separate Region, Heal Separation, and various useful Trim Region commands.
There are actually three Separate Region commands. If you have made an Edit selection using the Selector tool you can separate this to form a new region using the ‘At Selection’ command from the Separate Region sub-menu. Or you can type Command-E (Mac) or Control-E (Windows) on your computer keyboard to invoke the ‘Separate Region At Selection’ command if you prefer.
tip
If you simply insert the Selection cursor into the waveform without making an Edit selection, the ‘Separate Region At Selection’ command will split the region at this insertion point instead.
If you need to separate a region into lots of smaller regions, you can use one or other of the two additional choices available in the Separate Region sub-menu: ‘Separate Regions On Grid’ separates regions based on the currently displayed Grid values and boundaries. ‘Separate Regions At Transients’ separates regions at each detected transient.
note
With looped regions, the Separate Regions commands automatically unloop and flatten the looped regions before separating them.
The Heal Separation command returns separated regions to their original state – provided that the regions are still next to each other and that their relative start/end points haven’t changed since they were separated.
Once you have created a region, it appears in the Region List. From the Region List you can drag it to a track to add to an existing arrangement of regions or to create a new arrangement ‘from scratch’. You can slide regions or groups of regions around freely in the Edit window using the Time Grabber tool in Slip mode. You can also move regions around while constrained to the grid in Grid mode, or shuffle them around in Shuffle mode. You can also ‘spot’ regions to exact locations using Spot mode, which is particularly useful in post-production.
Sync Points
When you are placing regions in Spot mode or Grid mode, it is sometimes useful to align a particular point within a region with a specific Timeline location – instead of aligning the start point of the region, which is the default situation. To cater for such situations, Pro Tools lets you define a sync point for any region.
This situation often comes up when you are laying up music and sound effects to picture. The standard example quoted here is where you have a creaking door that eventually slams shut. The sound effect file includes the creak and the slam, and the obvious thing to do here is to line up the sound of the door slamming shut with the video frame at which the door actually slams shut – which is some way into the audio region representing this sound effect.
You can define a region’s sync point in Slip mode by first placing the Selector tool’s insertion cursor at exactly the point within the region where the sound that you want to synchronize to starts. Then choose the Identify Sync Point command from the Region menu to identify this as the sync point for the region.

Fig. 9.37 – Setting a sync point within a region.
A small down arrow appears at the bottom of the region, with a vertical, light grey line above this indicating the location of the sync point. You can move this sync point to anywhere else inside the region using the Time Grabber tool to drag it earlier or later.
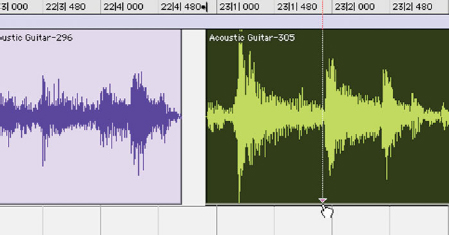
Fig. 9.38 – Dragging a sync point to a new position within the region using the Time Grabber.
Hearing the audio scrubbing back and forth can often be far more revealing than looking at the waveform when you are trying to identify what sounds best. So you may find it helpful to use the Scrubber tool to help you locate where the sync point should be.
To remove a sync point, just Option-click (Mac) or Alt-click (Windows) on the sync point using the Time Grabber or Scrubber tools.
Nudging Regions
Pro Tools lets you nudge regions (or MIDI notes) by small increments or decrements along the tracks in the Edit window. The way this works is that you set a Nudge value using the Nudge Value popup menu, then select a region or group of regions; then you move (i.e. nudge) these forwards or backwards along the Timeline by pressing the plus (+) or minus (−) keys on the numeric keypad.
You can nudge material while Pro Tools is playing back, which really helps when you are fine-tuning ‘grooves’. You can nudge continuously in real time to adjust the timing relationship between tracks and you can even nudge the positions of automation breakpoints in the playlists.
The Nudge value not only determines how far regions and selections are moved when you press the nudge keys, it can also be used to move the Start and end points for selections by the Nudge value or to trim regions by the Nudge value.
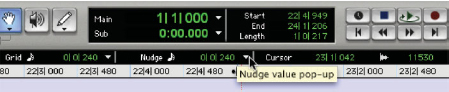
Fig. 9.39 – Setting the Nudge value.
A popup selector near the top of the Edit window lets you choose the Nudge value. With the main counter set to Bars:Beats, for example, the values offered are the common sub-divisions of a bar. You can also type the values you want directly into the Nudge Value display, which is useful if the values you want to use are not listed in the popup.
tip
If you press and hold the Command and Option keys (Mac) or the Control and Alt keys (in Windows) you can use the plus (+) and minus (−) keys on the numeric keypad to increment or decrement the nudge value.

Fig. 9.40 – The Nudge value popup.
tip
You can also nudge a region’s contents (sliding audio or MIDI into and out of the current region boundaries) while keeping the region’s start and end points exactly where they are – assuming that there is material outside the region’s start and end points that can be slid into or out of the region. Using the Time Grabber tool, select a region whose contents you want to nudge. Press and hold the Control key (Mac) or the Start key (Windows) while you use the plus (+) and minus (−) keys to nudge the contents of the region without changing the region’s start and end points.
Useful Region Editing Commands
The Edit menu and the Region menu both contain useful commands that you can apply to regions.
Shift Region
You can use the Edit menu’s Shift command to move track material forward or back in time by a specified amount. The Shift command can operate on selections, regions, MIDI notes, MIDI controller data, and automation breakpoints. Note that if you have selected just part of a region, when you shift it, new regions are created from the selection and from any material outside of the selection.
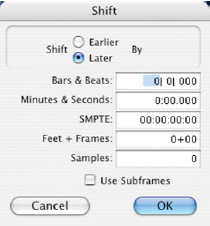
Fig. 9.41 – The Shift dialog.
Duplicate Region
The Edit menu’s Duplicate command copies a selection and places it immediately after the end of the selection. Though this is similar to using Copy and Paste, Duplicate is more convenient and faster, particularly when working with data on multiple tracks.
tip
To duplicate a region and automatically place it immediately before the selected region choose the Time Grabber tool then click on the region while holding all three modifier keys: Command-Option-Control (on the Mac) or Start-Alt-Control (in Windows). And it gets better! If you click on any other region in the track first to select it, then click on the region you want to duplicate while holding the three modifier keys, a duplicate of this region will attach itself immediately before the region you first selected.
Repeat Region
The Edit menu’s Repeat command is similar to Duplicate, but allows you to specify the number of times the selected material is duplicated. The material is placed immediately after the selection’s end point, and duplicated by the number of times specified.
note
When using Duplicate (or Repeat) for audio that must fall cleanly on the beat (such as rhythmic loops), it is important that you select the audio material with the Selector tool, or by typing in the start and end points in the Event Edit area. If you select an audio region with the Time Grabber tool (or by double-clicking it with the Selector tool), the material may drift by several ticks because of sample-rounding.
If, on the other hand, you want to Duplicate (or Repeat) audio that is not bar- and beat-based, set the Time Scale to any format except Bars:Beats. This ensures that the duplicated audio material will have the correct number of samples and will be placed accordingly.
Lock Region
If you want to prevent a region from being moved or deleted you can use the Region menu’s Lock command. A small lock icon appears in the region to warn you that it has been locked. Locking regions can help to prevent you from accidentally moving these – especially in Shuffle mode. The neat thing here is that in Shuffle mode, locked regions, and all regions occurring after the locked region, will stay exactly where they are even though regions on neighbouring tracks are being shuffled around.
Mute Region
The Region menu’s Mute/Unmute command mutes playback of any selected regions and dims these to let you know that they are muted. Choose the command a second time to unmute the selected regions.
Quantize to Grid
The Region menu’s Quantize to Grid command adjusts the placement of selected audio and MIDI regions so that their start points (or their sync points, if they contain one) line up exactly with the nearest Grid line. Choose a Grid value then use the Selector or Grabber tool to select the regions you want to quantize, making sure that the whole of each region is selected. When you choose the Quantize To Grid command, selected regions (or their sync points) are moved to the nearest Grid line.
Region Groups
Many small regions, such as the individual hits of a drum pattern, can be created using Beat Detective or the ‘Separate Region At Transients’ command, or can be imported as REX or ACID files. These can be unwieldy if you need to move them around while you are arranging your music, so Pro Tools provides a set of region commands that let you manipulate regions in groups. Region groups are also useful for grouping parts and sections together so that they can be easily copied and moved. So, for example, you might group all the backing vocals together in the first chorus so that you can copy and paste these into subsequent choruses.
note
A region group is a collection of any combination of audio and MIDI regions that looks and acts like a single region. Region groups can be created on single or multiple adjacent audio, MIDI, and Instrument tracks and can include both tick- and sample-based tracks.
To create a region group, select one or more regions on one or more tracks and choose the Group command from the Region menu.
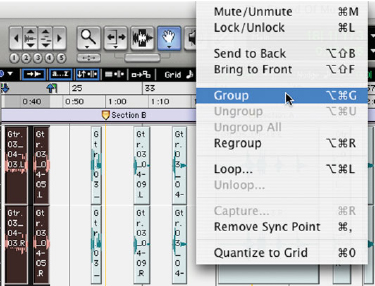
Fig. 9.42 – Using the Group command to group two regions.
The region group will appear as one region with the Region Group’s icon in the lower left corner and will be added to the Region List.
You can ‘nest’ region groups together with other regions or region groups. Take a look at the screenshot below and observe the region group created in the example above about to be nested within a new region group comprising this region group and three more regions.

Fig. 9.43 – Nesting a region group together with other regions into a new region group.
The Region menu also has commands to let you ungroup and regroup regions. If you apply the ‘Ungroup’ command to nested region groups, it will only ungroup the top-layer region group, leaving any underlying region groups untouched. The ‘Ungroup All’ command, on the other hand, will ungroup a region group together with all of its nested region groups.
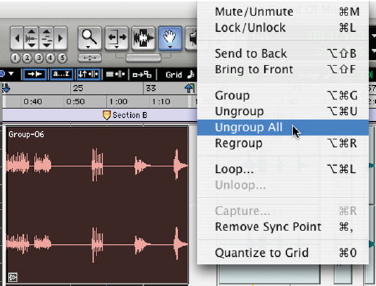
Fig. 9.44 – Using the Ungroup All Region command.
As you can see from the screenshot below, after using the ‘Ungroup All’ command, the grouped region is disassembled so that the original regions are accessible again.
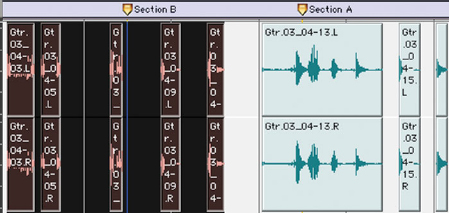
Fig. 9.45 – Regions all ungrouped.
With the regions ungrouped you can edit these individually, as necessary. As long as you don’t group and ungroup any other regions beforehand, you can then use the Regroup command to regroup these as they were and continue working on your arrangement.
You can also create multitrack region groups by selecting regions on multiple adjacent tracks.
Step 1. Select regions across multiple adjacent tracks.

Fig. 9.46 – Preparing to create a mixed multitrack Region Group.
Step 2. Choose the Group command from the Region menu.
If you group a mix of sample- and tick-based audio or MIDI tracks together, a different region group icon in the bottom left corner of the region group indicates this. Take a look at the screenshot below to see how this looks.
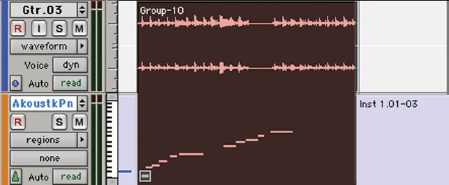
Fig. 9.47 – A mixed multitrack Region Group containing both sample-based and tick-based tracks with a mixed region group icon in the lower left corner.
note
Region groups can become separated if you move a track from the group so that it is no longer adjacent, hide a track from the group, insert a track within the group, delete a track from the group, record into a region group, change the tempo of a mixed group, or change playlists on a track within the group. A broken icon appears in the lower left corner to warn you if this has happened.

Fig. 9.48 – A mixed multitrack Region Group separated by changing tempo.
tip
Pro Tools can export and import region groups using the new ‘.rgrp’ region group file format. This can be very useful for creating multitrack loops containing references to all the audio files within the region group, region names and relative location in tracks, track names, fades and crossfades, and all the MIDI data from the region group. You can then import these into your current or future projects by dragging and dropping the region group file from a DigiBase browser or from Windows Explorer or Macintosh Finder to the Timeline, a track, the Track List, or the Region List.
Region group files don’t store automation, plug-ins, track routing, tempo or meter maps, or Region List information.
Region Looping
In common with most popular audio + MIDI software, Pro Tools allows you to loop audio or MIDI regions or region groups using the Region menu’s Loop command, which can be more flexible than using the Duplicate or Repeat commands. For example, selecting and moving a looped region selects and moves the source region and all of its repeated region loops as one.
Step 1. Select a region or region group.
Step 2. Choose Loop from the Region menu to open the Region Looping dialog.
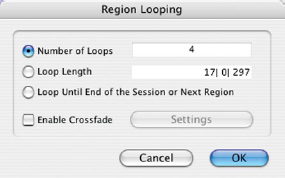
Fig. 9.49 – Region Looping dialog.
Step 3. Select the ‘Number of Loops’ option and enter the number of times to loop the region, enabling a crossfade at the loop point if necessary.
Alternatively, you can enter an exact duration for the loop, or loop until the next region on the track or until the end of the session.
Step 4. Click OK when you have chosen your settings and the region will be looped for the specified number of times.

Fig. 9.50 – Looped regions with the Loop icon visible in the lower right corner.
note
Looping a region does not loop any automation associated with the source region, but you can always use the ‘Copy Special’ and ‘Paste Special’ ‘Repeat To Fill Selection’ commands to copy automation from the source loop to all the loop repeats.
The Region menu’s Unloop command lets you unloop looped regions. You can either remove all the looped regions to revert back to the original region, or you can convert the looped regions into normal regions – a process referred to as ‘flattening’ the loop.

Fig. 9.51 – The Unloop Regions dialog.
Editing Looped Regions
You can edit looped regions either as a group or as individual regions. To edit an individual looped region, click its Loop icon to select this first.
You can trim selections from within looped regions using the various Trim Region commands available from the Trim sub-menu in the Edit menu or you can trim the entire looped region using the standard Trim tool.
tip
If you hold down the Control key (Mac) or Start key (Windows) while using the Trim tool, it will constrain the Trim tool to removing or revealing the individual regions from the looped region.
There is also a special Loop Trimmer feature that lets you trim the duration of the individual loop regions while filling the total length of the looped region. Depending on whether you extend or reduce the length of an individual loop region, the number of repetitions of the trimmed loop increases or decreases to fill the length of the entire looped region. Let’s see how this works in practice:
Step 1. Select the Standard or Scrub Trim Tool.
Step 2. Move the cursor over a Loop icon in a looped region. The cursor changes to the Loop Trimmer icon.

Fig. 9.52 – The Loop Trimmer about to be applied to a looped region.
Step 3. Trim the start or end of any of the individual loop regions in the group.
In the example below I trimmed the last looped region to decrease it to less than half of its previous length
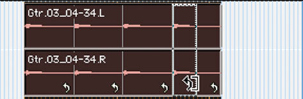
Fig. 9.53 – Using the Loop Trimmer to trim the end of the last individual looped region in the group.
Step 4. Let go of the Loop Trimmer.
As you can see in the screenshot below, all the other regions were automatically adjusted to this new length, and additional looped regions (almost 5 new looped regions) were created to fill the original length of the looped regions (making a new total of almost 9 looped regions).
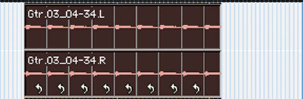
Fig. 9.54 – The looped region filled with the individual trimmed loop regions.
Step 5. Now let’s go the other way and extend the length of one of the individual regions.
In the example below, it was only possible to extend the individual regions by about 60% because the audio file referenced by these regions was quite short in duration.
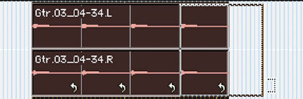
Fig. 9.55 – Extending the last looped region using the Loop Trimmer.
Step 6. Let go of the Loop Trimmer.
As you can see in the screenshot below, in this example just two whole loop regions fit within the original looped regions selection. A third, truncated, loop region is added at the end to fill up the available space.

Fig. 9.56 – The looped region filled with the individual trimmed loop regions.
note
If you have made a selection within a looped region, or even a selection that extends beyond the looped region, you can use the commands in the Edit menu’s Trim Region sub-menu to trim the region in various interesting and useful ways. For example, if the source region is extended to the left using the Trimmer tool for the total length of the loop, the source region is moved earlier in the Timeline and repeated loop regions fill in up to the point where the last original loop region ended. If the trim to the left is part of the source region’s length, the source region is not moved and a partial loop region is created to the left of the source region. This is a powerful feature that lets you make quick changes to your arrangement by using partial loops as upbeats, or by extending looped sound effects or ambience earlier in a film score.
Stripping Silence from Regions
The Strip Silence feature lets you analyze audio selections containing one or more regions across one or more tracks to define areas that you wish to regard as ‘silence’. Once you have identified these, you can ‘strip away’ (i.e. remove) the ‘silence’, or you can keep (i.e. ‘extract’) the ‘silence’ by removing the rest of the audio. The third option is to separate your selection into lots of smaller regions so that these can be quantized or edited individually afterwards.
Four sliding controls in the Strip Silence window let you set the parameters by which ‘silence’ will be defined.
tip
If you press Command (Mac) or Control (Windows) while adjusting the sliders you get finer resolution.

Fig. 9.57 – The Strip Silence window.
The Strip Threshold parameter lets you set a value for the amplitude, below which any audio is considered to be silence. For example, on a bass drum track, you will probably hear the sound of the rest of the drum kit when the bass drum is not playing, but this will be much quieter than the bass drum – in other words, the amplitude of this quieter audio will be much less than the amplitude of the bass drum sound. You can define this low amplitude audio to be considered as silence by setting the Strip Threshold just above this.
You can also define what is to be considered to be silence using the Minimum Strip Duration parameter. This sets the minimum amount of time that the material below the threshold must last for before it is considered to be wanted audio.
The Region Start Pad parameter lets you extend the start of each new region to include any wanted audio material that falls below the threshold, such as breathy sounds before a vocal or the sound of fingers sliding up to a note or chord on a guitar. Similarly, the Region End Pad parameter lets you extend the end of each new region to make sure that the full decay of the audio material is preserved.
As you adjust the controls, rectangles start to appear in the selected region surrounding the wanted audio. The audio in between these rectangles is considered to be silence.
For example, take a look at the screenshot below. This shows a selection from the bass drum track of a multi-mic’ed drum kit. The bass drum inside the selection plays ‘bu-boom….bu-boom.…bu-boom….bu-boom’. These four sets of notes are outlined by four white rectangles. Everything in between is considered to be silence. As you can see, three additional areas of the waveform within the selection are also outlined by white rectangles. These are where the unwanted audio rises above the Strip Threshold for a short time. This was the best compromise that could be achieved by adjusting the parameters, so I accepted these settings even though it meant that I would have to manually deal with the two wrongly defined areas.

Fig. 9.58 – With the Strip Silence parameters correctly set, you see white rectangular boundaries around the ‘wanted’ audio.
If you click the Strip button, it removes the areas that you have defined as silence from the selected region. In the screenshot below you see the four ‘wanted’ regions containing the bass drum notes and the three smaller ‘unwanted’ regions. Now you can delete the unwanted regions and move the bass drums around to change the timing or ‘feel’ – or edit these whatever way you wish.
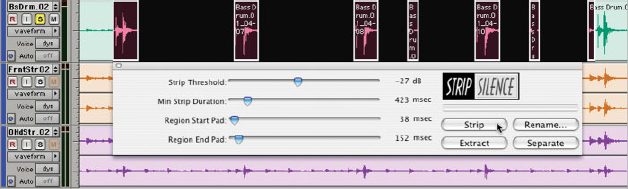
Fig. 9.59 – The ‘silence between the “wanted” regions has been stripped away by clicking “Strip”’.
If you click the Extract button instead, this removes the audio above the Strip Threshold and leaves (or ‘extracts’) the audio that you have defined as silence. So you can think of Extract as the inverse of Strip with the ‘wanted’ audio in this case being the audio that falls below the Strip Threshold. This feature can be useful in post-production if you want to extract the ‘room tone’ or ambience from part of a recording to use elsewhere.
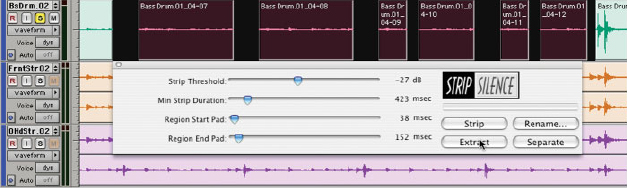
Fig. 9.60 – The audio above the Strip Threshold has been removed, leaving the audio defined as ‘silence’, but which actually contains ambience, remaining (i.e. ‘extracted’) in the track.
The third option is to click the Separate button. This automatically divides the selection into regions based on the boundaries detected by Strip Silence. In the screenshot below you see that the selection has been divided into 13 separate regions, each with its own name (although the 13th region is too short to display its name). The Separate feature is very useful if you want to quantize the audio in each region to line up with the bars and beats, for example.

Fig. 9.61 – The Separate button divides the whole selection into separate regions based on the boundaries detected by Strip Silence.
If you click the Rename button in the Strip Silence window, this opens the Rename Selected Regions dialog. This lets you define how the regions that you will create using the Strip Silence feature will be named. For example, if you set the naming options as in the screenshot below, the names generated for the first six regions created by Strip Silence would be as follows:
• SFX023.Reel1
• SFX024.Reel1
• SFX025.Reel1
• SFX026.Reel1
• SFX027.Reel1
• SFX028.Reel1

Fig. 9.62 – Rename Selected Regions dialog.
note
This dialog remembers your previous settings. You can clear any unwanted previous settings using the Clear button.
Inserting Silence
The Insert Silence command does what it says, replacing a selection that you have made on a track or tracks with silence. Less obviously, it can also be used to remove automation data.
If the track is displaying audio or MIDI data, when you apply the Insert Silence command to a selected range, it not only clears the audio or MIDI data, it also clears any automation data for the track or tracks.
However, if the selected tracks are displaying automation data, the automation data visible on each track is cleared throughout the selected range and any audio or MIDI is left untouched. Also, if you press the Control key (Mac) or Start key (Windows) while choosing the Insert Silence command, this clears all the automation data from all the selected tracks – not just the visible data.
The Insert Silence command is particularly clever when used in Shuffle mode. In this case it moves the track data within and after the Edit selection forward, by an amount equal to the selection, pushing everything (including any automation data) forward from the start of the selection – to get it ‘out of the way’ of, thus making room for, the silence that you are inserting.
To explain this another way: when you apply the Insert Silence command to an Edit selection while in Shuffle mode, Pro Tools splits the region(s) at the beginning of the insertion point and moves the new region(s) to a position later in the track by an amount equal to the length of the selection, before inserting the selected amount of silence.
tip
If this written description still leaves you wondering what this is all about, then the best way to get to know how this works (as with most things) is to try it for yourself.
Consolidating Regions
Often, during your editing sessions, you will end up with tracks made up from many smaller regions. This could happen if you ‘comp’ several takes to make a composite containing the best from each take. Or maybe you have separated several small regions from one take containing notes unintentionally played ‘off the beat’ so that you can move these to their correct bar/beat positions.
When you are satisfied with your edits to these tracks, Pro Tools allows you to consolidate a track, or a range within a track (such as a verse or chorus), into a single region, which is much easier to work with. When working with audio tracks, this consolidation process causes a new audio file to be created that encompasses the selection range, including any blank space, treating any muted regions as silence. To consolidate regions within a track:
Step 1. Select the regions you want to consolidate using the Time Grabber tool or the Selector tool.
Step 2. Choose Consolidate from the Edit menu to create a new, single region that replaces the previously selected regions.
tip
Consolidating an audio track does not apply any automation data as it creates the new file, so if you want to create a new file with automation data applied to the audio, use the ‘Bounce to Disk’ feature instead.
Compacting Audio Files
When you have finished your editing session you should consider ‘compacting’ any edited audio files to remove any unused audio that you are sure you have no further use for. This makes the files smaller, so it saves disk space from being used up unnecessarily.
If you have recorded or imported a large number of audio files, yet have only actually used a fraction of these, compacting the files can save considerable amounts of disk space, making backups much less costly both in time needed to make the backups and for the media used.
To compact an audio file:
Step 1. Select the region or regions that you want to compact in the Region List.
Step 2. Choose Compact from the popup menu at the top of the Region List.
Step 3. Enter the amount of padding in milliseconds that you want to leave around each region in the file.
Step 4. When you click Compact, the file or files are compacted and the session is then automatically saved.
Because it permanently deletes audio data, the Compact Selected command should only be used after you have completely finished your editing and are sure that you have no further use for the unused audio data.
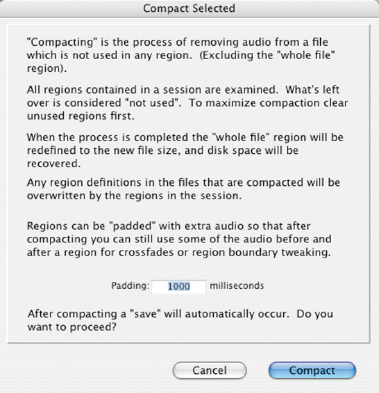
Fig. 9.63 – The Compact Selected dialog.
What you have learned
How to use the Cut, Copy, Paste, and Clear commands and how to make Edit selections are explained in some detail.
The various Edit modes are explained along with tips and tutorials on how to use these.
Making Timeline selections and the pros and cons of linking these with Edit selections are explained.
How to find your way around the Edit window, zooming, scrolling and finding the ends of the selection are explained in some detail.
How to work with regions and how to use the various Region Editing commands.
Finally, how and when to consolidate and compact regions and audio files is explained.