
Hardware Options for Pro Tools LE and M-Powered Systems
Pro Tools LE software requires you to connect a suitable Digidesign hardware interface to your computer before it will run. Digidesign hardware for LE systems includes the Digi 001, the Mbox, the Mbox 2, the Digi 002, and the Digi 002 Rack. The Command | 8 hardware controller also works with LE systems.
The Mboxes are very affordable and ideal for use with laptops but only offer two channels of analogue and two channels of digital input and output. The Digi 002 Rack is more expensive, but supports multi-channel operation. The Digi 002, covered in the next chapter, incorporates a hardware control surface along with the same interfacing features as the Digi 002 Rack. The Command |8, also covered in the next chapter, is similar to the Digi 002 Rack, incorporating a MIDI interface and basic audio monitoring, but without the multi-channel audio input and output interface capabilities.
Let’s take a look at the discontinued Digi 001 first, as this was the first serious multi-port interface for Pro Tools LE systems and there are still many of these in use today.
Digi 001
The Digi 001 system includes a PCI card that you install in your computer; an I/O interface with a range of input and output connectors; and the Pro Tools LE software. The PCI card has a connector to link to the Digi 001 interface and also has a pair of ADAT optical connectors for multi-channel digital input and output (I/O). Each optical connector can carry 8 channels of 24-bit digital audio or can be switched using the software for use as an additional 2-channel S/PDIF interface.
The I/O interface provides 8 analogue audio inputs and outputs with 24-bit converters, S/PDIF digital audio input and output, a stereo headphone jack socket, a footswitch jack socket, and a pair of MIDI In and Out sockets. The total number of audio inputs and outputs is 18 – counting the 8 ADAT digital channels, the 2 S/PDIF digital channels, and the 8 analogue channels.
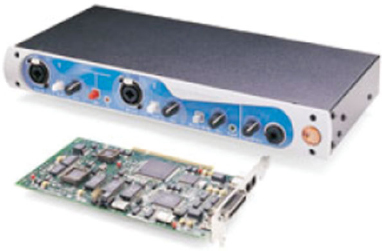
Fig. 1.1 – Digi 001: no longer manufactured.
The MIDI in and out connectors let you use the Digi 001 as a basic 16-channel MIDI interface for Mac or PC. The headphone jack socket lets you connect a pair of stereo headphones to monitor whatever audio you have routed to analogue outputs 1 and 2 using the Pro Tools LE software. The footswitch jack lets you connect a footswitch to control the QuickPunch and MIDI punch-in and punch-out recording features.
The 001’s microphone preamps will accept a wide range of microphone types, including high-quality ‘condenser’ models that require ‘phantom’ power. Dynamic microphones (such as the popular Shure SM58) don’t need power, but professional studio models (such as the AKG C414) need 48 volts which the preamplifier can send via the microphone cables into the microphone, rather than via separate power cables – hence the name ‘phantom’ power.

Fig. 1.2 – Digi 001 front panel.
The pair of analogue audio inputs provided on the front panel of the interface can accept either Mic-level or Line-level signals. The input sockets are combined XLR and 1/4″ jack types, so you can plug either of these commonly used connectors into the Digi 001. The ‘pad’ switches provided for each input reduce the input sensitivity by 26 dB when you want to use line-level signals instead of microphones. The phantom power switches are labelled ‘48 V’ which is the voltage supplied to power the microphones. A pair of Input Gain controls is also provided. Gain controls for the line inputs, 3–8 on the back of the Digi 001 interface, are provided in software so you can use these with mixers, preamps, keyboards, or other line-level sources.

Fig. 1.3 – Digi 001 rear panel.
A pair of Monitor Outputs is provided on the back panel. These carry the same audio signals that are routed to analogue outputs 1 and 2. The difference is that they are intended to let you listen to your main mix by hooking up a pair of powered speakers or a stereo power amplifier and speakers. A Monitor Volume control is provided on the front panel of the Digi 001 interface to control the listening level.
The Main Analogue outputs, 1 and 2, can be used to connect to a tape recorder when you are mixing down, although they may be connected to an external mixer. These outputs are balanced, +4 dBu line level. Analog Outputs 3–8 are unbalanced, −10 dBu line level, and can be used as sends to outboard gear or as outputs to an external mixer.
Another option for mixdown is to connect the S/PDIF outputs to a DAT or other digital recorder. By default, whatever is routed to outputs 1 and 2 is also sent to the S/PDIF outputs. You can disable this S/PDIF ‘mirroring’ (as it is referred to in the manual) so that you can use the S/PDIF connections to hook up an external digital effects unit, for example.
Low Latency Monitoring on the Digi 001
The Digi 001 supports Pro Tools LE’s special Low Latency Monitoring feature. This lets you record and monitor the 8 analogue and 8 ADAT digital inputs directly via outputs 1 and 2 with very low latency. When you select Low Latency Monitoring from Pro Tools LE’s Options menu, the audio entering the hardware interface is not passed through the host computer’s processor – it is routed directly to the main outputs instead.
There is a slight amount of latency involved here due to the A/D and D/A conversions and the internal routing within the hardware. From the information I was able to gather, the total delay is roughly 164 samples. This may not sound that low, but it’s a lot better than the 1024 samples that would have been in there had the Low Latency feature not been implemented.
There are some limitations with this method – any plug-ins and sends assigned to record-enabled tracks will be bypassed, for example – but at least you can get around the problem reasonably well.
One particular situation always requires a workaround. If you are using a plug-in to create a metronome click, you are going to lose your click in Low Latency mode.
One solution is to use an external MIDI device such as a drum machine to play the click. Another, partial, solution is to bus the output of the track containing the plug-in to an audio track and record this to your hard disk first. Then you can dispense with the plug-in track and simply replay the audio click track.
The problem with this, of course, is that you lose the ability to hear the click during count-off bars. If your session starts at Bar 1, Beat 1, for example, this can make it practically impossible to cue a musician to overdub starting at Bar 1, Beat 1.
A solution here is to make sure that you leave one or more bars empty at the start of your session so that you can record the click as audio into these ‘startup’ bars and use this to cue the musicians.
Monitoring latency and MIDI
To monitor a MIDI device through the audio inputs on the Digi 001, you need to route each input to a track and record-enable that track before you will hear any output. This is another reason why it is useful to use a separate external mixer with the Digi 001 – so you can always hear your synths, drum machines, and samplers without setting up routings in the Pro Tools software.
Also, when you are monitoring the audio coming into the Digi 001 from an external synthesizer, what you hear will have an audio delay equivalent to the number of samples specified in your Hardware Buffer settings – the latency delay. This delay will be very apparent if you have existing audio tracks, as these will be heard first and the MIDI devices will be heard a little later. If you don’t have an external mixer you will have to accept this latency while recording MIDI.
But there is a way around this for playback – use the Global MIDI Playback Offset feature in Pro Tools LE’s MIDI Preferences to trigger your MIDI data early to compensate for the latency. This offset is made in such a way that it just affects the playback – not the way the MIDI data is displayed in the Edit window. You are given the choice of offsetting the MIDI tracks either globally (all by the same amount) or individually. To compensate for audio monitoring latency you will need to enter a negative offset that causes the MIDI data to be played back earlier by a number of samples equivalent to the latency in samples. The best way to work out which latency value to use is to record the audio from your MIDI device into Pro Tools, then simply look at the exact position in samples where the audio starts compared to where the MIDI note is placed. This way you can read off the delay between these exactly in samples.
You can also set up Individual MIDI Track Offsets in Pro Tools LE. This can be useful when you want to compensate for the time it takes for a particular synth or sampler to respond to an incoming MIDI message. This can amount to several milliseconds and this can be enough to make supposedly simultaneous percussive instruments sound like they are ‘flamming’. This is typically the case with a snare drum sample played from Pro Tools as audio that you want to combine with another snare sample played from an external MIDI sampler. The solution here is to offset the individual MIDI track in Pro Tools to compensate for the delay in the MIDI sampler.
Digi 002 Rack
Priced around $1200, the Digi 002 Rack is, essentially, the Digi 002 without the control surface. What you get is a 2U 19″ rackmountable unit that connects to the computer via FireWire. It is just about light enough in weight to carry with you in a bag, and it is perfect for small studio setups – supporting a wide range of analogue and digital audio, and MIDI inputs and outputs. It also has dedicated monitor and headphone outputs.
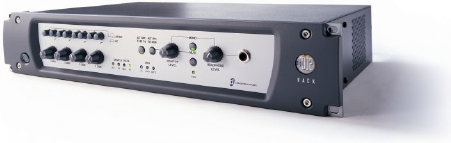
Fig. 1.4 – The Digi 002 Rack: the successor to the Digi 001.
The Digi 002 Rack will record audio with 24-bit clarity and up to 96 kHz sample rate support
Front panel

Fig. 1.5 – Digi 002 Rack front panel.
At the left of the front panel there are rotary gain controls for each of the four microphone preamplifiers. Above these there are four pairs of buttons. The first of each pair switches the input between microphone and line level. The second button switches in a high-pass filter to remove lower frequencies that may contain rumble or other unwanted sounds. Four LEDs to the right of the gain controls indicate the sampling rate as: 44.1, 48, 88.2, or 96 kHz. Three more LEDs to the right of these indicate MIDI input and output activity. Above these there are two small button switches. The first routes the Alternative Source to input pair 7–8 while the second routes the Alternative Source to the monitor outputs. An associated rotary control knob lets you adjust the output level to the monitors and, adjacent to this, a button switch is provided to let you mute the monitors. Finally, at the right of the panel, there is a 1/4″ jack socket, providing a headphone output, with an associated volume control knob.
Rear panel
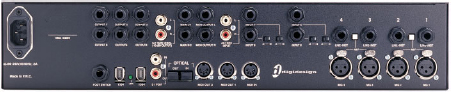
Fig. 1.6 – Digi 002 Rack rear panel.
Looking at the rear panel you will find the inputs at the right and the outputs at the left. The first four inputs accept either microphones via XLR connectors or line- or instrument-level inputs via 1/4″ jack connectors. Two switches are provided for 48-volt phantom power – the first switches this on for inputs 1 and 2, while the second switches it on for inputs 3 and 4.
This is something of a limitation if you only have one microphone that needs phantom power. Fortunately, most dynamic microphones are not usually harmed if phantom power is applied, even they do not need this. Unfortunately, ribbon microphones can be damaged if you apply phantom power – so take care!
So-called ‘phantom’ power is used to supply the 48 volts typically used to power capacitor microphones directly via the microphone audio cables. Examples include the large-diaphragm studio types like the AKG C414 or Neumann U87 models.
Inputs 5, 6, 7, and 8 just have 1/4″ jack connectors, but individual switches are provided for +4 dBu or −10 dBV operation. An Alternate Source Input for direct monitoring of −10 dBV audio equipment, such as tape players or CD players, is provided via a pair of RCA/phono sockets for left and right channels.
To the left of these, a pair of 1/4″ jacks sockets carries the left and right Monitor outputs. You connect these to your monitor amplifier and speakers, or directly to powered monitors, and you can control the level of this output using the dedicated volume control on the front panel. This monitor output carries whatever signals are being routed to Main output pair 1–2.
The main left and right outputs, output pair 1–2, may be connected to a tape or DAT or CD recorder when recording final mixes to stereo, or may be used along with the other three output pairs, 3–4, 5–6, and 7–8, to connect to any other equipment.
The Monitor outputs and the individual outputs are fixed at +4 dBu to suit connection to professional equipment. Signals routed to output pair 1–2 are also mirrored on a pair of RCA/phono sockets that provides an alternative −10 dBV output to, say, a cassette or Mini-disc recorder.
So, in total, the Digi 002 Rack has 8 analogue input channels and 8 analogue outputs, and the A/D and D/A converters offer 24-bit/96 kHz operation – which provides significantly higher audio quality than the Digi 001 or Mbox, for example.
One MIDI input socket and two MIDI output sockets are provided to support 16 channels of input and 32 channels of output. To the left of these there is a pair of optical connectors that can provide either 8 channels of ADAT optical I/O (up to 48 kHz) or 2 channels of S/PDIF I/O (up to 96 kHz).
There are also two RCA/phono sockets for standard S/PDIF I/O and a pair of IEEE 1394 ‘FireWire’ ports – one to connect to your computer and one to act as a ‘thru’ port to another FireWire device, such as an external hard drive.
A 1/4″ jack socket to the left of the FireWire ports, labelled Footswitch, is provided for QuickPunch control – use this to punch in and out while recording.
Finally, the power connector will accept AC supplies between 100 and 240 volts running at either 50 or 60 Hz – so you can connect the Digi 002 Rack to the main electricity supplies in most countries around the world without problems.
The Mbox
Mbox is a low-cost system for recording, editing, and mixing up to 32 tracks of audio that includes an audio interface along with Pro Tools LE software. The interface connects to your computer via USB – ideal for use with laptops.
The Mbox requires a free USB port on the computer to connect to – it will not work with a USB hub – which could make things awkward with some setups. However, the Mbox takes its power from the USB port, so no power adapter is required – a distinct advantage for portable setups.
Compact in size, Mbox measures just over six inches high, three and a half inches wide, and seven inches deep. It has two analogue audio inputs into which you can feed a microphone, a line-level signal, or a direct instrument signal via the XLR/1/4″ jack combination connector. The high-impedance line input has a low-noise setting for use with electric instruments such as guitar, bass, or keyboard. MBox also has 2 channels of S/PDIF digital I/O.
The A/D and D/A converters and the S/PDIF I/O are all 24-bit, working at either 44.1 or 48 kHz sampling rates, and the microphone preamplifiers were designed by Focusrite to provide the best quality possible at this price.
The front panel

Fig. 1.7 – The original Mbox: now discontinued.
Looking at the front panel, there are two knobs with associated switches and LED indicators to let you select between the mic, line and instrument inputs, and control the input levels of these. Below these, third from the top, you will find a knob labelled ‘Mix’ that lets you monitor whatever is plugged into the Mbox’s inputs, or the playback of any audio tracks in Pro Tools, or a blend or mix of these, as described later. Finally, at the bottom of the front panel there is a 1/8″ ‘mini’ headphone jack with an associated volume knob and mono button.
The back panel
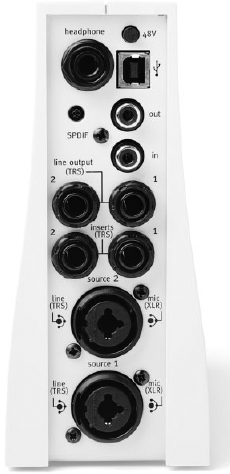
Fig. 1.8 – Mbox back panel.
At the top-left of the back panel there is a standard 1/4″ headphone jack. To the right of this there is a USB port with a 48-volt phantom power switch above it. Underneath the USB port there is a pair of RCA/phono connectors for S/PDIF input and output. The line outputs are underneath again, in the form of a pair of 1/4″ TRS jacks that can provide either balanced or unbalanced analogue output. A pair of analogue inserts is also provided via 1/4″ TRS jacks to allow you to hook up outboard processors while recording to disk. The final two connectors are dual-purpose XLR/1/4″ jack combinations that will accept either a typical balanced microphone cable XLR connector or a typical musical instrument cable 1/4″ jack connector.
Zero-latency monitoring
One of the neatest features is the Mix control. This lets you blend the sound of anything plugged into the Mbox with the playback from Pro Tools LE. This is ideal, especially when overdubbing, to avoid the latency delay that normally appears when you monitor inputs through the software (via A/D, the computer CPU, then D/A) and back out to the speakers – rather than monitoring straight from the source to the speakers.
Just mute the track to which you are recording in the Pro Tools LE software mixer so that you don’t hear its delayed sound being monitored through the system. Then adjust the Mix control to feed the incoming signal from the instrument you are recording directly into the stereo mix. Et voila! There you have it – zero-latency monitoring.
note
When you are using the Mbox hardware with Pro Tools LE software, there is no Low Latency Monitoring option in the Operations menu. This is not needed, as the Mix control effectively does the same thing.
Exploring the Mbox Mix control
Try this:
Step 1. Plug a microphone into one of the Mbox inputs.
Step 2. Route this to an audio track in the Pro Tools LE mixer.
Step 3. Record-enable the audio track so that the audio coming in from the Mbox will be routed via the Pro Tools mixer back out to the Mbox.
Step 4. Now hit the Record and then the Play buttons (or hit Command-Spacebar) to start recording and count out loud to ten (or just say anything for 10 seconds or so) into the microphone.
Step 5. Then hit the Spacebar to stop recording and de-select the track’s Record-Enable button.
Now let’s explore how the Mix control works:
Step 6. Turn the Mix control to Input (all the way anti-clockwise, to the left).
Step 7. Speak into the microphone. You will hear the microphone directly through the speakers.
Step 8. Now turn the Mix control to Playback (all the way clockwise, to the right).
Step 9. Speak into the microphone and you will discover that you cannot hear the sound directly through the speakers any more.
Step 10. Now hit the Spacebar to playback your recording. You will hear this directly through the speakers.
Step 11. Now put the Mix control back to Input and the playback from Pro Tools will not be heard any more.
This is because putting the Mix control in the Input position only lets you hear what is plugged into the Mbox’s inputs (with no latency delay as it is not being monitored via the computer) and putting it in the Playback position only lets you hear what is being played back from Pro Tools.
note
Beware the trap of forgetting to turn the Mix control to either Input or Playback as necessary or you may end up ‘scratching your head’ wondering why you are hearing no sound through the speakers at all.
tip
The clever trick is to balance the Mix control somewhere in-between these two extremes so that you hear enough of the Input directly via the Mbox so that you can play or sing into the microphone without being put off by the latency delay while hearing enough of the Playback to keep you happy as well.
Summary
Ideal for laptop users, the Mbox interface is very compact, light, and easy to carry around in a bag with a laptop, a pair of small self-powered monitors, and maybe an M-Audio Oxygen keyboard and a Shure SM58 microphone. This setup is basically a ‘studio-in-a-bag’ that you can set up just about anywhere you like.
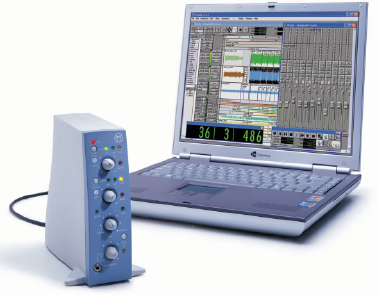
Fig. 1.9 – Laptop with Mbox.
Reasons to buy an Mbox? If you want a portable recording studio for your laptop, get an Mbox. If you want to learn Pro Tools before investing in an expensive professional system, get an Mbox. If you are on a budget, but want to make a start working with the industry-standard digital audio workstation, get an Mbox. If you already have a Pro Tools system at the studio and want to take work home to review and edit, get an Mbox.
Mbox 2
Digidesign brings out new products each year and retires older models from time to time. The original Mbox was discontinued in the summer of 2005 and immediately replaced in Digidesign’s product range by the Mbox 2 – allowing Digidesign to continue offering a USB-powered studio-in-a-box for under $500.
The Mbox 2 is slightly larger than the original Mbox and features MIDI in and out ports in addition to similar audio features to the original Mbox. It also has microphone, line, and DI inputs. So you can hook up a MIDI module or controller, then plug a guitar or bass directly into the DI jack (without the need for an extra preamp), plug a keyboard or mixer into the line jack, or plug a pair of microphones into the XLR jacks.
Although Mbox 2 looks like a 2-channel unit, it actually supports 4 channels of input and output if you use both the analogue and digital I/O at the same time. As with the original Mbox, the A/D and D/A converters and the S/PDIF I/O are all 24-bit, working at either 44.1 or 48 kHz sampling rates.
The maximum analogue input level is +21 dBu and maximum analogue output level is an impressive +4 dBV–so Mbox 2 should interface with just about any type of mixer or other audio equipment that you are likely to be using.
The Mbox 2 hardware unit can be positioned horizontally or vertically to fit into any workspace. It comes with two faceplates that can easily be swapped using the included hex wrench. One faceplate features a large handle that makes the unit easily portable. The second faceplate, which offers a rubberized grip, allows Mbox 2 to sit flat on a desktop and reduces the space required when the unit is packed for travelling.
Weighing in at just 1.23 kg, Mbox 2 is compact and easily portable. The dimensions measured with the unit in horizontal (handle-down) configuration are as follows: height: 4.9 cm, with handle: 7.7 cm, with handle cover: 5.6 cm; width: 22.4 cm; depth: 18.4 cm (including the knobs).
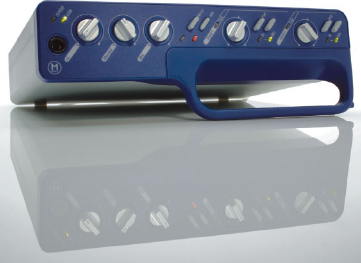
Fig. 1.10 – Mbox 2. Front panel
Front panel
At the far left there is a 1/4″ headphone jack with an associated knob to control the volume. To the right of this you will see the main Monitor volume control and the Mix control that lets you balance between incoming source audio being routed direct to the monitor outputs and audio from the computer being routed to the monitor outputs.
tip
Use the Mix control for zero-latency monitoring of your source audio while recording. With it somewhere in the middle you can hear both source audio and audio from the computer.
Looking at the right-hand side of the front panel you will see the Input gain controls along with associated indicator LEDs, source selection, and Pad buttons.
In the middle there is a very useful Mono button and a button to switch on the 48-volt ‘phantom’ power, which is needed if you want to connect condenser microphones directly to Mbox 2’s microphone preamplifiers.
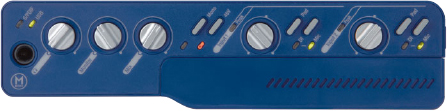
Fig. 1.11 – Mbox 2 front panel.
Rear panel
Toward the left-hand side, the rear panel has two groups of analogue inputs, each with an XLR microphone input, a balanced Line input (via ‘stereo’ 1/4″ Tip/Ring/Sleeve jack) and an unbalanced DI input (via ‘mono’ 1/4″ jack) to let you connect musical instruments.
In the middle of the panel there is a pair of 1/4″ jacks carrying the left and right unbalanced analogue outputs. Next to these, a pair of RCA/phono jacks provides stereo 24-bit S/PDIF digital input and output. To the right of the panel there is a pair of sockets for MIDI input and output and at the far right you will find the USB connection that carries data between Mbox 2 and the computer.
note
The USB socket also carries power from the computer for Mbox 2 so it needs to be connected directly to the computer or via a powered USB hub.
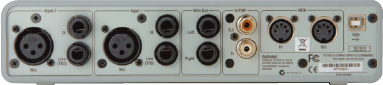
Fig. 1.12 – Mbox 2 rear panel.
M-Audio M-Powered Interfaces for Pro Tools
M-Audio offers a range of PCI, USB, and FireWire hardware interfaces that work with Pro Tools M-Powered software – providing many more options for users to put together suitable, affordable Pro Tools systems.
FireWire vs USB
There are two types of connectors used to hook up popular Audio and MIDI interfaces to your computer – USB and FireWire (IEEE 1394). FireWire supports much greater bandwidth than USB 1.1 so you can use more channels of digital audio at higher sampling rates and bit depths with your application. USB is OK for less demanding applications with just a couple of channels of input and output. FireWire is better able to handle multi-track operation with lower latency and higher fidelity.
FireWire interfaces
M-Audio offers five FireWire multi-channel audio/MIDI interfaces that work with Pro Tools M-Powered – the Ozonic keyboard and interface, the FireWire 410 and FireWire 1814, FireWire Audiophile, and FireWire Solo.
Ozonic
Ozonic is a 37-note velocity- and pressure-sensitive MIDI keyboard, with plenty of MIDI-assignable knobs, sliders, buttons, joystick, and other controllers. It also incorporates an audio interface with 4 inputs and 4 outputs, a MIDI interface, a microphone preamplifier, instrument inputs, and a headphone output.
Ozonic has 40 MIDI-assignable controllers that you can use to program and perform with Real-Time AudioSuite (RTAS) virtual instruments and effects – bringing back tactile control. So, for example, you could assign the mod wheel to the cut-off frequency of your virtual MiniMoog or map Ozonic’s slider bank to the drawbars of your virtual tone wheel organ.
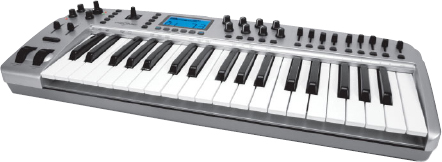
Fig. 1.13 – Ozonic 37-key FireWire audio/MIDI interface and controller.
Ozonic connects to your computer via FireWire and also incorporates both MIDI and audio interfaces. So, if you already have a laptop or desktop, a pair of powered monitor speakers, and maybe a microphone or guitar, Ozonic completes your MIDI and audio recording system. M-Audio also offers a range of accessories including sustain and expression pedals, an affordable studio microphone, and Ableton Live software.
The MIDI keyboard has pitch bend and modulation wheels at the left and an octave selector button that you can press to play lower notes or higher notes than the default range. Above these there are several controls for output level, headphone level, input gain, and so forth. Directly above the keys, you will see two columns of buttons that let you select the preset, group, or zone, with an assignable joystick positioned between these. A row of 14 MIDI-assignable buttons runs above the rest of the keys. Above the buttons there is a small LCD screen, 8 assignable knobs, and 9 MIDI-assignable faders. You can use all these controls to give you hands-on control of any MIDI-controllable hardware devices, mixers, sound modules or effects, or ‘virtual’ instruments, effects, and other software.
The audio and MIDI interfaces are accessed via the back panel. Ozonic has just one FireWire socket, which can be a limitation if you want to use it with other FireWire peripherals. Normally, Ozonic takes its power from your computer via the FireWire bus, but a low-voltage power input is provided that you can use with any suitable mains adapter as necessary. MIDI in and out sockets are provided along with a pair of jack sockets for sustain and expression pedals. There are four 1/4″ audio output jacks, three 1/4″ audio input jacks, an XLR socket with associated phantom power switch that you can use to hook up any stage or studio microphone – and a headphone socket.
You get a cut-down version of Reason free with Ozonic to get you started. You also get a software control panel that provides basic audio mixing and metering facilities. And now that Avid/Digidesign owns M-Audio, you can buy Pro Tools M-Powered software to use as the software front-end for Ozonic. This means that the files you record using Ozonic at a gig, in the field, or on the road can be session-compatible with full Pro Tools systems at professional studios around the world.
FireWire 410 & FireWire 1814
The FireWire 410 has 2 balanced analogue inputs and 8 balanced analogue outputs plus 2 channels of S/PDIF I/O. You might choose this interface when you need to run discrete output channels to independent mixer channels and other outboard gear, or to provide separate outputs for surround monitoring. It has MIDI in and out sockets, direct hardware monitoring, and is bus-powered with an optional low-voltage power input.
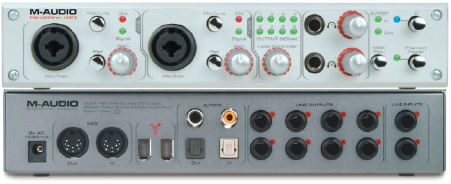
Fig. 1.14 – FireWire 410 4-In/10-Out FireWire mobile recording interface.
If you’re recording a full band, the FireWire 1814 with its 8 balanced analogue inputs and 4 balanced analogue outputs makes a better choice (especially if you get the optional 8-channel Octane preamp). It also has 8 channels of digital input and output via optical ‘Lightpipe’ connectors, along with word clock synchronization for seamless communication with devices, such as ADATs, DA-88s, and digital mixers.
Fig. 1.15 – FireWire 1814 18-In/14-Out FireWire audio/MIDI interface w/ADAT lightpipe.

Fig. 1.16 – FireWire 1814 rear panel.
The FireWire 1814 and FireWire 410 both support up to 24-bit/96 kHz with Pro Tools M-Powered. (When used with software supporting even higher data rates, the FireWire 410 can output 2 channels at 192 kHz, and the FireWire 1814 goes so far as 2 × 4 analog at 192 kHz.) Both units have great dual mic/instrument preamps, as well as dual simultaneously active headphone amps with convenient individual front-panel controls and 1/4″ outputs.
These compact studios literally fit in a backpack (M-Audio even make the backpack) and are amazingly powerful and convenient for remote recording. Again, the files you record at a gig, in the field, or on the road are session-compatible with full Pro Tools systems at professional studios around the world.
FireWire Audiophile
Created with the laptop-based DJ or live performer in mind, the FireWire Audiophile is a compact, FireWire-compatible audio/MIDI interface in a mobile package that’s perfect for live performance, home recording, and digital DJ work.
Stereo headphone output with A/B switching between assignable sources allows precuing for DJs and mobile musicians – and the assignable aux bus is perfect for creating dedicated headphone mixes and effect sends. You also get zero-latency hardware direct monitoring, ultra-low latency ASIO software direct monitoring, and MIDI I/O. The FireWire Audiophile even has AC-3 and DTS pass-through for surround sound playback.
The front panel has a 1/4″ jack headphone output with associated volume control and an A/B source switch, a pair of LEDs to indicate S/PDIF I/O activity, an assignable level control, and a power on/off button.
Fig. 1.17 – FireWire Audiophile 4-In/6-Out FireWire audio/MIDI interface.
The rear panel has a 12-volt low-power input, a pair of FireWire sockets, a pair of coaxial connectors providing 2 channels of S/PDIF digital input and output, a pair of MIDI in and out sockets. It also has two pairs of RCA connectors providing analogue line outputs and one pair of RCA connectors providing analogue output.
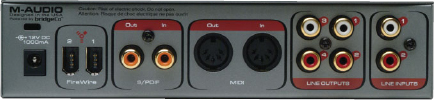
Fig. 1.18 – FireWire Audiophile rear panel.
That makes the FireWire Audiophile a four-input, six-output audio interface capable of high-quality analog and digital I/O with full 24-bit resolution at sampling rates up to 96 kHz for recording and playback.
FireWire Solo
FireWire Solo is a mobile audio interface designed for songwriters and guitarists.
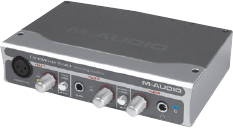
Fig. 1.19 – FireWire Solo.
The front panel has an XLR microphone input with associated gain control, a 1/4″ jack guitar input with associated gain control, a front/rear input selector, a phantom power on/off switch for the microphone preamplifier, and a headphone output 1/4″ jack with associated volume control.
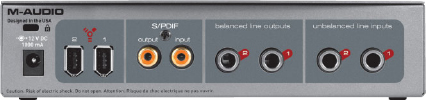
Fig. 1.20 – FireWire Solo rear panel.
The rear panel has 2 FireWire sockets, a 12-volt power input, stereo S/PDIF I/O, 2 unbalanced analogue line inputs and 2 balanced analogue line outputs via 1/4″ jack sockets.
PCI cards and interfaces
Pro Tools M-Powered works with various M-Audio Delta PCI 2.2 interface cards, including the best-selling Audiophile 2496 and the next-generation Audiophile 192. Other systems available at the time of writing include the Delta 1010, the Delta 1010 LT, the Delta 44, and the Delta 66.
Audiophile 2496 & Audiophile 192
Pro Tools M-Powered works with various M-Audio Delta PCI 2.2 interface cards, including the best-selling Audiophile 2496 and the next-generation Audiophile 192.
Both of these feature 2-channel analogue balanced 1/4″ I/O, 2-channel S/PDIF coaxial digital I/O, and up to 24-bit/96 kHz operation with Pro Tools. (The Audiophile 192 also features balanced 1/4″ I/O and provides up to 192 kHz sampling rate with applications that support it.) Both devices let you use analogue and digital I/O simultaneously, providing the flexibility of configuring 4-channel I/O, monitoring analogue while outputting digital, or running a digital effects loop.
Direct monitoring on both devices allows you to hear the input without latency while recording. The Audiophile 192 provides the extra benefit of a second pair of outputs, allowing routing to a separate headphone mix or two different speaker systems.
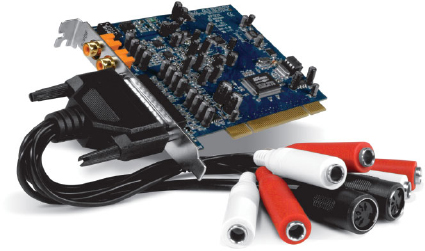
Fig. 1.21 – Audiophile 192 high-definition 4-In/4-Out audio card with digital I/O and MIDI.
These PCI 2.2 interfaces come with control panels that give you full digital mixing control of all inputs and outputs. Another benefit is that all M-Audio products that feature digital I/O provide pass-through of surround-sound-encoded AC-3 and DTS content, allowing you to stream surround content directly to a compatible surround receiver or similar device.
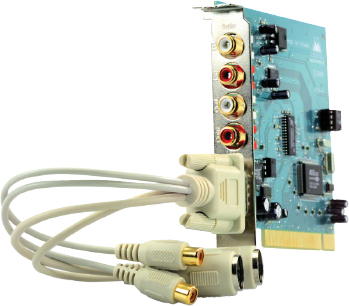
Fig. 1.22 – Audiophile 2496 4-In/4-Out audio card with MIDI and digital I/O.
Both the Audiophile 2496 and Audiophile 192 have built-in 16-channel MIDI I/O, so there’s no need for a separate MIDI interface. You’ll also find built-in support for ASIO, WDM, GSIF2, and Core Audio for compatibility with most other applications, such as Cubase SX, Sonar, Digital Performer, and so forth.
Delta 1010
The Delta 1010 10-In/10-Out PCI/Rack Digital Recording System with MIDI and Digital I/O consists of a PCI card that connects to a 19″ rackmountable box that contains the various input and output sockets.
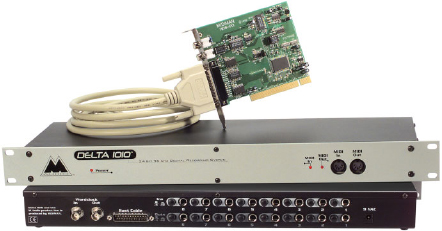
Fig. 1.23 – Delta 1010 10-In/10-Out PCI/Rack digital recording system with MIDI and digital I/O.
Delta 1010 LT
The Delta 1010 LT version does not have the rackmountable audio interface. Instead, the input and output sockets attach to the PCI card via multi-way connectors and ‘float’ around loose at the back of your computer – which is not as robust a solution, but is even more affordable.
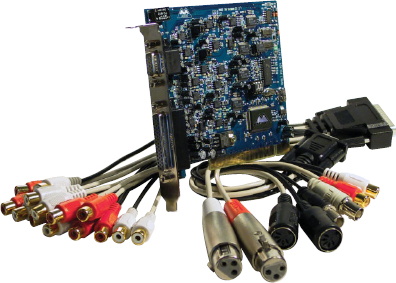
Fig. 1.24 – Delta 1010 LT.
Delta 44
The Delta 44 Professional 4-In/4-Out Audio Card is a PCI card that connects to a small breakout box that houses the four audio input jacks and four audio output jacks.
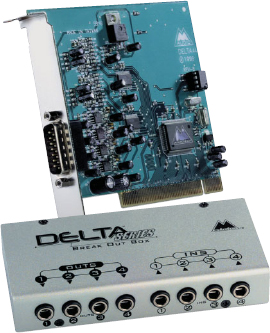
Fig. 1.25 – Delta 44 professional 4-In/4-Out audio card.
Delta 66
The Delta 66 Professional 6-In/6-Out Audio Card with Digital I/O is virtually identical to the Delta 44 but has the additional benefit of a pair of digital stereo input/output S/PDIF sockets on the back of the PCI card.
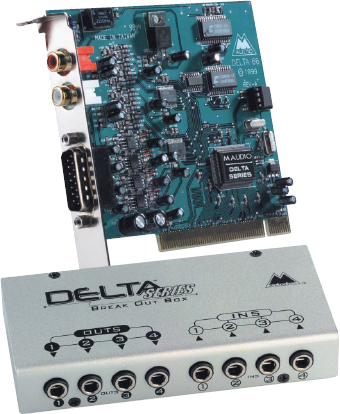
Fig. 1.26 – Delta 66 professional 6-In/6-Out audio card with digital I/O.
Latest Additions
Coinciding with the launch of Pro Tools 7, Digidesign announced that several more M-Audio devices had been qualified for use with Pro Tools M-Powered 7 software, including Black Box, Ozone, Mobile Pre USB, Fast Track USB, and Transit.
You won’t be needing a crystal ball to figure out that this will be an ongoing process, so keep your eyes out for future announcements in the Digidesign and M-Audio websites and in the various music technology magazines.