Recording Audio
Pro Tools is an excellent system to use for recording audio. With LE and M-Powered systems you can record and play back up to 32 tracks of audio using qualified hard drives (check the compatibility section on the Digidesign website to see which drives Digidesign has tested). The big advantage that digital audio recording has over analogue systems is that making copies once you are in the digital domain does not degrade the audio, building up layers of noise and distortion on each subsequent copy – as is the case with analogue tape systems.
One of the keys to making good recordings is maintaining a good signal-to-noise ratio. So record using levels as ‘hot’ as you can get them without overloading any of the components in the recording chain. If you are recording 16-bit, this is very important, but with 24-bit systems it is less crucial to keep the signal levels at their maximums. 24-bit systems can record a much wider range of signal levels, so even if the signal is relatively low, it may still be using, say, 16 of the 24 available bits, and if this audio is intended to sound quiet in the mix, you will not hear any low-level noise.
Preparing to Record
There are several preparatory steps that you may need to take before you start to record audio, so let’s look at these first.
Monitoring Levels vs Input Gain Levels
One of the first things you need to be clear about is that the volume and pan controls in Pro Tools only affect the monitoring (listening) levels – they do not have any effect on the input levels that you are recording.
The place to adjust input levels is at the audio interface. Use the controls on your interface’s microphone, instrument or line level inputs to set the input levels high enough to make full use of the dynamic range available in Pro Tools while avoiding clipping of the input waveform, which causes distortion that you cannot remove later.
The way to adjust input gain levels is to sing or play the loudest sound that you wish to record and turn the input level controls up until the meters indicate clipping. Then back off the input gain control until this clipping disappears. Then back it off a little more in anticipation of the fact that many musicians actually play or sing even louder when recording rather than rehearsing – in their enthusiasm for the ‘take’.
tip
Getting the input levels right is one of the main ‘keys’ to making quality recordings
Auto Input vs Input Only Monitoring
You also need to be aware of the two different ways in which the input signals can be monitored while playing back, while recording, or with the transport stopped, namely the Auto Input and Input Only monitoring modes.
Let’s look at the default Auto Input mode first. When playback is stopped, the track monitors whatever is coming into its audio input. Now let’s consider what happens when you are overdubbing and reach a punch-in point. In this case, you will normally want to hear whatever has been recorded up to the punch-in point. Then you want to hear the new audio that is coming in. When you reach the punch-out point you want the monitoring to switch back so that you can hear the existing track material again. So this is exactly what Auto Input mode does.
Sometimes you don’t want to hear the original material that was recorded, you want to hear the incoming audio at all times. This is what Input Only Monitoring does. You will find a menu command for this in the Track menu. To warn that you have switched to this mode, the Input Monitor Enabled Status indicator in the Transport window lights green when Input Only mode is enabled.
tip
To switch between Auto Input and Input Only monitoring, use Option-K on the Mac or Alt-K on Windows.
note
When you record-enable audio tracks, their volume faders turn bright red. This is to remind you that different fader levels can apply during recording and playback if you de-select ‘Link Record And Play Faders’ in the Operation page of the Preferences window. With this preference de-selected, if you adjust a fader when a track is record-enabled and then turn off record enable for the track, the fader returns to its playback level.
When the Operation preference for ‘Link Record and Play Faders’ is selected, Pro Tools does not keep track of different record and play levels for audio tracks. In this case, record enabling an audio track has no effect on the fader level for the track. This lets you maintain a consistent mix regardless of whether you’re recording or just listening.
Latency
Because the audio coming into Pro Tools LE has to be processed by the computer on its way through the system, before it is routed to your monitoring system, you will hear a delayed version of the input through your monitor speakers.
This can be very off putting for a musician who is trying to overdub to an existing performance, because the music already recorded plays back at the correct time while the new performance is delayed with respect to this.
It is possible to reduce the size of the hardware buffer to minimize this so-called ‘latency’ delay. You can do this in the Playback Engine dialog that you can access from the Setup menu. The disadvantages here are that at the smallest buffer sizes there is still some latency, and reducing the buffer size limits the number of simultaneous audio tracks that you can record without encountering performance errors.
Using an external mixer
You can avoid the problem altogether by monitoring the recording source with an external mixer, before it is routed to Pro Tools. Plug your microphones or instruments into the mixer and you will hear the sound directly through a connected monitor system – with no audible delay. At the same time, route the audio to your Pro Tools interface so that you can record it.
tip
If you are monitoring through an external mixer while recording, don’t forget to defeat the monitoring (pull the fader down or engage the mute button) for each track that you are recording in Pro Tools. Otherwise you will hear the delayed version of the audio mixed in with the un-delayed version.
Zero Latency Monitoring
If you are using an Mbox or Mbox 2, you can use the Mix control on the front panel to set up the output mix that is sent to the monitor system. The Mix control lets you balance between the audio coming into the interface’s analogue input and any audio coming back from Pro Tools. Because the audio coming into the interface’s analogue input is passed directly to the Mbox’s monitor outputs, without going through the computer, there is no latency. Again, you should defeat the track monitoring in Pro Tools (pull the fader down or engage the mute button) to prevent audio being passed through Pro Tools and back out to the monitors where it would interfere with the directly monitored audio.
Low Latency Monitoring
If you are using a Digi 002 or Digi 002 Rack, these systems have a special Low Latency Monitoring option that can be used to record with an extremely small amount of monitoring latency. When you select this from the Options menu, all tracks with inputs set to an audio interface (as opposed to a bus), and outputs set to Output 1 or Output 2, will use Low Latency Monitoring.
note
When Low Latency Monitoring is enabled, any plug-ins and sends assigned to record-enabled tracks (routed to Outputs 1–2) are automatically bypassed.
Record Enabling
Each track in Pro Tools has a Record Enable button that must be selected (lit up red) before you put Pro Tools into record mode using the Transport controls. You can record simultaneously to multiple tracks by record enabling your choice of audio, Instrument or MIDI tracks. When you have clicked the record-enable button for the first track you want to set up, you can add more choices by Shift-clicking on more track record-enable buttons as you figure out which you want to use.
tip
If you enable the Latch Record Enable Buttons preference that you will find in the Operations section of the Preferences window then you don’t need to Shift-click the Record Enable buttons to enable additional tracks – just click each in turn that you want to be enabled. They will all stay enabled until de-selected. And if you want to record-enable all the tracks in your session, if you are recording a band, for example, then Alt-clicking (Windows) or Option-clicking (Macintosh) will do this.
Record Safe Mode
If you are worrying that you might accidentally put the wrong track or tracks into record and mess up a previous recording, then be assured that it is very unlikely that this could happen with Pro Tools. Any new recordings are made to new files by default, so the previous files will still be there in your Regions list and in your session’s audio folder. This is what is referred to as ‘non-destructive’ recording. Nevertheless, Pro Tools does have a ‘destructive’ recording mode in which new recordings replace previous recordings into the same files.
So, to prevent accidents, Pro Tools provides a Record Safe mode on a per track basis that prevents tracks from being record-enabled. Simply Control-click (Windows) or Command-click (Macintosh) the track’s Record Enable button and this will become greyed out and won’t let you enable the track to record. If you change your mind, just do this again to get out of Record Safe mode.
tip
Hold the Alt (Windows) or Option key (Macintosh) at the same time and all tracks will be affected. And if you hold the Shift key as well, just the currently selected tracks will be affected.
Other Record Modes
Pro Tools actually has four different record modes. The default record mode is non-destructive, as mentioned above. In the Options menu you will find three other record modes: Destructive Record, Loop Record, and QuickPunch. You can switch between these by Right-clicking (Windows and Macintosh) or Control-clicking (Macintosh) the Record Enable button in the Transport window. When you cycle through these modes, the Record Enable button changes to indicate the currently selected mode, adding a ‘D’ to indicate Destructive, a loop symbol to indicate Loop Record, and a ‘P’ to indicate QuickPunch.
Destructive mode works like a conventional tape recorder where new recordings onto a particular track replace any previous recordings to that track. There is little justification for using this mode unless you are running out of hard disk space to record to.
Loop Record mode lets you record multiple takes into the same track over a selected time range. Each successive take will appear in the Region List and can be placed in the track using the Takes List popup menu. This is very useful when a singer or musician is trying to perfect a difficult section.
QuickPunch lets you manually punch in and out of record on record-enabled audio tracks during playback by clicking the Record button in the Transport window. This is useful when the engineer/producer wants to decide ‘on-the-fly’ which bit of a performance to replace while the singer or musician plays throughout the session.
Recording through plug-ins
It is always very tempting to want to record into Pro Tools while adding a plug-in effect. Unfortunately, there are various reasons why this is not always a good thing to do.
For a start, the additional processing via the plug-in adds a further latency delay that can be considerable with certain plug-ins.
Also, real-time plug-in effects are applied to the incoming signals before the record monitoring fader, but after they have been recorded onto your hard disk. The way this works is that when you insert a plug-in onto an audio track then record audio to this track, you will hear the sound of the audio being processed by the plug-in through your monitors – but this processed audio will not be recorded to disk.
To record the processed audio to disk you have to:
1. Create an Auxiliary Input.
2. Connect your audio source to this Auxiliary Input.
3. Insert the plug-in effect onto this Auxiliary Input track.
4. Route the output from this Auxiliary Input to the audio track to which you want to record.
For these reasons, it is more usual to apply plug-in effects to your recordings after you have recorded the basic tracks. You can either apply AudioSuite plug-ins or bounce audio tracks containing real-time plug-ins to disk to create new files, or simply apply real-time plug-ins to create effects in real time within your mix.
Your first Audio Recording
OK, let’s get started recording some audio.
Step 1. Launch Pro Tools and choose New Session from the File menu.
Step 2. In the New Session dialog, choose the 44.1 kHz sample rate, change the bit depth from the default 24-bit to 16-bit, leave the default Broadcast WAVE (BWF) file format selected, name the session, choose where to save it, then click ‘Save’.
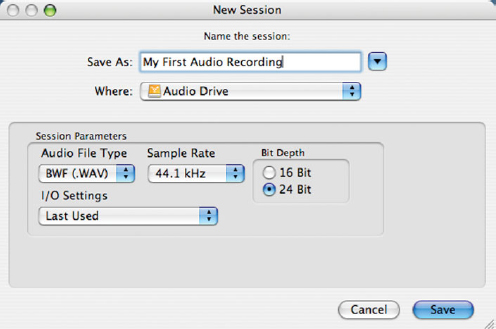
Fig. 8.1 – New Session dialog.
Step 3. Select New… from the Track menu and create 1 mono Aux input for the click, 1 mono Audio track to record onto, and 1 stereo Master Fader.
Step 4. Insert the click plug-in onto the Aux track, rename this as the Click track, and make any adjustments to the sound and level of the click.
Step 5. Open the I/O Setup dialog from the Setup menu and name the first pair of inputs to correspond to the names of your microphones, such as SM57 and SM58 as in this example.
(If you only have 1 microphone, name the first of these. If you have more, name as many as you like. If you don’t have any microphones then connect a musical instrument such as an electric guitar or a MIDI device such as a sampler or drum machine instead.)
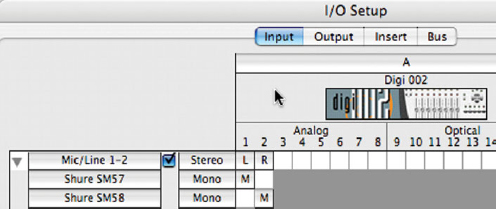
Fig. 8.2 – Naming the inputs in the I/O Setup window.
Step 6. For the Audio track, choose the track input using the popup track input selector, then record-enable the audio track.
Step 7. Sing or speak into your microphone (or play your instrument) at the loudest level you expect to use while you adjust the input level to your Pro Tools interface, keeping this as high as possible while avoiding clipping.
Step 8. Open the Transport window and use the popup selector to set the display to Bars:Beats then open the Big Counter from the Window menu so that you can see the bars and beats more clearly when you run the sequence.
tip
At this stage your screen should look similar to the screenshot below. If not, take a moment or two to arrange everything neatly on screen – you will always find a neatly arranged set of windows much faster to work with than an untidy set of windows.

Fig. 8.3 – Pro Tools LE ready to record a mono audio track while listening to a click.
Step 9. Make sure that Destructive Record, Loop Record, and QuickPunch are all de-selected in the Options menu and that the Click in the Transport window is enabled.
Step 10. Press the Return key on your computer keyboard to make sure you are at the beginning of the session and that no start and end times are selected. You may find it helpful to set up a couple of countoff bars so that you are cued to start recording at Bar 1.
Step 11. Click Record in the Transport window to enter Record Ready mode then click Play to begin recording.
Count out loud each beat as it flashes up in the Big Counter, just like this, saying:
‘1, 2, 3, 4;’
‘2, 2, 3, 4;’
‘3, 2, 3, 4;’
‘4, 2, 3, 4.’
note
This is exactly how musicians count the beats in the bars, so non-musicians who want to use Pro Tools efficiently and to work with musicians effectively should find that counting in time with the click like this helps their understanding of bars and beats and what a musician or singer has to do to keep in time with a click. For musicians, of course, this should be a trivial exercise.
If the default tempo of 120 BPM is too fast for you to say these numbers comfortably, just slow the tempo down a little before you start recording.
If you already started recording and you know you messed up, just press Command-Period (.) (Macintosh) or Control-Period (.) (Windows) while Pro Tools is still running. This removes the audio recorded up to that point from your hard drive and deletes the region from the track’s playlist in the Edit window.
If you stopped Pro Tools running when you realized your mistake you can use the Undo command from the Edit menu to discard the take.
Step 12. Click Stop in the Transport window.
That’s it! Your first audio recording has been written to disk and you will see it as an audio region in the Edit window and in the Region List.
First Fixes
Maybe you got it exactly right first time – and maybe you didn’t. Listen carefully and be honest. Did you make a slip here and there and speak a little early or a little late? If you did you will be in very good company. Even the best and most talented performers make mistakes some of the time – just less often than the rest of us. So we had better talk about how to fix mistakes during the recording process so that you have something recorded which is worth editing, mixing, and mastering later on.
Recording over an existing region
Now let’s suppose that you recorded a generally good ‘take’, but messed up Bar 2. All the numbers should correspond exactly to metronome clicks. You can tell that you messed up if any of the numbers that you speak falls in between two clicks of the metronome. You can see this better if you change the grid to quarter notes.
Here’s how to fix this:
Step 1. Switch to Grid Mode and set the grid value to 1 bar.
Step 2. Choose the Selector Tool, then click somewhere near Bar 2 in the Edit window to insert the cursor into the waveform display. The blinking cursor (the vertical line that blinks on and off) will be positioned exactly at the beginning of Bar 2.

Fig. 8.4 – The cursor positioned in the playlist’s waveform display in Audio track 1.
Step 3. Make sure that the click and the countoff bars are still enabled and that the track is record-enabled.
Step 4. Press Record then Play in the Transport window, pick up your microphone, wait for the countoff to complete then say ‘2, 2, 3, 4’ into the microphone again. When you reach the end of Bar 2, just press the spacebar to stop. And with a bit of luck, you’ll get it right this time! Your Edit window should look something like the screenshot below if you set the track to Jumbo size as I have done.
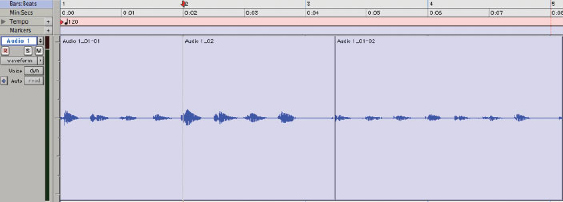
Fig. 8.5 – Recording over Bar 2.
Notice that I didn’t stop exactly at the beginning of Bar 3, I over ran a little, covering up the beginning of the next beat with a silent piece of audio.
First Edits
So now it’s time for your first edits.
Step 1. Choose the Trim tool.
Step 2. Make sure you are in Grid mode then trim the end of the region you just recorded so that it finishes at the end of Bar 2/beginning of Bar 3.
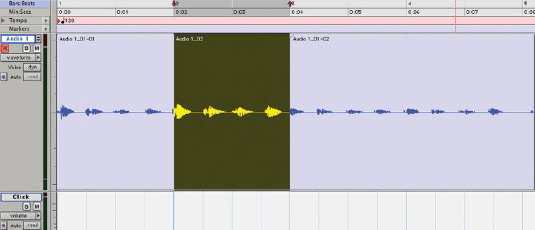
Fig. 8.6 – Trimmed region.
Step 3. Now trim the original region to end exactly at the beginning of Bar 5.
Step 4. Change to the Grabber tool, select the first region and shift-click to select the other two regions.
Step 5. Use the Group command from the Region menu to group these as one so the region can easily be moved around along the timeline. Notice the small icon that is added to the bottom left corner to indicate that this is a grouped region that can be ungrouped.
Fig. 8.7 – Grouped regions.
Separating and Moving Regions
When you listen carefully, you realize that the positioning of the words could be a little more accurate. The fix for this is to separate each word into its own region, then move these individually until they line up more accurately with the bar lines.
Step 1. Make sure the grid is set to quarter notes and select the region containing the audio.
Step 2. Choose ‘Separate Region On Grid’ from the Edit menu. In this example, it makes sense to separate the regions according to the grid lines, because we want each quarter note (containing one word) to be separate.
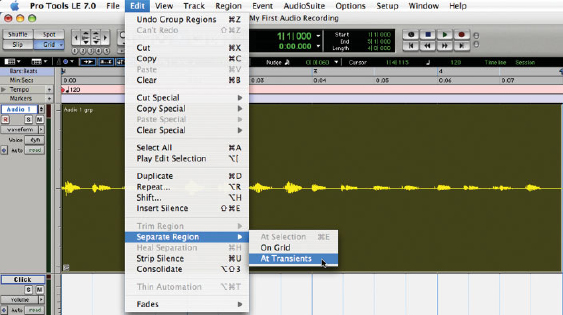
Fig. 8.8 – Using the Separate Region commands.
Step 3. Zoom in so that it is easier to see the beginning of each bar line.
Step 4. Play from the beginning of the region and listen out for the first region that is off the beat, then identify this visually, and select it.
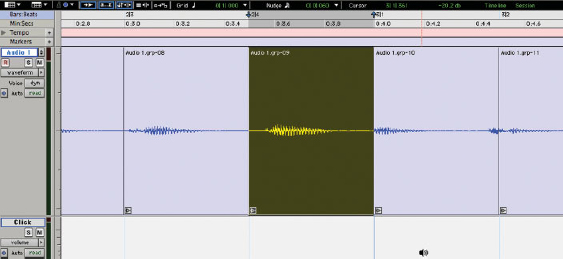
Fig. 8.9 – Beat 4 of Bar 2 sounds and looks ‘off the beat’.
Step 5. Increase the vertical zoom level so that you can see the start of the audio more clearly.

Fig. 8.10 – After increasing the vertical zoom then using the Trim tool to move the start of the region to the left, the start of the word is revealed a little way before the beat – yet the word sounds late.
Step 6. Change to Slip mode and use the Trim tool to make the region encompass all the audio that ‘belongs’ within that region – that is, the whole of the word.
note
In this example, when I increased the vertical zoom and looked for the start of the word, I could see that this actually started earlier than the beginning of the beat – despite the fact that the word ‘four’ sounded late (I had held the ‘fff’ sound at the beginning of the word a little too long). So I actually had to use the trim tool to reveal the audio before the start of beat 4 then move the whole of this region to start a little earlier than where it was recorded to get it to sound right. This will happen to you at some time or other if you are editing audio performances, so watch out for it by zooming in and listening carefully.
Step 7. Use the Grabber tool in Slip mode to move the region along the timeline until it sounds in time with the click. In this example, dragging the region a little to the left cured the problem.
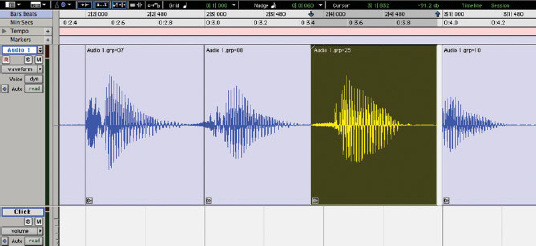
Fig. 8.11 – Moving the late-sounding word a little way to the left fixes the problem.
Now some of you may be wondering why I didn’t use the command to ‘Separate Region At Transients’. The transients are the peaks at the beginnings of the sounds so in theory if you separate the regions each time a new transient appears, that would put all of the separations in the correct places, immediately before the transient at the start of each spoken word. I did try this, but what happened was that the audio was often split two or three times within each word. This happens because there may be a very quiet transition between vowels and consonants that is interpreted as silence – or there may even be a small gap. Of course you can take two or more adjacent regions and use the Heal Separation command to make them join up into one region again – but this takes time. So I decided that the best choice here would be to separate on the grid then trim these as explained and move them individually into position as necessary. Another point to note from this example is that the best way to make edits is to zoom in far enough vertically as well as horizontally so that you can see what is happening with the waveform and to also use your ears to listen carefully to what is going on – adjusting the volume of your monitoring system until it is loud enough to hear the quietest sounds.
Recording multiple ‘takes’
Pro Tools offers yet another method that you will find very useful when trying to perfect a recording.
Each time you make a recording, this is called a ‘take’. That’s the jargon that has been used in studios for decades. For example, you might record a take to Audio track 1, then record subsequent takes into tracks 2, 3, 4, 5 and so on while trying to record that perfect guitar solo or vocal performance. Of course you would have to spend a little time creating a new track and setting it up ready to record in between takes if you used this method – making it less spontaneous and running the risk of the performer ‘going off the boil’.
As we have seen, you can always keep recording new takes into the same track – replacing part or all of the audio in that track. And the previous audio regions will still be available in the Regions List from which you can either delete them or drag them back into audio tracks to use later on.
But Pro Tools provides yet another way to non-destructively record a new take into the same track – by creating a new playlist for that track first.
Step 1. Click and hold the Playlist Selector popup just to the (top) left of the track meter in the Edit window.
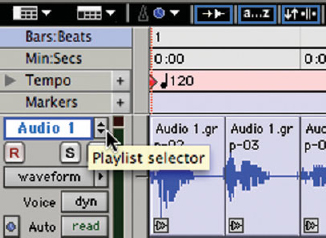
Fig. 8.12 – Click and hold to reveal the popup Playlist Selector.
Step 2. Select ‘New…’ then let go of the mouse.
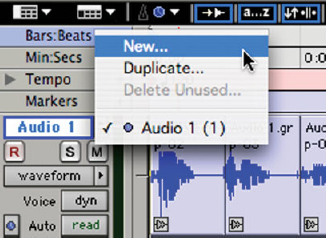
Fig. 8.13 – Creating a new playlist.
Step 3. Name the playlist in the dialog box that appears.

Fig. 8.14 – Naming the new playlist.
A new, empty, playlist appears in the track in the Edit window.
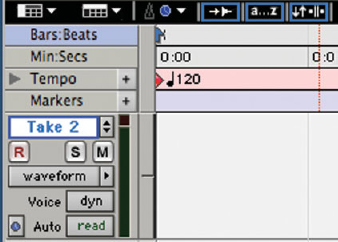
Fig. 8.15 – Playlist empty and ready for you to record into again.
Step 4. Record your next take into the track using this second playlist this time.
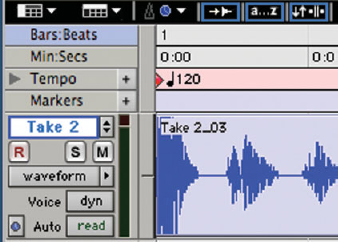
Fig. 8.16 – Take 2 recorded into the new playlist.
tip
You can always bring the first (or any previous) playlist back into the track by selecting this using the Playlist Selector again.
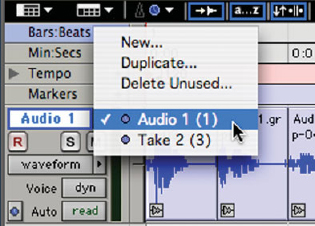
Fig. 8.17 – Selecting the first playlist again.
Step 5. You can create as many of these playlists as you are likely to need and use these to record as many takes as you have space for on your hard drives.
note
When you select a playlist, the regions that previously appeared in the track are recalled. All the regions from all the playlists are always available in the Region List, from where they can be dropped into any playlist on any track.
Punch Recording
Earlier, we saw how easy it is to place the cursor at any Bar:Beat location in the waveform display and record over an existing take. And you don’t have to be too careful about where you start recording from as long as it is before the audio you want to replace because you can trim the newly recorded audio afterwards so that it just replaces the section you are interested in.
However, anyone who is more familiar with using a multi-track tape recorder may feel more comfortable with the idea of setting up specific punch-in and punch-out points so that Pro Tools only records between these exactly specified locations.
Step 1. Make sure that the Edit and Timeline selections are linked. (Select Link Timeline and Edit Selection from the Options menu or make sure that the Link Timeline and Edit Selection button above the rulers is highlighted.)
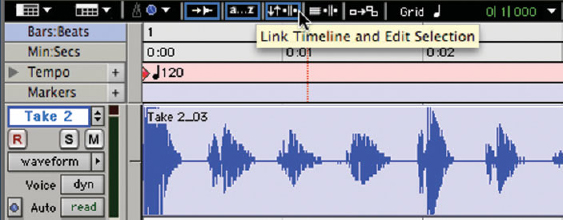
Fig. 8.18 – Engaging the Link Timeline and Edit Selection button.
Step 2. Choose the Selector Tool and drag the cursor over the range of audio in the playlist that you want to replace.
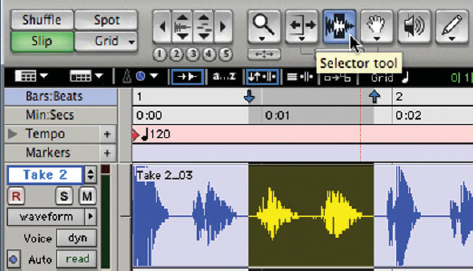
Fig. 8.19 – Use the Selector Tool to select a range of audio in the playlist.
tip
If you prefer, you can type the exact locations of the punch-in and punch-out points as Start and End times in the Transport window.
Step 3. Record-enable the track or tracks onto which you wish to record.
tip
You may also find it helpful to set a specific pre-roll time in the Transport window. If a pre-roll time is set, playback begins at the pre-roll time and proceeds to the start time (the punch-in point), where recording begins. When the end time (the punch-out point) is reached, Pro Tools automatically switches out of Record mode.
Step 4. When you are ready to begin recording, click Record then Play in the Transport window.
note
If you are recording in the default non-destructive mode, a new audio file is written to your hard drive and a new audio region appears in the record track and Region List. If you are recording in Destructive Record mode, the new audio overwrites the previous material in the existing audio file and region.
Step 5. When you have finished recording, click Stop in the Transport window.
Loop Recording
Pro Tools also provides a Loop Record mode that lets you keep recording over the same section while creating multiple takes.
Step 1. Make sure that Loop Record is selected from the Options menu so that the loop symbol is showing in the Transport window’s Record Enable button.
Step 2. If you are going to set a record or play range by selecting within a playlist, make sure that the Edit and Timeline selections are linked. (Select Link Timeline and Edit Selection from the Options menu or make sure that the Link Timeline and Edit Selection button above the rulers is highlighted.)
Step 3. Choose the Selector Tool and drag the cursor across the range of audio in the playlist that you want to loop record over. Alternatively, you can set Start and End times for the loop in the Transport window.
note
The Loop Record selection must be at least 1 second long.
Step 4. Make sure that the track or tracks you want to record onto are record-enabled.
tip
Although you can set a pre-roll time that will be used on the first pass and a post-roll time that will be used on the last pass, I recommend that you select a loop range that includes some time before and some time after the range you wish to record over. Later, you can trim back the recorded takes to the proper length with the Trim tool.
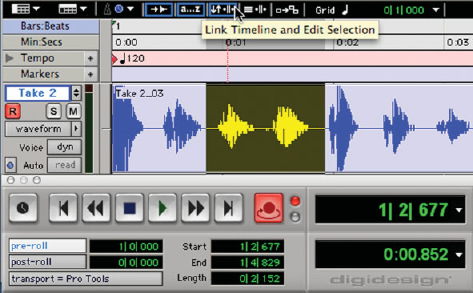
Fig. 8.20 – Getting ready to Loop Record.
Step 5. When you are ready to begin recording, click Record then Play in the Transport window.
Step 6. When you have finished recording, click Stop in the Transport window.
All the takes are recorded into a single audio file with sequentially numbered regions defined for each take. The most recently recorded take is left in the record track. All of these takes appear as regions in the Region List and you can audition takes on their own, from the Region List, or from the Takes List popup menu.
Selecting Takes
To select a different take from the Region List:
Step 1. Use the Time Grabber tool to select the current take in the Edit window.
Step 2. Command-drag (Macintosh) or Control-drag (Windows) another take from the Region List into the playlist. This replaces the previous take and snaps exactly to the correct location.
note
Each region created using punch or loop record is given an identical start time (the User Time Stamp). This feature makes it possible to select and audition takes from the Takes List popup menu. You can even select different takes while the session plays or loops.
To access the Takes List popup menu so that you can select a different take:
Step 1. Make sure that the Selector tool is engaged.
Step 2. Select the take currently residing in the track, then Command-click (Mac) or Control-click (Windows) anywhere in the region. The popup menu that appears contains a list of regions that share the same User Time Stamp.
Step 3. Choose a region from the Takes List popup menu. This replaces the previous take and snaps exactly to the correct location.
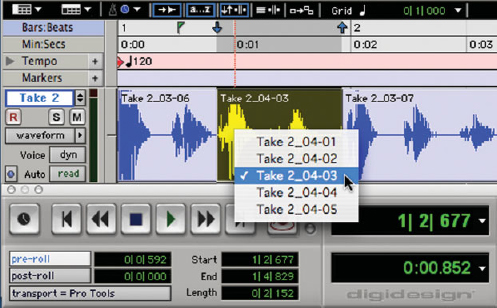
Fig. 8.21 – Choosing a take from the Takes List popup.
QuickPunch
QuickPunch lets you manually punch in and out of record on record-enabled audio tracks during playback by clicking the Record button in the Transport window.
note
QuickPunch limits the number of tracks and plug-ins that you can use at the same time. The reduced track count when using QuickPunch in Pro Tools LE occurs because it requires two voices per QuickPunch track. (Of course, CPU processing power will also be a factor in how many QuickPunch tracks you can finally get.) In practice, you can record up to 16 audio tracks with QuickPunch if you are already using the maximum number of mono tracks supported by your specific Pro Tools LE system. If you need to record more than 16 tracks using QuickPunch, you will have to reduce the number of other tracks to allow the CPU to handle the extra load.
To use QuickPunch mode:
Step 1. Select QuickPunch mode from the Options menu. The letter ‘P’ will appear in the Record Enable button in the Transport window.
Step 2. Make sure that the track (or tracks) that you want to record onto are record-enabled.
Step 3. Press the spacebar or click the Play button to start playback.
Step 4. When you reach the location at which you want to start recording, simply click the Record Enable button in the Transport window. Pro Tools will immediately switch to monitoring the input (if it is not already in Input Monitoring mode) and will start recording.
Fig. 8.22 – Recording in QuickPunch mode.
Step 5. When you are finished recording, just click Stop in the Transport window or press the spacebar to stop recording and playback.
Or,
Click the Record Enable button a second time to stop recording while continuing to play back. Then, if you want to record at other places along the timeline, all you need to do is to click the Record Enable button on and off as you please.
note
QuickPunch instantly switches from monitoring the input to monitoring the playback when you punch-out of recording (which is not the case with the other record modes).
Saving your Sessions
As you build a session by recording tracks and making edits and changes to controls, you should save your work regularly. Get used to using the keyboard commands to do this (Command-s on the Mac, Control-s in Windows) and get into the habit of saving every time you have recorded a new track or made any significant edits or changes to the controls.
note
The File menu offers three ways to save sessions:
1. ‘Save Session’ saves the currently open session file, leaving it open for you to continue working.
2. ‘Save Session As’ creates a duplicate session file with the name you choose and leaves the duplicate open for you to continue working. It does not create a new Audio Files or Fade Files folder. This can be useful if you want to experiment with different arrangements in the session without affecting the original session.
3. ‘Save Session Copy In’ saves copies of the session file and the files that you are using in the current session. This can be useful for creating a final copy of the session that does not include audio files or fades you are no longer using.
Tidying up your Sessions
When you have finished recording for the day you should spend a few minutes tidying up your session before backing it up.
Step 1. Open the Regions List and choose ‘Select Unused Audio Except Whole Files’ from the popup menu at the top of the Regions List.
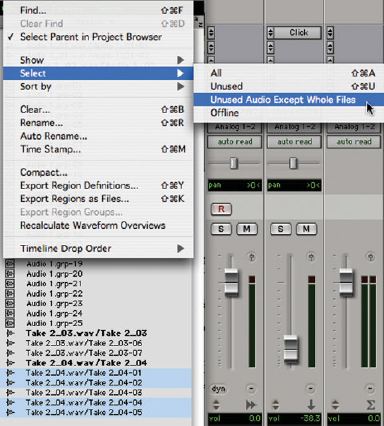
Fig. 8.23 – Selecting Unused Audio Regions.
Step 2. Take a look at what you have selected to make sure that there are no regions selected that you want to keep for any reason. For example, you may want to keep some or all of the takes that are not currently residing in active playlists.
Step 3. Choose ‘Clear…’ from the Regions List popup menu and click ‘Remove’ in the dialog that appears.
Step 4. Check that all the audio files and regions have suitable names. If not, select each file or region and choose the ‘Rename…’ command from the Regions List popup menu to bring up the Name dialog and type a suitably descriptive name.
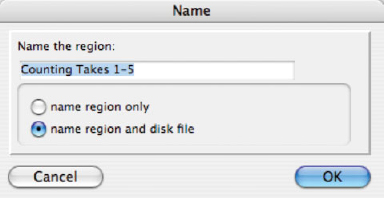
Fig. 8.24 – The Name dialog.
Step 5. Now save your Session and make a backup.
What you have learned
If you have followed this chapter carefully and thoroughly you should be able to record anything into Pro Tools. Once you can record successfully onto one mono track, you should have no problem recording onto a stereo track, or onto multiple mono or stereo tracks in whatever combination.
The key points are that you need to adjust the input levels on your microphone preamplifiers, instrument-level or line-level inputs to avoid clipping and to maximize the signal-to-noise ratio; be aware of the monitoring issues, how to handle latency delays, how to set listening levels differently for recording and playback; and know how to choose the most suitable recording mode.
One of the main things that you should be getting used to is that you can keep recording over existing recordings (or, more correctly, over the regions that represent these recordings) without destroying the earlier recordings – unless you choose to use Destructive mode.
You should appreciate that you need to decide on a strategy for recording multiple takes: you can either create new tracks for new takes or you can create new playlists, which is faster and simpler.
You should be reasonably familiar with how to handle punch-ins and loop recording.
You should also understand that it is essential to save your session regularly, take time out at the end of the session to tidy this up, then make a backup copy.