Backups and Transfers
Backups
When you have finished your project you should tidy this up and back it up to make way for the next project.
A golden rule of computing says that if it only exists on one hard disk, it probably doesn’t exist at all. All it takes is a few errors on the hard drive to make the disk directory unreadable, so that you can’t find your files. Software such as Disk Warrior can help prevent such catastrophes, but disasters can still happen. As I am writing this chapter, I am having disk directory problems with three of my hard drives, and one appears to have completely failed. And these drives are all less than 18 months old and have been regularly maintained. One of the drives was purchased just a week ago!
Of course, if a disk drive completely fails, you stand a good chance of losing all your files permanently. There are commercial data recovery services available, but these usually charge ‘an arm and a leg’ and can never guarantee to recover all, or even any, of your data.
I have two identical external drives so that I can keep a copy of the data from the first drive on the second drive at all times in case one of these drives fails. When I have completed a project, and sometimes at various stages throughout a project, I make backups onto CD-R or DVD-R.
Before backing up, you should thoroughly tidy up your session. If you need to work on the session at any time in the future, you will save a lot of time if you have left it in a tidy state. Also, if you intend to take a project to another studio to do more recording, editing, or mixing on another system, a tidy session always makes transfers run more smoothly. For example, you should remove any unused regions and files, and make sure that all your regions and files are named sensibly.
When this is done, use the Save Copy In… command to save a copy of the Session file along with copies of all the audio files used in the project. You can then back this up to CD-R or DVD-R secure in the knowledge that all the necessary audio files are included in the backup along with the Session file. You can also transfer the copied session to any other system, again confident in the knowledge that all the necessary audio files are with the Session file.
Transfers
Preparing Pro Tools Sessions for Transfer
Typically, after a busy Pro Tools session you may have several tracks containing alternate takes that you subsequently decide will never be used. You might also have other tracks that you used for one reason or another along the way that are no longer needed. Before making your transfer, you should save an edited version of your session with these extra tracks removed.
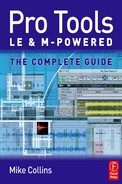
It is also quite likely that you have a number of unused regions clogging up your Region List as a result of trial edits, false takes, and so forth. The quickest way to get rid of most of these is to choose ‘Select Unused Regions Except Whole Files’ from the popup menu at the top of the Regions List.
You should choose the ‘Except Whole Files’ option because otherwise any whole files that you had edited to create shorter regions from would become selected – which, of course, you would not normally want (It is useful to retain the region that encompasses the whole file in case any adjustments need to be made when editing further ‘down the line’).
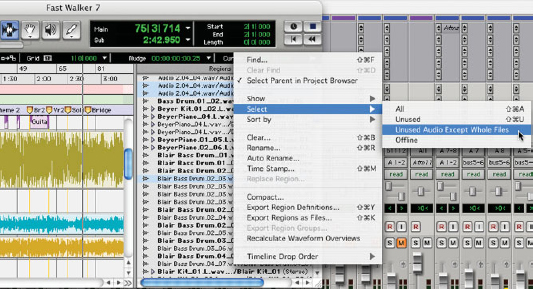
Fig. A1.1 – Selecting unused files.
The next step is to choose the ‘Clear’ command from this menu, which brings up the ‘Clear Regions’ dialog. Here you can choose whether to simply remove the selected regions from the list or whether to completely delete these from your hard drive. You should always choose the ‘Remove’ option unless you know for sure that all these unused regions belong to files for which you have no further use.

Fig. A1.2 – Clear Regions dialog.
You should also carefully go through the whole file regions, identified in bold type in the list, to get rid of any false takes or other stuff that you will never need again – auditioning each of these carefully first if you are at all unsure. When you identify any such files, you can use the ‘Clear Regions’ command to get rid of these, choosing the ‘Delete’ option this time to remove them from your hard disk.
When you have tidied up your session, your next move should be to make a copy of the session – complete with any associated files. Choose the ‘Save Copy In…’ command from the File menu.
In the ‘Save’ dialog that appears, you can choose the sample rate, bit depth session format and audio file type for the target system to which you are making your transfer.

Fig. A1.3 – Save Copy In… dialog.
You should select the box for ‘All Audio Files’ to make sure that all the audio files associated with your project will be copied – even any files that may exist on a different hard drive or in a different folder on the same hard drive. You can also include various other files and settings as necessary.
Types of Transfers
You may be moving from a Pro Tools LE system to another LE system with different plug-ins and a different audio interface, or to an M-Powered system or a Pro Tools │ HD system. You may have started your project on a PC running Pro Tools LE at home and you may wish to transfer to a Pro Tools │ HD system running on a Mac at the professional studio. It is also possible that you want to transfer from Pro Tools to MIDI + Audio sequencer (such as Cubase SX, Nuendo, Logic Pro, Digital Performer, or Sonar) or vice versa. And if you are working to picture, you may want to transfer a project into Pro Tools from Avid Xpress or from Final Cut Pro and back again.
Moving Pro Tools Sessions between Systems
The good news is that Pro Tools is extremely flexible when it comes to moving sessions around between different systems. The software will automatically deactivate tracks, routings and plug-ins not available when moving to a different system – while retaining the data for use when transferring back. Unique file identifiers help to resolve file and location references when moving between systems. Pro Tools also supports work with offline media, allowing a session to be opened and edited even if all the session’s audio or video files are currently unavailable – and any edits that you make to tracks containing offline media are reflected in the session when the files are available again.
Also, to conserve DSP resources in a session, tracks, I/O assignments and plug-ins can be set to ‘inactive’. Inactive items retain their various settings, routings, and assignments, but are taken out of operation – freeing the DSP they were using for other uses. The original settings will remain saved so you can always see what you’ve deactivated and return to these at any time. Even better – when you move a Pro Tools session to a system that has different plug-ins and I/O configurations, Pro Tools will automatically deactivate tracks, plug-ins, sends, or I/O channels as necessary while letting you preserve your original session settings so you can return to these when you move back to the original system.
Mac/PC Compatibility
All newly created Pro Tools 7.0 Sessions are compatible on both Macintosh and Windows systems. Older versions of Pro Tools are not necessarily Mac/PC compatible, but an ‘Enforce Mac/PC Compatibility’ option is available in the ‘Save Copy In’ dialog to let you save sessions to be compatible with lower versions of Pro Tools. This ensures that all Pro Tools files are saved in the Audio Interchange File Format (AIFF) or Broadcast Wave (BWF) (.WAV) format, and that no illegal characters are used in file names.
note
If you create a Pro Tools 6.9.x or lower session on a Macintosh system, the session will only be compatible on Windows systems if the ‘Enforce Mac/PC Compatibility’ option is selected when using the ‘Save Copy In…’ dialog.
The file format to use for cross-platform interoperability is BWF. This uses the. WAV file extension and is now the default format for new Pro Tools sessions. Older Mac versions used the Sound Designer II (SDII) format but this is not supported on Windows and only supports sample rates up to 48 kHz. AIFF format can also be used on both platforms, but lacks the metadata features of the BWF.
You should also use 3-letter file extensions for cross-platform compatibility. The Mac does not insist on this, but Windows requires that all files in a session must have a 3-letter file extension added to the file name. Make sure that any Wave files created on the Mac have the ‘.wav’ file extension, that any AIFF files have the ‘.aif’ file extension, that Pro Tools 5.1 to 6.9.x session files have the extension ‘.pts,’ and that Pro Tools 5 sessions have the extension ‘.pt5.’
note
There are restrictions on the ASCII characters that you use to name regions, track names, file names, and plug-in settings if you want to achieve full Mac/PC compatibility. As you might expect, any character typed with the Mac’s Command key won’t be available for Windows. Less obviously, you should avoid the following:
/ (Forward Slash)
(Backslash)
: (Colon)
* (Asterisk)
? (Question mark)
“ (quotation marks)
< (Less than symbol)
> (Greater than symbol)
│ (Vertical line or pipe)
When you import files into a session, incompatible characters are converted to underscores (‘_’) and the renamed files are placed in a folder called ‘Renamed Files’.
Transferring Files between Different Computer Platforms
There are many ways to get your Pro Tools files from PC to Mac or vice versa. If the two computers are networked, you can transfer the files using Ethernet. Then there is always ‘sneakernet’, where you put the files onto a CD-ROM or DVD-ROM and take this to the other computer. Just make sure that the CD-ROM is prepared with the correct options to work on both Mac and PC. For example, Toast 7 for the Mac offers ‘Mac Only’, ‘Mac & PC’, ‘DVD-ROM’, and ‘ISO 9660’ formats. Obviously, you need to avoid the ‘Mac Only’ option if you want to take your files to a PC.
CD-R gives you the best chance of compatibility with the widest range of target systems. DVD-R is a good choice if you know that they are going to a high-end Mac or PC that has a built-in DVD drive. Any other removable disk or tape or hard drive system would work just as well – but not everyone has Sony AIT or Quantum Digital Linear Tape (DLT) drives, for instance.
You can copy your Pro Tools files directly from an New Technology File System (NTFS) (Windows XP) drive to an HFS+ (Mac) drive (or vice versa) on a Windows XP system with the MacDrive utility installed.
tip
MacDrive lets you plug a MacDrive into a PC FireWire or USB port without having to reformat the drive. You can get hold of MacDrive 6 for Windows from MediaFour at www.mediafour.com/products/macdrive6/.
For example, a Windows XP session stored on an NTFS formatted drive can be copied to an HFS+ formatted drive connected to the Windows computer. The MacDrive 6 Utility has options for Backup/File Transfer. With this set, you can simply drag the session folder from the NTFS drive to the HFS+ drive.
If you want to go the other way, to transfer Pro Tools Macintosh sessions from HFS+ drives to NTFS drives, set the MacDrive 6 Options to Normal Use then drag the session folder from the HFS+ drive to the NTFS drive.
note
If you transfer a Pro Tools session from the Mac that uses Windows-incompatible characters, the Pro Tools sessions will be unable to re-link to the unfortunately-named audio files and fades in Windows. The illegal characters will be converted to underscore (‘_’) characters and these files will be saved to a folder that is automatically created, called ‘Renamed Audio Files’. You will then have to manually re-link each file by File ID, which can be a tedious process. The best way to avoid this is to avoid using illegal Windows characters in your Mac sessions in the first place.
Moving between Pro Tools │ HD and Pro Tools LE or M-Powered systems
One of the most useful features in Pro Tools is the session interchange facility provided between Pro Tools │ HD systems and Pro Tools LE or M-Powered systems.
Pro Tools │ HD 7 sessions can have up to 256 tracks while LE and M-Powered 7 only support 128 tracks, and only 32 of these can be played at the same time. Also, Pro Tools │ HD 7 systems support up to 128 Instrument tracks, 128 busses and 10 sends while Pro Tools LE or M-Powered 7 systems only support up to 32 Instrument tracks and mix busses – and older Pro Tools versions only support up to 16 busses and 5 sends.
So what happens if you open a Pro Tools │ HD 7 session with more than 32 mono tracks, Instrument tracks or mix busses into Pro Tools LE or M-Powered 7? Specifically, for any tracks beyond the first 32, as well any inactive tracks, the track’s Voice Selector is set to ‘voice off’. Also, any Instrument tracks and any bus assignments beyond 32 are made inactive and any sends beyond the first five are removed.
Pro Tools LE and M-Powered systems do not support multichannel surround tracks, so any of these will be removed. Similarly, Pro Tools │ HD 7 systems may have many more inputs and outputs than LE or M-Powered systems. If this is the case, any input and output paths that are not available are made inactive.
If you are using plug-ins when exchanging project files between Pro Tools platforms, ideally you will want to have the same plug-ins installed on all systems involved. You can get around this by bouncing tracks that have plug-in processing to audio tracks that include these effects ‘printed’ to disk. And if your studio tracks use DSP-based TDM plug-ins, you can bounce these to disk before transferring to your Pro Tools LE or M-Powered system.
Nevertheless, the way that Pro Tools LE and M-Powered handle sessions that use TDM plug-ins is particularly neat – TDM plug-ins with Real-Time AudioSuite (RTAS) equivalents are converted; those without equivalents are made inactive. As you will appreciate, you can’t use TDM plug-ins with LE systems – so you could end up losing lots of useful signal processors that you have used to build your session. Fortunately, there are now RTAS equivalents for many TDM plug-ins, so if you have used any of these in your TDM session, all the plug-in settings will transfer to the LE system – where it will use the RTAS equivalent. If there is no RTAS equivalent, the settings will be transferred to the LE version, but the plug-in will be made inactive. When you transfer this back to the TDM system the TDM plug-ins will become active again and the settings data will still all be there.
note
This even works when transferring between two differently configured TDM systems – Pro Tools will automatically deactivate any unavailable routing assignments and plug-ins while keeping all settings and automation data (including references to plug-ins not installed on the current system).
If you have used more tracks, busses or sends in your Pro Tools │ HD 7 session than your LE or M-Powered system can handle, then it is a good idea to make some decisions before making your transfer about how to handle these. One possibility is to save a version of your Pro Tools │ HD 7 session that only includes the 32 most important tracks. Another way is to bounce combinations of tracks together, such as a stereo mix of all the drums, to get the track count down to 32 before you make the transfer. You could even bounce everything as a stereo mix and add a further 30 new tracks on your LE system – then transfer these back to the Pro Tools │ HD 7 system and combine the two sessions using the Import Track feature. The Import Track feature will seamlessly transfer audio and MIDI tracks between sessions with all the mixer settings, tempo maps, plug-ins, and automation intact, so you could open either the original Pro Tools │ HD 7 session and import the new tracks from the transferred LE session – or vice versa.
Transferring Pro Tools 7 Sessions to earlier versions
You may also need to transfer sessions from Pro Tools 7 format to Pro Tools 6.9 or lower. You can choose to save sessions in earlier formats using the ‘Save Copy In…’ dialog, which can be accessed from the File menu.
When you save session to versions 5.1 to 6.9 formats, Fader Gain levels and automation breakpoints higher than +6 dB will be changed to +6 dB, any Instrument tracks will be split into separate Auxiliary Input and MIDI tracks, and any long names will be shortened to 31 characters. Also, any Region groups or loops, any marker locations above 201, any buses above 17, and any sends F–J with any associated automation will be dropped and the attributes marking any MIDI regions or tracks as sample based will be dropped.
If you save sessions in version 5.0 format, any multi-mono plug-in instances, multichannel tracks, or sends assigned to multichannel paths or sub-paths of multichannel paths will also be dropped. In addition, any tracks assigned to ‘No Output’ will be routed to Busses 31 and 32; any tracks or sends assigned to Busses 33–64 will be routed to Busses 31 and 32; any tracks assigned to multichannel paths or sub-paths of multichannel paths will be routed to Busses 31 and 32; and any tracks or sends assigned to stereo paths referring to even/odd channels (such as 2–3) will be routed to Busses 31 and 32.
Working with offline media
Now what if you don’t have enough hard disk space to hold the audio and video files that you are working on in the studio – but you want to do some work at home using MIDI, for example? No problem here, as Pro Tools will allow you to open and edit sessions even if none of the audio or video files used in the original sessions are available.
Regions are said to be ‘offline’ when their parent audio files cannot be located, or are not available, when you open a session or import a track. Offline regions appear in playlists in the Edit window as light blue regions with italicized names. Also, in the Region List, offline region names are italicized and the listed names are dimmed.
Here’s the trick: although the region is offline, you can still edit the offline region – making cuts, deleting sections, copy or repeating sections – and when the media is available again, that is, ‘online’, these edits will apply to the online media just as though the media files were there when you made the edits. Of course, this only goes so far – you can’t apply AudioSuite processing to an offline region for instance – but it does mean that you can work on your session much more flexibly using this feature.
Transferring Projects between applications
There are two ways to transfer projects between MIDI + Audio applications – the hard way and the easy way! Which way you will be able to use will depend on which software versions you are using. With older software versions of these applications, earlier than, say, the summer of 2003, it is much more likely that the only way is the hard way. Thankfully, with most of the software released since July 2003, you can probably do it the easy way.
The Hard Way: Using a MIDI file and separate audio files
Transferring projects from one MIDI + Audio workstation to another can be a tedious business. Nevertheless, with a few tips and hints to help you through, it can go quite smoothly.
The MIDI File format makes a reasonable job of transferring MIDI sequences from one MIDI sequencer to another, complete with tempo information, markers, and track names. And MIDI files can easily be transferred across platforms – from PC to Mac, for example. Nevertheless, it can still take some time to re-assign the track outputs on a different system or platform. And unless the target system has access to the same synthesizers and samplers loaded with the same selection of patches and samples it can be very difficult to recreate the original sounds. Synthesizer patches can be saved via SysEx and transferred as computer files, and samples can be transferred on disk or across a network to a new system – but this all takes time and trouble.
tip
A better way is to record any MIDI tracks as audio before transferring the project. This way, what you were hearing before the transfer should be what you hear after the transfer.
note
You should make sure that any audio tracks that you want to transfer start at the beginning of your sequence (Bar 1, Beat 1, or wherever). If you have any audio in your project that does not start at the beginning of the sequence, then you need to use your software’s ‘bounce to disk’ feature to create new audio tracks that do start at the beginning of the sequence and that end just after the last audio finishes on each track – taking into account any reverberation or effects that may need time to die away at the end of the tracks.
Quite often, people build up musical arrangements using audio files containing short sections of music (audio regions) that only play at certain positions within the arrangement. You could write down the Bar, Beat, Clock positions and the lengths for each audio region within, say, a Cubase SX project and then painstakingly recreate these in, say, Pro Tools – but this could take a very long time for a large, complex project. That’s why the only practical solution is to bounce each track (that consists of multiple regions or that doesn’t start at the beginning of the sequence) to disk, starting at the beginning of the sequence and finishing after the last piece of audio has finished sounding. This is the tedious bit. However, once this is done, it then becomes trivially easy to transfer the project: just open a new file in Pro Tools (or whichever), import all the audio files from Cubase SX (or whichever), and place these in new audio tracks starting at the beginning of the sequence.
The Easy Way: Using a MIDI and OMF, AES31, or AAF files
Support for OMFI, BWF/AES31 files, and the new AAF format, means that you can now swap projects between Apple Logic Pro, Yamaha’s Steinberg Nuendo and Cubase SX, Digidesign Pro Tools and Avid video systems – whether running on Mac or PC – with relative ease.
These formats contain information about where all the audio regions are positioned within your project – so you don’t need to go to the trouble of making all your audio regions start at the beginning of the sequence before making transfers.
Open Media Framework Interchange (OMFI), often referred to simply as OMF, was originally developed by Avid and others to allow interchange of video and audio files between workstations, complete with their edits. The OMF format is supported by Pro Tools (with the DigiTranslator option), Nuendo, Cubase SX, Logic Pro, Digital Performer, and Sonar.
AES31 was developed as an interchange format by the Audio Engineering Society that will take information about the positions of events, fades and so forth. AES31 uses BWF as the default audio format.
The AAF is a relatively new interchange format, available since 2001, sponsored by the AAF Association (a large group of professional media manufacturers) – see www.aafassociation.org. AAF works much like the OMF interchange format – allowing content creators to easily exchange digital media and metadata across platforms and between AAF-compatible systems and applications.
The metadata incorporated into OMF and AAF files includes info about each media file, such as sample rate, bit depth, region names, the name of the videotape from which the media file was captured, and even time code values that specify where a file was used in the project. It also includes information about what files are used, where they appear in a timeline, and automation. For AAF or OMF sequences, information about unrendered AudioSuite effects (such as real-time EQ) on Avid workstations is also included. (Rendered effects are media files that can be imported or skipped on import into Pro Tools, and Pro Tools always skips unrendered effects on import.) And for AAF or OMF sequences, information is included about automation (clip-based gain or keyframe gain).
If your software supports any of these formats, this greatly simplifies the process of transferring the audio between projects, although you still have to use a MIDI file to transfer any MIDI data.
note
There are two ways to handle media files when exporting OMFI files: using embedded media or using external file references.
Exporting to OMF with embedded media results in one large file containing both the metadata and all associated media files – with an upper file size limit of 2 GB. However, DigiTranslator only supports AAF export with external file references – it does not support AAF files with embedded media.
When you export projects using AAF or OMF with external file references this produces a metadata file with the ‘.aaf’ or ‘.omf’ file extension that simply contains references to the associated media – which remain untouched, stored as separate files. One advantage here is speed of operation – you are not, necessarily, having to copy the media files. And you are not likely to encounter any problems with file sizes on large projects, either. The main disadvantage is that you may have a large number of associated media files and all these have to be transported between systems. In this case, the potential for overlooking a file or whatever is obviously much greater.
Preparing Projects for Transfer
Before exporting an OMF or AAF file from your project, you should tidy this up, back it up, then prepare a special version for transfer to the target system.
If you are preparing a project for transfer to someone else’s studio, then you should ask whoever will be engineering the project to specify the format for the audio files you will supply, such as Wave or AIFF. And it would be wise to make sure that the transfer works properly by checking it out at their studio at least a day before it is actually needed – to allow time for any errors to be corrected.
tip
It makes sense to record your project using the sample rate and bit depth that matches that of the target system – otherwise you will have to convert your files at some stage or other, which takes time and can lose quality.
note
If you export an OMF file from Pro Tools using sample rate conversion and import it into a project with a higher sample rate (for example, from a Pro Tools session at 44.1 kHz to a media composer project at 48 kHz), clicks will appear in the audio at region separation points and at the beginning of fade outs and end of fade ins (but not in crossfades). To avoid this problem, export the OMF file from a Pro Tools session with the same sample rate as the destination project.
Checklist
1. Delete any tracks and any audio or MIDI regions and files that you don’t intend to use again.
2. If the project uses any MIDI or Instrument tracks, you can either record these as audio or export the MIDI data as a MIDI File.
3. If you have tracks or regions that use automation, it often makes sense to bounce these to disk first.
4. Similarly, if you want to export audio with the sound of any plug-in effects applied, you should process your audio using these first. Either create new files using AudioSuite plug-ins or bounce or record to disk if you are using RTAS or TDM plug-ins. Bear in mind that the target system may not have the same plug-ins available as the original system.
5. If your project uses more tracks than the target system can handle you may need to reduce the number of tracks – making submixes if necessary.
6. Use the Save Copy In… command, choosing the options to copy all audio files and any other needed files and settings, to save the specially prepared version of your project that you will use to transfer. You can also choose the required file formats, sample rate and bit depth for the target system here.
7. Finally, you should create a text file containing info such as the tempo and any special instructions for your project that you can keep with the transfer files.
OMF and AAF
If you have installed DigiTranslator, Pro Tools lets you export (or import) individual tracks or an entire Pro Tools session in OMF format or AAF format. These formats preserve all the edits you have made within your session and make transferring projects to and from other MIDI + Audio software applications much easier than before these formats were developed.
note
In earlier versions of Pro Tools, the DigiTranslator option was contained within the Pro Tools software as a demo version that could be authorized using an iLok key.
Digidesign 7.0 plug-ins and Pro Tools 7.0 software options no longer include time-limited demos. Instead, plug-in and option demos require an iLok USB Key and an iLok license for evaluation. To obtain a demo license, go to the individual product pages located on the Digidesign Website (www.digidesign.com) and click on the Demo button.
When DigiTranslator is installed and authorized, the File Menu command, ‘Export to OMF/AAF’ becomes active to let you export projects, and the ‘Open Session’ command allows you to import projects in OMF format.
OMFI format (usually referred to as OMF format) has been around for a long time in the video world and has become widely available for MIDI + Audio software – so this makes a good choice for project transfers. The more recently developed AAF also allows projects to be transferred between Pro Tools and AAF-compatible systems, but is not as widely implemented in other MIDI + Audio software. Both of these file formats can either contain links to the associated audio files or can contain audio files actually embedded (contained) within the OMF or AAF files.
DigiTranslator is available for both Pro Tools │ HD and Pro Tools LE systems. With this installed, you can import AAF or OMF sequences into Pro Tools using either the Import Session Data or Open Session commands. You can also drag and drop AAF or OMF sequences or audio files from any DigiBase browser.
note
Although Pro Tools can open and import AAF sequences that refer to other media files, AAF sequences that contain embedded media cannot be imported into Pro Tools. Also, if you plan to perform perf-based edits with a film project in Avid Xpress Pro, you should capture all media as OMF, and choose OMF instead of AAF when exporting a sequence for use in Pro Tools. Pro Tools does not recognize perf-based edits in an AAF sequence, and will place the audio at the full frame boundary.
Exporting AAF and OMF from Pro Tools
You can export individual tracks or an entire Pro Tools session in OMF format or AAF format using the Bounce to Disk, Export Selected as Files, and Export Selected Tracks as OMF commands. You can also export AAF and OMFI sequences using the Export Selected Tracks as OMF/AAF command.
note
AAF sequences and OMF sequences and files exported from Pro Tools only retain time code addresses, region names, and definitions. They do not support video files, or retain information about plug-ins’ assignments or parameters, routing, or grouping. Digidesign recommends that you bounce or record to disk any tracks that use effects prior to export.
When you select the tracks you want to export and choose ‘Export to OMF/AAF’ from the File menu, dialog appears that lets you choose the file formats and set various other options.

Fig. A1.4 – Exporting selected tracks.
The Export to OMF/AAF dialog defaults to exporting AAF format files, even though it mentions OMF files first in its name. So make sure to change the export format to OMF if this is what you want to use.
Also, if you want to export the session’s volume and pan automation to AAF and OMF, you must make sure that the ‘Quantize edits to frames boundaries’ option is disabled (not selected). This option is provided for compatibility with Avid systems.

Fig. A1.5 – Selecting OMF format.
To avoid using more space on your hard drive than is absolutely necessary, the OMF or AAF files that you create by default can be linked to the source media – the original audio files – instead of creating new copies of the source media. This is fine if you want to transfer your Pro Tools session into, say, Logic Pro running on the same computer with the same hard drive used for audio. But if what you really want to do is to transfer the OMF/AAF files onto another computer that is not connected to the original hard drive containing the original source media, then you should choose one of the other two options. Copy from Source Media creates new files identical to the original files, while consolidate from Source Media creates new files that only contain the audio referred to by the active regions in the session – saving some disk space.

Fig. A1.6 – Choosing the option that creates copies of the original audio files.
When you have made your selections, click OK.
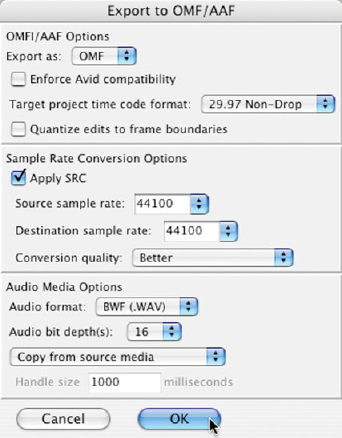
Fig. A1.7 – Export to OMF/AAF dialog showing typical settings.
The Publishing Options dialog appears next. You can use this to add a comment and name your sequence.
Fig. A1.8 – Publishing Options dialog.
When you OK the Publishing Options dialog, the standard ‘File Save’ dialog appears. Use this to name your file and choose a directory to save it into.
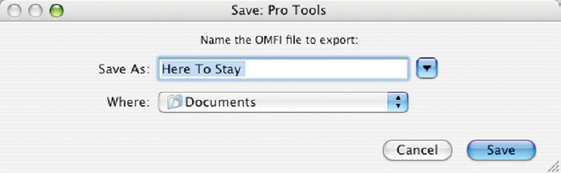
Fig. A1.9 – File Save dialog.
Importing AAF and OMF files into Pro Tools
With DigiTranslator 2.0, you can import AAF sequences (although not with embedded audio) or OMF sequences (with or without embedded audio), into Pro Tools with either the Import Session Data or Open Session commands.
You can also drag and drop AAF or OMF sequences, or audio files, from any DigiBase browser.
Individual OMF video files can be imported into Pro Tools using the Import QuickTime Movie or Import Session Data commands.
OMF audio files can be imported into Pro Tools with the Import Audio to Track, Import Audio to Region List commands. You can also drag and drop audio files from any DigiBase browser.
Using the Import Session Data command to import an OMF file
You can use the ‘Import Session Data’ command to bring audio tracks into an existing session from an OMF file and these tracks will be automatically added to your existing Pro Tools session:
1. Choose the ‘Import Session Data’ command from the File menu.

Fig. A1.10 – Import Session Data command.
2. Use the ‘Open file’ dialog that appears to select the file to import the session data from.

Fig. A1.11 – Open file dialog.
3. When you have selected the file, click Open to bring up the Import Session Data dialog.

Fig. A1.12 – Import Session Data dialog.
4. Make sure that the tracks you want to import are selected and choose the option to copy the files from the source media if you want this audio to be added to your project.
5. Click OK and the selected tracks will be imported into your Pro Tools Session onto tracks that are automatically created for you.
Opening an OMF file into a new Pro Tools session
1. Launch Pro Tools if it is not already open.
2. Choose the ‘Open Session’ command from the File menu.
3. A dialog appears to let you look for the file you want to open.
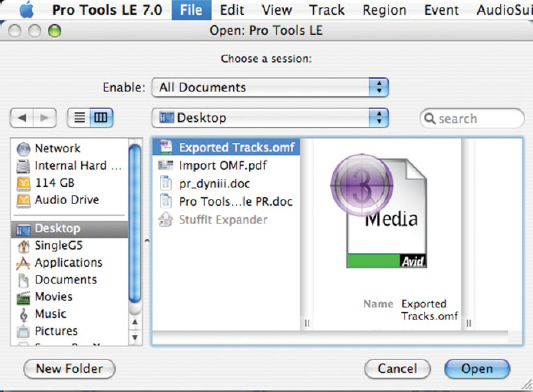
Fig. A1.13 – Pro Tools Open Session dialog.
4. Select an OMF file to open and the New Session dialog will appear. Here you can name the converted session and choose where to save it. You can also choose a new audio file format, sample rate and bit depth for your new session, as necessary.
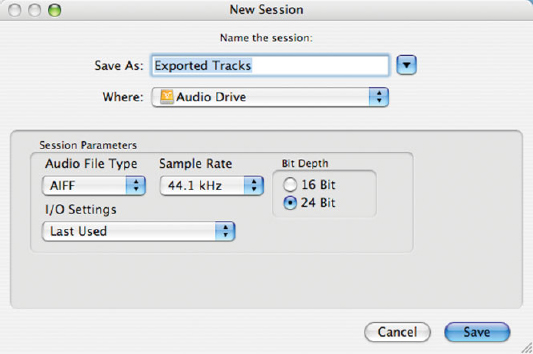
Fig. A1.14 – Pro Tools New Session dialog.
5. Click ‘Save’ in the New Session dialog and the Import Session Data dialog will appear. Here you can specify exactly which tracks you want to import and make various useful settings.

Fig. A1.15 – Pro Tools Import Session Data dialog.
note
If you want the audio files to be extracted from the OMF file and placed into the Pro Tools audio file folder, then make sure that you choose ‘Copy from source media’ using the popup selector in the Audio Media Options section of the Import Session Data dialog.