
2
Run-and-Gun Shooting
In basketball, “run-and-gun” is a strategy of training for and playing a fast-paced game with little time to think, scoring as quickly as possible before the defense is set. In video games, “run-and-gun” is a genre involving quick reflexes, often with characters on foot dodging and defending against bullets, missiles, or an overwhelming adversary. Sports, gaming, and hunting metaphors apply easily to the process of making motion pictures. In film or video, the term “run-and-gun” refers to shooting on the move in ongoing conditions, with minimal or no assistance, little or no time to prepare, adapting to available light, and having to make quick choices.
The G10/XA10’s lightweight body, versatility, and semi-automatic modes make it the ideal camcorder for shooting under these conditions. However, it takes discipline and a thorough knowledge of the camcorder to do this kind of production well. Event videography, surveillance, sports, news, documentary, and advocacy video often demand a run-and-gun approach, as might “stealth video” and “guerilla television.” At times, home video, diary, experimental, and even fiction may call upon the skills of instantaneous shooting and adapting to ongoing conditions. Academy Award–winning cinematographer Anthony Dod Mantle filmed moments when the fictional characters in Slumdog Millionaire were amid actual street scenes.
The most important thing before any shoot—and all the more important for conditions that may be chaotic—is to be prepared ahead of time. The camcorder should be charged and ready to go with all the appropriate presets, plus spare batteries and adequate time remaining on recording media.
The G10/XA10 comes with battery pack BP-808 with a capacity of only 720mAh, which lasts only about an hour or so. This is an undersized battery that only partially fills the chamber, making it a bit hard to remove. The single biggest complaint of G10/XA10 owners is that for the price, Canon should have shipped a full-size battery in the original package. After all, one of the primary reasons for using a camcorder with up to 192GB of memory is to shoot for hours at a time if necessary. To be prepared for several hours of shooting, you will need to purchase a full-sized battery, the BP-819 ($79 to $99) with a capacity of 1780mAh which lasts over two hours, or the extended-run BP-827 ($120 to $130) with a capacity of 2670mAh (three to four hours of recording time).
Checklist
Whether you or someone else last used the camcorder, you need to go over a checklist of important settings before you shoot. (See Figure 2.1.)
Figure 2.1 Status indicators on the touchscreen display.
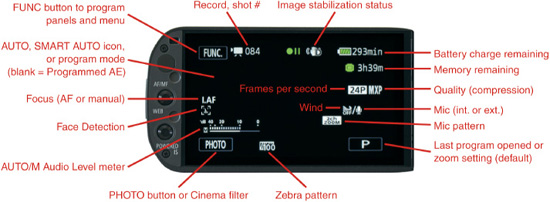
![]() Check the battery. This is so essential that Canon created a direct and immediate test as the first thing you do before turning the power on. Simply press the BATT. INFO button (the same as the DISP. button) on the left side of the camcorder while the power is off. For five seconds, the full touchscreen will display the capacity of the battery as a percentage on a color-coded graph and as remaining minutes of recording time. You should adopt the habit of checking the battery every time you prepare to shoot.
Check the battery. This is so essential that Canon created a direct and immediate test as the first thing you do before turning the power on. Simply press the BATT. INFO button (the same as the DISP. button) on the left side of the camcorder while the power is off. For five seconds, the full touchscreen will display the capacity of the battery as a percentage on a color-coded graph and as remaining minutes of recording time. You should adopt the habit of checking the battery every time you prepare to shoot.
![]() Check the operating mode. Look at the AUTO/M/CINEMA mode switch on the upper-right side of the camcorder to see if it is appropriately set for AUTO, M (manual), or CINEMA. You don’t want to mistakenly shoot in one mode while intending to be in another.
Check the operating mode. Look at the AUTO/M/CINEMA mode switch on the upper-right side of the camcorder to see if it is appropriately set for AUTO, M (manual), or CINEMA. You don’t want to mistakenly shoot in one mode while intending to be in another.
![]() Check the program mode. When you turn the power on, immediately verify your program mode in the upper left of the touchscreen, just below the FUNC button. If the upper left says “AUTO,” then you are in full AUTO mode and control is determined by the camcorder. If you are operating in M or CINEMA mode, this checkpoint is extremely important for identifying a specific program mode, and some of the information will appear only briefly. If you are in program AE (Canon’s term for Auto Exposure while in M or CINEMA mode), the letter P will appear for three seconds in the upper left, then disappear. If you are in Portrait, Sports, Night Scene, Snow, Beach, Sunset, Low Light, Spotlight, or Fireworks mode, the name will be spelled out for three seconds in the upper left of the touchscreen then disappear with only its icon remaining. If you are in Av (Aperture value) priority or Tv (Time value) priority, its symbol will remain constantly in the upper left along with its aperture or shutter value. If you are in Manual Exposure mode, the upper left displays the f/stop, shutter speed, and dB gain settings, which stay visible as long as you remain in Manual Exposure mode.
Check the program mode. When you turn the power on, immediately verify your program mode in the upper left of the touchscreen, just below the FUNC button. If the upper left says “AUTO,” then you are in full AUTO mode and control is determined by the camcorder. If you are operating in M or CINEMA mode, this checkpoint is extremely important for identifying a specific program mode, and some of the information will appear only briefly. If you are in program AE (Canon’s term for Auto Exposure while in M or CINEMA mode), the letter P will appear for three seconds in the upper left, then disappear. If you are in Portrait, Sports, Night Scene, Snow, Beach, Sunset, Low Light, Spotlight, or Fireworks mode, the name will be spelled out for three seconds in the upper left of the touchscreen then disappear with only its icon remaining. If you are in Av (Aperture value) priority or Tv (Time value) priority, its symbol will remain constantly in the upper left along with its aperture or shutter value. If you are in Manual Exposure mode, the upper left displays the f/stop, shutter speed, and dB gain settings, which stay visible as long as you remain in Manual Exposure mode.
![]() Check the memory. In the upper-right area of the touchscreen, memory location is indicated by an icon of a circuit chip or a memory card (indicating internal, MC1 or MC2). Next to this is an estimate of remaining recording time on the memory chip. If status information like this does not appear after startup, press the DISP. button. It is important to know which memory location you are recording to and how much memory space you have left. For long-duration shooting, you may want to set memory for Relay Recording so that when a memory card gets filled, recording automatically continues on the next available card. To select this setting, choose FUNC > MENU > Film Clip icon > Rec. Memory > Relay.
Check the memory. In the upper-right area of the touchscreen, memory location is indicated by an icon of a circuit chip or a memory card (indicating internal, MC1 or MC2). Next to this is an estimate of remaining recording time on the memory chip. If status information like this does not appear after startup, press the DISP. button. It is important to know which memory location you are recording to and how much memory space you have left. For long-duration shooting, you may want to set memory for Relay Recording so that when a memory card gets filled, recording automatically continues on the next available card. To select this setting, choose FUNC > MENU > Film Clip icon > Rec. Memory > Relay.
![]() Check the frame rate and record quality mode. The two are displayed together on the middle-right side of the touchscreen. If only the quality mode appears (MXP or FXP, for example) with no indication of frame rate, then the camcorder is running at its default rate, which is 60i. Any other frame rate will be displayed.
Check the frame rate and record quality mode. The two are displayed together on the middle-right side of the touchscreen. If only the quality mode appears (MXP or FXP, for example) with no indication of frame rate, then the camcorder is running at its default rate, which is 60i. Any other frame rate will be displayed.
![]() Check the microphone. Verify the microphone source by its icon on the lower-right side. The icon for the internal mic also indicates the directional pattern, equalization, and digital windscreen. Make a sound or gently tap the microphone to see that the Audio Level meter on the lower left responds.
Check the microphone. Verify the microphone source by its icon on the lower-right side. The icon for the internal mic also indicates the directional pattern, equalization, and digital windscreen. Make a sound or gently tap the microphone to see that the Audio Level meter on the lower left responds.
![]() Check zebra patterns. You will need to know whether zebra patterns are on and whether they are calibrated for 70 percent or 100 percent. If zebra patterns are on, a striped icon appears near the bottom left with a 70 or 100.
Check zebra patterns. You will need to know whether zebra patterns are on and whether they are calibrated for 70 percent or 100 percent. If zebra patterns are on, a striped icon appears near the bottom left with a 70 or 100.
![]() Check the method of focus. An icon midway on the left side will indicate I.AF (instant auto focus), M.AF (medium auto focus), AF (normal auto focus), Face Detection (a rectangular smiley face), or MF (manual focus).
Check the method of focus. An icon midway on the left side will indicate I.AF (instant auto focus), M.AF (medium auto focus), AF (normal auto focus), Face Detection (a rectangular smiley face), or MF (manual focus).
![]() Check the color balance. There will be no indication of color balance in AUTO mode or in program modes that have a predetermined value or preset automatic white balancing. Otherwise, if the White Balance setting is something other than Automatic, there will be an icon indicating the type of balance midway on the left, next to the icon indicating the method of focus.
Check the color balance. There will be no indication of color balance in AUTO mode or in program modes that have a predetermined value or preset automatic white balancing. Otherwise, if the White Balance setting is something other than Automatic, there will be an icon indicating the type of balance midway on the left, next to the icon indicating the method of focus.
![]() Check for any unintended functions. See if there are unexpected icons on the touchscreen (for example, Image Effects, x.v. Color, or Reverse Scan) and run the camera to see if everything works as you expect, including zoom control and focus parameters. Make certain you are not in Decoration, Digital Zoom, Conversion Lens, Backlight On, or Video Snapshot mode unless you intend to be.
Check for any unintended functions. See if there are unexpected icons on the touchscreen (for example, Image Effects, x.v. Color, or Reverse Scan) and run the camera to see if everything works as you expect, including zoom control and focus parameters. Make certain you are not in Decoration, Digital Zoom, Conversion Lens, Backlight On, or Video Snapshot mode unless you intend to be.
If you need to change anything, the touchscreen is fairly easy to navigate once you get accustomed to the five display layers: FUNC, MENU, Camera/Play settings (indicated by the Camera icon), media settings (indicated by the Film Clip icon), and tools (indicated by the Tool icon, which resembles a wrench). Tapping an icon or word activates it. Gently moving your finger up or down the screen will scroll to other items on the menu. Tapping X will exit a menu layer and will enable any adjustment you made while in that layer.
To get out of an unwanted program setting, tap FUNC > Rec. Programs > and select the program setting you want instead. Basic media parameters like memory location, shutter speed, and record quality can be located while in M mode by pressing FUNC > MENU > Film Clip icon. (See Figure 2.2.) Other basic settings from screen brightness to headphone level to initializing memory are under the Tool icon. Not everything under each menu is intuitive. If you have trouble locating what you need, see Appendix C, “Menu Map,” available at www.courseptr.com/downloads.
The alternative to the preceding checklist is to take the time to systematically check and set every menu item, particularly if you are going to shoot in M or CINEMA mode. Press FUNC to examine or select the options in the program panel:
![]() Rec. Programs P (AE, Tv, Av, Manual Exposure, or Scene)
Rec. Programs P (AE, Tv, Av, Manual Exposure, or Scene)
![]() BLC (backlight correction)
BLC (backlight correction)
![]() White Balance
White Balance
Figure 2.2 Status indicators in the program panel selections. Press FUNC and scroll to access these screens.
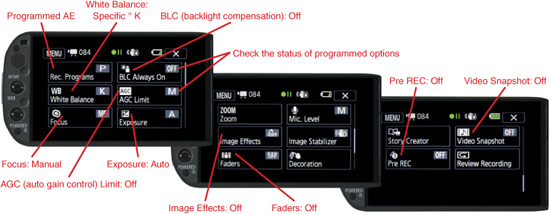
![]() AGC Limit (auto gain control)
AGC Limit (auto gain control)
![]() Focus
Focus
![]() Exposure
Exposure
![]() Zoom
Zoom
![]() Mic. Level
Mic. Level
![]() Image Effects
Image Effects
![]() Image Stabilizer
Image Stabilizer
![]() Faders
Faders
![]() Decoration
Decoration
Do a similar thorough check under the Camera, Film Clip, and Tool icons. The options are spelled out in Appendix C.
Run-and-Gun Focus
Here are the features and techniques that allow for quick and easy focus under ongoing run-and-gun conditions:
![]() Face Detection. Face Detection is the camcorder’s ability to recognize and give focus and exposure priority to faces. It works in AUTO, M, and CINEMA modes.
Face Detection. Face Detection is the camcorder’s ability to recognize and give focus and exposure priority to faces. It works in AUTO, M, and CINEMA modes.
![]() Touch & Track. Touch & Track enables the camcorder to track focus and exposure of a face or an object that you have selected, wherever the image moves within the frame.
Touch & Track. Touch & Track enables the camcorder to track focus and exposure of a face or an object that you have selected, wherever the image moves within the frame.
![]() Touch Focus panel. Using the Touch Focus panel located at FUNC > Focus in M and CINEMA modes, you can lock the point of focus to a selected part of the composition. The focus remains locked to that distance until another point of focus or until automatic is selected. This is particularly useful for run-and-gun shooting.
Touch Focus panel. Using the Touch Focus panel located at FUNC > Focus in M and CINEMA modes, you can lock the point of focus to a selected part of the composition. The focus remains locked to that distance until another point of focus or until automatic is selected. This is particularly useful for run-and-gun shooting.
![]() Toggling between AF and MF. The AF/MF (auto focus and manual focus) switch on the bezel of the touchscreen allows you to toggle between manual and automatic focus. This is also well suited for run-and-gun shooting. It allows you to instantly choose when you want to be in auto or manual mode. In addition, in run-and-gun conditions, it allows you to lock a good auto focus setting to manual so that it does not wander. The AF/MF switch frees the touchscreen for other functions.
Toggling between AF and MF. The AF/MF (auto focus and manual focus) switch on the bezel of the touchscreen allows you to toggle between manual and automatic focus. This is also well suited for run-and-gun shooting. It allows you to instantly choose when you want to be in auto or manual mode. In addition, in run-and-gun conditions, it allows you to lock a good auto focus setting to manual so that it does not wander. The AF/MF switch frees the touchscreen for other functions.
None of these take the time of full manual focus, but they all allow a degree of selection and control as part of the focus process.
Full manual focus, Face Only (coupled with manual focus), the focus ring on the lens, and focusing aids are discussed in Chapter 5, “Selective Focus and Depth of Field,” which covers focus in greater detail.
Run-and-Gun Exposure
Here are the options and techniques that allow for quick automatic or semi-automatic control over exposure under ongoing run-and-gun conditions:
![]() Full AUTO mode with SMART AUTO
Full AUTO mode with SMART AUTO
![]() Programmed AE (Auto Exposure)
Programmed AE (Auto Exposure)
![]() Touch Exposure
Touch Exposure
![]() Tv (Time value) priority
Tv (Time value) priority
![]() Av (Aperture value) priority
Av (Aperture value) priority
![]() Scene program
Scene program
These semi- or fully automatic program modes determine exposure along with other parameters like white balance, color saturation, and whether additional controls are activated. Full manual exposure and record program modes with manual overrides are covered in Chapter 4, “Controlling Exposure.” However, beyond discussing fully automatic exposure, we will introduce the basic elements of Touch Exposure later in this chapter because Touch Exposure particularly lends itself to run-and-gun use.
AUTO Mode
Let’s examine your options if you decide to approach a run-and-gun situation in full AUTO mode. Whatever frame rate you have set in M mode will revert to 60i in full AUTO mode. However, the following functions remain active if they are first set in M mode before switching to AUTO mode:
![]() Recording mode (quality), the Mbps setting
Recording mode (quality), the Mbps setting
![]() Memory location for video files and photos
Memory location for video files and photos
![]() Auto focus speed (instant, medium, or normal)
Auto focus speed (instant, medium, or normal)
![]() Zoom speeds and Soft Zoom
Zoom speeds and Soft Zoom
![]() Audio input, internal mic pattern, equalization, windscreen
Audio input, internal mic pattern, equalization, windscreen
![]() Image Stabilization settings, including the POWERED IS button setting
Image Stabilization settings, including the POWERED IS button setting
![]() Video Snapshot setting (turn this off unless you want to be restricted to shooting two-, four-, or eight-second clips of predetermined length)
Video Snapshot setting (turn this off unless you want to be restricted to shooting two-, four-, or eight-second clips of predetermined length)
Even though you are in full AUTO mode, you have a powerful semi-automatic/ semi-manual control for selecting focus on the touchscreen in run-and-gun situations. Face Detection and Touch & Track are always activated in full AUTO mode, even if previously turned off in the menu while in M or CINEMA mode.
You can adjust how quickly the G10/XA10 responds in auto focus to suit your style of shooting. A quick response snaps focus into place nearly instantaneously using both through-the-lens (TTL) and external auto focus sensors. The extra sensor adds accuracy and minimizes searching, which is particularly useful in run-and-gun scenarios. On many camcorders, a quick auto focus often has an annoying mechanical look, but on the G10/XA10 the I.AF (instant auto focus) setting glides smoothly into position and works well in most run-and-gun situations. This setting ensures the maximum duration of a focused image, which can be useful in post production as shots are trimmed and assembled in the editing process. The camcorder’s M.AF (medium auto focus) speed may be a good compromise for moderate and slower-moving action. In this mode, focus changes that happen during sustained long takes can seem to glide into place without calling attention to themselves. The relatively slow AF setting (which Canon calls normal auto focus) might be appropriate for situations in which the action itself is in a decidedly slow rhythm—for example, panning among people doing yoga or tai chi. A slow setting is useful for a lingering focus pull from a nearly static image in the foreground to one in the background or vice versa, and its rate might be intentionally chosen for that type of shot. But the G10/ XA10’s fastest setting will probably work best for shooting on the move while adapting to a variety of ongoing conditions.
Face Detection and Touch & Track
In full AUTO mode, Face Detection and its related feature, Touch & Track, operate by default. Within any auto focus situation, the camera’s focus and exposure will seek out faces with a higher priority than other kinds of images. When its logic system detects faces, it places a frame around each one in the LCD screen—as many as nine faces simultaneously. The camera focuses on the most prominent face and displays a white frame around it, with dark gray frames around the secondary faces. (See Figure 2.3.) As characters move, the logic system swaps focus among them to whichever face is momentarily prominent in the composition; the screen will indicate the area of focus with a white frame. At this point, you are in Face Detection but not in Touch & Track.
Figure 2.3 Face Detection indicators.
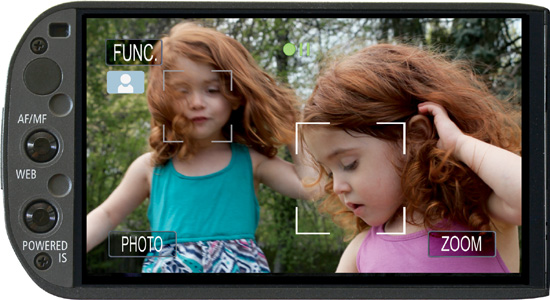
If you tap a face on the touchscreen, even a secondary one, focus will shift to that individual (along with the white indicator frame); you will have moved into Touch & Track mode while still in Face Detection. As long as features are distinctive, the logic system can identify one person from another and will track the selected face, adjusting focus and prioritizing that person’s exposure as long as the face is visible on the screen. When the selected face is no longer present in the shot, the logic system returns to regular AUTO mode and will behave as it did before you touched the screen, selecting automatically among faces in the composition or focusing on other prominent details when no face is present.
The ability to track focus and exposure in full AUTO mode is not restricted to faces. The same Touch & Track mechanism can lock onto an object, an animal, a car, or a piece of scenery if you select it on the touchscreen. As an indicator, the display places a white rectangle around the selected object. The object you select must have distinctive features that differentiate it from other images in the frame.
Initially, the logic system will seek out faces in AUTO mode unless there is no face present or until you select a non-facial image. Only then will the camera’s logic drop its face-seeking priority. In the M and CINEMA modes you can turn off Face Detection while in auto focus or toggle Face Detection in or out with an assignable button for use in manual focus. We will discuss these options in Chapter 5.
Image Stabilization
The Powered IS (Image Stabilization) feature is particularly useful in run-and-gun situations when you find that you suddenly need to become a human tripod. To know for certain that Powered IS is functional, test it by pressing the POWERED IS button on the left bezel of the touchscreen. The hand icon on the upper part of the screen should turn from white with the letter D (for Dynamic IS) to yellow with the letter P. If Powered IS does not operate, its button has been re-assigned to some other function. To restore it, choose FUNC > MENU > Tool icon > Assign Button 2 and select Powered IS. In addition, you can set Powered IS to operate only while the button is physically held down (the default mode), or to toggle on and off. You might choose the latter setting if you anticipate long static moments; otherwise, the default mode works best for most on-the-move situations. Remember that Powered IS is for keeping the camera very still, not for stabilizing the moving camera. This is why you want to easily get into and out of this function.
One quite effective run-and-gun strategy is shooting in full AUTO mode, manually selecting faces or other points of focus with your thumb on the touchscreen (which reverts to auto focus when nothing is selected), and holding down the POWERED IS button for moments where you need maximum stability. Powered IS seamlessly reverts to Dynamic IS to handle motion when the button is released. These functions work well together and rarely compete with each other. Your subject is usually already locked in focus and being tracked at the point you need to hold the frame in place.
SMART AUTO
As you shoot in full AUTO mode, icons for portrait, landscape, backlight, sunset, extreme close-up, and other characteristics will replace the word AUTO in the upper-left area of the touchscreen as SMART AUTO circuitry recognizes compositional clues in your subject and adjusts accordingly. Canon’s computerized scene detection considers parameters like front light versus backlight; stationary versus moving subjects; portraits; landscapes; blue, grey or sunset skies; close-ups; extreme close-ups (tele-macro); spotlight; or night scenes, and the touchscreen displays one of 38 icons indicating how the scene has been analyzed. (See Figure 2.4.)
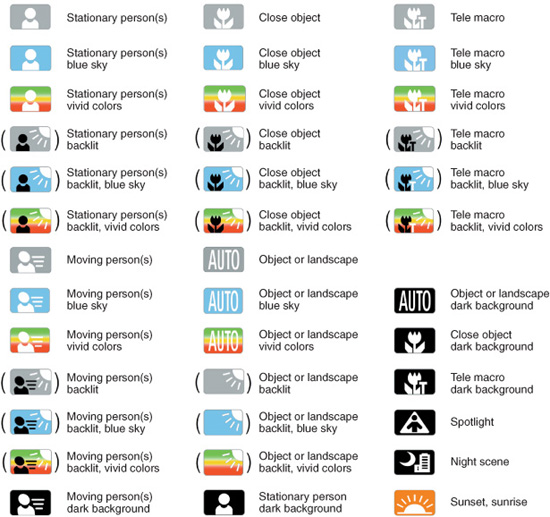
Pay attention to these icons. They are purely informational; you cannot adjust them because they occur in full AUTO mode. But the icon is still useful, particularly if you notice one that indicates the camcorder is misinterpreting your subject or your intentions. This is your cue to switch to M mode and select a record program consistent with your intentions—for example, Programmed AE, which does not have the SMART AUTO function—or to take complete manual control.
Of course, in an ongoing run-and-gun situation, you might not have the time to switch to a semi-automatic program or to manual control. If you prefer to stay in full AUTO mode, you might simply alter the framing until the icon changes back to AUTO or to an icon that represents a more appropriate interpretation of the scene.
Semi-Automatic
The so-called M (manual) setting on the AUTO/M/CINEMA switch is a misnomer. Most of the choices in M mode are still automatic—or at least semi-automatic— like Programmed AE, Portrait, Sports, Night Scene, Snow, Beach, Sunset, Lowlight, Spotlight, Fireworks, Auto White Balance, and Auto Backlight Correction. Many choices allow you to set one function manually while others remain semi-automatic, like Av (Aperture value) priority, Tv (Time value) priority, +/− Exposure, and Auto Gain Limit. Canon might just as well have called this mode “P mode,” or “program mode,” instead of “M mode.”
Full Manual Exposure is only one choice of 13 exposure programs in the M mode. The remaining 12 settings are automatic but optimized for a particular type of situation or are semi-automatic settings allowing you to set one parameter. Several of these could be perfect for run-and-gun shooting, depending on the nature of your shooting conditions. To access the semi-automatic/semi-manual Rec. Program techniques described in this chapter, set the AUTO/M/CINEMA switch on the upper-right side of the camcorder to M (manual). Then choose FUNC > Rec. Programs and select one of the following:
![]() Programmed AE
Programmed AE
![]() Tv Shutter Priority AE
Tv Shutter Priority AE
![]() Av Aperture Priority AE
Av Aperture Priority AE
In run-and-gun situations, one of the most useful controls in Programmed AE is the ability to toggle between auto focus and manual focus. Programmed AE mode is a basic automatic exposure, which differs from full AUTO mode in that you will not have the camera’s logic system additionally invoking SMART AUTO interpretations and adjustments. Unlike full AUTO, Programmed AE allows you to selectively add manual overrides for some of its functions, including choices between auto or various manual settings for white balance and adjusting aspects of exposure. Within Programmed AE, you also have the possibility of Touch Exposure (+/− Exposure) compensation.
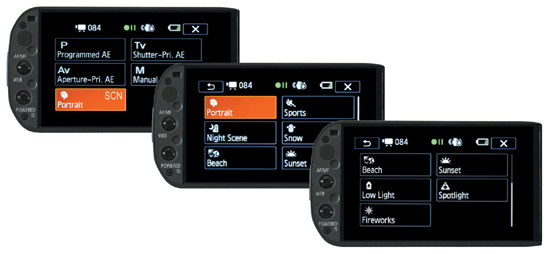
Among the other selections in the Rec. Programs panel, you have the choice of full manual exposure, which is discussed in Chapter 4, or one of the nine content-defined scene programs like Portrait or Night Scene. When you enter Rec. Programs (choose FUNC > Rec. Programs while in M mode), the last previously accessed scene appears with the letters “SCN” among the other program choices in the panel. If you want a content-defined scene, tap the SCN button regardless of which icon it shows, and the icons for all nine content-defined scenes will appear (see Figure 2.5):
![]() Portrait. If your run-and-gun situation is exclusively waist high, chest high, and shoulder high shots of people in a fairly intimate space, then Portrait is a viable option. Face Detection operates in this mode and adjusts both focus and exposure to optimize human faces. Portrait mode lowers the gain setting so that the lens aperture will open to compensate. A nearly wide open aperture provides a shallower depth of field, which will emphasize and better separate a portrait subject in sharp focus from a softer background.
Portrait. If your run-and-gun situation is exclusively waist high, chest high, and shoulder high shots of people in a fairly intimate space, then Portrait is a viable option. Face Detection operates in this mode and adjusts both focus and exposure to optimize human faces. Portrait mode lowers the gain setting so that the lens aperture will open to compensate. A nearly wide open aperture provides a shallower depth of field, which will emphasize and better separate a portrait subject in sharp focus from a softer background.
![]() Sports. Sports emphasizes more distant focus and accommodates fast action.
Sports. Sports emphasizes more distant focus and accommodates fast action.
![]() Night Scene. Night Scene exposes for the highlights and limits gain so that areas of the composition remain black.
Night Scene. Night Scene exposes for the highlights and limits gain so that areas of the composition remain black.
![]() Snow. Snow brings out detail on the subject, which otherwise might underexpose amid white surroundings. It also minimizes the blue tint that occurs as a snows-cape reflects the sky. This is intended for a sunlit scene, not shade, overcast, or falling snow.
Snow. Snow brings out detail on the subject, which otherwise might underexpose amid white surroundings. It also minimizes the blue tint that occurs as a snows-cape reflects the sky. This is intended for a sunlit scene, not shade, overcast, or falling snow.
![]() Beach. Beach is similar to Snow but with a different color balance. It brings out detail on the subject, which otherwise might underexpose with a background of bright sand under sunlight.
Beach. Beach is similar to Snow but with a different color balance. It brings out detail on the subject, which otherwise might underexpose with a background of bright sand under sunlight.
![]() Sunset. Sunset provides saturated colors and exposes so that detail emerges from the glare of a sunset (or sunrise), which may silhouette foreground images.
Sunset. Sunset provides saturated colors and exposes so that detail emerges from the glare of a sunset (or sunrise), which may silhouette foreground images.
![]() Low Light. Low Light enables slower shutter speeds and higher gain for greater visibility in dark areas.
Low Light. Low Light enables slower shutter speeds and higher gain for greater visibility in dark areas.
![]() Spotlight. Spotlight exposes for the highlights in situations where a pool of light illuminates a small part of the composition while the rest of the area is dark.
Spotlight. Spotlight exposes for the highlights in situations where a pool of light illuminates a small part of the composition while the rest of the area is dark.
![]() Fireworks. Fireworks is not likely to be chosen in run-and-gun situations. It emphasizes distant (infinite) focus and rich color in a predominantly dark environment.
Fireworks. Fireworks is not likely to be chosen in run-and-gun situations. It emphasizes distant (infinite) focus and rich color in a predominantly dark environment.
Figure 2.5 SCN on the program panel leads to nine content-defined scene modes.
Sunset, Night Scene, Spotlight, and Low Light are discussed in Chapter 9, “Lighting Techniques,” and Chapter 10, “Shooting at Night.”
Custom Settings
A menu item that you need often could be re-programmed onto the two mechanical buttons on the left bezel of the LCD screen if you want to forego the ability to either toggle between manual and auto focus or use the POWERED IS button for steady telephoto shots. Most videographers will find that these two buttons are extremely useful at their original assignments and probably will not want to reassign them. But depending on your style of shooting, some of you may consider reassigning one or the other button to be able to toggle into Backlight Correction or Auto Focus/Face Detection (within manual focus), or a swap between a current and a preset white balance value versus automatic. These reassignments are effective only in M and CINEMA mode.
To reassign a button, choose FUNC > MENU > TOOL > Assign Button 1 or Assign Button 2. Then choose one of the following:
![]() BLC Always On
BLC Always On
![]() Face Only AF (set to work in manual focus)
Face Only AF (set to work in manual focus)
![]() WB Priority
WB Priority
![]() IR Light (XA10 only)
IR Light (XA10 only)
![]() AF/MF (default setting for Button 1)
AF/MF (default setting for Button 1)
![]() POWERED IS (default setting for Button 2)
POWERED IS (default setting for Button 2)
![]() Off
Off
Fixed Focus
An effective strategy for unpredictable run-and-gun situations is to shoot in manual focus almost exclusively in wide angle as if the zoom didn’t exist at all, and pre-setting the focus to a fixed distance. Wide angle provides the deepest depth of field and least camera shake, issues that are discussed further in Chapter 5, “Selective Focus and Depth of Field,” and Chapter 12, “Controlling the Moving Camera.” Having to physically move farther or closer with the camcorder to create long shot, medium shot, and close-up more dynamically positions the spectator in the world of the event compared to zooming, which simply magnifies and de-magnifies images from one point in space. The deep depth of field of a wide angle also allows for composition in depth with near, medium, and far images in sharp focus within the same frame. Staying at a particular focal length also provides a visual consistency to the scene.
In full wide angle, manual focus can be locked at a fixed point just beyond your closest expected image—for example, at a distance of 38 inches. The depth of field in wide angle is so deep for this particular lens that when you focus at 38 inches, about 19 inches to infinity will be in focus. There will be no need to refocus as long as you remain in full wide angle and do not get closer than 19 inches. With this approach, you will have completely eliminated unwanted focus shifts that can easily occur under run-and-gun conditions. You will be able to do spectacular z-axis compositions in depth, with foreground and background in dramatic focus, and wherever you pan will be in focus. The trade-off is that in order to obtain a variety of shots, you have to become a human zoom, physically moving in tightly with the camera for a close-up, back for a medium shot, and farther back for a long shot.
In D.A. Pennebaker’s 1967 landmark documentary Don’t Look Back on folk and rock icon Bob Dylan’s tour of England (available on DVD), the close-ups in the early parts of the film were shot in telephoto and are consequently shaky and sometimes soft focus. As Dylan eventually got used to the presence of the camera, Pennebaker shot almost exclusively in wide angle with its inherently deep depth of field, moving to within a couple feet for close-ups and composing with deep focus. The focus, steadiness, and visual consistency of the film are noticeably better as Pennebaker’s run-and-gun strategy moved to wide angle.
Shooting exclusively in wide angle can free you to concentrate on visual composition and controlling exposure in run-and-gun situations. One thing to be careful of, however, is that your focus does have to be preset for an appropriate distance that maximizes your depth of field. Check out the depth-of-field charts in Chapter 5. An incorrect setting could result in the entire field of view in soft focus.
The +/− Exposure panel interface enables Touch Exposure, which allows you to select a point within the composition on which to base exposure, along with the ability to lighten or darken the selection using a slider control, or lock the exposure to manual, or toggle back to auto exposure. (See Figure 2.6.) These controls are particularly useful if your subject of interest is lighter or darker than the rest of the composition. The Exposure panel is available in M mode in all record programs and all content-based scene modes except full manual exposure and Fireworks. To access it in M mode, you must be operating in a compatible record program; choose FUNC > Rec. Programs and select a program or scene mode and press X. Then, when you want to use Touch Exposure while shooting in your selected mode, choose FUNC > +/− Exposure.
Figure 2.6 The +/− Exposure panel. Touch Exposure can be performed in the central rectangle.
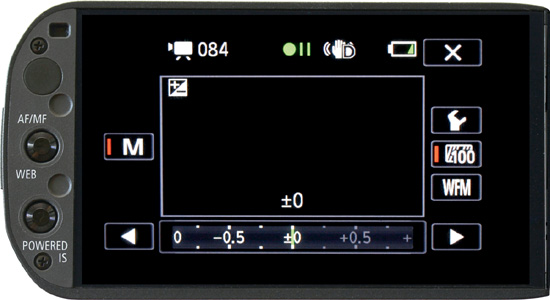
The Exposure panel also provides access to exposure measuring instruments, zebra patterns, and a waveform monitor. We will discuss the Exposure panel in greater detail and the instruments for measuring exposure in Chapter 4.
Coverage Strategies
Even in hectic run-and-gun conditions, there is a need for discipline, structure, and coverage as events are unfolding. It is important to record a meaningful selection of shots that have everything you will need in the editing process for emphasis/ de-emphasis, progression, development, point-of-view, and meaning. This can involve a kind of storyboard thinking, in which you continually ask yourself structural questions during the act of shooting—for example, what should the next shot be? Or, phrased in a few other ways:
![]() What is the complement or visual answer to the current shot?
What is the complement or visual answer to the current shot?
![]() Does it need to change angle?
Does it need to change angle?
![]() Where can the camcorder be placed for a meaningful relationship between the spectator and the subject?
Where can the camcorder be placed for a meaningful relationship between the spectator and the subject?
![]() Should I be inside the circle of action, on its edge, or outside?
Should I be inside the circle of action, on its edge, or outside?
![]() Should I favor one character over another?
Should I favor one character over another?
![]() Should the composition change because the nature of the moment has changed?
Should the composition change because the nature of the moment has changed?
![]() Should the camcorder remain stationary and let the subject move, or should it follow the subject, lead, react, move in counterpoint, or seek out new angles or other images?
Should the camcorder remain stationary and let the subject move, or should it follow the subject, lead, react, move in counterpoint, or seek out new angles or other images?
![]() Do I need detail shots, establishing shots, cutaways, and inserts, or simply an evolving long take?
Do I need detail shots, establishing shots, cutaways, and inserts, or simply an evolving long take?
Among these choices, you want to make sure you have enough coverage. One aspect of coverage is simply having shot ample material in your shooting ratio to be certain you have enough footage and, hopefully, the right footage. Some Direct Cinema observational documentaries by filmmakers like Ricky Leacock or Fred Wiseman have shooting ratios of 50:1 up to 100:1 (100 hours of footage to make a one-hour film). Another aspect of coverage is the concept of the alternative shot or alternative angle. If all the footage is primarily from the same angle, it will be very difficult to cut together without jumps in continuity. Sometimes coverage represents a completely alternative strategy in case the primary footage does not work out in the editing. More often, a coverage angle is chosen because it could be a viable change of vantage point that would cut well with the primary material.
If you are shooting for the purpose of editing, see Chapter 3, “Visual Composition,” and Chapter 17, “Production Strategies,” for establishing shots, cutaways, B-roll, room tone, et cetera.
Pre-Record
A particularly useful aid in situations that are difficult to predict is the ability of the G10/XA10 to automatically pre-record three seconds before you press the Record button. In run-and-gun shooting, you may want to routinely activate this feature. It works particularly well when the camcorder is on a tripod or already has the potential moment well framed. Human reaction time is about [1/10] of a second, but the camcorder can take up to an additional second to start recording. Pre-record will ensure that you lose none of this. Even if you had not been well framed, capturing the camcorder’s visual reaction or at least the three seconds of lead-in sound can be useful in the editing process.
Pre-recording is not available in full AUTO mode. To engage the Pre-Record function, choose FUNC, scroll down to Pre REC, and choose ON while in M or CINEMA mode. (The Pre REC option is found at the bottom of the MENU screen.) When the function has been activated, an oval icon with a 3 in its center appears in the lower right of the touchscreen. To de-activate Pre-Record, simply follow the same procedure but tap OFF.
Figure 2.7 The Pre-Record panel and its control screen.

If you are depending on Pre-Record, be certain that its icon appears on the touchscreen. A number of actions will automatically de-activate the Pre-Record function. These include the following:
![]() Five minutes of inactivity
Five minutes of inactivity
![]() Changing the AUTO/M/CINEMA switch
Changing the AUTO/M/CINEMA switch
![]() Activating Video Snapshot
Activating Video Snapshot
![]() Entering Playback mode
Entering Playback mode
![]() Entering Standby by closing the touchscreen
Entering Standby by closing the touchscreen
![]() Tapping any of the program panels, like White Balance, Gain Limit, Image Stabilizer, Faders, Decoration or Review Recording
Tapping any of the program panels, like White Balance, Gain Limit, Image Stabilizer, Faders, Decoration or Review Recording
In addition, the Pre-Record function cannot record a full three seconds if you press Record less than three seconds after initially activating the Pre-Record function or less than three seconds after the end of the previous shot.
Another form of coverage during run-and-gun situations is to record extensive continuous takes of audio while shooting intermittent video. This can be done if you have a separate high quality audio recorder for “double system” sound. Double system recording is discussed in Chapter 7, “Improving Sound.”