13. Working with Bank and Credit Card Accounts
Incorrect bank account balances are one of the most common problems I find when troubleshooting a client’s QuickBooks data. One of the first questions I ask new clients is whether they have reconciled their bank or credit card accounts in QuickBooks. Most tell me they have. I then review any transactions that are not marked as cleared and I will usually find older, dated transactions that have not cleared. For more information, see “Reviewing Uncleared Transactions,” in this chapter.
One of the most important reconciliations you should do in QuickBooks is match your bank or credit card transactions recorded in QuickBooks with the same transactions reported by the financial institution in their monthly statement. Just reconciling your account balances can correct many errors on the Profit & Loss statement.
Preferences That Affect Banking and Credit Card Management
Did you know that you can streamline your banking and credit card processes by setting certain QuickBooks preferences? Setting preferences saves keystrokes, which in turn can save data entry time.
Not every preference that affects banking or credit card management impacts your financials; some preferences enable specific features. To set preferences in QuickBooks from the menu bar select Edit, Preferences.
Preferences in QuickBooks come in two forms:
• My Preferences—Settings that are unique to the current user logged in the data file and are not shared by other users.
• Company Preferences—Settings that are common for all users.
→ For a detailed review of the preferences that affect working with banking and credit card activities, see “Preferences That Affect Accounts Payable,” p. xxx.
Working with Write Check Transactions
An important task for any financial management software is the capability to record the expenses that a business has in providing the product or service to its customers.
QuickBooks offers multiple transaction types for recording your business expenses. The Write Checks transaction offers a quick method for entering costs. Another transaction for recording expenses is the Enter Bills transaction.
Note
To set company preferences, you must log in to the file as the Admin or External Accountant user and switch to single-user mode (if you are using the data file in a multiuser environment). The Admin user is the default user created when you begin using QuickBooks for the first time.
Proper data entry security includes limiting which employees have access to logging in as the Admin and setting company preferences that are global for all users. For more information see, “Setting Up Users and Permissions,” p. xx.
→ For more information, see “The Accounts Payable Process,” p. xxx.
Both the Write Checks transaction and the Enter Bills transaction can be used to record expenses. However, some notable differences exist between the two:
• Using a vendor bill transaction allows you to track what is owed until you pay an invoice, whereas using a write check transaction simply records the cost as of the date of the check.
Caution
The Write Checks transaction is not the proper type of transaction for recording payment of a bill entered into QuickBooks, sales tax liability payments, paychecks for employees or payroll liability payments. More detailed information about using the proper transaction type for these specific transactions can be found in the following chapters:
• Chapter 7, “Setting Up Vendors”
• Chapter 9, “Setting Up Customers”
• Chapter 11, “Setting Up Payroll”
• If you use a vendor bill, QuickBooks warns you if you enter the same reference number (vendor’s invoice number) that has already been recorded. This warning helps to control inadvertently paying a vendor more than once for the same invoice.
You might want to use a vendor bill for selected vendor costs rather than writing a check. This chapter is specific to working with the costs you will be recording using the Write Checks or Enter Credit Card Charges transactions.
Using the Expenses Tab and Items Tab
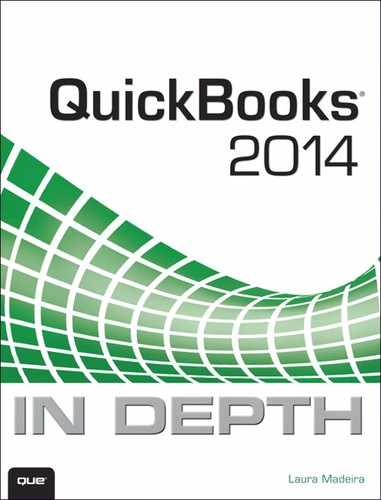
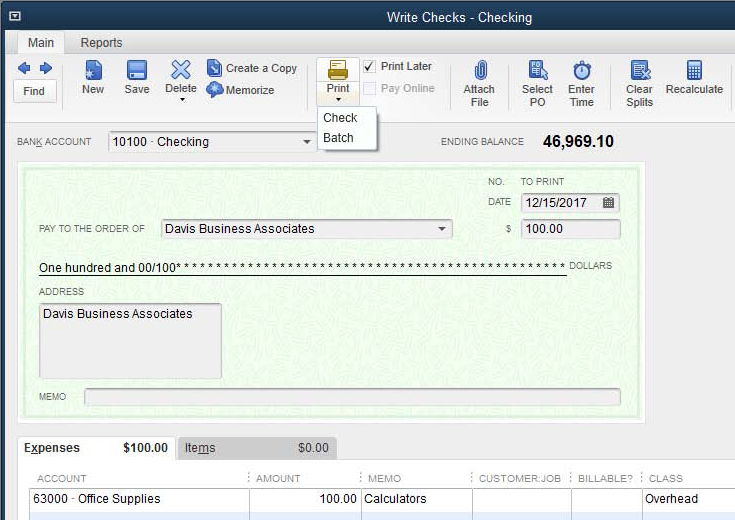
The QuickBooks Write Checks transaction includes an Expenses and Items tab. The information entered on these tabs provides financial detail about the cost being recorded as well as other useful information. See Figure 13.1.
Figure 13.1. Use the Expenses tab to record administrative or overhead costs.
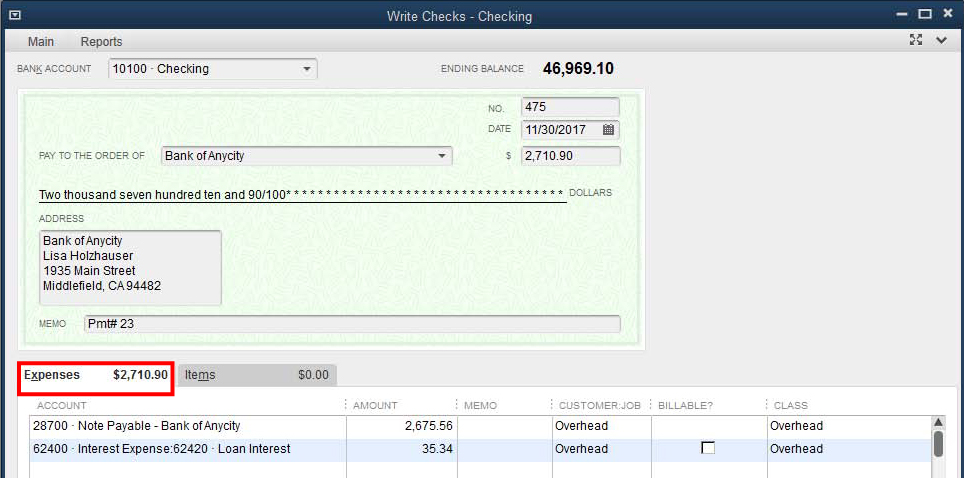
The Expenses and Items tabs on a write check or vendor bill affect QuickBooks reports in different ways. Costs recorded on either tab are included in all the Profit & Loss reports. However, if your business wants to use the many job profitability reports, you must consistently use the Items tab for recording job-related expenses as shown in Figure 13.2. If you use the Expenses tab, you will see these costs on a Profit & Loss by Job, but not itemized on the Job Profitability reports.
Figure 13.2. Use the Items tab to record customer- or job-related expenses to take advantage of the reporting available with job profitability reports.
From the menu bar, select Reports, Jobs, Time & Mileage. These job profitability reports depend on the information entered on the Items tab of the write checks transaction.
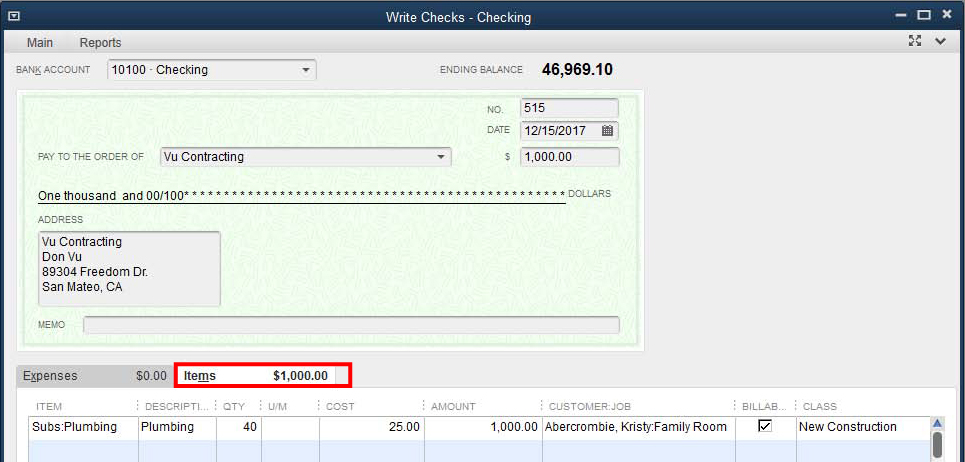
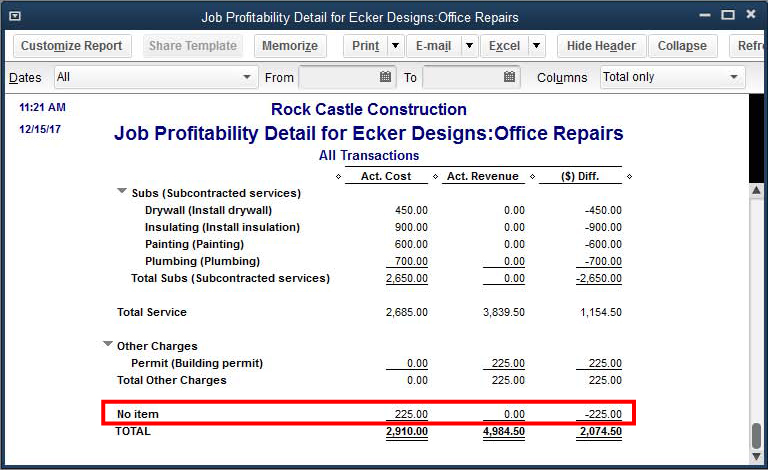
Tracking job profitability includes setting a budget and tracking costs for the same budgeted items. When you do not use the Items tab on expense transactions (see Figure 13.3), the costs display as a No Item line on Job Profitability reports, as shown in Figure 13.4. Doing so makes it impossible to track profitability by the budgeted item.
Figure 13.3. Using the Expense tab for job expenses will make Job Profitability reports less meaningful.
Figure 13.4. Job Profitability report when the Expense tab was used instead of the preferred Items tab when job costing expenses.
→ For more information, see “Items,” p. xxx.
Tip
QuickBooks can automatically open drop-down lists when you’re typing. From the menu bar, select Edit, Preferences, and select the General—My Preferences tab on the Preferences dialog box. Place a checkmark in the Select the Automatically Open Drop-Down Lists When Typing. Click OK to close the dialog box and save your changes.
Another useful purpose of the Items tab is to automate assigning the expense to a specific chart of account. An example is recording telephone expenses. A business that has multiple vendors for telephone, fax, or cell phone services can create an item named Telephone. This item is mapped to the appropriate chart of account. When a bill is received, the cost can be recorded on the Items tab using the Telephone item. QuickBooks automatically assigns the cost to the expense account included in the item setup.
Writing a Check
Writing a check is an easy way to record expenses. I recommend using it for one-time purchases from a supplier or service provider, or for recording debit card or ACH payments from your bank account.
To practice creating a write check transaction, open the sample data file as instructed in Chapter 1, “Getting Started with QuickBooks.” If you are working in your own file, use these instructions:
1. From the menu bar, select Banking, Write Checks.
2. On the Write Checks transaction that displays, leave the prefilled Bank Account—Checking.
3. In the Pay To The Order Of field, begin typing Davis Business Associates until the appropriate vendor displays. QuickBooks will prefill if the name is recognized in any of the lists in QuickBooks (see Figure 13.5). To continue with the sample exercise, skip to step 9; if you’re working in your own file, continue to step 4.
Figure 13.5. Create a write check transaction to record a business expense.
4. When you are entering checks in your own file and the payee is not included in a list, select Add New at the top of the Pay To The Order Of drop-down list.
5. When you’re adding a new payee, the Select Name Type message displays where you will assign the new payee as a Vendor, Customer, Employee, or Other. After selecting the appropriate list, click OK.
6. Complete the details for the newly created list item.
7. (Optional) Instead of selecting Add New in step 4, if you begin typing the new vendor name in the payee field, QuickBooks offers these choices:
• Quick Add—Creates a new list record with just the name field.
• Set Up—Opens up the Select Name Type. Choose from Vendor, Customer, Employee, or Other names list. Complete as detailed in step 8.
• Cancel—Select to not add the new payee.
8. Complete the remaining fields for adding the new name to the selected list. This process varies depending on whether you are adding a new vendor, employee, customer, or other name. Click OK to return to the Write Checks transaction.
9. Accept the prefilled Date. The cost is recorded in the business financials as of this date.
10. In the amount field, type 100.00.
11. (Optional) Complete the address details. (When you save the record, QuickBooks prompts you if you want to save the changes for future transactions.)
12. Enter an optional Memo (the field below the address box). This memo prints on the check. If the Memo field is left blank, QuickBooks can insert the Account Number from the vendor record. For more information, see the section “Adding or Modifying Vendors,” in Chapter 7.
13. On the first line of the Expenses tab, begin typing the account Office Supplies.
14. Use the Tab key on your keyboard to advance to the following fields:
• Memo—Enter an optional memo that will be included in reports (not on the printed check).
• Customer:Job—Leave blank for this exercise. It is recommended you use the Items tab when assigning costs to jobs with budgets.
• Billable—Leave blank for this exercise. For more information, see “Time and Expense Invoicing,” p. xxx.
• Class—Select Overhead.
15. Leave the following fields unselected on the Main tab of the ribbon toolbar at the top of the transaction:
• Print Later—When selected, QuickBooks removes any prefilled check number. The check number will be assigned when the check is printed.
• Pay Online—Select if you’ve established electronic bill payment through your QuickBooks file. For more information, see the section in this chapter titled “Online Banking Center.”
16. (Optional) Click any of the following also found on the Main tab of the ribbon toolbar to help complete the transaction:
• Select PO—If purchase orders are enabled in inventory preferences. See Chapter 5, “Setting Up Inventory”.
• Enter Time—Select if you want to prefill the Write Check with time sheet data. See Chapter 7 “Setting Up Vendors” and Chapter 11, “Setting Up Payroll”.
• Clear Splits—Clears the amounts you entered in the detail section of the check and moves the total to the Expenses tab.
• Recalculate—Useful if, after entering an amount at the top of the record, you add additional lines of detail to the Expenses or Items tab, will update the amount of the check to match the total of the newly added detail lines.
• Batch Transactions—A useful tool for adding multiple checks in a spreadsheet like interface. This is available only with QuickBooks Premier Accountant and all versions of QuickBooks Enterprise.
When you are completed with the entry details, you can select from one of the following choices:
• Clear—Remove all data entered in fields and start over.
• Save & Close—Save and close the dialog box.
• Save & New—Save and continue with another record.
Note
You will not have the Class field in your data if Class Tracking in the Preferences dialog box is not enabled. To enable class tracking, from the menu bar select Edit, Preferences, Accounting, Company Preferences tab.
Printing Checks
Printing checks from QuickBooks can save you time over manually writing checks and later recording them in your software. Printing also helps to limit any confusion about the amount the transaction is approved for.
Ordering QuickBooks Checks
Many check printing suppliers offer QuickBooks-compatible checks. When ordering, confirm with your check supply source that they guarantee the format supplied will work with the QuickBooks software. In QuickBooks, only a few minor adjustments can be made to the placement of data on the printed check.
You can also purchase checks directly from Intuit. For more information, click the Order Checks icon on the Main tab of the Write Checks ribbon toolbar.
Setting Form Defaults and Making Printing Adjustments
Before printing checks from your QuickBooks file, review the printing defaults assigned to checks or paychecks.
To review the printing defaults in your file follow these steps:
1. From the menu bar, select File, Printer Setup.
2. From the Form Name drop-down list, select Check/PayCheck, as shown in Figure 13.6.
Figure 13.6. Select the check style you will be printing and other settings.
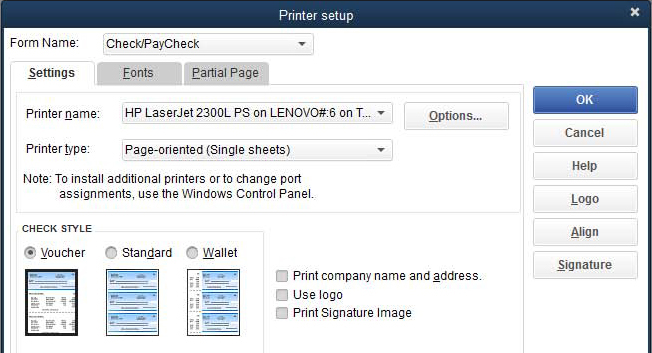
3. From the Settings tab, you can select the following:
• Printer Name and Printer Type
• Check Style—Select from Voucher, Standard, or Wallet.
• Print Company Name and Address, Use Logo, or Print Signature Image—Click the Signature button to the right to locate the electronically stored signature image.
4. Select the Fonts tab to modify the Font used on the check.
5. Select the Partial Page tab if you print standard or wallet format style checks. Use this setting to define how to print a partial page of checks and the position of the check to use with the printer.
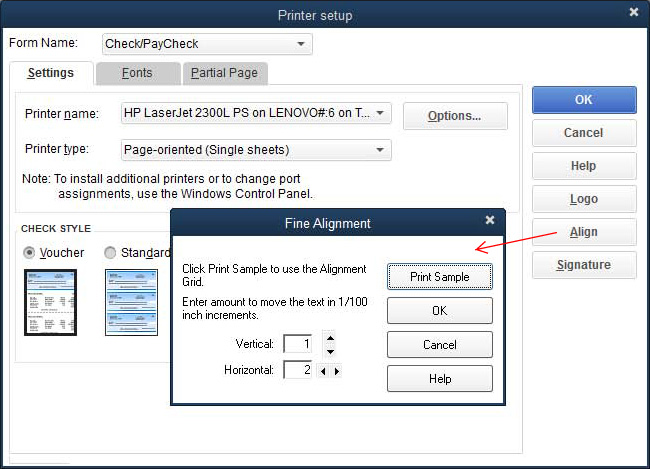
6. After printing a check, you might find it necessary to make minor alignment modifications to the printed check. Click the Align button. Select amounts to move the text in 1/100-inch increments (as shown in Figure 13.7).
Figure 13.7. From the Printer Setup you can choose to make minor alignment adjustments.
7. Click Print Sample to check your new settings. Click OK to close the Printer Setup when you’re finished with this task.
Printing Checks
With QuickBooks, you can print checks individually or in a batch of checks all at one time as shown in Figure 13.5.
To print a check or a group of checks, follow these steps:
1. If the Write Checks transaction isn’t already open, select Banking, Write Checks from the menu bar, and prepare your check for printing.
2. In the Print drop-down list, select from the following:
• Print—Enter the check number you are printing.
• Print Batch—Select the Bank Account. Enter the First Check Number and remove the checkmark for any check you will not be printing in the batch.
3. The Print Checks dialog box displays. Change the defaults as necessary.
4. If you are printing a partial page of checks using the Standard or Wallet check style, click the Partial Page tab. Review the settings specific for how your printer needs the partial page of checks to be positioned before printing.
5. Click the Print button to print your checks. The Print Checks—Confirmation dialog box displays as shown in Figure 13.8.
Figure 13.8. Make sure that each check printed correctly before selecting OK on the Print Checks—Confirmation dialog box.

6. Review the checks that just printed. If each check printed successfully, click OK on the Print Checks—Confirmation dialog box. If any check did not print successfully, place a checkmark in the Reprint column. You can return to step 2 and reprint the checks selected.
Tip
You can review both printed and to be printed check transactions by clicking the Check Register icon on the Home page and selecting the appropriate bank account.
Entering a Bank Debit Charge
If your business uses a debit card for making purchases, you need to record these expenses like any other purchase transaction. A debit card transaction is debited from your bank’s available cash balance, unlike a credit card where the payment for the purchase is made at some later date.
→ To enter a bank debit charge to your bank account, follow the same steps outlined in the sidebar titled “Writing a Check,” pg. xxx.
Instead of printing a check, remove the Print Later checkmark and in the No. field enter a notation as described in the Caution in this section. Or, you can enter some notation of your own that will help you identify the charge as a debit when reconciling the bank account.
Caution
If you are recording a debit card payment made to a vendor for whom you issue a year-end Form 1099-MISC, specific notations should be used in the No. field. For more information, see “Tracking and Reporting Vendor 1099-MISC Payments,” p. 263.
Entering Credit Card Charges
QuickBooks uses the Enter Credit Card Charges transaction to record business purchases made on credit. Has your business been using this transaction type? If not, you might have recorded credit card purchases using a vendor bill payable to the credit card merchant. Listed here are a few of the reasons to use a credit card receipt to record payments made by credit card:
• Track the vendors paid for the service or product.
• Track the date the purchase was made.
• Reconcile the credit card activity to the monthly statement from your credit card provider.
To practice recording a credit card charge, open the sample data file as instructed in Chapter 1. If you are working in your own file, use these instructions to enter a credit card charge:
1. From the menu bar, select Banking, Enter Credit Card Charges.
2. Leave the prefilled QuickBooks Credit Card account (see Figure 13.9).
Figure 13.9. Recording expenses made with the company credit card.
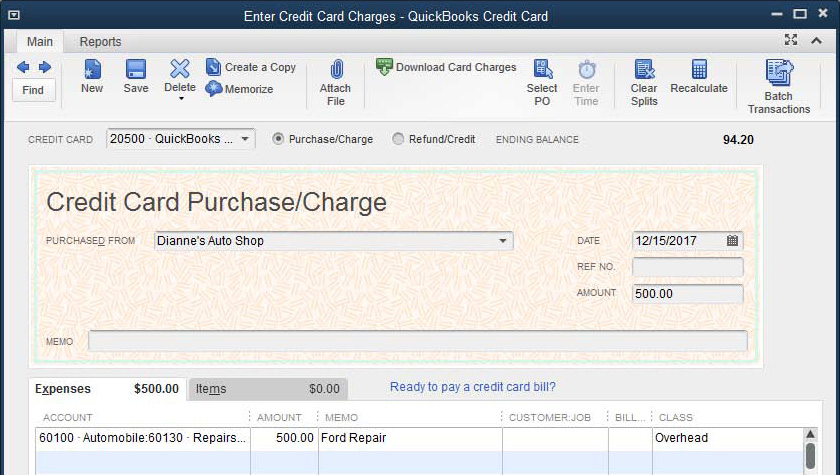
3. For this exercise, leave Purchase/Charge selected. When working in your own data, you can select Refund/Credit when necessary.
4. In the Purchased From drop-down list, start typing Dianne’s Auto Shop. To add a new payee when necessary, select Add New at the top of the list. Select an appropriate type from the Select Name Type dialog box that displays.
5. For this exercise, leave the prefilled date. When working with your own data, use the date the charge was incurred.
6. If you want to record a reference number enter it into the Ref. No. field.
7. Type the amount of 500.00.
8. For details in your reporting enter a Memo.
9. On the Expenses tab, the account has prefilled from the default settings with that vendor or from past credit card purchases or if no pre-fill, select the appropriate account.
10. For this exercise, leave the Memo and Customer:Job blank.
11. For this exercise, leave the Billable column blank and select the Overhead class.
12. (Optional) Click any of the following to help complete the transaction:
• Clear Splits—Clears the amounts you entered in the detail section of the check and moves the total to the Expenses tab.
• Recalculate—Recalculates the Amount field from the total of the rows.
• Clear—Removes all data entered in fields and start over.
• Save & Close—Saves and closes the dialog box.
• Save & New—Saves and continues with another record.
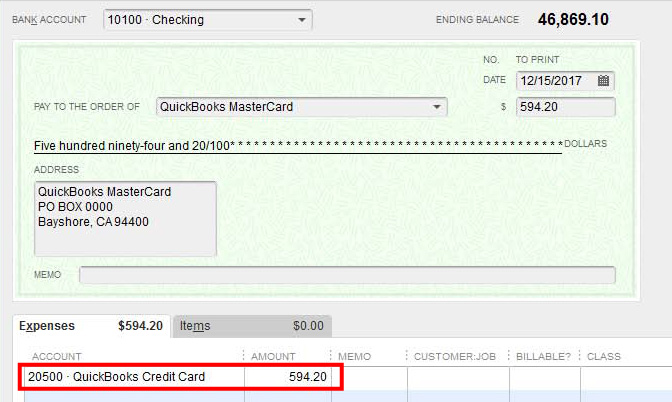
Paying the Credit Card Bill
As you enter credit card charges, QuickBooks increases the amount you owe your credit card provider. Because the individual charges have already been recorded, when you pay your bill, you need to reduce your bank balance and the amount you owe the credit card company.
Tip
Often credit card purchases are made from one-time suppliers. I recommend that you select the Other name type when adding this type of payee. This will keep your vendor list limited to those you frequently do business with.
If you are using a check to record the payment, from the menu bar, select Banking, Write Checks. Follow the instructions for writing a check, with one exception. On the Expenses tab, in the Account column, select the other current liability credit card account associated with the bill you are paying (see Figure 13.10).
Figure 13.10. Properly record the payment of your credit card bill by assigning the credit card liability account on the Expenses tab.
If you choose to enter a bill, from the menu bar, select Vendors, Enter Bills.
→ For more information on working with vendor records, see “Recording Vendor Bills,” p. xxx.
On the Expenses tab, in the Account column, select the other current liability credit card account. Process the payment for the vendor bill as with other bills.
Include reconciling your credit card account on your list of monthly accounting tasks; doing so will help you manage your credit card activity as discussed in this chapter.
Transferring Funds Between Bank Accounts
If your business has more than one bank account, at some time you will probably need to transfer funds from one account to another account. If you need to physically take a printed check to the bank, use the instructions in the sidebar “Writing a Check” earlier in this chapter. In the Account column, on the expenses tab, select the bank account you are depositing the funds into.
If you transfer the funds between accounts using your bank’s online portal, you can record the transaction using the Transfer Funds Between Accounts transaction type using these steps:
1. From the menu bar, select Banking, Transfer Funds.
2. Enter the date the transfer is effective.
3. Select the Transfer Funds From account and the Transfer Funds To account.
4. Enter the Transfer Amount $.
5. (Optional) Enter a memo, which will display in reports.
6. If you have signed up for Online Banking within QuickBooks and you are transferring funds between two accounts at the same bank, select Online Funds Transfer. QuickBooks automatically processes the transfer the next time you synchronize your records with the bank via the Online Banking Center.
Bank Feeds
Manage your banking and credit card balances in QuickBooks by securely downloading transactions from the financial institution directly into your data file. QuickBooks will match the downloaded transactions to existing transactions, and will mark for review any discrepancies. No need to manually enter the missing transactions!
QuickBooks 2014 has totally redesigned the online banking experience in QuickBooks. You can choose to use an older version of the user interface by selecting from the menu bar, Edit, Preferences, Checking. Select the Company Preferences tab. You can choose to use the new Express Mode and set preferences for the renaming rules. Or choose to use the older Classic Mode (Register Mode) for working with Bank Feeds. It is your choice, and you can switch back and forth.
You stay in control, by accepting or ignoring the transactions before adding them to QuickBooks. Downloading transactions is accomplished using one of the following methods:
• Direct Connect—Users will login seamlessly to the financial institution within QuickBooks. This is the method discussed in this article.
• Web Connect—Users will download a file from the financial institutions website and then import this file into QuickBooks also from the Banking, Bank Feeds menu.
The method used is often determined by your bank’s participation in the QuickBooks Bank Feeds feature and may automatically default during the setup. The cost of using Direct Connect with Bank Feeds (if any) also depends on your financial institution.
So whether you are up-to-date with your transaction data entry or behind, Bank Feeds will help confirm, reconcile and add missing transactions. The result will be more accurate and timely reporting of your business expenses and account balances.
Set Up Bank Feeds
In just a few steps, you will be ready to download bank or credit card transactions into your QuickBooks file:
1. Verify your financial institution participates. From the menu bar, select Banking, Bank Feeds, Participating Financial Institutions. For participating banks or credit card providers, you must first establish online account access directly with the financial institution. You will need to enter the User ID and password when completing the remaining setup steps in QuickBooks.
2. From the menu bar, select Banking, Set Up Bank Feeds for an Account. You can also access the setup from the New or Edit Account window, by selecting the Set Up Bank Feeds button at the bottom of the window. The Find Your Bank window displays as shown in Figure 13.11.
Figure 13.11. Most of the popular financial institutions participate in Bank Feeds.
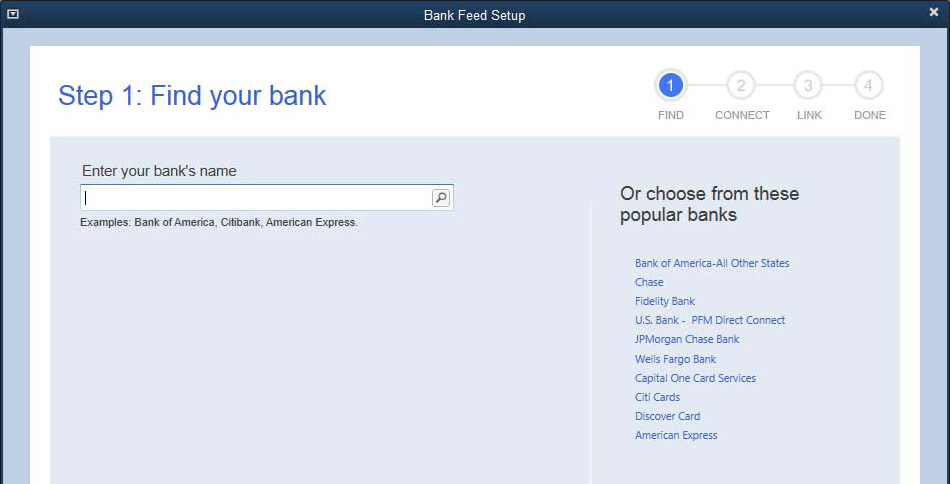
3. In the Enter Your Bank’s Name field, begin typing the financial institution’s name or select from the list on the right.
4. If the bank or credit card participates, Step 2 in the Bank Feed Setup displays. Type your User ID and Password. If you are having any troubles with the setup, contact information for your bank or credit card provider is listed on each of the setup windows.
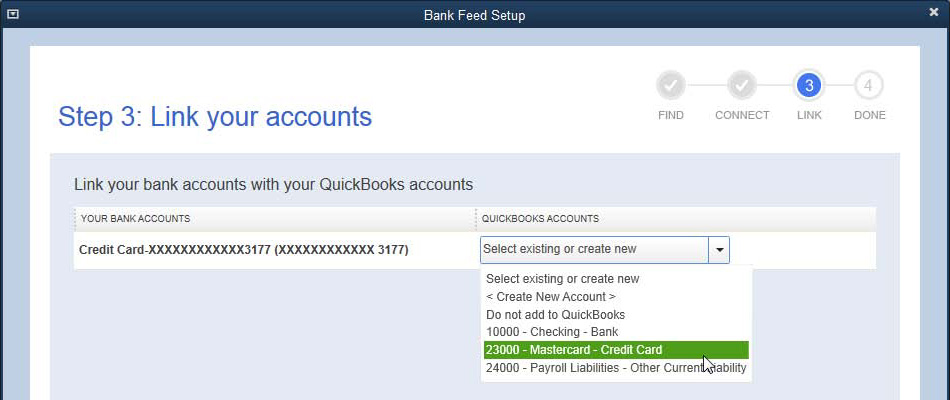
5. Next, in Step 3, from the QuickBooks Accounts drop-down select an existing QuickBooks account or create a new account. This step directs which QuickBooks account you want the Bank Feeds transactions to be downloaded into. See Figure 13.12
Figure 13.12. Associate your online bank or credit card with an account in QuickBooks.
6. Step 4: The Success! message displays in the Bank Feed Setup window. Click Close to complete the setup. You are now ready to manage your bank feeds in QuickBooks.
If this is your first time downloading data into QuickBooks, do not worry. The Bank Feeds do a great job of matching transactions avoiding any duplication. Or perhaps, you are behind on your data entry and will use the download to automatically create those missing transactions. Both needs are met very well with Bank Feeds. However, the period of time that is downloadable the first time with Direct Connect is controlled by the financial institution.
Manage Bank Feeds
With each successive download, Bank Feeds will know what has already been downloaded and will add any new transactions. Let’s get started with these simple steps:
1. To launch Bank Feeds, from the menu bar, select Banking, Bank Feeds, Bank Feeds Center.
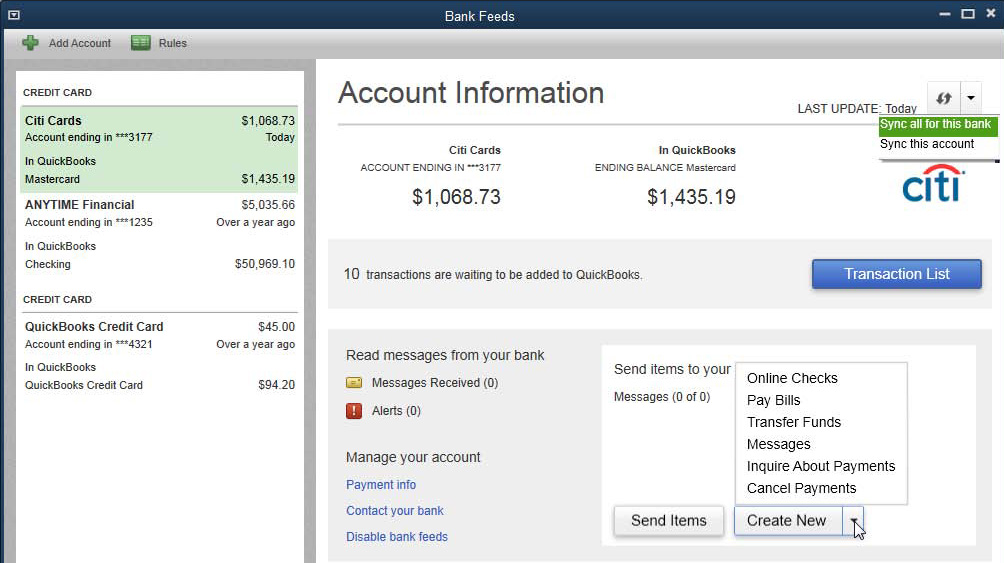
2. The Bank Feeds Account Information displays. In the top right, as shown in Figure 13.13, with your cursor click the refresh icon or from the drop-down choose to Sync All For This Bank or Sync This Account. You are in control, choosing when to synchronize your file with the financial institutions online data.
Figure 13.13. The new Account Information window helps you manage your online transaction details
3. Type your Pin/Password as recognized by your bank or credit card. (Your User ID was stored when you first created the link between QuickBooks and the institution). Click OK to proceed.
4. The Bank Feeds Account Information window now displays details about the selected account. The at-a-glance summary of the balances per your bank/credit card as compared to the balances in QuickBooks is one of the many improvements made to QuickBooks online banking functionality. From this window you can:
• View the Transaction List of newly downloaded transactions
• Create new online checks, pay bills, transfer funds, send your bank/credit a message and other actions. (Your bank may charge a fee for these added online services)
• Create a credit card payment
• Contact your bank
• Disable bank feeds
5. From the Bank Feeds Account Information window, select Transaction List. Bank Feeds displays a list of downloaded transactions separated into three groupings, click on the colored bar at the top of the window to filter the results for the following:
• Need Your Review — transactions that have not yet been added to your QuickBooks file.
• Chg — transactions that have been changed due to a renaming rule.
• Auto — transactions that were automatically entered from following a specific renaming rule.
• Add/Approved — transactions that you have approved while viewing the Transaction List.
6. For each selected transaction assign a Payee and Account. Choose to manage the transactions individually on the right in the Action column. Options include:
• Quick Add — Transaction will be added to QuickBooks.
• Add More Details — Permits you to add a Number, assign a Payee, add a Memo, and break the transaction down into multiple lines of detail.
• Match to Existing Transaction — This is generally not needed, as the Bank Feeds will automatically match the transactions. But you can use this option to manually match two like transactions.
• Ignore — transaction will not be added to QuickBooks and will be removed from future download details.
• Choose from other specific actions depending on the type of transaction selected.
7. Optionally, select multiple transactions and choose to Add/Approve or Ignore from the Batch Actions drop-down list at the bottom of the window.
Figure 13.14. Click on any section of the colored bar to filter the results displayed or to open the register

8. Click on any section of the colored bar to filter the results displayed or to open the register
Success with Bank Feeds is when your financial institution balance is the same as the balance in QuickBooks. Now how easy was that! The QuickBooks user stays in control, viewing each of the transactions before adding them to the file.
Note
If you select to ignore an individual or group of transactions, they will not be added to your QuickBooks data and will not be displayed the next time you refresh your downloaded data.
Renaming Rules in Bank Feeds
Would you like QuickBooks to “remember” the name and account you previously assigned to a downloaded transaction? QuickBooks does this with Renaming Rules that automate and standardize the names of downloaded banking transactions into QuickBooks. For example, your financial institution might include a transaction number in the downloaded Payee name field. In such cases, QuickBooks might then create a new vendor for each transaction; when you assign a name from one of your QuickBooks lists to this transaction, QuickBooks automatically creates the renaming rule to use for this same transaction in the future.
For example, suppose you purchase mobile phone services from Verizon Wireless. When the transaction is downloaded, the vendor name is “Verizon Wireless - <transaction code or location>.” You can create a renaming rule that instructs QuickBooks to ignore the transaction code and assign it to the proper vendor.
Renaming rules are created automatically by QuickBooks and are based on several options: begins with, ends with, contains, or exactly matches.
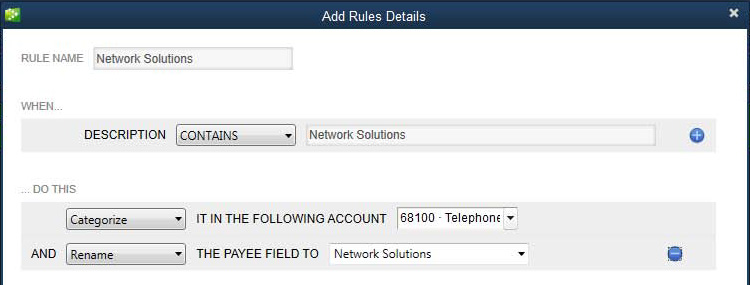
To create or modify the renaming rules click the Rules icon on the top left of the Bank Feeds window as shown previously in Figure 13.13.
Figure 13.15 shows the Renaming Rules that were created by QuickBooks. From this window you can edit or remove the properties of the Renaming Rule or add a new rule manually as shown in Figure 13.16.
Figure 13.15. Bank Feeds automatically creates renaming rules that you can edit
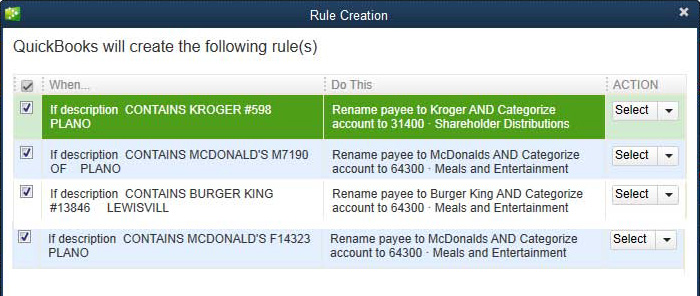
Figure 13.16. Manually add or edit Renaming Rules
Note
Did you know that the QuickBooks Bank Feeds feature creates a renaming rule automatically when you assign the transaction to an existing QuickBooks name for the first time? You can then modify the renaming rule created.
Reconciling the Bank or Credit Card Account
Are you reconciling your bank or credit accounts in QuickBooks? If the answer is no, are you reconciling these accounts on the monthly paper statement provided by the financial institution? If you still answered no, you will certainly find value in learning how easy it is to reconcile these accounts in QuickBooks.
Note
If your work is interrupted while you are reconciling a bank or credit card statement, you can click Leave in the Reconcile–Account dialog box. Clicking Leave will keep the checkmarks you have assigned to transactions and let you return to finish your work later.
Why exactly is it so important? Most businesses record a significant amount of income and expenses through bank or credit card activity. When the reconciliation is not completed in the software, how certain are you that the financial reports are accurate?
There are a few exceptions to income and expenses flowing through a bank account. For example, a restaurant or bar might manage a significant amount of cash during the course of doing business. Do not limit yourself to thinking the task of reconciling is limited to bank or credit card accounts. If you have a cash safe, drawer, or box at the office, reconcile the ins and outs of the cash in your QuickBooks data.
To begin reconciling your bank or credit card accounts, follow these steps:
1. From the menu bar, select Banking, Reconcile to open the Begin Reconciliation dialog box, as shown in Figure 13.17.
Figure 13.17. Reconcile your accounting records to your financial institution’s monthly statement.
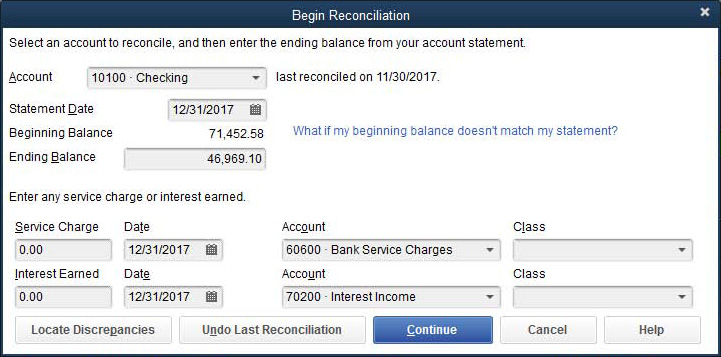
2. From the Account drop-down list, select the appropriate account. (Any Balance Sheet type account can be reconciled.)
3. Select the Statement Date that matches the ending statement date from your financial institution.
4. Review the Beginning Balance, which should equal the same number provided by your financial institution. Later sections in this chapter will detail methods of troubleshooting errors in the Beginning Balance.
Note
Where does the beginning balance originate from on the Begin Reconciliation dialog box? It is the sum total of all previous transactions for the selected account that are marked as cleared.
5. Enter the ending balance from your financial institution’s period statement.
6. (Optional) Enter any Service Charge or Interest Earned, selecting the appropriate date, account, and Class if tracking the use of Classes.
7. Click Continue. The Reconcile–Account Name dialog box opens.
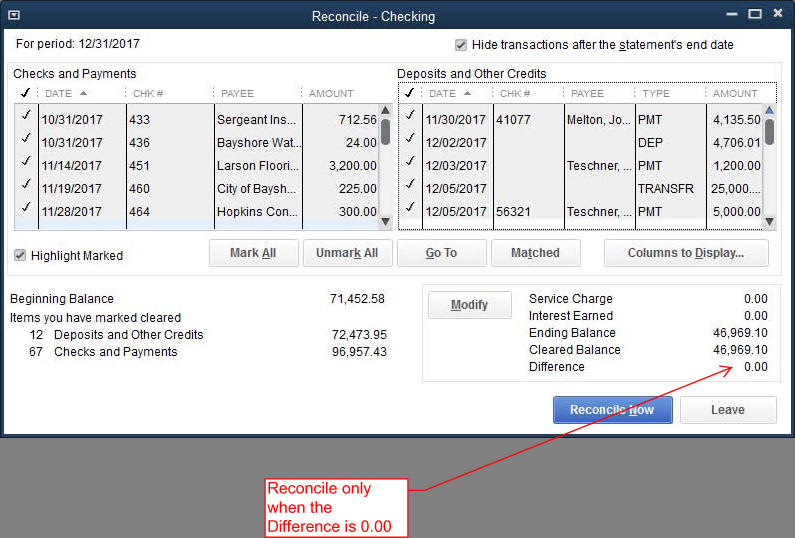
8. Place a checkmark in the Hide Transactions After the Statement’s End Date. This makes the task of reconciling much easier.
9. Place individual checkmarks next to each cleared Checks and Payments and Deposits and Other Credits that are included in the statement from your financial institution.
10. Click Reconcile Now only when the Difference is 0.00. See Figure 13.18. This indicates that your cleared transactions match those provided by the financial institution.
Figure 13.18. Reconcile your QuickBooks transactions to your financial institutions for a specific month.
→ For more information, see “Reconciling with an Adjustment,” p. xxx.
11. Follow the prompts to print the reconciliation report to attach to your financial institution’s statement for safekeeping.
Other useful features of working with the Reconcile feature in QuickBooks include the following:
• Highlight Marked—Make it easier to differentiate the cleared from the noncleared transactions on the computer screen.
• Mark All or Unmark All—Use to automatically add or remove checkmarks from transactions during the bank reconciliation process.
• Go To—Open the currently selected transaction. Useful if you need to modify the transaction.
• Matched—Match downloaded transactions to the transactions in QuickBooks.
• Columns to Display—Add or remove the columns of data displayed.
• Modify—Click to change the reconcile For Period date or the Ending Balance amount or to add bank charges and/or interest earned.
• Leave—Click to save your work and close the Begin Reconcile window.
You can also click any column header to sort the data in that column.
Reconciliations are easiest when done each month. However, you might have been using QuickBooks for some time before learning how to complete the reconciliation task. The following section of this chapter helps you learn how to troubleshoot the first reconciliation or fix errors in previous reconciliations.
Troubleshooting Reconciliations
A simple way to determine whether your bank account is correctly reconciled is to compare your bank statement beginning balance to the QuickBooks Beginning Balance amount in the Begin Reconciliation dialog box. From the menu bar, select Banking, Reconcile, and select the appropriate Account. If you find your QuickBooks Beginning Balance does not agree with your bank statement, you can use one or a combination of several methods listed in this chapter to figure out why.
Note
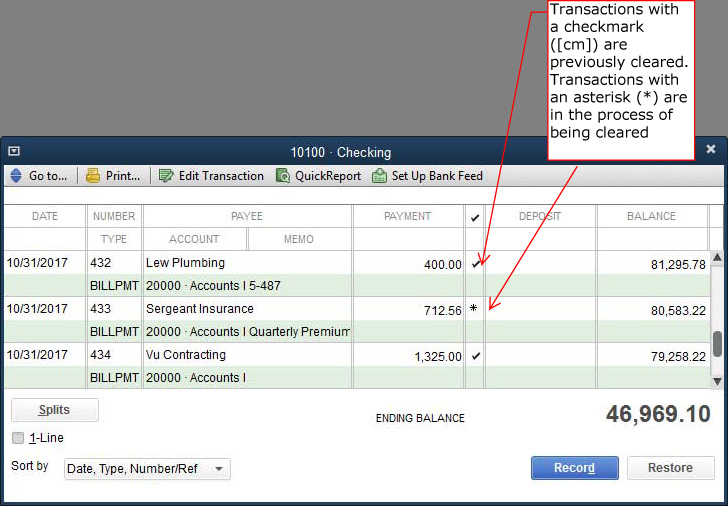
What makes up the Beginning Balance, as shown in Figure 13.17? The beginning balance is the sum of all previously cleared checks, deposits, and other transactions. A checkmark next to a transaction item in the bank account register indicates it has previously been cleared in the bank reconciliation in QuickBooks. An asterisk indicates the item is currently being reconciled, as shown in Figure 13.19. A lightning bolt (not shown) next to a transaction indicates it has been downloaded and matched, but has not yet been marked as cleared.
Figure 13.19. View the cleared status of transactions in your account register.
Determining Whether the Account Has Been Reconciled
If your business is just starting, it is a good time to make it part of your regular routine to reconcile your bank account in QuickBooks with the statement you receive each month. However, what if you have been using QuickBooks for years or months and have never reconciled the bank account in the software?
How can you tell whether your bank account has been reconciled? An easy method is to begin the bank reconciliation. From the menu bar, select Banking, Reconcile, and select the desired account. Review the Last Reconciled On (date) in the Begin Reconciliation window. A month/day/year indicates that the account has previously been reconciled (see Figure 13.17). If you have a Beginning Balance amount but no Last Reconciled On (date), no reconciliation has been completed. This beginning balance was most likely from entering your bank balance when you first created your QuickBooks file.
Tip
Are you an accounting professional? Included with QuickBooks Accountant 2014 and QuickBooks Enterprise Accountant 14.0 is the Accountant Center, as shown in Figure 13.20.
Figure 13.20. The Accountant Center is available with the Accountant editions of QuickBooks.
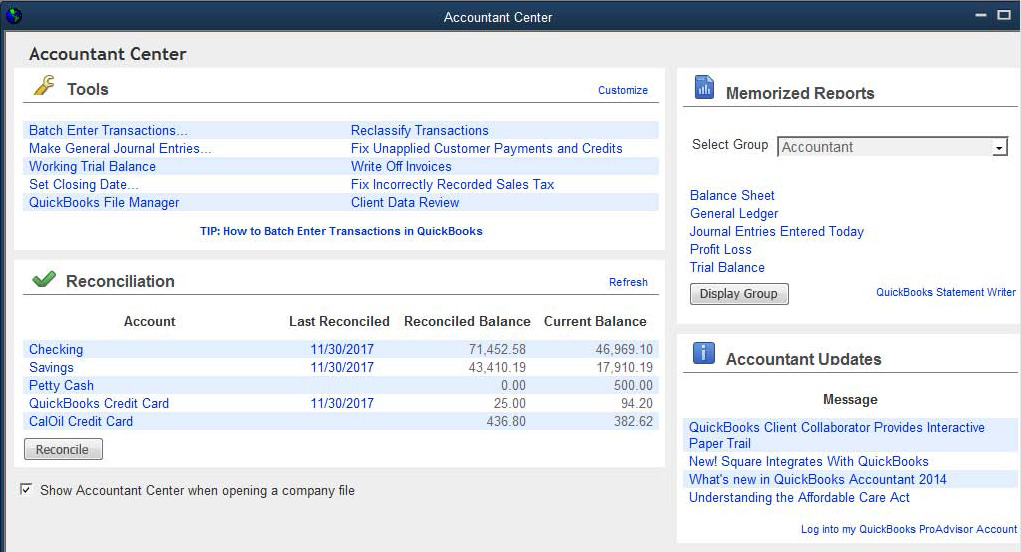
Open a client’s file and the Accountant Center summarizes important information about your client’s account reconciliations.
→ For more information, see “Express Start,” p. xx.
Have there been no reconciliations completed? First, determine how many months have gone by. Catching up with a few months of bank statement reconciliations takes much less effort than having to do several years or months of bank statement reconciliations. If you are going to go back to the beginning of the business and reconcile each month, you need to start with the first month of your bank activity and work your way month by month to the current month. Completing your bank reconciliation for each month is the most accurate and thorough process and provides a separate reconciliation report for each month.
However, it is often not practical to go back to the start of your business when you simply want to get the bank account reconciled in the current month.
Complete the recommendations in the following sections before attempting to complete a multiyear or multimonth bank reconciliation.
Caution
As with any major task or adjustment you plan to make in your QuickBooks data, I recommend you make a backup copy. You can easily create this backup by selecting File, Create Backup from the menu bar, and then follow the instructions on the screen.
Verifying That All Account Transactions Have Been Entered
Ensuring that all checks, bill payments, payroll checks, customer payments, and any other banking-related transactions have been entered in the QuickBooks data file is critical to the success in accurate reporting in your own or your client’s QuickBooks file. You don’t want to complete a multiyear or multimonth bank reconciliation if handwritten checks or other bank transactions have not been recorded in the data.
Creating a Missing Checks Report
To help you determine whether any check transactions are missing, create a Missing Checks report. To do so, follow these steps:
1. From the menu bar, select Reports, Banking, Missing Checks report.
2. In the Missing Checks dialog box, select the bank account from the drop-down list.
The resulting Missing Checks report shows all transaction types that reduce your bank account, i.e. checks, bill payments, paychecks sorted by number (see Figure 13.21). Look for any breaks in the detail with a ***Missing or ***Duplicate warning.
Figure 13.21. The Missing Checks report can help you determine whether you need to enter any missing transactions before you reconcile.

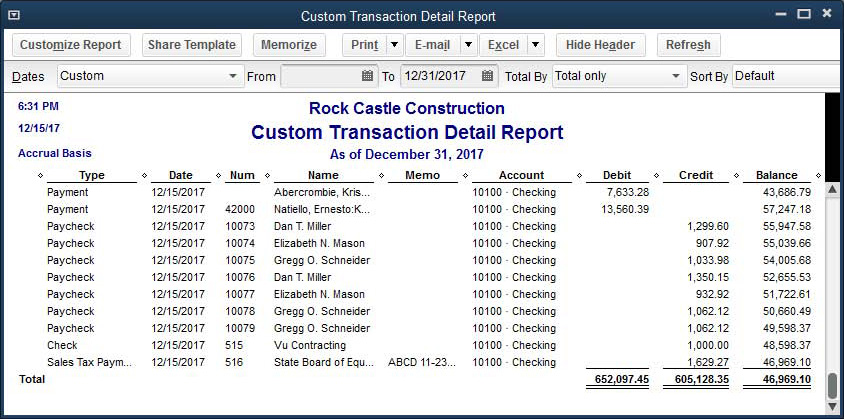
Creating a Custom Transaction Detail Report
Another method used to verify you have recorded all your transactions requires a bit more effort on your part. Manually add the total of all deductions and additions from the statements your bank provides you and compare to the Custom Transaction Detail report.
To do so, follow these steps:
1. From the menu bar, select Reports, Custom Reports, Transaction Detail. The Modify Report dialog box opens.
2. Select the From and To dates to match the period you are reconciling. If it’s from the beginning of the file, you might want to leave the From date blank and enter only the To date.
3. Click the Filters tab.
4. In the Choose Filter box, with the Account filter highlighted, choose the bank account from the drop-down list.
5. Click OK.
This report (see Figure 13.22) totals all debits (money into your bank account) and credits (money out of your bank account). To these totals, you have to add in checks and deduct deposits that have not yet cleared the bank. If the resulting totals are exact or close to your manual totals, you can feel confident reconciling multiple years or months at one time.
Figure 13.22. The modified Custom Transaction Detail Report shows the total of all money in and out of a bank account for the time period selected.
Identifying All Uncleared Transactions
Make a list of all the uncleared bank transactions as of the month and year you are reconciling. If you have been manually reconciling your bank account, simply find the paper statement for the selected month and look for the list of uncleared transactions.
For example, suppose it is April 2017 and you want to reconcile multiple years or months through December 31, 2016. Collect your bank statements for January through March of 2017. Identify any cleared transactions from these 2017 bank statements where the transaction date was on or before December 31, 2016, but did not clear your bank until year 2017.
Tip
If you are choosing to complete a multiyear or multimonth bank reconciliation, consider reconciling through the last month of your previous fiscal year, which for most companies would be your statement ending December 31, 20xx. Choosing a month to reconcile through that is two to three months in the past will make identifying the transactions that have not cleared the bank as of the month you are reconciling much easier.
Completing the Multiyear or Multimonth Bank Reconciliation
To complete the multiyear or multimonth bank reconciliation, follow these steps:
1. From the menu bar, select Banking, Reconcile. The Begin Reconciliation dialog box displays (refer to Figure 13.17).
2. Select the desired Account from the drop-down list, and type the Statement Date you want to reconcile through. Enter the Ending Balance from the bank statement and click Continue. The Reconcile–Account dialog box displays. Figure 13.18 shows the bank reconciliation in progress for the period ended December 31, 2017.
3. Place a checkmark in the Hide Transactions After the Statement’s End Date at the top right. Checking this box makes working with the remaining transactions easier.
4. Click the Mark All button. Now each transaction is marked as if it has cleared. Remove the checkmark from any transaction you previously identified as uncleared. Your work is complete when the reconciliation shows a Difference of 0.00 at the lower right of the Reconcile–Account dialog box.
5. Click Reconcile Now. QuickBooks creates a bank reconciliation report you can print.
For added convenience when reconciling, you can sort the uncleared transactions by clicking once on any of the column header that has the checkmark in the Reconcile–Account dialog box.
Not all bank account reconciliations are this easy to troubleshoot and correct. Often, you need to dig deeper into the possible causes of reconciliation errors. QuickBooks makes this task much easier by providing many tools and reports to help with this important process.
Caution
What if the reconciled difference is not 0.00? First determine whether the amount is significant. If the answer is yes, the best method for finding errors is to review each item marked cleared in QuickBooks with the transactions listed on your bank statements.
If you choose to record the adjustment, QuickBooks records this amount into an automatically created Expense account called Reconciliation Discrepancies. For more information, see “Reconciling with an Adjustment,” p. xxx.
Reviewing Uncleared Transactions
If your bank account has previously been reconciled, reviewing your uncleared bank transactions is the best place to start when troubleshooting an incorrectly reconciled bank account.
Creating an Uncleared Transactions Detail Report
This report is one of the most useful to you as you research your bank reconciliation errors. You might want to memorize this report so it can be reviewed again if needed.
To create an uncleared bank transactions report, follow these steps:
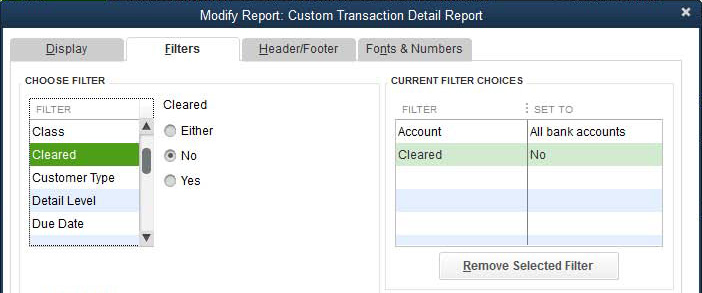
1. From the menu bar, select Reports, Custom Reports, Transaction Detail. The Display tab of the Modify Report dialog box displays. In the Report Date Range box, select All Dates. If you have more than one bank account, in the Total By drop-down list, select Account List to keep each bank account with separate totals. From the Columns box, select the data you want to appear in the report.
2. Click the Filters tab. In the Choose Filter box, with Account highlighted, select All Bank Accounts. Scroll down the Choose Filter list and select Cleared, and then click No next to the list, as shown in Figure 13.23.
Figure 13.23. Filter the report to show only uncleared bank transactions.
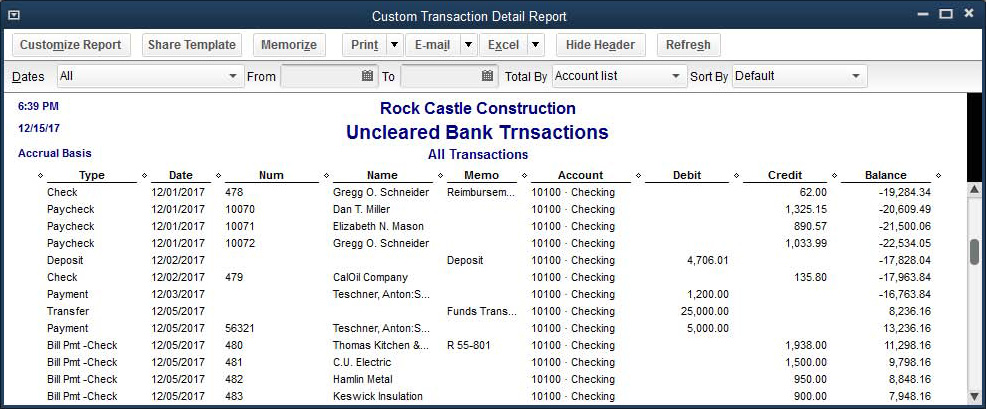
3. This report will be useful to you in the future, so go ahead and give it a specific name by clicking the Header/Footer tab and changing the Report Title as desired.
4. Click OK to create the report (see Figure 13.24).
Figure 13.24. Create a customized report to easily view uncleared bank transactions.
5. To store this report for future use, click Memorize. QuickBooks asks you to provide a name for the report. Click OK to close the Memorize Report dialog box.
Memorizing customized reports for later use is easy. First, make sure your Dates selection is appropriate. If your Dates selection is Custom, each time you create this report, it uses the custom dates. Selecting Dates, such as the generic This Month-to-Date or any of the other choices, makes the memorized report more valuable in future months.
Tip
Another useful option is to add this report to your icon bar. With the report displayed, select View, Add <name of report> to Icon Bar. If you use the Top Icon bar, you may need to click the right-facing double arrows to see this icon and others that do not fit on the icon bar.
If you are using the Left Icon bar placement, scroll down to the bottom of the My Shortcuts list to see the report added.
With the report displayed, click Memorize. QuickBooks offers to save the report with the header name, or you can rename it.
→ For more information, see “Reporting in QuickBooks,” p. xxx.
Sorting Transactions
Another method for reviewing uncleared bank transactions is to open your bank register and follow these steps:
1. From the menu bar select Banking, Use Register.
2. Select the desired bank account in the Use Register dialog box.
3. On the lower left of the register is a Sort By drop-down list. Select the Cleared status from the drop-down list.
4. Scroll through the register and view those transactions that are either
• Cleared—Denoted by a checkmark
• In process of being cleared—Denoted by an asterisk (*)
• Not cleared—No checkmark or *
Often, either a transaction that is cleared and should not have been cleared or a transaction that is uncleared and should have been cleared can be the cause of the opening balance not matching.
If you need to unclear a transaction or two, double-click the checkmark next to the item in the bank register. QuickBooks replaces the checkmark with an asterisk. You can also click once more to remove the asterisk if desired.
If you attempt to make a change to the cleared status of a transaction while in the bank register, QuickBooks provides a warning message.
Using additional reporting tools in QuickBooks can help you find changes made to previously reconciled transactions. You will find that using a combination of the following reports when troubleshooting reconciliation errors is useful.
Reviewing Previous Bank Reconciliation Reports
If you determine that the file has been previously reconciled but no paper copy was kept, no need to worry. This feature is available for QuickBooks Pro, Premier and Enterprise. From the menu bar, select Reports, Banking, Previous Reconciliation. In the Select Previous Reconciliation Report dialog box, choose a Statement Ending Date to view (see Figure 13.25). QuickBooks displays a listing of previous reconciliations for the chosen account (available only in QuickBooks Premier, Accountant, and Enterprise). Choose from the following view options: Summary, Detail, or Both.
Figure 13.25. Select the previous bank reconciliation report when troubleshooting errors.
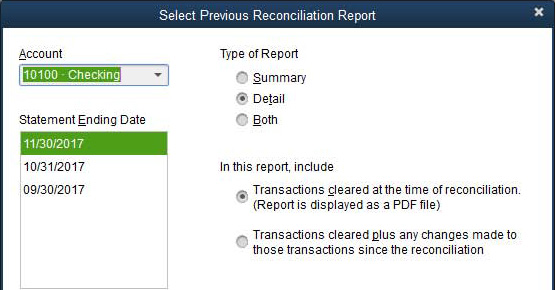
Additionally, you can view the reports in two ways:
• Transactions Cleared at the Time of Reconciliation—This stored report shows the bank reconciliation details in PDF form as they were completed at the time the account was reconciled.
• Transactions Cleared Plus Any Changes—View this report to see how the bank reconciliation would look today.
Compare the stored PDF with the Transactions Cleared Plus Changes report. Any differences between the two should indicate what your discrepancies are. You might be able to find these discrepancies easily with the Reconciliation Discrepancy report, as discussed next.
Locating Bank Account Reconciliation Discrepancies
Finding bank reconciliation discrepancies in QuickBooks is made easier with the Reconciliation Discrepancy report. To prepare this report:
1. From the menu bar, select Reports, Banking, Reconciliation Discrepancy. The Reconciliation Discrepancy Report displays.
2. Choose the bank account from the drop-down list and select OK to create the report.
This report identifies any transaction modified after being cleared in the bank reconciliation process. For each transaction on this report, you see the modified date, reconciled amount, type of change (amount added, deleted, or voided), and the financial effect of the change (see Figure 13.26).
Figure 13.26. View details of previously cleared transactions that have been modified, deleted, or voided.
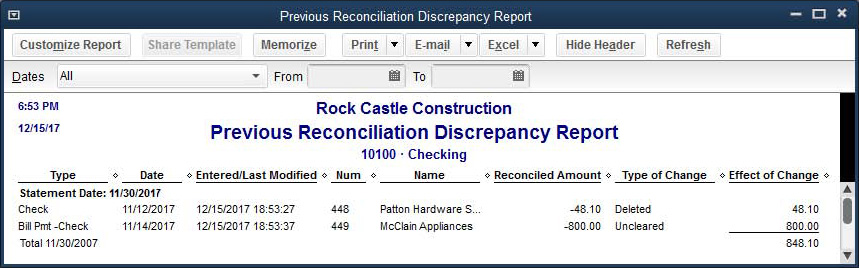
3. You can click Modify Report and add the username that modified the transaction to help in identifying who made the change to the transaction.
After you have found the reconciliation discrepancy, you can view the Voided/Deleted Report (discussed in the next section) to help re-create the transaction(s).
Reviewing the Voided/Deleted Transactions Reports
Caution
Troubleshoot your bank reconciliation beginning balance differences with the previous Reconciliation Discrepancy report before completing the next month’s reconciliation. Doing so is important because QuickBooks removes all detail from the discrepancy report when you complete a new reconciliation. This is due to QuickBooks determining that you have solved the issue, or you would not have completed the next month’s bank reconciliation.
This report does not track discrepancies caused by changing the bank account associated with a transaction.
Other reporting tools that help locate problem transactions are the Voided/Deleted Transactions Summary report and the Voided/Deleted Transactions Detail reports.
To create the Voided/Deleted Transactions Summary report, shown in Figure 13.27, from the menu bar, select Reports, Accountant & Taxes, Voided/Deleted Transactions Summary. Alternatively, you can select Voided/Deleted Transactions Detail from the submenu to view the detailed reported.
Figure 13.27. Use the Voided/Deleted Transactions Summary report to locate transactions that are possibly causing your reconciliation errors.
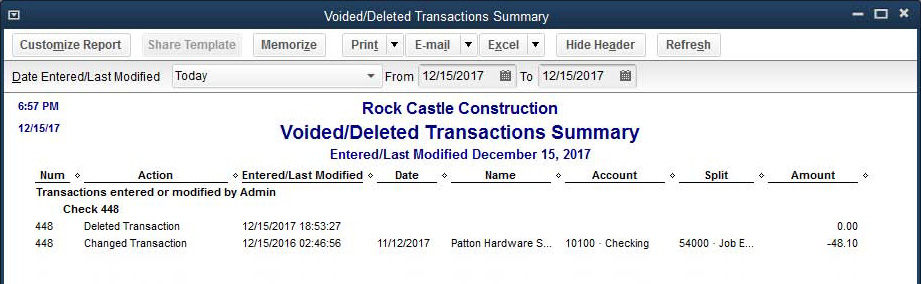
If you are having trouble finding the problem, particularly when the beginning balance has changed, this report can help you find the problem transaction(s).
Use this report for re-creating the voided or deleted transactions as part of the process of fixing your bank reconciliations.
If there are more than a few transactions in error, restarting or undoing the previous bank reconciliation might be easier than researching each transaction marked as cleared. However, if previously cleared transactions were voided or deleted, they will have to be re-created.
Restarting a Previously Completed Bank Reconciliation
If your review shows a few minor issues with bank reconciliation accuracy, restarting your reconciliation might be the best action to take. To do so, select Banking, Reconcile, Locate Discrepancies from the menu bar. The Locate Discrepancies dialog box displays. From this dialog box, click Restart Reconciliation.
Restarting your bank reconciliation retains your checkmarks on the cleared transactions, but enables you to put in a new statement date and ending balance. You can restart only the last month’s banking reconciliation.
If you need to restart the reconciliation for more than one banking month, click Undo Last Reconciliation. You can repeat this undo for multiple months in a row—all the way back to the first reconciliation if desired.
Undoing a Previous Bank Reconciliation
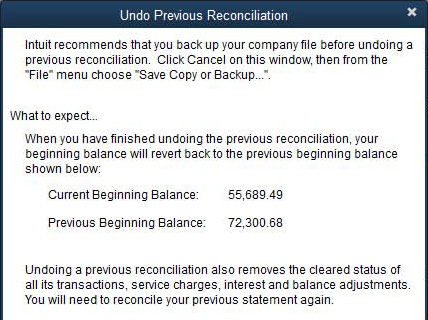
If you have determined that the integrity of one or more completed bank reconciliations is in question, you can easily undo previous reconciliations, one month at a time. From the menu bar select Banking, Reconcile, and click Undo Last Reconciliation.
QuickBooks opens the Undo Previous Reconciliation dialog box, providing you with ample information about what to expect, and recommending that you back up your company data file first. As each month is undone, QuickBooks shows you the Previous Beginning Balance. You should undo bank reconciliations only until you reach a statement where this amount agrees with the same month’s bank statement beginning balance, so watch it closely.
Click Continue after reviewing the message in Figure 13.28. You can undo the bank reconciliation one month at a time. You will know you are back to the first statement when the Undo Previous Reconciliation dialog box shows the Previous Beginning Balance as 0.00. When you return to the Begin Reconciliation dialog box, you no longer see a Last Reconciled On (date) or a Beginning Balance amount.
Figure 13.28. Details of what you can expect when you complete an Undo Previous Reconciliation transaction.
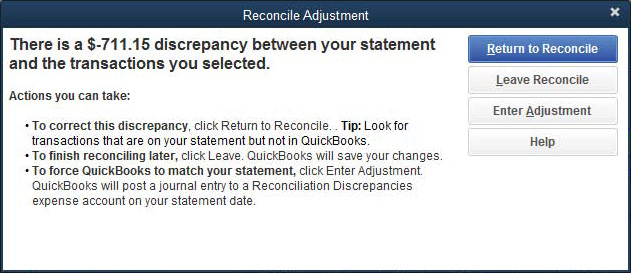
Reconciling with an Adjustment
QuickBooks creates an adjustment to your bank account and financials if you choose to reconcile a bank account that does not have 0.00 in the Difference row of the Reconcile dialog box.
When you decide to reconcile with an adjustment for the difference amount (see Figure 13.29), you need to first consider the following:
Figure 13.29. Letting QuickBooks enter an adjustment for the reconciliation difference.
Tip
Use the Undo a Previous Bank Reconciliation transaction when an incorrect statement date was entered on the bank reconciliation. QuickBooks defaults the next bank statement date to 30 days from the last statement date. Before beginning the bank reconciliation in QuickBooks, verify that the statement date and beginning balance are correct.
• Have you made every attempt to find the difference using those techniques and reports you have read in this chapter?
• Is the difference as reported on the QuickBooks Reconcile dialog box not a significant dollar amount?
If you can answer yes to these two items, let QuickBooks make an adjustment to your financials for the difference.
To reconcile with an adjustment created by QuickBooks, click Reconcile Now in the Reconcile–Account dialog box or the Enter Adjustment in Reconcile Adjustment dialog box.
QuickBooks details the amount of the adjustment and limits your choices to do the following:
Tip
One of my favorite tricks for tracking down an unreconciled balance is this: If the amount is evenly divisible by 9, there’s a very strong probability the digits of a transaction amount were transposed when the transaction was entered.
• Return to Reconcile—Click this option if you want to return to the reconciliation window to look for the difference.
• Leave Reconcile—QuickBooks saves your changes so you can return later and review your work.
• Enter Adjustment—This option forces QuickBooks’ accounting to match your bank statement.
• Help—This option provides useful links to information about reconciling your accounts.
When you choose Enter Adjustment, QuickBooks creates a journal entry and posts the difference to a Reconciliation Discrepancies expense account on the profit and loss report.
I don’t recommend reconciling with an adjustment. Sooner or later, you will have to identify where the adjustment came from and where it should be posted. However, making an adjustment for a small balance can often save time that would be better spent on activities that grow the business. Always put in place better processes so these types of errors do not occur again.
Note
Any Balance Sheet type account can be reconciled, not just bank account types. Reconciling credit card accounts provides the same control over the accuracy of your financials. Did you know that any account that transactions flow in and out of can be reconciled? Do you have a car loan? Have you reconciled your car loan account to the lending institution’s statement? Do you loan money to employees and then have them pay the loan back? These are all examples of accounts that would benefit from the same reconciliation process used for bank accounts.