
Chapter 8. Building a simple social network
This chapter covers
- Users and statuses
- Home timeline
- Followers/following lists
- Posting or deleting a status update
- Streaming API
In this chapter, we’ll cover the data structures and concepts necessary to build a system that offers almost all of the back-end-level functionality of Twitter. This chapter isn’t intended to allow you to build a site that scales to the extent of Twitter, but the methods that we cover should give you a much better understanding of how social networking sites can be built from simple structures and data.
We’ll begin this chapter by talking about user and status objects, which are the basis of almost all of the information in our application. From there, we’ll discuss the home timeline and followers/following lists, which are sequences of status messages or users. Continuing on, we’ll work through posting status messages, following/unfollowing someone, and deleting posts, which involves manipulating those lists. Finally, we’ll build out a fully functioning streaming API with web server to encourage users of the social network to use and play with the data.
In the last chapter, we spent much of our time building an ad-targeting engine that combined user-entered data (the ads and their prices) with click behavior data in order to optimize ad earnings. The ad-targeting engine was query-intensive, in that every request could cause a lot of computation. In this Twitter-like platform, we’ll do our best to perform as little work as possible when someone is interested in viewing a page.
To get started, let’s build the basic structures that will hold much of the data that our users are interested in.
8.1. Users and statuses
As users interact with Twitter, two types of objects hold the most important information: users and status messages. User objects hold basic identity information, as well as aggregate data about the number of followers, number of status messages posted, and more. The user objects are important because they’re the starting point for every other kind of data that’s available or interesting. Status messages are also important because they’re how individuals express themselves and interact with each other, and are the true content of social networks.
In this section, we’ll talk about what data will be stored in the user and status message objects and how we’ll store them. We’ll also look at a function to create a new user.
Our first step is to define and create the structure for a user.
8.1.1. User information
In a variety of online services and social networks, user objects can be the basic building blocks from which everything else is derived. Our Twitter work-alike is no different.
We’ll store user information inside of Redis as a HASH, similar to how we stored articles in chapter 1. Data that we’ll store includes the username of the user, how many followers they have, how many people they’re following, how many status messages they’ve posted, their sign-up date, and any other meta-information we decide to store down the line. A sample HASH that includes this information for a user with the username of dr_josiah (my Twitter username) is shown in figure 8.1.
Figure 8.1. Example user information stored in a HASH
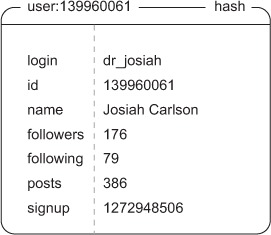
From this figure, you can see that I have a modest number of followers, along with other information. When a new user signs up, we only need to create an object with the following, followers, and post count set to zero, a new timestamp for the sign-up time, and the relevant username. The function to perform this initial creation is shown next.
Listing 8.1. How to create a new user profile HASH

In our function, we perform the expected setting of the initial user information in the user’s HASH, but we also acquire a lock around the user’s login name. This lock is necessary: it guarantees that we won’t have two requests trying to create a user with the same login at the same time. After locking, we verify that the login name hasn’t been taken by another user. If the name hasn’t been taken, we generate a new unique ID for the user, add the login name to the mapping of login names to user IDs, and then create the user’s HASH.
Sensitive user information
Because the user HASH will be fetched countless times for rendering a template, or for returning directly as a response to an API request, we don’t store sensitive user information in this HASH. For now, we’ll assume that hashed passwords, email addresses, and more are stored at other keys, or in a different database entirely.
We’ve finished creating the user and setting all of the necessary meta-information about them. From here, the next step in building our Twitter work-alike is the status message itself.
8.1.2. Status messages
As we mentioned earlier, whereas user profiles store information about an individual, the ideas that people are trying to express are stored in status messages. As was the case with user information, we’ll store status message information inside a HASH.
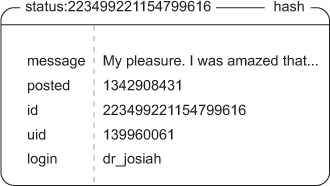
In addition to the message itself, we’ll store when the status message was posted, the user ID and login of the user who posted it (so that if we have a status object, we don’t need to fetch the user object of the poster to discover their login name), and any additional information that should be stored about the status message. Figure 8.2 shows an example status message.
Figure 8.2. Example status message stored in a HASH
And that’s everything necessary for a basic status message. The code to create such a status message can be seen in the next listing.
Listing 8.2. How to create a status message HASH
There isn’t anything surprising going on in the status creation function. The function fetches the login name of the user, gets a new ID for the status message, and then combines everything together and stores it as a HASH.
We’ll talk about making the status message visible to followers in section 8.4, so sit tight for now, as we now examine the most commonly used view into lists of status messages: a user’s home timeline.
8.2. Home timeline
When people visit Twitter after logging in, the first view that they see is what’s referred to as their home timeline. This is a list of status messages that have been posted by the user and all of the people they’re following. As the primary entry point to what users see, this data should be as easy to retrieve as possible.
In this section, we’ll talk about the data to be stored in the home timeline and how to fetch information to display the home timeline quickly. We’ll also talk about other important status message timelines.
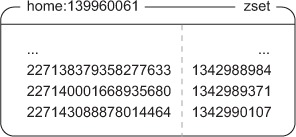
As mentioned earlier in this chapter, we want to be able to fetch all of the data required for a given view as quickly as possible. For the home timeline, which will store the list of status messages that have been posted by the people that the current user is following, we’ll use a ZSET to store status IDs as ZSET members, with the timestamp of when the message was posted being used as the score. Figure 8.3 shows an example home timeline.
Figure 8.3. When someone visits their home timeline on a site like Twitter, they see the most recently posted messages that people they follow have written. This information is stored as a ZSET of status ID/timestamp pairs. Timestamp information provides the sort order, and the status ID shows us what information to pull in a second step.
Because the home timeline is just referencing status messages—it doesn’t contain the status messages themselves—our function to fetch the most recently posted status messages must also fetch the status message data. The next listing shows the code to fetch a page of messages from the home timeline.
Listing 8.3. A function to fetch a page of recent status messages from a timeline
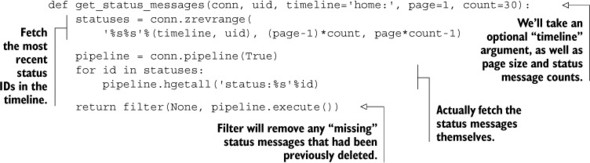
That function will fetch status messages in reverse chronological order from the provided timeline, which defaults to the home timeline.
A second important timeline is the timeline of posts that a user has posted. Where the home timeline includes posts from other people, the user’s timeline will include only those posts from the user. These timelines can be seen when visiting a user’s profile, and are the primary entry point for finding someone interesting. To fetch a page of statuses from a given user, we can call the same get_messages() function, but we’ll pass profile: as the timeline argument in our call.
Now that a user can fetch the home timeline, we should discuss how to manage the list of users that someone is following, and the list of users that are following them.
8.3. Followers/following lists
One of the primary services of a platform like Twitter is for users to share their thoughts, ideas, and dreams with others. Following someone means that you’re interested in reading about what they’re saying, with the hope that others will want to follow you.
In this section, we’ll discuss how to manage the lists of users that each user follows, and the users that follow them. We’ll also discuss what happens to a user’s home timeline when they start or stop following someone.
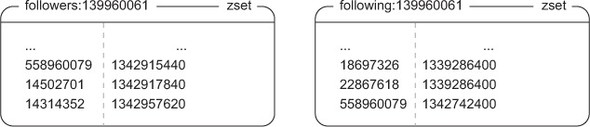
When we looked at the home and profile timelines in the last section, we stored status IDs and timestamps in a ZSET. To keep a list of followers and a list of those people that a user is following, we’ll also store user IDs and timestamps in ZSETs as well, with members being user IDs, and scores being the timestamp of when the user was followed. Figure 8.4 shows an example of the followers and those that a user is following.
Figure 8.4. To know who’s following a user, we store user ID/timestamp pairs in a ZSET. The user IDs are the people who’re following that user, and the timestamp is when they started following the user. Similarly, the users that a user is following are stored as a ZSET of user ID/timestamp pairs of the user ID of the person being followed, and the timestamp of when the user followed them.
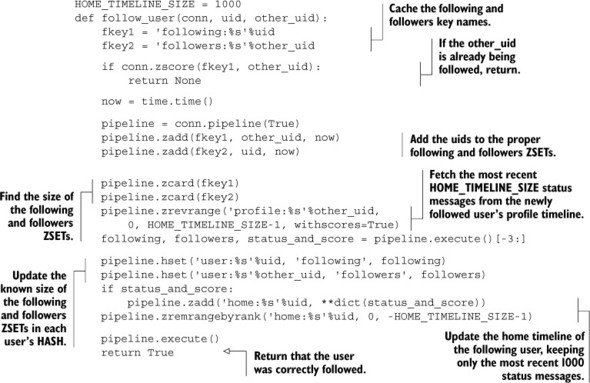
As we start or stop following a user, there are following and followers ZSETs that need to be updated, as well as counts in the two user profile HASHes. After those ZSETs and HASHes have been updated, we then need to copy the newly followed user’s status message IDs from their profile timeline into our home timeline. This is to ensure that after we’ve followed someone, we get to see their status messages immediately. The next listing shows the code for following someone.
Listing 8.4. Update the following user’s home timeline
Converting a list of tuples into a dictionary
As part of our follow_user() function, we fetched a list of status message IDs along with their timestamp scores. Because this is a sequence of pairs, we can pass them directly to the dict() type, which will create a dictionary of keys and values, as passed.
This function proceeds in the way we described earlier: we add the appropriate user IDs to the following and followers ZSETs, get the size of the following and followers ZSETs, and fetch the recent status message IDs from the followed user’s profile timeline. After we’ve fetched all of the data, we then update counts inside the user profile HASHes, and update the following user’s home timeline.
After following someone and reading their status messages for a while, we may get to a point where we decide we don’t want to follow them anymore. To stop following someone, we perform essentially the reverse operations of what we’ve discussed: removing UIDs from followers and following lists, removing status messages, and again updating the followers/following counts. The code to stop following someone is shown in the following listing.
Listing 8.5. A function to stop following a user
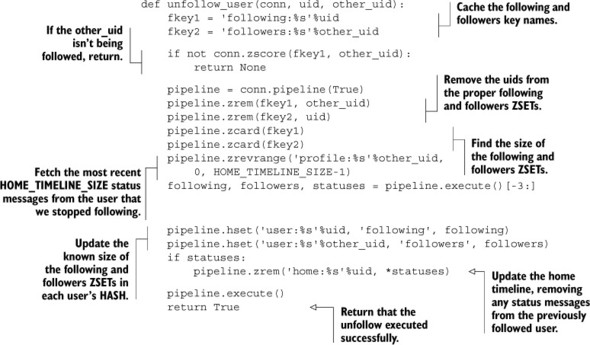
In that function, we updated the following and followers lists, updated the followers and following counts, and updated the home timeline to remove status messages that should no longer be there. As of now, that completes all of the steps necessary to start and stop following a user.
When someone stops following another user, some number of status messages will be removed from the former follower’s home timeline. When this happens, we can either say that it’s okay that fewer than the desired number of status messages are in the timeline, or we can make an effort to add status messages from the other people that the user is still following. Can you write a function that will add status messages to the user’s timeline to keep it full? Hint: You may want to use tasks like we defined in section 6.4 to reduce the time it takes to return from an unfollow call.
In addition to the list of users that someone follows, Twitter also supports the ability to create additional named lists of users that include the timeline of posts for just those users. Can you update follow_user() and unfollow_user() to take an optional “list ID” for storing this new information, create functions to create a custom list, and fetch the custom list? Hint: Think of it like a different type of follower. Bonus points: can you also update your function from the “Refilling timelines” exercise?
Now that we can start or stop following a user while keeping the home timeline updated, it’s time to see what happens when someone posts a new status update.
8.4. Posting or deleting a status update
One of the most fundamental operations on a service like Twitter is posting status messages. People post to share their ideas, and people read because they’re interested in what’s going on with others. Section 8.1.2 showed how to create a status message as a prerequisite for knowing the types of data that we’ll be storing, but didn’t show how to get that status message into a profile timeline or the home timeline of the user’s followers.
In this section, we’ll discuss what happens to a status message when it’s posted so it can find its way into the home timelines of that user’s followers. We’ll also talk about how to delete a status message.
You already know how to create the status message itself, but we now need to get the status message ID into the home timeline of all of our followers. How we should perform this operation will depend on the number of followers that the posting user happens to have. If the user has a relatively small number of followers (say, up to 1,000 or so), we can update their home timelines immediately. But for users with larger number of followers (like 1 million, or even the 25 million that some users have on Twitter), attempting to perform those insertions directly will take longer than is reasonable for a user to wait.
To allow for our call to return quickly, we’ll do two things. First, we’ll add the status ID to the home timelines of the first 1,000 followers as part of the call that posts the status message. Based on statistics from a site like Twitter, that should handle at least 99.9% of all users who post (Twitter-wide analytics suggest that there are roughly 100,000–250,000 users with more than 1,000 followers, which amounts to roughly .1% of the active user base). This means that only the top .1% of users will need another step.
Second, for those users with more than 1,000 followers, we’ll start a deferred task using a system similar to what we built back in section 6.4. The next listing shows the code for pushing status updates to followers.
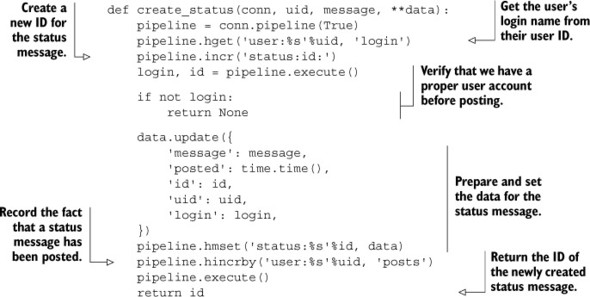
Listing 8.6. Update a user’s profile timeline
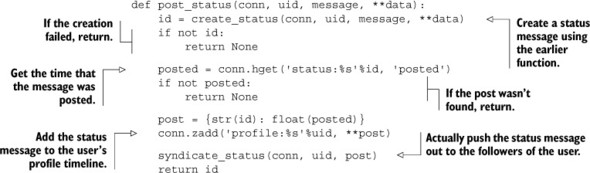
Notice that we broke our status updating into two parts. The first part calls the create_status() function from listing 8.2 to actually create the status message, and then adds it to the poster’s profile timeline. The second part actually adds the status message to the timelines of the user’s followers, which can be seen next.
Listing 8.7. Update a user’s followers’ home timelines
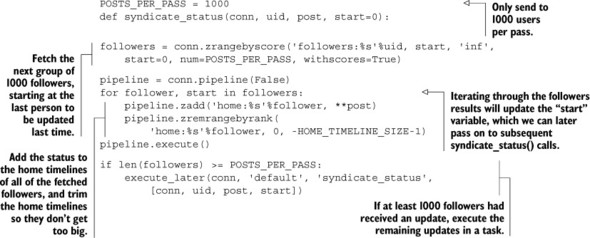
This second function is what actually handles pushing status messages to the first 1,000 followers’ home timelines, and starts a delayed task using the API we defined in section 6.4 for followers past the first 1,000. With those new functions, we’ve now completed the tools necessary to actually post a status update and send it to all of a user’s followers.
In the last section, I suggested an exercise to build named lists of users. Can you extend the syndicate_message() function to also support updating the list timelines from before?
Let’s imagine that we posted a status message that we weren’t proud of; what would we need to do to delete it?
It turns out that deleting a status message is pretty easy. Before returning the fetched status messages from a user’s home or profile timeline in get_messages(), we’re already filtering “empty” status messages with the Python filter() function. So to delete a status message, we only need to delete the status message HASH and update the number of status messages posted for the user. The function that deletes a status message is shown in the following listing.
Listing 8.8. A function to delete a previously posted status message
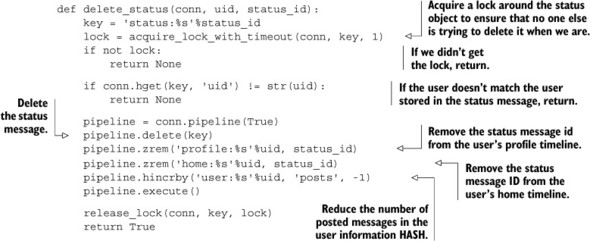
While deleting the status message and updating the status count, we also went ahead and removed the message from the user’s home timeline and profile timeline. Though this isn’t technically necessary, it does allow us to keep both of those timelines a little cleaner without much effort.
As status messages are deleted, “zombie” status message IDs will still be in the home timelines of all followers. Can you clean out these status IDs? Hint: Think about how we sent the messages out in the first place. Bonus points: also handle lists.
Being able to post or delete status messages more or less completes the primary functionality of a Twitter-like social network from a typical user’s perspective. But to complete the experience, you may want to consider adding a few other features:
- Private users, along with the ability to request to follow someone
- Favorites (keeping in mind the privacy of a tweet)
- Direct messaging between users
- Replying to messages resulting in conversation flow
- Reposting/retweeting of messages
- The ability to @mention users or #tag ideas
- Keeping a record of who @mentions someone
- Spam and abuse reporting and controls
These additional features would help to round out the functionality of a site like Twitter, but may not be necessary in every situation. Expanding beyond those features that Twitter provides, some social networks have chosen to offer additional functionality that you may want to consider:
- Liking/+1 voting status messages
- Moving status messages around the timeline depending on “importance”
- Direct messaging between a prespecified group of people (like in section 6.5.2)
- Groups where users can post to and/or follow a group timeline (public groups, private groups, or even announcement-style groups)
Now that we’ve built the last piece of the standard functional API for actually servicing a site like Twitter, let’s see what it’d take to build a system for processing streaming API requests.
8.5. Streaming API
As development of our social network continues, at some point we’ll want to learn more about what’s going on—maybe to discover how many posts are made every hour, the most-talked-about topics, or even who’s being mentioned all the time. One way of doing this is to make calls to gather this information. Another way is to record this information inside the functions that perform all of the operations. The third way, which we’ll explore in this section, is to build our functions to broadcast simple events, which are received and processed by event listeners to analyze the data.
In this section, I’ll describe how to build the back end for a streaming API that functions similar to the streaming API offered by Twitter.
Unlike the other parts of the system that we’ve already built, the streaming API is a different group of functionalities altogether. The functions that we built to support the typical operations of a site like Twitter in the last several sections were meant to execute and complete quickly. On the other hand, a streaming API request is meant to return data over a longer period of time.
Most modern social networks offer the ability to gather information from their system via some sort of API. One advantage that Twitter has shown over the last several years is that by offering real-time events to third parties, those third parties can develop unique and interesting analyses of the data that Twitter itself may not have had the time or interest to develop.
The first step in building a streaming API is understanding what kind of data we’ll be processing and producing.
8.5.1. Data to be streamed
As people perform a variety of actions within our social network, those actions are seen at the various functions that defined our API. In particular, we spent most of our time building out the ability to follow/unfollow users, and post/delete messages. If we’d built other pieces of our social network, we’d also find a variety of other events that occur as the result of user behavior. A streaming API is meant to produce a sequence of these events over time as a way of keeping clients or other services updated about a subset of what’s going on across the entire network.
In the process of building a streaming API, a variety of decisions must be made, which can be generally reduced to three major questions:
- Which events should be exposed?
- What access restrictions (if any) should exist?
- What kinds of filtering options should be provided?
For now, I won’t answer the second question about access restrictions. That’s a question that we need to answer when we’re building our social network based on expectations of privacy and system resources. But I’ll answer the other two questions.
Because we focused on posting/deleting messages and following/unfollowing users, we should offer at least some of those events. To keep things simple for now, we’ll only produce message posting and deletion events. But based on the structures that we create and pass around, adding functionality to support follow/unfollow events or events for other actions that we’ve added should be easy.
The types of filtering options that we’ll provide will overlap significantly with the API features and functionality that Twitter provides on the public side of things. In particular, we’ll offer the ability to filter over messages with an equivalent of follow (users), track (keywords), and location filters, in addition to a randomly selected subset of messages, similar to Twitter’s firehose and sample streams.
Now that we know what data we’ll have access to, let’s start looking at how we’ll serve the data.
8.5.2. Serving the data
In preceding sections and chapters, when we showed functions that made calls to Redis, we built on the assumption that we had an existing web server that would be calling these functions at just the right time. In the case of a streaming API, the details of streaming data to a client can be more complicated than just plugging these functions into an existing web service stack. In particular, most web servers operate under the assumption that we’ll be returning the entire response to a request at once, but this is definitely not the case with a streaming API.
Responses from a streaming API are received status message by status message as they’re produced and matched. Though modern technologies like WebSockets and SPDY can offer incremental data production, or even server-side push messages, the protocols involved are still in the process of being finalized, and client-side support in many programming languages is incomplete. But there is a method of producing incremental content with an HTTP server—sending data using the chunked transfer encoding.
In this section, we’ll build a simple web server that supports streaming to clients that can handle chunked HTTP responses. This is to support our later sections which will actually implement filtering options for streamed message data.
To build this streaming HTTP web server, we have to delve deeper into the Python programming language. In the past, we’ve attempted to keep everything to standard functions, and in chapter 6, we even started using generators (that was the code that included yield). But here, we’ll have to use Python classes. This is primarily because we don’t want to have to build an entire web server from scratch, and Python already includes servers that we can mix together to handle all of the difficult parts of web serving. If you’ve used classes in other languages, you’ll be comfortable with Python, because classes in Python are similar. They’re meant to encapsulate data, with methods to manipulate the data. In our case, most of the functionality that we want to use is already available in existing libraries; we just need to plug them together.
A streaming HTTP server
Within Python we have a series of socket server libraries that can be mixed together to offer varying types of functionality. To start, we’ll create a server that uses threads in order to process each incoming request separately. When the server receives a request, the server will create a thread to execute a request handler. This request handler is where we’ll perform some initial basic routing for GET and POST HTTP requests. Both the threaded server and the request handler are shown in the next listing.
Listing 8.9. Server and request handler for our streaming HTTP server
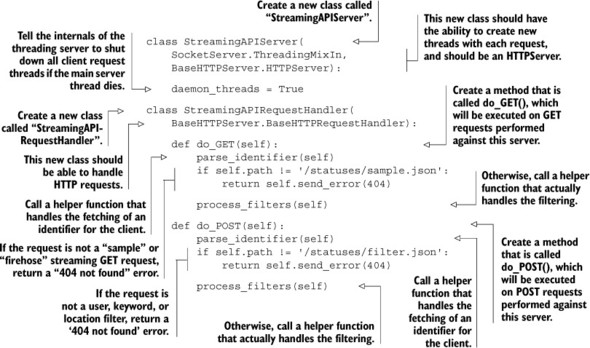
What we didn’t write is the code that actually starts up the server, but we’ll get to that in a moment. For now, you can see that we defined a server that created threads on each request. Those threads execute methods on a request handler object, which eventually lead to either do_GET() or do_POST(), which handle the two major types of streaming API requests: filtered and sampled.
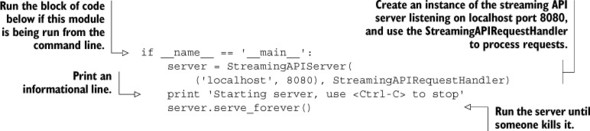
To actually run this server, we’ll use a bit of Python magic. This magic allows us to later import a module to use these predefined classes, or it allows us to run the module directly in order to start up a streaming API server. The code that lets us both import the module and run it as a daemon can be seen in the next listing.
Before you put these two blocks of code into a file and run them, remember that we’re still missing two functions that are called as part of the streaming API server, parse_identifier() and process_filters(), which we’ll cover next.
Listing 8.10. The code to actually start and run the streaming HTTP server
Identifying the client
The first of these two functions is a way of fetching identifying information about the client. This basic method extracts an identifier from the request query arguments. For a production scenario, we’d want to perform some amount of client validation of the identifier. Our simple method to parse an identifier from the request can be seen in the next listing.
Listing 8.11. An example function to parse and store the client identifier
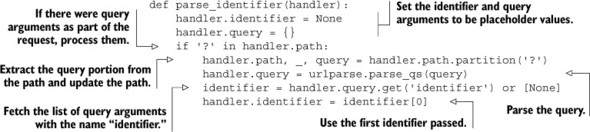
That function shouldn’t do anything surprising; we set some initial values for the query arguments (if we want to use them later) and the identifier, parse the query arguments, and then store the identifier from the query if it was available.
Handling HTTP streaming
There’s one final piece to the HTTP server portion of our request—actually sending the filtered responses. To prepare to send these filtered messages one by one, we first need to verify the requests are valid. Assuming that everything is okay, we must then send to the client the notification that we’ll be entering an HTTP mode called chunked transfer encoding, which will allow us to send messages one at a time as they come in. The function that performs this validation and the actual transfer of streamed messages to the client is shown next.
Listing 8.12. A function that will verify the request and stream data to the client
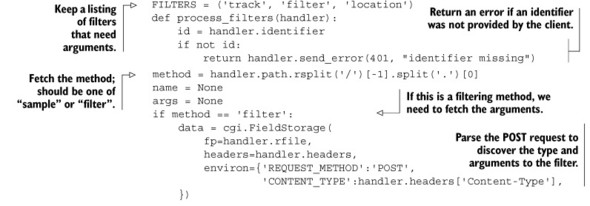
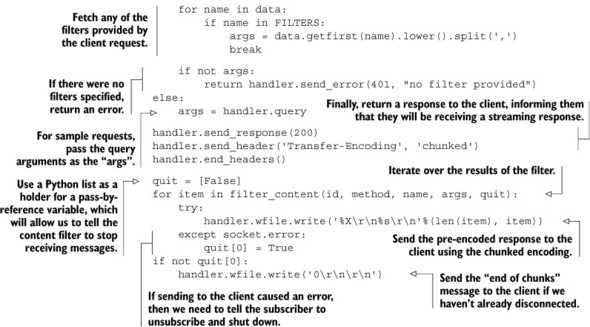
A few details in this function are tricky, but the basic idea is that we make sure that we have an identifier for the client and fetch the filtering arguments for the specific calls. If everything is okay, we then announce to the client that we’ll be streaming responses and pass the actual filtering off to a generator, which will produce the sequence of messages that match the filter criteria.
And that’s it for the streaming HTTP server. In the next section, we’ll build the methods that will filter messages that pass through the system.
8.5.3. Filtering streamed messages
So far we’ve built a server to serve the streamed messages; now it’s time to filter through the messages for streaming. We filter the messages so that a client making a request only sees the messages they’re interested in. Though our social network may not have a lot of traffic, sites like Twitter, Facebook, or even Google+ will see tens to hundreds of thousands of events every second. And for both third parties and ourselves, the cost of bandwidth to send all of that information can be quite high, so only sending messages that match up is important.
In this section, we’ll write functions and classes that will filter posted messages to be streamed to clients. These filters will plug into the streaming web server we wrote in section 8.5.2. As I mentioned at the beginning of section 8.5, we’ll support random sampling of all messages and access to the full firehose, as well as filtering for specific users, words, and the location of messages.
As mentioned way back in chapter 3, we’ll use Redis PUBLISH and SUBSCRIBE to implement at least part of the streaming functionality. More specifically, when users post messages, we’ll PUBLISH the posted message information to a channel in Redis. Our filters will SUBSCRIBE to that same channel, receive the message, and yield messages that match the filters back to the web server for sending to the client.
Updating status message posting and deletion
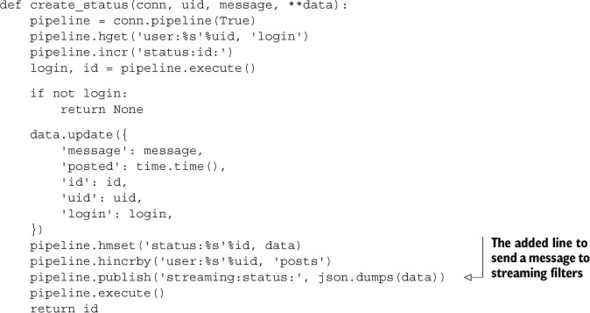
Before we get ahead of ourselves, let’s first update our message posting function from section 8.1.2 and message deletion function from section 8.4 to start producing messages to filter. We’ll start with posting in the next listing, which shows that we’ve added a line to our function that sends messages out to be filtered.
Listing 8.13. Updated create_status() from listing 8.2 to support streaming filters
All it took was one more line to add streaming support on the posting side. But what about deletion? The update to status message deletion is shown in the following listing.
Listing 8.14. Updated delete_status() from listing 8.8 to support streaming filters
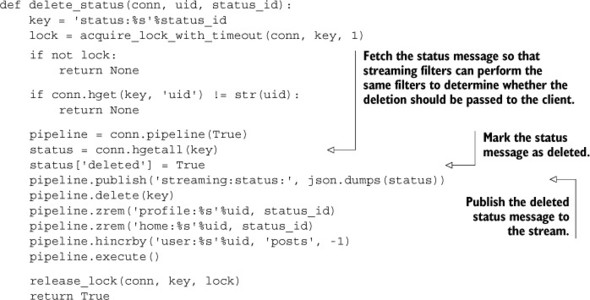
At first glance, you’re probably wondering why we’d want to send the entire status message that’s to be deleted to the channel for filtering. Conceptually, we should only need to send message-deleted information to clients that received the status message when it was posted. If we perform the same filtering on deleted messages as we do on newly posted messages, then we can always send message-deleted notifications to those clients that would’ve received the original message. This ensures that we don’t need to keep a record of the status IDs for messages sent to all clients, which simplifies our server and reduces memory use.
Receiving streamed messages for filtering
Now that we’re sending information about status messages being posted and deleted to a channel in Redis, we only need to subscribe to that channel to start receiving messages to filter. As was the case in chapter 3, we’ll need to construct a special pubsub object in order to subscribe to a channel. When we’ve subscribed to the channel, we’ll perform our filtering, and produce one of two different messages depending on whether the message was posted or deleted. The code for handling these operations is next.
Listing 8.15. A function to receive and process streamed messages
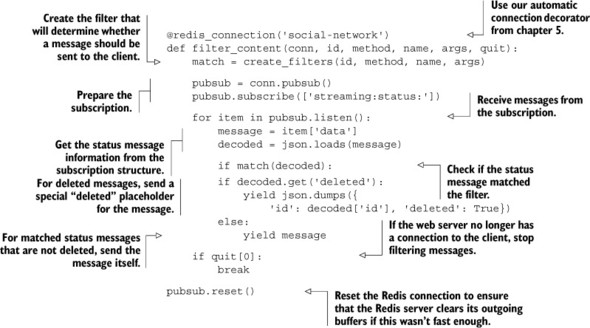
As I said before, this function needs to subscribe to a channel in Redis in order to receive posted/deleted notifications for status messages. But it also needs to handle cases where the streaming client has disconnected, and it needs to properly clean up the connection if Redis has been trying to send it too much data.
As we covered in chapter 3, there’s a Redis server setting to determine the maximum outgoing buffer for subscriptions to support. To ensure that our Redis server stays up even under heavy load, we’ll probably want to set client-output-buffer-limit pubsub to lower than the default 32 megabytes per connection. Where to set the limit will depend on how many clients we expect to support and how much other data is in Redis.
Filtering messages
At this point we’ve built every other layer; it now remains to actually write filtering. I know, there was a lot of build-up, but you may be surprised to find out that actually filtering messages isn’t difficult for any of our cases. To create filters, we’ll first define our create_filters() function in listing 8.16, which will delegate off to one of a variety of filtering classes, depending on the filter that we want to build. We’ll assume that clients are sending reasonable arguments, but if you’re considering using any of this in a production scenario, you’ll want to add validation and verification.
Listing 8.16. A factory function to dispatch to the actual filter creation
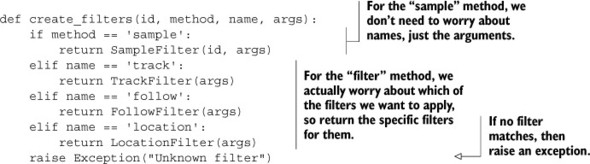
Nothing surprising there: we’re distinguishing the different kinds of filters. The first filter we’ll create will be the sample filter, which will actually implement the functionality of the Twitter-style firehose, gardenhose, and spritzer access levels, and anything in between. The implementation of the sampling filter is shown next.
Listing 8.17. The function to handle firehose, gardenhose, and spritzer
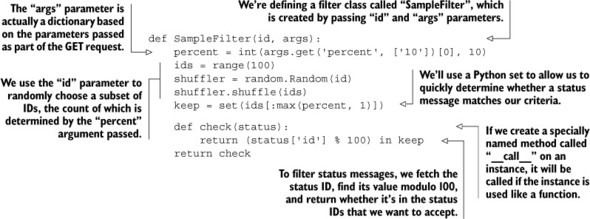
As you can see, we started using classes again, primarily because we need to encapsulate data and behavior together. This first class that defines sampling does one interesting thing—it uses a random number generator seeded with the user-provided identifier to choose the IDs of status messages that it should accept. This allows the sampling filters to receive a deleted notification for a message, even if the client had disconnected (as long as the client reconnected before the delete notification came through). We use Python sets here to quickly determine whether the ID modulo 100 is in the group that we want to accept, as Python sets offer O(1) lookup time, compared to O(n) for a Python list.
Continuing on, we’ll now build the track filter, which will allow users to track words or phrases in status messages. Similar to our sample filter in listing 8.17, we’ll use a class to encapsulate the data and filtering functionality together. The filter class definition is shown in the following listing.
Listing 8.18. A filter that matches groups of words that are posted in status messages
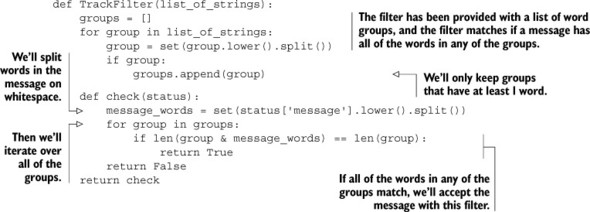
About the only interesting thing about the tracking filter is to make sure that if someone wants to match a group of words, the filter matches all of the words in the message and not just some of them. We again use Python sets, which, like Redis SETs, offer the ability to calculate intersections.
Moving on to the follow filter, we’re trying to match status messages that were posted by one of a group of users, or where one of the users is mentioned in the message. The class that implements user matching is shown here.
Listing 8.19. Messages posted by or mentioning any one of a list of users
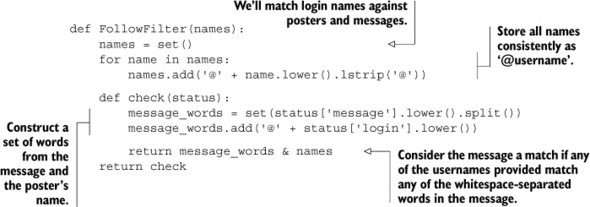
As before, we continue to use Python sets as a fast way to check whether a name is in the set of names that we’re looking for, or whether any of the names to match are also contained in a status message.
We finally get to the location filter. This filter is different from the others in that we didn’t explicitly talk about adding location information to our status messages. But because of the way we wrote our create_status() and post_status() functions to take additional optional keyword arguments, we can add additional information without altering our status creation and posting functions. The location filter for this optional data is shown next.
Listing 8.20. Messages within boxes defined by ranges of latitudes and longitudes
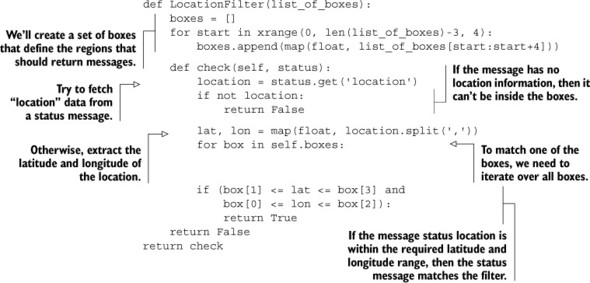
About the only thing that may surprise you about this particular filter is how we’re preparing the boxes for filtering. We expect that requests will provide location boxes as comma-separated sequences of numbers, where each chunk of four numbers defines latitude and longitude ranges (minimum longitude, minimum latitude, maximum longitude, maximum latitude—the same order as Twitter’s API).
With all of our filters built, a working web server, and the back-end API for everything else, it’s now up to you to get traffic!
8.6. Summary
In this chapter, we’ve built the majority of functionality that makes a site like Twitter work. Though these structures won’t scale to the extent that Twitter does, the methods used can be used to build a small social network easily. With a front end for users to interact with, you can start your own social network with your friends!
If there’s one thing that you should take away from this chapter, it’s that even immensely popular websites have functionality that can be built with the tools available inside of Redis.
In the upcoming chapters 9 through 11, we’ll look into methods to help reduce memory use, methods to help scaling Redis read and write loads, and scripting Redis to simplify (and sometimes help scale) applications. These things will help to scale Redis applications, like our social network, beyond expected single-machine limits. Our first step down this path is chapter 9, where I’ll show you how to reduce Redis’s memory use.