
Chapter 4. Keeping data safe and ensuring performance
This chapter covers
- Persisting data to disk
- Replicating data to other machines
- Dealing with system failures
- Redis transactions
- Non-transactional pipelines
- Diagnosing performance issues
In the last few chapters, you’ve learned about the variety of commands available in Redis and how they manipulate structures, and you’ve even solved a few problems using Redis. This chapter will prepare you for building real software with Redis by showing you how to keep your data safe, even in the face of system failure, and I’ll point out methods that you can use to improve Redis performance while preserving data integrity.
We’ll start by exploring the various Redis persistence options available to you for getting your data on disk. We’ll then talk about the use of replication to keep up-to-date copies of your data on additional machines for both performance and data reliability. Combining replication and persistence, we’ll talk about trade-offs you may need to make, and we’ll walk through a few examples of choosing persistence and replication options to suit your needs. We’ll then talk about Redis transactions and pipelines, and we’ll finish out the chapter by discussing how to diagnose some performance issues.
As we go through this chapter, our focus is understanding more about how Redis works so that we can first ensure that our data is correct, and then work toward making our operations on the data fast.
To start, let’s examine how Redis stores our information on disk so that, after restart, it’s still there.
4.1. Persistence options
Within Redis, there are two different ways of persisting data to disk. One is a method called snapshotting that takes the data as it exists at one moment in time and writes it to disk. The other method is called AOF, or append-only file, and it works by copying incoming write commands to disk as they happen. These methods can be used together, separately, or not at all in some circumstances. Which to choose will depend on your data and your application.
One of the primary reasons why you’d want to store in-memory data on disk is so that you have it later, or so that you can back it up to a remote location in the case of failure. Additionally, the data that’s stored in Redis may have taken a long time to compute, or may be in the process of computation, and you may want to have access to it later without having to compute it again. For some Redis uses, “computation” may simply involve an act of copying data from another database into Redis (as was the case in section 2.4), but for others, Redis could be storing aggregate analytics data from billions of log lines.
Two different groups of configuration options control how Redis will write data to disk. All of these configuration options with example configuration values can be seen in the following listing. We’ll talk about them all more specifically in sections 4.1.1 and 4.1.2, but for now, we’ll just look at the options so you can get familiar with them.
Listing 4.1. Options for persistence configuration available in Redis
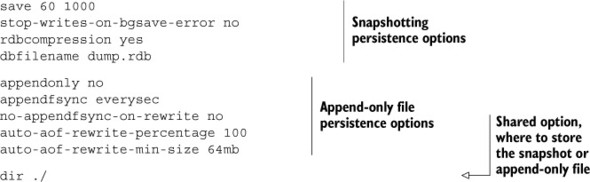
As you saw in listing 4.1, the first few options deal with basic snapshotting, like what to name the snapshot on disk, how often to perform an automatic snapshot, whether to compress the snapshot, and whether to keep accepting writes on failure. The second group of options configure the AOF subsystem, telling Redis whether to use it, how often to sync writes to disk, whether to sync during AOF compaction, and how often to compact the AOF. In the next section, we’ll talk about using snapshots to keep our data safe.
4.1.1. Persisting to disk with snapshots
In Redis, we can create a point-in-time copy of in-memory data by creating a snapshot. After creation, these snapshots can be backed up, copied to other servers to create a clone of the server, or left for a future restart.
On the configuration side of things, snapshots are written to the file referenced as dbfilename in the configuration, and stored in the path referenced as dir. Until the next snapshot is performed, data written to Redis since the last snapshot started (and completed) would be lost if there were a crash caused by Redis, the system, or the hardware.
As an example, say that we have Redis running with 10 gigabytes of data currently in memory. A previous snapshot had been started at 2:35 p.m. and had finished. Now a snapshot is started at 3:06 p.m., and 35 keys are updated before the snapshot completes at 3:08 p.m. If some part of the system were to crash and prevent Redis from completing its snapshot operation between 3:06 p.m. and 3:08 p.m., any data written between 2:35 p.m. and now would be lost. But if the system were to crash just after the snapshot had completed, then only the updates to those 35 keys would be lost.
There are five methods to initiate a snapshot, which are listed as follows:
- Any Redis client can initiate a snapshot by calling the BGSAVE command. On platforms that support BGSAVE (basically all platforms except for Windows), Redis will fork,[1] and the child process will write the snapshot to disk while the parent process continues to respond to commands.
1 When a process forks, the underlying operating system makes a copy of the process. On Unix and Unix-like systems, the copying process is optimized such that, initially, all memory is shared between the child and parent processes. When either the parent or child process writes to memory, that memory will stop being shared.
- A Redis client can also initiate a snapshot by calling the SAVE command, which causes Redis to stop responding to any/all commands until the snapshot completes. This command isn’t commonly used, except in situations where we need our data on disk, and either we’re okay waiting for it to complete, or we don’t have enough memory for a BGSAVE.
- If Redis is configured with save lines, such as save 60 10000, Redis will automatically trigger a BGSAVE operation if 10,000 writes have occurred within 60 seconds since the last successful save has started (using the configuration option described). When multiple save lines are present, any time one of the rules match, a BGSAVE is triggered.
- When Redis receives a request to shut down by the SHUTDOWN command, or it receives a standard TERM signal, Redis will perform a SAVE, blocking clients from performing any further commands, and then shut down.
- If a Redis server connects to another Redis server and issues the SYNC command to begin replication, the master Redis server will start a BGSAVE operation if one isn’t already executing or recently completed. See section 4.2 for more information about replication.
When using only snapshots for saving data, you must remember that if a crash were to happen, you’d lose any data changed since the last snapshot. For some applications, this kind of loss isn’t acceptable, and you should look into using append-only file persistence, as described in section 4.1.2. But if your application can live with data loss, snapshots can be the right answer. Let’s look at a few scenarios and how you may want to configure Redis to get the snapshot persistence behavior you’re looking for.
Development
For my personal development server, I’m mostly concerned with minimizing the overhead of snapshots. To this end, and because I generally trust my hardware, I have a single rule: save 900 1. The save option tells Redis that it should perform a BGSAVE operation based on the subsequent two values. In this case, if at least one write has occurred in at least 900 seconds (15 minutes) since the last BGSAVE, Redis will automatically start a new BGSAVE.
If you’re planning on using snapshots on a production server, and you’re going to be storing a lot of data, you’ll want to try to run a development server with the same or similar hardware, the same save options, a similar set of data, and a similar expected load. By setting up an environment equivalent to what you’ll be running in production, you can make sure that you’re not snapshotting too often (wasting resources) or too infrequently (leaving yourself open for data loss).
Aggregating logs
In the case of aggregating log files and analysis of page views, we really only need to ask ourselves how much time we’re willing to lose if something crashes between dumps. If we’re okay with losing up to an hour of work, then we can use save 3600 1 (there are 3600 seconds in an hour). But how might we recover if we were processing logs?
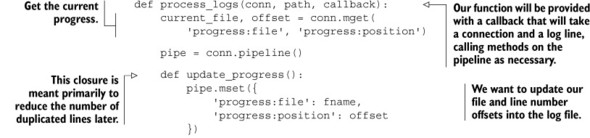
To recover from data loss, we need to know what we lost in the first place. To know what we lost, we need to keep a record of our progress while processing logs. Let’s imagine that we have a function that’s called when new logs are ready to be processed. This function is provided with a Redis connect, a path to where log files are stored, and a callback that will process individual lines in the log file. With our function, we can record which file we’re working on and the file position information as we’re processing. A log-processing function that records this information can be seen in the next listing.
Listing 4.2. The process_logs() function that keeps progress information in Redis

By keeping a record of our progress in Redis, we can pick up with processing logs if at any point some part of the system crashes. And because we used MULTI/EXEC pipelines as introduced in chapter 3, we ensure that the dump will only include processed log information when it also includes progress information.
Big data
When the amount of data that we store in Redis tends to be under a few gigabytes, snapshotting can be the right answer. Redis will fork, save to disk, and finish the snapshot faster than you can read this sentence. But as our Redis memory use grows over time, so does the time to perform a fork operation for the BGSAVE. In situations where Redis is using tens of gigabytes of memory, there isn’t a lot of free memory, or if we’re running on a virtual machine, letting a BGSAVE occur may cause the system to pause for extended periods of time, or may cause heavy use of system virtual memory, which could degrade Redis’s performance to the point where it’s unusable.
This extended pausing (and how significant it is) will depend on what kind of system we’re running on. Real hardware, VMWare virtualization, or KVM virtualization will generally allow us to create a fork of a Redis process at roughly 10–20ms per gigabyte of memory that Redis is using. If our system is running within Xen virtualization, those numbers can be closer to 200–300ms per gigabyte of memory used by Redis, depending on the Xen configuration. So if we’re using 20 gigabytes of memory with Redis, running BGSAVE on standard hardware will pause Redis for 200–400 milliseconds for the fork. If we’re using Redis inside a Xen-virtualized machine (as is the case with Amazon EC2 and some other cloud providers), that same fork will cause Redis to pause for 4–6 seconds. You need to decide for your application whether this pause is okay.
To prevent forking from causing such issues, we may want to disable automatic saving entirely. When automatic saving is disabled, we then need to manually call BGSAVE (which has all of the same potential issues as before, only now we know when they will happen), or we can call SAVE. With SAVE, Redis does block until the save is completed, but because there’s no fork, there’s no fork delay. And because Redis doesn’t have to fight with itself for resources, the snapshot will finish faster.
As a point of personal experience, I’ve run Redis servers that used 50 gigabytes of memory on machines with 68 gigabytes of memory inside a cloud provider running Xen virtualization. When trying to use BGSAVE with clients writing to Redis, forking would take 15 seconds or more, followed by 15–20 minutes for the snapshot to complete. But with SAVE, the snapshot would finish in 3–5 minutes. For our use, a daily snapshot at 3 a.m. was sufficient, so we wrote scripts that would stop clients from trying to access Redis, call SAVE, wait for the SAVE to finish, back up the resulting snapshot, and then signal to the clients that they could continue.
Snapshots are great when we can deal with potentially substantial data loss in Redis, but for many applications, 15 minutes or an hour or more of data loss or processing time is too much. To allow Redis to keep more up-to-date information about data in memory stored on disk, we can use append-only file persistence.
4.1.2. Append-only file persistence
In basic terms, append-only log files keep a record of data changes that occur by writing each change to the end of the file. In doing this, anyone could recover the entire dataset by replaying the append-only log from the beginning to the end. Redis has functionality that does this as well, and it’s enabled by setting the configuration option appendonly yes, as shown in listing 4.1. Table 4.1 shows the appendfsync options and how they affect file-write syncing to disk.
Table 4.1. Sync options to use with appendfsync
|
Option |
How often syncing will occur |
|---|---|
| always | Every write command to Redis results in a write to disk. This slows Redis down substantially if used. |
| everysec | Once per second, explicitly syncs write commands to disk. |
| no | Lets the operating system control syncing to disk. |
File syncing
When writing files to disk, at least three things occur. The first is writing to a buffer, and this occurs when calling file.write() or its equivalent in other languages. When the data is in the buffer, the operating system can take that data and write it to disk at some point in the future. We can optionally take a second step and ask the operating system to write the data provided to disk when it next has a chance, with file.flush(), but this is only a request. Because data isn’t actually on disk until the operating system writes it to disk, we can tell the operating system to “sync” the files to disk, which will block until it’s completed. When that sync is completed, we can be fairly certain that our data is on disk and we can read it later if the system otherwise fails.
If we were to set appendfsync always, every write to Redis would result in a write to disk, and we can ensure minimal data loss if Redis were to crash. Unfortunately, because we’re writing to disk with every write to Redis, we’re limited by disk performance, which is roughly 200 writes/second for a spinning disk, and maybe a few tens of thousands for an SSD (a solid-state drive).
Warning: SSDs and appendfsync always
You’ll want to be careful if you’re using SSDs with appendfsync always. Writing every change to disk as they happen, instead of letting the operating system group writes together as is the case with the other appendfsync options, has the potential to cause an extreme form of what is known as write amplification. By writing small amounts of data to the end of a file, you can reduce the lifetime of SSDs from years to just a few months in some cases.
As a reasonable compromise between keeping data safe and keeping our write performance high, we can also set appendfsync everysec. This configuration will sync the append-only log once every second. For most common uses, we’ll likely not find significant performance penalties for syncing to disk every second compared to not using any sort of persistence. By syncing to disk every second, if the system were to crash, we could lose at most one second of data that had been written or updated in Redis. Also, in the case where the disk is unable to keep up with the write volume that’s happening, Redis would gracefully slow down to accommodate the maximum write rate of the drive.
As you may guess, when setting appendfsync no, Redis doesn’t perform any explicit file syncing, leaving everything up to the operating system. There should be no performance penalties in this case, though if the system were to crash in one way or another, we’d lose an unknown and unpredictable amount of data. And if we’re using a hard drive that isn’t fast enough for our write load, Redis would perform fine until the buffers to write data to disk were filled, at which point Redis would get very slow as it got blocked from writing. For these reasons, I generally discourage the use of this configuration option, and include its description and semantics here for completeness.
Append-only files are flexible, offering a variety of options to ensure that almost every level of paranoia can be addressed. But there’s a dark side to AOF persistence, and that is file size.
4.1.3. Rewriting/compacting append-only files
After reading about AOF persistence, you’re probably wondering why snapshots exist at all. If by using append-only files we can minimize our data losses to one second (or essentially none at all), and minimize the time it takes to have data persisted to disk on a regular basis, it would seem that our choice should be clear. But the choice is actually not so simple: because every write to Redis causes a log of the command to be written to disk, the append-only log file will continuously grow. Over time, a growing AOF could cause your disk to run out of space, but more commonly, upon restart, Redis will be executing every command in the AOF in order. When handling large AOFs, Redis can take a very long time to start up.
To solve the growing AOF problem, we can use BGREWRITEAOF, which will rewrite the AOF to be as short as possible by removing redundant commands. BGREWRITEAOF works similarly to the snapshotting BGSAVE: performing a fork and subsequently rewriting the append-only log in the child. As such, all of the same limitations with snapshotting performance regarding fork time, memory use, and so on still stand when using append-only files. But even worse, because AOFs can grow to be many times the size of a dump (if left uncontrolled), when the AOF is rewritten, the OS needs to delete the AOF, which can cause the system to hang for multiple seconds while it’s deleting an AOF of tens of gigabytes.
With snapshots, we could use the save configuration option to enable the automatic writing of snapshots using BGSAVE. Using AOFs, there are two configuration options that enable automatic BGREWRITEAOF execution: auto-aof-rewrite-percentage and auto-aof-rewrite-min-size. Using the example values of auto-aof-rewrite-percentage 100 and auto-aof-rewrite-min-size 64mb, when AOF is enabled, Redis will initiate a BGREWRITEAOF when the AOF is at least 100% larger than it was when Redis last finished rewriting the AOF, and when the AOF is at least 64 megabytes in size. As a point of configuration, if our AOF is rewriting too often, we can increase the 100 that represents 100% to something larger, though it will cause Redis to take longer to start up if it has been a while since a rewrite happened.
Regardless of whether we choose append-only files or snapshots, having the data on disk is a great first step. But unless our data has been backed up somewhere else (preferably to multiple locations), we’re still leaving ourselves open to data loss. Whenever possible, I recommend backing up snapshots and newly rewritten append-only files to other servers.
By using either append-only files or snapshots, we can keep our data between system reboots or crashes. As load increases, or requirements for data integrity become more stringent, we may need to look to replication to help us.
4.2. Replication
Over their years of scaling platforms for higher loads, engineers and administrators have added replication to their bag of tricks to help systems scale. Replication is a method by which other servers receive a continuously updated copy of the data as it’s being written, so that the replicas can service read queries. In the relational database world, it’s not uncommon for a single master database to send writes out to multiple slaves, with the slaves performing all of the read queries. Redis has adopted this method of replication as a way of helping to scale, and this section will discuss configuring replication in Redis, and how Redis operates during replication.
Though Redis may be fast, there are situations where one Redis server running isn’t fast enough. In particular, operations over SETs and ZSETs can involve dozens of SETs/ZSETs over tens of thousands or even millions of items. When we start getting millions of items involved, set operations can take seconds to finish, instead of milliseconds or microseconds. But even if single commands can complete in 10 milliseconds, that still limits us to 100 commands/second from a single Redis instance.
Example performance for SUNIONSTORE
As a point to consider for the performance to expect from Redis, on a 2.4 GHz Intel Core 2 Duo, Redis will take 7–8 milliseconds to perform a SUNIONSTORE of two 10,000-item SETs that produces a single 20,000 item SET.
For situations where we need to scale out read queries, or where we may need to write temporary data (we’ll talk about some of those in chapter 7), we can set up additional slave Redis servers to keep copies of our dataset. After receiving an initial copy of the data from the master, slaves are kept up to date in real time as clients write data to the master. With a master/slave setup, instead of connecting to the master for reading data, clients will connect to one of the slaves to read their data (typically choosing them in a random fashion to try to balance the load).
Let’s talk about configuring Redis for master/slave operation, and how Redis behaves during the entire process.
4.2.1. Configuring Redis for replication
As I mentioned in section 4.1.1, when a slave connects to the master, the master will start a BGSAVE operation. To configure replication on the master side of things, we only need to ensure that the path and filename listed under the dir and dbfilename configuration options shown in listing 4.1 are to a path and file that are writable by the Redis process.
Though a variety of options control behavior of the slave itself, only one option is really necessary to enable slaving: slaveof. If we were to set slaveof host port in our configuration file, the Redis that’s started with that configuration will use the provided host and port as the master Redis server it should connect to. If we have an already running system, we can tell a Redis server to stop slaving, or even to slave to a new or different master. To connect to a new master, we can use the SLAVEOF host port command, or if we want to stop updating data from the master, we can use SLAVEOF no one.
There’s not a lot to configuring Redis for master/slave operation, but what’s interesting and useful to know is what happens to Redis when it becomes a master or slave.
4.2.2. Redis replication startup process
I briefly described what happens when a slave connects—that the master starts a snapshot and sends that to the slave—but that’s the simple version. Table 4.2 lists all of the operations that occur on both the master and slave when a slave connects to a master.
Table 4.2. What happens when a slave connects to a master
|
Step |
Master operations |
Slave operations |
|---|---|---|
| 1 | (waiting for a command) | (Re-)connects to the master; issues the SYNC command |
| 2 | Starts BGSAVE operation; keeps a backlog of all write commands sent after BGSAVE | Serves old data (if any), or returns errors to commands (depending on configuration) |
| 3 | Finishes BGSAVE; starts sending the snapshot to the slave; continues holding a backlog of write commands | Discards all old data (if any); starts loading the dump as it’s received |
| 4 | Finishes sending the snapshot to the slave; starts sending the write command backlog to the slave | Finishes parsing the dump; starts responding to commands normally again |
| 5 | Finishes sending the backlog; starts live streaming of write commands as they happen | Finishes executing backlog of write commands from the master; continues executing commands as they happen |
With the method outlined in table 4.2, Redis manages to keep up with most loads during replication, except in cases where network bandwidth between the master and slave instances isn’t fast enough, or when the master doesn’t have enough memory to fork and keep a backlog of write commands. Though it isn’t necessary, it’s generally considered to be a good practice to have Redis masters only use about 50–65% of the memory in our system, leaving approximately 30–45% for spare memory during BGSAVE and command backlogs.
On the slave side of things, configuration is also simple. To configure the slave for master/slave replication, we can either set the configuration option SLAVEOF host port, or we can configure Redis during runtime with the SLAVEOF command. If we use the configuration option, Redis will initially load whatever snapshot/AOF is currently available (if any), and then connect to the master to start the replication process outlined in table 4.2. If we run the SLAVEOF command, Redis will immediately try to connect to the master, and upon success, will start the replication process outlined in table 4.2.
During sync, the slave flushes all of its data
Just to make sure that we’re all on the same page (some users forget this the first time they try using slaves): when a slave initially connects to a master, any data that had been in memory will be lost, to be replaced by the data coming from the master.
Warning: Redis doesn’t support master-master replication
When shown master/slave replication, some people get the mistaken idea that because we can set slaving options after startup using the SLAVEOF command, that means we can get what’s known as multi-master replication by setting two Redis instances as being SLAVEOF each other (some have even considered more than two in a loop). Unfortunately, this does not work. At best, our two Redis instances will use as much processor as they can, will be continually communicating back and forth, and depending on which server we connect and try to read/write data from/to, we may get inconsistent data or no data.
When multiple slaves attempt to connect to Redis, one of two different scenarios can occur. Table 4.3 describes them.
Table 4.3. When a slave connects to an existing master, sometimes it can reuse an existing dump file.
|
When additional slaves connect |
Master operation |
|---|---|
| Before step 3 in table 4.2 | All slaves will receive the same dump and same backlogged write commands. |
| On or after step 3 in table 4.2 | While the master is finishing up the five steps for earlier slaves, a new sequence of steps 1-5 will start for the new slave(s). |
For the most part, Redis does its best to ensure that it doesn’t have to do more work than is necessary. In some cases, slaves may try to connect at inopportune times and cause the master to do more work. On the other hand, if multiple slaves connect at the same time, the outgoing bandwidth used to synchronize all of the slaves initially may cause other commands to have difficulty getting through, and could cause general network slowdowns for other devices on the same network.
4.2.3. Master/slave chains
Some developers have found that when they need to replicate to more than a handful of slaves, some networks are unable to keep up—especially when replication is being performed over the internet or between data centers. Because there’s nothing particularly special about being a master or a slave in Redis, slaves can have their own slaves, resulting in master/slave chaining.
Operationally, the only difference in the replication process that occurs is that if a slave X has its own slave Y, when slave X hits step 4 from table 4.2, slave X will disconnect slave Y, causing Y to reconnect and resync.
When read load significantly outweighs write load, and when the number of reads pushes well beyond what a single Redis server can handle, it’s common to keep adding slaves to help deal with the load. As load continues to increase, we can run into situations where the single master can’t write to all of its slaves fast enough, or is overloaded with slaves reconnecting and resyncing. To alleviate such issues, we may want to set up a layer of intermediate Redis master/slave nodes that can help with replication duties similar to figure 4.1.
Figure 4.1. An example Redis master/slave replica tree with nine lowest-level slaves and three intermediate replication helper servers
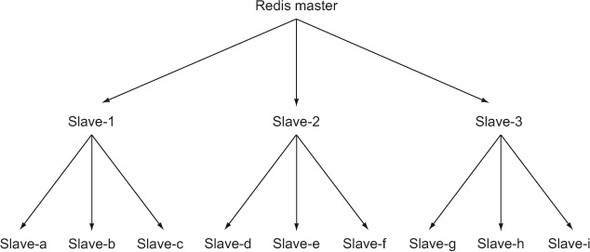
Though the example shown in figure 4.1 may not necessarily need to be in a tree structure, remembering and understanding that this is both possible and reasonable for Redis replication can help you later.
Back in section 4.1.2, we talked about using append-only files with syncing to limit the opportunities for us to lose data. We could prevent data loss almost entirely (except for system or hard drive crashes) by syncing every write to disk, but then we end up limiting performance severely. If we tell Redis to sync every second, we’re able to get the performance we need, but we could lose up to a second of writes if bad things happen. But by combining replication and append-only files, we can ensure that data gets to disk on multiple machines.
In order to ensure that data gets to disk on multiple machines, we must obviously set up a master with slaves. By configuring our slaves (and optionally our master) with appendonly yes and appendfsync everysec, we now have a group of machines that will sync to disk every second. But that’s only the first part: we must wait for the write to reach the slave(s) and check to make sure that the data reached disk before we can continue.
4.2.4. Verifying disk writes
Verifying that the data we wrote to the master made it to the slave is easy: we merely need to write a unique dummy value after our important data, and then check for it on the slave. But verifying that the data made it to disk is more difficult. If we wait at least one second, we know that our data made it to disk. But if we’re careful, we may be able to wait less time by checking the output of INFO for the value of aof_pending_bio_fsync, which will be 0 if all data that the server knows about has been written to disk. To automate this check, we can use the function provided in the next listing, which we’d call after writing our data to the master by passing both the master and slave connections.
Listing 4.3. The wait_for_sync() function

Other information from the INFO command
The INFO command can offer a wide range of information about the current status of a Redis server—memory used, the number of connected clients, the number of keys in each database, the number of commands executed since the last snapshot, and more. Generally speaking, INFO is a good source of information about the general state of our Redis servers, and many resources online can explain more.
To ensure correct operation, this function will first verify that the slave is connected to the master. It’ll then poll the slave, looking for the value that it had added to the sync wait ZSET. After it has found that the value has made it to the slave, it’ll then check on the status of the Redis write buffer, waiting for it to either say that there are no pending syncs to disk (signaling that the change had made it to disk), or wait for up to one second. We wait for one second under the assumption that after one second, the data had been synced to disk, but there’s so much writing to Redis that we didn’t catch when the data had been synced. After verifying the write to disk, we then clean up after ourselves.
By combining replication and append-only files, we can configure Redis to be resilient against system failures.
4.3. Handling system failures
In order to be able to handle system failures in Redis, we need to prepare ourselves for the failure. The reason we’ve spent so much time talking about these topics is because if we’re going to rely on Redis as the sole data store for our application, then we must ensure that we never lose any data. Unlike a traditional relational database that offers ACID[2] guarantees, when choosing to architect on top of a Redis back end, we need to do a little extra work to ensure data consistency. Redis is software, and it runs on hardware, and even if both were designed perfectly and couldn’t fail, power can fail, generators can run out of fuel, and batteries can run out of power. In looking at what Redis offers, we spent a lot of time preparing for potential system failures. This section will talk about what we can do when failure does happen.
2 ACID—or atomicity, consistency, isolation, and durability—is a functional description of what a database must guarantee to offer reliable transactions over data.
4.3.1. Verifying snapshots and append-only files
When confronted with system failures, we have tools to help us recover when either snapshotting or append-only file logging had been enabled. Redis includes two command-line applications for testing the status of a snapshot and an append-only file. These commands are redis-check-aof and redis-check-dump. If we run either command without arguments, we’ll see the basic help that’s provided:
$ redis-check-aof
Usage: redis-check-aof [--fix] <file.aof>
$ redis-check-dump
Usage: redis-check-dump <dump.rdb>
$
If we provide --fix as an argument to redis-check-aof, the command will fix the file. Its method to fix an append-only file is simple: it scans through the provided AOF, looking for an incomplete or incorrect command. Upon finding the first bad command, it trims the file to just before that command would’ve been executed. For most situations, this will discard the last partial write command.
Unfortunately, there’s no currently supported method of repairing a corrupted snapshot. Though there’s the potential to discover where the first error had occurred, because the snapshot itself is compressed, an error partway through the dump has the potential to make the remaining parts of the snapshot unreadable. It’s for these reasons that I’d generally recommend keeping multiple backups of important snapshots, and calculating the SHA1 or SHA256 hashes to verify content during restoration. (Modern Linux and Unix platforms will have available sha1sum and sha256sum command-line applications for generating and verifying these hashes.)
Checksums and hashes
Redis versions including 2.6 and later include a CRC64 checksum of the snapshot as part of the snapshot. The use of a CRC-family checksum is useful to discover errors that are typical in some types of network transfers or disk corruption. The SHA family of cryptographic hashes is much better suited for discovering arbitrary errors. To the point, if we calculated the CRC64 of a file, then flipped any number of bits inside the file, we could later flip a subset of the last 64 bits of the file to produce the original checksum. There’s no currently known method for doing the same thing with SHA1 or SHA256.
After we’ve verified that our backups are what we had saved before, and we’ve corrected the last write to AOF as necessary, we may need to replace a Redis server.
4.3.2. Replacing a failed master
When we’re running a group of Redis servers with replication and persistence, there may come a time when some part of our infrastructure stops working for one reason or another. Maybe we get a bad hard drive, maybe bad memory, or maybe the power just went out. Regardless of what causes the system to fail, we’ll eventually need to replace a Redis server. Let’s look at an example scenario involving a master, a slave, and needing to replace the master.
Machine A is running a copy of Redis that’s acting as the master, and machine B is running a copy of Redis that’s acting as the slave. Unfortunately, machine A has just lost network connectivity for some reason that we haven’t yet been able to diagnose. But we have machine C with Redis installed that we’d like to use as the new master.
Our plan is simple: We’ll tell machine B to produce a fresh snapshot with SAVE. We’ll then copy that snapshot over to machine C. After the snapshot has been copied into the proper path, we’ll start Redis on machine C. Finally, we’ll tell machine B to become a slave of machine C.[3] Some example commands to make this possible on this hypothetical set of systems are shown in the following listing.
3 Because B was originally a slave, our clients shouldn’t have been writing to B, so we won’t have any race conditions with clients writing to B after the snapshot operation was started.
Listing 4.4. An example sequence of commands for replacing a failed master node
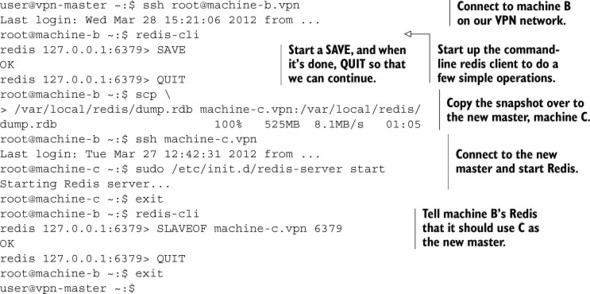
Most of these commands should be familiar to those who have experience using and maintaining Unix or Linux systems. The only interesting things in the commands being run here are that we can initiate a SAVE on machine B by running a command, and we later set up machine B to be a slave of machine C by running a command.
As an alternative to creating a new master, we may want to turn the slave into a master and create a new slave. Either way, Redis will be able to pick up where it left off, and our only job from then on is to update our client configuration to read and write to the proper servers, and optionally update the on-disk server configuration if we need to restart Redis.
Redis Sentinel
A relatively recent addition to the collection of tools available with Redis is Redis Sentinel. By the final publishing of this manuscript, Redis Sentinel should be complete. Generally, Redis Sentinel pays attention to Redis masters and the slaves of the masters and automatically handles failover if the master goes down. We’ll discuss Redis Sentinel in chapter 10.
In the next section, we’ll talk about keeping our data from being corrupted by multiple writers working on the same data, which is a necessary step toward keeping our data safe.
4.4. Redis transactions
Part of keeping our data correct is understanding that when other clients are working on the same data, if we aren’t careful, we may end up with data corruption. In this section, we’ll talk about using Redis transactions to prevent data corruption and, in some cases, to improve performance.
Transactions in Redis are different from transactions that exist in more traditional relational databases. In a relational database, we can tell the database server BEGIN, at which point we can perform a variety of read and write operations that will be consistent with respect to each other, after which we can run either COMMIT to make our changes permanent or ROLLBACK to discard our changes.
Within Redis, there’s a simple method for handling a sequence of reads and writes that will be consistent with each other. We begin our transaction by calling the special command MULTI, passing our series of commands, followed by EXEC (as introduced in section 3.7.2). The problem is that this simple transaction doesn’t actually do anything until EXEC is called, which means that we can’t use data we read to make decisions until after we may have needed it. This may not seem important, but there’s a class of problems that become difficult to solve because of not being able to read the data in a consistent fashion, or allow for transactions to fail where they should succeed (as is the case when we have multiple simultaneous transactions against a single object when using two-phase commit, a common solution to the problem). One of these problems is the process of purchasing an item from a marketplace. Let’s see an example of this in action.
Delayed execution with MULTI/EXEC can improve performance
Because of Redis’s delaying execution of commands until EXEC is called when using MULTI/EXEC, many clients (including the Python client that we’re using) will hold off on even sending commands until all of them are known. When all of the commands are known, the client will send MULTI, followed by the series of commands to be executed, and EXEC, all at the same time. The client will then wait until all of the replies from all of the commands are received. This method of sending multiple commands at once and waiting for all of the replies is generally referred to as pipelining, and has the ability to improve Redis’s performance when executing multiple commands by reducing the number of network round trips that a client needs to wait for.
In the last few months, Fake Game Company has seen major growth in their web-based RPG that’s played on YouTwitFace, a fictional social network. Because it pays attention to the needs and desires of its community, it has determined that the players need the ability to buy and sell items in a marketplace. It’s our job to design and build a marketplace that can scale to the needs of the community.
4.4.1. Defining users and their inventory
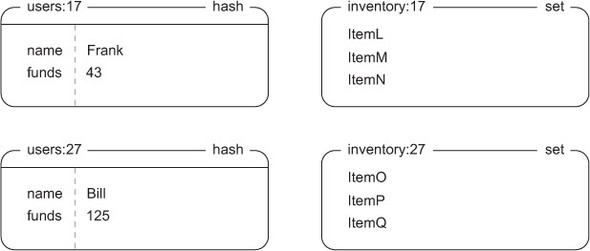
We’ll start by showing some structures that define our users and their inventory. User information is stored as a HASH, with keys and values that store user attributes like name, funds, and anything else. A user’s inventory will be a SET that holds unique identifiers for each item, which can be seen in figure 4.2.
Figure 4.2. Example user inventory and user information. Frank has 43 e-dollars and an item that he’s considering selling from his inventory.
Our requirements for the market are simple: a user can list an item for a given price, and when another user purchases the item, the seller receives the money. We’ll also say that the part of the market we’ll be worrying about only needs to be ordered by selling price. In chapter 7, we’ll cover some topics for handling other orders.
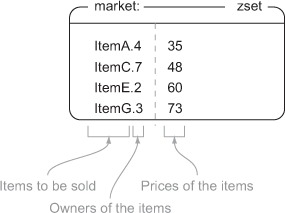
To include enough information to sell a given item in the market, we’ll concatenate the item ID for the item with the user ID of the seller and use that as a member of a market ZSET, with the score being the item’s selling price. By including all of this information together, we greatly simplify our data structures and what we need to look up, and get the benefit of being able to easily paginate through a presorted market. A small version of the marketplace is shown in figure 4.3.
Figure 4.3. Our basic marketplace that includes an ItemA being sold by user 4 for 35 e-dollars
Now that we know what structures our marketplace uses, let’s list items in the market.
4.4.2. Listing items in the marketplace
In the process of listing, we’ll use a Redis operation called WATCH, which we combine with MULTI and EXEC, and sometimes UNWATCH or DISCARD. When we’ve watched keys with WATCH, if at any time some other client replaces, updates, or deletes any keys that we’ve WATCHed before we have performed the EXEC operation, our operations against Redis will fail with an error message when we try to EXEC (at which point we can retry or abort the operation). By using WATCH, MULTI/EXEC, and UNWATCH/DISCARD, we can ensure that the data that we’re working with doesn’t change while we’re doing something important, which protects us from data corruption.
What is DISCARD?
In the same way that UNWATCH will let us reset our connection if sent after WATCH but before MULTI, DISCARD will also reset the connection if sent after MULTI but before EXEC. That is to say, if we’d WATCHed a key or keys, fetched some data, and then started a transaction with MULTI followed by a group of commands, we could cancel the WATCH and clear out any queued commands with DISCARD. We don’t use DISCARD here, primarily because we know whether we want to perform a MULTI/EXEC or UNWATCH, so a DISCARD is unnecessary for our purposes.
Let’s go about listing an item in the marketplace. To do so, we add the item to the market ZSET, while WATCHing the seller’s inventory to make sure that the item is still available to be sold. The function to list an item is shown here.
Listing 4.5. The list_item() function
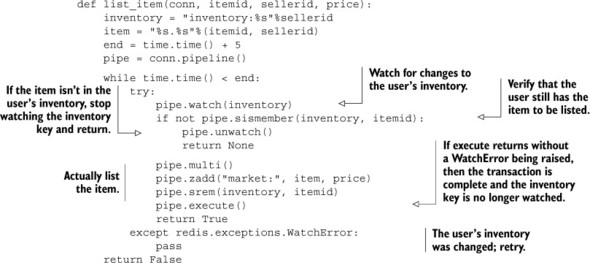
After some initial setup, we’ll do what we described earlier. We’ll tell Redis that we want to watch the seller’s inventory, verify that the seller can still sell the item, and if so, add the item to the market and remove the item from their inventory. If there’s an update or change to the inventory while we’re looking at it, we’ll receive an error and retry, as is shown by the while loop outside of our actual operation.
Let’s look at the sequence of operations that are performed when Frank (user 17) wants to sell ItemM for 97 e-dollars in figure 4.4.
Figure 4.4. list_item(conn, "ItemM", 17, 97)
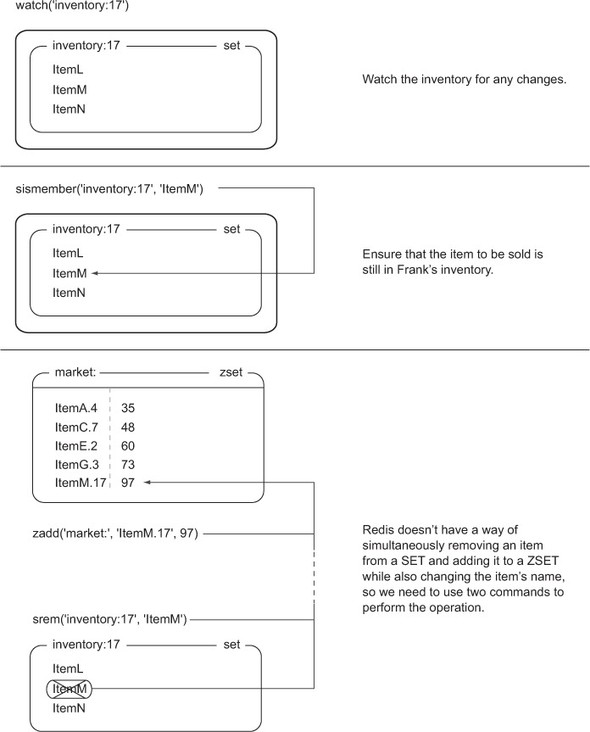
Generally, listing an item should occur without any significant issue, since only the user should be selling their own items (which is enforced farther up the application stack). But as I mentioned before, if a user’s inventory were to change between the WATCH and EXEC, our attempt to list the item would fail, and we’d retry.
Now that you know how to list an item, it’s time to purchase an item.
4.4.3. Purchasing items
To process the purchase of an item, we first WATCH the market and the user who’s buying the item. We then fetch the buyer’s total funds and the price of the item, and verify that the buyer has enough money. If they don’t have enough money, we cancel the transaction. If they do have enough money, we perform the transfer of money between the accounts, move the item into the buyer’s inventory, and remove the item from the market. On WATCH error, we retry for up to 10 seconds in total. We can see the function which handles the purchase of an item in the following listing.
Listing 4.6. The purchase_item() function
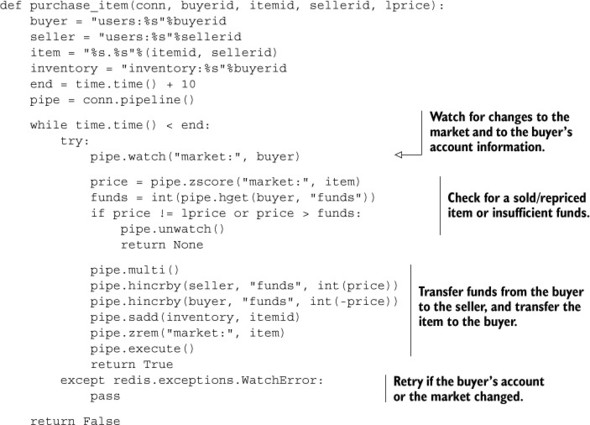
To purchase an item, we need to spend more time preparing the data, and we need to watch both the market and the buyer’s information. We watch the market to ensure that the item can still be bought (or that we can notice that it has already been bought), and we watch the buyer’s information to verify that they have enough money. When we’ve verified that the item is still there, and that the buyer has enough money, we go about actually moving the item into their inventory, as well as moving money from the buyer to the seller.
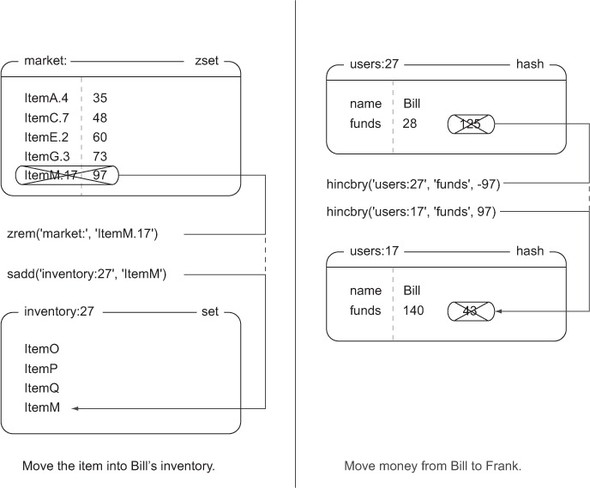
After seeing the available items in the market, Bill (user 27) decides that he wants to buy ItemM from Frank through the marketplace. Let’s follow along to see how our data changes through figures 4.5 and 4.6.
Figure 4.5. Before the item can be purchased, we must watch the market and the buyer’s information to verify that the item is still available, and that the buyer has enough money.
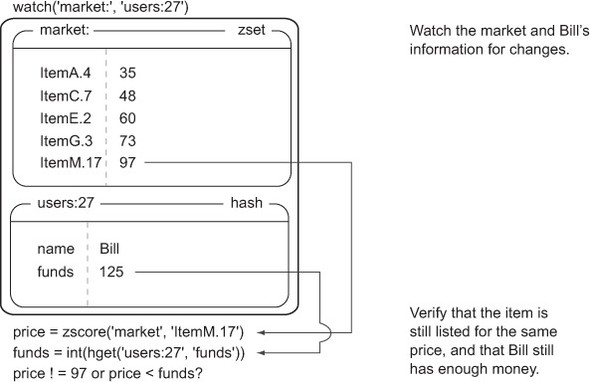
Figure 4.6. In order to complete the item purchase, we must actually transfer money from the buyer to the seller, and we must remove the item from the market while adding it to the buyer’s inventory.
If either the market ZSET or Bill’s account information changes between our WATCH and our EXEC, the purchase_item() function will either retry or abort, based on how long it has been trying to purchase the item, as shown in listing 4.6.
Why doesn’t Redis implement typical locking?
When accessing data for writing (SELECT FOR UPDATE in SQL), relational databases will place a lock on rows that are accessed until a transaction is completed with COMMIT or ROLLBACK. If any other client attempts to access data for writing on any of the same rows, that client will be blocked until the first transaction is completed. This form of locking works well in practice (essentially all relational databases implement it), though it can result in long wait times for clients waiting to acquire locks on a number of rows if the lock holder is slow.
Because there’s potential for long wait times, and because the design of Redis minimizes wait time for clients (except in the case of blocking LIST pops), Redis doesn’t lock data during WATCH. Instead, Redis will notify clients if someone else modified the data first, which is called optimistic locking (the actual locking that relational databases perform could be viewed as pessimistic). Optimistic locking also works well in practice because clients are never waiting on the first holder of the lock; instead they retry if some other client was faster.
In this section, we’ve discussed combining WATCH, MULTI, and EXEC to handle the manipulation of multiple types of data so that we can implement a marketplace. Given this functionality as a basis, it wouldn’t be out of the question to make our marketplace into an auction, add alternate sorting options, time out old items in the market, or even add higher-level searching and filtering based on techniques discussed in chapter 7.
As long as we consistently use transactions in Redis, we can keep our data from being corrupted while being operated on by multiple clients. Let’s look at how we can make our operations even faster when we don’t need to worry about other clients altering our data.
4.5. Non-transactional pipelines
When we first introduced MULTI/EXEC in chapter 3, we talked about them as having a “transaction” property—everything between the MULTI and EXEC commands will execute without other clients being able to do anything. One benefit to using transactions is the underlying library’s use of a pipeline, which improves performance. This section will show how to use a pipeline without a transaction to further improve performance.
You’ll remember from chapter 2 that some commands take multiple arguments for adding/updating—commands like MGET, MSET, HMGET, HMSET, RPUSH/LPUSH, SADD, ZADD, and others. Those commands exist to streamline calls to perform the same operation repeatedly. As you saw in chapter 2, this can result in significant performance improvements. Though not as drastic as these commands, the use of non-transactional pipelines offers many of the same performance advantages, and allows us to run a variety of commands at the same time.
In the case where we don’t need transactions, but where we still want to do a lot of work, we could still use MULTI/EXEC for their ability to send all of the commands at the same time to minimize round trips and latency. Unfortunately, MULTI and EXEC aren’t free, and can delay other important commands from executing. But we can gain all the benefits of pipelining without using MULTI/EXEC. When we used MULTI/EXEC in Python in chapter 3 and in section 4.4, you may have noticed that we did the following:
pipe = conn.pipeline()
By passing True to the pipeline() method (or omitting it), we’re telling our client to wrap the sequence of commands that we’ll call with a MULTI/EXEC pair. If instead of passing True we were to pass False, we’d get an object that prepared and collected commands to execute similar to the transactional pipeline, only it wouldn’t be wrapped with MULTI/EXEC. For situations where we want to send more than one command to Redis, the result of one command doesn’t affect the input to another, and we don’t need them all to execute transactionally, passing False to the pipeline() method can further improve overall Redis performance. Let’s look at an example.
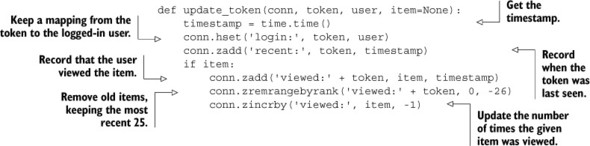
Way back in sections 2.1 and 2.5, we wrote and updated a function called update_token(), which kept a record of recent items viewed and recent pages viewed, and kept the user’s login cookie updated. The updated code from section 2.5 is shown in listing 4.7. Note how the function will make three or five calls to Redis for every call of the function. As written, that will result in three or five round trips between Redis and our client.
Listing 4.7. The update_token() function from section 2.5
If our Redis and web servers are connected over LAN with only one or two steps, we could expect that the round trip between the web server and Redis would be around 1–2 milliseconds. With three to five round trips between Redis and the web server, we could expect that it would take 3–10 milliseconds for update_token() to execute. At that speed, we could only expect a single web server thread to be able to handle 100–333 requests per second. This is great, but we could do better. Let’s quickly create a non-transactional pipeline and make all of our requests over that pipeline. You can see the updated function in the next listing.
Listing 4.8. The update_token_pipeline() function
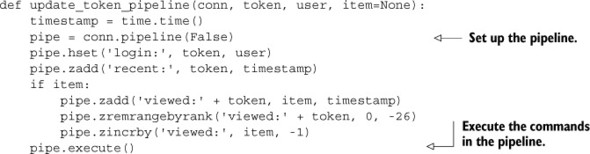
By replacing our standard Redis connection with a pipelined connection, we can reduce our number of round trips by a factor of 3–5, and reduce the expected time to execute update_token_pipeline() to 1–2 milliseconds. At that speed, a single web server thread could handle 500–1000 requests per second if it only had to deal with updating item view information. Theoretically, this is great, but what about in reality?
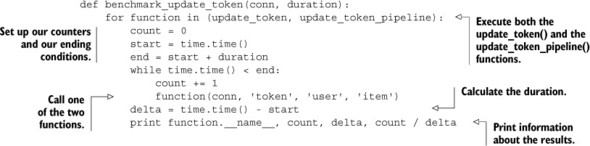
Let’s test both of these functions by performing a simple benchmark. We’ll test the number of requests that can be processed per second against a copy of Redis that’s on the same machine, across a fast and low-latency network connection, and across a slow and higher latency connection. We’ll first start with the benchmark code that we’ll use to test the performance of these connections. In our benchmark, we’ll call either update_token() or update_token_pipeline() repeatedly until we reach a prespecified timeout, and then calculate the number of requests we can service at a given time. The following listing shows the code that we’ll use to run our two update_token commands.
Listing 4.9. The benchmark_update_token() function
When we run the benchmark function across a variety of connections with the given available bandwidth (gigabits or megabits) and latencies, we get data as shown in table 4.4.
Table 4.4. Performance of pipelined and nonpipelined connections over different types of connections. For high-speed connections, we’ll tend to run at the limit of what a single processor can perform for encoding/decoding commands in Redis. For slower connections, we’ll run at the limit of bandwidth and/or latency.
|
Description |
Bandwidth |
Latency |
update_table() calls per second |
update_table_pipeline() calls per second |
|---|---|---|---|---|
| Local machine, Unix domain socket | >1 gigabit | 0.015ms | 3,761 | 6,394 |
| Local machine, localhost | >1 gigabit | 0.015ms | 3,257 | 5,991 |
| Remote machine, shared switch | 1 gigabit | 0.271ms | 739 | 2,841 |
| Remote machine, connected through VPN | 1.8 megabit | 48ms | 3.67 | 18.2 |
Looking at the table, note that for high-latency connections, we can multiply performance by a factor of five using pipelines over not using pipelines. Even with very low-latency remote connections, we’re able to improve performance by almost four times. For local connections, we actually run into the single-core performance limit of Python sending and receiving short command sequences using the Redis protocol (we’ll talk about this more in section 4.6).
You now know how to push Redis to perform better without transactions. Beyond using pipelines, are there any other standard ways of improving the performance of Redis?
4.6. Performance considerations
When coming from a relational database background, most users will be so happy with improving performance by a factor of 100 times or more by adding Redis, they won’t realize that they can make Redis perform even better. In the previous section, we introduced non-transactional pipelines as a way to minimize the number of round trips between our application and Redis. But what if we’ve already built an application, and we know that it could perform better? How do we find ways to improve performance?
Improving performance in Redis requires having an understanding of what to expect in terms of performance for the types of commands that we’re sending to Redis. To get a better idea of what to expect from Redis, we’ll quickly run a benchmark that’s included with Redis, redis-benchmark, as can be seen in listing 4.10. Feel free to explore redis-benchmark on your own to discover the performance characteristics of your server and of Redis.
Listing 4.10. Running redis-benchmark on an Intel Core-2 Duo 2.4 GHz desktop
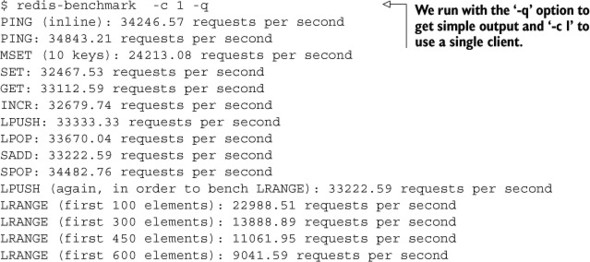
The output of redis-benchmark shows a group of commands that are typically used in Redis, as well as the number of commands of that type that can be run in a single second. A standard run of this benchmark without any options will try to push Redis to its limit using 50 clients, but it’s a lot easier to compare performance of a single benchmark client against one copy of our own client, rather than many.
When looking at the output of redis-benchmark, we must be careful not to try to directly compare its output with how quickly our application performs. This is because redis-benchmark doesn’t actually process the result of the commands that it performs, which means that the results of some responses that require substantial parsing overhead aren’t taken into account. Generally, compared to redis-benchmark running with a single client, we can expect the Python Redis client to perform at roughly 50–60% of what redis-benchmark will tell us for a single client and for nonpipelined commands, depending on the complexity of the command to call.
If you find that your commands are running at about half of what you’d expect given redis-benchmark (about 25–30% of what redis-benchmark reports), or if you get errors reporting “Cannot assign requested address,” you may be accidentally creating a new connection for every command.
I’ve listed some performance numbers relative to a single redis-benchmark client using the Python client, and have described some of the most likely causes of slowdowns and/or errors in table 4.5.
Table 4.5. A table of general performance comparisons against a single redis-benchmark client and what may be causing potential slowdowns
|
Performance or error |
Likely cause |
Remedy |
|---|---|---|
| 50–60% of redis-benchmark for a single client | Expected performance without pipelining | N/A |
| 25–30% of redis-benchmark for a single client | Connecting for every command/group of commands | Reuse your Redis connections |
| Client error: “Cannot assign requested address” | Connecting for every command/group of commands | Reuse your Redis connections |
This list of possible performance issues and solutions is short, but these issues amount to easily 95% of the performance-related problems that users report on a regular basis (aside from using Redis data structures incorrectly). If we’re experiencing slowdowns that we’re having difficulty in diagnosing, and we know it isn’t one of the problems listed in table 4.5, we should request help by one of the ways described in section 1.4.
Most client libraries that access Redis offer some level of connection pooling built in. For Python, we only need to create a single redis.Redis() for every unique Redis server we need to connect to (we need to create a new connection for each numbered database we’re using). The redis.Redis() object itself will handle creating connections as necessary, reusing existing connections, and discarding timed-out connections. As written, the Python client connection pooling is both thread safe and fork() safe.
4.7. Summary
Through this chapter, we’ve covered topics that can help keep Redis performing well while keeping your data secure against system failures. The first half of the chapter primarily discussed the use of persistence and replication to prepare for failures and deal with failures. The latter half dealt with keeping your data from being corrupted, using pipelines to improve performance, and diagnosing potential performance problems.
If there are two things you should take from this chapter, they are that the use of replication and append-only files can go a long way toward keeping your data safe, and that using WATCH/MULTI/EXEC can keep your data from being corrupted by multiple clients working on the same data.
Hopefully our discussion of WATCH/MULTI/EXEC introduced in chapter 3 has helped you to better understand how to fully utilize transactions in Redis. In chapter 6, we’ll revisit transactions, but now let’s move on to chapter 5, where you’ll learn more about using Redis to help with system administration tasks.