
Chapter 3. Commands in Redis
This chapter covers
- String, list, and set commands
- Hash and sorted set commands
- Publish/subscribe commands
- Other commands
In this chapter, we’ll primarily cover commands that we haven’t already covered in chapters 1 and 2. By learning about Redis through its commands, you’ll be able to build on the examples provided and have a better understanding of how to solve your own problems. If you’re looking for short examples that are more than the simple interactions I show here, you’ll find some in chapter 2.
The commands that are highlighted in this chapter are broken down by structure or concept, and were chosen because they include 95% or more of the typical Redis calls in a variety of applications. The examples are interactions in the console, similar to the way I introduced each of the structures in chapter 1. Where appropriate, I’ll reference earlier or later sections that use those commands.
In the section for each of the different data types, I’ll show commands that are unique to the different structures, primarily focusing on what makes those structures and commands distinct. Let’s start by seeing how Redis STRINGs offer more than just GET and SET operations.
Additional documentation for commands not covered
In this chapter, I only cover the most commonly used commands or those commands that we’ll use in later chapters. If you’re looking for a full command and documentation reference, you can visit http://redis.io/commands.
Redis 2.4 and 2.6
As mentioned in appendix A, as of the time of this writing, precompiled versions of Redis for Windows are from the 2.4 series. In this and other chapters, we use features that are only available in Redis 2.6 and later. The primary differences between Redis 2.4 and 2.6 include (but aren’t limited to) Lua scripting (which we’ll discuss in chapter 11), millisecond-level precision for expiration (PTTL, PEXPIRE, and PEXPIREAT, described in this chapter), some bit operations (BITOP and BITCOUNT), and some commands now taking multiple arguments where they previously only took one argument (RPUSH, LPUSH, SADD, SREM, HDEL, ZADD, and ZREM).
3.1. Strings
You’ll remember from chapters 1 and 2 that STRINGs hold sequences of bytes, not significantly different from strings in many programming languages, or even C/C++–style char arrays. In Redis, STRINGs are used to store three types of values:
- Byte string values
- Integer values
- Floating-point values
Integers and floats can be incremented or decremented by an arbitrary numeric value (integers turning into floats as necessary). Integers have ranges that are equivalent to the platform’s long integer range (signed 32-bit integers on 32-bit platforms, and signed 64-bit integers on 64-bit platforms), and floats have ranges and values limited to IEEE 754 floating-point doubles. This three-way ability to look at the simplest of Redis values can be an advantage; it offers more flexibility in data representation than if only byte string values were allowed.
In this section, we’ll talk about the simplest structure available to Redis, the STRING. We’ll cover the basic numeric increment and decrement operations, followed later by the bit and substring manipulation calls, and you’ll come to understand that even the simplest of structures has a few surprises that can make it useful in a variety of powerful ways.
In table 3.1, you can see the available integer and float increment/decrement operations available on Redis STRINGs.
Table 3.1. Increment and decrement commands in Redis
|
Command |
Example use and description |
|---|---|
| INCR | INCR key-name—Increments the value stored at the key by 1 |
| DECR | DECR key-name—Decrements the value stored at the key by 1 |
| INCRBY | INCRBY key-name amount—Increments the value stored at the key by the provided integer value |
| DECRBY | DECRBY key-name amount—Decrements the value stored at the key by the provided integer value |
| INCRBYFLOAT | INCRBYFLOAT key-name amount—Increments the value stored at the key by the provided float value (available in Redis 2.6 and later) |
When setting a STRING value in Redis, if that value could be interpreted as a base-10 integer or a floating-point value, Redis will detect this and allow you to manipulate the value using the various INCR* and DECR* operations. If you try to increment or decrement a key that doesn’t exist or is an empty string, Redis will operate as though that key’s value were zero. If you try to increment or decrement a key that has a value that can’t be interpreted as an integer or float, you’ll receive an error. In the next listing, you can see some interactions with these commands.
Listing 3.1. A sample interaction showing INCR and DECR operations in Redis
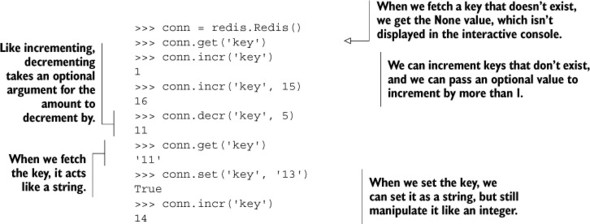
After reading other chapters, you may notice that we really only call incr(). Internally, the Python Redis libraries call INCRBY with either the optional second value passed, or 1 if the value is omitted. As of this writing, the Python Redis client library supports the full command set of Redis 2.6, and offers INCRBYFLOAT support via an incrbyfloat() method that works the same as incr().
Redis additionally offers methods for reading and writing parts of byte string values (integer and float values can also be accessed as though they’re byte strings, though that use is somewhat uncommon). This can be useful if we were to use Redis STRING values to pack structured data in an efficient fashion, which we’ll talk about in chapter 9. Table 3.2 shows some methods that can be used to manipulate substrings and individual bits of STRINGs in Redis.
Table 3.2. Substring manipulation commands available to Redis
|
Command |
Example use and description |
|---|---|
| APPEND | APPEND key-name value—Concatenates the provided value to the string already stored at the given key |
| GETRANGE | GETRANGE key-name start end—Fetches the substring, including all characters from the start offset to the end offset, inclusive |
| SETRANGE | SETRANGE key-name offset value—Sets the substring starting at the provided offset to the given value |
| GETBIT | GETBIT key-name offset—Treats the byte string as a bit string, and returns the value of the bit in the string at the provided bit offset |
| SETBIT | SETBIT key-name offset value—Treats the byte string as a bit string, and sets the value of the bit in the string at the provided bit offset |
| BITCOUNT | BITCOUNT key-name [start end]—Counts the number of 1 bits in the string, optionally starting and finishing at the provided byte offsets |
| BITOP | BITOP operation dest-key key-name [key-name ...]—Performs one of the bitwise operations, AND, OR, XOR, or NOT, on the strings provided, storing the result in the destination key |
GETRANGE and SUBSTR
In the past, GETRANGE was named SUBSTR, and the Python client continues to use the substr() method name to fetch ranges from the string. When using a version of Redis later than 2.6, you should use the getrange() method, and use substr() for Redis versions before 2.6.
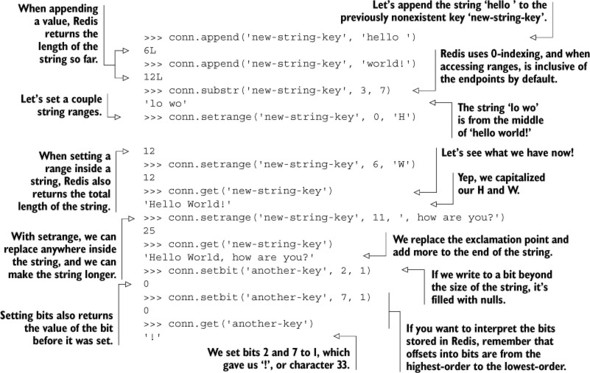
When writing to strings using SETRANGE and SETBIT, if the STRING wasn’t previously long enough, Redis will automatically extend the STRING with nulls before updating and writing the new data. When reading STRINGs with GETRANGE, any request for data beyond the end of the STRING won’t be returned, but when reading bits with GETBIT, any bit beyond the end of the STRING is considered zero. In the following listing, you can see some uses of these STRING manipulation commands.
Listing 3.2. A sample interaction showing substring and bit operations in Redis
In many other key-value databases, data is stored as a plain string with no opportunities for manipulation. Some other key-value databases do allow you to prepend or append bytes, but Redis is unique in its ability to read and write substrings. In many ways, even if Redis only offered STRINGs and these methods to manipulate strings, Redis would be more powerful than many other systems; enterprising users could use the substring and bit manipulation calls along with WATCH/MULTI/EXEC (which we’ll briefly introduce in section 3.7.2, and talk about extensively in chapter 4) to build arbitrary data structures. In chapter 9, we’ll talk about using STRINGs to store a type of simple mappings that can greatly reduce memory use in some situations.
With a little work, we can store some types of sequences, but we’re limited in the kinds of manipulations we can perform. But if we use LISTs, we have a wider range of commands and ways to manipulate LIST items.
3.2. Lists
As you may remember from chapter 1, LISTs allow you to push and pop items from both ends of a sequence, fetch individual items, and perform a variety of other operations that are expected of lists. LISTs by themselves can be great for keeping a queue of work items, recently viewed articles, or favorite contacts.
In this section, we’ll talk about LISTs, which store an ordered sequence of STRING values. We’ll cover some of the most commonly used LIST manipulation commands for pushing and popping items from LISTs. After reading this section, you’ll know how to manipulate LISTs using the most common commands. We’ll start by looking at table 3.3, where you can see some of the most frequently used LIST commands.
Table 3.3. Some commonly used LIST commands
|
Command |
Example use and description |
|---|---|
| RPUSH | RPUSH key-name value [value ...]—Pushes the value(s) onto the right end of the list |
| LPUSH | LPUSH key-name value [value ...]—Pushes the value(s) onto the left end of the list |
| RPOP | RPOP key-name—Removes and returns the rightmost item from the list |
| LPOP | LPOP key-name—Removes and returns the leftmost item from the list |
| LINDEX | LINDEX key-name offset—Returns the item at the given offset |
| LRANGE | LRANGE key-name start end—Returns the items in the list at the offsets from start to end, inclusive |
| LTRIM | LTRIM key-name start end—Trims the list to only include items at indices between start and end, inclusive |
The semantics of the LIST push commands shouldn’t be surprising, and neither should the pop commands. We covered a couple of these, along with both LINDEX and LRANGE, back in chapter 1. The next listing shows some uses of these push and pop commands.
Listing 3.3. A sample interaction showing LIST push and pop commands in Redis
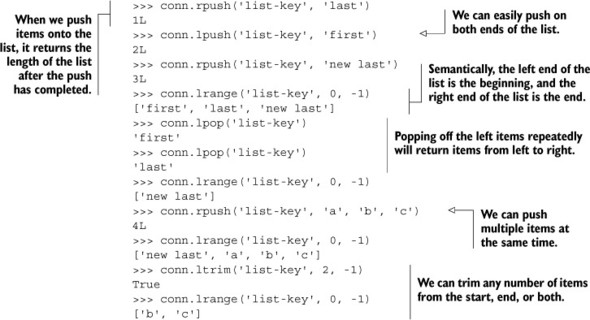
The LTRIM command is new in this example, and we can combine it with LRANGE to give us something that functions much like an LPOP or RPOP call that returns and pops multiple items at once. We’ll talk more about how to make these kinds of composite commands atomic[1] later in this chapter, as well as dive deeper into more advanced Redis-style transactions in chapter 4.
1 In Redis, when we talk about a group of commands as being atomic, we mean that no other client can read or change data while we’re reading or changing that same data.
Among the LIST commands we didn’t introduce in chapter 1 are a few commands that allow you to move items from one list to another, and even block while waiting for other clients to add items to LISTs. Table 3.4 shows our blocking pop and item moving commands.
Table 3.4. Some LIST commands for blocking LIST pops and moving items between LISTs
|
Command |
Example use and description |
|---|---|
| BLPOP | BLPOP key-name [key-name ...] timeout—Pops the leftmost item from the first non-empty LIST, or waits the timeout in seconds for an item |
| BRPOP | BRPOP key-name [key-name ...] timeout—Pops the rightmost item from the first non-empty LIST, or waits the timeout in seconds for an item |
| RPOPLPUSH | RPOPLPUSH source-key dest-key—Pops the rightmost item from the source and LPUSHes the item to the destination, also returning the item to the user |
| BRPOPLPUSH | BRPOPLPUSH source-key dest-key timeout—Pops the rightmost item from the source and LPUSHes the item to the destination, also returning the item to the user, and waiting up to the timeout if the source is empty |
This set of commands is particularly useful when we talk about queues in chapter 6. The following listing shows some examples of moving items around with BRPOPLPUSH and popping items from multiple lists with BLPOP.
Listing 3.4. Blocking LIST pop and movement commands in Redis
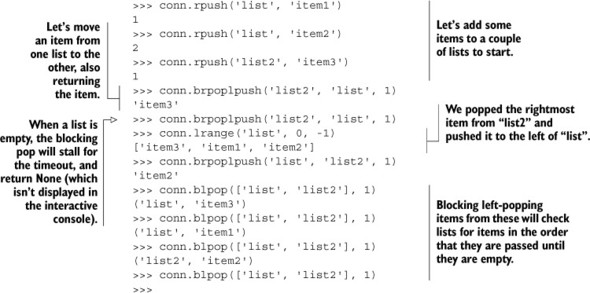
The most common use case for using blocking pop commands as well as the pop/push combination commands is in the development of messaging and task queues, which we’ll cover in chapter 6.
Back in sections 2.1 and 2.5, we used ZSETs to keep a listing of recently viewed items. Those recently viewed items included timestamps as scores to allow us to perform analytics during cleanup or after purchase. But including these timestamps takes space, and if timestamps aren’t necessary for our analytics, then using a ZSET just wastes space. Try to replace the use of ZSETs in update_token() with LISTs, while keeping the same semantics. Hint: If you find yourself stuck, you can skip ahead to section 6.1.1 for a push in the right direction.
One of the primary benefits of LISTs is that they can contain multiple string values, which can allow you to group data together. SETs offer a similar feature, but with the caveat that all items in a given SET are unique. Let’s look at how that changes what we can do with SETs.
3.3. Sets
You’ll remember from chapter 1 that SETs hold unique items in an unordered fashion. You can quickly add, remove, and determine whether an item is in the SET. Among the many uses of SETs are storing who voted for an article and which articles belong to a specific group, as seen in chapter 1.
In this section, we’ll discuss some of the most frequently used commands that operate on SETs. You’ll learn about the standard operations for inserting, removing, and moving members between SETs, as well as commands to perform intersection, union, and differences on SETs. When finished with this section, you’ll be better prepared to fully understand how our search examples in chapter 7 work.
Let’s take a look at table 3.5 to see some of the more commonly used set commands.
Table 3.5. Some commonly used SET commands
|
Command |
Example use and description |
|---|---|
| SADD | SADD key-name item [item ...]—Adds the items to the set and returns the number of items added that weren’t already present |
| SREM | SREM key-name item [item ...]—Removes the items and returns the number of items that were removed |
| SISMEMBER | SISMEMBER key-name item—Returns whether the item is in the SET |
| SCARD | SCARD key-name—Returns the number of items in the SET |
| SMEMBERS | SMEMBERS key-name—Returns all of the items in the SET as a Python set |
| SRANDMEMBER | SRANDMEMBER key-name [count]—Returns one or more random items from the SET. When count is positive, Redis will return count distinct randomly chosen items, and when count is negative, Redis will return count randomly chosen items that may not be distinct. |
| SPOP | SPOP key-name—Removes and returns a random item from the SET |
| SMOVE | SMOVE source-key dest-key item—If the item is in the source, removes the item from the source and adds it to the destination, returning if the item was moved |
Some of those commands should be familiar from chapter 1, so let’s jump to the next listing to see some of these commands in action.
Listing 3.5. A sample interaction showing some common SET commands in Redis
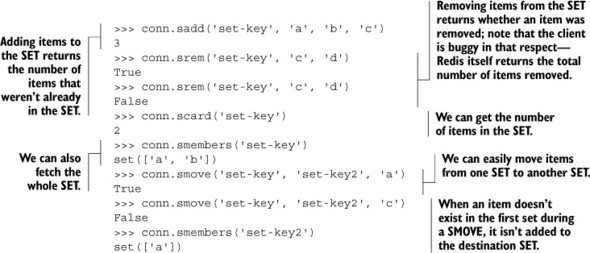
Using just these commands, we can keep track of unique events and items like we did in chapter 1 with voting and article groups. But the real power of SETs is in the commands that combine multiple SETs at the same time. Table 3.6 shows some of the ways that you can relate multiple SETs to each other.
Table 3.6. Operations for combining and manipulating SETs in Redis
|
Command |
Example use and description |
|---|---|
| SDIFF | SDIFF key-name [key-name ...]—Returns the items in the first SET that weren’t in any of the other SETs (mathematical set difference operation) |
| SDIFFSTORE | SDIFFSTORE dest-key key-name [key-name ...]—Stores at the dest-key the items in the first SET that weren’t in any of the other SETs (mathematical set difference operation) |
| SINTER | SINTER key-name [key-name ...]—Returns the items that are in all of the SETs (mathematical set intersection operation) |
| SINTERSTORE | SINTERSTORE dest-key key-name [key-name ...]—Stores at the dest-key the items that are in all of the SETs (mathematical set intersection operation) |
| SUNION | SUNION key-name [key-name ...]—Returns the items that are in at least one of the SETs (mathematical set union operation) |
| SUNIONSTORE | SUNIONSTORE dest-key key-name [key-name ...]—Stores at the dest-key the items that are in at least one of the SETs (mathematical set union operation) |
This group of commands are three fundamental SET operations, with both “return the result” and “store the result” versions. Let’s see a sample of what these commands are able to do.
Listing 3.6. A sample interaction showing SET difference, intersection, and union in Redis
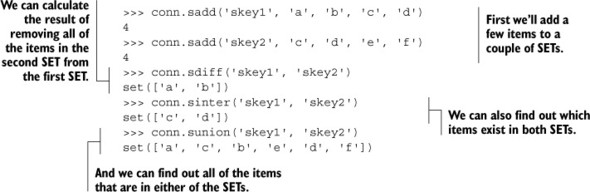
If you’re comparing with Python sets, Redis SETs offer many of the same semantics and functionality, but are available remotely to potentially many clients. We’ll dig more deeply into what SETs are capable of in chapter 7, where we build a type of search engine with them.
Coming up next, we’ll talk about commands that manipulate HASHes, which allow us to group related keys and values together for easy fetching and updating.
3.4. Hashes
As introduced in chapter 1, HASHes in Redis allow you to store groups of key-value pairs in a single higher-level Redis key. Functionally, the values offer some of the same features as values in STRINGs and can be useful to group related data together. This data grouping can be thought of as being similar to a row in a relational database or a document in a document store.
In this section, we’ll talk about the most commonly used commands that manipulate HASHes. You’ll learn more about the operations for adding and removing key-value pairs to HASHes, as well as commands to fetch all of the HASH contents along with the ability to increment or decrement values. When finished with this section, you’ll better understand the usefulness of storing your data in HASHes and how to do so. Look at table 3.7 to see some commonly used HASH commands.
Table 3.7. Operations for adding and removing items from HASHes
|
Command |
Example use and description |
|---|---|
| HMGET | HMGET key-name key [key ...]—Fetches the values at the fields in the HASH |
| HMSET | HMSET key-name key value [key value ...]—Sets the values of the fields in the HASH |
| HDEL | HDEL key-name key [key ...]—Deletes the key-value pairs in the HASH, returning the number of pairs that were found and deleted |
| HLEN | HLEN key-name—Returns the number of key-value pairs in the HASH |
Some of those commands should be familiar from chapter 1, but we have a couple of new ones for getting and setting multiple keys at the same time. These bulk commands are mostly a matter of convenience and to improve Redis’s performance by reducing the number of calls and round trips between a client and Redis. Look at the next listing to see some of them in action.
Listing 3.7. A sample interaction showing some common HASH commands in Redis
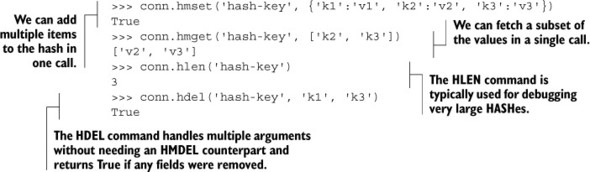
The HMGET/HMSET commands are similar to their single-argument versions that we introduced in chapter 1, only differing in that they take a list or dictionary for arguments instead of the single entries.
Table 3.8 shows some other bulk commands and more STRING-like operations on HASHes.
Table 3.8. More bulk operations and STRING-like calls over HASHes
|
Command |
Example use and description |
|---|---|
| HEXISTS | HEXISTS key-name key—Returns whether the given key exists in the HASH |
| HKEYS | HKEYS key-name—Fetches the keys in the HASH |
| HVALS | HVALS key-name—Fetches the values in the HASH |
| HGETALL | HGETALL key-name—Fetches all key-value pairs from the HASH |
| HINCRBY | HINCRBY key-name key increment—Increments the value stored at the given key by the integer increment |
| HINCRBYFLOAT | HINCRBYFLOAT key-name key increment—Increments the value stored at the given key by the float increment |
With the availability of HGETALL, it may not seem as though HKEYS and HVALUES would be that useful, but when you expect your values to be large, you can fetch the keys, and then get the values one by one to keep from blocking other requests. HINCRBY and HINCRBYFLOAT should remind you of the INCRBY and INCRBYFLOAT operations available on STRING keys, and they have the same semantics, applied to HASH values. Let’s look at some of these commands being used in the next listing.
Listing 3.8. A sample interaction showing some more advanced features of Redis HASHes
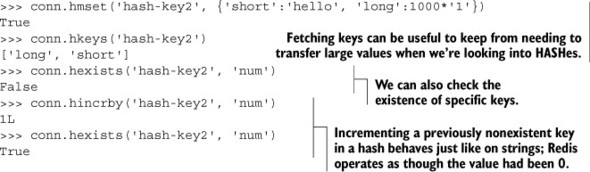
As we described earlier, when confronted with a large value in a HASH, we can fetch the keys and only fetch values that we’re interested in to reduce the amount of data that’s transferred. We can also perform key checks, as we could perform member checks on SETs with SISMEMBER. And back in chapter 1, we used HINCRBY to keep track of the number of votes an article had received, which we just revisited.
Let’s look at a structure that we’ll be using fairly often in the remaining chapters: sorted sets.
3.5. Sorted sets
ZSETs offer the ability to store a mapping of members to scores (similar to the keys and values of HASHes). These mappings allow us to manipulate the numeric scores,[2] and fetch and scan over both members and scores based on the sorted order of the scores. In chapter 1, we showed a brief example that used ZSETs as a way of sorting submitted articles based on time and how many up-votes they had received, and in chapter 2, we had an example that used ZSETs as a way of handling the expiration of old cookies.
2 Scores are actually stored inside Redis as IEEE 754 floating-point doubles.
In this section, we’ll talk about commands that operate on ZSETs. You’ll learn how to add and update items in ZSETs, as well as how to use the ZSET intersection and union commands. When finished with this section, you’ll have a much clearer understanding about how ZSETs work, which will help you to better understand what we did with them in chapter 1, and how we’ll use them in chapters 5, 6, and 7.
Let’s look at some commonly used ZSET commands in table 3.9.
Table 3.9. Some common ZSET commands
|
Command |
Example use and description |
|---|---|
| ZADD | ZADD key-name score member [score member ...]—Adds members with the given scores to the ZSET |
| ZREM | ZREM key-name member [member ...]—Removes the members from the ZSET, returning the number of members that were removed |
| ZCARD | ZCARD key-name—Returns the number of members in the ZSET |
| ZINCRBY | ZINCRBY key-name increment member—Increments the member in the ZSET |
| ZCOUNT | ZCOUNT key-name min max—Returns the number of members with scores between the provided minimum and maximum |
| ZRANK | ZRANK key-name member—Returns the position of the given member in the ZSET |
| ZSCORE | ZSCORE key-name member—Returns the score of the member in the ZSET |
| ZRANGE | ZRANGE key-name start stop [WITHSCORES]—Returns the members and optionally the scores for the members with ranks between start and stop |
We’ve used some of these commands in chapters 1 and 2, so they should already be familiar to you. Let’s quickly revisit the use of some of our commands.
Listing 3.9. A sample interaction showing some common ZSET commands in Redis
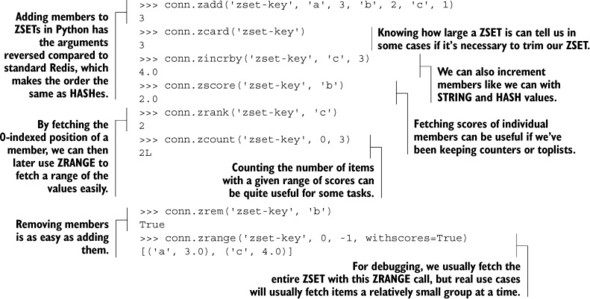
You’ll likely remember our use of ZADD, ZREM, ZINCRBY, ZSCORE, and ZRANGE from chapters 1 and 2, so their semantics should come as no surprise. The ZCOUNT command is a little different than the others, primarily meant to let you discover the number of values whose scores are between the provided minimum and maximum scores.
Table 3.10 shows several more ZSET commands in Redis that you’ll find useful.
Table 3.10. Commands for fetching and deleting ranges of data from ZSETs and offering SET-like intersections
|
Command |
Example use and description |
|---|---|
| ZREVRANK | ZREVRANK key-name member—Returns the position of the member in the ZSET, with members ordered in reverse |
| ZREVRANGE | ZREVRANGE key-name start stop [WITHSCORES]—Fetches the given members from the ZSET by rank, with members in reverse order |
| ZRANGEBYSCORE | ZRANGEBYSCORE key min max [WITHSCORES] [LIMIT offset count]—Fetches the members between min and max |
| ZREVRANGEBYSCORE | ZREVRANGEBYSCORE key max min [WITHSCORES] [LIMIT offset count]—Fetches the members in reverse order between min and max |
| ZREMRANGEBYRANK | ZREMRANGEBYRANK key-name start stop—Removes the items from the ZSET with ranks between start and stop |
| ZREMRANGEBYSCORE | ZREMRANGEBYSCORE key-name min max—Removes the items from the ZSET with scores between min and max |
| ZINTERSTORE | ZINTERSTORE dest-key key-count key [key ...] [WEIGHTS weight [weight ...]] [AGGREGATE SUM|MIN|MAX]—Performs a SET-like intersection of the provided ZSETs |
| ZUNIONSTORE | ZUNIONSTORE dest-key key-count key [key ...] [WEIGHTS weight [weight ...]] [AGGREGATE SUM|MIN|MAX]—Performs a SET-like union of the provided ZSETs |
This is the first time that you’ve seen a few of these commands. If some of the ZREV* commands are confusing, remember that they work the same as their nonreversed counterparts, except that the ZSET behaves as if it were in reverse order (sorted by score from high to low). You can see a few examples of their use in the next listing.
Listing 3.10. A sample interaction showing ZINTERSTORE and ZUNIONSTORE
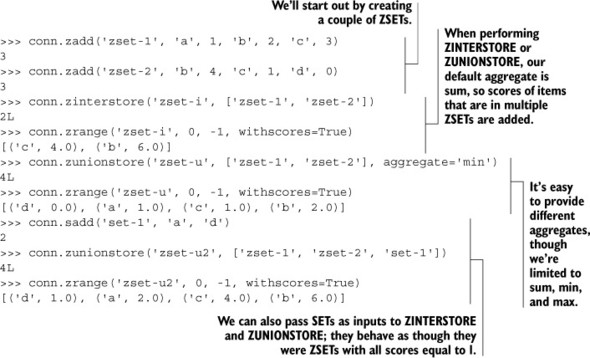
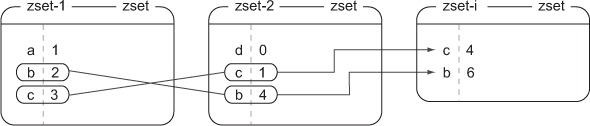
ZSET union and intersection can be difficult to understand at first glance, so let’s look at some figures that show what happens during the processes of both intersection and union. Figure 3.1 shows the intersection of the two ZSETs and the final ZSET result. In this case, our aggregate is the default of sum, so scores are added.
Figure 3.1. What happens when calling conn.zinterstore('zset-i', ['zset-1', 'zset-2']); elements that exist in both zset-1 and zset-2 are added together to get zset-i
Unlike intersection, when we perform a union operation, items that exist in at least one of the input ZSETs are included in the output. Figure 3.2 shows the result of performing a union operation with a different aggregate function, min, which takes the minimum score if a member is in multiple input ZSETs.
Figure 3.2. What happens when calling conn.zunionstore('zset-u', ['zset-1', 'zset-2'], aggregate='min'); elements that exist in either zset-1 or zset-2 are combined with the minimum function to get zset-u
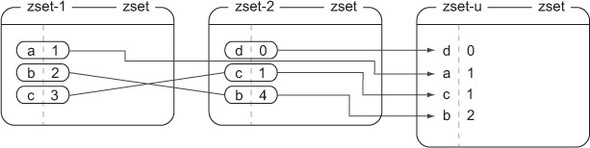
In chapter 1, we used the fact that we can include SETs as part of ZSET union and intersection operations. This feature allowed us to easily add and remove articles from groups without needing to propagate scoring and insertion times into additional ZSETs. Figure 3.3 shows a ZUNIONSTORE call that combines two ZSETs with one SET to produce a final ZSET.
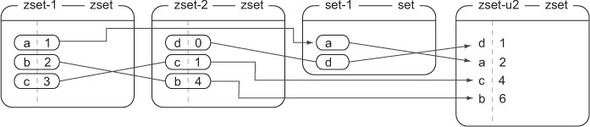
Figure 3.3. What happens when calling conn.zunionstore('zset-u2', ['zset-1', 'zset-2', 'set-1']); elements that exist in any of zset-1, zset-2, or set-1 are combined via addition to get zset-u2
In chapter 7, we’ll use ZINTERSTORE and ZUNIONSTORE as parts of a few different types of search. We’ll also talk about a few different ways to combine ZSET scores with the optional WEIGHTS parameter to further extend the types of problems that can be solved with SETs and ZSETs.
As you’re developing applications, you may have come upon a pattern known as publish/subscribe, also referred to as pub/sub. Redis includes this functionality, which we’ll cover next.
3.6. Publish/subscribe
If you’re confused because you can’t remember reading about publish or subscribe yet, don’t be—this is the first time we’ve talked about it. Generally, the concept of publish/subscribe, also known as pub/sub, is characterized by listeners subscribing to channels, with publishers sending binary string messages to channels. Anyone listening to a given channel will receive all messages sent to that channel while they’re connected and listening. You can think of it like a radio station, where subscribers can listen to multiple radio stations at the same time, and publishers can send messages on any radio station.
In this section, we’ll discuss and use operations involving publish and subscribe. When finished with this section, you’ll know how to use these commands, and why we use other similar solutions in later chapters.
In Redis, the pub/sub concept has been included through the use of a collection of the five commands shown in table 3.11.
Table 3.11. Commands for handling pub/sub in Redis
|
Example use and description |
|
|---|---|
| SUBSCRIBE | SUBSCRIBE channel [channel ...]—Subscribes to the given channels |
| UNSUBSCRIBE | UNSUBSCRIBE [channel [channel ...]]—Unsubscribes from the provided channels, or unsubscribes all channels if no channel is given |
| PUBLISH | PUBLISH channel message—Publishes a message to the given channel |
| PSUBSCRIBE | PSUBSCRIBE pattern [pattern ...]—Subscribes to messages broadcast to channels that match the given pattern |
| PUNSUBSCRIBE | PUNSUBSCRIBE [pattern [pattern ...]]—Unsubscribes from the provided patterns, or unsubscribes from all subscribed patterns if none are given |
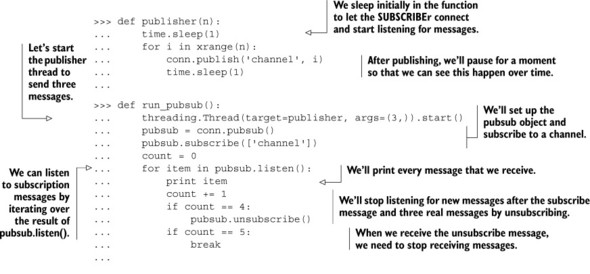
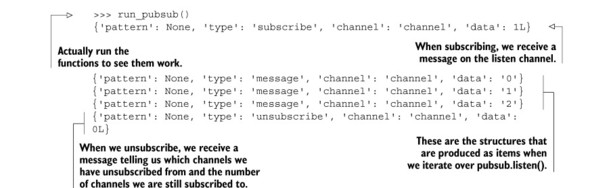
With the way the PUBLISH and SUBSCRIBE commands are implemented on the Python side of things, it’s easier to demonstrate the feature if we use a helper thread to handle the PUBLISHing. You can see an example of PUBLISH/SUBSCRIBE in the next listing.[3]
3 If you’d like to run this code yourself, you can: I included the publisher() and run_pubsub() functions in the source code for this chapter.
Listing 3.11. Using PUBLISH and SUBSCRIBE in Redis
The publish/subscribe pattern and its Redis implementation can be useful. If you skip ahead and scan around other chapters, you’ll notice that we only use publish/subscribe in one other section, section 8.5. If PUBLISH and SUBSCRIBE are so useful, why don’t we use them very much? There are two reasons.
One reason is because of Redis system reliability. In older versions of Redis, a client that had subscribed to channels but didn’t read sent messages fast enough could cause Redis itself to keep a large outgoing buffer. If this outgoing buffer grew too large, it could cause Redis to slow down drastically or crash, could cause the operating system to kill Redis, and could even cause the operating system itself to become unusable. Modern versions of Redis don’t have this issue, and will disconnect subscribed clients that are unable to keep up with the client-output-buffer-limit pubsub configuration option (which we’ll talk about in chapter 8).
The second reason is for data transmission reliability. Within any sort of networked system, you must operate under the assumption that your connection could fail at some point. Typically, this is handled by one side or the other reconnecting as a result of a connection error. Our Python Redis client will normally handle connection issues well by automatically reconnecting on failure, automatically handling connection pooling (we’ll talk about this more in chapter 4), and more. But in the case of clients that have subscribed, if the client is disconnected and a message is sent before it can reconnect, the client will never see the message. When you’re relying on receiving messages over a channel, the semantics of PUBLISH/SUBSCRIBE in Redis may let you down.
It’s for these two reasons that we write two different methods to handle reliable message delivery in chapter 6, which works in the face of network disconnections, and which won’t cause Redis memory to grow (even in older versions of Redis) unless you want it to.
If you like the simplicity of using PUBLISH/SUBSCRIBE, and you’re okay with the chance that you may lose a little data, then feel free to use pub/sub instead of our methods, as we also do in section 8.5; just remember to configure client-output-buffer-limit pubsub reasonably before starting.
At this point, we’ve covered the majority of commands that you’ll use on a regular basis that are related to individual data types. There are a few more commands that you’ll also likely use, which don’t fit into our nice five structures-plus-pub/sub theme.
3.7. Other commands
So far we’ve gone through the five structures that Redis provides, as well as shown a bit of pub/sub. The commands in this section are commands that operate on multiple types of data. We’ll first cover SORT, which can involve STRINGs, SETs or LISTs, and HASHes all at the same time. We’ll then cover basic transactions with MULTI and EXEC, which can allow you to execute multiple commands together as though they were just one command. Finally, we’ll cover the variety of automatic expiration commands for automatically deleting unnecessary data.
After reading this section, you should have a better idea of how to combine and manipulate multiple data types at the same time.
3.7.1. Sorting
Sorting in Redis is similar to sorting in other languages: we want to take a sequence of items and order them according to some comparison between elements. SORT allows us to sort LISTs, SETs, and ZSETs according to data in the LIST/SET/ZSET data stored in STRING keys, or even data stored in HASHes. If you’re coming from a relational database background, you can think of SORT as like the order by clause in a SQL statement that can reference other rows and tables. Table 3.12 shows the SORT command definition.
Table 3.12. The SORT command definition
|
Command |
Example use and description |
|---|---|
| SORT | SORT source-key [BY pattern] [LIMIT offset count] [GET pattern [GET pattern ...]] [ASC|DESC] [ALPHA] [STORE dest-key]—Sorts the input LIST, SET, or ZSET according to the options provided, and returns or stores the result |
Some of the more basic options with SORT include the ability to order the results in descending order rather than the default ascending order, consider items as though they were numbers, compare as though items were binary strings (the sorted order of the strings '110' and '12' are different than the sorted order of the numbers 110 and 12), sorting by values not included in the original sequence, and even fetching values outside of the input LIST, SET, or ZSET.
You can see some examples that use SORT in listing 3.12. The first few lines of the listing show the addition of some initial data, and basic sorting (by numeric value and by string order). The remaining parts show how we can store data to be sorted by and/or fetched inside HASHes using a special syntax.
Listing 3.12. A sample interaction showing some uses of SORT
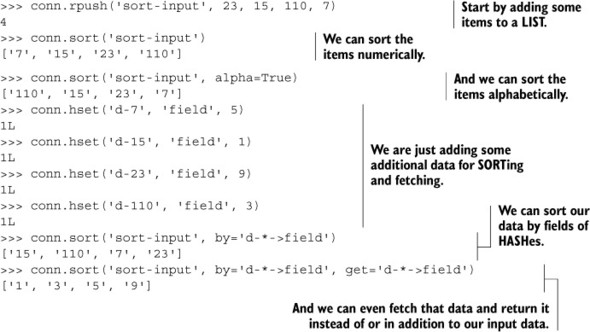
Sorting can be used to sort LISTs, but it can also sort SETs, turning the result into a LIST. In this example, we sorted numbers character by character (via the alpha keyword argument), we sorted some items based on external data, and we were even able to fetch external data to return. When combined with SET intersection, union, and difference, along with storing data externally inside HASHes, SORT is a powerful command. We’ll spend some time talking about how to combine SET operations with SORT in chapter 7.
Though SORT is the only command that can manipulate three types of data at the same time, basic Redis transactions can let you manipulate multiple data types with a series of commands without interruption.
3.7.2. Basic Redis transactions
Sometimes we need to make multiple calls to Redis in order to manipulate multiple structures at the same time. Though there are a few commands to copy or move items between keys, there isn’t a single command to move items between types (though you can copy from a SET to a ZSET with ZUNIONSTORE). For operations involving multiple keys (of the same or different types), Redis has five commands that help us operate on multiple keys without interruption: WATCH, MULTI, EXEC, UNWATCH, and DISCARD.
For now, we’ll only talk about the simplest version of a Redis transaction, which uses MULTI and EXEC. If you want to see an example that uses WATCH, MULTI, EXEC, and UNWATCH, you can skip ahead to section 4.4, where I explain why you’d need to use WATCH and UNWATCH with MULTI and EXEC.
What is a basic transaction in Redis?
In Redis, a basic transaction involving MULTI and EXEC is meant to provide the opportunity for one client to execute multiple commands A, B, C, ... without other clients being able to interrupt them. This isn’t the same as a relational database transaction, which can be executed partially, and then rolled back or committed. In Redis, every command passed as part of a basic MULTI/EXEC transaction is executed one after another until they’ve completed. After they’ve completed, other clients may execute their commands.
To perform a transaction in Redis, we first call MULTI, followed by any sequence of commands we intend to execute, followed by EXEC. When seeing MULTI, Redis will queue up commands from that same connection until it sees an EXEC, at which point Redis will execute the queued commands sequentially without interruption. Semantically, our Python library handles this by the use of what’s called a pipeline. Calling the pipeline() method on a connection object will create a transaction, which when used correctly will automatically wrap a sequence of commands with MULTI and EXEC. Incidentally, the Python Redis client will also store the commands to send until we actually want to send them. This reduces the number of round trips between Redis and the client, which can improve the performance of a sequence of commands.
As was the case with PUBLISH and SUBSCRIBE, the simplest way to demonstrate the result of using a transaction is through the use of threads. In the next listing, you can see the result of parallel increment operations without a transaction.
Listing 3.13. What can happen without transactions during parallel execution
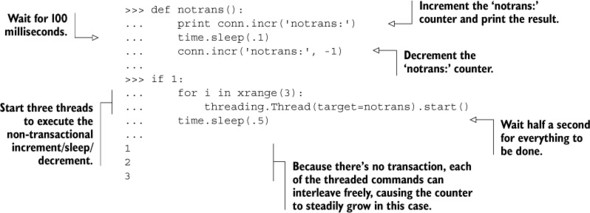
Without transactions, each of the three threads are able to increment the notrans: counter before the decrement comes through. We exaggerate potential issues here by including a 100ms sleep, but if we needed to be able to perform these two calls without other commands getting in the way, we’d have issues. The following listing shows these same operations with a transaction.
Listing 3.14. What can happen with transactions during parallel execution
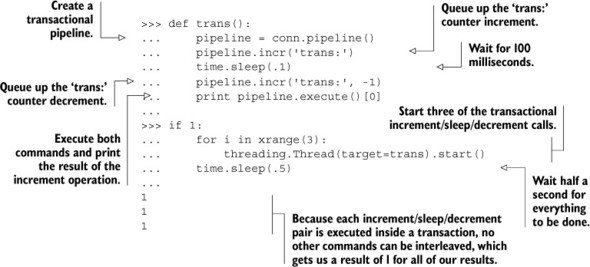
As you can see, by using a transaction, each thread is able to execute its entire sequence of commands without other threads interrupting it, despite the delay between the two calls. Again, this is because Redis waits to execute all of the provided commands between MULTI and EXEC until all of the commands have been received and followed by an EXEC.
There are both benefits and drawbacks to using transactions, which we’ll discuss further in section 4.4.
One of the primary purposes of MULTI/EXEC transactions is removing what are known as race conditions, which you saw exposed in listing 3.13. It turns out that the article_vote() function from chapter 1 has a race condition and a second related bug. The race condition can cause a memory leak, and the bug can cause a vote to not be counted correctly. The chances of either of them happening is very small, but can you spot and fix them? Hint: If you’re having difficulty finding the memory leak, check out section 6.2.5 while consulting the post_article() function.
A secondary purpose of using pipelines in Redis is to improve performance (we’ll talk more about this in sections 4.4–4.6). In particular, by reducing the number of round trips between Redis and our client that occur over a sequence of commands, we can significantly reduce the amount of time our client is waiting for a response. In the get_articles() function we defined in chapter 1, there will actually be 26 round trips between Redis and the client to fetch a full page of articles. This is a waste. Can you change get_articles() so that it only makes two round trips?
When writing data to Redis, sometimes the data is only going to be useful for a short period of time. We can manually delete this data after that time has elapsed, or we can have Redis automatically delete the data itself by using key expiration.
3.7.3. Expiring keys
When writing data into Redis, there may be a point at which data is no longer needed. We can remove the data explicitly with DEL, or if we want to remove an entire key after a specified timeout, we can use what’s known as expiration. When we say that a key has a time to live, or that it’ll expire at a given time, we mean that Redis will automatically delete the key when its expiration time has arrived.
Having keys that will expire after a certain amount of time can be useful to handle the cleanup of cached data. If you look through other chapters, you won’t see the use of key expiration in Redis often (except in sections 6.2, 7.1, and 7.2). This is mostly due to the types of structures that are used; few of the commands we use offer the ability to set the expiration time of a key automatically. And with containers (LISTs, SETs, HASHes, and ZSETs), we can only expire entire keys, not individual items (this is also why we use ZSETs with timestamps in a few places).
In this section, we’ll cover commands that are used to expire and delete keys from Redis automatically after a specified timeout, or at a specified time. After reading this section, you’ll be able to use expiration as a way of keeping Redis memory use low, and for cleaning up data you no longer need.
Table 3.13 shows the list of commands that we use to set and check the expiration times of keys in Redis.
Table 3.13. Commands for handling expiration in Redis
|
Command |
Example use and description |
|---|---|
| PERSIST | PERSIST key-name—Removes the expiration from a key |
| TTL | TTL key-name—Returns the amount of time remaining before a key will expire |
| EXPIRE | EXPIRE key-name seconds—Sets the key to expire in the given number of seconds |
| EXPIREAT | EXPIREAT key-name timestamp—Sets the expiration time as the given Unix timestamp |
| PTTL | PTTL key-name—Returns the number of milliseconds before the key will expire (available in Redis 2.6 and later) |
| PEXPIRE | PEXPIRE key-name milliseconds—Sets the key to expire in the given number of milliseconds (available in Redis 2.6 and later) |
| PEXPIREAT | PEXPIREAT key-name timestamp-milliseconds—Sets the expiration time to be the given Unix timestamp specified in milliseconds (available in Redis 2.6 and later) |
You can see a few examples of using expiration times on keys in the next listing.
Listing 3.15. A sample interaction showing the use of expiration-related commands in Redis

In sections 2.1, 2.2, and 2.5, we used a ZSET with timestamps to keep a listing of session IDs to clean up. By using this ZSET, we could optionally perform analytics over our items when we cleaned sessions out. But if we aren’t interested in analytics, we can instead get similar semantics with expiration, without needing a cleanup function. Can you update the update_token() and add_to_cart() functions to expire keys instead of using a “recent” ZSET and cleanup function?
3.8. Summary
In this chapter, we’ve looked at commands that typically should cover at least 95% of your command usage in Redis. We started with each of the different datatypes, and then discussed PUBLISH and SUBSCRIBE, followed by SORT, MULTI/EXEC transactions, and key expiration.
If there’s one thing that you should learn from this chapter, it’s that a wide variety of commands can be used to manipulate Redis structures in numerous ways. Although this chapter presents more than 70 of the most important commands, still more are listed and described at http://redis.io/commands.
If there’s a second thing you should take away from this chapter, it’s that I sometimes don’t offer the perfect answer to every problem. In revisiting a few of our examples from chapters 1 and 2 in the exercises (whose answers you can see in the downloadable source code), I’m giving you an opportunity to try your hand at taking our already pretty-good answers, and making them better overall, or making them suit your problems better.
One large group of commands that we didn’t cover in this chapter was configuration-related commands. In the next chapter, we get into configuring Redis to ensure your data stays healthy, and we give pointers on how to ensure that Redis performs well.