Chapter 2
Familiarizing Yourself with the Interface
In This Chapter
![]() Working with menus and toolbars
Working with menus and toolbars
![]() Distinguishing between classic and enhanced navigators
Distinguishing between classic and enhanced navigators
![]() Making changes to a navigator
Making changes to a navigator
![]() Working with Timeslips Today
Working with Timeslips Today
Whenever you tackle a new subject, you need to learn the lingo. And whenever you tackle a new software package, you need to learn its interface. In Sage Timeslips, you use a combination of menus, toolbars, and navigators to find your way around. In this chapter, I explain all these elements –— and the options associated with each one.
Using Menus and Toolbars
When you first open Sage Timeslips, you’re greeted by its main screen (see Figure 2-1), which includes an enhanced navigator. (More about navigators later in this chapter.)
Menus run across the top of the screen. Just below the menus, you see a toolbar with buttons you can click.
The Tip of the Day window appears by default. If you don’t want to see these tips, deselect the check box in the lower-left corner of the tip window. You can always open the Tip of the Day window manually by using the menu bar; just choose Help⇒Tip of the Day.

Figure 2-1: The main screen for Sage Timeslips.
In addition to the menus at the top of the screen, a shortcut menu relevant to what you’re doing at the time often appears when you right-click. For example, in Figure 2-2, you see the shortcut menu that appears when you right-click in the Time and Expense Slip List window.

Figure 2-2: When you right-click, Sage Timeslips often displays a shortcut menu.
Focus, for a moment, on the bottom of the Sage Timeslips window (see Figure 2-3).

Figure 2-3: The bottom of the Timeslips screen provides a wealth of information.
At the left edge, you’ll see the Guides button. Click this button to display a list of guided tutorials on a variety of subjects related to Timeslips functions. You click Guides also to open the sample database. In the Guides and Procedures window that appears, scroll to the bottom of the list, click Switch to Sample Database, and then click Play.
To switch back to your database, click the Guides button and, in the Guides and Procedures window, scroll to the bottom of the list, click Return to My Database, and click Play.
Immediately to the right of the Guides button is the complete pathname (the list of folders) to your Sage Timeslips database. You can use the pathname to confirm that you’re working in the correct database.
Beside the pathname, you see the date Timeslips will use if you opt to prepare bills. You can change the billing date by clicking the date link at the bottom of the Sage Timeslips screen, which displays the Bill and Aging Date dialog box shown in Figure 2-4.
If you’d like to see the Bill and Aging Date dialog box every time you open Timeslips, choose Setup⇒Preferences to display the Personal Preferences dialog box and then click the Startup and Exit link on the left. Then, click to select the first option.
I prefer to display the Bill and Aging Date dialog box only when I need it, by clicking the date link.
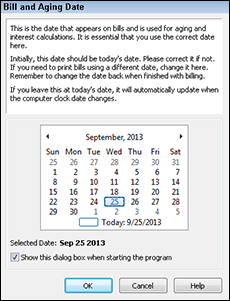
Figure 2-4: Use this dialog box to set the billing and aging date.
Finally, at the far right edge of the bottom of the screen, you see the name of the timekeeper logged into Timeslips. Each time you open a Timeslips database, Timeslips prompts you to select a timekeeper name from a list of available timekeepers so that program can use the personal preferences that timekeeper set.
Taking Advantage of Navigators
Navigators are tools you can use to, well, navigate through Sage Timeslips. Instead of using the menus, you can click navigator buttons to open various Timeslips windows. Navigators group commands with related functions, helping you identify how processes work together.
Navigators come in two formats: enhanced, as you’ve seen in the early figures in this chapter, and classic. The classic navigator format, shown in its docked form in Figure 2-5, is less complicated and is actually part of the enhanced navigator.

Figure 2-5: A classic navigator is docked vertically on the left.
Working with classic navigators
The classic navigators are simple and focus on guiding users through tasks. They’re useful if you don’t want to display additional information.
To use a navigator, you click a topic on the left side of the navigator to see command buttons associated with that topic, and then you click a button to make Timeslips perform that command. In Figure 2-6, I clicked the Prepare and Print Bills topic on the navigator. The flow diagram provides information about the most logical order in which to use the commands, but you don’t need to click the buttons in the order they appear. For example, you can click the Show Slips button to display the Time and Expense Slip List window.
 When you click a button on a navigator, you might notice in the upper-left corner a message flash indicating that an automated procedure is playing. Don’t be concerned about that flashing. When you click a button on a navigator, you’re running a small program (similar to a macro).
You might have noticed that I’ve referred to “classic navigators” in the plural — that’s because you can choose from different templates. In Figure 2-7, you see the Advanced template. You can also use the Basic or Tutorial template, and if you’re savvy, you can create a custom version of the classic navigator. If you’re not feeling savvy, you can hire a Sage Timeslips Certified Consultant to build the navigator for you.

Figure 2-6: A topic on a classic navigator.

Figure 2-7: The classic navigator using the Advanced template and undocked.
Visit http://na.sage.com/sage-timeslips/Support/ to find a Sage Timeslips Certified Consultant in your area.
In addition to docking the classic navigator along the left side of your screen, you can undock it to display it as a window, as shown in Figure 2-7. When you undock the classic navigator, you click a button along the left side of the navigator window to display the various navigator pages.
If you choose to display the navigator as a window (and not a docked toolbar), don’t worry if you accidentally close the navigator window by clicking the X in the upper-right corner. Just press Ctrl+F10 to redisplay it.
Exploring enhanced navigators
As you can see in Figure 2-8, an enhanced navigator provides the roadmap graphic used in classic navigators, along with additional information in data sections.
 To select a navigator to display, see the “Choosing a Navigator” section, later in this chapter.

Figure 2-8: Click a topic on the left to view its roadmap and additional data sections.
On each navigator topic, you’ll find up to three different data sections. The additional information in a data section is interactive; you can double-click any entry in any data section to open a related window.
As described later in this chapter, in the “Making simple changes to an enhanced navigator” section, you can make some easy changes to customize enhanced navigators by using the links in the lower-left corner of the screen.
You also can choose from various templates for an enhanced navigator. The default navigator that appears when you open Sage Timeslips for the first time (refer to Figure 2-1) is the enhanced navigator using the Office Manager template. If you’re not an office manager, you might prefer the Timekeeper template (refer to Figure 2-8).
In addition to these two templates for the enhanced navigator, there’s a template for the business owner and a tutorial template. You can also create a custom navigator if you’re knowledgeable or hire a Sage Timeslips Certified Consultant to do so.
The first page of every enhanced navigator that ships with Timeslips displays a special overview page called Timeslips Today. Read more about Timeslips Today later in this chapter.
Choosing a navigator
So, how do you switch among all these possibilities? Choose Setup⇒Preferences to display the Personal Preferences dialog box. Then, on the Startup and Exit page of the Interface section, make sure that the Navigator drop-down menu displays Yes, as shown in Figure 2-9.

Figure 2-9: First, make sure you’re displaying a navigator.
Next, click Navigators in the Interface section and choose the navigator you want to display (see Figure 2-10). Use the Template drop-down list to select the template for the navigator variation you select. And if you selected a classic mode navigator, open the Style drop-down list to specify whether you want to display the navigator docked or undocked.

Figure 2-10: Select the navigator format and template here.
Making simple changes to an enhanced navigator
You don’t need to be technically savvy to make a few changes to an enhanced navigator so that it’s friendlier to your needs. For example, you can reorder the topics and you can reorder or select the data sections that appear on the page for a given navigator topic. Suppose that you enter primarily expense slips instead of time slips; you might want to swap the order of these two topics on the enhanced navigator Timekeeper template. Or suppose that you don’t want a list of tasks appearing on the Enter Time tab of the enhanced navigator Timekeeper template; you’d prefer a list of the slips you’ve entered. Follow these steps:
- Display the enhanced navigator template whose topics you want to reorder.
You’ll find information on displaying a selected navigator in the “Choosing a Navigator” section. If you’re already displaying an enhanced navigator, you can click the Change Template link in the lower-left corner of the Sage Timeslips window (refer to Figure 2-8).
- Click the Change Settings link (refer to Figure2-8) in the lower-left corner of the Sage Timeslips window.
The Navigator Settings dialog box appears, as shown in Figure 2-11.
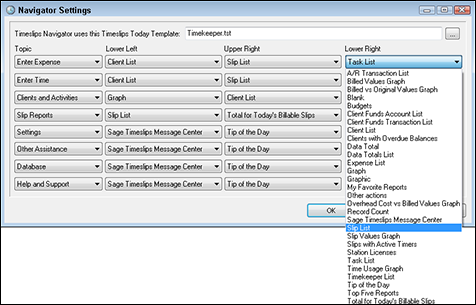
Figure 2-11: Use this window to reorder navigator topics and select data section information.
- To reorder navigator topics, click a Topic drop-down list and select a different topic.
In the example, I clicked the first topic and changed it from Enter Time to Enter Expense.
- Repeat Step 3 for another Topic drop-down list to avoid displaying a topic twice.
Again, in the example, I opened the second topic and changed it from Enter Expense to Enter Time.
- To change a data section, open the drop-down list in the data section you want to change (Lower Left, Upper Right, or Lower Right) and select a different data section.
In the example, I opened the first drop-down list in the Lower Right section and then selected Slip List (the data sections appear in alphabetical order).
- Click OK.
Timeslips updates the navigator with the new section you chose (see Figure 2-12).
By default, Sage Timeslips updates enhanced navigator information about every 15 minutes, but you can update at any time. Just right-click any data section and choose Update Section or Update All Sections from the shortcut menu that appears. Be aware that updating can be a lengthy process if you have a lot of data.
Now suppose that you like displaying your slips in the Slip List data section, but you don’t need to see the timekeeper column in that data section (because you know who you are). Click the small gear in the upper-right corner of the section to display the Slip List Section Options dialog box.
At the bottom of the dialog box shown in Figure 2-13, in the Columns section, deselect the Timekeeper option (or make any other changes you’d like) and then click OK. Timeslips updates the data section in the navigator.
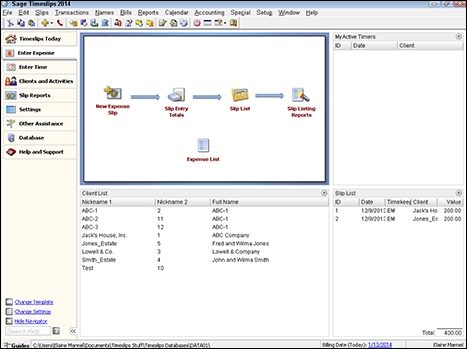
Figure 2-12: After you change a section, Timeslips updates the navigator topic.
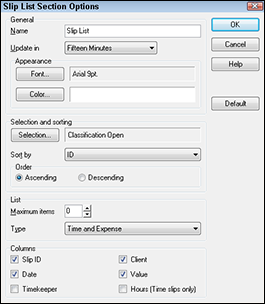
Figure 2-13: Customize the way Timeslips displays information in the data section.
Viewing Information by Using Timeslips Today
Timeslips Today is a special overview page that provides a shortcut method to view and print information and, in the case of lists, access information from almost any area of Sage Timeslips. If you opt not to use Timeslips Today, you need to use menus or navigators to open windows and print reports to get the information.
 Timeslips Today can present a large amount of information from many areas of the program. If your database is large, using Timeslips Today can slow program performance; consider using a classic navigator and then displaying Timeslips Today when you need it.
To access list information that appears in Timeslips Today, double-click the list entry. To print information that appears on the Timeslips Today page, right-click the page and choose Print Current Section or Print All Sections from the shortcut menu that appears.
By default, Timeslips Today appears as the first page of all enhanced navigators, as you can see Figure 2-14. But if you use a classic navigator, have no fear; you can still view Timeslips Today, as shown in Figure 2-15. You can also opt to display Timeslips Today each time you open Timeslips.

Figure 2-14: The first page of every enhanced navigator is Timeslips Today.

Figure 2-15: You can use a classic navigator and still display the Timeslips Today page.
To manually display Timeslips Today while using a classic navigator, choose Special⇒Sage Timeslips Today⇒Show Sage Timeslips Today. If you haven’t assigned a Timeslips Today template to the current timekeeper, you’ll see a window like the one shown in Figure 2-16.

Figure 2-16: This timekeeper doesn’t have an assigned Timeslips Today template.
Click the Open an Existing Template button and select a Timeslips Today template from the list that appears.
Assigning a Timeslips Today template
You can assign a Timeslips Today template to each timekeeper in your database. If you use a classic navigator, making such an assignment has a couple of advantages:
- You won’t see the Sage Timeslips Today Template Not Found window every time you want to use Timeslips Today.
- You can tell Timeslips to display Timeslips Today every time you open the program. If you don’t assign a template, Timeslips doesn’t know which template to display, even if you set your preferences to display it when opening the program.
To assign a Timeslips Today template, follow these steps:
- Click Special⇒Sage Timeslips Today⇒Assign Templates.
The Assign Sage Timeslips Today Templates dialog box appears, as shown in Figure 2-17.

Figure 2-17: Assign a Timeslips Today template to each timekeeper in your database.
- In the list on the right side of the dialog box, click a timekeeper.
- In the list on the left side of the dialog box, click the template you want to assign to that timekeeper.
- Click the right-pointing arrow between the two sides of the dialog box.
- Repeat Steps 2–4 for each timekeeper to whom you want to assign a Timeslips Today template.
- Click Done.
To use a classic navigator and display Timeslips Today each time you open Timeslips, do the following:
- Assign a template to each timekeeper.
- Choose Setup⇒Preferences. On the Interface: Startup and Exit page, select Yes in the Navigator list.
- Choose Setup⇒Preferences. Click Navigators on the left side of the dialog box. Then select the classic navigator template you want to use.
Refreshing Timeslips Today
To optimize program performance, Sage Timeslips refreshes data displayed in Timeslips Today periodically, usually every fifteen minutes.
If you want to manually refresh Timeslips Today information, right-click a Timeslips Today section and choose Update Section or Update All Sections.
Modifying Timeslips Today
You aren’t limited to displaying the Timeslips Today template that your enhanced navigator uses. You can use any enhanced navigator and also select any Timeslips Today template to display with it. Suppose you like the Office Manager enhanced navigator, but you prefer the Timekeeper Timeslips Today page. No problem. Follow these steps:
- Display the enhanced navigator you want to use.
Refer to the “Choosing a Navigator” section, earlier in this chapter.
- Click the Change Settings link in the lower-left corner of the Timeslips screen.
The Navigator Settings dialog box appears, as shown in Figure 2-18.
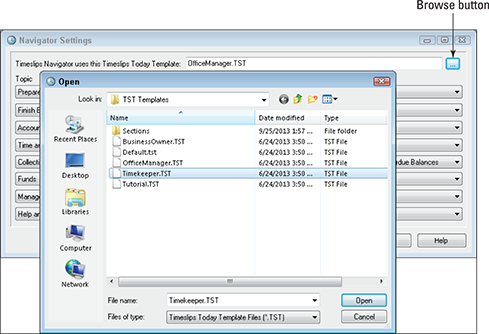
Figure 2-18: The first line in the Navigator Settings dialog box, which is in the background of this figure, displays the selected Timeslips Today template.
- In the Navigator Settings dialog box shown in the background of Figure2-18, click the Browse button.
- In the Open dialog box that appears, select the Timeslips Today template you want to use with your navigator and click Open.
The Navigator Settings dialog box reappears and displays the Timeslips Today template you chose in the text box at the top of the dialog box.
- Click OK.
Timeslips redisplays the main window using the enhanced navigator and the Timeslips Today template you selected.
You also can add sections to or remove sections from any Timeslips Today template. Suppose, for example, that you like the Timekeeper Timeslips Today template but you’d like it to display slips with Active Timers and you don’t want to see the Timeslips Message Center. Follow these steps to add or remove sections:
- Make sure that you’re displaying the Timeslips Today template you want to edit.
- Right-click anywhere on the Timeslips Today page and choose Edit.
Sage Timeslips displays a message explaining that it will open the Timeslips Today editor.
- Click Yes.
Sage Timeslips switches to the Edit Sage Timeslips Today window, where you can edit the current template (see Figure 2-19).
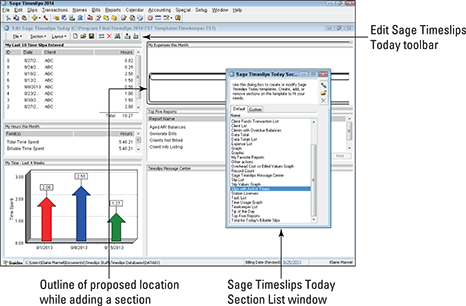
Figure 2-19: You can make changes to the current Timeslips Today template.
- Using the Sage Timeslips Today Section List window on the right, click the section you want to add and drag it onto the Timeslips Today template in the location where you want it to appear.
An outline marks the proposed location.
- Drop the section at the appropriate location to add it.
- To remove a section, right-click it and choose Delete from the shortcut menu that appears.
- To customize the behavior or appearance of any section, right-click it and choose Options from the shortcut menu that appears to make your selections.
If the Sage Timeslips Today Section List window disappears at any point and you need to redisplay it, choose Section⇒Show List from the Edit Sage Timeslips Today toolbar or press Ctrl+L.
- To save the changed template, click the File command on the Sage Timeslips Today menu bar at the top of the window. Then click Save to overwrite the original template or click Save As to assign a new name to the template.
I suggest that you preserve the original template by clicking Save As and giving the modified template a new name.
You can display multiple instances of the same section and customize them to display different information. For example, you can add two Client Funds Transaction List sections and display payments deposited in one section and payments withdrawn in the other. Or you can display transactions recorded last week in the one section and transactions recorded this week in the other.