
Chapter 9
Using the Slip Billing Arrangement
In This Chapter
![]() Understanding slip values and billed slip values
Understanding slip values and billed slip values
![]() Changing the billed value of an individual slip
Changing the billed value of an individual slip
![]() Changing billed values for tasks or expenses
Changing billed values for tasks or expenses
![]() Changing billed values for a client
Changing billed values for a client
Sage Timeslips uses the term billing arrangements to describe the agreement you make with your client concerning the way you charge the client for work you perform. The standard and most typical billing arrangement is the slip-based arrangement, which displays the details of the work you’ve performed by printing the slips you record in Timeslips on your client’s bill. Effectively, when you use the slip-based billing arrangement, you bill for the time you spend.
 Even though you might use the slip-based billing arrangement, you can control the amount of detail that Timeslips prints on the bill by using replacement slips. See this book’s website at www.dummies.com/extras/sagetimeslips for an article that describes how to use replacement slips.
 You can set up billing arrangements also for a variety of flat fees, in which you and your client agree upon a price, regardless of the time involved. And you can use the progress billing and interim billing arrangements, which work well for those who need to bill as a job progresses. You can read about flat fee arrangements in Chapter 10 and progress and interim billing in Chapter 11.
You establish a client’s billing arrangement in the Client Information window. The slip-based billing arrangement is the one used most often by companies that bill for time spent working for a client, so it’s no surprise that Timeslips sets up the slip-based billing arrangement as the default arrangement for each client you create. Therefore, you don’t need to take any specific action to use the slip-based billing arrangement. Throughout the book so far, the bills I’ve shown you use the slip-based billing arrangement.
“But,” you ask, “what if I want to change the value of the slip on a client’s bill? That is, I don’t want to use the value Timeslips calculates for the slip. Instead, I want to increase or decrease the slip’s value. How do I handle that?”
Good question. I spend the rest of this chapter answering that question because you can change the value of a slip in several ways.
You might be tempted to fiddle with the time spent on a slip to change its value, but that’s not a good approach because it misrepresents, both to you and to your client, how long a task took. You need accurate information about how long work takes so that you don't undercharge on future jobs.
You can use any and all methods I discuss in this chapter to change billed slip values before you approve a bill.
 When a bill has been approved, you can change the bill’s value by using an accounts receivable transaction. This type of transaction is described in Chapter 5.
The Difference between Slip Value and Billed Slip Value
Each slip you enter has two values: an original value and a billed value.
Timeslips calculates each slip’s original value using basic math. For time slips, Timeslips multiplies the time spent by the hourly rate or assigns a flat amount you might provide. For expense slips, Timeslips calculates the slip value by multiplying the quantity by the price.
A slip’s billed value might be the same as the slip’s original value, but it can also be different from the slip’s original value. A slip’s billed value differs from its original value if you assign a markup/markdown or an adjustment to the slip. You can view the billed value for any slip by clicking the Value field in the upper-right corner of the Slip Entry window to display the Slip Values dialog box (see Figure 9-1). Timeslips doesn’t actually assign the billed value to the slip until you approve the bill on which the slip appears.

Figure 9-1: Identifying a slip’s original value and billed value.
Using any flat fee or adjustment billing arrangement also affects a slip’s billed value. See Chapters 10 and 11 for details on flat fee arrangements. See the “Changing Billed Slip Values by Client” section, later in this chapter, for details on adjustment billing arrangements. See Chapter 12 for details on the method Timeslips uses to calculate billed values for slips.
Changing the Billed Value of Individual Slips
When you work with a slip-based billing arrangement and you want to change the calculated billed value of a slip, you use an adjustment or a markup or a markdown. In general:
- Use an adjustment if you want to change a slip’s billed value by a flat dollar amount.
- Use a markup or a markdown if you want to change a slip’s billed value by a percentage.
Be aware, though, that your choice has an effect on the way charges appear on your bill. Figure 9-2 shows a bill for one slip, entered by timekeeper XY, at the hourly rate of $100. The slip that XY entered was for one hour, so the slip’s value is $100. But XY entered a 10 percent markup on the slip, so Timeslips changed the hourly rate from $100 to $110. The math — rate times time spent — correctly calculates the slip’s billed value as $110.

Figure 9-2: A sample of a bill showing one $100 slip marked up by 10 percent.
On the other hand, Figure 9-3 shows a bill for one slip, also entered by timekeeper XY at the hourly rate of $100. On this slip, though, XY entered an adjustment of $10. Note three things:
- Timeslips did not change XY’s hourly rate.
- Timeslips did not print the individual slip’s amount; the Amount column heading and value appear for the total time charges and for the bill’s total.
- The total amount of the bill doesn’t appear to equal the slip’s rate times time spent.

Figure 9-3: A sample of a bill showing on $100 slip adjusted by $10.
Your biggest objection to the slip adjustment will probably be its apparent miscalculation of the bill. I understand; if you received the bill shown in Figure 9-3, you’d probably question it before paying it.
Because you’ll have the most use for a markup/markdown slip, the following steps focus on entering a markup or markdown. It’s possible, though, that you might negotiate a billing arrangement with a client who gives you a reason to use a slip adjustment. For example, you and your client might agree to discount certain work on a bill by a fixed dollar amount. In this case, you can enter a slip adjustment, and you do that the same way you enter a markup/markdown; you simply use the Adjustment field in the Slip Entry window. And yes, you can enter both a markup/markdown and an adjustment on the same slip.
If the apparent discrepancy between a timekeeper’s rate and the amount on the bill disturbs you, you can opt to remove the rate from the bill layout. See Chapter 8 for details on removing fields from bill layouts.
Follow these steps:
- Choose Slips⇒Time & Expense Slips.
The Time & Expense Slip window appears.
- To start a new slip, click the New (plus sign) button on the vertical toolbar. To edit an existing slip, double-click it.
The Slip Entry window appears.
- If you started a new slip, fill in the timekeeper, client, task or expense, and any other information appropriate for the slip, including dates and dollar amounts.
- Click the Markup, Adjustment, and Do Not Bill Time button to display the available options (see Figure9-4).
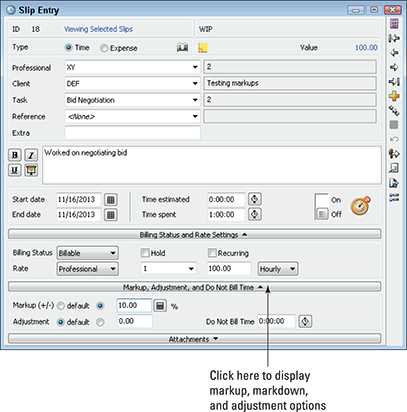
Figure 9-4: Use the Markup, Adjustment, and Do Not Bill Time section to enter markups, markdowns, and adjustments.
- To assign a percentage markup or markdown to the slip, enter the markup amount as a positive or negative number in the box beside the Markup (+/−) field.
If you don’t know the percentage by which you want to mark the slip up or down, click the calculator button beside the text box to display the Markup Calculator dialog box shown in Figure 9-5. Enter an amount in the Markup field or the Final Value field, and Timeslips calculates the markup percentage for you. When you click OK, Timeslips enters that markup percentage on the slip.
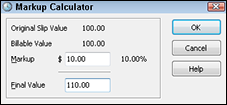
Figure 9-5: Calculate a markup percentage.
- Click the Save (disc) button on the vertical toolbar to save the change.
Changing Billed Values for a Task or an Expense
In addition to changing billed values for individual slips, you can set up tasks and expenses to automatically increase or decrease the original value of the slip. For example, suppose that you have a task called additional services for which you always want to charge 10 percent more than the slip value, regardless of the timekeeper or client assigned to the slip. You can establish a 10 percent markup for any slip to which you assign the additional services task. And you can follow these same steps to assign a markup or a markdown to an expense:
- Choose Names⇒Task Info.
To assign a markup or markdown to an expense, choose Names⇒Expense Info.
- Double-click the task or expense that you want to change.
- Click the Billing tab (see Figure 9-6).

Figure 9-6: Assigning a markup to a task.
- Open the Markup/Discount list and choose Yes.
- In the text box that appears, type the percent by which you want to alter the billed value of a slip to which the task is assigned.
To apply a discount to the task, type the percentage as a negative number.
- Click the Save (disc) button on the vertical toolbar running.
The first and third slips on the bill shown in Figure 9-7 apply each timekeeper’s regular hourly rate. The second and fourth slips, which use the additional services task, show each hourly rate as 10 percent higher.

Figure 9-7: A 10 percent markup assigned to the additional services task adjusts the hourly rate of the timekeeper assigned to the slip.
Changing Billed Slip Values by Client
In addition to changing the billed value of individual slips and changing billed values for particular tasks or expenses, you can change billed values for the slips of a particular client. Using the Arrangement 1 tab of the Client Information window, you can
- Adjust a client’s total charges
- Adjust a client’s charges for selected timekeepers
- Adjust a client’s charges for selected tasks or expenses
And you can change billed values for time slips independently from expense slips. That is, you can opt to change only time charges, only expense charges, or both.
To changed billed slip values by client, choose Names⇒Client Info to display the Client List window. Then double-click the client whose billing arrangement you want to change, and click the Arrangement 1 tab (see Figure 9-8).

Figure 9-8: Change a client’s billing arrangement.
You can use the two options at the top of the Billing Arrangements section to assign billing arrangements separately to time slips and expense slips, or you can opt to have one billing arrangement for both fees and costs. For this example, I assume that you want to set up your billing arrangements separately for fees and costs.
In each section — Fees: Charges for Time and Costs: Charges for Expenses — click the Bill Arrangement drop-down list and select an option to change billed values:
- Choose Adjust Total Charges to change the client’s bill total by a dollar amount or a percentage.
- Choose Adjust by Professional to change all charges on the client’s bill for a selected timekeeper by a dollar amount or a percentage.
The sample database I’m using calls timekeepers Professionals. Remember, you can use the General Settings dialog box (choose Setup⇒General) to customize the terminology that Timeslips uses to refer to the people whose time you track. I’ve seen clients call these people timekeepers, attorneys, users, professionals, and consultants, just to name a few terms. If you want to call them worker bees, go for it.
- Choose Adjust by Expense to change all expenses on the client’s bill by a dollar amount or a percentage.
Let’s walk through an example. Suppose that you opt to set the Fees: Charges for Time Bill Arrangement field to Adjust by Professional (or timekeeper or attorney or whatever). Click the Edit button beside the list to display the Adjust by Professional — Fees dialog box shown in Figure 9-9. This dialog box displays all adjustments you set up for the fee portion of your arrangement with your client — and yes, you can set up multiple adjustments.
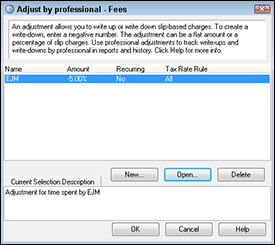
Figure 9-9: All adjustments you've established for your client’s fee billing arrangement.
Click the New button to display the Adjustment Entry dialog box shown in Figure 9-10.

Figure 9-10: Creating an adjustment for a client’s fees.
In the Name drop-down list, select the nickname for the timekeeper. In the Amount box, supply a dollar amount or a percentage for the adjustment. Use a positive number to increase the amount and a negative number to decrease the amount.
If you want to apply the adjustment to all future bills, select the Recurring check box. You can supply a description for the adjustment; the description does not appear on the client’s bill. Click OK to save the adjustment entry.
Figure 9-11 shows a sample of a client’s bill that uses the 5 percent discount adjustment for EJM’s time. Without the adjustment, the bill total would have been $500. With the adjustment, it’s $485. Note that, once again, if a client did the math, the bill wouldn’t add up. In this case, I’d recommend that you remove the Rate field from the bill layout to help avoid confusion.

Figure 9-11: A bill that reduces the fees charged by timekeeper EJM by 5 percent.
Summing Changes to Billed Slip Values
Be aware that you can use any and all methods described in this chapter to change the billed value of slips. The methods aren’t mutually exclusive. For example, on one bill you can combine
- An individual slip that includes a markup/markdown, an adjustment, or both
- A slip that Timeslips adjusts based on the task assigned to the slip
- An adjustment to the charges of one particular timekeeper
If you include multiple types of adjustments on a client’s bill, the changes are cumulative.