Chapter 6
Preparing and Sending Bills
In This Chapter
![]() Examining the bill cycle
Examining the bill cycle
![]() Reviewing and correcting billing information
Reviewing and correcting billing information
![]() Generating and approving bills
Generating and approving bills
![]() Reprinting bills
Reprinting bills
![]() Undoing approved bills
Undoing approved bills
![]() Sending bills
Sending bills
Entering slips and transactions, as described in Chapters 4 and 5, forms the foundation for the information that appears on client bills. In this chapter, we explore exactly how to prepare bills in Sage Timeslips.
But first, let’s talk a little terminology. Timeslips uses the terms bill and invoice pretty much interchangeably to refer to a document that displays new charges that your client hasn’t seen yet, similar to the bill you receive for a credit card. Any unpaid balance appears on a Timeslips bill as a single line, again, the same way it would appear on a credit card bill. You also can prepare statements in Timeslips, which lists single-line total amounts for invoices you’ve sent as well as payments the client has made and shows a total amount due. And good news here: The process of preparing statements is the same as the process of preparing bills. In this chapter, we focus on preparing bills — I mention any differences as we explore the process.
 Statements are useful when you’ve prepared several invoices that remain unpaid. If you bill a client several times during a month, preparing a month-end statement that recaps the month’s invoices might be useful for both you and the client.
Examining a Typical Billing Cycle
Most companies bill in cycles, typically once a month. During any given billing cycle, you and your employees enter slips to record work performed (see Chapter 4) and transactions that record money that has changed hands (see Chapter 5).
Most companies tend to prepare bills during the first week of a month for the preceding month, and they typically set an end date for the slips and transactions that appear on the bill — again, just like a credit card bill. For example, you might prepare bills for the month of September on October 3 or 4 and set an end date of September 30 for the slips and transactions that appear on the September bill.
Before you produce a bill, Timeslips considers the unbilled information to be in the ready stage of billing. As you produce the bills, they go through proof stage, revision stage, and approved. You follow the conceptual steps below to move billing information through the stages and produce a set of bills for your clients:
- Print reports to review the information that will appear on bills for accuracy and completeness.
- Print the bills and place them in the proof stage in Timeslips. You use proof stage to temporarily hold information appearing on the bills while you review them to determine whether you need to make changes you missed when you first reviewed billing data.
- Review the printed bills and divide them into two piles: a pile for the ones that are accurate, which you are ready to send to your clients, and a pile for the ones that contain mistakes, which need to be corrected.
- Put aside the ones that are correct and focus on the incorrect ones. To make minor corrections, such as fixing a typographical error, you move the bills to the revision stage and make the corrections. However, if you need to add slips or transactions to a bill, you clear it from the proof stage and add the missing data to Timeslips.
- After making corrections, you reprint the bills you corrected and once again place them in the proof stage.
- Repeat Steps 3–5 until you have a clean set of bills ready to send to your clients. At this point, all the bills are in the proof stage.
- Approve all the bills in proof stage and then send them to your clients.
Approving bills before you send them is very important because the approval process in Timeslips updates your client’s account balances and marks all information on the bill so that it won’t appear on any future bill. If you send bills without approving them, your client’s balances will be inaccurate, you won’t know which slips and transactions appeared on the bill, and you’ll have a real mess on your hands.
As you read through the rest of this chapter, you’ll find details on how to complete each of the conceptual steps just listed.
Reviewing Information and Making Corrections
You can review billing information using pre-bill worksheets that you print; most companies print worksheets and someone in authority reviews them and marks corrections on them. To make corrections, you use the window in which the mistake originated. That is, if you need to correct a slip, you use the Slip Entry window (see Chapter 4). Or, if you need to correct an accounts receivable transaction, you use the Accounts Receivable Entry window (see Chapter 5).
In this section, I show you how to print pre-bill worksheets. Then you review the tools you can use to make corrections.
 Before you start the billing process, check the Billing Date in the lower-right corner of the main Timeslips window. If your billing date will differ from today’s date, choose Bills⇒Revise Bill Date and use the Bill and Aging Date dialog box to set the billing date.
Printing pre-bill worksheets
If you bill a lot of clients at one time, you’ll probably find it easiest to review pre-bill worksheets that detail the information that will appear on a bill when you print it. To print pre-bill worksheets, choose Reports⇒Billing. In the Report List window, shown in Figure 6-1, click Pre-bill Worksheet. Below the list of reports, supply an ending date for the information you want to include on the bill.

Figure 6-1: Setting up to print pre-bill worksheets.
I suggest that you supply an ending date without a starting date; that way, if employees enter slips for a prior month without your knowledge, you’ll see them on the worksheets. You also can control the earliest date an employee can use on slips from the General Settings dialog box on the Slips, A/R, & Funds tab, but you need to update this date after each billing cycle. Not supplying a starting date for pre-bill worksheets offers an additional safeguard to avoid missing time entered outside the billing cycle.
You can filter this report to print worksheets for only those clients you select. For details on setting up filters and sort orders for reports, see Chapter 13.In addition, you can produce the Clients Not Billed report, found in the same list where you select the Pre-bill Worksheet report. The name is somewhat of a misnomer because it shows you the last date you billed each client, along with dollar amounts for billed but unpaid balances and for unbilled work.
Next, select a device for the report. I suggest that you first print to Display so that you can view the report on-screen and make sure you have set up the report to include the information you want. In addition, while viewing the report on-screen, you again have the option to print the report to paper, as you can see in Figure 6-2. Then click the Print button to display the report.
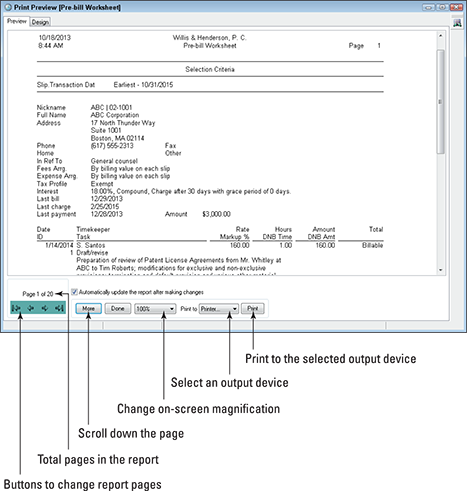
Figure 6-2: A sample pre-bill worksheet report.
The Print Preview window is interactive. As you slide your mouse cursor over report information, Timeslips highlights information in pale yellow and purple. Click an element highlighted in purple, and Timeslips opens that element in its associated window. So you can, for example, edit a slip’s description by clicking it in the Print Preview window of the Pre-bill Worksheet report.
If you prefer, print the report to a printer. When you finish with the on-screen report, click the Done button to close the window.
Making corrections
You can use the list windows described in Chapters 4 and 5 to find slips and transactions and make corrections to them. But you might find it easier to display bills on-screen and then click the information that needs to be corrected to directly open the window where you can make the correction.
You can use Firm Assistant or Billing Assistant to review information. From both windows, you can print bills to your screen and then click an element that needs to be corrected to open it in the window where it was created.
Using Firm Assistant
To open the Firm Assistant window, choose Bills⇒Firm Assistant. Supply an ending date for the information you want to include on the bill, and then click the Update button in the middle of the window to display the Firm Assistant window shown in Figure 6-3.
After you click the Update button, Timeslips replaces it with information, so you won’t see the Update button again until you make a change to the selection criteria.

Figure 6-3: The Firm Assistant window.
On the Details tab, Timeslips displays three lines for each client, showing billable and unbillable information, previous balances, new charges, and more. On the Summary tab, Timeslips displays total dollars for all clients in a variety of categories such as fees, costs, and taxes.
You can double-click in the various columns for a client to navigate to the window that shows the supporting information for the displayed value. But I feel that the real power of editing in Firm Assistant comes into play when you click a client in the Firm Assistant window and then click the Generate Bill button (second button from the top on the vertical toolbar on the right). From the Report Entry: Generate Bills window that appears, check the settings in the lower-right corner to ensure that the Print To list shows that you are printing to Display. Then click the Print button, and the bill for the selected client appears on-screen, as shown in Figure 6-4.
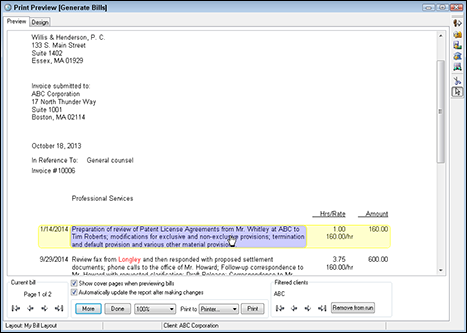
Figure 6-4: A sample bill generated from the Firm Assistant window.
As you mouse over an entry on the bill, you can click to open that entry in the window in which the entry was created and make changes to it. When you save your changes, the Print Preview (Generate Bills) window reappears and displays the updated entry.
When you finish editing one client, click Done and move on to the next client.
Don’t worry about printing just yet. I talk about what happens when you print and how you should proceed in the “Generating bills” section, later in this chapter.
Using Billing Assistant
You also can use Billing Assistant to review and change information. From the Billing Assistant window, you can view one client at a time or all clients Timeslips thinks you should bill because the database contains information for those clients entered since the last time you produced bills.
To open the Billing Assistant window, choose Bills⇒Billing Assistant. The first time you open Billing Assistant, Timeslips prompts you to select a default view for the window. You can view one client at a time (the Single Client option) or you can view a list of clients. Timeslips uses a rule you establish to identify and display the clients that appear in the list. I show you both views, but I start by showing you the single client view (see Figure 6-5).

Figure 6-5: The Billing Assistant single client view.
To view the details behind the Bill Overview information, click the Go to Billing Details button at the top of the Billing Assistant window. The Billing Details window shown in Figure 6-6 appears.

Figure 6-6: Billing details in the Billing Assistant window.
Click the Back to Overview button, at the top of the Billing Assistant window, to redisplay the overview information shown previously in Figure 6-5.
To view a list of clients based on a rule you establish, click the View a List of Clients link in the lower-right corner. Timeslips displays a list of your clients (see Figure 6-7); the current rule that Timeslips is using to determine the clients to display appears just above the list. To change the rule — and potentially display a different list of clients — click the Change Billing Rule button.

Figure 6-7: The Billing Assistant list view.
To preview the bill on-screen for the selected client from either list view or single client view, make sure the following settings appear in the lower-left corner of the window:
- Select the Generate Bills option (if you select Pre-Bill Worksheet, Timeslips displays the Pre-bill Worksheet report for the client).
- Select Display from the list to the right of the Generate Bills and Pre-Bill Worksheet options.
The Generate Bills button (not the option) and the Pre-Bill Worksheet button (again, not the option) give you control over filtering and sorting functionality, as described in this chapter in the “Generating Bills” and “Printing Pre-Bill Worksheets” sections. If you use the options (not the buttons), Timeslips uses default settings (all slips, sorted by Slip Date and Slip Transaction ID Number) to sort and filter information that appears on the bill. Typically, you use the buttons only when you're billing or printing worksheets for multiple clients.
Click the Print button, and Timeslips displays the same Print Preview (Generate Bills) window shown previously in Figure 6-4. You make changes to an entry on the bill by clicking it to display that entry in the window in which the entry was created. after you finish making changes in the originating window, clicking Save on the toolbar redisplays the bill in the Print Preview (Generate Bills) window, along with the updated entry.
When you finish editing one client, click Done and move on to the next client by selecting that client using the controls at the top of the Billing Assistant window.
Generating and Approving Bills
After editing, you’re ready to produce bills to send to your clients. Of course, you’ll want to review the bills before you send them out, so it’s time to print the bills to paper and review them.
You can print your bills to .PDF files. During the review and editing process, this approach might not be practical, but when you’ve fixed all mistakes, you might want to print the final bills to .PDF files. See Chapter 13 for details on printing bills to .PDF files.
Before you print bills, you might want to consider the following issues:
- If you want to use timekeeper titles to organize and summarize information on bills, use the Employee Titles page of the General Settings dialog box to establish the job titles you use in your company. (Choose Setup⇒General and then click Employee Titles on the left side of the dialog box.) Then, in the Timekeeper Information window, select each timekeeper’s title from the Title list.
- Set up any messages you want to include on client bills (see Chapter 7).
 If you intend to link Timeslips with a general ledger, set up the link. Visit www.dummies.com/extras/sagetimeslips and see the bonus chapter for information on linking Timeslips to a general ledger.
- Establish your bill’s appearance by designing or modifying the bill layout (see Chapters 7 and 8).
- Timeslips supports several add-on packages you can use to prepare bills for the electronic delivery typically required by insurance companies. You need to set up client information in Timeslips according to the requirements of your add-on before you prepare bills.
- If you intend to e-mail bills, make sure you’ve set up your clients properly, as described in the “E-Mailing Bills” section, later in this chapter.
- If you want to be able to select paper bill clients separately from your e-mail bill clients, you can set up a custom field that you can use as a filter to select clients as you prepare bills. Call it something like Billing Method and make it a list-type custom field with three choices: Postal Service, E-mail, and Other (for the bills that go one way sometimes and the other way at other times or for clients you don’t bill regularly). See Chapter 16 for details on creating a custom field, Chapter 13 for details on setting up filters, and the “Sending Bills by U.S. Postal Service” and “E-Mailing Bills” sections, later in this chapter, for details on mailing and e-mailing bills.
When you print bills to paper (or any location other than your screen), Timeslips offers you the option of placing the bills in the proof stage so that you can review them, placing them in the revision stage so that you can edit them, approving some or all bills that printed, or doing nothing. The stage you choose depends on where you are in the process of producing the bills.
I generally recommend to my clients that they put bills in the proof stage. Read on to learn why.
Timeslips refers to the process of producing bills as generating bills. You can generate bills in three ways, by using
- The Generate Bills command
- Billing Assistant
- Firm Assistant
In the preceding section, you saw how you could use Billing Assistant and Firm Assistant to produce bills one client at a time. If you want to generate a bill from the one on-screen, you click the Print To list button and select a printer or file. Then follow the process described in this section, where I show you how to use the Generate Bills command to produce bills for a batch of clients and approve the bills so that you can safely send them to your clients.
Generating bills
The Generate Bills command is available while you're using Billing Assistant or Firm Assistant and also on the menus. If you use the command from the Billing Assistant or Firm Assistant windows, Timeslips assumes that you want to produce a bill for only one client. If you use the Generate Bills command from the menus, Timeslips assumes that you want to produce bills for all clients in the database. In the steps that follow, I use the default assumption to generate bills for all clients. You can limit the clients you bill using filters and sort information on bills; see Chapter 13 for details.
Don’t forget to check the Billing Date in the lower-right corner of the main Timeslips window. To change the billing date, choose Bills⇒Revise Bill Date, and make your changes in the Bill and Aging Date dialog box that appears.
To generate bills, follow these steps:
- Choose Bills⇒Generate Bills to display the Report Entry: Generate Bills window.
From this window, you can select bills to print based on a variety of filters, and you can sort and subtotal information on the bills. For example, you can select individual clients or select clients by using a custom field, and you can sort and subtotal information on the bill by reference. But, for this example, I accept the default settings and print all bills for all clients.
- In the list on the left, double-click Slip Transaction Date.
The Filter for Slip Transaction Date dialog box appears, listing two calendars. You can use the calendar on the left to select a starting date for slips that should appear on the bill, but I recommend that you ignore the calendar on the left.
- Using the calendar on the right, click the ending date for slips that should appear on the bill.
- Click OK to redisplay the Report Entry: Generate Bills window.
- In the lower-right corner, open the Print To list and select a printing option, typically a printer.
- Click the Print button.
Timeslips prints the bills and displays the dialog box shown in Figure 6-8.

Figure 6-8: Select an option for handling the bills you just printed.
- Place the bills in the proof stage so that you can review them.
For a better understanding of the various bill stages, see the “Understanding bill stages” sidebar. And see the “Options for generating bills” sidebar for details on handling the dialog box that appears, asking if you want to print labels or envelopes.
- Review the printed bills and divide them into two piles:
- Ones that are accurate, which are ready to be sent to your clients
- Ones that contain mistakes, which you need to correct (it happens; you miss things)
Put aside the pile that contains the accurate bills; later, you'll approve these bills and send them to your client. Remember, as long as the bills remain in the proof stage, you can enter slips and transactions without affecting the bill but you can’t generate a new bill for the client.
To generate statements, you use the same steps as the preceding ones, except you choose Bills⇒Generate Statements in Step 1.
Managing the proof and revision stages
Take the pile of bills that still contain mistakes and correct them, using one of the techniques described previously in this chapter. As soon as you attempt to change any slip or transaction on the bill, the window shown in Figure 6-9 appears. You use this window to move the bill from the proof to the revision stage. Just click the Revision button.

Figure 6-9: Use this window to take a bill out of the proof stage.
If you type too fast and don’t see the window, don’t worry; Timeslips automatically moves the bill to the revision stage for you.
If you need to make changes that affect the slips and transactions that appear on the bill, moving it to the revision stage won’t help you; instead, you should clear the bill from proof stage by clicking the Clear button. When you clear a bill from proof stage, Timeslips treats the slips and transactions on the bill as if they had never appeared on a bill; you’re free to add new slips and transactions to the bill or delete slips and transactions from the bill.
After you make corrections, use the steps in the “Generating and Approving Bills” section to reprint the bills you corrected. You should reselect the bill’s ending date. In addition, if you made any other custom selections, such as selecting by custom field or sorting by reference, you should make those selections again. But you don’t need to select only those clients whose bills you corrected; Timeslips won’t print another bill for any client in the proof stage, so only bills in the revision stage or ones you cleared from the proof stage will print.
Approving bills
You repeat the steps in the “Generating and Approving Bills” section until you have no additional corrections to make. At this point, all bills should be in the proof stage and ready to send to clients. Approving bills could be considered the most important part of the billing process because Timeslips marks all the information on the bills so that it won’t appear on future bills — most clients react badly to being billed twice for the same work — and updates the client’s outstanding balance.
If you intend to mail bills to clients and you didn’t previously print envelopes or mailing labels, print them now, before approving bills, using either the Mailing Labels or the Envelopes reports on the Client tab of the Report List window. These reports include a filter you can use to select clients with bills currently in the proof stage. See “Sending Bills by U.S. Postal Service,” later in this chapter, for details.
To approve the bills before you send them, follow these steps:
- Choose Bills⇒Approve or Clear Bills.
The Bill Stages window shown in Figure 6-10 appears.

Figure 6-10: Use this window to approve bills.
- Right-click any client in the list, and click All from the shortcut menu that appears.
Timeslips selects all the client bills listed on the Proof tab of the Bill Stages window.
- Click the Approve button.
Timeslips displays a confirming message, asking if you want to approve bills for the selected clients.
- Click Yes.
Timeslips approves the bills for the selected clients and removes all entries that appeared on the Proof tab of the Bill Stages window. Timeslips also creates an invoice transaction that represents the bill; you can see the transaction in the Accounts Receivable Transaction List window.
- Click the Done button.
If you approved bills for clients set up to receive bills by e-mail, see the “E-Mailing Bills” section, later in the chapter, to learn how to proceed at this point.
After you approve bills, you might want to print some reports, such as the Aged A/R Balances report. And if you use Timeslips with an accounting package, you might want to print the G/L Transfer Register report and update your accounting package.
You can read more about using Timeslips with an accounting package in the bonus chapter, “Linking to a General Ledger,” at www.dummies.com/extras/sagetimeslips.
Reprinting a Bill
After you approve a bill, Timeslips marks all the slips and transactions on the invoice as billed so that those slips and transactions won’t appear on any future bill to your client. But for those times when you need another copy of the bill, you can reprint it.
Timeslips creates an image of each bill you approve and saves the last 13 images (for many companies, 13 images is one year and one month’s worth of bills). You can control the number of images that Timeslips saves. Choose Setup⇒General, and click the Bills tab on the left side of the dialog box. Then set the limit in the Bill Images section.
Choose Bills⇒Reprint Bills to display the Reprint Bills window. Using the View By list, you can limit the bills appearing in the window to those of a specific client.
Place a check mark in the left column beside the bill (or bills) you want to reprint. Then, in the lower-right corner, use the Print To list to select a printer or file type, and click the Print button. After Timeslips reprints the selected bill(s), click the Done button to close the window.
You also can use Billing Assistant to reprint bills for an individual client. Open Billing Assistant and click the Go to Billing Details button. Select the client you want to review. Then in the left column, click Advanced and then click Billing History.
Attorneys might need to present a history bill to the court — a bill that shows all slips and transactions that appeared on all bills for a client. To print the History Bill report, begin by choosing Reports⇒Billing. For details on printing reports, see Chapter 13.
Undoing an Approved Bill
Even after exercising great care to ensure that a bill is accurate when you approve it, you can make a mistake. In this case, you might be able to undo the approved bill, correct it, and then print and approve it again.
You can undo only the last bill you approved for a client. And you might not be able to undo that bill if you’ve taken certain actions in Timeslips since approving the bill, such as editing or deleting a slip that appeared on the bill or changing the client’s classification to inactive or closed. For a complete list of actions that negate your ability to undo a bill, search Timeslips Help (choose Help⇒Online User’s Guide) for preventing undo of bill approval. If you are unable to undo a bill, enter a credit transaction to adjust the client’s balance.
Choose Bills⇒Undo Approved Bills to display the Undoable tab of the Bill Stages dialog box window. Place a check mark beside the bills you want to undo and then click Undo. Timeslips prompts you to place the data in the revision stage or clear the bill.
Sending Bills by U.S. Postal Service
To use the U.S. Postal Service to send bills you printed to paper, you can let Timeslips print mailing labels or envelopes. Timeslips prompts you to print envelopes or labels as you print bills, but most of my clients don’t want to print envelopes or labels until they're ready to approve their bills. So they turn off the prompt while printing bills, and print labels or envelopes just before they are ready to approve their bills — when the bills are in the proof stage.
As a third option, if you design your bill layout properly, you can fold the bill so that the client’s address appears in the window of a window envelope, as shown in Figure 6-11. See Chapters 7 and 8 for details on designing bill layouts.
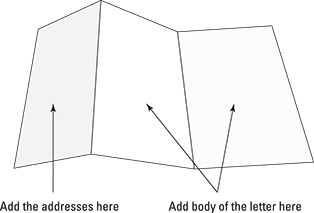
Figure 6-11: Fold your bill in thirds so that you can place it in a window envelope.
You print labels and envelopes in the same way; simply choose the appropriate report for your situation. In the following steps, I assume that you are printing before approving, and that the bills for which you want envelopes or labels are in the proof stage:
- Choose Reports⇒Client.
- From the Report List window, double-click either Envelopes or Mailing Labels.
The Report Entry: Client Labels window appears.
- On the left, double-click Bill Stage.
The Filter for Bill Stage dialog box appears, as shown in the center of Figure 6-12.
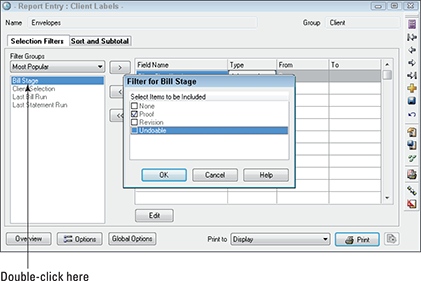
Figure 6-12: Setting up to print envelopes for bills in the proof stage.
- Remove the check marks from all the boxes except Proof.
- Click OK to save the filter.
The Report Entry: Client Labels window reappears.
- In the Print To list, select an output device.
- Click the Print button to print the labels or envelopes for bills in the proof stage.
E-Mailing Bills
If you use a MAPI-compliant e-mail program such as Microsoft Outlook, Mozilla Thunderbird, or Eudora, you can let Timeslips e-mail bills to your clients.
When you send bills via e-mail, you use the same procedure to generate your bills outlined previously in this chapter, but you should set up your clients to receive bills via e-mail before you generate their bills. Be aware that
- You can mail paper bills to some clients and e-mail bills to other clients.
- You can print bills to paper before e-mailing them.
When you approve bills for clients set up for e-mail bills, Timeslips automatically creates .PDF files to e-mail and attaches the .PDF version of the bills to e-mail messages that Timeslips then places in your e-mail program’s outgoing mail box.
To send the bills to your clients, you must open your e-mail program and send mail. Timeslips doesn’t control your e-mail program and doesn't send e-mail unless you take action to indicate that you actually want to send e-mail.
Setting up the e-mail message template
Using e-mail message templates, you can control the subject line and the text in the body of the message that Timeslips sends with e-mail bills.
To view and change the default text, choose Setup⇒Email Templates to display the Email Template List window. Then click the Open button and edit the message subject line as well as the text that will appear in the body of the message Timeslips generates.
Click OK when you finish editing, and then click the Done button in the Email Template List window.
Setting up clients
To send bills by e-mail, you need to set up e-mail options for each client to whom you want to e-mail bills and statements. Follow these steps:
- Choose Names⇒Client Info and double-click a client.
The Client Information window appears.
- On the General tab, supply the client’s e-mail address, along with any additional e-mail CC addresses that should also receive the bill.
- On the Arrangement 2 tab, select the options at the bottom of the page.
These options are Send Bills Via Email and Send Statements Via Email.
- On the Layout tab, open the Email Template list and select an e-mail template.
Timeslips will use this template when creating the messages it sends.
Bill options
Before printing bills, click the Options button in the Report Entry: Generate Bills window or the Options link in the Billing Assistant window to display the Generate Bills Report Options dialog box shown previously in this chapter in the “Options for generating bills” sidebar. Select the following check boxes:
- The Review Email Entries Before Printing check box
- The Send Bills Via Email check box
- The Clients Receiving Emails Print to Printer check box if you want to be able to print a list of clients to whom Timeslips sends e-mails
- The Include Attachments with Email check box if your bills include slips with attachments
After you approve bills, Timeslips displays the window shown in Figure 6-13 so that you can review the messages that Timeslips will create. You can remove check marks beside any messages you don’t want to send.

Figure 6-13: If you set up clients to receive bills by e-mail, this dialog box appears after you approve the bills.
Click OK, and Timeslips creates the e-mail messages, places them in your e-mail program’s outbox, and displays a dialog box that tells you how many messages it created. You can click the View Log button in that dialog box to see a list of the e-mail addresses, attachments, and associated invoice numbers.
Switch to your e-mail program, and you’ll find the messages in your outbox (see Figure 6-14).
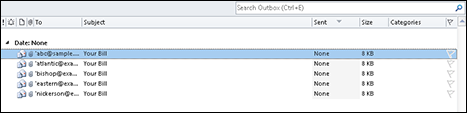
Figure 6-14: Bills attached to e-mail messages Timeslips creates.