
Chapter 5
Managing the Money
In This Chapter
![]() Working with accounts receivable and funds transactions
Working with accounts receivable and funds transactions
![]() Setting up multiple funds accounts and bank accounts
Setting up multiple funds accounts and bank accounts
![]() Using a bank deposit slip
Using a bank deposit slip
![]() Reviewing your transactions
Reviewing your transactions
Sage Timeslips uses transactions to manage client balances. Accounts receivable transactions track the money clients owe you because you sent a bill. Client funds transactions track the money given to you to hold for your client in advance of work you perform. Attorneys call these types of funds trust funds or escrow funds; other types of businesses call these types of funds retainer funds.
 I’ve oversimplified the definition of trust funds. In the legal profession, these types of funds have a specific definition. The American Bar Association has rules that document how an attorney must handle trust funds, and they can audit an attorney’s use of trust funds at any time to ensure that the attorney is following the rules. From the perspective of using Timeslips, however, the important point is not the definition of trust funds but rather that you use client funds transactions to manage trust funds.
You might be wondering whether you can enter transactions without having created bills to which you can apply them. Yes, you can. As you’ll see in this chapter, if you receive money before you send a bill, you can either apply it to a future invoice or place the money in a trust or retainer account.
Working with Accounts Receivable Transactions
Accounts receivable transactions increase or decrease the amount that a client owes you for services rendered. When you enter an accounts receivable transaction, Timeslips automatically enters a description for the transaction. Transactions and their descriptions appear in a separate section of the client’s bill, usually toward the end.
Regardless of the type of accounts receivable transaction you record, you apply it to either an outstanding invoice or to a future invoice as you enter the transaction. Applying accounts receivable transactions is important to maintaining accurate outstanding balances for your clients.
The transactions you typically enter appear in Table 5-1. The “Not your everyday transactions” sidebar lists information on transactions you’ll rarely, if ever, enter.
Table 5-1 Types of Accounts Receivable Transactions
|
Transaction Type |
Purpose |
Effect on the Outstanding Balance |
|
Payment |
Use this transaction to record receiving money from a client to pay existing charges for services rendered. If the payment amount exceeds the client's balance, Timeslips can hold the excess money to offset future bills or you can automatically transfer the excess money to the client’s funds account. |
Decrease |
|
Credit |
Use this transaction to reduce a client’s accounts receivable balance to reflect an incorrectly billed charge. You apply credits to specific invoices or to a future invoice. |
Decrease |
|
Write-off |
Use this transaction when you no longer expect payment on an outstanding balance. |
Decrease |
|
Refund |
Use this transaction when you intend to refund money to your client, typically because the client overpaid you. |
Increase |
|
Reverse payment |
Use this transaction to reverse the effects of a payment you previously recorded; you usually use this transaction when a client’s check is returned by the bank. |
Increase |
|
Discount |
Use this transaction to discount an invoice. |
Decrease |
Accounts receivable transactions either increase or decrease a client’s accounts receivable balance:
- Payments, credits, write-offs, and discounts decrease a client’s outstanding balance.
- Refunds and reverse payments increase a client’s outstanding balance.
Entering accounts receivable transactions
You enter all accounts receivable transactions in pretty much the same way. In this section, I show you how to enter a payment transaction because that’s the transaction you'll enter most often. (I assume that you received a check.) In the “Notes on accounts receivable transactions” section, which immediately follows this one, you’ll find extra information for some transaction types.
 If your client has available money in a funds account, Timeslips can automatically generate transactions that reduce the client’s funds account balance and accounts receivable balance when you prepare a bill for the client, automatically paying yourself for services rendered. You read more about this feature in the “Handling Client Funds Transactions” section, later in this chapter.
To enter an accounts receivable transaction, follow these steps:
- Choose Transactions⇒Accounts Receivable to display the Accounts Receivable List window.
I review this window at the end of the chapter.
- Click the New (plus sign) button on the vertical toolbar on the right.
The Accounts Receivable Entry window appears, as shown in Figure 5-1.

Figure 5-1: The Accounts Receivable Entry window.
- Near the top of the window, do the following:
- In the Type drop-down list, select the transaction type.
- In the drop-down list next to the Type list, select a payment method.
- If you select Check as the payment method, supply a check number.
- Select the client for whom you are recording the payment.
You can click the Find Client by Invoice (magnifying glass) button beside the client’s second nickname to supply an invoice number; Timeslips then finds the client based on the invoice number.
- Enter the date of the transaction.
If you type T, Timeslips will enter today’s date.
- (Optional) Select the Deposit Slip check box to create a list of deposits.
Using a deposit slip helps you create a report that groups multiple payments to make calculating a total bank deposit easier. Read more about bank deposit slips later in this chapter in the “Using Bank Deposit Slips” section.
- Provide an amount for the transaction.
You can have Timeslips automatically fill in the client’s current accounts receivable as the transaction amount; if the client makes a payment other than the current accounts receivable balance, you can type over the amount. To enable this setting, choose Setup⇒General, click the Slips, A/R, and Funds tab in the Transactions section, and then select the Use Current A/R Balance for New Payments, Credits and Write Offs check box.
- (Optional) In the large text box, edit the default description.
This description will appear on the client’s next bill.
- At the bottom of the window, click the Apply One button. Or if more than one outstanding invoice appears, click the Apply All button.
By default, Timeslips applies payments to the oldest open invoice first, as dictated by generally accepted accounting practices.
Timeslips follows generally accepted accounting practices and applies payments first to outstanding interest due, then to outstanding costs, and finally to outstanding fees. You can change this setting on the Accounts Receivable tab of the Client Information window. - If the client pays more than the balance due, do one of the following:
- Select the Remaining Amount Applies to Future Invoice box to apply the overpayment to the client’s next invoice or if you intend to refund the overpayment amount to the client.
- Click the Transfer Money button to transfer the overpayment amount either to the client’s funds account or, if you use the Client Project feature (described in Chapter 3), to an open invoice on a different project for this client.
- Click the Save button on the window’s toolbar to save the transaction.
Notes on accounts receivable transactions
In this section, you find some extra information that pertains to specific types of accounts receivable transactions.
Handling credits, write-offs, and refunds
You enter credits in the same way that you enter payments, except you don’t supply a payment method.
You enter write-offs the same way you enter payments and credits, except that you must apply the entire amount of the write-off. You can’t apply any of the write-off amount to future invoices, and you can’t transfer any of the write-off amount to a client funds account or another project for the client. When you select the write-off transaction, these options are not available.
To enter a refund, you must have previously recorded a payment that you applied to a future invoice. As you enter a refund transaction, Timeslips lists any payments with unapplied amounts. You select one of the payments and apply either a full or a partial refund to that payment.
Handling overpayments
Suppose that a client overpays and you want to transfer the payment to the client’s funds account. As you record the payment transaction, enter the full amount of the payment, including the overpayment amount. Then apply the payment. The overpayment amount appears in the Not Yet Applied field of the Accounts Receivable Entry window. Click the Transfer Money button at the bottom of the window to display the Transfer Money window shown in Figure 5-2.
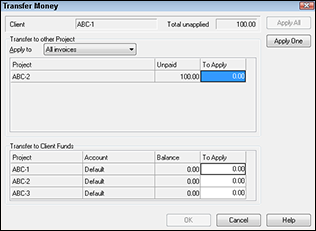
Figure 5-2: Distribute an overpayment.
To transfer the overpayment amount to an outstanding invoice for another project, select the amount in the top To Apply column for that invoice and then click the Apply One or Apply All button.
To transfer the overpayment to the client’s funds account, select the amount in the bottom To Apply column for the funds account and then click the Apply One or Apply All button.
Click OK to save the transaction.
Offering a discount
Using the discount transaction, you can apply a discount to an invoice in the same way that you apply a payment to a transaction. You might, for example, discount an invoice because the client paid early. Many companies offer discounts for early payment to encourage clients to pay in a timely manner.
You can offer early payment discount incentives also on a regular basis, without manually entering discount transactions. For example, you might offer your client a 2 percent discount if the bill is paid within 10 days. Any discount you offer appears on the client’s bill, as shown in Figure 5-3.
To set up a recurring discount for each bill you approve for a client, open that client’s Client Information window and click the Accounts Receivable tab. In the Discounts section, shown in Figure 5-4, specify the percentage by which you want to discount each bill, the number of days in which the bill must be paid to take advantage of the discount, and whether the discount applies to fees; costs; both fees and cost; or fees, costs, and interest. Then save your settings.
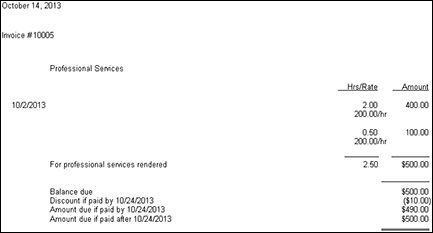
Figure 5-3: A bill offering a discount.

Figure 5-4: Establish discount settings.
Generally accepted accounting practice guidelines suggest that you should offer discounts only on fees.
After you approve an invoice for the client, Timeslips creates an invoice transaction that you can open. On the Discounts tab, you can view the anticipated discount if the client pays the bill within the designated timeframe. You open transactions from the Accounts Receivable List window, which is discussed later in this chapter in the “Reviewing Transactions” section.
Handling Client Funds Transactions
Timeslips uses the client funds account and various funds transactions to track money given to you by your client or by third parties in advance of work you perform. Law firms use funds accounts to store trust fund and escrow fund balances and track associated transactions. Other types of businesses use funds accounts to store retainer balances and track associated transactions.
Timeslips automatically establishes one funds account for every client nickname you create, but you can create additional funds accounts for any client who needs more than one.
Entering client funds transactions
You use one of four funds transactions to record activity in a funds account, as shown in Table 5-2. Two of those transactions, the ones with the word Payment in their title, record the exchange of money between you and your client. The other two transactions record the exchange of money between you and a third party on behalf of your client.
Table 5-2 Types of Client Funds Transactions
|
Transaction Type |
Purpose |
Effect |
|
Payment from account |
Pay yourself for services rendered. |
Reduces both the funds account balance and the accounts receivable account balance |
|
Payment to account |
Record money you receive from your client before you render services. |
Increases the funds account balance |
|
Deposit |
Record the receipt of money on behalf of your client from a third party, such as an insurance company. |
Increases the funds account balance |
|
Withdrawal |
Record payment from the funds account to a third party such as a process server on behalf of your client. |
Decreases the funds account balance |
When you enter a payment from account transaction to pay yourself for services rendered, Timeslips automatically creates an accounts receivable Payment transaction for you to reduce both the client funds balance and the accounts receivable balance.
To enter a funds account transaction, follow these steps:
- Choose Transactions⇒Client Funds to display the Client Funds List window.
You can use this window to search for specific funds transactions, as described later in this chapter in the “Reviewing Transactions” section.
- Click the New (plus sign) button on the vertical toolbar on the right to display the Client Funds Transaction Entry window shown in Figure5-5.

Figure 5-5: Enter funds account transactions.
- In the Type drop-down list, select the transaction type.
- (Optional) Select the Deposit Slip check box to create a list of deposits.
Using a deposit slip helps you create a report that groups multiple payments together to make calculating a total bank deposit easier. Read more about bank deposit slips later in this chapter in the “Using Bank Deposit Slips” section.
- Select the client for whom you are recording the transaction.
You can click the Find Client by Invoice (magnifying glass) button beside the client’s second nickname to supply an invoice number; Timeslips then finds the client based on the invoice number.
- If you use multiple bank accounts, select the bank account against which you want to record the transaction.
If you use multiple funds accounts for various clients, you can also set up bank accounts to organize and group funds accounts. See the “Managing multiple funds accounts” section, later in this chapter, for details.
- Enter the date of the transaction.
You can type T and Timeslips enters today’s date.
- If the client paid by check, enter the client’s check number.
- Provide an amount for the transaction.
- (Optional) Edit the default transaction description.
The text in the Description box appears on the client’s next bill; in this example, I edited the default description.
You can change the default descriptions for funds transactions from the Bank Account Entry dialog box. See the “Managing multiple funds accounts” section for details. - Click the Save (disc) button on the window’s toolbar to save the transaction.
Notes on funds account transactions
If you record a payment from account transaction, your client should also have outstanding invoices due. You need to apply the transaction to an outstanding invoice so that you reduce both the client’s funds balance and the balance owed to you. At the bottom of the Client Funds Transaction Entry, the client’s unpaid invoices appear. Apply the payment from account transaction to them in the same way you apply a payment in the Accounts Receivable Transaction Entry window using the Apply One or Apply All buttons. If, for some reason, you enter a payment from account transaction that exceeds the amount the client owes you, you can select the Remaining Amount Applies to Future Invoice box to apply the overpayment to the client’s next invoice.
If you record a deposit or a withdrawal funds account transaction, you’ll see the Transfer This Entry to the General Ledger. It Is Not Already In My Accounting System check box at the bottom of the Client Funds Transaction Entry window. Select this box if you've connected Timeslips to an accounting software package such as QuickBooks or Sage 50 and you want Timeslips to send a journal entry to the accounting package that reflects your Timeslips entry.
You typically don’t want to send withdrawal entries to your accounting package. Why? In the accounting package, you usually write a check that accounts for the withdrawal entry in Timeslips, and transferring the Timeslips transaction would duplicate the entry in the accounting package.
 You can read more about linking Timeslips to an accounting software package’s general ledger at www.dummies.com/extras/sagetimeslips.
Setting client funds account options
Timeslips automatically establishes one funds account for every client nickname you create, and you can set options for it on the Client Information tab of the Client Information window. Choose Names⇒Client Info to display the Client Information List window. Then double-click the nickname of the client and, when that client’s information appears, click the Client Funds tab (see Figure 5-6).
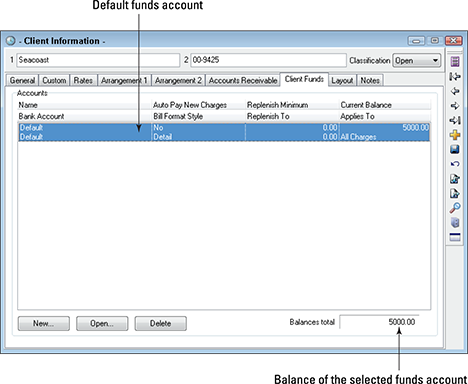
Figure 5-6: The default funds account that Timeslips establishes for every client appears on the Client Funds tab.
To set options for a funds account, double-click the account to display the Client Funds Account Entry dialog box shown in Figure 5-7.

Figure 5-7: Set funds account options.
You can set the following options:
- At the top of the dialog box, you can change the account name and the bank account to which the account is assigned. See the next section, “Managing multiple funds accounts,” for details on bank accounts.
- You can opt to use the account for fees only, costs only, or all charges.
You can’t set the balance for the funds account from this dialog box. If you’re new to Timeslips and you need to supply an opening balance for a client funds account, enter a deposit funds account transaction. If you acquire a new client who pays you upfront, enter a payment to account transaction.
- You can set parameters that Timeslips uses to automatically request replenishment of the account on the client’s bill when the account’s balance falls below an amount you specify.
- Using the Style on the Bill list, you can specify how Timeslips handles transaction activity from this funds account on the client’s bills. You can show the detail of each transaction, include a summary for each transaction type, or hide the information.
Some people think displaying the details of the transactions can be confusing to a client. Others, however, find that displaying detail tends to make the client pay the bill more quickly because it contains complete information.
- Select the Automatic Payment of New Charges on the Bill check box to make Timeslips automatically create a payment from account funds transaction and a payment accounts receivable transaction for you when you produce a client’s bill.
If the funds account doesn’t contain enough money to fully pay the bill, Timeslips uses all available funds. Letting Timeslips automatically create these transactions not only saves you work but also ensures that you mark a bill paid or partially paid. This method beats confusing a client by sending an unpaid bill when you already have the money to cover the bill.
Managing multiple funds accounts
You can create additional funds accounts for any client who needs more than one funds account. If you do create multiple funds accounts, consider creating multiple bank accounts.
Multiple bank accounts are optional, even if you create multiple funds accounts. Timeslips creates one bank account, titled Default, for each client, and you can assign multiple client funds accounts to that bank account. However, setting up separate bank accounts for each funds account can help you manage balances in client funds accounts.
First, let’s examine the Bank Accounts feature because as you create funds accounts, you assign them to bank accounts. Therefore, if you’re going to use separate bank accounts for each funds account, you need to set them up before setting up funds accounts.
Using bank accounts
If you intend to use multiple funds accounts, bank accounts can be useful because you can use them to organize funds account information.
Although funds accounts are specific to each client, bank accounts aren’t. Instead, they’re available to all clients.
You can use bank accounts to group and sort funds account transactions in any way that is meaningful to your company. For example, you might keep funds for some clients at one bank and funds for other clients at another bank. Or you might just have different bank accounts for funds at the same banking institution. In Timeslips, you can sort reports that list funds accounts and funds transactions by bank account, so that you can see funds account activity broken down by bank account.
Although bank accounts in Timeslips don’t have to correspond to bank accounts at banking institutions, many people find it conceptually helpful if they do.
To create a bank account or edit an existing account, follow these steps:
- Choose Setup⇒Banks Accounts to open the Bank Accounts window.
- Click the New button (to create an account) or double-click an account name (to edit an existing account).
In either case, the Bank Account Entry dialog box shown in Figure 5-8 appears.

Figure 5-8: Create and set options for a bank account.
- Enter a name for the bank account.
- Open the Applies To list and choose the types of charges that this bank account can pay.
Your choices are Fees Only, Costs Only, or All Charges.
- Open the Type list and select the types of transactions you can enter for this bank account.
Your choices are A/R (accounts receivable transactions), Funds, or A/R and Funds.
- (Optional) In the Description field, enter details for the account, such as the address of the bank.
- If you want to change the default descriptions that Timeslips uses on funds account transactions assigned to this bank account, make the changes in the Default Descriptions on Transactions section.
- Click OK to save your changes.
- Click Done to close the Bank Accounts window.
You can change the default descriptions for the default account that Timeslips establishes for all clients from the Bank Account Entry window. Just edit the default account.
Setting up a new funds account
Unlike bank accounts, which are available to all clients, funds accounts, other than the default account that Timeslips establishes, are specific to each client. To create a new funds account for a particular client, follow these steps:
- Choose Names⇒Client Info to display the Client Information List window.
- Double-click the nickname of the client and, when that client’s information appears, click the Client Funds tab (refer to Figure5-6).
- Click the New button, at the bottom of the window, to display the Client Funds Account Entry dialog box shown in Figure5-9.

Figure 5-9: Create a new funds account for a particular client.
- At the top of the dialog box, supply a name for the funds account.
- Select the bank account to which you want to assign the account.
- Open the Applies to list and choose the type of charges you want to be able to pay from this funds account.
You can opt to use the account for fees only, costs only, or all charges.
- If the account has an opening balance, supply it in the Current Balance field.
If you don’t know the opening balance, leave the Current Balance at $0. You can always enter a deposit to account transaction to establish the account’s opening balance.
- (Optional) In the When the Balance Falls Below and the Request Replenishment To boxes, set parameters that Timeslips uses to automatically request replenishment of the account.
If you set these parameters, Timeslips displays the following message on the client’s bill: “Please replenish client funds with $X,” where X is the amount you specified. You can edit this message. See Chapter 7 for details.
- Open the Style on the Bill list to specify how Timeslips handles transaction activity from this funds account on the client’s bills.
You can show the detail of each transaction, include a summary for each transaction type, or hide the information.
Some people think that clients are confused by transaction details. Others think that including details tends to make the client pay the bill more quickly because it contains complete information. - Select the Automatic Payment of New Charges on the Bill check box.
Timeslips will automatically create a payment from account funds transaction and a payment accounts receivable transaction for you when you produce a client’s bill.
Using Bank Deposit Slips
Suppose that you enter several payments you receive by check from clients. You can use the Bank Deposit Slip feature in Timeslips to group the payments so that you can match the total deposit you make at your bank to the total of the batch of checks you record in Timeslips.
Although you can print the Timeslips bank deposit slip, it doesn’t substitute for the deposit ticket you fill out for your bank. The Timeslips bank deposit slip doesn’t include any bank account or routing number information.
Bank deposit slips are available to all clients but specific to an individual bank account. On any bank deposit slip, you can include any of the three transactions you use in Timeslips to record receiving money: the payment to account funds transaction, the deposit funds transaction, and the payment accounts receivable transaction.
When you assign a bank account to a bank deposit slip, that bank deposit slip follows the rules of that bank account and you can enter only the types of transactions that the bank account allows.
You can create a bank deposit slip before you start entering transactions or as you enter the first transaction.
To start a new bank deposit slip before you start entering transactions, choose Transactions⇒Bank Deposit Slip. If no bank deposit slips exist for today, Timeslips prompts you to create one; click Yes, and Timeslips displays the Bank Deposit Slips window in the background and the Bank Deposit Slip Entry window (see Figure 5-10). If you start a new payment, payment to account, or deposit transaction and select the Deposit check box, the same thing happens.

Figure 5-10: Creating a bank deposit slip.
Select the bank account you intend to use as you enter transactions and set the date for the bank deposit slip. In the Total Planned box, you can type the total amount of all the transactions you intend to include on the bank deposit slip; when you finish entering transactions, Timeslips notifies you if the total you enter in this window doesn’t match the total of the transactions you enter.
You can leave the Total Planned amount at 0 and simply let Timeslips total the transactions you enter. If you don’t enter an amount, when you finish entering transactions, you will see a warning that the totals don’t match.
Click OK, and Timeslips closes the Bank Deposit Slip Entry window.
If a bank deposit slip already exists for today, Timeslips doesn’t display the Bank Deposit Slip Entry window; instead, the Bank Deposit Slips window shown in Figure 5-11 appears. To view and add to an existing bank deposit slip, open the Deposit Number list in the upper-right corner and select the slip.
To add a transaction to Timeslips and to the bank deposit slip, click the New button, at the bottom of the window, and then click the choice that corresponds to the type of transaction you want to enter: New Payment, New Payment to Account, or New Deposit to Account. Timeslips opens the appropriate transaction entry window for you to fill out as described earlier in this chapter.

Figure 5-11: The Bank Deposit Slips window.
When you finish entering the transaction, click the Save and Return (disc with an arrow) button. (Note that Timeslips replaces the Save button on the window’s toolbar with the Save and Return button.) Timeslips redisplays the Bank Deposit Slips window, where you can repeat the process of entering new transactions.
Each transaction you enter appears in the Bank Deposit Slips window on either the Accounts Receivable tab or the Funds tab. To edit any transaction, click it on the appropriate tab and then click the Open button, at the bottom of the Bank Deposit Slips window. Similarly, you can delete a transaction both from Timeslips and from the Bank Deposit Slips window by clicking it and then clicking the Delete button.
At any time, you can stop entering transactions and do other work. To enter more transactions on a particular bank deposit slip, reopen the Bank Deposit Slips window and use the Deposit Number list to display the bank deposit slip. Then simply add new transactions to it.
When you finish entering transactions for a particular day’s bank deposit, you can print the bank deposit slip to match it with the deposit you make at your bank. In the Bank Deposit Slips window, use the Deposit Number list to display the bank deposit slip that you want to print, and then click the Print (printer) button on the vertical toolbar on the right.
After the deposit slip finishes printing, Timeslips prompts you to mark the bank deposit slip as printed; click Yes.
If you choose to print the deposit slip, you won’t be able to print it a second time. Timeslips won’t print the slip again, even if you add transactions to it. So, don’t print the deposit slip until you’re sure you’ve finished entering transactions for it.
You also can print the Bank Deposit Slip Listing report, shown in Figure 5-12, by choosing Reports⇒A/R Transactions and then double-click the report. By default, this report shows unprinted deposit slips for today. To learn more about setting up and printing reports, see Chapters 13 and 14.

Figure 5-12: A sample Bank Deposit Slip Listing report.
Reviewing Transactions
To view transactions you’ve entered in Timeslips, you use the Accounts Receivable List window or the Client Funds List window. Both windows work the same way; in this section, I focus on the Accounts Receivable List window shown in Figure 5-13. To open this window, choose Transactions⇒Accounts Receivable.
You can search for transactions using the Text Search window, shown and discussed in Chapter 4.
At the top of the Accounts Receivable List window, you can open the View By list and choose whether to view transactions by the ID number Timeslips assigns to them as you enter them, by a date range, or by client. After you select an option from the View By list, click the Update button, which Timeslips displays in the middle of the window each time you change the method by which you view transactions. Timeslips then redisplays information in the window using the View By option you selected.

Figure 5-13: The Accounts Receivable List window.
In the window, Timeslips displays each transaction on a single line and alternates the color of each line between white and cyan. Transactions appear in date order by default, with the latest transaction appearing at the bottom of the list. You can reorder the transactions by clicking a column heading.
To control the appearance of the window, right-click any column heading and then choose List Appearance Options. For example, you can specify the color Timeslips uses for alternate rows.
Beside the Client column, an unnamed column appears. Point the cursor at that column, and a tip indicates that it is the Billing Status column. Indicators appear in this column. A yellow envelope indicator means that the transaction has appeared on a bill you approved before sending it to the client. If the envelope indicator is red, the transaction appears on a bill that you’ve placed in proof stage but not yet approved.
See Chapter 6 for details on the billing process and the stages in which you can place a bill.
The final indicator you might see in the Billing Status column is a right-pointing arrow, which means that the transaction has been posted to a general ledger in an accounting package.
You can find additional information about posting Timeslips transactions to an accounting package general ledger by visiting the following: www.dummies.com/extras/sagetimeslips.
In addition to using the Accounts Receivable List window or the Client Funds List window, you also can print transaction list reports; the A/R Transaction Listing and the Funds Transaction Listing report both provide details for transactions you’ve entered.
You can print the A/R Transaction Listing by choosing Reports⇒A/R Transactions and then double-clicking the A/R Transaction Listing report. In the Report Entry window, click the Print button.
You can print the Funds Transaction Listing by choosing Reports⇒Funds Transactions and then double-clicking the Funds Transaction Listing report. In the Report Entry window, click the Print button.
For details on sorting and filtering information on these and other reports, see Chapter 13.