
Chapter 8
Designing Bill Layouts
In This Chapter
![]() Creating a layout to modify
Creating a layout to modify
![]() Understanding the Design tab
Understanding the Design tab
![]() Making changes to a free-form section
Making changes to a free-form section
![]() Changing a table section
Changing a table section
Chapter 7 introduces you to bill layouts; in this chapter, we explore ways to customize a bill layout. Throughout the chapter, I show you various bill layout customization techniques that you can use to create the bill layout shown in Figure 8-1.
 Timeslips ships with a document that provides details on the many ways in which you can customize a bill layout. Choose Help⇒Other Documents⇒Bill Samples to view the Bill Samples .PDF document. You must have Adobe Reader installed on your computer.
You can create a new layout or open an existing layout and make changes to it. If you plan to change an existing layout, you might consider duplicating it first and then tweaking it. This method leaves the original layout intact but has the advantage of using an existing layout as a starting point.
 You use the same process to customize a bill layout and a statement layout, so everything I tell you in this chapter applies to both types of layouts.

Figure 8-1: A sample bill layout.
Getting Started
You start designing a bill layout in the Bill and Statement Layout List window. Choose Bills⇒Bill and Statement Layouts to display the window (see Figure 8-2). Then click the New (plus) button in the vertical toolbar to create a new layout. Or select an existing layout, and then click the Open (folder) button to open that layout or the second button to duplicate it.
If you’re editing an existing layout, you can skip to the next section, “Understanding the Design Tab.”
If you decide to create a layout, select a starting layout template. The bill layout templates contain some basic layout information so that you don’t start with a blank screen — and blank screens can be intimidating. When you click the New button in the Bill and Statement Layout List window, Timeslips displays the Create a New Bill Layout dialog box shown in Figure 8-3.

Figure 8-2: To customize a bill layout, start from this window.

Figure 8-3: Select a layout template to customize.
Click a layout in the list on the left, and Timeslips displays a preview of that layout on the right. You can double-click the preview to enlarge it for a better view.
Below the list of layouts, you can select an amount of detail you want on the bill, and you can opt to include a cover page with your bill.
You can add or remove a cover page as you customize the layout, so don’t worry over this decision.
Choose a layout that most closely resembles the one you eventually want to use. The different layouts are a bit difficult to describe, so I suggest that you double-click the previews for a low, medium, and high detail bill layout. For example, on a Basic Bill layout, the low detail shows the amount for each slip, while the medium detail shows the hours and rate along with the amount for each slip. The high detail version of the Basic Bill Layout includes the hours, the rate, and the amount for each slip along with each slip’s task or expense long name (not its nickname).
For this example, I use the Bill with Firm Heading layout with Medium detail. After you make your choices, click OK, and Timeslips displays the layout on the Design tab of the Print Preview window (see Figure 8-4).

Figure 8-4: Use this window to customize a bill layout.
Understanding the Design Tab
When you create a new layout, the layout has no name initially. You should start by typing a name for the layout in the Layout Name box and then clicking the Save button.
The Preview and Design tabs appear at the top of the window; you can switch between them to see the effects of changes you make to your layout as you customize it. When you click the Preview tab, Timeslips prompts you to select a client to use as you preview changes; click a client for whom you know slips exist and select the Preview Selected Client Until the Layout Is Closed check box. Then click OK and switch back to the Design tab.
Navigation tools for this window — menus and toolbars — appear just below the Preview and Design tabs. The Field list appears on the right side of the window, and you use the Field Group drop-down list above the fields to select the type of fields you want to view.
The rest of the window is the work area, where you make changes to the bill layout. Each bill layout is divided into sections. You can identify the currently selected section in the Go To Section drop-down list. You use that list also to switch to a specific section. Alternatively, you can click a section to switch to it.
Every layout starts with the Bill Header — First Page section and ends with the Footer — Last Page section. Between these two sections, you find a variety of other sections. You can optionally include other sections, such as sections that contain project information if you use projects in Timeslips, a bill cover page, and up to two blank customizable sections to which you can add whatever information you want. See “Adding the aged balances table,” later in this chapter, for details on adding sections to a bill layout.
You find two basic types of sections in the work area:
- Free-form sections, where you can place fields anywhere in the section and add graphics, lines, and boxes. All header and footer sections are free-form sections, along with the Cover Page sections and the customizable sections.
- Table sections use tables to align fields within a bill section. In table sections, you can place only text fields and database fields. The Time Charges — Itemized and the Expense Charges — Itemized sections are table sections.
Throughout the rest of this chapter, I show you how to make changes to both types of sections. You can make changes to the entire bill layout or to a specific section. You can add, move, or delete fields; hide, display, and reorder sections; and change settings such as the phrases that appear in various sections and the font used on the bill.
Let’s start by changing the bill layout’s font.
Changing Fonts for a Bill Layout
Although you can establish fonts for individual sections, I recommend that you use one font for all information on your bill, with the possible exception of your company’s name and address. Why? Because using multiple fonts is distracting and draws your reader’s attention away from the content of the bill. The purpose of sending a bill is to get paid, so you don’t want to distract the reader from the bill’s content.
You can simultaneously change the font used in all sections of a bill layout using the Global Bill Layout Options dialog box. Globally changing the font used in a bill layout affects most but not all bill layout fields. After changing the font globally, you can make other font changes as needed.
Follow these steps:
- Choose Layout⇒Layout Options.
Timeslips displays the Global Bill Layout Options dialog box.
- Click the Font Styles tab.
You see the screen shown in Figure 8-5.

Figure 8-5: Set options that affect all sections of the bill layout.
- Click the Other Font Defaults button.
- In the Layout Font Defaults dialog box, shown in Figure8-6, click the Edit button.
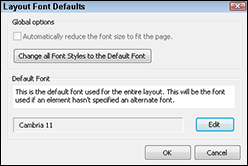
Figure 8-6: The default font appears beside the Edit button.
- In the Font: Default dialog box that appears, select a new font and font size and click OK.
Timeslips redisplays the Layout Font Defaults dialog box.
- Click the Change All Font Styles to the Default Font button.
A message warns you that changing the font and font size could affect positioning on your layout and asks if you want to proceed.
- Click Yes.
- Click OK to redisplay the Global Bill Layout Options dialog box.
- Click OK to redisplay the Design tab.
- Click the Preview tab to make sure that your changes didn’t negatively affect your bill layout.
As you can see from Figure 8-7, these steps don’t quite change the font everywhere. The bill layout still uses the original font in the fields at the top of the bill but uses the new font in the fields where charges appear. Essentially, changing the font globally doesn’t affect existing fields in the bill layout. If you add new fields to the top of the bill (the Bill Header — First Page section), Timeslips displays the new fields using the new font; it just doesn’t update the font of existing fields when you change the font globally.

Figure 8-7: Changing the font globally doesn’t affect existing fields.
No problem. You can change the font of existing fields by using these steps:
- Press and hold down the Ctrl key as you click each field you want to change.
Clicking a field selects it; holding down Ctrl as you click enables you to select multiple fields. In Figure 8-8, I selected all the fields in the Bill Header — First Page section except the Firm Name and the Firm Address — Standard fields.
If your bill layout includes the Firm Name and Firm Address fields, Timeslips automatically supplies this information based on what is stored on the Address Information page of the General Settings dialog box. Choose Setup⇒General to view this information.
Figure 8-8: Changing the font of selected fields.
- Choose Tools⇒Font.
Timeslips displays the Font dialog box. The title of the dialog box also contains the name of the last field you select (in the example, the date field).
- Choose a font and, if appropriate, a font size.
- Click OK.
Timeslips changes the font of the selected fields.
- Click anywhere in the work area to cancel the selection you made in Step 1.
Let’s take a look at some of the other changes you can make in a free-form section.
Making Changes in a Free-Form Section
In a free-form section, you can
- Change the space allotted to fields.
- Rearrange and align fields.
- Add database fields and text fields.
- Change the amount of space allotted to the section.
You look at all these tasks in this section.
Changing the space allotted to a field
Changing the bill layout font might have negatively affected some fields, so you might need to allot more space to them to make them display properly. As you can see in Figure 8-9, the Invoice Submitted To: field doesn’t fit into the space allotted to it because I changed the font. In the new font, the Invoice Submitted To: field wraps onto a second line and overlays the client name.

Figure 8-9: Changing the font made the Invoice Submitted To: field too big.
To change the space allotted to a field, click it to select it. Then slide the mouse pointer over one of the square handles that appear on the side of the field and drag. In Figure 8-10, I drag the handle on the right side of the Invoice Submitted To: field to the right as much as necessary to add space to the field. By giving the field more space, it no longer wraps onto a second line and the client name — the Full Name field — becomes visible.

Figure 8-10: Drag a field handle to change the space allotted to the field.
Rearranging and aligning fields
You can rearrange fields in a free-form section. For example, most of my clients prefer to reduce the amount of space taken up by the Bill Header — First Page section, so they move the Bill Date field to the right and up, aligning it with the bill recipient’s name. To move any field, simply drag it to its new position.
You cannot move a field from one layout section to another with this technique. Instead, you must add the field to the section where you want it to appear and delete it from the original section. In the next section, I walk you through this process.
To align two fields, follow these steps:
- Click the field you want to align.
I clicked the Bill Date field.
- Press and hold down the Ctrl key as you click the field you want to use as the alignment model.
I clicked the Full Name field.
- Choose Tools⇒Align Fields⇒Align Bottom.
Timeslips moves the field you selected in Step 1 to align with the bottom of the field you selected in Step 2.
Adding database fields and text fields
Most of my clients want their firm name, address, and phone number to appear at the top of the bill. The figures in this chapter so far show the firm name and address, but not the phone number, at the top of the bill. The layout design I chose to create places the phone number in the footer area of each page.
To add the firm phone number to the Bill Header — First Page section, follow these steps:
- Make space for the phone number by dragging the Firm Name and Firm Address — Standard fields up a bit.
- Open the Field Group drop-down list (on the right side of the Design tab) and select Firm Contact Info.
- Drag Firm Phone 1 from the Field List to the blank space you created in Step 1.
The field appears below the firm address, justified to the left.
- Right-click the Firm Phone 1 field and choose Justification.
- In the Text Justification: Firm Phone 1 dialog box that appears, choose Center.
Now the field justification of the phone number matches that of the firm name and address, which are both centered.
- Click OK.
- Align the Firm Phone 1 field between the left and right margins by right-clicking it and choosing Align to Page⇒Snap to Center of Margins.
The font of the Firm Phone 1 field matches the global font you set earlier. To change the font to match the font used for the firm name and address, right-click one of those fields and choose Font to identify the font they use. Then right-click the Firm Phone 1 field and choose Font. Select the font used by the firm name and address fields and then click OK.
If you opt to place the phone number at the top of the bill, you might want to delete it from the bill layout footer. In the Go To Section drop-down list, choose Footer — First Page. Then click the Firm Phone 1 field and press the Delete key on your keyboard.
Many of my clients also prefer to eliminate the space allotted to the Project Header — First Page section, especially if they don’t use projects in Timeslips.
Although you can’t move fields from one section to another, you can delete them in one section and then add them to another. In this example, you can place the In Reference To fields (one database and one text field) and the Invoice # fields (also one database and one text field) in the Bill Header — First Page section.
The database fields contain labels that identify the database fields on the layout. However, Timeslips replaces those labels with the actual values on the bill, so you should add text fields to identify the database fields for your client.
First, delete the four fields from the Project Header — First Page section by clicking each field and then pressing the Delete button on your keyboard.
Next, add the database fields to the Bill Header — First Page section. Click the section and then drag the fields from the Field List on the right side of the Design tab to the general location in the section where you want them to appear. Remember, you can position them at any time by dragging and aligning.
In Figure 8-11, I’ve already added the In Reference To field from the Field List of the Client Contact Info field group. Then I switched to the Client Values field group to drag the Invoice Number field to the Bill Header — First Page section.
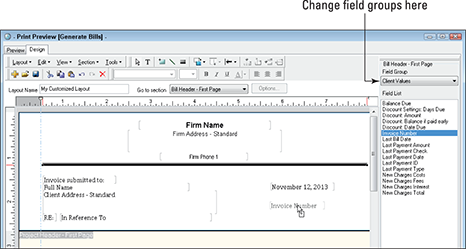
Figure 8-11: Adding the Invoice Number database field to the Bill Header — First Page section.
Now add the text fields that contain labels for these database fields so that your client can identify their purpose. To add a label, click the Text tool on the toolbar. Then slide the mouse pointer to the location where you want the label to appear and click. Timeslips displays the field with sample text that reads Text field. The sample text is already selected, so simply type the text for your label. Timeslips replaces the sample text with your text.
In Figure 8-12, I added a label for the In Reference To field and typed RE: as the label text. Then I added another text field to label the Invoice Number field, but I haven’t yet typed the replacement text.
You might want to align these fields to other fields in the section. See the “Rearranging and aligning fields” section, presented previously in the chapter, for details on aligning fields.

Figure 8-12: Adding text fields as labels for database fields.
Changing the section’s allotted space
When you preview the bill layout at this point, a large white gap appears between the top of the bill and the section where charges appear. That large white gap is the space allotted to the Project Header — First Page section. To reduce the space, switch back to the Design tab. Then click the Project Header — First Page section and position the mouse pointer on the horizontal line that appears at the bottom of the section, dividing it from the Bill Header — Other Pages section. When the mouse pointer changes to a two-headed arrow pointing up and down, drag the mouse pointer up as far as it will go. When you preview the bill layout again, the large white gap is all but gone.
You can reduce the space allotted to the Bill Header — First Page section by using the same technique. But before you do that, let’s consider adding some graphics to the bill layout, including a horizontal line that divides the top of the bill from the sections where charges appear.
Inserting a graphic
You can insert .JPG graphic images stored on your computer. You might, for example, insert in the bill layout the graphic image your company uses as its logo. Graphic images are particularly effect in bills you send via e-mail. Follow these steps to insert a graphic image:
- Select the bill layout section where you want to insert the graphic image.
For this example, I selected the Bill Header — First page section.
- Choose Tools⇒Insert⇒Graphic.
Timeslips displays the My Pictures folder of the Open dialog box.
- Navigate to the graphic image you want to insert in your bill layout, click it, and then click the Open button.
Timeslips inserts the graphic into the upper-left corner of the selected section.
You can move the graphic to a different location in the section by dragging it.
You also might want to add a line that separates the Bill Header — First Page section from the portion of the bill where charges appear. You use the Line tools to add a line.
If you plan to draw a line that spans the bill horizontally, make certain that you can see both of the vertical blue dashed lines that represent the bill layout margins.
Next, click the Line tool on the toolbar and position the mouse pointer — a large plus sign — where you want the line to appear. Drag to draw the line. When you release the mouse button, Timeslips displays the line and selects it.
To adjust the line’s weight, click the Line Styles tool to display the Line Style: Graphic dialog box and select a line weight and color; then click OK. In Figure 8-13, you see a preview of the bill containing a graphic logo and a line dividing the address information from the bill’s charges.

Figure 8-13: A bill layout containing graphics.
Making Changes in a Table Section
The Time Charges — Itemized and the Expense Charges — Itemized sections are two table sections that appear on every bill layout. In these sections, you can
- Change phrases that appear within the section.
- Delete and add information.
- Adjust the width of the columns within the section.
For details on making these types of changes, read on.
Changing phrases
You can make changes to phrases that appear in a section. For example, suppose that you feel that Professional Services doesn’t quite say what you want. Instead, you’d like the phrase that introduces the time charges on your bill to read, For Professional Services:. Similarly, you want to change Additional Charges: to read Expenses Incurred:.
Although you can change phrases specific to a section, most of my clients find it easier to change phrases globally. That way, they can make all phrase changes at the same time instead of selecting and changing each section’s phrases separately. You use the same technique to change phrases whether you change them globally on the bill layout or specifically for a selected section. Follow these steps:
- Choose Layout, Phrases.
Timeslips displays the Phrases tab of the Global Bill Layout Options dialog box (see Figure 8-14).
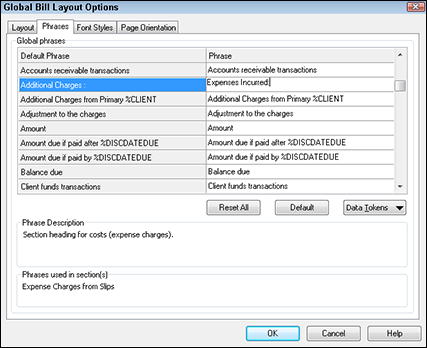
Figure 8-14: Change phrases that appear on bill layouts.
- In the Global Phrases list, scroll down until you find the default phrase you want to change.
In this example, look for Professional Services and Additional Charges:.
If you select a section in the Default Phrase list on the left, you see a description of the selected section below the list in the Phrase Description box. - Click in the Phrase column and type the new phrase you want to use.
- Repeat Steps 2 and 3 until you finish changing phrases.
Note: If you change the phrase that introduces a section, you also might want to change the phrase that represents the total for that section.
- Click OK to save your changes.
Changing information
You can adjust the information that appears in a table section by deleting and adding fields. You also can adjust the space allotted for various table fields.
Suppose, for example, that you don’t want to display the hours and the rate per hour for each line in the Time Charges — Itemized section of the bill. Instead, you want to display just the time spent. Follow these steps:
- Open the Go To Section list and select Time Charges — Itemized.
Timeslips selects the section and changes the Field Group list on the right to Slip.
- In the Hrs/Rate column, right-click the second 0.00 value and then choose Find in Field List.
Timeslips identifies this field as the Rate (Hourly Only) field (see Figure 8-15).
You can, in fact, use this technique to identify any field on the layout.
Figure 8-15: Identifying a field in a table section.
- Right-click the second 0.00 value and choose Delete.
Timeslips removes the field and retitles the column heading to Hours.
For the most part, my clients find that the appearance and spacing settings for the two table sections in a bill layout work well and don’t need to be changed. However, you can change them if you want.
You can control the appearance of a table section to specify whether it should list details for that section or summarize information by timekeeper, task, or reference. For the Expense Charges section, you also can opt to combine expenses in the time charges section instead of segregating and subtotaling the two types of charges.
You can control the spacing vertically between entries on the bill and horizontally between columns in a table section. You use the Layout Options: Time Charges from Slips dialog box (see Figure 8-16) or the Layout Options: Expense Charges from Slips dialog box. Use the Go To Section drop-down list to select the section you want to modify and then choose Section⇒Options to display the appropriate dialog box.

Figure 8-16: Control vertical spacing in a table section.
Use the Section Format tab to control the vertical spacing of the section. In Figure 8-16, the bill layout is set up to display all slips, double-space between slip entries, show total hours, and show starting dates only when the date changes between two slips. If you have more than one slip for a given date, Timeslips displays the date only once and displays a dash beside the second and subsequent slips for that date.
Using the other settings on this tab, you can control the spacing before and after the section and the indentation of each line between the left and right margins.
Click the Columns — Itemize tab to control the horizontal spacing on each line of the section. Figure 8-17 shows only the first three columns of the seven columns available on each row of the table.

Figure 8-17: Control the horizontal spacing on each line of a table section.
If no X appears in the Keep If Empty check box below a column, Timeslips hides spacing for that column if no information would appear in that column.
For each column, you can set the column width and use the Gap field to add white space between columns. If values appear in both the Width and the Gap fields, Timeslips allots the total of that space to the column. If you place an X in the Keep If Empty check box and the column doesn’t contain any information, Timeslips displays the total of the Width and Gap fields as white space on the bill.
You can use the Line field for each column to specify whether a line should appear above, below, or both above and below the column.
Adding the aged balances table
You can add, hide, and reorder bill layout sections using the Configure Layout Sections dialog box shown in Figure 8-18. To display this dialog box, choose Section⇒Configure Layout Sections.

Figure 8-18: Add, hide, and reorder bill layout sections.
You can add a cover page to any bill layout from the Configure Layout Sections dialog box. Simply select the Show a Cover Page on the Bill check box at the top of the dialog box.
You use the options in the Projects section of the Configure Layout Sections dialog box to control the appearance of project information on a bill layout. Select the Projects Are Included on a Consolidate Bill option to ensure that multiple projects appear on a consolidated bill, and then select other project options as appropriate to your needs. Remember also that you need to include all projects when you print bills to produce a consolidated bill.
For example, suppose a client doesn’t pay a bill before you issue the next bill; that is, the client has an overdue balance. The purpose of sending a bill is to get paid, so it would be a good idea to remind the client of the unpaid balance. You can do that by adding the aged balances table to your bill. The aged balances table appears only if a client has an overdue balance, and it serves as a gentle reminder to pay outstanding balances.
To add the aged balances table to the bill, select Aged Balances Table in the Section Settings list. You can click the Move Down and Move Up buttons to move the section up or down on the bill. Most people prefer the aged balances table at the end of the bill after all the rest of the bill’s information.
Use the Move Down and Move Up buttons to reposition any section vertically on your bill layout. You can set options for any bill layout section by selecting that section in the Section Settings list and then clicking the Options button.
Click OK to save any changes you made. Refer to Figure 8-1 to see a sample of the bill layout that includes the aged balances table.