Chapter 16
Managing Databases
In This Chapter
![]() Changing databases
Changing databases
![]() Using custom fields
Using custom fields
![]() Hiding Timeslips features
Hiding Timeslips features
![]() Hiding and redisplaying data
Hiding and redisplaying data
![]() Removing data
Removing data
![]() Archiving data
Archiving data
![]() Exchanging data with other Timeslips databases
Exchanging data with other Timeslips databases
Way back in Chapter 1, I cover how to create a new Timeslips database. All of your Timeslips stuff is stored in that database. Like so much else in life, you need to manage the stuff in your database so that things continue to run smoothly. In this chapter, you look at some of the ways you can manage Timeslips databases.
Opening a Different Database
Although most companies typically work with only one database, nothing stops you from creating and working with as many Timeslips databases as you need, using a single copy of Sage Timeslips. For example, you might work for several companies, tracking their billing information. In this case, you should store each company’s information in its own database. To open any Timeslips database, you need to find the database folder and select the MAIN.DB file.
 You can easily identify the database you’re using by looking at the bottom of the Timeslips window. The path to the database folder, which usually begins with C:, appears at the bottom-left of the screen, next to the Guides button. The last entry on the line identifies the database.
By default, when you open Timeslips, it opens the database you were using when you last closed the program. But, you can easily open another database. Follow these steps:
- Choose File⇒Open Database.
Timeslips displays the Open Sage Timeslips Database dialog box shown in Figure 16-1.

Figure 16-1: Navigate to the folder of the database you want to open.
- Use the Look In drop-down list at the top of the dialog box to navigate to the location where you store Timeslips databases.
Most people store all Timeslips databases in a single folder, as shown in Figure 16-1. That way, locating a particular database is easy.
- From the folders appearing below the Look In drop-down list, double-click the one containing the database you want to open.
- In the folder that opens, click the MAIN.DB file.
On your computer, you might see just MAIN, without the extension of .DB; in that case, click MAIN.
- Click the Open button.
Timeslips opens the database and prompts you to select a timekeeper. You can verify that you’re using the correct database by reviewing the database folder at the bottom of the Timeslips window.
Creating Custom Fields
As you create timekeepers, clients, tasks, and expenses, you fill out a variety of fields that describe each new nickname. If you find that you need to track other information for these nicknames that isn't in Timeslips, you can use a custom field.
You define a custom field to enter and store nickname-related information that Timeslips doesn’t ask you to store. For example, suppose that you want to bill your clients once each month. In Chapter 6, I suggest that you could set up a custom field for clients and store a billing cycle date, such as the 1st or the 5th or the 11th of the month. Because you can filter using custom fields, you can bill daily, selecting clients with a particular billing cycle date to bill. That way, each client would receive a bill only once each month. If you assume that clients generally pay within 30 days of receiving a bill, billing daily would keep cash flowing into your business regularly — maybe even daily.
 You can filter, sort, and subtotal any report using custom fields. For details on setting up filters and sorting and subtotaling report information, see Chapter 13.
In Chapter 17, you read about using the Fee Allocation feature in Timeslips; this feature enables you to allocate client payments to selected timekeepers in percentages of fees collected or based on the timekeepers assigned to the client’s slips. To use the Fee Allocation feature, you set up custom fields for client nicknames that enable you to assign timekeeper nicknames to the client.
And if you use a Timeslips add-on to prepare electronic bills, you use custom fields. In many cases, the add-on sets up the custom fields for you when you install it, but in some cases, you need to set up the fields manually.
For each type of Timeslips nickname — client, timekeeper, task, and expense — you can create the types of custom fields shown in Table 16-1.
Table 16-1 Types of Custom Fields
|
Type |
Purpose |
|
Text |
Use this type to enter additional free-form text for a name. |
|
Date |
Use this type to store a date, such as a timekeeper’s birth or hire date, or the date you started working for a client. |
|
List |
This field type enables you to create your own list of items and then assign one list item to each name. You could use a list field to set up a Billing Cycle custom field for clients; you’d enter values in the list such as 1st, 2nd, 3rd, and so on to represent each day of the month you plan to bill. You could even include entries for quarterly billing or annual billing. |
|
Timekeeper |
This type is a variation of the list type. The values in the list are automatically the timekeepers defined in your database, and you assign a particular timekeeper to a client, a task, or an expense. The Fee Allocation feature uses this type of custom field. |
|
Percent |
Any number you enter in this type of field appears as a percentage. You could use this type of custom field to show a commission rate for a timekeeper. |
|
Money |
Any number you enter in this type of field is a monetary value. You could use this type of custom field to track, for example, a dollar amount you expect to receive as an insurance settlement for a client. |
|
Number |
You can enter only numbers in this type of field. You can use this type of field to assign a number to a name. If your company assigns account numbers to your clients or ID numbers to your employees, you might use this type of custom field to store that numeric value. |
|
Hours |
Timeslips treats any number you enter in this type of field as a time value. You can use this type of custom field to set a threshold of hours you expect to work. |
Because of their free-form nature, text fields leave a lot of room for disparate entries, such as Case #12345 and Case 12345. For that reason, text fields don’t work well as filter, sort, or subtotal settings.
Let’s walk through the example of setting up a Bill Cycle custom field to establish a bill cycle for each client. To create this custom field, you use a list type custom field for client nicknames. Remember, the list type custom field offers a list of choices you can assign to the nickname, so you create both the custom field and the possible choices available to assign to the custom field. Follow these steps:
- Choose Setup⇒Custom Fields.
Timeslips displays the Custom Fields dialog box shown in Figure 16-2. This dialog box contains three tabs — Client, Timekeeper, and Activity. You select a tab depending on the type of custom field you want to create.
You select the Activity tab if you want to create a task or an expense custom field. Remember, activity is the term Timeslips uses to refer collectively to tasks and expenses.Each tab contains six groups to help you organize your custom fields if you define a lot of them. Timeslips displays each group of custom fields on its own Custom Field tab in the Client, Timekeeper, Task, or Expense Information window. You can replace each group’s name (that is, Group 1, Group 2) with a more meaningful description of the group of custom fields.

Figure 16-2: The Custom Fields dialog box.
- Click in a group.
- Click the New button to display the menu shown in Figure 16-2.
- Click the type of custom field you want to create.
Timeslips displays the Custom Field Attributes dialog box (see Figure 16-3).
The appearance of the Custom Field Attributes dialog box changes, based on the type of custom field you opt to create. For the example, I chose List. For many custom field types, Timeslips displays only the Name text box for the custom field in the Custom Field Attributes dialog box.
Figure 16-3: Set up the custom field’s values.
- In the Name box, type a name for the custom field.
I call this custom field Bill Cycle.
- Select the This Is a Required Field check box to force your data entry people to set a value for the custom field before saving a nickname.
Values you make available for the custom field appear in the Items list.
- Click the New button to create a value you can assign to a nickname.
Timeslips displays the Edit List Item dialog box (see Figure 16-4).
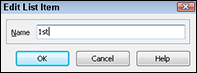
Figure 16-4: Create an available value for the list.
- Type a value for the list and click OK.
You can use up to 15 characters. Timeslips redisplays the List Type Custom Field Attributes dialog box, and your value appears in the Items list.
- Repeat Steps 7 and 8 for each value you want to assign to the custom field.
You can store up to 1000 entries in a list.
- Click OK when you finish.
- Repeat Steps 2–6 to create additional custom fields.
If you create another list-type custom field, also repeat Steps 7–9 to establish values for the list.
- Click OK when you finish creating custom fields.
After you create a custom field for any type of nickname, Timeslips adds a Custom tab to that nickname’s Information window and, on that tab, you find the custom fields you created. In Figure 16-5, you see the Custom tab in the Client Information window. The Custom tab contains two tabs of its own because I set up two groups of custom fields. The Bill Cycle custom field offers a list of values I can assign to the client.

Figure 16-5: View the established custom fields for clients.
Hiding Features You Don’t Use
Timeslips is a feature-rich program, and there’s no doubt that it contains features you might not ever want to use. You can leave those features functioning or, if you feel that they get in the way, you can hide them.
The features I hide most often for my clients are fields that appear in the Slip Entry window, shown in Figure 16-6.

Figure 16-6: The default appearance of the Slip window.
In particular, my clients opt to hide the Extra field, the Slip End Date, and the Time Estimated field:
- The Extra field enables you to add 16 characters of extra free-form text to a slip — text that typically doesn’t appear on a client’s bill unless you add the Extra field to the bill layout. (See Chapter 8 for details on adding a field to a bill layout.)
- My clients rarely if ever work on a single task for more than a single day, so they opt to disable the Slip End Date because it is the same as the Slip Start Date.
- Most of my clients don’t use the Time Estimated field because they tend to create their slips as they work or after they finish.
Because my clients don’t use these fields, hiding them makes slip entry more efficient. They have to press the Tab key less often to bypass fields in which they don’t enter information.
To hide features you don’t intend to use, follow these steps:
- Choose Setup⇒Features Enabled.
Timeslips displays the Features Enabled dialog box shown in Figure 16-7.

Figure 16-7: Disable features you don’t use.
- On the left side of the dialog box, click the category of the feature.
To see an alphabetical list of all features, click Feature List at the bottom of the list on the left. For the example, I chose Slips.
- Remove the check beside any feature you want to disable.
In Figure 16-7, I disabled the Extra field, the End Date field, and the Time Estimated field.
- Repeat Steps 2 and 3 to disable other features.
You can reenable any feature by repeating these steps and selecting the feature.
- Click OK to save your changes.
Timeslips prompts you to confirm that you want to shut off the features you identified.
- Click Yes.
Figure 16-8 shows the Slip Entry window after I disabled the Extra, End Date, and Time Estimated features.

Figure 16-8: The Slip window after disabling fields.
Hiding and Redisplaying Data
As you use Timeslips, your Timeslips database will grow. Clients and timekeepers come and go, and even your need for certain tasks and expenses can change. Slips and transactions appear on bills and really serve no further purpose.
If you’re one of those people with a full garage because you can’t bear to part with anything — after all, you might need it someday — you might want to hide rather than delete your old data. By hiding old data, you can work more efficiently because your database will respond more quickly. And if you hide data, you can still include it on reports and, if necessary, redisplay the data.
If you’re not one of those people with a full garage, you might want to consider deleting older data. For details, see the “Removing Data” section, later in this chapter.
Changing classifications for clients, timekeepers, and tasks
After you complete work for a client, you might find that you don’t need the client’s nickname and other information, including slips, transactions, and approved bills. When you first create a nickname, Timeslips assigns that nickname a classification of Open. You can change the classification to Inactive or to Closed. Changing the classification hides the nickname — and associated information — from the lists you use daily to create slips and transactions, edit information, and filter reports.
Everything I say here about clients also applies to timekeepers, tasks, and expenses.
What’s the difference between Inactive and Closed? The difference lies in the way Timeslips behaves when you delete data by purging, as discussed later in this chapter. Setting a classification to Closed signifies that Timeslips can remove the information associated with any closed nickname when you purge data. If you set a nickname’s classification to Inactive, Timeslips ignores that nickname when you purge data.
To change the classification of a single nickname from open to either inactive or closed, open that nickname in its Information window — for example, the Client Information window. Then open the Classification drop-down list in the upper-right corner, select a new classification, and save the nickname.
If you’re the type of person who wants to clean house at the end of the year, you can make changes to multiple nicknames simultaneously using the Change Classification dialog box shown in Figure 16-9. To display this dialog box, open the Names menu and choose the appropriate List window (the Client, Timekeeper, Task, or Expense List window). Then, on the toolbar running across the top of the window, click the Change Classification button.

Figure 16-9: Change the classification of multiple clients simultaneously.
Use the Change Classification From drop-down list to specify the current classification and the new classification, and then select the clients you want to change. Timeslips displays warnings, if any, associated with the nicknames you want to close. For example, in Figure 16-9, unbilled slips exist for the selected clients. If warnings appear, you can cancel changing classifications and take action to remove the warnings (in this example, delete or close the slips or bill them) or you can go ahead and click OK to change the classification of the selected nicknames. Timeslips asks if you’re sure; click Yes, and Timeslips changes the classification.
The List window for that nickname type no longer displays those nicknames on the Open tab. Instead, you can click the Inactive or the Closed tabs to view nicknames with those classifications (see Figure 16-10).

Figure 16-10: The list of inactive clients.
If necessary, you can opt to include inactive and closed clients on reports. When setting up filters for the report, include the nickname’s Classification filter and edit the filter by clicking the Edit button that appears below the list of selected filters. In the dialog box that appears, select the classifications you want to include on the report (see Figure 16-11).
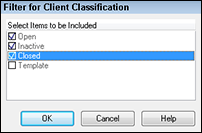
Figure 16-11: Include open, inactive, and closed clients on a report.
Closing and reopening slips
Over time, you’ll probably generate more slips than any other type of data in your Timeslips database. And you’ll probably want to keep your slips around for as long as possible, even after you approve the bills on which they appear, because so many of the reports in Timeslips use slip information.
When you get to the point where you have thousands of slips in the database, you might begin to notice a performance slowdown in Timeslips. Slips take longer to display, and reports take longer to generate. You can speed up the process somewhat by using selection filters, but these filters will provide only so much help. At that point, you should consider closing slips.
Closing slips hides them from view in Timeslips and speeds up processing in Timeslips without reducing the size of your Timeslips database.
Choose Slips⇒Close Slips to display the Close Slips dialog box (see Figure 16-12). Use the Limit Slips To drop-down list to specify the slips that Timeslips should close. You can close slips based on their age or you can set up filters to identify the slips to close.

Figure 16-12: Set criteria for closing slips.
If you select the Include Slips on Undoable Approved Bills check box, Timeslips will close slips on bills for which you can undo approval, and you will no longer be able to undo the approval of those bills.
Click OK to close the slips you identify. Remember, closed slips aren’t visible in the Slip Entry or Slip List windows, but you can include them on reports by setting the Slip Classification filter.
If you need to reopen slips, choose Slips⇒Reopen Slips and set the filters to reopen the slips you want.
Removing Data
People make mistakes as they work, and part of correcting those mistakes might be to simply delete an incorrectly entered slip or transaction.
You will also want to eventually remove, or purge, data you’ve hidden because your Timeslips database will continue to grow. By removing the data, you can reduce both the size of your database and the probability that data corruption will occur.
Deleting slips
Deleting open slips and transactions is really a simple matter. Select the slip or transaction in its List window (the Time and Expense Slip List window, the Accounts Receivable List window, or the Client Funds List window). Then click the Delete (red X) button on the vertical toolbar. Timeslips asks you to confirm that you want to delete the slip.
 Deleting a slip or transaction that has appeared on a bill might eliminate your ability to undo the bill.
If you have several slips you want to delete, you can choose Slips⇒Delete Multiple Slips to display the Delete Multiple Slips window shown in Figure 16-13.
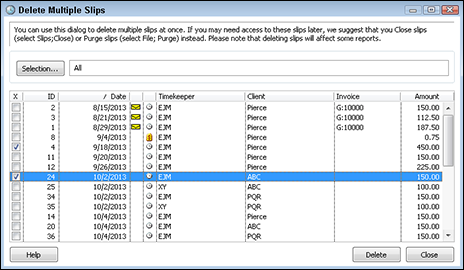
Figure 16-13: Delete more than one slip simultaneously.
In the leftmost column of the window, place a check mark next to each slip you want to delete. Then click the Delete button at the bottom of the window, and Timeslips will ask you to confirm that you want to delete the slips.
Purging information
To remove information other than slips, you use the Purge feature in Timeslips.
You also can purge slips, which has the same effect as deleting them. Using the Purge feature, you also have the option to archive slips that you purge, which deletes them from your Timeslips database but saves them to a special type of Timeslips database. You can read more about archiving slips and working with archive databases in the next section, “Saving Purged Data.”
You use the Purge feature to remove accounts receivable transactions and funds transactions as well as closed clients, timekeepers, tasks, and expenses.
Because purging is a permanent action, I recommend that you back up your database before you start the purging process. Timeslips gives you an opportunity during the process, but just go ahead and make your backup before you start purging so you can focus on the action at hand.
To purge information, choose File⇒Purge to display the Purge dialog box shown in Figure 16-14.

Figure 16-14: Select information to purge.
To select information to purge, place a check mark in the box beside the type of information you want to purge. Then use the selection lists to identify the information you want to remove from the database. When you opt to purge slips, accounts receivable transactions, or funds transactions, Timeslips warns you that purging is permanent. Click OK to dismiss the message. When you purge names, Timeslips also removes slips and transactions associated with those names.
You can purge transactions based on whether they have appeared on approved bills and how old they are. The Billed and Closed, Older Than option means that
- Slips have appeared on a bill you’ve approved and you’ve closed those slips as described previously in this chapter in the “Closing and reopening slips” section. Note that Timeslips uses the slip’s end date to determine its age.
- Accounts receivable transactions have appeared on a bill and a statement that you’ve approved. Invoice transactions must be fully paid, and all payment transaction applied to that invoice transaction must be purged before Timeslips will purge the invoice transaction. In addition, if you use TAL or TAL Pro, the Billed and Closed, Older Than option means that accounts receivable transactions have appeared on an approved transfer register.
 You can read more about using TAL and TAL Pro by visiting www.dummies.com/extras/sagetimeslips.
 - Funds transactions have appeared on a bill you’ve approved and, if you use TAL or TAL Pro, on an approved transfer register.
Or you can choose the Use Filters option to specifically select slips, accounts receivable, and funds transactions to purge. Most of my clients opt to use a filter to select slips. They are most comfortable using the Slip Transaction Date filter, shown in Figure 16-15, to identify the date of the latest slip to purge. They leave the Start Date on the left side of the dialog box set to Earliest and then click an End Date on the right side of the dialog box.
To set the Slip Transaction Date filter in the Purge dialog box (refer to Figure 16-14), choose the Use Filters option from the drop-down list in the Transactions section and then click the Filters button. In the Purge Slips Selection dialog box that appears, the Slip Transaction Date filter appears in the Most Popular filter group (the one shown by default). Double-click the filter to display the window shown in Figure 16-15.
You can use the Purge feature also to consolidate the historical totals that appear in the Client History dialog box or the Timekeeper History dialog box. Consolidating histories merges the details of separate months of historical totals into one total based on the number of months you indicate.
You can view history from the Names menu. Click either Client History or Timekeeper History.
You can use the Options page, shown in Figure 16-16, to set additional options for purging. For example, you can opt to print a report of information that Timeslips purges.

Figure 16-15: Use the Slip Transaction Date filter to select slips to purge.

Figure 16-16: Set Purging options.
Exercise care when purging transactions that appear on bills that you can still undo. If you purge these transactions, you will no longer be able to undo those bills.
Click OK, and Timeslips prompts you to make a database backup. If you didn’t make that backup I recommended at the start of this section, please make it now.
If you opted to print a report of the information that Timeslips purges, Timeslips prints that report before purging your data. Then Timeslips asks you to confirm that you want to purge records. When you click Yes, Timeslips purges the selected data and then displays a dialog box summary showing the number of records of each type that it deleted.
Saving Purged Data
Many people don’t want to delete information from their regular Timeslips database; they fear that Murphy’s Law will raise its ugly head: After deleting information, they’ll find that they need it to prepare a report. On the other hand, these same people recognize that keeping information that they don’t use on a day-to-day basis makes the database grow large and unwieldy and slows down working with the information.
During the purge process, you can opt to save the slips you purge to an archive file— a special file that you can use to create a database of purged information. I show you how to create a database of purged information in the upcoming section, “Restoring archives.” Archiving slips is the best way to move a set of slips from a Timeslips database on one network to a different Timeslips database on a different network.
If you need to move slips between two databases on the same network, consider using the Exchange feature, described in the “Exchanging Data with Other Databases” section.
Archiving purged data
On the Options tab of the Purge dialog box (refer to Figure 16-16), select the Place Purged Slip Transactions into an Archive File In option. I suggest that you select the New Archive option. Although you can subsequently add purged slips to the same archive file, you then run the risk of importing the same slip more than once when you import slips from the archive file to a Timeslips database.
Some of my clients add a date to the archive filename that represents the oldest slip transaction date in the file. That way, they know at a glance the date ranges of slips in each archive file.
Click the Browse button and navigate to the folder where you want to store the archive file. Supply a name and click Save (see Figure 16-17).

Figure 16-17: Create an archive file to store purged slips.
Set other options as you want, and then purge as described in the preceding section, “Purging information.”
You might have noticed the Archive command on the File menu. This command enables you to create an archive file of slips but does not purge the slips. Because most people want to remove slips that they archive, I don’t cover the archive only option.
Restoring archives
To use slips you placed in an archive file, you need to import them into a regular Timeslips database. Although nothing stops you from importing them into your regular Timeslips database, that process can turn messy in a hurry. If you import the archive slips into your regular Timeslips database, you’ll need to purge them again when you finish using the archived slips. And when you do that, you need to make sure that you set up your filters to remove only the archived slips — a potentially messy situation.
Creating a separate database in which you store the purged slips is much safer. That way, they don’t go back into your regular database and mix with your active data.
If you want to use the archived slips in a database on a different network than your regular database, copy the archive file to that network. Remember, though, that you need access to the Sage Timeslips program to use the archive file.
The first step to take is to create a new database; see Chapter 1 for details. For this example, I created a database based on the original database I use every day, and I placed it in a folder called Data02 Purge. I refer to the new database as the Purge database. When you base a new database on another database, Timeslips automatically populates the new database with the nicknames in the original database along with the details for those nicknames. You can accept most of the defaults the wizard suggests as you create the database. You might want to deselect the Synchronize Data with MS Outlook option, but the other defaults work fine.
If you use more than one Timeslips database, you might want to include the database name, along with the word Purge, when you name the database folder.
After you create the new database, Timeslips opens it. Check the bottom of the Timeslips window beside the Guides button to confirm that you’re using the Purge database you just created. To combine the archived slips into the Purge database, follow these steps:
- Choose File⇒Combine to display the Sage Timeslips Import window (see Figure16-18).

Figure 16-18: Identify the file containing the archived slips and the database into which you want to place them.
- Confirm that the Put Data Into option is set to Default.
The default database is the one you’re currently using, the Purge database.
- Click the Browse button (three dots) beside the Get Data From option.
- Navigate to the archive file you created.
- Select the archive file and click Open.
In the example, I selected the archive file 11-30-13 Data 02 Archive.SAR. The Sage Timeslips Import window reappears, displaying the archive file containing the slips you want to import in the Get Data From box.
- Click the Import button.
- When Timeslips prompts you to back up the Purge database, do so.
It can’t hurt to have a backup, so I suggest you make one. See Chapter 15 for details on the backup process.
After the backup process finishes, Timeslips begins to combine the slips into your empty Purge database. Because the database is empty, Timeslips doesn’t recognize any of the nicknames on the slips, so a dialog box like the one shown in Figure 16-19 appears.
You see the dialog box in Figure 16-19 only when a nickname on an archived slip doesn’t exist in the Purge database.
Figure 16-19: Tell Timeslips how to handle unknown nicknames.
- Click the Add All button.
Timeslips adds all client nicknames.
- Repeat Step 8 for tasks, expenses, and timekeepers if Timeslips prompts you.
When the import process finishes, Timeslips displays a dialog box that summarizes the number of slips it imported.
When you click the X in the upper-right corner of the Sage Timeslips Import window, you are prompted to save the settings in the window. I suggest that you plan to create separate archive files each time you purge slips; in this case, you don’t want to save these settings, so click No.
The slips you imported appear in the Time and Expense Slip List window, and you can produce any of the slip-based reports. If you open any of the windows available in the Names window, you’ll find nicknames without any details defined for them.
Remember that you’ve imported slips into the Purge database that no longer exist in your regular Timeslips database. If you need to produce a report that includes slips from both databases, use the Exchange feature, which is described in the next section.
Exchanging Data with Other Databases
Archiving slips is one method you can use to save purged slips, but it’s not the only method. Instead of purging and archiving slips, you can set up an exchange database.
An exchange database is one that you connect to an originating database — typically the database you use in your everyday work — so that you can easily transfer information between the two databases.
And what do you transfer? Nicknames (new and modified) and slips. After you exchange information, you can effectively use the exchange database to prepare nickname- or slip-based reports. And, as you transfer slips to the exchange database, you can purge the slips from the originating database to reduce its size and improve its efficiency.
While it might seem tempting, you shouldn’t try use the exchange database to prepare bills. You could very well end up with a mess you need to sort out.
Setting up an exchange database
To create a new database to use as an exchange database, follow these steps:
- Choose File⇒New⇒Database Based on Current.
The Selection for New Sage Timeslips Database Based on Current dialog box appears.
- Set filters to select the data you want to copy to the new database.
To copy all data, don’t set any filters.
- Click OK.
Timeslips displays the Personalize This Database dialog box shown in Figure 16-20.

Figure 16-20: The Personalize This Database dialog box.
- Type a name that identifies the exchange database.
Although Timeslips suggests you use some sort of user-friendly name, I suggest that you use the name you intend to assign to the new database folder because the connected database will be easier to identify, as you’ll see later in this section. In the example, I use DATA03 because that will be the name of the database folder.
- Click OK.
Timeslips displays the New Sage Timeslips Database Based on Current dialog box, where you set the folder in which to save the new database (see Figure 16-21).

Figure 16-21: Select a folder for the new database with which you’ll exchange information.
- If the Save In folder at the top of the dialog box doesn’t suit you, change it to a different folder.
If you change the folder, remember that you should choose an empty folder for the database. Otherwise, you might overwrite information unintentionally.
- Click Save.
Timeslips creates the new database and then displays a message indicating that it created the database successfully.
- Click OK.
Timeslips returns to the original database you used as the model to create the exchange database.
If you choose File⇒Connected Databases, Timeslips displays the dialog box shown in Figure 16-22, which identifies the new database you created.
If you supplied the user-friendly name that Timeslips suggests in Step 4, that name appears in the Database column of the Connected Databases dialog box. In my opinion, that user-friendly name wouldn’t really have given me any useful information. Instead, by using the database folder name, I can identify which of my Timeslips databases is connected to the database I’m currently using.
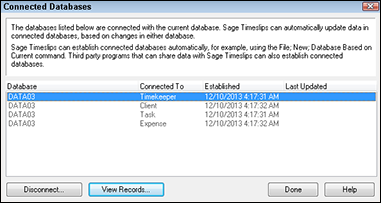
Figure 16-22: The Connected Databases dialog box.
If you click any connection listed in this dialog box and then click View Records, Timeslips will show you the nicknames associated with that connection.
If you open the new database by choosing File⇒Open Database, you’ll find that Timeslips has populated the new database with all the nicknames in the originating database, but the new database contains no slips — yet. Now, on to the heart of exchanging data.
Exchanging data
When you exchange data between the originating database (the database you use every day) and the exchange database, you can opt to exchange selected slips, new and changed clients and references, timekeepers, tasks, and expenses. If you exchange slips, you can specify what Timeslips should do to the slips in the originating database after the exchange. I suggest that you purge the slips that you transfer. If you follow my suggestion, you should
- Back up the exchange database and the originating database before you exchange slips.
- Use the Slip Transaction Date filter, as described earlier in the “Purging information” section, to set dates for the slips you want to transfer and purge. Set the Latest Date in the Filter for Slip Transaction Date dialog box (refer to Figure 16-15) to the date assigned to the last slips you want to purge. Don’t select any date for the Earliest Date.
When you opt to purge slips during an exchange, the slips don’t need to be closed as they do when you use the Purge feature.
To exchange slips between the originating database and the exchange database, back up both databases and then follow these steps:
- Choose File⇒Exchange.
Timeslips displays the Exchange Data with Another Database dialog box (see Figure 16-23).

Figure 16-23: Select the settings for transferring information between the originating and the exchange databases.
- Use the list at the top of the dialog box to specify whether you are in the originating (source) database or the exchange (destination) database.
In the example, I start in the originating database, which is DATA02.
- In the Send to the Other Database section, select the types of information you want to transfer.
- If you opt to transfer slips, use the drop-down list to identify the slips you want to transfer.
I suggest that you select Use Filters, click the Filters button, and set the Slip Transaction Date filter to identify the slips to transfer by their end date.
- Open the Once Complete list and select Purge Slips.
- Select the check box beside other types of data you want to transfer.
Timeslips doesn’t purge any data except slips.
- Click OK.
Timeslips displays the Select the Destination Database dialog box.
- Navigate to the exchange database folder and click Open.
Timeslips exchanges the selected data and, assuming you selected Purge Slips in Step 5, purges the selected slips.
Invariably, the situation arises where you need to produce a report that includes slips in both the originating database and the exchange database or the Purge database, if you purged and archived slips as described in the preceding section, “Restoring archives.” Because you can’t produce a report across two databases, I suggest that you use the following workaround to get all the slips you need for your report into the exchange database (or the Purge database). When you start this process, no slips appear in both the originating and the exchange or Purge databases. The process copies the slips from the originating database to the exchange or Purge database, leaving your day-to-day database untouched.
- In the exchange or Purge database, note the date of the newest (that is, the latest) slip.
- Choose File⇒Exchange to transfer all slips from the originating database to the exchange or Purge database.
See the preceding steps for details on exchanging information.
If you created a Purge database because you purged and archived and then combined slips into the Purge database, Timeslips might complain when you use the File Exchange command. During the process, Timeslips will prompt you for instructions on handling nicknames because the databases aren’t connected. Just click Add All whenever prompted. Timeslips won’t connect the two databases, but it will transfer the data. - Make sure that you set the Once Complete option to Do Nothing.
By setting the option to Do Nothing, you leave the originating database unchanged.
- Print the reports you need.
- Purge the exchange or Purge database — not the originating database — of the newest slips that you transferred into the database.
Use the Slip Transaction Date filter to purge all slips with a date that is later than the date you noted in Step 1; when you set the filter, choose the date as the Start Date on the left side of the Filter for Slip Transaction Date dialog box (refer to Figure 16-15). When you finish, the exchange or Purge database will once again contain only purged slips.