Chapter 3
What’s In a Name?
In This Chapter
![]() Understanding Timeslips templates
Understanding Timeslips templates
![]() Creating nicknames for timekeepers, tasks, and expenses
Creating nicknames for timekeepers, tasks, and expenses
![]() Managing multiple matters for the same client
Managing multiple matters for the same client
![]() Importing and exporting information between clients
Importing and exporting information between clients
Although Shakespeare’s Juliet argued that names don’t matter — “that which we call a rose by any other name would smell as sweet” — names form the foundation of the information you store in Sage Timeslips. You use names to identify the person doing the work, the work that’s being done, and the entity for whom the work is being done. You also can set up some optional names, as you discover at the end of this chapter.
By default, Timeslips refers to those who do the work as timekeepers, the work that’s being done as tasks or expenses, and the entities for whom the work is done as clients. This terminology is customizable; choose Setup⇒General to display the General Settings dialog box and then click Terminology on the left side of the page to make changes to these default terms. I use Timeslip's terminology throughout this book, but you can call timekeepers users if you want.
To make your life simpler, you set up names — Timeslips calls them nicknames— to identify your timekeepers, tasks and expenses, and clients. In this chapter, you learn how to create those nicknames and then set up details for them.
Saving Time with Templates
Templates are prototypes you can create to store default settings used by all nicknames of a given type. That is, you can create your own templates for timekeeper nicknames, task nicknames, expense nicknames, and client nicknames, and each template would contain defaults you want to apply to all new nicknames of that type that you create.
You create a template in much the same way that you create a nickname, with the following changes:
- As you assign a nickname, change its Classification from Open to Template.
- In the nickname 1 box, type the name you want to use for the template.
- Don’t fill in any fields in the template unless you want that information assigned to all new nicknames based on that template.
Sage Timeslips contains one template for each type of nickname, aptly named the Default template. If you don’t create your own templates, you can use the default template as you create a nickname or you can opt to use settings established in the General Settings dialog box. Because the settings in both the General Settings dialog box and the default templates are generic, you can’t go wrong using them.
If you don’t assign a nickname to a template, however, you can’t go back later and make the assignment, and you can’t change a nickname’s assigned template. So, throughout this chapter, I suggest that you assign nicknames to the Default template because you’ll have more options if you later realize that you want to apply a setting to all nicknames.
If you have certain settings that you want to use for all nicknames of a type, you can create your own template. If you want to ensure that you can always see the original way Timeslips did things, create your own copy of the Default template with a name like My Default Template and don’t change its settings. Assign the new template to your nicknames. If you make changes to your default template later, you’ll keep the original Default template clean.
Creating Timekeepers
Timeslips timekeepers are the people who perform work in your company and charge for expenses. As part of tracking work performed and expenses incurred, you create timekeeper nicknames. Typically, these nicknames appear only internally in Timeslips windows and on analysis reports. Nicknames make data entry quick and easy.
You can create two nicknames for the same timekeeper. The first nickname is required and must be unique in the timekeeper list. The second nickname is optional. The rest of the information you supply about the timekeeper is optional as well.
 When your employees create nicknames, you can enforce a format that specifies certain types of characters at certain positions in the nickname. This formatting is available for timekeeper, task, expense, and client nicknames, and you establish the format on the Nicknames tab of the General Settings dialog box (choose Setup⇒General). For detailed information on establishing a nickname format, choose Help⇒Online User’s Guide and, in the Help Index, search for Formatting Nicknames.
Before you begin to set up timekeeper nicknames, you might want to disable conflict checking if you didn’t do so in Chapter 1. Otherwise, Timeslips will automatically check for conflicts as you save each new timekeeper, which can become annoying. To disable conflict checking, choose Setup⇒General. On the left side of the General Settings dialog box, click Conflict Checking. Then deselect the Check for Conflicts when Saving a New Timekeeper option. To reenable conflict checking, reopen the General Settings dialog box and select that option.
To create a timekeeper nickname, follow these steps:
- Choose Names⇒Timekeeper Info.
The Timekeeper List window appears, as shown in Figure 3-1. The window contains elements common to all nickname list windows: a toolbar and a set of tabs that organize nicknames into three classifications (Open, Inactive, and Closed) as well as a tab that lists available Timekeeper templates. For more on nickname classifications, see the “Understanding classifications” sidebar.

Figure 3-1: Create and open timekeeper names.
- On the Timekeeper List toolbar, click the plus sign to display the Timekeeper Information window shown in Figure3-2.
If you hover your mouse pointer over each toolbar button, you will see a tip that describes the button’s function.

Figure 3-2: Establish the nicknames for a timekeeper.
- In the 1 and 2 boxes at the top of the window (called Nickname 1 and Nickname 2 in Timeslips terminology), type a nickname that represents the timekeeper.
You might consider using the timekeeper's initials or, if the initials aren't unique, a first initial and a last name. Or use the timekeeper’s full name. Nickname 1 can be up to 30 characters and Nickname 2 up to 15 characters.
 The first nickname must be unique and cannot be assigned to any other timekeeper. The second nickname is optional; if you don’t supply one, Timeslips will supply a number, starting with 1 and incrementing sequentially.
 - In the Set Up This Record to Match Fields From list, click Default to select the Timeslips default template and then click the Apply Defaults button.
The detailed version of the Timekeeper Information window appears, as shown in Figure 3-3. The nicknames you typed still appear at the top of the box, along with the classification of Open. The information you supply in this window is optional.

Figure 3-3: Define the details for the timekeeper.
- (Optional) Fill in the following information as appropriate:
- Name: Type the timekeeper’s full name. In the Initials box, type the timekeeper’s initials. This information can appear on client invoices if you choose to display it.
- Title: You can use the Employee Titles page of the General Settings dialog box to establish the hierarchical job titles used in your company. (Choose Setup⇒General and then click Employee Titles on the left side of the dialog box. To establish an employee’s hierarchical job title, select it from the Title list.) Then you can sort information on client invoices and other Timeslips reports by title.
- Email Address and Additional Email Addresses: In the e-mail address boxes, type e-mail addresses for the timekeeper.
- Rate Table: Establish up to 20 billing rates for the timekeeper. If you opt to create slips based on each timekeeper’s rates, as most companies do, the first rate you fill in is the default rate that Timeslips suggests as you store slips, as described in Chapter 4.
Although you can set up rate tables for all names, typically you set up rate tables for only one type of name. That is, if your company bills by timekeeper rates, it probably does not also bill by task rates. When you set up your clients in Timeslips, you establish rules that describe how to assign rates to slips by default by using a timekeeper rate, a client rate, or a task rate.
- Minimum Hours: Establish your company’s work week.
- Overhead: Establish the amount you pay the timekeeper. Using reports, you can compare the amount you pay the timekeeper to the amount in fees billed to your clients for work performed by the timekeeper.
You can read about the calendar in Chapter 4 and the My List feature in Chapter 17.
- Click the Save (disc) button, in the vertical toolbar on the right.
You use these same basic steps to create a template. See the “Saving Time with Templates” section for details on the few changes you need to make to create a template.
In addition to the Timeslips field information you can store with each nickname, you also can set up custom fields that store information of your choosing. Custom fields can be particularly useful with client nicknames. For example, you can use them to allocate fees you collect by timekeeper. And, if you use electronic billing with audit houses, you’ll probably need to set up custom fields using the parameters that the audit houses provide. See Chapter 16 for details on setting up custom fields and Chapter 17 for details on using the Fee Allocation feature.
Creating Tasks and Expenses
Every slip you create must be assigned a task or an expense. As with timekeepers, you create nicknames to represent tasks and expenses.
Setting up tasks
Timeslips tasks represent work that a timekeeper performs. You can set up lots of tasks or only a few, but you need at least one task in your database. Some companies want to be able to view reports that show time spent performing a particular task, regardless of the person who performed the work or the client for whom it was performed. Other companies want to sort bills based on tasks performed. These companies might create several tasks. Still other companies don’t care about tracking such information; if your company falls into this group, make sure you set up at least one task and don’t worry about setting up any others.
Don’t get carried away creating tasks. Having too many tasks can slow data entry as your employees search for the correct task to assign. Furthermore, if your employees have trouble deciding between tasks, they might choose the wrong one, which will skew your reports and not produce good data — and defeat the purpose of setting up many tasks.
At some places in the Sage Timeslips program, you’ll find mentions of activity, the term that was originally used in Timeslips for tasks. When you see activity, think task.
As you create tasks, remember that Nickname 1 is required and the rest of the information is optional but can help you speed up data entry. To create a task, follow these steps:
- Choose Names⇒Task Info.
The Task List window appears, looking just like the Timekeeper List window (refer to Figure 3-1).
- Click the New (plus sign) button on the toolbar at the top of the window.
The Task Information window appears, looking just like the Timekeeper Information window (refer to Figure 3-2).
- Type characters that represent the task for nickname 1 in the 1 box, and if appropriate, type nickname 2 in the 2 box.
Each nickname must be unique. Nickname 1 can be up to 30 characters, and nickname 2, up to 15 characters.
The first nickname must be unique and cannot be assigned to any other task. The second nickname is optional. - In the Set Up This Record to Match Fields From list, click Default to select the Timeslips default template. Then click the Apply Defaults button.
The detailed version of the Task Information window appears, as shown in Figure 3-4, displaying the nicknames you supplied as well as a classification of Open. The rest of the information you supply in this window is optional.

Figure 3-4: The window where you supply details for a task.
- (Optional) In the Name box, type a full name for the task.
- (Optional) In the Category drop-down list, select a category if you use this feature.
See Chapter 17 for details on the Category feature.
- (Optional) In the Rate Table section, establish up to 20 billing rates for the task.
If you opt to create slips using each task’s rates, the first rate you fill in is the default rate Timeslips suggests as you store slips.
When you set up your clients in Timeslips, you establish rules that describe how to assign rates to slips using a timekeeper rate, a client rate, or a task rate. - (Optional) In the Rate Type list, specify whether the task should be calculated at an hourly rate or a flat rate.
- (Optional) In the Slip-Making Defaults section, establish default information that will appear on each slip when you select this task:
- Time Spent and Time Estimated: Establish a default amount of time estimated and time spent.
- Bill Status: Establish a default billing status for the task; in most cases, you should set the Bill Status drop-down list to Billable. See Table 3-1 for information on each billing status option.
- Hold: Establish a default Hold status for the slip. Typically, you'll want slips you create available for billing (and not on hold), so the default Hold status should be Off.
- Description: Establish part or all of the description you want to appear on slips using this task. Providing some or all of a description can save time when creating slips.
See Chapter 4 for other timesaving techniques you can use to create slips.
- On the vertical toolbar, click the Save (disc) button.
Table 3-1 Bill Status Options
|
Bill Status Option |
Meaning |
|
Billable |
Timeslips will include the slip on all bills using a Slip billing arrangement (see Chapter 9 for details). |
|
Do Not Bill |
Timeslips won’t include the slip on the client’s bill, regardless of the billing arrangement. |
|
No Charge |
Timeslips will include the slip on all bills using a Slip billing arrangement, but the value of the slip will be $0. |
|
Override |
Timeslips will include the slip on a bill even if you’ve established a flat fee billing arrangement with the client. See Chapter 10 for more information. |
Tracking expenses
Often during the normal course of business, you incur expenses that you want to pass on to your clients. Typically, you and your client agree in advance that the client will cover the costs you incur on his or her behalf. In Timeslips, you use expense slips to record these expenses.
Entering an expense is much like entering a task; to create an expense, follow these steps:
- Choose Names⇒Expense Info.
The Expense List window appears, looking just like the Timekeeper List window (refer to Figure 3-1).
- Click the New (plus sign) button on the toolbar at the top of the window.
The Expense Information window appears, looking just like the Timekeeper Information window (refer to Figure 3-2).
- Type characters that represent the expense for nickname 1 in the 1 box, and if appropriate, type nickname 2 in the 2 box.
Each nickname must be unique. Nickname 1 can be up to 30 characters, and nickname 2, up to 15 characters.
The first nickname must be unique and cannot be assigned to any other expense. The second nickname is optional. - In the Set Up This Record to Match Fields From list, click Default to select the Timeslips default template. Then click the Apply Defaults button.
The detailed version of the Expense Information window appears, as shown in Figure 3-5, still displaying the nicknames you supplied as well as a classification of Open. The rest of the information you supply in this window is optional.
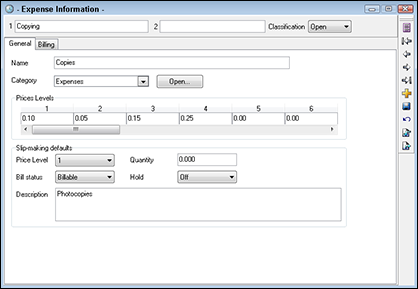
Figure 3-5: Supply details for an expense.
- (Optional) In the Name box, type a full name for the expense.
- (Optional) In the Category drop-down list, select a category if you use this feature.
See Chapter 17 for details on the Category feature.
- (Optional) In the Prices Levels section, establish up to 20 prices for the expense.
- (Optional) In the Slip-Making Defaults section, establish the default information that will appear on each slip when you select this expense:
- Price Level: Establish a default price level (from the prices you set in the Prices Levels section) for Timeslips to use when you create slips using this expense.
- Bill Status: Establish a default billing status for the expense; in most cases, you should set the Bill Status field to Billable. See Table 3-1 for information on each available billing status option.
- Quantity: Establish a default quantity for Timeslips to display when you create slips using this expense.
- Hold: Establish a default Hold status for the slip. Typically, you'll want slips you create available for billing (and not on hold), so the default Hold status should be Off.
- Description: Establish part or all of the description you want to appear on slips using this expense. Providing some or all of a description can save time when creating slips.
See Chapter 4 for other timesaving techniques you can use to create slips.
- On the vertical toolbar, click the Save (disc) button.
You can point at the tools on the toolbar to see tips describing their functions.
Setting Up Clients
Before you dive into the task of creating clients, you need to consider whether you’re likely to handle multiple matters for the same client and, if so, how you want to handle them. The method you choose affects the way you assign nickname 1 and possibly some other settings.
Handling multiple matters for a client
You can handle multiple matters for clients in three ways, and you can use all three methods in Timeslips as your needs for a particular client dictate. The method you choose for each client depends primarily — but not entirely — on the way you want to present bills to the client.
The idea here is that you want your bill to be as easy to understand as possible so that your client doesn’t question your bill — and hold up payment. Note that the ease with which a client understands can change from client to client. See Chapter 8 for details on designing bill layouts.
Method 1: Multiple clients
You can simply set up the client multiple times — once for each matter — if
- The matters are unrelated
- You want to send the client separate bills for each matter
- You don’t need to present the client with consolidated totals for all matters you handle
In this case, you don’t need to do anything special; you can simply establish nicknames for your clients and establish settings for each client individually. When you create the nicknames, consider using a two-part nickname separated by a character not likely to be a part of any client name, such as an underscore. Then make the first part of the nickname consistent for the client and the second part representative of the matter. For example:
- Smith_Estate
- Smith_Lawsuit
- Smith_Divorce
In addition, instead of typing the client address information for each matter, you might want to save time by importing and exporting the information between clients, as described later in this chapter in the “Importing and Exporting Information between Clients” section.
This approach enables you to use different billing arrangements, bill layouts, and budgets for each matter; to bill the client separately for each matter; to apply payments to each matter; and to track and maintain separate accounts receivable and client funds balances for each matter.
Method 2: Using the Client Project feature
The Client Project feature is a variation on the first method. Using the Client Project feature, you can
- Establish different bill arrangements for each project
- Set up different client budgets for each project
- Apply payments to each project
- Track separate accounts receivable balances and client funds balances
But the Client Project feature offers one additional benefit that you don’t get if you use the first method: the opportunity to consolidate information from different matters on bills and reports. The only end-result difference between these two methods is the capability to produce consolidated information.
In Figure 3-6, you see a sample of the project billing summary you can produce when you set up clients and projects using the Client Project feature. This summary appears at the end of the consolidated bill.

Figure 3-6: The summary for a consolidated bill.
Figures 3-7 and 3-8 show the first invoice and the second invoice, respectively, of a consolidated bill for two projects for the North Lake Consulting company. The consolidated bill lists the client’s name and address only once, at the top of the first bill. Charges for each project appear on the consolidated bill separated by an invoice number, and (if you establish it as I did) information from the In Reference To field. By default, projects don’t start on a new page, but you can change that setting in the bill layout you use, as I did in these figures. See Chapter 8 for details on adjusting bill layout settings for projects.

Figure 3-7: The first bill in a consolidated bill displays address, subject, and invoice number information.

Figure 3-8: The second and subsequent bills do not display address information.
You can use the Client Project feature without preparing a consolidated bill; that is, you can bill for each project individually. Your choice between method 1 and method 2 should be based on your need to consolidate information.
In the introduction to this section, I said that the only end-result difference between methods 1 and 2 is the capability to produce consolidated information. I used the expression “end-result” because you need to take some different actions before you set up these clients and while you set up these clients to make the Client Project feature work properly.
You can use the Client Project feature selectively. In other words, you can treat some clients as Client Project clients and others as regular clients.
When you create the nicknames for clients with projects, you’ll need to use a two-part nickname separated by a character not likely to be a part of any client name, such as an underscore. You make the first part of the nickname consistent for the client and the second part representative of the project. Nicknames might look something like this:
- Smith_Estate
- Smith_Lawsuit
- Smith_Divorce
In addition, as you set up clients with projects, you need to establish one client as the master client. Timeslips can copy information from the master client to the project clients, making setup quick and easy for you. Based on the settings you choose, you might not have to set up information such as the client’s name and address, the billing arrangement, the rates, and the bill layout for each project.
To use the Client Project feature, you need to establish the separator you intend to use in the nickname to distinguish clients with projects from clients without projects, and you need to identify the information Timeslips will take from the master client and automatically apply to the project clients. Take these steps before you set up clients and projects:
- Choose Setup⇒General.
The General Settings dialog box appears.
- On the left, click Nicknames.
- Open the Project Separator list and choose the character you want to use to separate the first part of the nickname from the second part (see Figure3-9).
Be sure to select a character that will not appear as part of any client’s nickname other than when you use it to establish a Client Project nickname.
- On the left side of the dialog box, click New Names.
- In the Clients section, select the fields you want Timeslips to copy from a master client to a project client (see Figure3-10).
You’re can safely copy address information without any unexpected consequences. Choosing to copy other fields depends on the differences you need to establish between the master client and the various projects.
- Click OK to save your changes.

Figure 3-9: Establish a separator for Client Project nicknames that won’t appear as part of any client’s name.

Figure 3-10: Select the type of client information you want Timeslips to copy from the master client to the projects.
When you set up a client with multiple projects, set up the master project first and use the Client Project naming convention for nickname 1, as shown in Figure 3-11. Also fill in the address information as you want it to appear on the bill and, in the Status section, make sure that you select the Master Client check box. Then, save the master client.

Figure 3-11: Establish nickname 1 using the Client Project naming convention and the project separator.
 If you opted to link Timeslips and either Sage 50 or QuickBooks when you set up your database, Timeslips prompts you to add the client to the accounting software. For details on linking to Sage 50 or QuickBooks, see the bonus chapter, “Linking to a General Ledger” at www.dummies.com/extras/sagetimeslips.
You can find details on the other fields on this tab later in this chapter, in the “Creating clients” section.
Now you’re ready to create a project client. After saving the master client, click the New (plus sign) button on the toolbar along the right side of the window and create a project. Instead of typing the client nickname, type the project separator. Timeslips automatically enters the first part of the Master Client's nickname — the part to the left of the project separator — in the Nickname 1 field. You fill in the right side of the nickname to make the nickname unique.
To make Timeslips fill in the left side of the correct client, open the master client before you click the New (plus sign) button on the toolbar. Timeslips assumes that you want to set up a new project for that master client. You can identify master clients easily in the Client List window because an M appears beside them.
Click the Apply Defaults button, and Timeslips automatically fills in information for the project client based on the settings you established in the General Settings dialog box. You’re free to make any changes you want — for example, you might want to change the text that appears in the In Reference To field — and then save the project. However, don't select the Master Client check box; for each client with multiple projects, you want only one master client.
Method 3: Creating References
Using references is the third way that you can manage multiple matters for clients. Unlike the other two methods, you create only one client. Then you create references and assign them to the slips that you create for the client. The references enable you to select, sort, and subtotal related information on internal reports and on your client’s bill.
Your client’s bill, sorted and subtotaled by reference, would look something like the one shown in Figure 3-12, in which each reference is underlined, followed by the charges associated with that reference.
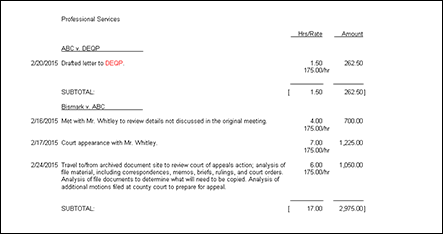
Figure 3-12: A bill, sorted and subtotaled by reference.
If you opt to use references, be aware that Timeslips can’t track accounts receivable balances by reference, and you can’t apply client payments to a particular reference. If you need these two features, choose either Method 1 or Method 2 to manage multiple matters for your client.
Before you create any references, you should create your client nicknames as described in the next section, “Creating clients.” That way, you have the option of creating references specifically for each client, or you can create references available to all clients by assigning them to a client template.
To create a reference for a specific client, follow these steps:
- Choose Names⇒Client References.
The Client Reference List window appears, as shown in Figure 3-13.

Figure 3-13: Client Reference List window.
- In the Client list, select that client for whom you want to create a reference, and then click the New (plus sign) button on the vertical toolbar.
The Reference Entry window appears, as shown in Figure 3-14.

Figure 3-14: Creating a new reference for the selected client.
- For the Nickname 1 field, you can enter up to 60 characters.
Remember that this nickname will appear on client bills if you sort and subtotal bills by reference.
The Nickname 2 field is optional and can be up to 15 characters. - Click OK.
Timeslips redisplays the Client Reference List window, and the reference you just created appears in alphabetical order below the client’s name.
Suppose that you’re a lawyer and your practice focuses on estate work. You could use the same references, such as Trust Preparation and Living Will, for many different clients. In this case, you should take advantage of setting up references attached to the template you assign as you create clients. That way, you can create the reference once and have it available to all clients.
Making a reference available to all clients is a two-part process:
- Assign each client to the Default template from the Client Reference List window.
- Create the references you want available to all clients.
Let’s start by assigning each client to the Default template. Follow these steps:
- Choose Names⇒Client References.
The Client Reference List window appears. Note that the Switch to the Template Client button appears dimmed, indicating that it is unavailable.
- In the Client list, select the first client for whom you want to set up references.
- On the vertical toolbar on the right side of the window, click the Client Setup button (last button on the toolbar).
The Client Reference Setup dialog box appears, as shown in Figure 3-15.

Figure 3-15: The Client Reference Setup dialog box.
- Open the Also Use Template drop-down list and select the Default template.
You can use the fields in the Naming section to specify the types of characters and their position in the reference nickname. For details on using autoformatting fields, click the Help button in the Client Reference Setup dialog box and, in the Help Index, search for formatting nicknames.
- (Optional) In the References on Slips section, establish a default reference that should be assigned to every slip.
Use a client-specific reference you already created. You also can indicate that slips for the client displayed in the dialog box must include a reference.
- Click OK to redisplay the Client Reference List window.
Note that the Switch to the Template Client button below the list of references is no longer dimmed.
- For each client in the Client list, repeat Steps 3 4, and 6 (and Step 5 if appropriate for the client) to set the Default template for that client.
Next, you can create references assigned to the Default template; the references you create will be available to all clients. Do the following:
- In the Client Reference List window, select any client.
- Click the Switch to the Template Client button.
Timeslips displays Default in the Client list. If you open the list, you’ll see other templates you’ve created.
- Click the New (plus sign) button on the vertical toolbar on the right.
The Reference Entry dialog box appears, looking like the one shown previously in Figure 3-14, except nickname 1 and nickname 2 both display Default (the name of the template in which you’re working).
- Type the text you want to use for the reference in the Nickname 1 and, if appropriate, Nickname 2 fields.
The reference text will be available for all clients as you create slips.
- Click OK to save the reference.
The Client Reference List window reappears.
- Repeat Steps 3–5 to create any additional references you want available for all clients.
- Click the Return to client name button, where client name is the name of the client you selected in Step 1.
- Click the X in the upper-right corner of the Client Reference List window to close it.
To use references, you assign them to time and expense slips you create. After you assign references to slips, you can sort and subtotal bills and reports by reference.
See Chapter 4 for details on assigning references to time and expense slips, Chapter 6 for information on sorting and subtotaling bills by reference, and Chapter 13 for details on sorting and subtotaling reports by reference.
Creating clients
As with timekeepers, tasks, and expenses, you also set up nicknames for your clients. The process is similar, except that a lot more options are available to set up for clients. In this section, I show you how to create a client and establish basic information for the client. I refer you to other places in the book for details on some of the screens available when working with client information.
Before you begin to set up client nicknames, you might want to disable conflict checking if you didn’t do so in Chapter 1. During setup, conflict checking can be annoying because Timeslips automatically checks for conflicts as you save each new client. To disable conflict checking, choose Setup⇒General and, on the left side of the General Settings dialog box, click Conflict Checking. Click to deselect the Check for Conflicts When Saving a New Client option. As you begin to use Timeslips, you will probably want to re-enable conflict checking; reopen the General Settings dialog box and select that same option.
To create a new client’s nicknames, follow these steps:
- Choose Names⇒Client Info to open the Client List window.
The Client List window looks just like the Timekeeper List window (refer to Figure 3-1).
- Click the New (plus sign) button on the toolbar at the top of the window.
The Client Information window appears, looking just like the Timekeeper Information window (refer to Figure 3-2).
- Type characters that represent the client for nickname 1 in the 1 box and, if appropriate, type an optional nickname 2 in the 2 box.
Each nickname must be unique. Nickname 1 can be up to 30 characters, and nickname 2, up to 15 characters.
Remember, Nickname 2 is optional. Many law firms assign one nickname as the client’s file number and the other nickname as an English language-like name for the client. - In the Set Up This Record to Match Fields From list, click Default or the appropriate template. Then click the Apply Defaults button.
The detailed version of the Client Information window appears, as shown in Figure 3-16, still displaying the nicknames you supplied as well as a classification of Open.
If you plan to use replacement slips for some of your clients and you’re creating nicknames for a replacement slip client, make sure you select your replacement slip template. Otherwise, select the Default template. See the sidebar, “Clients and client templates” and Chapter 12 for details on using replacement slips.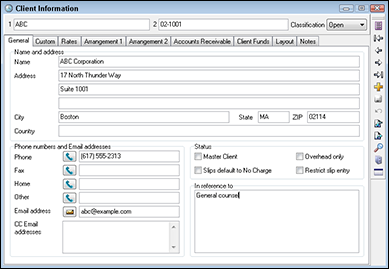
Figure 3-16: Note the many tabs in the window where you supply details for a client.
- In the Name and Address section, provide the client’s name and address as you want them to appear on the client’s bill.
- In the Phone Numbers and Email Addresses section, supply appropriate phone numbers for the client. If you plan to e-mail bills to the client, provide an e-mail address and any e-mail addresses to which you want to send copies.
If you use a compatible phone device and service, you can let Timeslips dial the phone for you by clicking the button beside the phone number you want your computer to dial.
See Chapter 6 for more information on e-mailing bills.
- In the Status section, you can
- Designate a client as a Master Client. The Master Client is part of the Client Project feature, described earlier in this chapter in the “Handling multiple matters for a client” section.
- Specify that slips for this client default to No Charge. Lawyers often use this setting to track work for pro bono clients.
- Identify the client as an overhead client, to whom employees can assign time spent on non-client work.
- Select the Restrict Slip Entry box to warn employees that you don’t want them to enter slips for this client. When used with the Timeslips Security feature, you can prevent employees from entering slips for the client. Some companies use this setting to try to control entering slips for clients who might have a large outstanding balance.
- In Reference To box, type a description of the general work you do for the client.
This information typically appears on the client’s bill, immediately below the client’s address information.
- Click the Save (disc) button on the vertical toolbar.
You’ve now set up the basics for a client. But, as you’ve noticed, the Client Information window contains many tabs. I cover some of them here and the remaining ones in the following chapters:
- Custom tab: Chapter 16
- Arrangement 1 tab (billing arrangements): Chapters 9 and 10
- Arrangement 2 tab (e-mail options): Chapter 6
- Accounts Receivable tab: Chapter 5
- Client Funds tab: Chapter 5
- Layout tab: Chapter 7
Examining the Rates tab
You use the Rate Table on the Rates tab, shown in Figure 3-17, to establish up to 20 billing rates for the client. These rates are optional if, for example, you plan to create slips using a timekeeper rate.

Figure 3-17: The Rates tab.
You also can optionally set up automatic rate selection rules for each client using the Rate Rule Entry dialog box (click the New button at the bottom of the Rates tab). Figure 3-18 shows a sample rule. These rules compare the timekeeper and task you select on a slip you’re entering to automatic rate selection rules you define and assign to clients. If Timeslips finds a rule that matches the names you select on the slip, the slip’s Rate Source, Rate Level, and Rate Type are assigned using the information in the Set the Slip Rate Information Fields to This section of the rule.

Figure 3-18: The Rate Rule Entry dialog box.
If Timeslips doesn’t find any automatic rate selection rules or any matches to existing rate selection rules, the program tries to use rules from existing client templates, if they contain rules.
If Timeslips finds no rules in existing client templates, it uses the values you set at the bottom of the Rates page. As Figure 3-17 shows, you can indicate that Timeslips should, by default, assign the timekeeper’s second rate on slips. You also can opt to have Timeslips use a client’s rate or a task’s rate.
Establishing Hold information
On the Arrangement 1 tab, shown in Figure 3-19, you establish billing arrangements for the client, as described in Chapters 9 and 10. At the bottom of the tab, you also can establish hold information for the client. You place a client on hold to easily avoid printing a bill for the client, even if you accidentally select the client as part of the group you want to bill.

Figure 3-19: Use the bottom of the Arrange-ment 1 tab to establish hold information for a client.
Using the settings in this section, you can hold only certain types of charges or the entire bill. For example, you might agree not to bill a client for your time until it reaches a certain dollar or hour amount but to bill the client for expenses you incur.
You also can opt to hold accounts receivable transactions from a client’s bill. Accounts receivable transactions are typically payments you receive from the client for services rendered. To read more about them, see Chapter 5.
Looking at the Arrangement 2 tab
On the Arrangement 2 tab, shown in Figure 3-20, you can assign tax profiles, establish rounding and markup or discount rules, establish interest rates and rules, and identify the bill to which finance charges apply.
If you're required to charge clients tax, use the Taxes dialog box shown in Figure 3-21 to set up tax profiles, rates rules, and jurisdictions (choose Setup⇒Taxes).

Figure 3-20: The Arrange-ment 2 tab.
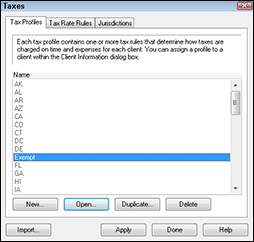
Figure 3-21: The Taxes dialog box.
Tax profiles (which appear on the first tab) contain tax rate rules (shown on the second tab), and tax rate rules incorporate a jurisdiction listed on the Jurisdictions tab. You use the Tax Rate Rules dialog box, shown in Figure 3-22, to define the tax rate and the type of charges to which it applies.

Figure 3-22: Define a tax rate rule using this dialog box.
In addition to managing a client’s tax profile, you can use the Adjustments to Individual Charges section of the Arrangement 2 tab to control the way Timeslips rounds fees on slips, to determine the decimal places Timeslips uses to calculate 1/3 of an hour, and to automatically mark up or discount slips that use selected tasks or expenses. You can choose the tasks or expenses that use this markup value on the Billing tab of the Task Information and the Expense Information windows.
In the Interest and Finance Charge sections, you can set up the client so that you can charge interest if the client doesn’t pay on time. If you supply a value in the Annual Interest Rate box, Timeslips calculates the interest and prints it on the client’s bill using the rules you establish in the rest of these two sections. To avoid charging interest, set the Annual Interest Rate to 0.
Importing and Exporting Information between Clients
Much of the information you establish for one client applies to other clients. Instead of making individual settings on each client, make the settings for one client and then export them to other clients. Or go in the opposite direction and import information from one client to another. The process is similar, regardless of the direction in which you send the information. The only difference lies in the client you open before exporting or importing:
- To import information, open the client who should receive the information.
- To export information, open the client for whom you’ve already set up the information.
When would you use the Import or Export feature? One prime example comes to mind: If you handle multiple matters for a single client and choose to use method 1 described in the “Handling multiple matters for a client” section. In this circumstance, you set up the client several times in Timeslips — once for each matter you handle. But why type the client’s name and address information each time you set up the client, when you can import it from one of the matters?
 You can’t undo exporting and importing, so it’s wise to create a backup of your Timeslips database before you start. See Chapter 15 for instructions on creating a backup.
Let’s assume that you set up three clients to represent three matters for the ABC Company: ABC-1, ABC-2, and ABC-3. Let’s further assume that you set up the name and address information for the ABC Company only in the first matter (ABC-1). You can export that information to ABC-2 and ABC-3 by following these steps:
- Choose Names⇒Client Info.
The Client List window appears.
- Double-click the client in which you stored the information you want to export.
For this example, I opened ABC-1, as shown in Figure 3-23.

Figure 3-23: Display the Client Information window containing the information you want to export.
- On the vertical toolbar on the right, click the Export button.
The Export Client Information window appears, as shown in Figure 3-24. The left side contains all the fields available on all tabs of the Client Information window; by default, Timeslips highlights and selects the fields on the tab you were viewing when you opened this window. The right side of the window lists all clients you’ve created.

Figure 3-24: Select fields to export or import.
- Verify that Timeslips selected the fields that you want to export on the left side of the window.
If Timeslips selected more fields than you want, deselect those fields. Similarly, if Timeslips missed some fields you want, select them.
- Select the clients to whom you want to export the selected information.
In this example, I selected ABC-2 and ABC-3.
- Click the Export button.
Timeslips reminds you to back up before exporting.
- Click Yes to continue the export process.
Timeslips exports the selected information to the designated clients and notifies you that the export was successful.
You can open any of the clients to whom you exported the information to verify that the result is what you expected.
Importing works the same as exporting, except you work with only two clients simultaneously (remember, in Step 5, I exported the information from one client to two other clients, but I could have exported to more clients).
When you import information, you open the client who is missing information and display the tab where you want information to appear. Then you click the Import button on the Client Information window toolbar to display the Import Client Information window, which is set up in the reverse order of the Export Client Information window; that is, the list of available clients appears on the left and the highlighted and selected fields appear on the right. In the Import From list on the left side of the window, you click one client who contains the information you want to import. Verify the fields that Timeslips has selected to import and (assuming that the correct fields were selected) click the Import button. And that’s it — you’re done.