Chapter 13
Making Reports Work for You
In This Chapter
![]() Examining the types of reports
Examining the types of reports
![]() Controlling report content
Controlling report content
![]() Printing reports
Printing reports
Reporting is a big part of any business. You can use Timeslips reports to view information about your clients and track the money they owe you and the money they’ve paid you. You also can print reports about your timekeepers, including information on the slips they’ve recorded and the way they’ve spent their time.
In this chapter, you focus on how to set up a report to view the information you need. You can sort information on reports and, in some cases, subtotal the information. You can also filter reports to limit the information that appears on them. In many cases, you can set report-specific options. You also can print reports to a variety of mediums: your display, any printer available to your computer, and a variety of file types, including .PDF files.
Bills are considered reports in Timeslips, so I use bills as examples in many places throughout this chapter.
 Everything in this chapter applies to both text-format reports and graph-format reports.
Understanding the Types of Timeslips Reports
Timeslips contains more than 100 reports, some in text format and others in graph format. You can view samples of every Timeslips report in the Report Samples file that ships with Timeslips. To view this document, choose Help⇒Other Documents⇒Report Samples.
To help you efficiently find the report you need, Timeslips organizes reports into 10 groups:
- Billing
- Slips
- A/R transactions
- Funds transactions
- Client
- Timekeeper
- Activity
- System
- Tax
- Other
You can view the reports in each group by clicking the Reports menu. When you select a report group, the Report List window shown in Figure 13-1 appears. The Report List window use tabs to organize reports into groups.

Figure 13-1: The Report List window organizes reports into groups.
 You can rename and reorder the group tabs in the Report List window. And if you think a report belongs more logically in a different report group, you can move the report to that group. See Chapter 14 for details.
For each report that you select from the list on the left side of the Report List window, Timeslips displays a small sample of the report and a description of its content on the right side of the report. You can click the View Full Example link to use Adobe Reader to view a full-sized sample of the report. The View Full Example link opens the Report Samples file (mentioned previously) directly to the report selected in the Report List window.
To use the View Full Example link, Adobe Reader must be installed on your computer and be the default .PDF reading software program. The link doesn’t work with any other .PDF reader programs.
For some reports, such as the Pre-bill Worksheet and the Generate Bills reports, Timeslips also displays date range boxes below the list of report names. You can use these boxes to set slip dates to include on the report.
Controlling Report Content
You control the content on a report by
- Establishing filters to select the data to include in the report — slips, clients, transactions, and other information
- Sorting the report to specify the order in which the records appear on the report
- Setting up report-specific options
- Selecting an output device for printing the report
Selecting filters
Filters help you limit the data that Timeslips includes on a report. For example, you might set up a Bill Cycle custom field for your clients and assign each client to a bill cycle, similar to the technique described in Chapter 6 in the sidebar detailing the frequency with which you should bill. You can then use the Bill Cycle custom field to select clients to bill. Or, on the Invoice Listing report, you might exclude unpaid invoices to produce a report of fully or partially paid invoices.
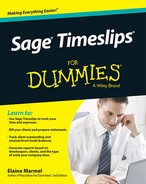
You use the Report Entry window for the report to establish filters; the available filters are specific to each report. Regardless of the report you choose, the Report Entry window contains two tabs: the Selection Filters tab and the Sort and Subtotal tab. You can read about the Sort and Subtotal tab in the next section.
In the following steps, you find out how to set a filter by using the Bill Cycle filter to select clients to bill:
- In the Report List window (refer to Figure13-1), double-click the name of the report you want to produce.
The report’s Report Entry window appears. In the example, the Generate Bills Report Entry window appears.
- Click the Selection Filters tab.
- Open the Filter Groups list and select a type of filter (see Figure13-2).
In the example, I chose Client. Regardless of the filter group you choose, Timeslips repopulates the list with filters available for the group you choose.
By default, Timeslips displays in the Report Entry window the filters available in the Most Popular filter group. Many more settings are available in other filter groups.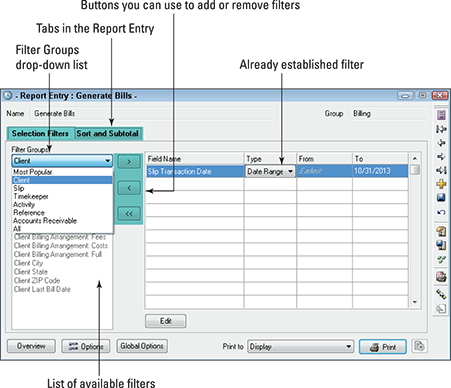
Figure 13-2: Set filters for a report.
- In the list of available filters, double-click the filter you want to set.
Instead of double-clicking the filter to set, you can click the right-pointing arrow that appears between the list of available filters and the list of filters that have already been set.
Timeslips displays a dialog box you use to set the filter. In the example, Timeslips displays the Filter for Client Bill Cycle dialog box shown in Figure 13-3, where I can choose to print bills for clients in a variety of bill cycles.
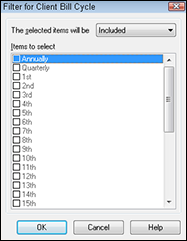
Figure 13-3: Making filter selections.
- Make selections to set the filter.
In the example, choosing Monthly tells Timeslips to select clients assigned to the monthly billing cycle.
- Click OK.
Timeslips redisplays the Report Entry window, and the filter you set appears on the right side of the window.
- To set additional filters, repeat Steps 3–6.
The more filters you set, the more information you exclude from a report. Think of it this way: Each filter you set eliminates information that doesn’t match that filter. More filters eliminate more information.
You can make changes to any filter already set by double-clicking the filter on the right side of the Selection Filters tab. (Or you can click the filter and then click the Edit button that appears below the right side of the window.)
You can remove any filter already set by clicking it on the right side of the Selection Filters tab and then clicking the left-pointing arrow that appears between the list of available filters and the list of filters already set.
Establishing sort and subtotal options
In addition to filtering a report to limit the information it displays, you can sort and, if numbers are involved, subtotal report information. For example, if you use the Timeslips Reference feature described in Chapter 3, you might want to sort and subtotal client reports by reference. In the steps that follow, I use the Generate Bills report to demonstrate sorting and subtotaling by reference; you can see a sample bill sorted and subtotaled by reference in Chapter 3.
- Click Reports and then click the group containing the report you want to produce.
To set up the Generate Bills report to sort and subtotal client bills by reference, choose the Billing group.
- In the Report List window, double-click the report you want to produce.
- On the Selection Filters tab, set any filters for the report using the steps in the preceding section.
- Click the Sort and Subtotal tab (see Figure13-4).
You might see already established sort fields on the right side of the window. Timeslips sorts the report data in the order in which the listed sort fields appear. In Figure 13-4, Timeslips sorts information on client bills first by the date on the client’s slips and then by slip number within each date.

Figure 13-4: Setting up sorting and subtotaling options for a report.
- If sort fields already appear on the right side of the window, click the one after which you want to add a sort field.
For example, to sort client bill information by slip date, slip number, and then reference, click the Slip Transaction ID sort option as I did in Figure 13-4.
- On the left side of the Sort and Subtotal tab, open the Sort Groups drop-down list and select a sort group.
Timeslips displays the sorting and subtotaling options available in that sort group below the Sort Groups drop-down list. To sort and subtotal client bills by reference, I choose the Reference sort group.
- Double-click the field by which you want to sort the report.
Timeslips moves that field — in the example, the Reference Nickname 1 field — to the right side of the Sort and Subtotal tab below the sort field you selected in Step 5.
Instead of double-clicking, you can click the right-pointing arrow that appears between the list of available sort and subtotal options and the list of sort and subtotal options already set. - On the right side of the Sort and Subtotal tab, set the sort and subtotal options:
- Use the Order column to change the sort order from Ascending to Descending.
- If available, choose a Subtotal option in the Subtotal column.
- Use the Up and Down buttons below the selected sort and subtotal fields to reorder the way Timeslips sorts and subtotals the information on the report.
- Repeat Steps 3–8 to set any additional sort and subtotal options.
To remove a sort and subtotal option, click it on the right side of the Sort and Subtotal tab and then click the left-pointing arrow that appears between the list of available sort groups and the list of sort and subtotal options already set.
Setting report-specific options
If you click the Options button in the Report Entry window, you can set report-specific options and you can control some report formatting. For example, most reports show, by default, the filter criteria you establish for the report, but you can suppress this information. The steps that follow use the Aged A/R Balances report as an example:
- Click Reports, and then click the group containing the report you want to produce.
To set report-specific options for the Aged A/R Balances report, choose Billing as the report group.
- In the Report List window, double-click the report you want to produce.
- Click the Options button to display the Report Options dialog box (see Figure 13-5).
The Options button is at the bottom of the Report Entry window, just below the Filter Groups list. The available options depend on the report you select in Step 2. Figure 13-5 shows the options for the Aged A/R Balances report.

Figure 13-5: The options in the Report Options dialog box depend on the report you choose to print.
- Set any options you want.
To hide the selection criteria for a report, deselect the Show Selection Criteria option.
- Click OK.
The Global Options button appears beside the Options button in the Report Entry window. You can click the Global Options button to display the Global Options dialog box and make changes that affect all reports. Typically, the default settings in the Global Options dialog box work fine and don’t need to be changed.
Saving report settings
Suppose that, every time you print a particular report, you want to sort and subtotal it using the same options. Instead of setting up those options each time you print the report, you can click the Save (disc) button on the vertical toolbar to display the Save dialog box shown in Figure 13-6.

Figure 13-6: Saving options you set for the selected report.
Typically, you don’t want to save filters you set; each time you print the report, you typically want to establish the information that appears on the report.
However, many times, you do want to sort the report in the same order. And you might want to save report-specific options, the Print to Choice option, which controls the output device to which the report prints, and even the options available in the Print Setup dialog box.
You can read more about the Print to Choice option in the next section.
Remove the check marks beside any settings you don’t want to save. Then click OK, and Timeslips saves the options.
Printing a Report
You can preview reports on-screen and then print them to a printer or to a variety of file formats. All printing is controlled in the lower-right corner of the Report Entry window, where you use the Print To drop-down list to select an output device or file format. Then you click the Print button to send the report to the selected output device (see Figure 13-7).
Wondering about the difference between Print and Print… in the Print To drop-down list? Print sends the report to the default printer. Print… displays a dialog box where you can select a printer and then print the report.

Figure 13-7: Use the Print To drop-down list to select an output device for a report.
When you preview a report on-screen, you can hover the mouse pointer over report information and, when a yellow highlight appears, click to drill down and view the details behind the report information.
If a purple highlight appears and you click, Timeslips not only displays the detail but also positions the mouse pointer in the specific field. On the Slip Listing report shown in the Print Preview window in Figure 13-8, the mouse pointer is pointing at a slip description. If you click, Timeslips opens the Slip Entry window, displays the slip on which you clicked, and positions the mouse pointer in the slip description field. You can then edit the information and, when you save and close the window, Timeslips redisplays the report.
Figure 13-8: Hover the cursor over report information and click to see the details.
You can drill down only on individual records on a report, not on totals. You can’t drill down on totals because totals are an accumulation of values from multiple records.
If you want Timeslips to update the report to reflect changes you made to a record, select the Automatically Update the Report after Making Changes check box at the bottom of the Print Preview window.
When you opt to print the report to paper, you can choose Printer or Printer from the Print To drop-down list. If you choose Printer, Timeslips prints the report to your computer’s default printer. If you choose Printer, Timeslips displays the Print dialog box, from which you can choose the printer to which you want to print the report.
Creating an Excel file
If you want to perform your own calculations on a report’s data, you can export the report information to an Excel workbook. In the Print To drop-down list in the Report Entry window, select Microsoft Excel file, and then click Print. Timeslips then displays the Print to Excel dialog box, where you can set up options that determine how the report will print (see Figure 13-9).

Figure 13-9: Use this dialog box to set up options before you export report information to an Excel workbook.
Timeslips will not include report totals, report subtotals, or their headings in the Excel workbook. The worksheet will, however, reflect any sort keys that you have set up.
Although you can use Timeslips options to suppress zero values on some reports, Timeslips will always include zero values when printing to Excel so that you can easily calculate values in Excel.
Creating a .PDF file
You can print Timeslips reports to .PDF files, a universal file format available for free to all who install .PDF reader software on their computers. Files formatted using .PDF format display on-screen exactly the way the report would print to a printer.
To save paper and postage, many companies have moved to sending bills to clients via e-mail. That process is described in detail in Chapter 6. For your own records, you can create .PDF copies of bills you send.
You can set defaults for how Timeslips handles .PDF bills, and you can save the options you set up.
The following steps refer only to setting up bills to print to .PDF files. You can print other reports to .PDF files, but you won’t be using the settings you establish in these steps for other reports.
- From the Report Entry: Generate Bills window, open the Print To drop-down list in the lower-right corner and choose PDF File.
- Click the Device Setup button, which is immediately to the right of the Print button.
The PDF Options dialog box appears, as shown in Figure 13-10.
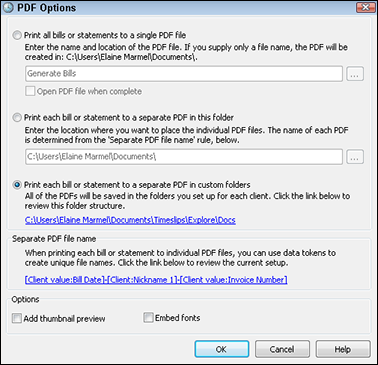
Figure 13-10: Specify how Timeslips should handle bills you print to .PDF files.
- Choose an option to determine how Timeslips handles bills printed to .PDF format:
- Choose the first option if you want to print all bills you generate to a single .PDF file.
- Choose the second option if you want to create separate .PDF files for each bill you generate and place all .PDF files in one folder on your computer.
- Choose the third option to print separate .PDF files for each bill you create and place the .PDF files in client-specific folders that Timeslips can create for you using, by default, the client’s Nickname 1. By default, Timeslips creates the client-specific folders in a folder called Docs inside your Timeslips database folder.
I usually recommend that my clients choose the second option or the third option. Either of these options will help you find particular bills for a client more easily. - If you choose the second or third option, click the link at the bottom of the PDF Options dialog box in the Separate PDF File Name section,
The dialog box shown in Figure 13-11 appears. From this dialog box, you can control the filename that Timeslips assigns to the individual bills.
By default, Timeslips creates .PDF files named using each client’s Nickname 1 and the invoice number assigned to the bill. You might, for example, also want to separate each part of the filename with a dash and include the bill date as part of the filename.
Figure 13-11: Establish a filename format for individual bill .PDF files.
- Click in the Name field and make changes.
- To separate the components of the name with hyphens, type a hyphen between each part of the name, as I did in Figure 13-11.
- To add a field to the filename, place the insertion point at the position in the Name field where the new field should appear; in Figure 13-11, I placed the insertion point at the beginning of the filename. Then click the new field in the Fields list and click the Add Field button.
- Click OK to redisplay the PDF Options dialog box.
The new filename format appears in the Separate PDF File Name section.
- Click OK again to close the PDF Options dialog box.
- Click the Save (disc) button on the vertical toolbar in the Report Entry window.
The Save dialog box shown in Figure 13-12 appears.

Figure 13-12: To save .PDF options, select only the option titled Report Device Options and Print Setup.
- Deselect all boxes in the Save These Settings section except the Report Device Options and Print Setup option.
By selecting only this option, Timeslips saves your .PDF file location and name settings without saving the .PDF file as your default output device. That way, you can print bills to .PDF files when you want — and Timeslips will use the saved .PDF file settings — but print bills to other output devices as you work through the billing process described in Chapter 6.
Using the billing process described in Chapter 6, you place all bills in the proof stage until they're ready to go to clients. At that point, you approve the bills. To create a .PDF file version for your own records, move the bills from the proof stage to the revision stage and then reprint them to .PDF files. After Timeslips creates the .PDF files, approve the bills. To move the bills from the proof stage to the revision stage, choose Bills⇒Approve or Clear Bills. In the Bill Stages window, select all bills in the proof stage and click the Clear button to display a prompt. In the prompt window, click the Revision button.
Creating other types of files
In addition to Excel files and .PDF files, you can use the Print To drop-down list to print reports to three other formats:
- Rich text files (.RTF)
- Text files (.TXT)
- Delimited files that separate fields using commas (.CSV) or tab characters (.TAB)
You can’t print Timeslips graph reports — such as the Monthly Billed Values report, the Billed Values by Timekeeper report, the Monthly Slip Values report, or the Monthly Time Usage report — to any of these formats.
Use the rich text file format or the text file format if you want to try to edit a report in a word processing program. The text file format doesn’t preserve formatting, but the rich text format preserves the fonts, formatting, and positioning of report data.
Use the delimited file formats to print reports to files that you can then import into other software programs. (And good luck with that, given that correct import file formats vary from program to program!)