Chapter 1
Setting Up Sage Timeslips
In This Chapter
![]() Reviewing the billing process in Sage Timeslips
Reviewing the billing process in Sage Timeslips
![]() Creating a database
Creating a database
![]() Setting preferences
Setting preferences
![]() Understanding the restrictions for network users
Understanding the restrictions for network users
Before you dive into learning how to use Sage Timeslips, performing a few housekeeping tasks will make things easier for you as you learn. For example, understanding the billing process that Sage Timeslips uses is helpful. In addition, to store your information, you’ll need to create a Sage Timeslips database. Finally, you might want to know about some program functions you can set to make Timeslips work the way you want. Let’s get started.
Even if you’ve installed the product, please read the installation instructions in Appendix A, especially if you plan to use Timeslips on a network. The process isn’t straightforward, and the program might behave unexpectedly if you don’t install it correctly.
Understanding the Sage Timeslips Billing Process
If you bill for your time, you need to capture time and expenses for each client and generate bills that describe those time and expense charges. Then you’ll want to produce reports that describe the status of payments — important information when trying to stay in business.
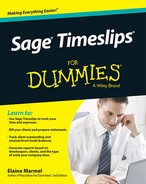
In Sage Timeslips, slips form the foundation of the information you enter that might appear on a client’s bill. Cleverly, Sage Timeslips uses time slips (see Figure 1-1) to help you track and describe the time you spend working for a client and expense slips to track and describe the expenses you incur on behalf of a client.
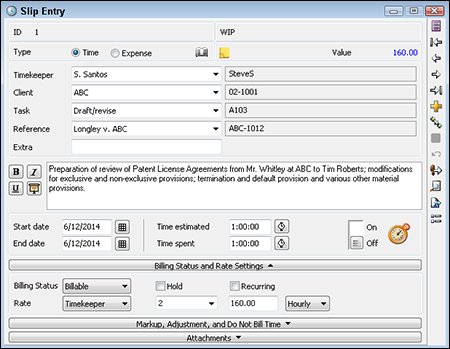
Figure 1-1: A typical time slip.
As a matter of good business practice, you should record time and expense slips for everything you do, even if you don’t expect to bill your client for all your time or expenses. Knowing how you spend your time and money helps you improve your ability to earn money. And displaying charges on a bill and indicating to your client that you gave away that time or ate that expense often builds goodwill, a commodity impossible to measure but invaluable to the success of your business.
You enter slips throughout your billing cycle. At some point, you generate bills and send them to clients, who typically take 30 days to pay your bill. Using Sage Timeslips, you can bill as often as you want — even daily, if that floats your boat. Just don’t bill the same clients every day; you don’t want to irritate them.
You can bill your clients based on the slips you enter, or you can establish any of several flat fee arrangements, in which you agree to do a job for a fixed amount, regardless of the time and expenses you invest in the job. When you use a flat fee arrangement, it’s still important to enter slips to record your time and expenses because you can determine whether you invested more time and money than you collected from the client — and improve your estimating skills for future flat fee jobs.
You’ll find more information on billing arrangements — both slip-based and flat fee — in Chapters 9 and 10, respectively. For more on slips in general, see Chapter 4.
At any time, you can produce reports that help you evaluate your business. For example, you can print reports that show who owes you money, how much you’re owed, and even how long the money has been owed. You use accounts receivable transactions in Timeslips to record events such as a client paying your bill or a credit for a disputed charge.
Creating a Sage Timeslips Database
Every slip you create must identify the person who did the work, the client for whom the work was done, and the work performed or the expense incurred. Tasks are time-based services you perform for clients, and you typically bill them using an hourly rate. Expenses are costs that you incur on behalf of the client, such as photocopying, or items you purchase for the client. Expenses are typically measured by quantity and price.
Timeslips makes it easy to create a slip. The program stores lists of information that you need to create slips, such as the people who work at your company, information about your clients, tasks you perform, and types of expenses you incur. Timeslips stores lots of information in its database.
To create a database, follow these steps:
- If you’re opening the program for the first time, click Create a New Database from the Welcome to Sage Timeslips window that appears. Otherwise, choose File⇒New⇒Database to display the Select a Database Style page of the Create a New Database wizard shown in Figure1-2.
You can populate your database automatically with a starting list of tasks and expenses and custom fields commonly used by accountants, architects, consultants, construction companies, and law firms. If you wanted to go that route, you would select Professional Database and then choose a database style. However, I’ve found that most users prefer to create an empty database that they populate themselves, so that’s what you’ll do in these steps. (See Chapter 16 for information on custom fields.)
 If you’re planning to use a Sage Timeslips add-on product to support electronic billing (used primarily by law firms that do business with insurance companies), you should install the add-on before you create a Timeslips database and you should select the database style associated with your add-on. That database style will contain the custom fields you’ll need for electronic billing.
Figure 1-2: You can populate part of your database or create an empty database.
- Select Empty Database and then click Next.
The Select a Database Location dialog box appears.
- Click the Browse button to the right of the listed path name and navigate to the folder where you want to store your database, as shown in Figure1-3.
Although the wizard suggests that you store your database in a folder located inside the Program Files folder, where you installed the program, and that you name that folder DATA01, many IT people prefer that you not store data in the Program Files folder. I usually recommend that you store your Timeslips database in a folder inside the Documents folder; that way, if you use the Windows 7 backup utility, it will automatically include your Timeslips database when backing up your files.
- Click Next and enter your company’s name as you want it to appear on reports and possibly your bills.
 You can print your bills on plain paper, and Timeslips will print your company name on the bill. Or you can opt to print bills on letterhead and suppress the printing of your company name. See Chapter 8 for details.
 - Click Next and select the number of decimal places you want Timeslips to track for numeric values, such as rates and fees.
If you’re in the United States, select the 2 Decimal Places option.
- Click Next and select a starting month for your company’s fiscal year.

Figure 1-3: Select a folder in which to store your Timeslips database.
- Click Next and specify the first invoice number you want Timeslips to use on the first bill it generates.
After you produce the first bill, Timeslips automatically increments invoice numbers from this first number you specify.
- Click Next and select a bill format (see Figure1-4).
Don’t worry; you’re not locked into the bill format you use. Timeslips uses the format you select when you create your database as the default, but you can switch to a different layout at any time, and you can modify any bill layout you select. I suggest that you choose Basic Bill and choose Medium for the Detail option. You also can opt to include a cover page, which produces a summary page of charges for your bill.
You can select each layout in the list and then double-click the Preview to get a better look at the layout. - Click Next and select an option for the Timeslips Accounting Link (see Figure1-5).
Using the Timeslips Accounting link (TAL), you can track the accounting information associated with bills and their subsequent payments. If you use Sage 50 or QuickBooks, you can directly transfer accounting information. If you use any other accounting package, select the Timeslips Accounting Link (TAL) option to generate a report of entries you can use to easily enter information into your accounting package.
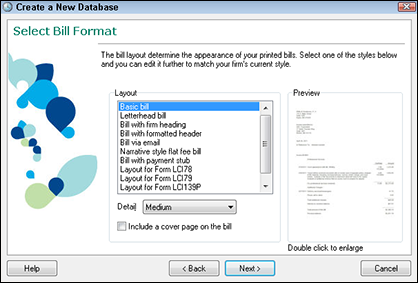
Figure 1-4: Select a bill format.
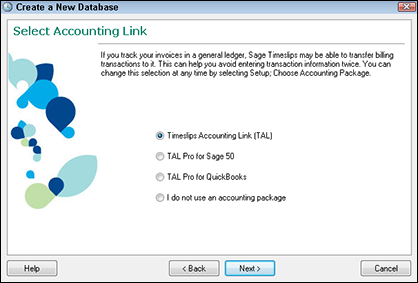
Figure 1-5: Indicate how you want to handle the accounting information that Timeslips generates.
 For information on setting up Timeslips Accounting link, see the bonus chapter on the web at www.dummies.com/extras/sagetimeslips.
 - Click Next and select additional Timeslips features you want to use.
You can turn the following features on or off at any time:
- You can synchronize with Microsoft Outlook so that you can create slips from Outlook entries.
For details, see Appendix B, “Linking to Microsoft Outlook.”
- You can track trust funds or client retainers; for details, see Chapter 5.
- You can set up budgets for clients and track planned versus actual hours, fees, and costs; see Chapter 17 for details.
- You can synchronize with Microsoft Outlook so that you can create slips from Outlook entries.
- Click Next to display the last screen of the wizard.
The screen tells you that it doesn’t need any more information to create your database.
- Click Next a final time.
Timeslips creates your database.
After the wizard creates your database, it suggests that you open the General Settings dialog box and review some basic information that Timeslips is using in your database. Go ahead and click Finish to open the General Settings dialog box. Then continue to the next section of the book, where you examine the dialog box.
Instead of using your own database to mess around and test things, you can use the Explore database, which contains sample data. To open the Explore database, and for more information on switching databases, see Chapter 16.
Making Things Work Your Way
Using the General Settings dialog box and the Personal Preferences dialog box, you can control much of the way Timeslips operates. In this section, I cover some of the more important settings in these dialog boxes. Throughout the book, when appropriate, I’ll bring you back to these dialog boxes.
Establishing general settings for the database
The General Settings dialog box, shown in Figure 1-6, opens automatically after you create a database. You can also open it at any time by choosing Setup⇒General.
Click a link on the left side of the dialog box, and information related to that link appears on the right. The defaults that Timeslips sets for the options in this dialog box work well for most Timeslips users.

Figure 1-6: The General Settings dialog box.
In the Address Information page, which appears by default when you open the dialog box (and is shown in Figure 1-6), you can supply your company’s contact information. You can then choose to have Timeslips print this information on bills and reports.
Next, select Conflict Checking on the left side of the dialog box. In the Conflict Checking page that appears, as shown in Figure 1-7, you control when Timeslips automatically checks clients and timekeepers— the people whose time you need to track in Timeslips — for conflicts. Conflict checking is important in law firms because lawyers must ensure that they don’t represent two clients who are at odds with one another. To save time and keystrokes as you set up clients and timekeepers, I suggest that you disable conflict checking by removing the check marks from the first two options on this page.

Figure 1-7: Disable automatic conflict checking while you set up your database.
Don’t worry; you can manually check for conflicts at any time, so you don’t need Timeslips to automatically check.
On the Payment Types page, shown in Figure 1-8, you can select the methods of payment your firm accepts. Timeslips assigns a payment type when you record a payment. You can print the payment type on various reports and even filter reports to display only transactions assigned a particular payment type.

Figure 1-8: Identify the types of payments your firm accepts.
You probably won’t need every payment type that Timeslips offers, such as the Japan Credit Bureau payment type. And if you don’t accept credit card payments, you might want to disable the various credit card payment types.
When you finish exploring the General Settings dialog box, click OK. If you opened this dialog box after creating a database, three more “getting started” dialog boxes appear:
- The first dialog box asks for your full name and initials. Based on the information you supply in this dialog box and the next, Timeslips sets you up as a timekeeper in your database.
A timekeeper is someone whose time you need to track in Timeslips. Typically, these people work for your company, but they could be independent contractors.
- The second dialog box asks for your nickname and, optionally, a second nickname. A nickname is just that — a shorthand version of your name. Timeslips uses nicknames throughout the database to give you a quick and easy way to select timekeepers, clients, tasks, and expenses. You can learn more about nicknames in Chapter 3. I suggest that you use your initials for your nickname, keeping in mind that each timekeeper’s nickname should be unique. If you share initials with someone else in your firm, use your full name or perhaps your first initial and your last name for your nickname.
- The last dialog box asks if you want to review Timeslips training videos. You can view training videos at any time by choosing Help⇒View Training Videos, selecting a topic from the list, and clicking a video. All videos are stored on the Sage Timeslips website, so you’ll need an Internet connection to watch them.
Click Finish, and the Bill and Aging Date dialog box appears; you use this dialog box primarily when you prepare bills, so, at this point, you can simply click OK.
Note: An advertisement appears for Sage Payment Solutions; you can select the check box to avoid seeing the ad again. After the ad closes, the Product Enhancement dialog box appears, asking if you want to send data to Sage Software to help improve Timeslips. Make your choice and click OK.
Setting personal preferences
You can use the Personal Preferences dialog box to customize Timeslips behavior on your workstation and each workstation in a network. Choose Setup⇒Preferences to open the Personal Preferences dialog box. You see the Startup and Exit page of the Interface section, as shown in Figure 1-9.

Figure 1-9: The Startup and Exit page of the Personal Preferences dialog box.
Again, I don’t cover every setting in this dialog box, but I do describe the ones I think you’ll find most helpful, most of which appear in the Interface section. The rest of the default settings work well for most users, but look them over at your leisure and make changes as you see fit. Click any link on the left to see the options associated with that link on the right.
By default, Timeslips displays a splash screen (its logo) when it opens and then displays a window asking you to confirm today’s date. However, you may find that Timeslips opens more quickly if you don’t display the splash screen. And because Timeslips gets its date information from Windows, you might want to disable the option to confirm today’s date if you’re comfortable that your computer’s date is correct.
By default, Timeslips displays the Office Manager navigator on the left side of the screen. If you’re not an office manager, you might prefer to display a different navigator, one more suited for your use. For details on navigators and selecting them, see Chapter 2.
Sage Timeslips Today displays overview information about your Timeslips database when you open the program. Gathering information such as a list of clients with overdue balances can be time-consuming in a large database, so you might prefer to disable the Sage Timeslips Today option.
Using the Open Window and Also Open Window fields, you also can open particular Timeslips windows each time you open the program. These options can be useful if you open Timeslips most of the time to perform a particular action, such as create a slip.
At the bottom of the page, you can control how often Timeslips prompts you to back up your database. For more information on backing up the Timeslips database, see Chapter 15.
In Chapter 4, I cover the preferences you can set for entering slips; reading about those settings will make more sense after you’ve created a slip.
Notes for Network Timeslips Users
Although all licensed workstations can simultaneously work in the same Timeslips database, network users of Timeslips should be aware that Timeslips restricts certain actions to ensure and maintain the integrity of your database.
First, you’ll find that you can’t make changes to a record that another user is currently using. As you work, Timeslips locks each record to prevent more than one user from simultaneously editing the record. If you try to edit a locked record, Timeslips displays a dialog box, letting you know that someone else is using that record and asking you to wait. So, wait a little bit and try again. If you still can’t access your record, use Station Administrator to see who’s logged in to Timeslips and might be working with your record. For more information on using Station Administrator, see Chapter 15.
Second, only one workstation at a time can perform the following Timeslips commands:
- File⇒Archive
- Slips⇒Close Slips
- Setup⇒Accounting Link, and
- Setup⇒G/L Accounts
In addition, you can print bills from only one workstation at a time. Once one workstation finishes performing any of these commands, another can perform them.
Last, you can use the commands that perform critical functions when only one workstation is using the database:
- File⇒Backup
- File⇒Restore
- File⇒Data Verification
- File⇒Purge
- Setup⇒General
- Setup⇒Custom Fields
- Setup⇒Security
If other users are working in the database, you won’t be able to perform any critical functions until those users exit the database. In addition, you can’t use critical functions if other programs on the same computer are accessing the Sage Timeslips database.