Chapter 4
Slips: The Foundation of Time Tracking
In This Chapter
![]() Examining three ways to create slips
Examining three ways to create slips
![]() Tracking your time
Tracking your time
![]() Searching for a slip
Searching for a slip
![]() Reviewing techniques and settings to make data entry easier
Reviewing techniques and settings to make data entry easier
As the title of this chapter declares, slips are the foundation of time tracking in Sage Timeslips. By default, Timeslips assumes that you want to bill your clients based on the slips you enter. Those slips contain the nickname of a timekeeper, a client, and a task or expense, as well as other optional information, such as a description you want on the client’s bill and the date you performed the work.
 Although Timeslips assumes that you want to bill based on the slips you enter, you may use other billing arrangements. For more information on billing arrangements, see the chapters in Part III.
You can enter slips in Timeslips using different methods; each method has its own window. In this chapter, you discover how to enter slips by using the
- Slip Entry window
- Sage TimeCapture window
- Timesheet Slip Entry window
You can create slips also from Outlook entries. The process is described in Appendix B.
Although you can create slips using any of these windows, each method eventually creates a time slip that you can view in the Slip Entry window, so let’s start by examining that window.
Creating a Time Slip with the Slip Entry Window
When you create a slip in the Slip Entry window, you have the most control over all information stored on the slip. To open the Slip Entry window and create a slip, follow these steps:
- Click the New (plus sign) button on the toolbar at the top of the main Sage Timeslips window.
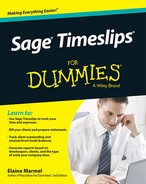
The Slip Entry window appears, as shown in Figure 4-1.
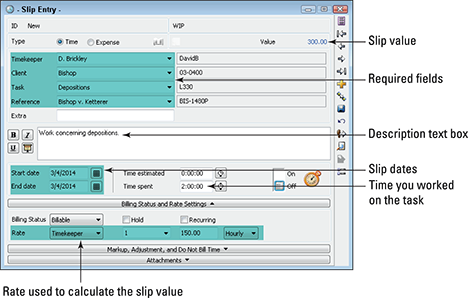
Figure 4-1: Use this window to create a time slip.
- Assign a timekeeper to the slip.
You can select nicknames by tabbing to the field and typing a few characters of the nickname. Timeslips displays the nickname that most closely matches the letters you type. Using this approach, you can keep your hands on the keyboard, which most people find speeds data entry.
- Assign a client and a task to the slip.
If you filled in a default task description, it appears in the large text box, which is the Description field. Information in the Description field appears on a client's bills.
 The Timekeeper, Client, and Task fields are the only fields required to save a slip. However, you’ll want to complete the remaining fields so that your bills contain this meaningful information.
 - If your company uses references, select the Reference field and then use the drop-down list or type a few characters to find and select the reference you want to assign.
- (Optional) You can type free-form text in the Extra field.
The Extra field is a custom field; you can use it to enter up to 16 characters of free-form text. You can use this text as a selection filter when generating bills and reports.
 Any text you type in the Extra field must be the same on every slip where you include it; otherwise, Timeslips won’t select all the slips you intend. I tell my clients not to use information they enter in this field to select slips to include on bills or reports. If you don’t expect to use the Extra field or any other fields in the Slip Entry window, you can disable them so that they don’t appear in the window. See Chapter 16 for details.
 - In the large text box, type or finish typing a description of the work performed.
Anything you type in this box automatically appears on a client's bills. You can use the buttons to the left of the box to format anything you type in the text box. While the description isn’t required to save a slip, your client is unlikely to pay you for time spent that you don’t describe.
Timeslips uses a built-in spell checker to help you identify misspellings. You’ll hear a “ding” if you misspell (or mistype) a word; you can right-click that word and use the first four commands on the shortcut menu that appears to check spelling and grammar. You also can run the spell checker before you print bills; this approach works well if multiple timekeepers enter their own slips and use TimeCapture, as described later in the “Using TimeCapture” section.
If you commonly use the same phrases or sentences, you can save them as abbreviations, as described at the end of this chapter in the “Making Data Entry Easier” section. - Tab to the Start Date field and supply the date when the work began.
To assign today’s date, type T. You also can press the minus (−) key and the plus (+) key to decrement or increment, respectively, the date one day at a time.
You also can type a date. Use two digits to represent the month, the day, and the year — Timeslips will supply slashes or dashes. See the “Using the Date Range dialog box” sidebar for details on using the calendars next to the date fields.
- Tab to the End Date field and use the techniques described in Step 7 to supply an end date.
Typically, using the same start date and end date is best. For that reason, Timeslips assigns the same date in the End Date field that you used in the Start Date field. If this doesn’t happen, type an S in the End Date field.
- Tab to the Time Estimated field and, if you want, supply the amount of time you think the work will take if you haven’t already done it.
You can type your time in hours, minutes, and seconds, separated by colons (:), but most people find it easiest to enter time using decimals, where 1/10 an hour equals six minutes. When you tab out of the field, Timeslips automatically converts the decimal entry to an hour/minute/second entry.
If you don’t plan to estimate your time, feel free to hide the Time Estimated field this field; see Chapter 16 for details.
- Tab to the Time Spent field and type the amount of time you spent on the task using either decimal entry or hour/minute/second entry.
When you press Tab to select the next field, Timeslips updates the slip’s value in the upper-right corner of the Slip Entry window. To determine the value of the slip, Timeslips multiplies the time you spent on the task by the rate shown in the Billing Status and Rate Settings section.
By default, Timeslips uses the rate setting you selected when you created the client’s nickname. (See Chapter 3 for details on setting default rates.) - Click the Save (disc) button on the vertical toolbar on the right.
Timeslips saves the slip and assigns it an ID number, which appears in the upper-left corner of the Slip Entry window.
Were you wondering about the field with the timepiece and the On/Off switch? See the “Tracking Time as You Work” section, later in this chapter, for details.
In most cases, that’s all you need to do to enter a slip. However, sometimes you might want to take some additional actions, such as the ones that follow.
The Billing Status and Rate Settings section
In the Billing Status and Rate Settings section, you can change the Billing Status of the slip from Billable to Do Not Bill, in which case the slip won’t appear at all on a client’s bill, or No Charge, in which case the slip will appear on the bill with the words No Charge where the slip’s value would ordinarily appear. If you're working on a slip for a client whose billing arrangement if a flat fee, you can assign the slip a Billing Status of Override to force the slip to appear on the client’s bill, in addition to the flat fee.
You also can change the rate used to determine the slip’s value. For example, you can use a different timekeeper rate, a client or task rate, or a flat rate instead of an hourly rate.
If you select the Hold check box, Timeslips ignores the slip when you prepare a bill. A notation appears on the client’s Pre-bill Worksheet report beside the slip. If you use this feature, make sure that you print the Pre-bill Worksheet report before preparing a bill; otherwise, you might accidentally skip billing a client for a particular task.
As an alternative to placing slips on hold, consider placing the client on hold using the Arrangement 1 tab of the Client Information window.
You can select the Recurring check box if you want Timeslips to generate a duplicate slip after billing the current slip. You might want to use recurring slips when you bill a client the same amount for the task every month. For example, an accounting firm that bills monthly might use a recurring slip to charge bookkeeping services each month; the same bill might also include other, nonrecurring charges. Note that Timeslips assigns today’s date to the slip on the day you include it on a bill.
The Markup, Adjustment, and Do Not Bill Time section
At the bottom of the Slip Entry window, click the Markup, Adjustment, and Do Not Bill Time button to display the settings available in this section (see Figure 4-2).
To mark the value of the slip up or down, click the text box beside the Markup (+/−) field and type a percentage for the markup. To mark the slip down, type a minus sign before the percentage.
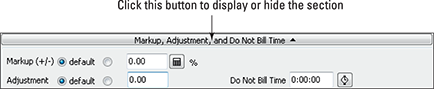
Figure 4-2: The Markup, Adjustment, and Do Not Bill Time section.
Timeslips can calculate the percentage for you. Click the calculator button beside the Markup (+/−) field to display the Markup Calculator dialog box, and then supply the dollar amount for the markup or markdown. Timeslips displays the percentage for you as well as the slip’s final value. Click OK, and Timeslips inserts the markup or markdown percentage for you.
If you want to use a dollar markup or markdown, use the Adjustment text box. Enter a positive number to mark the slip up or a negative number to mark the slip down.
You can use both the Markup (+/−) field and the Adjustment field to mark the slip down by both a percentage and a value.
The last field in this section, Do Not Bill Time, enables you to record the total amount of time you spent on a task but bill only a portion of that time. Just type the amount of time you don’t want to bill.
If you make any adjustments in this section, you won’t see their effects on the slip’s value in the upper-right corner. But you can click the slip’s value to display the Slip Values dialog box shown in Figure 4-3 and determine the slip’s billing value.
Figure 4-3: A $300 slip’s value after applying markdowns, adjustments, and do not bill time.
The Attachments section
If you want to attach a document to the slip and even include that document with the client’s bill, click the Attachments button to display the Attachments section (see Figure 4-4).
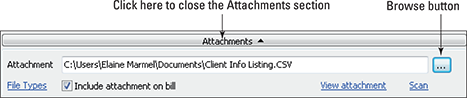
Figure 4-4: Use the Attachments section to attach a document to a slip.
For example, if you have a slip showing the amount of time you spent writing a letter on the client’s behalf, you might want to attach that letter to the slip. Click the Browse button to navigate to the document and then select it. If you want to include the letter with the client’s bill, select the Include Attachment on Bill option.
If you plan to print the client’s bill and mail it, you can include graphics files (BMP, DIB, JPG, TIF, PNG, EMF, and WMF) as attachments. If you plan to e-mail your bills to your clients, you can include all types of files.
If necessary, you can click the Scan link to scan the file directly from the Attachments section to create a graphic image file to include with your bill.
Don’t forget to save your changes by clicking the Save (disc) button on the vertical toolbar in the Slip Entry window.
Creating an Expense Slip in the Slip Entry Window
You use the Slip Entry window to create expense slips in pretty much the same way you create time slips, with a few exceptions:
- Click the right edge of the New (plus sign) button and choose Expense Slip from the drop-down menu that appears (see Figure 4-5).
- Click the New (plus sign) button, and Timeslips displays a time slip. Click the Expense option at the top of the window to enter an expense slip (see Figure 4-6).
Fill in the top of the expense slip in the same way you fill in the top of a time slip: supply a timekeeper, a client, an expense, and if you’re using references, a reference. If you set up the expense to include a default description, it appears in the large text box, where you can edit it or add to it. If no text appears in the text box, type a description.

Figure 4-5: Click the right edge of the New button and choose the type of new entry to create.
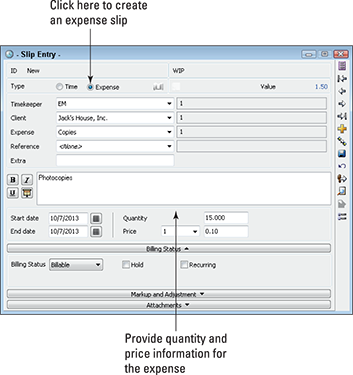
Figure 4-6: Entering an expense slip.
Supply start and end dates for the date when you incurred the expense. As you can see in Figure 4-6, the area beside the Start Date and End Date fields changes to accommodate an expense slip. Supply a quantity for the expense and, if necessary, select a different price level.
If necessary, make changes to the Billing Status, Markup and Adjustment, and Attachments sections.
You may want to scan any expense receipts, attach them to the slip, and include that attachment with the client’s bill.
Click the Save (disc) button on the vertical toolbar on the right to save the expense slip.
On occasion, you’ll incur expenses that you don’t intend to pass on to your client. To get an accurate picture of how much you earn, you need to take these expenses into account and should, therefore, create slips for them even if you don’t intend to bill your client for them. As you do in time slips, you can set the Billing Status field of an expense slip to something other than Billable.
Tracking Time as You Work
Tracking time as you work is more efficient than trying to capture it after the fact. To that end, Timeslips offers two ways to capture time as you work:
- The Slip Entry window
- TimeCapture
Remember one rule as you capture time: To save the time you track as you work, you must create a slip that contains, at a minimum, a timekeeper, a client, and a task. Both methods I describe help you easily convert the time you track into slips.
Using a slip timer
You can use the timer available in the Slip Entry window to track time as you work. You can start a new slip and immediately turn on the timer, even before you fill in the timekeeper, client, and task . This feature is helpful if you need to take a call from a client; when you finish the call, you turn off the timer and then fill in the details of the slip.
If you’re about to work on a task for a client, you can fill in the details of the slip, start the timer, do the work, and then stop the timer.
To start and stop the timer in the Slip Entry window, click the timer switch (see Figure 4-7) or press F5 on the keyboard. As the timer runs, the value of the slip in the upper-right corner of the window increases.

Figure 4-7: Click the timer switch to start and stop the timer.
Some tips:
- By default, if you start a new slip and turn on its timer, Timeslips automatically turns off any timers running on other slips. Typically, you want this behavior, but you can change it if you have a reason to allow one timekeeper to run multiple timers simultaneously. Choose Setup⇒Preferences and then select Options in the Slip section on the left. Change the Permit Multiple Timers Simultaneously Running on This Station option to Yes and click OK.
- You can save and close the Slip Entry window while a timer continues to run. Later, if you can’t remember which slip had a timer running, press Ctrl+F5 or choose Slips⇒Stop My Timers to stop all timers for the currently logged in user. To stop all timers in the Timeslips database, press Alt+F5 or choose Slips⇒Stop All Timers.
- Using the Time and Expense Slip List window, discussed later in this chapter in the “Searching for Slips” section, you can view slips with running timers and slips that previously had running timers.
When a timer is running, Timeslips calls it an active timer. You might need that terminology when you search for slips. For more information, see the “Searching for Slips” section, later in the chapter.
Using TimeCapture
You use TimeCapture, a separate program that comes with Timeslips, to automatically capture time as you work at your computer. By default, TimeCapture automatically starts timers for every open window on your computer. You can opt to create slips from the entries or you can delete them.
For those who have been using Timeslips for years, note that TimeCapture replaces TSTimer.
You can start TimeCapture from your Sage Timeslips 2014 program group on the Windows All Programs menu. Click the TimeCapture shortcut in the group; when TimeCapture is running, it displays an icon in your status bar like the one shown in Figure 4-8. You can double-click this icon at any time to display the TimeCapture window shown in Figure 4-9.
Because the programs are independent, Timeslips doesn’t need to be running to run TimeCapture.

Figure 4-8: This icon appears in the system tray when TimeCapture is running.
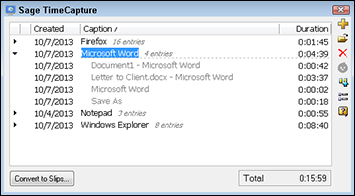
Figure 4-9: The Sage TimeCapture window.
TimeCapture entries are not part of the Timeslips database until you convert them to slips, as I describe later in this section. The entries are stored on your local computer and must be backed up manually. Instead, plan to convert them to slips daily. You can back up TimeCapture entries using the Save Copy of Data Files command that appears when you right-click the TimeCapture icon.
The TimeCapture window displays all programs it finds running on your computer. To the right of each program, you see the number of entries TimeCapture has created for the program, based on actions you take while working in the program. For example, saving a document in Microsoft Word counts as an action, and TimeCapture displays it as an entry. To see the entries that TimeCapture has captured for a program, click its right-pointing caret.
Combining entries
You can easily merge time from one entry to another, by dragging the entry you want to eliminate onto the entry you want to keep. For example, in Figure 4-9, I can drag all listed actions onto the Letter to Client.docx action to combine all the entries into one entry. When you drag, drag in the Caption column.
You also can combine the time of entries listed for one program with entries listed for another program. For example, if you used Windows Explorer to open a Microsoft Word document, you can drag the Windows Explorer entry and drop it onto the Word document you opened.
Creating slips from TimeCapture entries
To create slips from a TimeCapture entry, you first must supply a timekeeper, client, and task for the entry and you probably should supply a description of the work, too.
You can create slips for individual entries listed below a program or for all entries listed for a program.
If the entries listed for the program apply to different clients or different tasks, double-click an individual entry below a program name to display the TimeCapture Entry dialog box shown in Figure 4-10.
Fill in the client for whom you did the work and the task that describes the work you did. In the Notes text box, supply a description for the slip. Then click OK.

Figure 4-10: Assign a timekeeper and task to a TimeCapture entry.
TimeCapture doesn’t contain a spelling checker, so be sure to check your spelling in Timeslips. Display the slip in Timeslips, and then right-click in the description text box and choose Spell Check Entire Field.
Alternatively, if all the entries listed below a program apply to one client and one task, you can select the program name to create multiple slips that are identical in all ways except for the time on the slip.
Be aware that TimeCapture creates one slip for each entry listed below a program name in the TimeCapture window. Review the entries below a program name and merge as many as possible to produce the fewest number of slips.
After you set up TimeCapture entries so that they include clients and tasks, you can convert them to slips in Timeslips. Click the Convert to Slips button at the bottom of the TimeCapture window to display the Convert Timers to Slips dialog box shown in Figure 4-11.
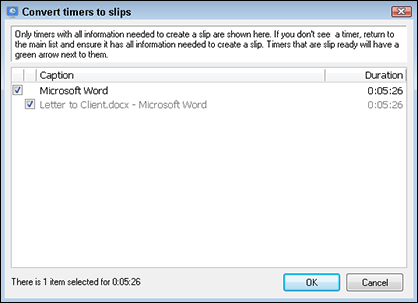
Figure 4-11: Timers ready to be converted to slips.
The dialog box lists only those timers for which you’ve saved client and task information. Click OK, and TimeCapture converts the entries listed in the dialog box to slips in Timeslips.
If you try to run Timeslips while TimeCapture is running, you might get an error message. To close TimeCapture, right-click the TimeCapture icon in the system tray and choose Exit. By the way, this error doesn’t seem to occur if you open Timeslips before you open TimeCapture.
Deleting TimeCapture entries
If you decide that you don’t need entries that appear in the TimeCapture window, delete them. Click a program’s heading and then click the Delete (X) button on the vertical toolbar on the right. You can select multiple entries using typical Windows selection techniques:
- To select a contiguous list, click the first entry in the list, press and hold down the Shift key, and then click the last entry in the list.
- To select several noncontiguous entries, press and hold down the Ctrl key as you click each entry.
Setting up TimeCapture rules
You can set up rules for TimeCapture. For example, you might set a rule to ignore certain programs, automatically combine entries, or even assign names from Sage Timeslips to entries. Each rule consists of
- A rule name
- Up to two conditions
- An action to take when the conditions are met
To easily set up a rule to ignore a particular application — in this case, to tell TimeCapture not to track time for the application — right-click the application in the Sage TimeCapture window and click Ignore, from the shortcut menu that appears; then click This Application.
A rule that ignores an application must include a condition that lists the path name for the application. The right-click approach is a much easier and less error-prone way to set up an ignore rule than trying to type the path name.
To manually set up a rule, click the Rules button (third button from the bottom on the vertical toolbar in the TimeCapture window) to display the Rules dialog box, which lists rules you’ve already established.
In the Rules dialog box, click the New (plus sign) button on the vertical toolbar on the right to display the Rule Entry dialog box shown in Figure 4-12.

Figure 4-12: Create a TimeCapture rule.
TimeCapture supplies a default name that you can change, as I did. In the Rule section, set the conditions and then click OK.
Using the Timesheet Window
If you’re more comfortable with a spreadsheet interface for tracking time, you can use the Time Sheet Slip Entry window (see Figure 4-13) to create slips. You'll need to supply a timekeeper, a client, a task, and, if you intend to include the work on a client’s bill, a description. You display this window by choosing Slips⇒Time Sheet⇒Slip Entry.
Select the week for which you want to record time in the upper-right corner. Timeslips displays that time period in columns. When you enter an amount of time, Timeslips assigns the date for which you enter time as the Start date on the slip.
The rows in this window list active slip entry templates for the timekeeper you selected at the top of the window. Slip entry templates contain the information Timeslips needs to convert time sheet entries into slips: the timekeeper, the client, and the task. You can also include default rate and description information on the template.
At the bottom of the window, totals appear for each day. The Non-Template totals include time entered using methods other than the Time Sheet Slip Entry window method.
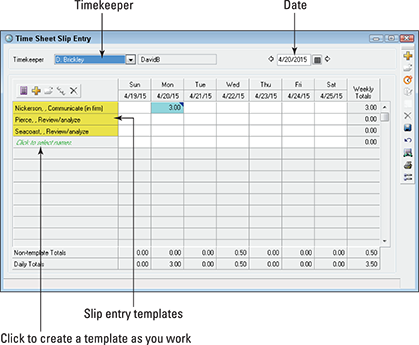
Figure 4-13: The Time Sheet Slip Entry window.
You can print the current time sheet by clicking the Print (printer) button on the vertical toolbar on the right.
At the intersection of a row and column, you enter values that reflect the total time spent on that day for slips associated with a particular slip entry template. But before I talk about entering time in this window, let’s examine creating slip entry templates either before you start working or as you work.
Creating templates
You can set up slip entry templates separately, or you can create them as you work.
To create slip entry templates that you know you'll need, choose Slips⇒Time Sheet⇒Slip Templates. The Time Sheet Slip Template List window appears, as shown in Figure 4-14, with a list of templates you've created.

Figure 4-14: The Time Sheet Slip Template List window lists templates you already created.
You can double-click an existing template to open and edit. Or you can create a template by clicking the New (plus sign) button on the right side of the window. In either case, the Time Sheet Slip Template Entry window shown in Figure 4-15 appears.
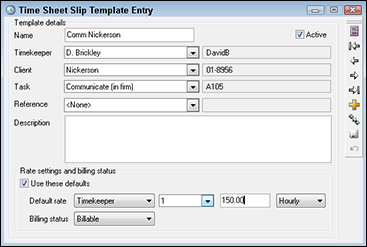
Figure 4-15: Use this window to edit an existing template or create a new one.
To set up the template:
- Assign a name to the template that you’ll recognize when you work in the Time Sheet Slip Entry window.
- Select a timekeeper or, if you want the template available to every timekeeper in the database, set the timekeeper to All.
- Select a client and task and, if you use references, a reference.
- (Optional) Fill in a description, which will appear on each slip you create using this template.
- (Optional) Establish default rates and billing status information.
Save the template by using the vertical toolbar on the right. When you open the Time Sheet Slip Entry window, your template name will appear in the list on the left.
Templates appear in the left column of the Time Sheet Slip Entry window (refer to Figure 4-13) as long as the template is assigned to the timekeeper displayed at top of the window and the template's Active option is selected (refer to the upper-right corner in Figure 4-15).
As you work, you might find that you need to track time for a template you haven't created. No problem; create a slip entry template as you work. Click the text Click to Select Names (refer to Figure 4-13), and you’ll see the small window shown in Figure 4-16; use it to select a client, a task, and optionally, a reference. Then click the Save (disc) button at the right edge of the window.

Figure 4-16: Use this window to create a template as you work.
Timeslips assumes that the timekeeper is the one who appears at the top of the Time Sheet Slip Entry window. To create a template specific to a different timekeeper, select that timekeeper before you click the text Click to Select Names.
If you prefer to fill in all the details of a template immediately, click anywhere on the weekly grid in the template’s row. Then click the Open (folder) button on the toolbar that appears above the list of templates to open the Time Sheet Slip Template Entry window (refer to Figure 4-15).
Entering time
To enter time in the Time Sheet Slip Entry window, click the intersection of the slip entry template and the date on which you did the work — this intersection is called a cell— and type the amount time in decimal format or in hour:minute:second format. Or start the timer by clicking the Timer (clock) button on the toolbar on the right side of the window.
Suppose that you need to add a slip for a particular template on a day when you’ve already created a slip. No problem; click the cell where you need to add an entry and then click the New (plus sign) button. The Time Sheet Time Spent Entry dialog box appears, as shown in Figure 4-17. Supply the time and click OK; Timeslips updates the value shown in the cell.

Figure 4-17: Adding time to a cell.
For any entry, you can add a description that will appear on a client’s bill. Right-click the entry and choose Description from the shortcut menu that appears. If the cell contains multiple slips, choose Open from the shortcut menu (Description won’t be available) to display the Time and Expense Slip List window, which is discussed later in this chapter in the “Searching for Slips” section. You can then choose the slip to which you want to add a description.
Timeslips doesn’t save entries as slips until you click the Save (disc) button on the toolbar on the right. In Figure 4-18, the entries for Nickerson and Pierce have a caret in the upper-right corner. The caret represents a saved slip. The entries for Atlantic and Seacoast represent have not been saved. Note also that cells that contain single entries are highlighted in cyan, and cells containing multiple slips are highlighted in gray. If you hover the mouse pointer over each entry, you’ll see a tip describing the number of saved slips that the entry represents.
To edit a saved slip, click the cell containing the time spent and then click the Open (folder) button on the right-side toolbar. Make your changes in the Slip Entry window that appears and then click the Save and Return button (the sixth button from the bottom of the toolbar that appears on the right side of the Slip Entry window).
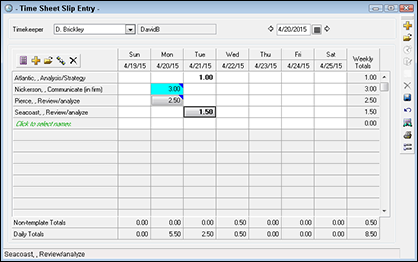
Figure 4-18: Under-standing entries in the Time Sheet Entry window.
Customizing the Time Sheet Slip Entry window
Using the Time Sheet Slip Entry Options dialog box shown in Figure 4-19, you can control the order of the template components in the template list on the left side of the window. For example, you can opt to display the task name before the client name. You also can control the starting day of the week, the time format, and whether Timeslips displays a confirmation dialog when you delete a saved entry. You also can opt not to display non-template totals.
To display the Time Sheet Slip Entry Options dialog box, first display the Time Sheet Slip Entry window (choose Slips⇒Time Sheet⇒Slip Entry). Then click the last button on the vertical toolbar in the Time Sheet Slip Entry window.
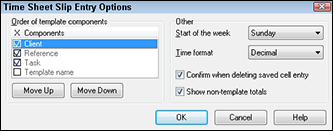
Figure 4-19: Use this dialog box to customize the Time Sheet Slip Entry window.
Searching for Slips
You can search through slips in two ways. You can use the Time and Expense Slip List window, or you can use the Text Search window. You try both methods in this section.
Searching in the Time and Expense Slip List window
Over time (sorry for the pun), you enter lots and lots of slips. When you need to make changes to a slip, finding the right one would be a daunting task without the Time and Expense Slip List window.
The Time and Expense Slip List window, shown in Figure 4-20, lists all slips in your database. You can use this window to find and open a particular slip. Begin by choosing Slips⇒Time and Expense Slips.

Figure 4-20: Use this window to search for a particular slip.
At the top of the window, you can narrow your selection by using the View By list, the Show Only the Last X Slips Entered check box, and the Selection button. For example, suppose that you know both the client and the timekeeper for a particular slip. You can select Client from the View By list and then click the Selection button to filter the list to display a timekeeper you choose. When you make a change to the appearance of the window using any of these settings, you must click the Update button that appears in the window to apply your choices.
You can read more about setting selection filters in Chapter 13.
You can narrow the slips that appear in the list also by using the Time and Expense tabs. As you’d expect, the Time tab displays only time slips and the Expense tab displays only expense slips. (To view both types of slips, select the Both tab.)
The grid in the middle of the window shows two lines for each slip, and the column headings at the top of the list help you identify the information in each slip. You can click any column heading to sort the list of slips by that column heading.
Two unlabeled columns appear between the Activity column (remember, activity equals task) and the Time column. These blank columns display small graphics that indicate, for example, whether a slip has appeared on a client’s bill.
When you click a slip, its description appears in the box at the bottom of the slip. You can make changes to the description and then click the Save (disc) button in the Description box to save your changes.
The lower-right corner of the window shows you total hours and charges for the slips that appear in the Time and Expense Slip List window.
You can open any slip in by double-clicking it or by selecting it and clicking the Open (open folder) button on the right-side toolbar. You can delete slips from the Time and Expense Slip List window by clicking the Delete (X) button on the toolbar.
Click the List Appearance Options button — the last button on the vertical toolbar — to display the List Appearance Options dialog box shown in Figure 4-21. You use this dialog box to control the appearance of the Time and Expense Slip List window.

Figure 4-21: Change the appearance of the Time and Expense Slip List window.
Using the tabs in this dialog box, you can control the fields that appear on the Time and Expense Slip List window manually by selecting a field from the Available Fields list and adding it to the First Row box or the Section Row (Optional) box by using the buttons that appear between the lists.
Or you can use one of the Timeslips predefined themes to change the appearance of the Time and Expense Slip List. For example, the Expense Slips field theme lists a single line for time and expense slips displayed in the Time and Expense Slip List window. Open the Field Themes list box and select an option. Click Apply and then click OK.
On the Colors and Appearance tab, you can control the colors used in the window.
On the Hide and Show Areas tab, you can control whether the following options appear in the window:
- Show Only the Last X Slips Entered check box
- Slip description
- Totals information
You also can control the location of the window’s toolbar and, if you display Totals information, whether total hours appear in decimal or hour:minute:second format.
Performing a text search
Sometimes, the easiest way to find a slip is based on information you stored in the slip's description. For this task, you use the Text Search window.
The Text Search window, shown in Figure 4-22, can search for more than just slips, but searching for a slip is a great example of using this powerful feature.

Figure 4-22: Use this window to search for text.
Choose Special⇒Text Search to display the Text Search window. In the box at the top of the window, supply the text (up to 100 characters) for which you want to search. Remember, the more text you supply, the fewer results Timeslips can match to your search text.
Use the Search Options and the Search Scope sections to limit your search. You must select at least one option in the Search Scope list, and you can further limit the search by clicking the Filter button and making a selection. See Chapters 6 and 13 for details on selecting filters.
When you click the Search button, Timeslips returns the results of your search on the Result tab of the Text Search window (see Figure 4-23). In the example, Timeslips found three slips that contain the text Mr. Whitley in the Description field.
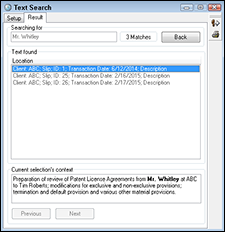
Figure 4-23: The results of a text search.
You also can print the Slip Listing report to view details of the slips you’ve entered. Choose Reports⇒Slips and then double-click the Slip Listing report. In the Report Entry window, click the Print button. For details on sorting and filtering information on this and other reports, see Chapter 14.
Making Data Entry Easier
You can set several preferences in Timeslips to make entering slips easier. I don’t have enough space to cover all these options, but I can provide a list of the places where you can make these choices.
In the Personal Preferences dialog box (choose Setup⇒Preferences), check out the settings on these tabs:
- Slips, Options
- Slips, Slip Entry
- Slips, New Slip Rules
In the General Settings dialog box (choose Setup⇒General), check out the settings on the Transactions, Slips, A/R, and Funds tab.
Using abbreviations
The Abbreviation feature is one of the most powerful ways to save time during data entry. Abbreviations are codes you can set up that, well, abbreviate phrases. You type the code in the Description box in the Slip Entry window, and when you press any of 16 delimiting characters (including Enter, the spacebar, a period, a comma, a semicolon, or a colon), Timeslips substitutes the expanded phrase for the shortcut abbreviation code.
Abbreviations are available in many places in Timeslips besides the Description box in the Slip Entry window. For example, you can use them in the Client Information window in the In Reference To field on the General and Notes tabs. For a complete list of places where you can use abbreviations, search the Online User’s Guide for the topic abbreviations.
Creating an abbreviation
To create an abbreviation, choose Setup⇒Abbreviations to display the Database Abbreviations window. The window lists existing abbreviations, divided into two categories:
- Database abbreviations are available to all timekeepers in the database.
- Personal abbreviations are available only at a specific workstation.
I suggest that you create most abbreviations as database abbreviations so that they will be available to everyone using your Timeslips database.
In the Database Abbreviations window, click the Database tab, and then click the New (plus sign) button to display the Abbreviation Entry dialog box shown in Figure 4-24.

Figure 4-24: Setting up an abbreviation.
In the Token text box, type characters that you want Timeslips to recognize as an abbreviation. An abbreviation can be between one and eight characters, but make sure that you don’t use any real words, such as a or and.
In the Token text box, I suggest that you use consonants but not vowels. If you include vowels in the token, you might accidentally use a word that you type regularly. Then each time you type that word, Timeslips would display the expanded version of the abbreviation. For example, if you used can as a token and supplied coordinate assistance and supply needs as the expanded phrase, every time you typed can, Timeslips would assume that you meant the abbreviation and would change it to the expanded phrase. A better token would be cn because it isn’t a set of characters you typically type sequentially.
In the Expands To text box, type the phrase you want Timeslips to use when replacing the abbreviation. You can include prompts that will appear when you use the abbreviation; at the position in the abbreviation where prompted information should appear, click the Insert Prompt button and type your prompt, which is typically a phrase that describes the type of information the timekeeper should supply (refer to Figure 4-24).
Click OK to save the abbreviation.
Using your abbreviation
You’ll find abbreviations most useful when filling in slip descriptions. Open any slip in the Slip Entry window and click in the Description box at the location where you want the expanded abbreviation phrase to appear. Then type the abbreviation code and press a delimiting character such as a space or a period. If you want the first letter of the expanded phrase to appear capitalized, type the first letter of the abbreviation code as a capital letter.
If your abbreviation contains a prompt, a dialog box like the one in Figure 4-25 will appear, prompting you for information. Supply it and click OK, and Timeslips replaces the abbreviation code with the expanded phrase.
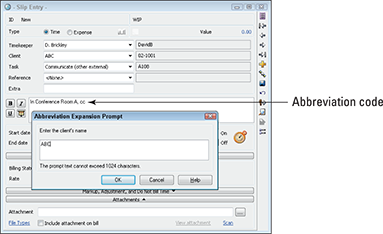
Figure 4-25: Using an abbreviation with a prompt.
Using Slip triggers
Often, entering one slip causes you to enter another slip. For example, if you need to consult with a client at his or her site, you might enter a time slip to record the time spent in the consultation and an expense slip for the mileage you incurred to travel to the client’s site. Using the Timeslips Slip Triggers feature, you create slip trigger rules that Timeslips uses to automatically start a new slip when you save a slip for a specific task or expense.
To create a slip trigger rule, choose Slips⇒Slip Triggers to open the Slip Triggers window. Then, click the New (plus sign) button above the list of existing slip trigger rules to display the Slip Trigger Entry dialog box shown in Figure 4-26.
At the top of the dialog box, select the type of slip that will trigger a new slip — time or expense — and then select the specific task or expense.
If you opt to limit the slip trigger, use the next set of option buttons to select the timekeepers and clients for whom the slip trigger should work.
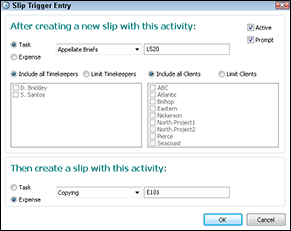
Figure 4-26: Creating a new slip trigger rule
At the bottom of the window, select the type of slip that Timeslips should automatically create and then select the specific task or expense for that new slip. In the figure, Timeslips will automatically create an expense slip for Copying if I create a time slip for Appellate Briefs. This rule works for all timekeepers and all clients.
In the upper-right corner of the dialog box, two check boxes appear:
- Active: Deselect the Active check box if you want to disable a trigger.
- Prompt: Deselect the Prompt check box if you don’t want Timeslips to prompt you before creating the second slip. If you leave this box selected, Timeslips asks if you want to create the slip before creating it.