
In this chapter, you learn about sending mail, reading your incoming mail, and replying to your mail.
Mail, like all information found in Lotus Notes, is stored in a database. The stored mail includes copies of messages you’ve received and sent, as well as some specialized documents such as calendar entries and tasks. To open your mail database, click on the mail hotspot on the Welcome page or click the Mail bookmark.
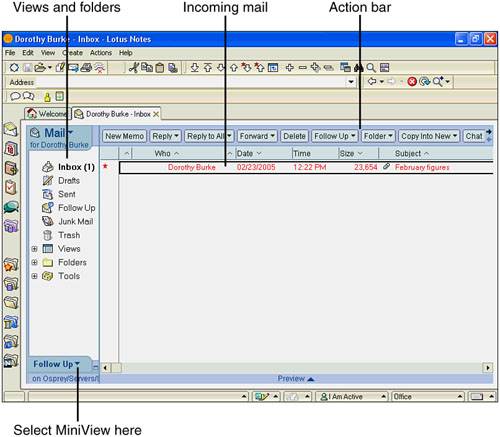
When you first open a Lotus Notes database (such as Mail), the display is split into two large panes called the Navigation pane and the View pane. The titles of the available views are displayed in the pane on the left (the Navigation pane), and more specific information is displayed in the pane on the right (the View pane).
The Mail Navigation pane (see Figure 3.1) lists views and folders, such as the Inbox, Drafts, Sent, Follow Up, Junk Mail, and Trash, as well as containers named Views, Folders, and Tools, which contain other views and folders.
Note
You can change the size of the Navigation and View panes to see more of one side or the other. Point to the line that separates the two panes until your mouse pointer turns into a two-headed arrow, separated by a black line. Drag that line to the left or right. You can also resize the columns in the View pane. Use the method that was just described for resizing panes, but drag the lines between columns.
At the bottom of the Navigation pane, you can display a MiniView. There are three possible MiniView options:
Follow Up shows any messages you have flagged for follow up (learn more about using Follow Up in Chapter 4, “Managing Mail”).
New Notices displays all Calendar notices to which you have not yet responded (see Chapter 9, “Using the Calendar”).
To Do shows outstanding To Do items (see Chapter 11, “Working with To Do Items”).
To change the MiniView display, click the arrow next to Follow Up (or whatever the current choice is) and select the option you want to see. To expand/collapse the MiniView display, click just to the right of the MiniView tab.
As you make choices in the Navigation pane, documents change in the View pane. For example, when you click on Inbox, your incoming mail messages are visible in the View pane. When you click on Sent, however, your outbound mail messages are visible.
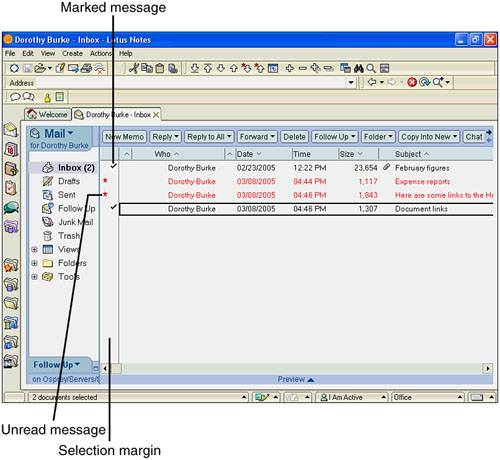
Click on the Inbox to see your incoming mail messages. You can see who sent the message, the date it was sent, and the size and subject of the message. All unread messages have a red star in the selection bar to the left of the message (see Figure 3.1).
Note
If you don’t see mail, make sure that you have clicked the Inbox at the top of the Navigation Pane. If you are new to Notes, it’s entirely possible that no mail has been sent to you, so no documents are listed in the View pane.
Table 3.1 describes the views that are found in the Mail Navigation pane.
Table 3.1. Mail Database Views
View | Description |
|---|---|
Inbox | |
Drafts | Displays mail messages you’ve elected to save as drafts instead of sending, which allows you to edit or make changes to the message before you send it. |
Sent | Displays copies of messages you have sent if you chose to keep a copy of the message when you sent it. |
Follow Up | Displays copies of messages you have marked for follow up, so you know that you still have to do something about the message. |
Any mail you block from your Inbox using the Mail Tools appears in this view until you decide what you want to do with it—delete it or move it back to the Inbox or a folder. | |
Trash | Displays messages that are marked for deletion until you empty the trash or permanently delete the message. |
Views | Click the + sign next to Views to access the All Documents and Mail Thread views as described below. |
All Documents | (Available when you click the + next to Views) Displays all messages, including those you’ve sent, received, saved in folders, saved as drafts, and so on. The subject line of reply messages are indented, so it is easy to see the relationship between messages and their replies. |
Mail Threads | (Available when you click the + next to Views) A list of mail messages organized by conversation, with an initial message listed first and the responses to that message listed directly below it. |
Folders | Contains the folders that you create to organize your mail. When you first open Lotus Notes, this folder is empty. Learn more about creating and using folders in Chapter 4. |
Tools | Click the + sign next to the Tools icon to reveal the Archive, Rules, and Stationery views. |
Archive | (Available when you click the + next to Tools) Contains a view of documents that have been archived, or saved in a way that compacts the size of the database. Archiving is beyond the scope of this book; however, we recommend you read the Lotus Notes Help database regarding archiving and discuss archive settings and preferences with your System Administrator. |
Rules | (Available when you click the + next to Tools) Displays a list of mail rules you have created. When you first open Lotus Notes, this view shows no rules. Learn more about rules in Chapter 5, “Using Mail Tools.” |
Stationery | (Available when you click the + next to Views) Displays a list of custom stationery you have created and saved. If you are new to Notes, this shows no stationery. You learn more about stationery in Chapter 5. |
Note
The Mail Threads view is one of the most useful, yet most overlooked views in Lotus Notes. It can help you to determine if you’ve responded to an email, or if someone has responded to an email you sent to them. But it’s important to understand that the Mail Threads will only work when you answer an email using the “reply” feature and your mail recipients use the “reply” feature when answering your email. Replying to mail is discussed later in this chapter.
The Action bar (see Figure 3.1) contains command buttons to assist you with your current task. For example, when you select a mail message in the View pane, you can click one of these buttons to delete a message or to reply to a message. Like the menu bar and toolbars, the Action bar buttons change depending on the task you are performing. If your screen isn’t wide enough to display all the buttons on the Action bar, a pair of arrows appears on the right side; click an arrow to see additional buttons. You can move the action bars by dragging them. You can also right-click the Action bar to display a menu showing which Action bars are currently displayed, and change them if you wish.
Before you can read, delete, print, or take any other action on a mail message, you must first select it. One message is already selected when you open your mailbox. To select a message, click once on the message in the View pane. A selected message has a heavy black rectangle around the name, date, and subject of the message.
To select a different message in the list, click on it or use the up and down arrows on your keyboard to move to it. To select multiple messages, click in the column to the left of the “Who” column (this column is called the “selection margin”). This places a checkmark in that column; then any action you take will be applied to all checked documents, such as clicking the Delete button or the Print button.
You can also use the menu command Edit, Select All to select all the messages in the view, and you can use Edit, Deselect All to remove all the checkmarks from the messages in the view.
If you accidentally select a document, you can deselect it by clicking on the check mark again.
Note
If you want to select multiple messages, place your mouse cursor in the selection bar to the left of the messages. Click and hold down the mouse button and drag down the selection bar. This places check marks next to all the messages you drag past. You can deselect messages the same way.
After you select mail messages, you can delete them, move them to folders, print them, and so forth. To delete them click the Delete button on the Action bar, and the marked messages will be removed from the Inbox and put in the Trash view. By default, the memos in the Trash folder are removed from the database after 48 hours. You will learn how to use folders and print from views in other lessons in this book.
To read a mail message, double-click the message in the View pane or press the Enter key on a selected message. Figure 3.2 shows an open mail message.
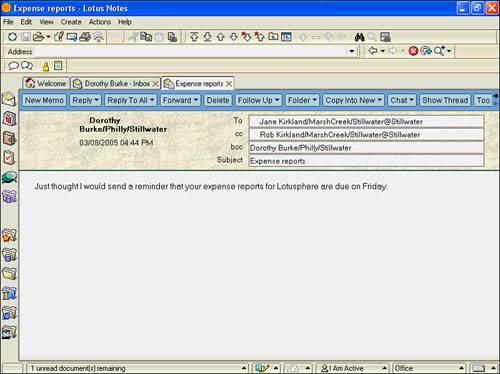
Every mail message, or memo, contains the following elements:
Heading—. The heading contains the name of the person who sent the message, as well as the date and time it was sent. You might also see a domain name, company name, or other information next to the sender’s name.
To:—. The To: line shows the name of the person to whom the message is being sent. Again, the domain name might be included. If the message is coming to you, your name is displayed in the To: line.
cc:—. The cc: (carbon copy) line displays a list of anyone who received a copy of the message, as determined by the sender.
bcc:—. The bcc: (blind carbon copy) line contains a list of anyone who received a blind copy of the message, as determined by the sender; however, only the sender sees the entire contents of the bcc: field. For example, if Jane sends an email and lists Dorothy and Rob in the bcc: field, Dorothy will see only her name in that field, and Rob will see only his name in the field, but Jane (the originator of the email) sees both names in that field.
Subject—. The subject describes the topic of the message, as defined by the sender of the message.
The rest of the email message form is the body field. The mail body field in Lotus Notes is a rich text field, which means that you can read and create text with attributes such as bold and italics, and you can view and create images in your email. If you cannot view an entire message onscreen at once, use the vertical scroll bar, or use the Page Up, Page Down, and arrow keys on your keyboard to navigate.
Note
You can press Ctrl+End to go to the end of a long message or Ctrl+Home to go to the beginning of a message.
Note
Information that is stored in Lotus Notes is stored in fields. A rich text field is the only type of field that can accept multiple data types: text, numbers, graphics, file attachments, and so forth. It is also the only kind of field in which you can assign text and paragraph attributes such as changing the font, bolding or italicizing text, or changing the spacing between paragraphs and creating numbered lists.
When you finish reading a message, press the Esc key to return to your Inbox, or click on the X at the top right of the message window tab.
You can tell with a glance at your Inbox which messages you’ve read and which you haven’t read or opened. Mail messages you haven’t read appear in red and have a red star located in the selection bar to the left of the mail message. After you open and read the message, the star disappears, and the mail message appears in black. Figure 3.3 shows both read and unread messages in the Inbox, as well as messages that are marked, or selected.
The Preview pane enables you to read most of your messages from the Inbox view without opening them in a new window. To see the Preview pane, click on the Preview triangle at the bottom of your View pane; the Inbox view splits into three panes (see Figure 3.4).
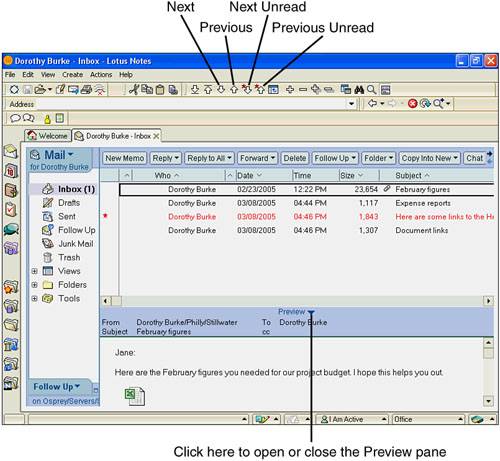
Figure 3.4. The Preview pane enables you to read most mail messages quickly. If you prefer, press the Enter key to view your mail message, and use the Navigate View buttons on the toolbar to navigate through your mail.
Once the Preview pane is open, you can resize it by placing your cursor at the top of the pane, and when the cursor turns into a double-headed arrow, drag the mouse up or down the screen to obtain the size pane you prefer.
With the Preview pane activated, the mail message that is selected in the View pane is the message that displays in the Preview pane. To navigate through mail while using the Preview pane, you can do the following:
Use the up and down arrow keys on your keyboard
Use the Navigate View buttons (Next, Previous, Next Unread, Previous Unread) on the toolbar
Use your mouse to select a mail message
Note
By default, Lotus Notes does not consider previewed mail as having been read. Unread marks continue to display until you open individual mail messages. You can change this default setting but be warned; by changing the default if you use your keyboard arrow keys to quickly pass over messages in your inbox, each one you pass will be marked as “read” even though you didn’t take the time to read the actual message, but merely cursored over it. To change this default, choose File, Preferences, User Preferences from the menu. In the Additional Options box, place a check mark next to Mark documents read when opened in preview pane. Click OK.
Notes mail messages use a form called the Mail Memo form (see Figure 3.5) and can contain formatted text, tables, graphics, attachments, graphs, and embedded objects.
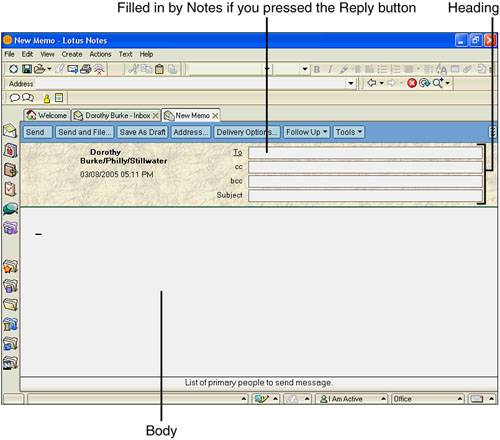
Figure 3.5. To display a new Memo like the one shown here, click the New Memo button on the Action bar. If you are responding to an email in your Inbox, click the Reply button, which will also display a new mail memo but with the To: field filled in.
You can create mail messages from any area of Notes, even when you are working in other databases. Use one of the following methods to create a mail message from your Inbox:
To create a memo when the Mail isn’t open, choose Create, Mail, Memo from the menu.
A blank memo like the one in Figure 3.5 appears. Your name and today’s date and time are displayed in the Heading of the email. A separate window tab labeled New Memo displays to the right of the Inbox. The message is split into two parts: The heading is the top part and the body is the bottom.
The heading of the mail memo consists of fields; you begin your email by filling out those fields. Follow these steps to complete the heading information:
Type the name of the person to whom you want to send the memo in the To field. To send to multiple recipients, separate the names in the To field with a comma.
Note

As you type, Notes searches your personal address book and a company-wide address book called the “Domino Directory” to find a match for the name you are typing. This feature, called type-ahead, continues to search as you type until it finds the unique name you want. Quick-address searches for both first names and last names. If you don’t like this feature, you can disable it in the Mail section of your Location document. See “Connecting” in Chapter 17, “Using Notes Remotely,” for more information on Location documents.
(Optional) Use the Tab key or your mouse to move to the cc (carbon copy) field. Type the name of the person to whom you want to send a copy of the message. The cc field is used to send a copy of a message to someone who is not directly affected by the message, but who needs to know about the contents of the message for informational purposes only. Quick-address works in this field, too.
(Optional) Click in the bcc field and type the name of the person to whom you want to send a blind carbon copy. The recipients of the message, and those listed in the carbon copy field, do not know that the person who is listed in the blind carbon copy field received a copy of the message.
In the Subject field, enter a descriptive title for your message. It is extremely important that you fill in a Subject because it appears in the recipients’ Inbox views, telling them the purpose of your message. To create multiple lines within the subject line, press the Enter key.
Note
Don’t send an email without including a clear and concise description of your message in the Subject line. It lets your recipients know what the message is about before they open it. If you enter something benign like “read this!” you are taking the chance that people will not read (or even delete without reading) your message, as they may think it’s an advertisement or junk mail. Be descriptive and professional, and by helping the recipient determine the contents of your mail without opening it, you are helping yourself to ensure your email will be read.
Most Notes clients have two address books: the Personal Address Book, which is usually stored on your local hard drive or in a network folder reserved for your files, and at least one Directory stored on the Domino server. Like everything else in Notes and Domino, these address books are databases. You are the only person who has access to your personal address book, and your last name is usually part of the database name (for example, “Burke’s Address Book”). The Directory is accessible to everyone in your company and it usually contains the name of your company (for example, “Stillwater’s Address Book”) in the title. The Directory is managed by your company’s system administrators; you manage the content of your personal address book.
While you’re writing a memo, you can use the address books to add people to your To, cc, and bcc fields. This is especially useful if you aren’t sure of a person’s last name or the spelling of his name. Use the following steps to access the address books from a new mail memo:
Click the Address button on the Action bar. The Select Addresses dialog box appears, as shown in Figure 3.6. Table 3.2 lists the options in this dialog box.
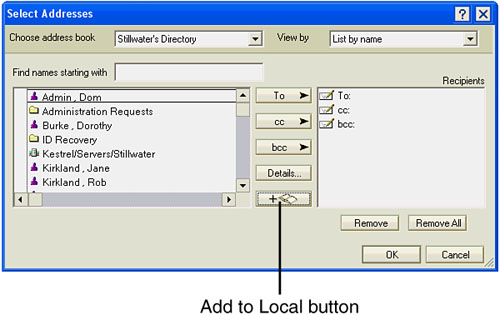
Figure 3.6. Choose your address book and mail recipients in the Select Addresses dialog box. To add a person to your Personal Address Book at the same time as you are using this dialog box to address mail, click the Add to Local button.
Table 3.2. The Select Addresses Dialog Box
Select the address book you want to access. If you are using the Notes client for the first time, your Personal Address Book is probably empty at this point, but it can be easily populated using the Copy to Local button. In order to access the company-wide Directory, you have to connect to the Domino server.
Select the names of the individuals or groups from the available list of names. To select one person, click on that person’s name; to select more than one person, click once in the margin to the left of the person’s name to place a checkmark next to their name.
Click on To, cc, or bcc, depending on which address field you want to complete. Or you can click the Copy to Local button to add this person or people to your personal address book.
Type the message you want to send in the lower half of the screen, which is known as the body (see Figure 3.5). Unlike the fields in the heading, the text and the paragraphs in the body of the message can be formatted because this is a rich text field. You learn more about rich text formatting in Chapter 14, “Editing and Formatting Documents,” and more about attachments in Chapter 15, “Working with Attachments.”
Spell Check compares your text against a stored spelling dictionary of tens of thousands of words. If any of your words aren’t in the spelling dictionary, Spell Check tells you that the word is possibly misspelled. In addition to your misspellings and typos, Spell Check also alerts you to proper names and unusual words that might be spelled correctly, but that are not in the spelling dictionary.
Lotus Notes looks in two dictionaries for correctly spelled words. The main dictionary is extensive, covering most of the common words. Proper names, acronyms, and business jargon that are not included in the main dictionary are then looked for in your user dictionary. The user dictionary is one to which you can add words.
Spell Check reports duplicate words, such as the the, but it won’t look at single-character words such as a or I, or words that are longer than 64 letters. It also ignores text that doesn’t have any letters, such as the number 1,200,543.
Unlike other programs, for example some word processing programs, Spell Check does not operate as you type. You have to initiate it. When you want to check the spelling in your message, you must be in edit mode. Edit mode enables you to change the text in the document in which you are currently working. When you’re creating a new mail message, you’re automatically in edit mode.
To run Spell Check, follow these steps:
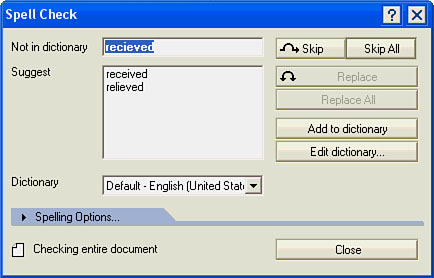
Choose Edit, Check Spelling, or, if you have toolbars displayed, click the Check Spelling button. If Spell Check finds a questionable word, the Spell Check dialog box appears, as shown in Figure 3.7.
When Spell Check finds a word it doesn’t recognize, the word appears in the Replace box of the dialog box. You can then choose one of the following options:
Skip—. Ignores the misspelling and goes on to the next word. Use this option when the word is spelled correctly.
Skip All—. Tells Notes to ignore all the instances of this word in the message. This is useful when a correctly spelled proper name crops up several times in a memo.
Replace—. Enables you to change an incorrect spelling to a correct one. If the correct spelling of the word shows up in the Suggest box, click the correct guess and then the Replace button. If Spell Check provides no suggestions and you know the correct spelling, click in the Not in dictionary field and make the correction by deleting or adding characters. Then, click Replace to make the change in your message.
Replace All—. Tells Notes to replace all the instances of this word with the suggested word you choose.
Add to Dictionary—. Adds the selected word to your user dictionary. After the word is added, Spell Check recognizes it as correctly spelled (so make sure you spell it correctly when you add it).
Edit Dictionary—. Opens a new dialog box displaying the contents of your personal dictionary. This is very useful when you accidentally add an incorrectly spelled word to your personal dictionary and need to correct or delete that word.
After correcting, adding, or replacing words that Lotus Notes Spell Check has questioned, click Close.
Note
To further refine your Spell Check, click the arrow by Spelling Options to expand the Spell Check dialog box and provide more options that make Spell Check ignore words that are all in uppercase or that contain numbers.
By default, Spell Check checks your entire mail message. If you want to Spell Check one word or a paragraph, select the word or text with your mouse, and then start the Spell Check using the previously outlined process.
Running Spell Check doesn’t guarantee a perfect mail message. If you accidentally type the word form when you wanted to type from, for example, Spell Check won’t catch it because form is a word that is in the dictionary. Also, Spell Check doesn’t catch incorrect punctuation or missing words.
As previously mentioned, you might mistakenly add a misspelled word to your personal dictionary. To edit your personal dictionary when not running spell check, do the following.
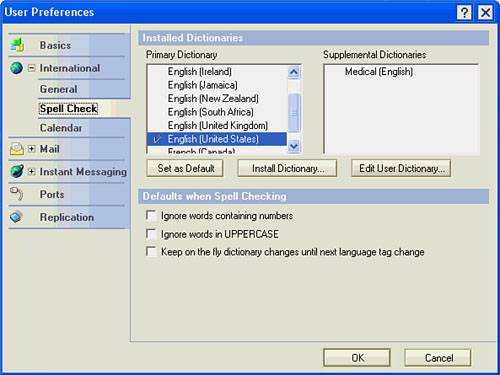
Choose File, Preferences, User Preferences. In the User Preferences dialog box (see Figure 3.8), click the plus sign next to International and click on Spell Check. On the right side of the dialog box, click the Edit User Dictionary button.
You can then make any of the following changes:
When you finish, click OK. Then, click OK to close the User Preferences dialog box.
When you have completed spell check, you can send the message or you can save it as a draft to send later (see Figure 3.9).
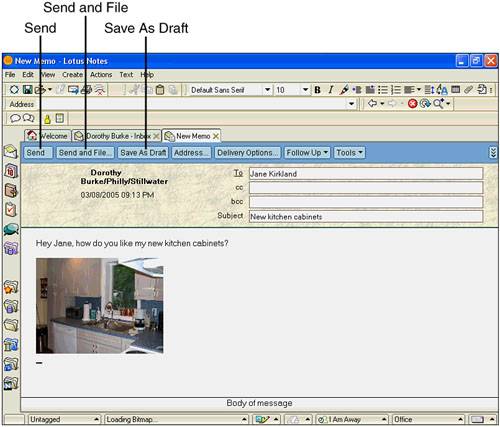
Figure 3.9. A completed message can be sent or saved in the drafts folder. The body of the message is a rich text field and can contain formatted text or pictures as shown here.
To send the message, click the Send button or the Send and File button in the Action bar:
Send—. Sends the message to the recipient’s mailbox and, by default, saves a copy of your message in the Sent view.
Send and File—. In addition to sending the message, you are given the option of storing a copy of the message in a folder. For more information about creating folders, see Chapter 4.
Note
You can set a user preference to automatically perform a Spell Check on every mail message you create. It is highly recommended that you set this option. Open a mail memo and choose Tools, Preferences from the Action bar. On the Basics tab of the Mail section, select Automatically check mail messages for misspellings before sending. Click OK to close the window.
To save a message as a draft, click the Save As Draft button in the Action bar. Your message is stored in the Drafts folder. At a later time, you can open the message by double-clicking the message from the Drafts view. The document is automatically opened in edit mode. When you’re ready to send the message choose Send or Send and File in the Action bar.
You control how and when each of your mail messages is delivered through the Delivery Options button on the Action bar. Delivery Options, as described in Table 3.3, have to be set prior to sending the message. If you are sending mail via the Internet to non-Notes users, some of these features do not work, and they are marked as such with an asterisk (*) in Table 3.3. See Figure 3.10 to see the Delivery Options dialog box, which appears when you click the Options button on the Action bar.
Table 3.3. Basic Delivery Options
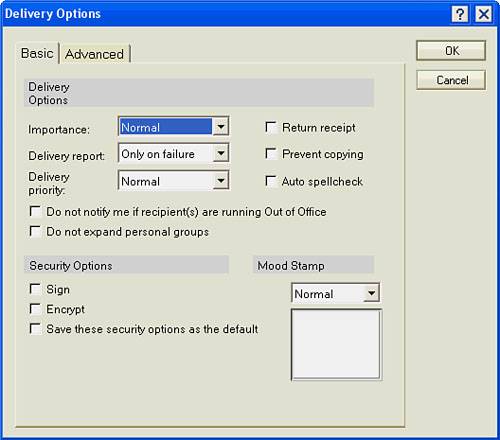
Figure 3.10. Set your delivery preferences in the Delivery Options dialog box. Please check with your Domino system administrator before you send mail High priority. It might not be necessary for you to select that option for important mail.
Note
For the most part, you do not need to access Delivery Options for each mail memo you send. The default settings in Notes may be sufficient for efficient sending and receiving of mail. Changing the priority of a mail memo can affect the performance of your Domino servers. Discuss mail delivery options with your supervisor, help desk, or system administrator and ask them to suggest if and when you need to set or change your email delivery options.
Note
Encryption sounds like you need to put on your magic decoder ring! When you choose to encrypt a message, Lotus Notes scrambles the message, and only the recipient has the key to unscramble it. Because your message travels from your PC to the Lotus Notes server and then to the PC of the recipient, encrypting the message prevents anyone who might be working at the Lotus Notes server from reading your message.
Note
Lots of new Notes users think that the Flame mood stamp indicates that a message is “hot” (important). In the true Net Etiquette sense, flaming is an indicator that you are truly angry with someone and is considered insulting. You might want to think twice about using this mood stamp. Try setting the Importance to High instead.
You can find less frequently used delivery mail options by choosing the Advanced tab of the Delivery Options dialog box. For example, you can set mail expiration dates and request where and when you want replies to messages to be sent. The Advanced Delivery Options are not used as frequently as the Basic Delivery Options. For most of your mail, you can leave advanced options set at their default. For additional help with the Advanced Delivery Options, see the Lotus Help database.
To reply to a mail message, select the message to which you want to reply in the View pane, or open the message. Click the Reply or the Reply to All button in the Action bar. Each of these buttons has the same choices on its pull-down menus, beginning with Reply. The difference between the two buttons is that the Reply button sends your reply to the sender only; the Reply to All button sends your reply to the sender and anyone he included in his To and cc fields.
Follow these steps to reply to mail:
Click the Reply or Reply to All button and choose Reply from the pull-down list. The New Reply window appears. When you reply to mail, Notes fills in the header information of your mail message. You can make changes to the header information if you want.
To send a copy of the message to new parties, type the names in the cc field. If you used the Reply to All button and the sender had names in the cc field, those names will be filled in.
To send blind carbon copies, type the names in the bcc field.
Position the mouse cursor in the message body and begin typing your reply message.
Note
Use the Reply to All button when replying to mail that originally included others in the header fields. This is a courtesy that saves you time later, when you discover that you have not informed everyone in the original distribution list of your reply.
Use the Reply with History option to attach a copy of the original message to the bottom of the reply. Use this option when you want to respond to a lengthy message, providing the recipient with a copy of the original message, or when you just want to make it easy for the recipient to understand your reply by attaching their original email. Keep in mind that Reply with History will resend any attachments that you received in this email. If there were attachments in the email you received, you might want to choose the Reply without Attachment(s) option, which sends the body of the email but not the attachments.
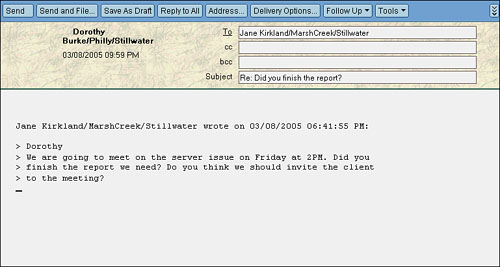
Choose the Reply with Internet Style History if you are replying to an email you received from someone who is not using Lotus Notes. This option strips out headers from the original message as shown in Figure 3.11. This makes a much cleaner history and is easier for non-Notes users to read.
You can forward any mail message (that has not been restricted with the “Prevent copying” feature) to another person, and you even can add your own comments or reply to it. To pass a message on to someone else, click the Forward button in the Action bar. Options for this feature are Forward without Attachments and Internet-Style Forward. These options work similarly to the reply options discussed in the previous section, “Replying to Mail.”
When you select a Forward option, the New Memo window appears (see Figure 3.12).
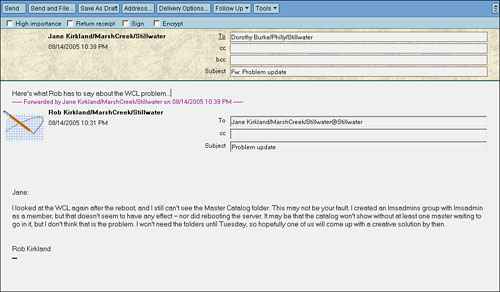
Figure 3.12. You can add comments to forwarded messages, explaining your purpose for sending this message.
Forwarding a mail message inserts one mail message into another so that the original header information stays intact. Complete the To and Subject lines and add your comments above the Forwarded by line. Click the Send or Send and File button in the Action bar to send the message.
Quick Notes enables you to quickly create a new mail memo, contact, journal entry, or reminder from the Welcome page (see Figure 3.13) if you are using the Basics or Basics with Calendar Welcome page. To enable Quick Notes, click the small blue triangle on the right side of your Welcome page.
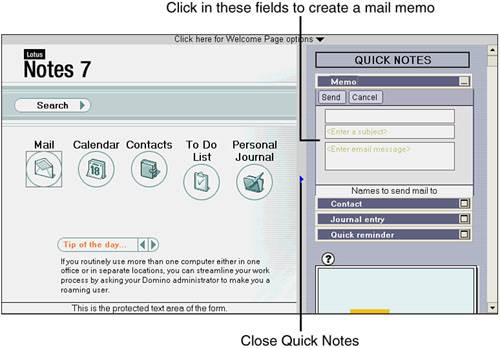
Figure 3.13. To close Quick Notes, click the small blue triangle to the left of Quick Notes. Resize the Quick Notes window by dragging the left border of the Quick Notes frame.
To Create a new mail memo from Quick Notes, simply place your cursor in the To, Subject, and message fields and type your information.
In this chapter, you learned how to open and close your mail database, read and navigate your incoming mail messages, and to create, reply to, and send mail. You also learned how to use Spell Check and set delivery options, as well as how to use a new feature of Lotus Notes called Quick Notes. In the next chapter you learn how to sort, manage, and print mail.