
In this chapter, you learn how to set your preferences for your mail database and your calendar. You’ll also learn how to control access to and delegate tasks for mail and calendar.
Mail preferences determine how your mail works—who can read your mail, whether mail should be encrypted automatically, whether all your outgoing mail is signed by you, and so on.
Complete the following steps to set your mail preferences:
Open your mail database.
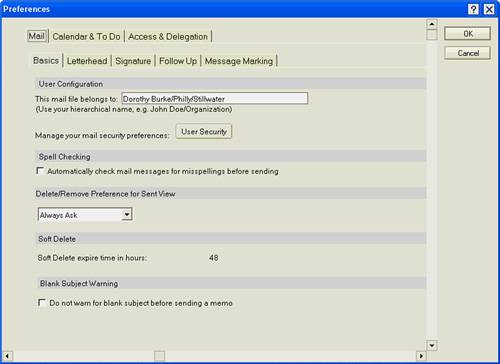
Click the Tools button on the Action bar and choose Preferences. The Preferences dialog box appears (see Figure 8.1). When the Mail tab is selected, the following five subtabs appear: Basics, Letterhead, Signature, Follow Up, and Message Marking.
Click the Basics tab. The This Mail File Belongs To field automatically displays your full Notes name. (If it displays a name other than yours, tell your Notes administrator or help desk immediately.) Other options on this tab include:
To have Notes automatically check the spelling of your mail messages, enable Automatically Check Mail Messages for Misspellings Before Sending.
When you try to delete a message from the Sent view in your mail, you need to set one of the options under Delete/Remove Preference for Sent View: Always Delete removes the mail from the mail database (all views), Always Remove removes the mail from the Sent view but leaves it in the All Documents view, and Always Ask prompts you to make a choice each time you delete mail from the Sent view.
Soft Delete Expire Time in Hours displays the number of hours a deleted message will remain in your Trash view until it is automatically deleted from your mail. Depending on your level of access to your mail database, this may be a read-only field.
Enable Do Not Warn for Blank Subject Before Sending a Memo if you want to turn off the automatic alert that occurs when you attempt to send mail without adding a subject.
Click the Letterhead tab. Select the default letterhead of your choice. A preview is provided at the bottom of the screen. When you change letterhead, memos created with your previous choice of letterhead do not change. New memos you create after selecting a letterhead here use the new letterhead. You can change letterhead as often as you like.
Click the Signature tab. Select Automatically Append a Signature to the Bottom of My Outgoing Mail Messages if you want your signature added to all your mail memos. A signature can be a piece of text or an HTML file. Don’t confuse this signature with electronic signatures, which are a security feature as described in Appendix A, “Understanding Security and Access Rights.” To create a text signature, choose Text and enter the signature text in the Signature box. To use an existing file as your signature, select File and enter the name of the file (or click Browse and select the file).
Note

Signatures that you create as text cannot be formatted, because the Signature feature of Notes does not allow that. However, if you attach an HTML file, formatting is preserved. If you want a scripted signature, create a signature in your word processing program and format it to your liking. Save it as an HTML file and attach it in the Signature file box.
Click the Follow Up tab. The options on this tab set the defaults for the Flag for Follow Up dialog box. You can set the default for flag priority, follow up date, follow up time, and alarms (see Chapter 4, “Managing Mail,” for more information on flagging messages for follow up).
Click the Message Marking tab. You use message marking to help identify mail that is important to you. There are two tabs—Senders and Recipients.
On the Senders tab you can set up to three color combinations to identify mail from specific senders. Enter or select the name(s) whose mail you want to color code in one of the Sender names’ boxes. Then select a background and/or text color. Mail from these senders will appear in your mail views with the designated coloring.
On the Recipients tab, you specify what icons you want to see next to your incoming mail in mail views. Enable any or all of the options: Display a Solid Circle When I Am the Only Recipient in the To Field, Display a Half-circle When My Name Is One of UP TO This Many Names in the To Field (and specify the number), or Display an Empty Circle When My Name Is in the cc Field. If you receive mail under any other name (such as an Internet name), enter that name in the box at the bottom of the screen. When you belong to a group and mail is addressed to that group, the icons will not display for that email.
As you did with your mail, you set up how you want to use the features of the calendar using the calendar preferences. You learn more about using the calendar in the next chapter, but you can set calendar preferences even if you aren’t yet familiar with the use of the calendar. For example, in the calendar preferences you set up your free time schedule and determine who can see your schedule. The default free time is Monday through Friday, 9 a.m. to 12 p.m. and then 1 p.m. through 5 p.m. If your regular work schedule is different than those hours or your lunch hour is different, you’ll want your calendar to reflect that. You also specify when and how you want to be reminded of upcoming calendar events, set defaults for calendar entries, choose how time intervals display on your calendar, decide how to process meeting invitations, and specify who can view or manage your calendar.
Complete the following steps to set your calendar preferences (if you did not close the Preferences dialog box after choosing your mail preferences, skip to step 3):
Open your mail database.
Click the Tools button on the Action bar and choose Preferences.
Click the Basics tab to set the defaults for the calendar. From the drop-down list, select the type of calendar entry you want to automatically appear when you create a new calendar entry. Set the default length for appointments (in minutes) and meetings by specifying the number of minutes in the second box. In the Anniversaries Repeat For box, enter the number of years for which you want an anniversary to be entered on your calendar. Finally, if you want to enter any personal categories for use in the calendar, type the category text in the Personal Categories text box.
Click the Display tab. To set the length of day you want to see in the calendar pages, indicate when you want the calendar day to start by selecting a time in the Beginning of the Work Day field. Do the same for the ending time in the End of the Work Day field. Select a number of minutes from the Each Time Slot Lasts drop-down list to decide how far apart the times on your calendar should display, as in 60-minute increments, 30-minute increments, and so forth. Choose the Days Displayed in a Work Week by clicking in the checkbox next to the days in the list. You can also choose to start your month view with the current week by selecting the Start Monthly View with Current Week field. If you don’t want meetings to appear in the All Documents view of Mail select the Don’t Display New Calendar Entries and Notices in the All Documents View of Mail. If you don’t want meeting invitations to appear in your Sent View of mail, select Don’t Display New Meeting Invitations in the Sent View of Mail. If you would like to have your meeting invitations removed from your Inbox after you respond to them, select Remove Meeting Invitations from Your Inbox After You Have Responded to Them. You can also specify Types of Meeting Notices to Be Shown in Your Inbox by selecting All, All except responses, or None from the drop-down list. Where can you keep track of these meetings if you choose not to show them in your Inbox? You can display them in the MiniView that appears in the lower portion of your mail and calendar navigation pane. Enable Put C&S documents into a Special New Notices MiniView for Processing.
Click the Scheduling tab (see Figure 8.2), if it’s not already displayed. On the Your Availability tab, check the days you want to include in your free time schedule (the time you are available for meetings). For each day you check as being available for meetings enter the times when you are normally available. You can also set the Time Zone for these hours. On the When Adding an Entry to Your Calendar tab, select the option When Adding Appointments, Accepting Meetings, Scheduling a Meeting if you want Notes to check for conflicts when you schedule or accept a meeting. If you select this option, you may also enable Note a Conflict If Entry Occurs Outside Available Hours Described on the Your Availability tab. There are also options for what you will see in the Scheduler when you are setting up a meeting. You can choose to see Schedule Details for Each Participant or Suggested Best Times for Meeting. You may also opt to Show 24 Hours on Meeting Scheduler Display.
Click the Alarms tab. Select Enable the Display of Alarm Notifications if you want Notes to alert you to upcoming events that you have entered in your calendar. When you select this field, the dialog box shows new fields, and a list of calendar entry types. Select the types of calendar entries about which you want to be reminded. Then enter the number of minutes or days in advance you want to receive the reminder. If you want to be alerted by a sound, select a Default Sound from the drop-down list (if your computer has sound capabilities).
Click the To Do tab. When you create a To Do item, it appears on the Calendar unless you enable Do not Display To Do Entries in the Calendar. To display incomplete To Do entries on the current day in the Calendar, select Allow Notes to Update To Do Status and Dates for Incomplete Entries.
Click the Autoprocess tab to determine how you want to process meeting requests. You must manually respond to all requests for meetings unless you choose Enable Automatic Responses to Meeting Invitations. By choosing this, Notes will automatically respond to meeting invitations that arrive in your Inbox. Once you choose this option, you must then select from the following:
When a Meeting Invitation Is Received from—Anyone is a default setting for this field, but you can use the drop-down menu to select a list of people, or a list of exceptions.
You must also tell Notes what actions to take when meeting invitations arrive: If you choose Automatically Accept If Time Is Available, Notes will automatically accept any meeting invitations for you if the time of the proposed meeting is free in your free time schedule. If you’re busy at the time of the proposed meeting, Notes auto-declines the meeting, but places a memo in your Inbox titled “Declined Meeting Name” so you can accept later. If you choose And Automatically Decline If Time Is Not Available, Notes will automatically decline meeting invitations that conflict with free time shown on your calendar. When you choose Let Me Decide If Time Is Not Available, Notes will give you the option of attending or not, regardless of your schedule.
You can also delegate meeting invitations to another person. In the Perform the Following Actions drop-down field, select Delegate Invitations to the Following Person Instead of Me. By choosing this option, Notes forwards all meeting invitations to the person you specify (the person you enter in the Delegate field). This is useful if someone else manages your calendar. The person who invited you to the meeting will receive notice that you have appointed a delegate to this meeting.
Select Automatically Accept Even If Time Is Not Available to accept all meetings, whether you have free time or not. You will have to resolve any conflicts if this causes double bookings.
Two options are available in the Automatic Inbox Management section: The first is Prompt to Confirm Deletion, which results in Notes prompting you when you delete a calendar notice from your Inbox or any view in your Mail Database. The second, Remove from This View/Folder with Prompting, results in no prompting by Notes when you make such deletions.
Click the Colors tab to choose your color preferences for calendar items.
Click the Rooms and Resources tab. If your organization’s directory contains listings for rooms or resources or there is a reservations database (see your Domino administrator if you want to know more), you can set some defaults for how these items appear when you schedule a meeting, such as a preferred site, a preferred rooms list, and a preferred resources list. You can also determine when you want rooms and resources added to your own preferred rooms and resources lists.

The Access & Delegation preferences are divided into three tabbed pages: Access to Your Mail and Calendar, Access to Your Schedule, and Shortcuts to Others’ Mail. On these pages, you determine who can access your mail (see Figure 8.3), who can access your free time, who can see your calendar entries, who can create calendar entries in your calendar, and so forth. If you make no changes and accept the program defaults, no one can access your mail, everyone has access to your free time (but they can’t see the details or names of entries in your calendar), and you have no shortcuts to access the mail databases of other people.

Figure 8.3. By the default setting, no one but you has access to your mail. When you add someone to the access list, you’ll have the opportunity to designate their level of access.
To set Access and Delegation preferences, follow these steps (if the Preferences box is open, skip to step 3):
Open your mail database.
Click the Tools button on the Action bar and choose Preferences.
Click the Access & Delegation tab (see Figure 8.3). On the Access to Your Mail & Calendar page, click Add Person or Group and select the person or group you want to permit access to your mail or calendar entries under step 1 (see Figure 8.4).

Figure 8.4. When you give access to your mail to others, they can see everything in your mail database that is not marked Private.
In step 2, choose how much of your mail file you want to grant access to. See Table 8.1 for an explanation of access levels.
In step 3, choose the level of access you want to give for your mail, calendar, and To Do items. See Table 8.1 for a detailed explanation of level of access. The choices in the drop-down section of step 3 change according to the choices you made in step 2.
Table 8.1. Select the Level of Access to Your Mail and Calendar
Select This Option
For This Level of Access
All Mail, Calendar and To Do
Read any document
Allows the person or group you designate to read your email (but not encrypted mail), calendar entries (but not details of entries marked private), and To Do items (but not those you mark private).
Read and create any document, send mail on your behalf
The same as the preceding selection, but they can also send mail from your database. When they send mail from your database, the mail is identified to the recipients as a memo created by the delegate, and sent on your behalf (By Jane Kirkland on behalf of Dorothy Burke).
Read, edit, and create any document, send mail on your behalf
Same as previous, but also allows the delegate to edit your mail.
Read, edit, create, and delete any document, send mail on your behalf
Same as previous but also allows the delegate to delete any document in your mail database.
Read and create any document, delete any document they created
Restricts the delegate to deleting only those documents they created in your database.
Only Calendar and To Do
Read any Calendar Entry or To Do
Allows delegate to read your Calendar and To Do items, but not your email and calendar items you marked as private.
Read, create, edit, and delete any Calendar Entry or To Do
Same as previous but also allows delegate to edit and delete Calendar and To Do items.
None
In step 4, if you want Notes to automatically forward notices to the person listed in step 1, choose either Forward Notices Where You Are the Invitee (when you receive meeting invitations they will automatically be forwarded to the person listed in step 1), or Forward Notices Where You Are the Chair of the Meeting (when you receive calendar notices where you are the Chairperson, they will be automatically forwarded to the person listed in step 1).
Allowing others to see your schedule information is different than allowing them to see your calendar entries. By default, when others are scheduling a meeting and they check your availability, they can see if your time is free or not free. There are two sections to the Access to Your Schedule page: First, Who Is Allowed to See Your Schedule Information (When You Are Busy or Available) is where you give access to individuals or groups to your scheduling information. The default is Everyone May See Your Schedule Information. To make changes to the default, choose No One May See Your Schedule Information or select an individual or group who may see your schedule information. The second section is What Schedule Information They May See and the default here is Only Information About When You Are Busy or Available. You can choose Detailed Information About Your Calendar Entries if you want everyone to see appointments on your calendar when they are looking for your available time, or choose Only Information About When You Are Busy or Available, Except the Following People May See Detailed Information and in the drop-down menu, select the people that you want to see your calendar entries.
Note
You do not have to give out your password for others to access your mail or calendar information if you grant them access through the Preferences dialog box. Never give out your password. When you give people access to your mail database, they can’t read encrypted mail sent to you, and you can’t read encrypted messages they create on your behalf unless your User ID contains the encryption key used to encrypt the messages. Consult with your Administrator if you need to read each other’s encrypted mail or if your designee needs to send encrypted mail on your behalf.
For others to read mail, send mail, set appointments, and use the rights you have just given them, they need to open your mail database, or if you’ve been given rights to others’ databases, you need to open their mail databases. The easiest way to access the calendar and mail to which you have rights is to add a shortcut. To do so, open your mail inbox, and choose Tools, Preferences. On the Access & Delegation page, choose Shortcut to Others’ Mail. Use the drop-down menu to choose people from the address book who have given you access to their mail or calendars (see Figure 8.5).

As long as you have your Notes client running, even minimized, you receive notification of any new mail. If you exit Notes, however, you have no idea that a new, and possibly urgent, memo has been delivered to your Mail database.
Notes has a utility that notifies you of new mail and any Calendar alarms, even when you aren’t running your Notes client. The utility is called the Notes Minder. When Notes Minder is running, an envelope icon displays in the system tray of your Windows taskbar. The current status or number of new mail messages received pops up when your mouse pointer points to the icon. For example, it might read “Mail last checked at 4:45 PM.” Double-clicking the icon launches Notes in your Mail file.
Start Notes Minder initially by choosing Programs, Lotus Applications, Notes Minder from the Start menu (click Start on the Windows taskbar). Your Notes client does not have to be open. If you want Notes Minder to start automatically when your computer starts, copy its Windows menu icon into the Windows Startup menu. You can do this by dragging it or using copy and paste commands.
Clicking on the Notes Minder icon with the right mouse button pops up a menu (see Figure 8.6).

Select a menu choice to do one of the following:
View Mail Summary opens a dialog box that displays the unread messages in your Inbox. Double-clicking one of the messages in the Unread Mail Summary dialog box opens the Notes client and displays that message. To close the dialog box without viewing a mail message, click OK.
Properties displays the Options for the Lotus Notes Minder dialog box (see Figure 8.7). In the Properties box, you set the types of notifications you want to receive (audible, visual, and/or missed alarms). You also specify how frequently you want the Notes Minder to check for incoming mail, or you can disable checking. Click OK to close the dialog box.
Enabled has a check mark when Notes Minder is enabled. You click this menu selection to enable or disable the Notes Minder.

In this chapter, you learned how to set your preferences for both mail and the calendar, how to choose letterhead, and how to use Notes Minder. In the next chapter, you learn how to use the calendar.