
In this chapter, you’ll learn how to work with Notes when you aren’t in the office—by replicating mail, creating replicas of databases, and encrypting local databases.
A mobile user is one who works from multiple locations and sometimes works in Notes while disconnected from the Notes network. Non-mobile Notes users typically just turn on Notes and start working; they never have to think about how to connect to their servers.
As a mobile user, you have to decide as you move from place to place or from computer to computer how you will connect from that place or computer to the Domino servers where your data resides. Luckily, you will probably connect in only one of two ways—either to the local area network in your office or to the Internet. But you may have to decide whether to make that connection using your computer’s wired Ethernet adapter, its wireless Ethernet adapter, or its modem adapter. And you may have to figure out how to dial a long distance call from a hotel room. And you may have to decide whether to work with databases residing on the server or locally.
If you use one computer at work and a second computer at home, you have to think about how you’ll keep the Personal Address Books and personal journals on those two computers in sync with each other. Luckily, Notes takes much of the pain out of all of these decisions. And hopefully your administrator did the basic setup for you.
Note
If you are a mobile user who has a high-speed connection to the Internet, such as a DSL line or cable modem, you might not have to set up replication of your databases and mail. After you set up your connection, you can work almost as if you were in the office. Even when we are traveling, we always try to find a hotel that has high-speed connections. However, they aren’t always available or working properly, so it is good to be prepared to connect via a phone connection.
As a mobile user you may have to make sure of the following (especially if you will be traveling):
Your location and connection documents are set up.
You have local replicas of any databases you’ll be using and you’ve added any necessary entries to the Replicator page.
You have telephone and Ethernet cables.
You have the phone number for your Domino administrator. (Please don’t tell him we suggested you travel with his cell phone number, home phone number, and beeper number!)
Aside from connecting cables, getting connected to your servers is entirely an exercise in configuring location and connection documents, then choosing the right ones for your situation. Location and connection documents reside in your Personal Directory. Between them (and information stored in your operating system) they provide all the information Notes needs to establish connections to your servers. The location document tells Notes where it is currently located, what servers it should rely on from that location, whether to use local or server-resident databases, and, if local, how often to replicate with the servers. The connection document tells Notes how to connect to the server. The easiest way to configure location and connection documents is, okay, to have your administrator do it. But if you have to do it yourself, you want to set up your location document first, then your connection document.
Notes includes several predefined location documents. Unless your administrator has deleted them you should be able to adapt them to your use. The ones that you will find most useful are those labeled Office, Internet, Home (Network Dialup), and Island (Disconnected). Their characteristics are set forth in Table 17.1.
Table 17.1. Location Documents and their Characteristics
Location Name | Mode of Connection | Location of Mail Database |
|---|---|---|
Office | Local Area Network | On Server |
Internet | Local Area Network | Local |
Home (Network Connection | Modem Connection to Internet Service Provider or Remote Access Server | Local |
Island (Disconnected) | No connection available | Local |
The other predefined connection documents—Home (Notes Direct Dialup) and Travel (Notes Direct Dialup) assume you will connect by modem directly to a Domino server. Now that the Internet offers universal connectivity, organizations rarely bother to set up direct modem server connections for their users, so we won’t discuss them further.
You can often use these location documents as is. Their best uses are as follows:
Office—. Wherever 1) you can connect to your office network or the Internet by Ethernet, Cable Modem, or DSL adapter and 2) you want to work directly in your mail server’s copy of your mail database.
Internet—. Wherever 1) you can connect to your office network or the Internet by Ethernet, Cable Modem, or DSL adapter and 2) you want to work in your workstation’s copy of your mail database.
Home (Network Connection)—. Wherever you must use a modem to connect to the Internet.
Island (Disconnected)—. Wherever you cannot establish a connection to a Domino server, such as in an airplane.
The above location documents will generally work as is in every situation except when you are away from home and have to use a modem to connect to other computers. For that situation, you may need to create a new location document from scratch or, better yet, adapt the Home (Network Connection) location document.
To adapt the Home (Network Connection) or any other location document, we recommend that you make a copy of it, then edit the copy. To make a copy of a location document, select it in the Locations view of your Personal Directory, then in the menu choose Edit, Copy, then Edit, Paste. The new document will appear just below the original. To edit it, select it, then press Ctrl+E. Edit the Location name field (Basics tab) to give it a new name. Other fields that you as a mobile user may want to edit are listed below:
Prompt for time/date/phone (Basics tab)—. Set to Yes for any location document that you plan to use while traveling. Each time you start Notes, you will be prompted for the time, date, and phone number where you are located.
Server fields (Servers tab)—. Enter the full name of your home/mail server (e.g., Osprey/Servers/Stillwater) in the Home/Mail server field. The other server fields are optional. If you are working in a copy of an existing location document, these fields may be correctly populated already. But if, say, you intend to use a location document at a branch office of your company thousands of miles from your own office, you may want to repopulate some of these fields with the names of servers local to where you will use this document, rather than those back home. Ask your administrator about this.
Replication fields (Replication tab)—. You may want to enable scheduled replication. See Appendix B, “Understanding Replication,” for details about this.
Use operating system’s time zone settings (Advanced, Basics tab)—. You may want to set this to No. If you do, other fields will appear where you can specify the time zone settings that Notes should use when this location document is selected. You may prefer to do this instead of changing the time zone settings in your operating system at travel time.
Load images (Advanced, Basics tab)—. You may want to change this to On request to improve download performance when using a modem.
Network dialup idle time (Advanced, Basics tab)—. Insert a number of minutes in this field to ensure that you don’t rack up huge long distance charges because you forgot to disconnect from the server.
Secondary TCP/IP Notes name server (Advanced, Secondary Servers tab)—. You can enter the name of a Domino server will act as a backup name, home, and mail server should your primary home server become unavailable. This might be especially useful if you travel internationally. Ask your administrator about setting this field.
Secondary TCP/IP host name or address (Advanced, Secondary Servers tab)—. If you set the previously listed field, you will want to enter that server’s hostname or IP address in this field.
After you have saved your new location document, you can select it (or any other) at any time in either of two ways. In the menu you can choose File, Mobile, Choose Current Location, then choose it from the list. Or, with your mouse, you can choose it from the Location list in the bottom right corner of your Notes window.
The connection document holds the information Notes needs to complete a connection to a particular Domino server. You won’t always need a connection document to connect to a given server. On the other hand, for a given server you might find you need multiple connection documents, one for each location document.
The connection document is a companion document to the location document and a good way to create one is to use the Connection Configuration Wizard. Follow these steps:
Open your Personal Directory and navigate to the Advanced, Locations view.
Open the location document that needs the new connection document, then click the Connection Configuration Wizard action button.
Fill in the fields as prompted, then click Finish. The information you will be prompted for include things like the Domino name and hostname of the destination server, or the phone number that connects you to your ISP. When you click Finish, the wizard will create your connection document.
You can also create a connection document from scratch by clicking the New action button, visible from any view in your Personal Directory, and choosing Server Connection. You might prefer to do this if the connection document will be used with more than one location document. Most likely, you will only ever have to create two kinds of connection document: Local Area Network or Network Dialup. If you ever have to use one of the other kinds, your administrator will undoubtedly create it for you.
To create a connection document for use with a Local Area Network type of location document (for example, Office and Internet), follow these steps:
In your Personal Directory, click the New Action button and choose Server Connection.
On the Basics tab, set the fields as follows:
Connection type—. Select Local Area Network.
Use LAN port—. Select TCP/IP. (Your TCP/IP port might have a different name, but it should be obvious that it is a TCP/IP port. Don’t choose a port that isn’t obviously a TCP/IP port.)
Server name—. Enter the full name of the server to which you want to connect.
On the Comments tab, enter any text that will help you, years from now, to remember why you created this document.
On the Advanced tab, set the fields as follows:
Only from Location(s)—. Select one or more location documents that this connection will be used with. The default is all location documents.
Only for user—. Select one or more users for which the location document will be available. The default is all users of the machine.
Usage priority—. Select Normal.
Destination server address—. Enter the server’s hostname or IP address.
Save and close the document. It will appear in the Connections view of your Personal Directory.
To create a connection document for use with a Network Dialup type of location document (for example, Home [Network Dialup]), follow the same steps as above, but with three changes:
Before you create this connection document, create a dialup network connection in your computer’s operating system. If you have already created one that you can use with this connection, write down its name. To create a new dialup network connection record in Windows, open the Control Panel, choose Network Connections, and choose Create a new connection under Network Tasks or select New Connection in the File menu. The New Connection Wizard will appear. There you can choose Connect to the Internet, then choose Set up my connection manually, and finally choose Connect using a dial-up modem. From that point forward, you’ll be prompted to enter your account name at your ISP, your password with the ISP, and a phone number provided by your ISP or your Domino administrator. Record the name of this connection; you will need it when setting up your Notes connection document.
In the Notes connection document, under the Basics tab, in the Connection type field, select Network Dialup. When you do, another tab will appear, labeled Network Dialup.
In the Notes connection document, on the Network Dialup tab, in the Choose a server type field, choose the server type for your operating system. For Windows, choose Microsoft Dial-Up Networking. Then click the Edit Configuration button. In the dialog box that appears, enter the name of the dialup connection you created in your computer’s operating system. You can enter data in the other fields, too, but you don’t have to re-enter any data that you entered in the dialup connection you created in the operating system. Click OK when finished.
When you need to work on databases that are stored on the server at the office, but you’re working away from the office, you may want to make local copies of the databases. It’s a good idea to create the replicas while you are still in the office with a fast network connection because it may take a long time, but not nearly as long as it would take with the slow connection you may have on the road.
The most important database to replicate locally is your mail database. See Figure 17.1 for the Open Database dialog box. Before you begin, verify that you need to make a new replica. There could be one on your laptop already that you don’t know about. To find out if a replica is on your computer, right-click the bookmark for your mail file and choose Open Replica. If local appears in the list of replicas, you already have the replica on your laptop.

Figure 17.1. The Open Database dialog box. Some of the databases may be in folders at the bottom of the list, like Mail.
The following procedure will make a local replica of your mail database (or of any other database, for that matter):
Open your mail database, and then choose File, Replication, New Replica from the menu (or right-click the bookmark, and choose Replication, New Replica from the menu).
The Create Replica for Database [database title] dialog box appears (see Figure 17.2).

Figure 17.2. Click the twistie by Replica Settings to encrypt the replica, create a full text index for searching, or have the replica created immediately (versus the next time replication occurs). Encrypt the Replica Using is a default setting; deselect it if you don’t need the security or choose a higher level of encryption if you do.
Make sure the Server displayed is Local. Notes automatically fills in the Database and the File path. You can change the path to put the file in a different location if you want, but for your mail database, you should not change the target location. If you do, your mail bookmarks won’t work correctly.
Click the twistie by Replica Settings, and then select Create Immediately.
Having created local replicas of databases, periodically you have to sync them with the originals on your server(s). To do so, you can use the Replication page. The Replication page provides a central location to handle all your replication needs. By using the features available on the Replication page, you can set options to control replication of your mail and any other databases you might use. Access the Replication page by clicking the Replication bookmark.
When you create a local replica of any database, Notes adds an entry for that database to your Replication page. In addition there will be entries for sending outgoing mail and possibly for sending mail directly to the Internet. See Figure 17.3.
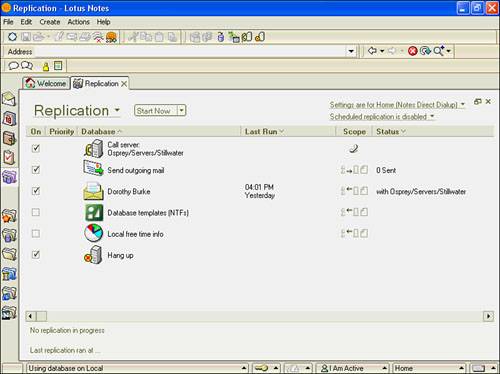
Figure 17.3. The Replication page lists all the databases for which you have replicas. Put a checkmark in front of the items that you want replicated.
To replicate, click Start Now. To replicate only the mail database and transfer outgoing mail, click the arrow next to Start Now and select Start Mail Only Now.
Note
You can also send and/or receive mail without opening the Replication page by clicking the Quickpick button on the status bar. Choose Receive Mail, Send Outgoing Mail, or Send & Receive Mail from the pop-up menu.
At the bottom of the Replication page, you’ll see the progress of the replication. After replication is complete, a note appears at the bottom of the page indicating when the last replication was completed. For information on how the Replication page works, see “Using the Replication Page” in Appendix B.
Notes handles your local mail a little differently than it does other local databases. When you send messages, Notes deposits them into a database whose filename is mail.box. When you work with your server-based mail database, Notes deposits outgoing messages into your mail server’s mail.box database, named [SERVERNAME] Mailbox. But when you work in your local mail database, Notes deposits your outgoing messages into a local mail.box, named Outgoing Mail. The local mail.box isn’t a replica of the one on the server, so outgoing mail isn’t replicated back to the server. Rather, when you tell Notes to send outgoing mail, it removes the outgoing messages from the local mail.box and redeposits them into the server’s mailbox. Meanwhile, the router on your mail server delivers incoming messages into the server’s copy of your mail database. Your server and local mail databases are replicas of each other, so incoming messages do replicate from the server to the local mail database.
To see the mail that is waiting to be sent, open the Outgoing Mail database by choosing File, Database, Open from the menu. You won’t see the Outgoing Mail database listed in the databases. You need to enter mail.box in the Filename box. Click Open to see the database. You might want to bookmark the database if you intend to use it again.
You can view a list of the messages awaiting delivery, but you can’t read the mail message from the Outgoing Mail database.
Note
When you work directly with your server-based mail, you can’t snatch your mail back after you’ve sent it. Deleting the Mail Memo from your mail database won’t stop its delivery. When you work with a local copy of your mail database, however, you can stop the mail before it gets to the server. If you haven’t sent outgoing mail to the server yet, the mail is still in the Outgoing Mail database. Open the database, select the mail message, and click the Delete Message button on the Action bar. You’ll also want to delete any copy of it that you may have saved in your mail database.
Security is an issue in every company, and if your laptop becomes lost or stolen, the information stored in your Notes databases is no longer secure. To help ensure that information on your laptop is available to only you, encrypt the local copies of databases on your laptop.
To encrypt a local database, follow these steps:
Right-click the database bookmark, and choose Database, Properties.
On the Database Basics tab, click the Encryption Settings button.
From the Locally Encrypt This Database Using drop-down list (see Figure 17.4), select Medium Encryption. Select Strong Encryption only if your system administrator instructs you to do so.

There are times when you won’t be able to connect to the server—via a LAN, a WAN, or a modem. For example, you might be traveling by plane or train or staying in an older hotel/motel with hard-wired phones. In these cases, you can only work offline. Change your location to Island (Disconnected) so your computer does not attempt to connect to the server if you accidentally try to open one of the databases only found on the server.
Remember to change your location again when you reach a site where you can connect to the server.
In this chapter, you learned how to work remotely with Notes. In the next chapter, you learn about instant messaging and web conferencing.