
In this chapter you learn how to create and respond to meeting invitations and to create and use group calendars.
Lotus Notes is an ideal product for organizing group activities. Notes helps you schedule meetings and invite participants, as well as reserve rooms and resources for those meetings.
When you identify a need for a meeting, you must inform all the people involved of the meeting time and place—and, of course, that their attendance is requested. Do this by creating a meeting invitation. The first time you create a meeting invitation, it will take you some time to learn to use all the meeting invitation features, including how to view the free time of others. After you create one or two meeting invitations, you’ll find that this task is easy and quick. Follow these steps to create an invitation:
Create the invitation.
Identify the invitees and others whom you want to inform about this meeting.
Check the time of the invitees and (optionally) schedule your meeting time according to their availability.
Determine how you want your invitees to respond to your meeting.
Mail the meeting invitation.
To begin, open your Calendar and follow these steps:
With your Calendar open, click the Schedule a Meeting button on the Action bar.
In the Meeting document (see Figure 10.1), enter a brief description for the meeting in the Subject field.
Enter or select the Starts and Ends dates and times (click the button at the right end of the field to use a date or time picker, as you learned in Chapter 9, “Using the Calendar”).
For a meeting that will fall within a different time zone, choose Specify a different time zone. Click the button to the right of the time zone fields to select the time zone. The Local time for the meeting displays below.
For a meeting that will occur at regular intervals (such as a monthly meeting), select Repeats and enter your repeat options. For specific information on creating repeated meetings, see Chapter 9.
In the Invitees Required (to) field, enter the names of people you want to invite to the meeting (click the button at the right end of the field to select names from an address book).
(Optional) To provide a copy of the invitation to someone that informs him and keeps him updated about the meeting but doesn’t invite him to the meeting, enter the person’s name in the cc or bcc field. Use the bcc field only if you don’t want other recipients to see the name of the person receiving an information-only copy of the invitation.
In the Description field (see Figure 10.2), enter important facts about your meeting, such as its purpose, directions to the location of the meeting, and so forth. You can embed files in this rich text field, such as supporting data for your meeting, and you can also attach a file by clicking the Click to append attachment(s) link (or the paper clip icon).
To check the availability of your invitees, click the Click to see Invitee, Room and Resource availability link (or expand the Scheduler button to the left of the link) in the Scheduler section of the form.
Be sure the Details radio button is selected in the Show section for this exercise. The Free Time section appears (see Figure 10.3). You can see the free time of each invitee (shown in white) sorted by the names of the invitees, by the week, by who can attend, by who cannot attend, or by whose time wasn’t found. If the schedule is okay for everyone—that is, if a green bar appears for all names—go to step 12.
If you see a conflict (time shows in red) in the schedule, do one of the following:
Point to the meeting time bar and drag it to a more appropriate time. When everyone is available for the meeting, the bar will turn green and you can release the mouse button.
Select a time from a list of recommended times by clicking on the Summary radio button (see Figure 10.4). Double-click a suggested time in the summary, or select it and click the Use Selected Time button.
Set a new date or time in the Starts or Ends fields.
When the meeting time is okay (green) for everyone, click the Collapse Scheduler button to close the section and continue with your meeting invitation. To schedule a resource, continue with step 13; otherwise, go to step 14.
(Optional) Click the helper button at the right end of the Rooms box to book a room for the meeting. Click the Resources helper button to reserve resources, such as audio-visual equipment, for the meeting. Handling these reservations is covered more fully later in this chapter.
(Optional) Check Pencil In if you want to keep the time of this meeting available in your free time schedule. Select Mark Private if you want to prevent people who have access to your Calendar from reading the invitation. If you want to set up a notification for the upcoming meeting, click Notify Me and pick the appropriate Alarm Options. From the Categorize field, select an appropriate category for the meeting.
Click the Delivery Options button on the Action bar to set any of the following options, and then click OK to close the dialog box:
Set the Delivery Report and Delivery Priority as you would set them for email delivery. (Refer to Chapter 3, “Email Basics,” for more information.)
Check the Return Receipt box if you want notification that your meeting invitation has been received by the recipient(s).
I Do Not Want to Receive Replies from Participants sends the invitation as a broadcast message that doesn’t require a reply. Use this for large, general meetings where attendance is always required or there is such a large number of people invited that individual responses would be overwhelming.
Prevent Counter-Proposing stops the recipient from proposing a different time schedule for the meeting.
Prevent Delegating keeps the recipient from delegating attendance to another individual.
Sign adds a digital signature to the invitation to guarantee that you are the person who sent it.
Encrypt encrypts the invitation so only intended recipients can read it.
Save the invitation and send it to the invitees by clicking the Save and Send Invitations button on the Action bar. Alternately, click Save as Draft on the Action bar to save the invitation as a draft and send it at a later time.


Meetings can be held online, too, if your group uses IBM Lotus Instant Messaging and Web Conferencing (formerly known as Lotus Sametime). In such a meeting, each attendee remains at his or her computer and connects to an online meeting in which, optionally, there may be a whiteboard and one attendee or another can share the content of his or her screen with the other attendees. The attendees typically talk with each other by telephone.
If you check This is an Online Meeting in the Where section of the Meeting form, new fields appear. Choose a Type—Collaboration, Moderated presentation/demo, or Broadcast meeting—and enter the location (or click the button on the right to select one from the Directory) for the meeting in Place. You can also add meeting attachments, such as presentations, and assign a password to the meeting.
After you have scheduled a meeting, you will want to manage the meeting by checking on the status of responses to your meeting, rescheduling meetings when necessary, and possibly sending mail memos that relate to the meeting. All this management of the meeting can be done with the Notes Calendar and Notes Mail.
By default, the All Calendar Entries view of your Calendar displays a list of all your Calendar entries by date and time. When you click on the down arrow on the All Calendar Entries tab, you can choose to view all your entries in one of three ways:
On My Calendar displays all the entries in your Calendar—appointments, all-day events, anniversaries, meetings, reminders, and penciled-in and draft meetings. Each instance of a repeating meeting appears individually (if you open the instance, you will see all the dates for the other instances).
All By Date shows all the entries you see when you select On My Calendar plus meeting workflow documents and any meetings to which you have been invited but haven’t replied.
Meeting Threads displays all meeting documents (see Figure 10.5), including meeting invitations to which you haven’t responded. Repeating meetings and workflow documents are indented beneath the meeting to which they are related.

Figure 10.5. The Meetings Threads variation of the All Calendar Entries view lists the meetings in date order, oldest to newest, and also shows the responses from the invitees. Click on the Meeting Time heading and you can change the order of appearance.
Using Action buttons in this view, you can create new meetings, take owner actions on selected meetings, or take participant actions on selected meetings. You can also copy meeting information into new memos, calendar entries, and To Do’s.
To reschedule a meeting, follow these steps:
Open your Calendar and click the All Calendar Entries view tab. Select the meeting you want to change.
Click the Owner Actions button on the Action bar (because you created the meeting invitation you are considered the Chair or Owner), and select Reschedule.
The Reschedule Options dialog box opens (see Figure 10.6).
Modify the Start and End dates or times (click Check Schedules to use the free time schedule to see when your invitees are available).
Click OK. Notices will be sent to the invitees, informing them of the change of date or time. By checking Include additional comments on notice in the dialog box, you can add a short explanation along with the notice.

When you cancel a meeting, you need to notify all the participants that the meeting has been cancelled. The steps for canceling a meeting are as follows:
Select the meeting document in the All Calendar Entries View of the Calendar.
Click the Owner Actions button on the Action bar, and select Cancel.
The Cancel Options dialog box appears (see Figure 10.7).
If you select Permanently delete the Meeting and all notices and documents related to the Meeting, Notes removes any documents related to the meeting. Or, you can remove the meeting from your Calendar but leave it in your All Calendar Entries view. Again, you have the option to include a message along with the notice. Click OK to close the dialog box. Notes automatically sends a cancellation notice to all the invitees for that meeting and removes any room or resource reservations related to the meeting.

After you have received the responses to your meeting invitation, you should remove from the meeting document the names of invitees who won’t be attending. You should then send a confirmation notice to the remaining invitees to let them know the meeting is indeed at the time and date specified. The notice will include the new list of participants for the meeting. To confirm a meeting, follow these steps:
Select the document from the All Calendar Entries view of the Calendar.
Click the Owner Actions button on the Action bar, and select Confirm.
(Optional) Select Include additional comments on notice in the dialog box to give yourself the chance to add your own text to the notice.
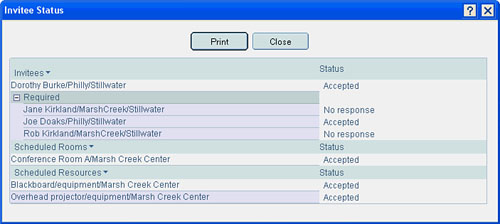
Although the All Calendar Entries view displays response documents to meeting invitations, it’s not easy to determine whether all the invitees have responded and accepted. To quickly review the status of the responses to your invitation, follow these steps:
Select the meeting in the All Calendar Entries view.
Click the Owner Actions button on the Action bar and select View Invitee Status.
The Invitee Status dialog box opens (see Figure 10.8), displaying the list of invitees, including optional or FYI invitees who were copied on the invitation. The dialog box displays the role of each person and the status of the invitation.
Click Print to print the list or Close to close the dialog box.
If you want to send a memo to all meeting participants to update the agenda or to provide more details about the upcoming meeting, follow these steps:
Select the meeting in the All Calendar Entries view.
Click the Owner Actions button on the Action bar, and choose Send Memo to All invitees, Send Memo to Invitees Who Have Responded, or Send Memo To Invitees Who Have Not Responded.
A new mail memo opens. The list of invitees appears in the To field, and optional invitees are in the cc or bcc field (depending on where you listed them in the meeting invitation).
The Subject field contains only the name of the meeting. The message area is blank, and you can create a message there as you would in any mail memo.
Click Send to send the memo to the invitees.
Part of creating the meeting invitation is to specify and reserve a room and any equipment to be used for the meeting. As you learned earlier in this chapter, you can reserve a room or resource from the meeting invitation while you are creating an invitation, or even after the meeting has been scheduled (re-open the meeting entry and click the Add Reservation button).
Note
To reserve rooms and resources, your organization must have rooms or resources in its Directory (Address Book). Check with your Notes administrator if you don’t see such resources in your Directory.
Rooms and resources can be reserved using one of two methods: Reserve them by their names (overhead projector or Ellis Room), or search for them by criteria (conference room that seats 10 people) or categories (conference rooms, audiovisual equipment).
Note
If you have difficulty or questions regarding room or resource reservations, consult with your help desk or your Notes administrator. Our instructions assume that resources are included in your Directory and that sites and categories have been assigned.
To reserve a room or resource by name, follow these steps:
Open a meeting invitation.
(To reserve a room) In the Where section, enter the name of the room you want to use in the Rooms field, or click the button at the right end of the field to select from a list of rooms.
(To reserve a resource) In the Where section, enter the name of the resource in the Resources field or select the name from the list that appears when you click the button for that field.
To search for a room by criteria (site and/or seating capacity), follow these steps:
Open the meeting invitation and click the Find Room or Resource button on the Action bar. Choose Find Room(s).
The meeting dates and times appear automatically in the Scheduler dialog box (see Figure 10.9), as does the name of the organization directory (you can change to another address book if you want). Click the helper button to the right of the Site field to select a site other than the one listed by default (the default site is set in Calendar Preferences, as explained in Chapter 8, “Setting Mail, Calendar, and To Do Preferences”). Sites are a service set up by the Notes administrator. If no sites are available, this field can be left blank.
Enter the # of attendees in that field. The number of attendees helps Notes find a room based on its seating capacity. Don’t leave this field blank. If you pick a room that isn’t large enough for the people specified, Notes will book the room but notify you that it is not the correct size for the number of people attending.
If you have set preferred rooms for the site in your Calendar Preferences (see Chapter 8), check Limit search to preferred rooms for this site to display only those rooms as choices.
Click the Search button.
Under Search Results, select the room you want to reserve, and click OK.
When you save the meeting entry, Notes sends a reservation request to your Resource Reservations database. This room is now “booked” and will not appear as an available resource during the time and date you have booked it. It is possible that some rooms and resources have been set by your administrator so they can they only be booked by their “owner”. If you are not the “owner” all you can do is request a reservation and wait for confirmation from the owner.

To search for a resource, follow the preceding steps but choose Find Resource(s) instead of Find Room(s) in step 1. You also will have to specify a resource category before searching by clicking the Category button and then selecting the appropriate one from the dialog list.
If you need to cancel a room or reservation (if you don’t cancel the entire meeting), open the meeting invitation and click the Remove Room or Remove Resource buttons below the Rooms or Resources fields. Save the invitation.
You can accept or decline an invitation to a meeting. Unless prevented by the sender of the invitation, you can also propose a different meeting time that is more suitable for you, or delegate the meeting to someone else.
When you receive the invitation in your mail, you open the document (you can also open an invitation from the New Notices MiniView in your Calendar). Use the buttons on the Action bar to respond to the invitation (see Figure 10.10). Click Request Information to send a Meeting Update Request to the meeting owner with questions or comments. Click Check Calendar to see whether you are available at the meeting time.

Figure 10.10. You can check your Calendar before responding to a meeting invitation by clicking the Check Calendar button.
Note
Don’t assume that the owner of the invitation checked your free time before inviting you to the meeting. To be sure you have the time available, click the Check Calendar button on the Action bar to see what you have scheduled for the day of the meeting before you respond to the invitation.
Note
No respond button? The sender does not expect an answer to the meeting invitation because the memo is a broadcast invitation. Click Add to Calendar to add the meeting to your Calendar. Click Request Information if you want to know more about the meeting.
To respond to the invitation, click the Respond or Respond with Comments button and choose one of the following:
Accept accepts the invitation. A memo of acceptance is sent, and an entry for the meeting appears on your Calendar.
Decline rejects the invitation. A memo is sent noting that you decline the invitation.
Delegate declines the invitation for you but enables you to specify the person to whom you want the invitation sent. Notes then forwards the invitation to that person. This option might not be available if the owner of the invitation chose to prevent delegation. You should also be aware that the person you delegated has the option to decline the invitation. You might want to check Keep me informed of updates so you continue to receive information about the meeting.
Propose New Time gives you the opportunity to propose an alternative meeting time that is more convenient for your schedule. You specify the new date or time and click OK. A counterproposal memo goes to the invitation sender, but it displays the changes in schedule you propose. That proposal can also be accepted or declined. The Propose New Time option might not be available if the owner of the invitation chose to prevent new time proposals.
Tentatively Accept accepts the meeting invitation and adds the meeting as an entry to your Calendar, but enables the Pencil in option on the Options page of the entry so the time still appears as free in your free time schedule.
Note
If the meeting invitation is for a repeating meeting, your answer applies to each instance of the meeting. Check your schedule before you reply. Also, be aware you can’t counter-propose for repeat meetings. You must first accept the invitation, then double-click the first instance in your Calendar of the meetings, click Respond, and choose Propose New Time.
If you choose Respond with Comments, add your comments to your answer and click Send to send your response. No response will be sent if you exit the form and don’t save it.
Rather than responding individually to each meeting invitation, Notes can automatically answer them for you. Click the Tools button on the Action bar in the Calendar. Select Preferences. Click the Calendar & To Do tab and then the Autoprocess tab. Select Enable automatic responses to meeting invitations, and then complete the following fields:
When a meeting invitation is received from—. Use the drop-down list to select those people whose meeting invitations you would like to send automatic responses.
Perform the following action—. Use the drop-down menu to select Automatically accept if time is available. If you make this selection, you must then choose and automatically decline if time is not available or and let me decide if time is not available. If you select Automatically accept even if time is not available, Notes will double book the time and you will be able to resolve the conflict at a later time.
Alternately, you can select Delegate invitation to the following person instead of me. Then, add the person’s name to the Delegee field.
Automatic Inbox Management—. From the drop-down menu, choose an action for Notes to take when you delete a calendar notice from your Inbox or Mail folder. The choices are Prompt to confirm deletion or Remove from this view/folder without prompting. If you choose not to be prompted, then when you delete a calendar or to-do message from a view or folder, it will be permanently deleted from the database. If you choose to be prompted, then when you delete a calendar or to-do message from a view or folder, you will be prompted whether to remove the message from the folder or delete it entirely from the database. If you choose to delete the message, it will be permanently deleted from the database. If you are in a folder when you choose to remove the message, it will be removed from the folder but not deleted from the database (it will still appear in the All Documents view). But if you are in a view when you choose to remove the message, it will in fact be deleted permanently from the database (because users can’t remove documents from views except by deleting them from the database).
A Group Calendar displays the free time schedules of a specified group of people. You quickly see who in the group is available or busy at a particular time. If you have access to their individual Calendars, you can display them below the Group Calendar.
To open a Group Calendar, open your Calendar and click Tools, View and Create Group Calendars from the Action bar. The Group Calendars View opens. If you want to create a new Group Calendar, click the New Group Calendar button on the Action bar. Enter a name for the Group Calendar, select the names of those you would like included, and then click OK. The Group Calendar opens, as shown in Figure 10.11.

Figure 10.11. The Group Calendar displays the free time of all the members of the group. To display the details of any busy block, click it. If you have access to that Calendar, the event will appear at the bottom of the screen; otherwise, you see instructions on how to use the Group Calendar.
You determine the starting time of the Group Calendar and the total number of hours shown for each day. Click the Display Options button on the Action bar. In the Options dialog box (see Figure 10.12), select a Starting Time and Duration. Then, click OK.

Figure 10.12. In this dialog box, set the total number of hours showing for every day on the Calendar and the time the days begin.
In the Group Calendar you can see what times the members already have scheduled and when they are unavailable. If you have permission to view a person’s calendar, you can double-click that person’s name and the calendar for that person will appear in the lower portion of the Group Calendar.
Once you have created and saved Group Calendars, they appear in the group Calendar list. To open one of the Calendars, double-click on its name.
From the Group Calendars View, any selected Group Calendar can be edited or deleted.
Editing a Group Calendar involves changing the members or the title. You select the Group Calendar and click the Edit Action button. The New Group Calendar dialog box appears, so you can add or remove members or modify the title of the Group Calendar. Make your changes, and click OK.
To delete a Group Calendar, select it in the Group Calendars folder and then click the Delete button on the Action bar. The Group Calendar document disappears but can be seen in the Trash folder in Mail. Permanently remove the Group Calendar when you refresh your view, exit the mail database, or click Empty Trash on the Action bar of the Trash folder. Confirm the deletion.
In this chapter you learned how to work with group calendaring and how to schedule, manage, and accept or decline meeting invitations. In the next chapter you learn how to work with To Do items.