
In this chapter, you learn how to browse web pages with Notes, bookmark the web pages you visit frequently, and set browser options.
You can browse Internet or intranet pages with Notes, or you can use other browser applications, such as Netscape Navigator, Firefox, or Microsoft Internet Explorer. A major advantage to using Notes as your browser is that Notes automatically stores copies of web pages as documents in a local Notes database called Personal Web Navigator. Then you can view them at any time, even if you are no longer connected to the Web.
Note
When you retrieve web pages and store them locally for offline use, Notes as a web browser may seem slower than other browsers. This is because of the extra time it takes to store each page you visit.
An offsetting disadvantage of using Notes to browse the Web is that Notes’s built-in browser may not be able to display all retrieved pages correctly. So, as an alternative, you can set up Notes to use an embedded copy of Internet Explorer to browse the Web. When you do this, you are actually using Internet Explorer as your browser, but it displays all content inside your Notes window. When you browse this way, you can set up Notes either to store retrieved web pages automatically or to store them manually, on demand.
Yet another way to browse the Web from within Notes is to have Notes open your favorite web browser in a separate window. When you browse this way, you don’t have the ability to store web pages in the Personal Web Navigator database. (You can, however, save pages to disk for later review.)
Configure your web browser options in your Location documents. Location documents are stored in your Personal Address Book. They tell Notes how to function from any particular location. For example, if your computer is located in your office at work, where you have a high-speed connection to your home server, an “Office” location document tells Notes to connect to the server over the network. But if your computer is traveling with you and you are in a hotel room with no high-speed Internet access, your “Travel” location document might tell Notes to use a particular telephone dialing sequence to connect to the Internet, then to your passthru server, and finally to your mail server.
In addition, many of the settings in your Location documents have little or nothing to do with where your computer is located. For example, one setting tells Notes which browser you want to use when you tell it to display a web page. You might prefer to use, say, Firefox as your everyday browser. But you may occasionally want to switch to Notes or the embedded version of Internet Explorer in order to store a web page in the Personal Web Navigator database. You could accomplish this switch by defining separate Location documents for each web browser you might want to use, then switching among them as needed.
Here are some useful techniques for changing your Location documents:
To edit your current Location document, you can click the Location box in the Status Bar (lower right corner of your Notes window) and choose Edit Current (the last item in the list).
To edit a non-current Location document, you can open your Personal Directory and navigate to the AdvancedLocations view. Or, in the Notes menu, you can choose File, Mobile, Locations.
To set which web browser to use, open a Location document in Edit mode, navigate to the Internet Browser tab, and select a browser in the Internet Browser field (see Figure 13.1).
To make Notes your default browser for all locations, choose File, Preferences, User Preferences from the menu. From the Additional Options list, select Make Notes the Default Web Browser on My System. Then, click OK.

Figure 13.1. Choose the web browser you want from this list in the keyword dialog box which appears when you click the arrow key in the Internet browser field of a Location Document.
Note
Another good use of Location documents is to easily change your Internet return address. Say you usually want your mail to be from [email protected], but occasionally you want your mail to be from [email protected] or [email protected]. You can set up different Location documents, each with a different address in the Internet Mail Address field. Then you can switch between the Location documents whenever you want to switch your return address. If you want to do this, have your administrator set up your Person document with each address you want to use; else replies may not be deliverable to you.
There are several ways to open web pages from within Notes, but the easiest is to enter the URL (Uniform Resource Locator) into the Address box on the toolbar (see Figure 13.2). Press Enter, and Notes retrieves the page. It isn’t necessary to enter the complete address, because Notes assumes the http:// part of the URL. Just start the address with the www (when applicable) when you enter it, such as www.takeawalk.com. If you have visited that page previously, you can click the down arrow at the right end of the Address field and select the URL from the list.

Figure 13.2. Open web pages by entering the URL in the Address box, just as you do in many browsers.
Use Bookmarks to mark your most frequently visited web pages. This will save you time in opening those websites in the future. To create a Bookmark, drag a page’s tab to the bookmark bar or right-click on the Window tab for the web page and select Create Bookmark from the context menu to open the Add Bookmark dialog box. Give the bookmark a name and select a folder in which to store it (or put it on the Bookmark bar). Click OK.
URL addresses you see in emails or other Notes documents are hotspots. When you click on one of these hotspots, the web page opens.
Note
To have Notes automatically create hotspots from URLs that appear in rich text fields of Notes documents like the body of a mail memo, choose File, Preferences, User Preferences from the menu. On the Basics page, select Make Internet URLs (http:// . . .) into Hotspots from the Additional Options list. For Notes to detect text as a URL in the rich text field, however, it must begin with http://. Documents in edit mode must be closed and reopened for the URL to become a hotspot. When the hotspots appear in the documents you open, click them to open the URL.
Like any browser, Notes has tools to help you navigate the Web. These same tools work when navigating Notes—databases, documents, views, or web pages. These tools are on the Navigation toolbar (see Figure 13.3). Table 13.1 explains their uses.
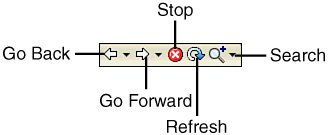
Table 13.1. Navigation Buttons for Web Pages
When you use Notes to retrieve web pages, the pages are stored in the Personal Web Navigator database located on your local drive. When you use “Notes with Internet Explorer” to retrieve web pages, the pages may automatically be stored in the Personal Web Navigator database, or you may opt to store pages manually. You can make this choice as follows:
If you opt to manually store pages, you can store them by displaying the desired page in the Notes menu, then choosing Keep Page in the Actions menu.
If you are storing web pages in the Personal Web Navigator database, you should manage the stored pages. For example, you need to specify how often stored pages should be updated. From the menu, choose File, Preferences, Location Preferences. When the current Location document opens, select the Advanced tab, and then click the Web Retriever tab (see Figure 13.4).
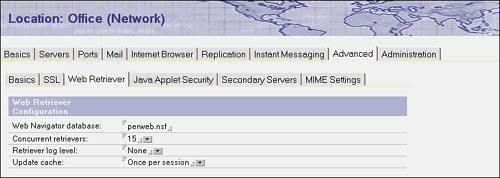
Figure 13.4. Messages about web retrieval are stored in your Notes log, along with the daily activities Notes performs. For Retriever log level, select None (the default) to have no messages sent about web retrieval, Terse to send minimal messages, or Verbose to send all messages.
Select an option from Update cache:
Never—. Select this option if you never want to update your stored web pages.
Once Per Session—. This is the default setting. This option updates stored web pages once per Notes session.
Every Time—. Select to update stored web pages each time you open one. This is especially important when you need up-to-date information every time you open a page (such as with stock prices).
Click the Save & Close button on the Action bar to save your choices.
Note
How many parts of a web page do you want to retrieve at once? Do you want to retrieve the text, images, and video all at the same time? You can set Notes to retrieve more than one at a time by choosing File, Preferences, Location Preferences from the menu, clicking the Advanced tab, selecting the Web Retriever tab, and then selecting a number in the Concurrent Retrievers field (15 is the default). However, the more retrievals you have working at the same time, the more computer memory you use, and the slower your computer will be in downloading pages.
To browse when you are disconnected from the Internet, change your Location document (or switch to a location that is disconnected, such as Island). Choose File, Preferences, Location Preferences from the menu to open the current Location document. Select the Internet Browser tab. From the Retrieve/open pages field, choose work offline and click OK. Then, click the Save & Close button on the Action bar.
Note
Quickly edit a location document by clicking the location in the status bar and choosing Edit Current from the pop-up menu. To switch locations, select a different location from the pop-up menu.
With work offline selected, Notes will only retrieve pages from the Personal Web Navigator or Server Web Navigator databases. Notes won’t retrieve pages from the Web. You will have to reconnect and change the setting in the Location document before you can retrieve new or updated pages.
If you switch to the Island (disconnected) location, you should use this setup so you can continue viewing web pages you’ve stored.
Forwarding a web page sends the body of the web page to the recipient (be sure you also include the URL). That way, the recipient can immediately see why the page caught your attention, making it more likely that the person will visit the page. However, to ensure that the person can access all the features of the page, you should forward the URL instead of the page.
To forward a page, open the web page and choose Actions, Forward from the menu. Then select Forward copy of this page. In the new mail memo that opens, enter or select the names of the recipients in the To field. Type any necessary comments, and then click Send.
Note
The page you forward might not look to the recipient exactly as you saw it on the Web. That’s because browsers control how pages are displayed, and the recipient may use a different browser than you use, or it may be differently configured than yours.
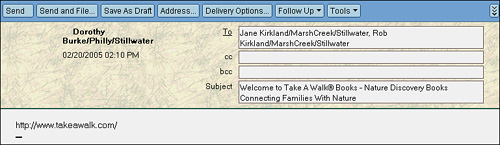
To forward a URL, start from the open web page and choose Actions, Forward from the menu. You then select Forward bookmark to this page and click OK. You enter the names of the recipients in the To field of the new memo (see Figure 13.5) or select them from the Address Book. Type any comments you want to accompany the URL, and then click Send.
When you need to check a web page frequently to see if there are any new updates, the Page Minder agent can do that for you. Whenever a change to the specific page occurs, the agent either sends you an email with a summary or the actual page.
Note
Before you can run an agent such as Page Minder or Housekeeping, you must enable scheduled local agents first. If you’ve done this once, you need not do it again. If you’ve not enabled scheduled agents, choose File, Preferences, User Preferences, and place a check mark next to Enable scheduled local agents. Click OK. Remember that agents will only run when Notes is running.
To set up the Page Minder agent, do the following:
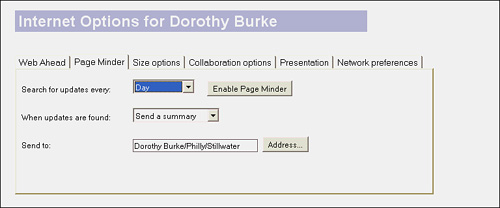
Open a web page and choose Actions, Internet Options from the menu.
Select the Page Minder tab (see Figure 13.6).
From the “Search for Updates Every” drop-down list, choose how often you want the agent to run—every hour, 4 hours, day, or week.
Determine whether you want Page Minder to Send a Summary or Mail the Actual Page when updates are found.
Enter the names of the users who should receive the updates. Your name is automatically entered; click Address to select additional users.
Click Enable Page Minder to turn on the agent.
When you are ready to specify a page that you want to be monitored, open the web page and choose Actions, Move to Folder. Under the Web Bots folder, select the Page Minder folder and click Add.
You stop monitoring a web page from the Personal Web Navigator database. Open the database by choosing File, Database, Open from the menu. Then select Personal Web Navigator from the list of local databases and click Open. Click the Page Minder folder, select the page, and click the Delete button on the Action bar.
When you want to disable the Page Minder agent, open a web page and choose Actions, Internet Options from the menu. Open the Page Minder tab and click Disable Page Minder. Then click Save and Close.
Storing all the web pages you visit could result in a very large database file. At some time, you’ll have to remove some of those files. One way to do this is to use the Housekeeping agent to automatically delete stored web pages. When enabled, this agent runs daily at 1:00 a.m. To enable Housekeeping, follow these steps:
Open a the Personal Web Navigator database.
Choose Actions, Internet Options from the menu.
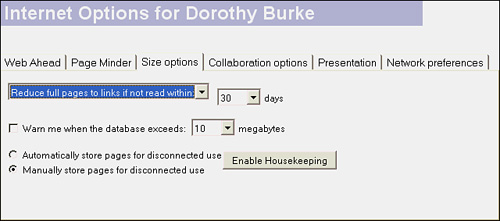
Click the Size Options tab (see Figure 13.7), and select one of these options:
Reduce Full Pages to Links If Not Read Within—. Select this option to have Notes delete the contents of the web page but save the URL so you can still open the page on the Web. Then specify the number of days that the web page should be in the database before deletion.
Remove Pages from Database If Not Read In—. Choose this option to have Notes delete the entire web page. Then specify the number of days that the web page should be in the database before deletion.
Disable—. Select this option to disable the agent so it won’t automatically delete stored web pages.
(Optional) If you want to be warned when the database gets to a certain size, select Warn Me When the Database Exceeds and then specify a size in megabytes.
Click Enable Housekeeping.
You must enable scheduled local agents first in order to use the Housekeeping agent.
If you prefer, you can delete web pages manually. Open the Personal Web Navigator and do one of the following:
Select Other, House Cleaning in the Navigation pane to display a list of documents sorted in descending order by document size (these include web pages and files associated with them, such as cookies and stylesheets). Select the documents you want to remove then click Delete on the Action bar. Notes deletes the selected documents.
Select Other, File Archive if you want to delete files based on file name. Notes displays a list of files, sorted alphabetically by file name (although you can click the sorting arrows in the File Size column heading to sort the view by file size). Select the files you want to remove, and then click Delete on the Action bar. Notes deletes the selected files.
In this chapter you learned how to use Notes to browse web pages, how pages are saved, and how to perform housekeeping. You also learned how to forward a web page or its URL in a mail memo. In the next chapter you learn to edit and format documents.