
In this chapter, you learn how to use some of the tools your Mail database provides to add graphics to mail headers, create personal stationary, manage junk mail, use the out of office reply, and set rules to handle your incoming mail.
You can personalize your mail by selecting a graphic to appear beside your name in your mail header. Lotus Notes has several from which to choose.
To select a letterhead, open your mail inbox and choose Tools, Preferences on the Action bar. The Preferences dialog box opens. Click on the Letterhead tab as shown in Figure 5.1. A list of available letterheads appears in the list box. As you move your cursor over the choices, the graphics appear in the Preview pane. When you find the letterhead you want, click OK. The new letterhead will appear on the next memo you create; older mail messages will not change.

Stationery differs from letterhead in that letterhead simply provides a graphic in your mail memo, whereas stationery can contain a graphic, list of recipients, and information in the body of the mail memo. Use stationery for reports that you generate frequently, such as a customer status report. Stationery is also useful when you want to create a signature or use a graphic for a signature. You can create as many different stationery designs as you like. Stationery is stored in your Stationery view and you can create mail memos using stationery at any time.
There are two kinds of stationery you can create: Memo stationery and Personal stationery. The Memo stationery uses the Mail Memo template, the same template you use when you create an email in Notes. This template contains only one rich text field—the body field—and has no header or footer fields.
Different from Memo stationery, the Personal stationery template has a total of three rich text fields to support graphics and formatting at the top and the bottom of the document.
Because the Memo stationery uses the Mail Memo template, a quick way to create stationery is to create a memo as you would any mail message, by clicking the New Memo button on the Action bar. When you have completed the fields you’d like to save, choose Tools, Save as Stationery, from the Action bar. Give the stationery a name and click OK. This saves your memo as Memo stationery.
To create Personal stationery, do the following:
Open your mail database and click Tools in the Navigator pane, then select Stationery.
Click the New button on the Action bar and choose Stationery - Personal.
The blank stationery form appears. If you have previously selected a letterhead, the letterhead graphic also appears. If you intend to put your own graphics or photos in your stationery, consider removing your letterhead graphic by choosing Plain Text from the list of letterhead choices. It will result in your memos looking like the one in Figure 5.2.
Fill in the header information—the To, cc, bcc, and Subject lines—if you want them to remain the same each time you use this stationery. These important fields are part of the purpose of creating stationery. Information you put into these fields is saved with the form.
Fill in the first rich text field that appears in the body of the memo. This is an optional step; however, if you leave this field blank, it appears as a blank field at the time you create a memo using your stationery. In other words, you can’t make this field disappear from the form by leaving it blank. Include any graphics or formatted text. This field name (Header) is misleading, since the header area of the memo is the area that you completed in the previous step (number 4). Unfortunately, we think Lotus made a bad call when they named this field Header. The result is that this stationery has two headers: One is the header area, the other the header field, and they are not at all related. To insert graphics in this field, choose Create, Picture from the menu and select a graphic from your personal files on your PC.
Fill in the body field (optional). It’s the second rich text field contained on this form. Remember, a rich text field can contain formatted text (bold, italics, colors) as well as graphics. It’s not a good idea to put too many graphics in your stationery form, though, as this results in large files that may take a long time for people to download when they are retrieving their mail messages from you. This is an optional step, but leaving the field blank does not delete the field from your saved form.
Fill in the third rich text field: the footer field. This is an optional step but leaving the field blank does not delete the field from your saved form.
Click the Save button on the Action bar.
A dialog box appears, as shown in Figure 5.3. Enter a name for the stationery in the What Would You Like to Call This Stationery? box, and then click OK.


Figure 5.3 is an example of a Personal Stationery template with a graphic heading and a table in the body field. With this kind of design leverage, you can use your stationery for many reports, such as weekly expense or sales reports.
The stationery is stored in the Stationery folder (see Figure 5.4).
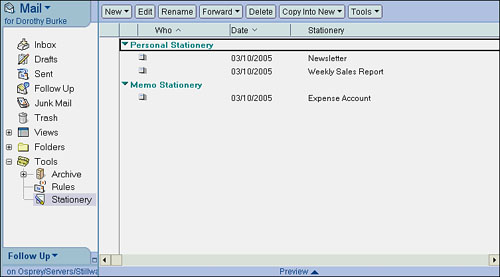
Figure 5.4. The Stationery view is the only view that shows a list of stationery you have created and saved. You don’t need to be in this view to create new memos with your stationery.
To use your new stationery, go to the Inbox, Drafts, Sent, or All Documents view and click the Tools button on the Action bar. Select New Memo—Using Stationery. The Select Stationery dialog box appears (see Figure 5.5). Select the stationery template you want to use and then choose OK. A new mail message appears, including the elements you incorporated into your template. All fields are in edit mode, so you can make changes to the fields at this time. Note that your changes will not be saved as changes to the form itself; they are only reflected in the memo you are creating. Enter your information and send it as you send any other mail message.

To change your stationery design, select it from the Stationery view and click the Edit button on the Action bar. Make your changes and save the document. To delete a stationery, select it in your Stationery folder and press the Delete key.
To create Memo stationery, follow the preceding instructions for creating Personal stationery, but choose Memo Stationery from the New Stationery button on the Action bar.
Spam is a major problem for many email users, often clogging thier Inboxes with unwanted messages. The definition of spam is unwanted, unsolicited, mail, usually sent to sell you something, often sent indiscriminately to mailing lists—otherwise known as junk mail. Most organizations today have some sort of spam-blocker on their mail servers, but even so some mail gets past it. Your anti-virus software is set up to detect possible viruses, so it won’t stop this type of mail.
One Notes tool that can help you control spam to a degree, is the Block Mail from Sender tool. This can help you to block mail from a specific sender or a specific domain. But keep in mind that most spammers never do two spams purported to be from the same sender. So this feature isn’t a junk mail controller, but can help with those who continue to send you email from the same email address. To block email from a sender, click the Tools button on the Action bar and choose Block Mail from Sender. The Blocked Senders List dialog box appears (see Figure 5.6).

Figure 5.6. You can choose to block all mail from the specified sender or all mail from the same domain. In the future, all mail from that address or domain will go to the Junk Mail folder instead of the Inbox.
You choose what you want to block: all the mail from this particular sender or all the mail from the same organization (domain). When you click OK, the selected message moves from the Inbox to the Junk Mail view. All future mail from that person or domain will be put directly into the Junk Mail, so you won’t have to deal with it in the Inbox.
After the messages are relegated to Junk Mail (see Figure 5.7), you can deal with them individually by selecting the ones on which you want to take action or with all of the messages in Junk Mail. You click on the appropriate button on the Action bar:
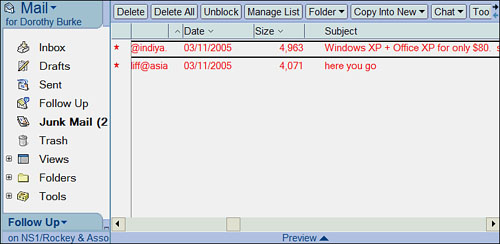
Figure 5.7. You can read or preview mail that appears in Junk Mail so you can be sure you really want to block messages from that sender.
Delete removes the selected message and puts it in Trash, ready for deletion. It is still available in the All Documents view and Trash until you empty the trash.
Delete All performs the same action as Delete, but on all the messages in the Junk Mail view.
Unblock stops the blocking on the email address for the selected memo (you will be asked to confirm the removal of the block). Future messages from that address will be delivered into the Inbox. However, the selected message will remain in the Junk Mail unless you drag it back into the Inbox.
Manage List opens the Blocked Senders List dialog box (see Figure 5.8), which displays the addresses of all the senders you have blocked. Select the address of any senders you want removed from the list and click Remove. Click Remove All to remove all the addresses from the list. Click OK to close the dialog box. Future messages from these removed addresses will appear in your Inbox, but current messages will remain in Junk Mail.

Rules determine how Notes handles your incoming mail. You create a rule by defining an action that Notes should take upon receiving email addressed to you. Creating rules is a two-step process: First you create the rule and then you activate the rule. Notes acts on any incoming mail that meets the conditions of the rule you create. If conditions are met, Notes then takes the action you define. For example, you can create a rule that tells Notes that when a memo arrives that has the subject “National Convention,” it should move the memo immediately upon receipt into your “Convention” folder. Folders display a number next to the folder icon that indicates the number of unread messages contained in the folder, so you can quickly tell when new messages have been moved to a folder. If you have blocked junk mail, you have already created one rule.
Use the following steps to create a new rule:
Open your mail database, open the Tools view, and then open the Rules view.
Click the New Rule button on the Action bar. The New Rule dialog box appears (see Figure 5.9).
Under Create Condition, select the elements of the rule’s condition: From the first drop-down list, select the item to look at (sender, subject, importance, To, cc, and so on). From the second drop-down list, select the condition “contains”, “does not contain”, “is”, or “is not”. In the third box, type or select the value for which you are looking.
Click Add.
(Optional) To create other conditions for the rule, select Condition and then choose AND or OR—AND to match both conditions, OR to match either. Then enter the second condition. Click Add.
(Optional) To create a condition under which the rule doesn’t apply, select Exception. Select or enter the appropriate conditions. Then click Add.
Under Specify Actions, define what action to take when a memo meets the conditions you set. Click the first drop-down list to select an action such as Move to folder or Delete. If you want to move or copy the memo to a folder, click Select to open the folders dialog box where you select a folder, and then choose OK (you can also create a new folder). Click Add Action.
After your conditions, exceptions, and actions are defined, click OK.

Rules are evaluated in the order they appear in the list of rules, from the top down. If any rule tests positive, no rules below are evaluated. So the order in which the rules appear is important, as is the composition of conditions and actions in each rule. Create your rules such that one rule won’t block the evaluation of another rule. Use the Move Up and Move Down buttons in the Action Bar to re-order the rules in the list.
To make changes to the rule, select it in the Rules folder and then click Edit on the Action bar. The New Rule dialog box opens again so that you can change your settings. Make your modifications to the conditions or actions and then choose OK.
If the rule is getting in the way of your mail management or if you are missing an element that you need when the rule runs, turn the rule off before opening it to edit. To turn rules off or on, click on the rule in the Rules view and click the Disable or Enable button on the Action bar. A rule is enabled when a green check mark shows next to its name.
The Out of Office notice automatically responds to incoming mail messages while you are away from the office. This is a good tool to use when you are away from the office for long periods of time without access to your mail. Prior to your vacation or absence, create a standard message that is automatically sent as a response to incoming messages, notifying others that you are away. You can even create a unique response message to individuals or groups so that some people receive one response and others receive a different response.
Use the following steps to create an Out of Office message:
Open your mail database. Click the Tools button and choose Out of Office from the menu.
The Out of Office dialog box appears. There are four tabs on this dialog box. On the Dates tab, add the dates for Leaving and Returning. Figure 5.10 shows those fields.

Figure 5.10. The Out of Office dialog box with Leaving and Returning dates. The Book Busytime option is selected by default. Leave the check in the box so others will see that you are not available when they are searching for free time on your calendar. You learn about free time in Chapters 8, 9, and 10.
The Out of Office Message tab provides a place for you to type the Out of Office message (see Figure 5.11) that will be delivered to all people except those who you will list on the Special Message and Exceptions pages. Note that this message will actually be delivered to all people unless you indicate otherwise.
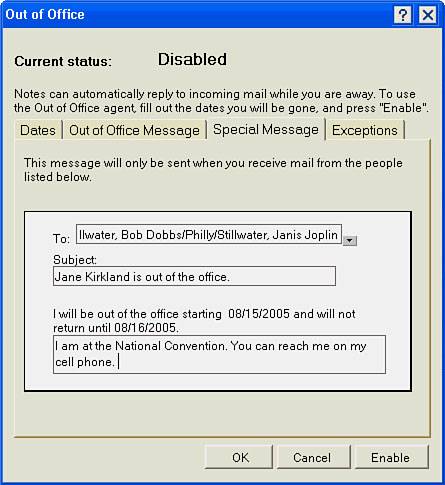
(Optional) The Special Message tab enables you to provide a message for a special person or a group of people. To select people for this group, click the down arrow button next to the To box. When the dialog box appears, select people from your address book, and type your message, as shown in Figure 5.12.
On the Exceptions tab (see Figure 5.13), indicate the people and groups who are not to receive any notification in the Do not automatically reply to mail from these people or groups field. Click the drop-down arrow key and select people or groups, type the names directly into the field, or leave the field blank if you have no such exceptions.
While you’re away, you might also get mail that is addressed to a group of which you are a member, and you won’t want Out of Office responses going out to the senders. In this case, enter the names of those groups in the Do not automatically reply to mail which is addressed to these groups field.
You may be a member of an automatic mailing, to which you don’t want Out of Office messages sent. Examples are notices of company meetings, or agents that search databases and notify you with automatic emails. In these cases, you might not know who will be sending the notices, and therefore you can’t include them in your exclusions list. However, you can exclude notification by using words or phrases. In the Do not automatically reply if the subject contains these phrases field, enter words or phrases (such as meeting) you want Notes to look for in the subject line of incoming messages. Note that this applies only to words in the subject line of incoming messages, and that these terms are case sensitive, so you want to enter both meeting and Meeting. Note too that this does not apply to Internet mailings; for those go to step 8.
Consider selecting the Do not automatically reply to Internet addresses field only if you have automatic mail sent to you from websites, list groups, and so forth.
Click the Enable/Disable button. A dialog box confirms that the agent is enabled. Click the OK button. If you receive a message indicating that you should contact a developer or administrator because you are not allowed to run agents, contact your Notes administrator for assistance.


Note
The Out of Office agent runs on the server once a day in the early morning hours. Because of this, enabling Out of Office for a one-day absence is not a good idea. Use it for an absence of two days or longer.
When you return to the office you need to disable the Out of Office agent using the following steps:
Note
If you are a remote user and you have created an Out of Office message from your remote PC, be certain to replicate your Mail database before leaving for your trip. Otherwise, the server is not notified that this Out of Office agent needs to run. Refer to Chapter 17, “Using Notes Remotely.”
In this chapter, you learned how to create and customize stationery. You also learned how to create, enable, and disable an Out of Office message. In addition, you’ll now be able to filter out unwanted messages from your Inbox and sort other messages into appropriate folders. In the next chapter, you will learn how to work with Notes utilities and use the Lotus Notes About and Using documents as well as the Help database.