
In this chapter, you learn about the two address books found in Lotus Notes—the Public Address Book and the Personal Address Book—and how to use your Personal Address Book for creating Business Cards and Groups.
Like Notes Mail, Notes Address Books are databases. Information such as email addresses and phone numbers are stored in your Address Book. At least two address books are available to you: your Personal Address Book and your Company Address Book (sometimes referred to as the Domino Directory or the Public Address Book; see Figure 12.1). Your system administrator might make other address books available to you, too.

As is the case with your Mail database, the contents of the Personal Address Book are controlled completely by you. You are the Manager (see Appendix A, “Understanding Security and Access Rights,” for a complete explanation of security and access rights) of this database. You’re the only one who can read, modify, or delete contact entries. You don’t need to add your fellow employees because everyone in your company is already in the Domino Directory, so avoid duplicating entries that might already be found there. If you are a remote or mobile user, your system administrator might have installed a mobile directly catalog on your workstation so you have access to all entries in the Domino Directory. If not, remote users should add people from the Public Address Book to their Personal Address Book because they may need to access the Domino Directory when they’re not connected to the Domino server. For more information on remote users, see Chapter 17, “Using Notes Remotely.”
After you click the Address Book bookmark, the Personal Address Book Navigation pane displays the following views:
Contacts—. Displays the people in your Address Book alphabetically. (If you are new to Lotus Notes Mail, your Address Book is probably empty.)
Contacts By Category—. The same people that are listed in your Contacts view, but now they are sorted by categories that you create. (If you are new to Notes Mail, you don’t yet have categories created.)
Groups—. Lists the groups of people you created as mailing distribution lists.
Birthdays and Anniversaries—. Lists the dates of birthdays and anniversaries of contacts. Of course, if you don’t include a birthday or anniversary date of a contact in his contact information, it won’t show in this view. Don’t confuse this with anniversary dates you create in your calendar.
Advanced—. The Advanced views are ones which you would not need to access or make changes to unless directed to do so by your system administrator.
The information you store about a person—name, title, company, address, phone, fax, email address, and so on—is kept in a Contact document, such as the one shown in Figure 12.2.
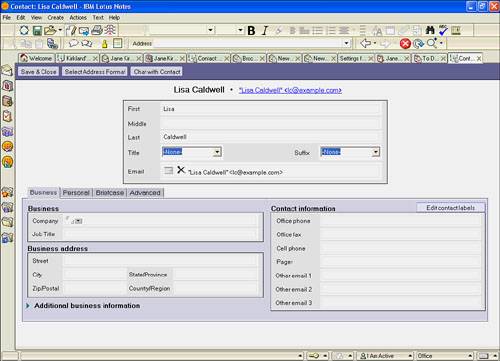
Figure 12.2. Tabs separate the Business, Personal, Briefcase, and Advanced sections of a Contact document where you can keep business as well as personal contact information.
To create a Contact document for a new person, click the New Contact hotspot (if one exists) on your Welcome page, or open your Address Book and click the New button on the Action bar and choose Contact. The following describes the fields for adding a new contact:
At the top level of this form are fields for names, title, suffix, and email. Either the last name field or the company field (in the Business section) is required. All other fields are optional.
When you fill in the Email address field, be sure to click the icon on the left of the field. Here, you’ll tell Notes what kind of email client you’re adding. This information helps Notes to format the contacts email address correctly. If you don’t know the details then don’t make a selection, but if, at the very least, you know enough about the contact to choose Notes or Internet, choose one of those two. If you have more than one email address for a contact, type the email address you use most for them in the email field and put the remaining email addresses in the Other Email fields on the bottom left of the Business tab section.
The Business section of the contact contains, appropriately, business information about that contact such as her company name, job title, and so forth. Start typing the business name and autofill will complete it for you if it is a company that exists in your Address Book. Alternately, click the drop-down arrow button and choose the company from the drop-down list. Click the triangle next to Additional Business Information to include such items as the company website address. There are no required fields here, so if you only know part of the business information such as the city, but not the street address, you can fill in the information you know (see Figure 12.3).
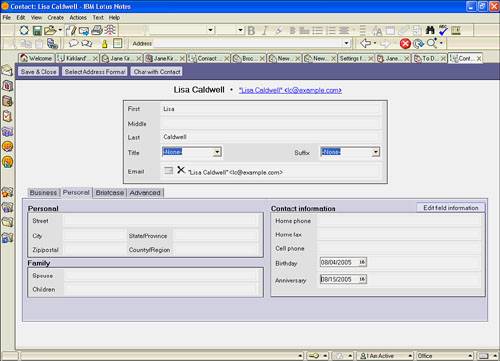
On the Personal tabbed page add personal information about this contact, such as his home address, birthday, or anniversary (see Figure 12.4).
The Briefcase tabbed page provides space to save photos, attach files, or add comments to your contact. For example, you could store a resume, a map to a client’s office, or a copy of an employee’s review.
The Advanced tabbed page allows you to categorize your contact so that it will show in the appropriate category when using the view Contacts by Category. Autofill will complete any category entry you begin to type. If you want a contact to display under more than one category, separate the categories with commas. Be consistent and watch your spelling, or you’ll end up with several similar categories—Friends, Friend, Fiend—which makes it harder to find people. You can also choose which information, business or personal, you want displayed in your Preview pane when previewing the contact information.
When you add a new contact, click the Save and Close button on the Action bar to save this information in your address book.

To send a mail message to more than one person, you can type each person’s name, separated by a comma, or you can create a mailing list. To create a mailing list, follow these steps:
Select Groups from the Personal Address Book Navigation pane.
Click the New button on the Action bar and choose Group.
The Basics section of the Group document is displayed, as in Figure 12.5. Type a short, descriptive name for your group in the Group Name field.
Note

The form and information found for contacts in your Personal Address Book differs from the information you find on an individual in the Company Address Book. For example, the Company Address Book does not have a field for a web page or birthday. You might want to record this information about a fellow co-worker because lots of people have personal web pages these days. In this case, instead of creating a new contact in your Address Book, copy that person from the Company Address Book into your Personal Address Book. Once added to your Personal Address Book, complete the information you want to keep. Remember, you don’t need to copy the Company Address Book into your Personal Address Book for the mere purpose of being able to send email to a fellow employee. However, if a person’s name or address changes in the Company Address Book, you will have erroneous information in your Personal Address Book. If you are a mobile Notes user, please be certain to read Chapters 18, “Instant Messaging,” and 19, “Customizing Notes,” so you have a full understanding of Address Books and replication.
You can ignore the Group Type field entirely and leave it as Multipurpose, or you can click the small triangle to the right of the Group Type field and select Mail Only for your group. The other options, Multipurpose (the default), Access Control List Only, and Servers only, are for use by your system administrator.
Type a short description of the group in the Description field. Although this is not a mandatory field, it might remind you why you created this group.
Click the down arrow next to the field and select the names from your Personal Address Book.
When you’re done, click the Save and Close button.

Note
If you have a mail message open that includes a list of recipients, you can create a group for that list. Open the message and choose Actions, Add Recipients, to new Group in Address Book from the menu. A dialog box opens with a list of recipients checked. Click OK and a new Group document is created. Another way to create a Group document is to check multiple people in your Contacts view of your Address Book and choose Tools, Copy into New Group on the Action bar.
After you create the group, you can use it when you address memos. Simply type the name of the group in the To field (Quick address completes the name as you type), and Notes sends your email to all the people in the group. If a person drops out of the group or a new person is added, you can edit the group document by selecting it from the Groups view and clicking the Edit Group button on the Action bar. By using the group name when addressing your mail, you can save a lot of typing.
Note
To quickly address a memo to a group, open the group view, highlight the group, and click Write Memo.
Some groups need to exist only for the length of a project on which you’re working. When you need to remove a group from your Personal Address Book, select it from the Groups view and click the Delete Group button on the Action bar.
By default, Notes sorts contacts in views by their first name. To change this default so you view contacts by last name, follow these steps:
Choose Actions, Edit Address Book Preferences from the menu or Tools, Preferences from the Action bar.
Select Display names by default in Contact form/views(s):Lastname Firstname.
Click Update All Entries to change existing entries as well as new entries.
Click Save and Close.
For any contact, you can customize field names (Lotus calls them labels) on the Business and Personal tabs. Perhaps you want the Other email 1 label to say Home email. To do this, click the Edit Contact Labels button near the top of the Contact Information section and rename the labels (see Figure 12.6).

Figure 12.6. When you click Edit Contact Labels, a dialog box appears. There, you can use field name suggestions provided by Notes in a drop-down menu, or you can type in your own names for fields.
You can also customize a contact’s address format. Notes provides six different internationally accepted formats for addressing mail. These formats are applied when you print labels from your address book. To apply an address format, open a contact and click the Select Address Format button on the Action bar. Choose the address format you prefer and Save and Close the contact.
You can print an alphabetical list of your contacts with their phone numbers and email addresses, and you can also print address or shipping labels in various sizes. Printing lists and labels for Address Books is available for local Address Books only, so if you need to print from your Domino Directory, you must replicate the directory to your hard drive or copy the Domino Directory into your Address Book. For more information on replication, see Appendix B, “Understanding Replication.” To print from your Address Book, follow these steps:
Open your Address Book and select the contact names you want to print by placing a checkmark in the margin. If you want to select your entire Address Book, choose Edit, Select All from the menu.
With your contacts selected, choose File, Print from the menu. The Print dialog box appears as shown in Figure 12.7.
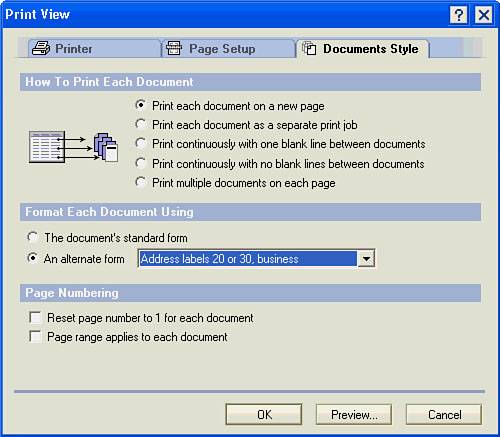
Click the Documents Style tab. To print a list, under the How to Print Each Document option, choose how many contacts to print on each page. You can click the Preview button to preview your options.
To print labels or a list other than the standard default list of contacts, go to the Format Each Document Using section and click the Alternate Form radio button.
A drop-down menu appears in which you can select the labels or lists you want (see Figure 12.8). There are choices here for both address labels and shipping labels.
(Optional) Specify page-numbering options.
(Optional) Click the Page Setup tab and specify additional page formatting as well as paper source (important when you are creating labels). Click OK when you are finished with your selections, and Notes will print your list or labels.

In this chapter, you learned about the Address Books and how to use your Personal Address Book for creating contacts and groups, as well as lists and labels. In the next chapter, you learn how to navigate the Web using Lotus Notes.