
In this chapter, you will learn how to access your Mail, Calendar, and To Do list when you away from the office and don’t have a computer with you that has Lotus Notes installed on it.
What do you do when you are not in the office and the only computer available to you does not have Lotus Notes on it? Don’t panic. As long as your Domino administrator has set up the mail server to allow you access to your mail via the Web, all you need is a computer with an Internet connection. Just make sure before you leave town that you ask your administrator for the following information:
Your user name. This may be the same user name as you use in Lotus Notes, or it could be a shortened version of your name.
Your Internet password. This is only used when you need web access to a Notes database.
The URL you must enter to access your mail file. This is usually in this format: http://server.organization.com/mail/yourname.nsf.
Note
Your Internet password is automatically assigned to you by your Domino administrator. Depending on policy settings established by your system administrator, you will initially have either no Internet password or your password will be the same as your Notes password. To change your Internet password, enter the URL for your Mail with ?changepassword added to the end, such as http://server.organiztion.com/mail/yourname.nsf?changepassword. When the Change Password dialog box appears, enter you old password and then your new password, and then confirm your new password by typing it again. Click Submit. Your old and your new passwords are both usable for the next two days. Keep in mind that if you are changing your Lotus Notes password you might also be changing your Internet password, depending upon the choices your system administrator made when setting up Lotus Notes.
When you need to access your mail, open the web browser (such as Microsoft Internet Explorer or Netscape Navigator) for the computer you are using and enter the URL in the address field. A login dialog box appears where you enter your user name and password. That will authenticate you with the server and identify you as having access to your mail file.
How your mail looks and works after you open it depends on whether you are set up to use WebMail or Domino Web Access.
After you log in, your mail opens in your web browser. WebMail looks similar to the way Mail appears in Lotus Notes (see Figure 16.1), but there are some differences.
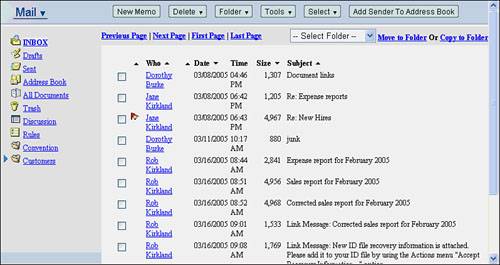
Figure 16.1. To open a document in a view or folder in WebMail, you click the link for the name of the sender (or recipient for sent mail).
The Navigation pane shows all the folders and views as links. When you click on one, such as Inbox, it changes to the same word all in uppercase (INBOX). The navigation links change to a different color after you open one to show you have already visited that view or folder.
The toolbars you see belong to your browser software. The only buttons available in WebMail are the Action bar buttons, and there are fewer buttons available than in Notes. For example, you don’t see Reply To or Follow Up in the Inbox view.
To see another screen of mail messages in the View pane, use the Previous Page, Next Page, First Page, and Last Page links.
When you want to select messages, you click the checkbox to the left of the message or click the Select Action button and choose Select all or Deselect all.
To move or add a message to a folder, choose the name of the folder from the Select Folder list and then click the Move to Folder or Copy to Folder link.
Your Personal Address Book is not available from WebMail. WebMail has its own address book. See the section on “Working with the WebMail Address Book” later in this chapter to learn how to set up contacts.
When you want to delete a mail message, you must select it and then click the Delete button on the Action bar. Select Delete. That marks the message for deletion, adds it to the Trash folder, and displays a small trash can to the left of the document. To completely remove the message from your database, click Delete, Empty Trash on the Action bar.
To create a new message in WebMail, click the New Memo button on the Action bar. The memo form is similar to the one you see in Notes (see Figure 16.2).
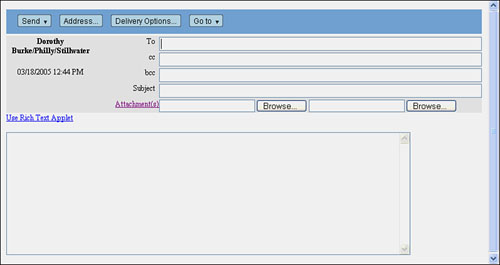
Figure 16.2. From any document, you can return to the Inbox, Calendar, or To Do by making the appropriate choice under the Go To button.
You can enter the full email addresses of the recipients or click the Address button to open a dialog box that lets you select names from the organization directory or your address book.
You can only attach two files to the memo. Click the Browse button for each file and select a file on your computer (or a CD, DVD, or floppy disk inserted in the PC’s drives).
The body field is just one big empty box where you can type your message. If the web browser is set up to use Java applets, click the Use Rich Text Applet link (you will lose anything you have put into the memo up to that time). The memo will refresh and display a new toolbar above the body field (see Figure 16.3) that allows you to format the body text, add and edit tables, and cut, copy, and paste.
Figure 16.3. If you want to send a message with formatted text, you have to enable the Rich Text Applet. Then this toolbar appears.
Note
Don’t know if your browser is set up for Java applets? Search the browser Help for Java applet to find out how to turn the setting on, if it isn’t already set. In Microsoft Internet Explorer 6.0, for example, you check the setting by going to Tools, Internet Options on the menu. Select the Advanced tab and scroll down to Java (Sun) or Microsoft VM to see if the options are enabled.
To reply to a mail message, you have to open the message first. You click on the name of the sender to open it. In the open memo, click on the Reply button on the Action bar and choose one of the reply options: Reply, Reply with History, Reply without Attachment(s), Reply to All, Reply to All with History, or Reply to All without Attachments. If you just reply or reply to all, the recipient(s) names appear in the To field (you can’t go back and choose Reply to All afterwards; you have to use the Address button to add recipients) and the Subject is filled in. The body field displays without the Java applet toolbar, unless you reply with history.
Delivery options are limited in WebMail. You can set the importance, request a delivery report, set delivery priority, or get a return receipt.
After you complete the mail message, click the Send button on the Action bar and choose Send, Send and Save, or Save as Draft.
Your WebMail address book doesn’t automatically synchronize with your Personal Address Book in Lotus Notes. To add new contacts, you can do one of these:
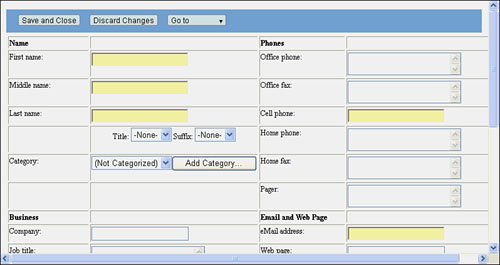
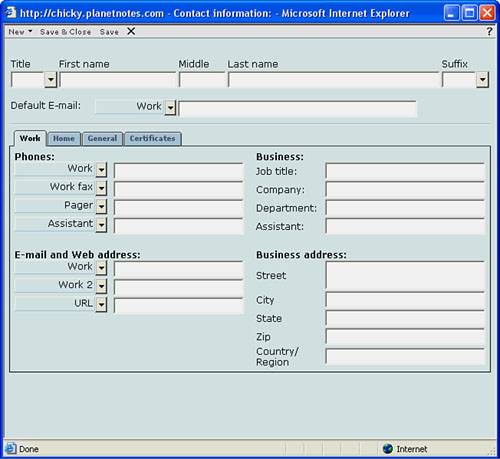
Click the Address Book link to open up the Contacts view. Then click the New, Contact button on the Action bar. Fill out the information in the Contact document (see Figure 16.4). Click Save and Close to save it.
From the Contacts view, click the Import from Directories button on the Action bar. In the Import Contacts and Groups dialog box (see Figure 16.5), select the directory and then the names of the people you want to add as contacts. Click OK to add them to your Contacts list.
From the Inbox, select a document sent by the person and then click the Add Sender to Address Book button on the Action bar.

If you are using a computer that is not your own, you don’t want to leave any traces of your files or authentication information on that computer. That might allow other people on the same PC to open your mail. To prevent this, don’t just leave the browser open when you are done with the computer. You need to log out properly and have WebMail close the window by doing the following:
Domino Web Access is a more robust product than WebMail, giving you access to Mail, Calendar and Scheduling, To Do, Contacts, and more.
Your Domino administrator must set up your mail database to use the Domino Web Access mail template before you can use the product. You access your mail the same way you do with WebMail, using the URL, user name, and password supplied to you by your Domino administrator, but because your mail is using the Domino Web Access template, you see a different user interface.
When you open Domino Web Access for the first time, you will need to download the Domino Web Access Control from IBM Corporation. Answer Yes, so you will have all the components you need to run the software properly.
Note
Domino Web Access works with these web browsers: Microsoft Internet Explorer 5.5 or later, and Mozilla 1.4.1 and 1.7.1 browsers for Linux clients. Optimally, the screen resolution of your PC monitor should be 1024x768 pixels, but 800x600 pixels is acceptable. Font size settings are controlled by the browser. You’ll also need to have Adobe Acrobat Reader 4.0 or later loaded on the PC if you want to print Calendar entries.
The Domino Web Access screen displays several tabs for the different tasks available to you while using the software (see Figure 16.6):

Figure 16.6. Click Edit Layout to customize your Welcome page. Select a layout of up to four panes and then choose the contents you want in each pane of your new layout, such as the Inbox, Schedule, To Do list, a web page, or Quick Links (a list of web page links).
Welcome—. This is the opening screen, and you may be able to customize it to fit your needs, depending on the settings made by the Domino administrator.
Mail—. Click on the tab to see your Mail or click on the down arrow on the tab to select a particular view to open or choose to create a new mail memo.
Calendar—. Click on the tab to see your Calendar or click on the down arrow to select a Calendar view (one-day, one-week, two-week, month and so on) or to look at views of your Meeting Notices or your Group Calendars. You can also choose to create a new Calendar entry from the menu.
To Do—. Click on the tab to see your To Do list or click on the down arrow to see one-day, one-week, one-month or one-year versions of your To Do list. You can also choose to create a new To Do.
Contacts—. Click on the tab to see your list of contacts or click on the down arrow to choose to create a new contact or a new e-mail group. Contacts that you create here are stored in your mail database. Contacts that you create when using Lotus Notes are stored in your Personal Directory. You can synchronize the two contact lists by opening your mail database in Lotus Notes and choosing Actions, Synchronize Address Book.
Notebook—. The Notebook allows you to create documents where you can keep important information or write notes to yourself about what you are doing, like you can do with the Personal Journal in Lotus Notes. Click on the tab to see your Notebook or to create a new Notebook page. Pages that you create here are stored in your mail database. You can synchronize your Notebook documents with your Personal Journal by opening your mail database in Lotus Notes and choosing Actions, Synchronize Journal.
Note
Depending on whether or not Instant Messaging has been set up by your administrator, you may also be able to use Chat when using Domino Web Access. Check with your administrator to see what you have to do to use this feature.
Note
Domino Web Access can also be set up to work with Microsoft Outlook. See your Domino administrator if you need this configuration.
To create a new mail memo in Domino Web Access, do the following:
Click the down arrow on the Mail tab.
Choose New Message from the drop-down menu.
A mail memo form opens in a new window (see Figure 16.7).
Enter the email addresses of the recipients. Click the To:, cc:, or bcc: buttons to select names from your Contacts list or the organization directory.
Enter a Subject and then type your message in the Body field. Notice that you have a full toolbar above the field that has tools for text formatting, inserting and editing tables, creating page breaks, inserting images, inserting links, spell checking, and selecting your dictionary language. The toolbar disappears if you choose Plain Text from the Format button on the Action bar at the top of the memo window.
(Optional) If you want to add attachments to the message, click on the small down arrow next to Attachments to expand the Add Attachments area of the memo form. Click the folder icon to browse your file system for the attachment(s) you want to make (click the trash can when you want to delete a selected attachment). The remaining tools above the attachment field control how the list of files is displayed.
(Optional) Set your delivery options by selecting the checkboxes at the top of the memo: High Priority, Return Receipt, Sign, or Encrypt (for more information on these options, see Chapter 3, “Email Basics”). For more delivery option choices, click the Options button on the Action bar. In the Delivery Options dialog box, you can set Delivery Report options, select a priority other than High Priority, choose your security options, and ask for a return receipt.
(Optional) Click the Follow Up button on the Action bar if you need to flag this message for further action later. Select Quick Follow Up to flag the message automatically with normal priority; select Add/Edit Flag to open a dialog box where you can choose the priority (urgent, normal or low), enter text about the follow up action, set a follow up date and time, and set a reminder alarm. The Remove Flag option removes any existing flags (for more information on using the Follow Up feature, see Chapter 4, “Managing Mail”).
(Optional) Click the Print This Document icon on the Action bar to print the memo.
Click one of the following Action bar buttons:
Send & File to send the message and select a folder where you want to store a copy.
Save As Draft to save the memo so you can complete it later and send it then.
Save As Stationery to save the memo as a form memo that you can use later. This is a good way to handle repetitive mail messages you must send.

When you receive an email, it displays in red in the Inbox until you open and read it. In the Inbox view, press Enter to open the selected memo or double-click on the document. The message opens in a separate window (see Figure 16.8).

Figure 16.8. Click the up and down arrows on the Action bar of the memo to go to the next or previous memo in the Inbox view.
The Action buttons give you the same options as you would have with an email you receive in Notes: Reply (to just the sender or all, with or without history, with or without attachments, or with internet-style history), Forward (with or without attachments or in Internet-style), Move (to a folder or copy to a folder), and Follow Up (add or edit flags, remove them, or just do a Quick flag). From the Tools button you can add the sender to your Contacts list or copy the memo into a new Calendar entry or To Do. There are also buttons to Show Mail Threads, edit the document, print the document, delete the document, or close the window. If you choose to show mail threads, a section appears at the bottom of the memo window that shows a view of the current memo and all the related memos in the full conversation.
Note
To get assistance on the tasks you need to perform, click the Help button (the question mark) in the upper right corner of the Domino Web Access window and choose either Help Topics or Help on this page. You will also find a ? (question mark) on most windows. Click it and open a Help window on what to do within that window.
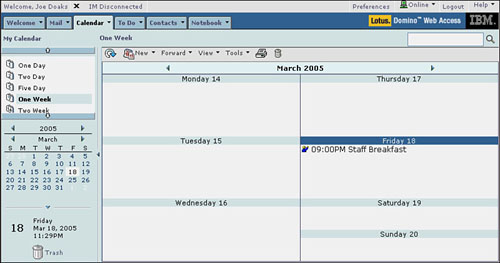
The Calendar in Domino Web Access has most of the features of your Lotus Notes Calendar. You can view it in One Day, Two Day, Five Day, One Week, Two Week, One Month or One Year formats (see Figure 16.9). You can also view a list of meeting notices or your group calendars. Select the one you want to view from either the Calendar Navigation pane or by clicking the down arrow next to the Calendar tab.
In the Calendar Entry window (see Figure 16.10), click the down arrow on the Appointment tab to choose the type of entry you want to create: Meeting, Appointment, All Day Event, Anniversary, or Reminder.

Figure 16.10. This Calendar Entry window is set up to create an appointment. Select another type of entry from the Appointment tab to schedule meetings, all day events, anniversaries, or reminders.
For an appointment you enter the Subject and set the Starting Date and Time and Duration. You can enter a Location or set a Category. You can even set an Alarm to alert you prior to the appointment. Click the down arrow next to Details to see a body field where you can enter more information. If you want to add an attachment, click the down arrow next to Attachments to expand that section. For an appointment that has regularly set times, you can click the Repeat tab to set up the subsequent dates and times.
Both all day events and anniversaries show the starting date, but not the time or duration. A reminder is similar but also has a time setting. Repeats can be set for all.
Meetings are more elaborate because they also include Invitees, Optional, and FYI recipients, as well as showing Rooms and Resources. You can even set up Online Meetings and send invitations. Use the Schedule tab to see the free times of all invitees (if they have allowed their free time to be seen) and pick a mutually acceptable meeting time. Click the Repeat tab to set up repeat meetings.
For more information on creating Calendar entries, see Chapter 9, “Using the Calendar.” Learn more about setting up meetings in Chapter 10, “Working with Meetings and Group Calendaring.”
If you already had contacts listed in your Personal Address Book when you first opened Domino Web Access, those contacts will not appear in the Domino Web Access Contacts list. To add them, open your mail database in Lotus Notes and choose Actions, Synchronize Address Book.
You can add new contacts by doing one of the following:
Click the arrow on the Contacts tab and select New Contact or New E-mail Group. The Contact Information dialog box opens (see Figure 16.11).
With the Contacts list open, click the arrow on the New button on the Action bar and select Contact or E-mail Group. The Contact Information dialog box opens.
With a mail memo open, click the Tools button on the Action bar and select Add Sender to Contacts.
Being away from the office may also mean that you can’t maintain a connection at all times with the server. Provided your Domino administrator has set your mail file up to work offline, you can create mail, make new contacts, schedule appointments, add To Do items, and make Notebook entries without having a network or Internet connection. When you are connected again, you can synchronize your copy of the Mail database with the one on the server to bring both copies up to date with additions, modifications, and deletions.
Before you go away from the office, you need to set up Domino Web Access to work with offline mail. You only need to do this setup once, unless you change your user name or your user ID expires.
Because your offline mail is vulnerable to access by other parties, your first step is to protect it by encrypting it. Encrypt your local mail file by following these steps:
Click Preferences.
Click Offline.
Select Encrypt mail file locally.
Choose Simple Encryption (protects against casual snooping), Medium Encryption (a balance between security, strength, and fast database access), or Strong Encryption (slows database access but is the best choice when security is all important).
Click OK.
Some of the other offline preferences may also be important for you to select:
Include server’s Domino Directory—. This option won’t appear unless your Domino administrator has made a condensed or extended directory catalog on your mail or directory server for you to take offline. You want to select this item so you can do address lookups offline; however, it will lengthen the synchronization process.
Compact mail file after sync—. You want to compact the mail file to reduce the amount of disk space it uses, but it will slow down the synchronization process.
Update full text index after sync—. This automatically updates the full text index for searching purposes, but enabling it will slow down the synchronization process.
Limit document attachments during sync—. If you enable this option, any attachments over 100K will be omitted during synchronization. It will minimize the size of your local mail file.
Only sync documents modified in last [specify] days—. This option limits the size of your local mail file and the amount of synchronization time by only synchronizing files created or modified in the specified time period.
You then need to install a synchronization manager to manage your offline subscriptions and work with your mail file offline. You will need your Notes ID to do this. This file is usually stored in your otesdata directory and has an .id extension (such as user.id).
Follow these steps to install a synchronization manager:
Click the Online button on the top right of the Domino Web Access window and select Go Offline.
If your web browser is Microsoft Internet Explorer, click Yes to install Lotus Domino Sync Manager. If you use Linux Mozilla, click Yes to install DWA Sync.
Accept the license agreement.
Select a folder where you want your offline mail installed.
If prompted for a Notes ID, browse to select your ID file.
Enter and confirm a web application password (this is the password for your Notes ID).
After you have set up Domino Web Access to work offline, click the Online button and choose Go Offline. When you choose Go Online after you are connected again, your local mail file will synchronize with your mail file on the server.
Browsers store pages that you read in them in a cache, so that they can redisplay the pages quickly if you decide to look at them again later on. When you access your mail database from a browser, potentially sensitive information gets cached. When you close your browser, that information may be left behind for some other browser user to peruse. If your organization cares about the security of the information you retrieve into your browser, specifically into your Domino Web Access mail reader, your administrator may have enabled a feature called Browser Cache Management, which causes Notes mail data to be purged from the browser cache when you log out of Domino Web Access.
Depending on how your administrator configured Browser Cache Management, it may install itself in your browser automatically when you load Domino Web Access, or you may have the option of installing/uninstalling it manually. (If your administrator hasn’t enabled it, it won’t be installable in your browser at all.) If you have the option of installing it manually, a category called “Logout” will appear in the Domino Web Access preferences page.
To install Browser Cache Management, do the following:
Click on Preferences.
Click on Logout.
Under Browser Cache Management, click the Install button.
Click OK to close the alert box that tells you Browser Cache Management is installed. Then click OK to close the Preferences dialog box.
Now, whenever you are ready to leave Domino Web Access, click Logout at the top right of the Domino Web Access window. You will see a message saying that you are logged out and that all mail-related files have been deleted from your Temporary Internet Files folder. Click the Close Window button.
In this chapter you learned about using WebMail and Domino Web Access to access your mail from a web browser. In the next chapter you will learn how to use Lotus Notes when you are away from the office.