
In this chapter, you will learn some skills that help you organize your mail and keep it up to date.
By default, the Inbox view is sorted by date in ascending order, which means that the older messages are at the top of the view and the newer messages are at the bottom. You can change the sort order of the documents in a view by clicking on the view column headers. However, not all the columns in the view can be changed. You can tell which columns can be sorted by the triangle on the column head (see Figure 4.1). The sortable column headers have triangles on them. For example, in the Inbox view, the Who column header has an up triangle that indicates that this column can be re-sorted in ascending order (alphabetically, from A–Z). The Date column has a down triangle, which means this column can be re-sorted in descending order (from most recent to oldest). The Size column has a down triangle, indicating that the messages can be re-sorted by size, with the largest messages first.
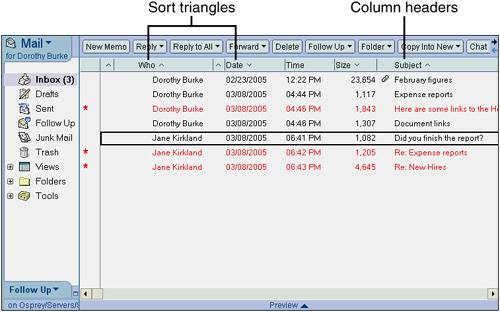
If the option to sort both ways is available in a view, there are two triangles in the column heading—one points up and the other points down. Once you sort columns, the columns stay in the sort order you placed them in, even if you exit Notes and open it again.
Note
Would you prefer to have the Subject column appear right after the Who column? You can rearrange the order of the columns in your Inbox. Point to the Subject column header and drag it to the left until you see a dark vertical line at the end of the Who column header. When you release your mouse button, the Subject column header is in its new position right after Who.
To keep your Mail database manageable, make it a practice to clear out old messages when you are through with them. It helps to keep your database file at a manageable size. If you think you’ll need the message again, archive it or store it in a folder. If you know that you don’t need the message anymore, delete it.
You can mark messages for deletion while you’re reading them, or you can do it from the View pane. Use the following steps to delete a message while you are in read mode:
To mark messages for deletion while you are in the Inbox or while you are in some other folder or view, you must first select the message or messages you want to delete. This can be done using one of the methods for selecting documents that were described in Chapter 3, “Email Basics.” Then click the Delete button on the Action bar or press the Delete key.
When you delete mail messages, they disappear from the Inbox and move to Trash. Deleted mail messages will stay in Trash for a specified period of time, and then be permanently removed from your Mail database after the time limit expires. To see this soft deletion time limit, open your Inbox and choose Tools, Preferences on the Action bar. The Preferences dialog box opens, as shown in Figure 4.2.

Figure 4.2. The number of hours your deleted messages will stay in the Trash is specified under the Soft Delete section. Depending on how your organization has configured your mail, you may even be able to set the time period yourself.
To permanently delete a message from your Mail database, open the Trash view in the Mail Navigator pane. You’ll see the messages you marked for deletion, as shown in Figure 4.3.

Click the Empty Trash button in the Action bar to delete all the messages in Trash. Alternately, to delete a single item, highlight the item and click Delete Selected Item. You will be asked to confirm that you want to delete the message(s). Be careful; once you do this you won’t be able to get the message(s) back!
Some of the mail messages you receive may require answers that you can’t research at the moment you open them, or ask you to do something that you want to be sure to remember to do later. You need to set some sort of reminder for yourself so you do what is required and then get back to the sender.
There are two ways you can handle these situations. If the memo asks you to complete a task, you may want to add a task to your To Do list. With the memo open or selected in a view, click the Copy Into New button on the Action bar and select New To Do. You then fill in the To Do item and save it to the list for action later. You’ll learn more about the To Do list in Chapter 11, “Working with To Do Items.”
The other way to handle this situation is to flag the message for Follow Up. With the message open or selected in a view, click the Follow Up button on the Action bar. Choose one of the following options:
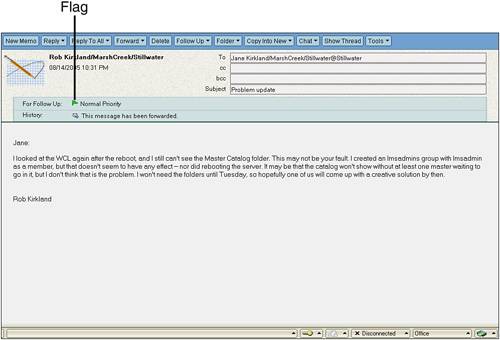
Quick Flag immediately adds a green flag to the header of the memo and next to the message in views (see Figure 4.4). It automatically sets the priority of the Follow Up to Normal Priority.
Add or Edit Flag adds a flag to a message or allows you to edit the attributes of the Follow Up if you already flagged it. A dialog box appears (see Figure 4.5) where you set these attributes.

Each time you select another view or folder in the Mail Navigator pane, you see different documents in the View pane, or you see the same documents sorted in a different way. If you want to save a mail message, assign it to an existing folder by dragging it to that folder. Alternately, select the message and choose Folder, Move to Folder from the Action bar, and if moving to a folder, select a folder from the list of folders. If you click the Add button in the Move to Folder dialog box, Notes will copy the message to the folder you pick but still leave a copy in the current view or folder.
So how does a folder differ from a view? The content of a view is controlled by the designer of the view; the content of a folder is controlled by you, the user. However, that same memo still shows up in your All Documents view. There aren’t two copies of the document in your database, just two ways to access the document. See Chapter 6, “Working with Databases,” for more information on views.
You can create your own folders in which to save your mail. To create a folder, follow these steps:
Choose Folder, Create Folder from the Action bar.
When you open the Create Folder dialog box, “Untitled” appears in the Folder name box until you replace it with your desired title. Type the name of the new folder directly over the word Untitled in the Folder name box. Figure 4.6 shows the Create Folder dialog box in which a folder is being created.
Select the location for the new folder. The default location is Folders, but you can place your new folder within an existing folder by selecting an existing folder—this is called nesting folders. For example, create a folder called Customers, and then create two folders under Customers called Active and Inactive (see Figure 4.7).
Note

Be careful when deleting documents from your folders because this action deletes those documents from your mail database. When you place a document in a folder or folders, it does not make a new copy of the document for each location; you are actually creating a pointer to that one document in the database. If you no longer want a particular document in a folder, select it and click on Folder in the Action bar and then Remove from Folder from the pull-down list.
To select a design for your folder, click on the Advanced button and click the Copy From button. The design determines what information from the documents appears in the columns of the folder. By default, the design is the Inbox folder, so the columns and headers you see in the Inbox folder are the same columns and headers you will see in your new folder. However, only the documents you send to that folder will appear when you open the folder. But you might want your new folder to look like your Drafts folder, where the column header information differs from the Inbox folder. When you click the Copy From button, select a folder on which to base your new folder and then click OK.
Click OK to save your changes and see your new folder in the Mail Navigation pane (see Figure 4.7).


You can open your new folder at any time by clicking on it; its contents appear in the View pane. You can also move and add messages to folders by clicking and dragging selected documents to folders you have created or by choosing Folder, Move to Folder from the Action bar.
To delete a folder, remove it from the Navigation pane by selecting it and choosing Actions, Folder Options, Remove Folder from the menu (not the Action bar). Any memos that are contained in the folder at the time you delete the folder remain in the All Documents view of the Mail database; they are not deleted when you delete the folder.
You can print one or many mail messages at a time, and as with many Windows products, you can activate the Print command in several ways. However, like deleting and moving documents, if you want to print multiple messages you must first select the messages in the View pane by placing a check mark in the selection bar to the left of the messages. If you want to print just one message, you can print that message from the view or from the opened document. Then print using one of the following methods:
All three of the previous options present the Print Document or Print View dialog box (see Figure 4.8), which enables you to select the printer, print a view, print selected documents with various page break and form options, select the pages to print, and print multiple copies. Table 4.1 describes the Print dialog box options in detail.

Figure 4.8. Set print options in the Print View dialog box, which appears when you select the document(s) from a view. Click the Settings button if you need to make changes to your printer such as selecting a particular tray, printing duplex, and so forth.
Table 4.1. Common Print Options
At times, it’s useful to print a view. For example, you might want to print a list of your customer emails contained in your active customer folder (if you created such a folder). When you print a view, the information displayed is exactly as it is displayed in the view pane, and in the case of mail, it would show you the Who, Date, Size, and Subject fields. To print a view, choose File, Print from the menu. In the What to Print portion of the Print dialog box, click Selected View. Click OK to print.
After you set your print options, click OK, Preview, or Cancel to finish and close the dialog box.
In this chapter, you learned how to sort mail, delete mail, flag messages for follow up, print mail and views, and use folders. In the next chapter, you learn how to create stationery, rules, and out of office notices.