Hour 4. Creating WinJS Namespaces, Classes, and Custom Controls
What You’ll Learn This Hour:
• How to use WinJS to define namespaces
• How to use WinJS to define classes
• How to create custom controls
• How to create custom HTML controls
• How to add intelliSense to functions so that Visual Studio can recognize them
We cover here how to create custom controls in different ways and how they can be consumed multiple ways. Finally, we show how to add intelliSense to JavaScript functions.
Defining Namespaces and Classes Using WinJS
In this hour, we explore how to use WinJS to define our own namespaces and classes. For programmers who work with only JavaScript, this might seem odd. However, namespaces have two important functions. The first job of a namespace is to prevent naming collisions. This is important so that if two different libraries (or a library and our own code) use the same function or property, we can distinguish and call the functionality we desire. The second purpose of a namespace is to group related functionality together even when the functionality resides in entirely different physical files. This enables us to break up our code in meaningful ways and yet still call the functionality in a way in which all related functionality is in the same group—the same namespace.
Many JavaScript libraries do not use namespaces and pollute the global space, making it difficult to use those libraries with other libraries. When using namespaces in our own code, we can be confident that, if we utilize another library, it won’t stomp all over the code we have written. We still must take caution when using multiple libraries together that didn’t define any namespaces.
We covered how to create an object during Hour 1, “Getting a Refresher on JavaScript, HTML5, and CSS3,” in the “Self-Executing Anonymous Functions” section. This was done by calling
window.myObject = {};
Instead of creating the object in the global space, we can use the same pattern to create a namespace in JavaScript:
window.MyNamespace = {};
Then we can assign as many classes as we want to that namespace:
window.MyNamespace.MyClass1 = {};
window.MyNamespace.MyClass2 = {};
We could use the Object Literal Notation discussed in Hour 1 to add functions, properties, and events to our class. However, instead of doing it that way, here we use some of the built-in functionality inside WinJS. WinJS provides ways for us to define our own namespaces and classes in a consistent way. To create a namespace using WinJS, we make the following call:
WinJS.Namespace.define("STYWin");
That line of code is the most simplistic way to create a namespace using WinJS. The define function also has another optional parameter that takes a collection of objects to add to the new namespace. For example, we could create a namespace and the complete classes in a single call:
(function () {
//Example of creating namespace in one go
WinJS.Namespace.define("STYWin", {
Messaging: {
sayHello: function () {
return "Hello today is " +
Windows.Globalization.DateTimeFormatting
.constructor(new Date()).toLocaleDateString(); + ".";
}
},
Math: {
add: function (a, b) { return a + b; },
subtract: function (a, b) { return b - a; }
}
});
})();
The same functionality could be written the following way, to break out some of the sayHello function:
(function () {
//Example of creating namespace in one go
WinJS.Namespace.define("STYWin", {
Messaging: {
sayHello: sayHello
},
Math: {
add: function (a, b) { return a + b; },
subtract: function (a, b) { return b - a; }
}
});
function sayHello() {
return "Hello today is " + privateFunction() + ".";
}
function privateFunction() {
return Windows.Globalization.DateTimeFormatting
.constructor(new Date()).toLocaleDateString();
}
})();
Both code snippets do the same thing. They define the namespace STYWin. They assign two classes to the namespace: Messaging and Math. Messaging has a single sayHello function. Math has two functions: add and subtract. The second code snippet shows how functions can be private by having the sayHello function call out to privateFunction.
Creating a namespace and corresponding objects this way isn’t necessarily common, but it is definitely an option. Instead, however, we typically use the single parameter overload of the function followed by another WinJS function called defineWithParent. For example:
(function () {
"use strict";
//Example of creating namespace with a parent namespace
WinJS.Namespace.define("STYWin");
WinJS.Namespace.defineWithParent(STYWin, "Utility", {
//public method
padLeft: function (str, len, pad) {
str = Array(len + 1 - str.length).join(pad) + str;
return str;
}
});
})();
The previous code defines the STYWin namespace. It then calls the defineWithParent function, passing in the actual object of the parent namespace. This is nice because a runtime error occurs if the parent namespace object is mistyped. The second parameter is the name of the namespace we are adding to the parent—in this case, "Utility". The last parameter takes an object. As usual, we use an object literal to create a public method directly on this namespace. This function is a simple padLeft function that takes a string and pads the left part of the string with some character for as long as is desired.
The WinJS.Namespace.define function allows the namespace to be defined using a dot notation to specify a child namespace. The following code snippet is also valid when creating a namespace:
WinJS.Namespace.define("STYWin.Utility");
Besides namespaces, we can create classes using WinJS. Consider this example of creating a namespace and both defining classes and assigning them to the namespace:
WinJS.Namespace.defineWithParent(STYWin, "Utility", {
Math : WinJS.Class.define( ctor,
{ add: add, subtract: subtract },
{ TAU: function () { return Math.PI * 2; } }
),
Date : WinJS.Class.define( function() {},
{ displayDate: displayDate },
{}
),
displayFullDate: function () { return displayDate(true); }
});
var a, b;
//typically wouldn't do a math class
//like this, but demoing the constructor...
function ctor(num1, num2) {
a = num1;
b = num2;
}
function add() { return a + b; }
function subtract() { return a - b; }
function displayDate(fullYear) {
var d = new Date();
return privateWelcomeFunction() +
(d.getMonth() + 1) + "-" +
d.getDate() + "-" +
(fullYear ? d.getFullYear() : d.getYear() - 100);
}
function privateWelcomeFunction() { return "Current Date is "; }
JavaScript doesn’t really have any notion of namespaces or classes, but this is a way for us to organize our code and possibly use some object-oriented programming patterns that most modern languages use. Obviously, we are not required to write our code or utilize WinJS in this way, but we can do so if we want. This book mostly uses this pattern.
In the previous code segment, we see a call to WinJS.Class.define. This is a helper function inside WinJS that enables us to define a class. It takes three parameters:
• constructor—This is the initialization function that gets called when the object is instantiated.
• instanceMembers—This is an object literal where we pass in all functions and properties associated to the class.
• staticMembers—This is an object literal where we define all the static functions, properties, and events for the class.
The code assigns the Utility namespace to the already created STYWin namespace. Inside the last parameter of the defineWithParent function is where we pass in an object literal containing two classes (Math and Date) and a function (displayFullDate). When we set up the Math class, we are setting the constructor, which, oddly enough, takes two numbers. This is not a typical way to create a math class, but it was done to demonstrate how the constructor actually works. (Typically, we would pass the numbers directly to the methods, such as with add and subtract.) The ctor function takes in num1 and num2 as parameters. It then sets variables a and b to those values, respectively. Notice that this is all done outside the WinJS namespace defineWithParent call. (What isn’t shown is that this is all wrapped in a single self-executing anonymous function so that it doesn’t clutter up global space.)
After setting the constructor method on the Math class, the next part of the WinJS.Class.define function takes the instance members. Here we declare the add and subtract functions. The last parameter is where we can pass in static members. We declare TAU here, which simply returns 2 pi.
After defining our Math class, we define our Date class. We don’t have a constructor for Date, so we pass in an anonymous function that doesn’t do anything. We could have just as easily passed in null. The second part of the object literal is the collection of instance members. We have only a single function, called displayDate. We have seen that function in a previous code segment.
Finally, we see that we can add both classes and functions into the namespace. By setting the displayFullDate function, we do the exact same thing as the code segment before, when we declared the padLeft function. Interestingly, if those two code segments were defined in separate anonymous functions—even in separate JavaScript files—both functions would be applied to the STYWin.Utility namespace.
All the code segments in this section have been added to a code project called NamespaceExample, found at Hour04NamespaceExample. The default.html has some DOM elements with ids that we assign values from our classes and namespaces:
<h2 id="greeting"></h2>
<h2 id="answer"></h2>
<h2>40 + 40 = <span id="add"></span></h2>
<h2>80 - 40 = <span id="subtract"></span></h2>
<h2>123 padded with zeroes = <span id="padLeft"></span></h2>
<h2>Show 4 digit year: <span id="displayFullDate"></span></h2>
<h2>Show 2 digit year: <span id="displayDate"></span></h2>
<h2>Static Property STYWin.Utilities.Math.TAU() : <span id="tau"></span></h2>
Inside the default.html, we also reference the Utility.js file where all the code segments we just discussed reside:
<script src="js/Utility.js"></script>
For sake of completeness, Listing 4.1 shows the contents of Utility.js.
(function () {
"use strict";
//Example of creating namespace in one go
WinJS.Namespace.define("STYWin.Option1", {
Messaging: {
sayHello: function () {
return "Hello today is " +
Windows.Globalization.DateTimeFormatting
.constructor(new Date()).toLocaleDateString(); + ".";
}
},
Math: {
add: function (a, b) { return a + b; },
subtract: function (a, b) { return a - b; }
}
});
})();
(function () {
"use strict";
//Example of creating namespace that includes private functions
WinJS.Namespace.define("STYWin.Option2", {
Messaging: {
sayHello: sayHello
},
Math: {
add: function (a, b) { return a + b; },
subtract: function (a, b) { return a - b; }
}
});
function sayHello() {
return "Hello today is " + privateFunction() + ".";
}
function privateFunction() {
return Windows.Globalization.DateTimeFormatting
.constructor(new Date()).toLocaleDateString();
}
})();
(function () {
"use strict";
//Example of creating namespace with a parent namespace
WinJS.Namespace.define("STYWin");
WinJS.Namespace.defineWithParent(STYWin, "Utility", {
//public method
padLeft: function (str, len, pad) {
str = Array(len + 1 - str.length).join(pad) + str;
return str;
}
});
})();
(function () {
"use strict";
WinJS.Namespace.defineWithParent(STYWin, "Utility", {
Math : WinJS.Class.define( ctor,
{ add: add, subtract: subtract },
{ TAU: function () { return Math.PI * 2; } }
),
Date : WinJS.Class.define( function() {},
{ displayDate: displayDate },
{}
),
displayFullDate: function () { return displayDate(true); }
});
var a, b;
//typically wouldn't do a math class
//like this, but demoing the constructor...
function ctor(num1, num2) {
a = num1;
b = num2;
}
function add() { return a + b; }
function subtract() { return a - b; }
function displayDate(fullYear) {
var d = new Date();
return privateWelcomeFunction() +
(d.getMonth() + 1) + "-" +
d.getDate() + "-" +
(fullYear ? d.getFullYear() : d.getYear() - 100);
}
function privateWelcomeFunction() { return "Current Date is "; }
})();
We have seen all this code before. The only difference is that the top two modules are added in the Option1 and Option2 namespaces because they have the exact same signatures (Messaging and Math).
Inside the default.js JavaScript file, we see how the namespaces and classes are used. This should seem familiar because we’ve been using the Windows and WinJS namespaces and classes already:
document.getElementById("greeting").innerText =
STYWin.Option1.Messaging.sayHello();
document.getElementById("answer").innerText =
"The answer is " + STYWin.Option2.Math.add(40, 2) + ".";
document.getElementById("add").innerText =
STYWin.Option1.Math.add(40, 40);
document.getElementById("subtract").innerText =
STYWin.Option2.Math.subtract(80, 40);
document.getElementById("padLeft").innerText =
STYWin.Utility.padLeft("123", 5, "0");
//Get full date from static method on Utility
document.getElementById("displayFullDate").innerText =
STYWin.Utility.displayFullDate();
//get 2 year digit display date from instance of Date class
var dateInfo = new STYWin.Utility.Date();
document.getElementById("displayDate").innerText =
dateInfo.displayDate(false);
//Not doing anything with result, but showing how
//to instantiate weird math constructor to then add
var math = new STYWin.Utility.Math(2,3);
var result = math.add();
var tau = STYWin.Utility.Math.TAU();
document.getElementById("tau").innerText = tau.toString();
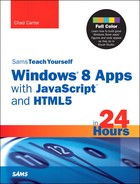
The JavaScript calls the different namespaces and classes and sets data accordingly. Figure 4.1 shows the results of this project.
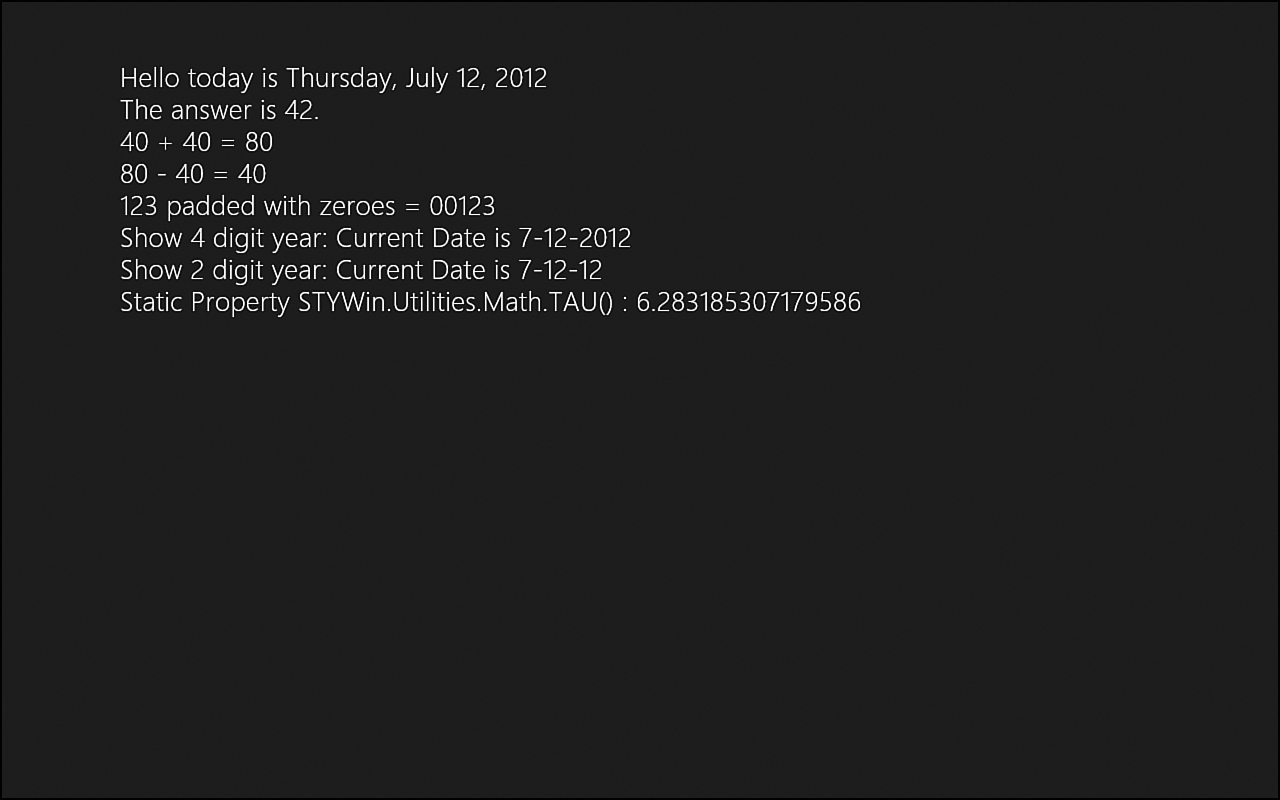
Figure 4.1. The NamespaceExample project assigns data to the elements on the page by accessing different functions and properties from namespaces and classes that have been defined.
Creating Custom Controls
Even with the great controls that are provided out of the box with WinJS, sometimes we want to create our own custom controls. We have a few options when creating our controls. Here we look at code in the Hour04CustomControl folder. The simplest way we can create a control is illustrated in simplecustomcontrolsimplecustomcontrol.js:
//example of the helloWorld Control (in global space)
var SimpleCustomControl = WinJS.Utilities.markSupportedForProcessing(
function (element, options) {
element = element || document.createElement("div");
element.textContent = "Global Space Hello World Control!";
//set the winControl to this control
element.winControl = this;
//set the element property of this control to the DOM element
this.element = element;
});
Not a lot of code is required to create a simple control. Let’s step through what is happening. We assign a global space variable SimpleCustomControl to a function that creates the control. We pass the function that creates the control into the WinJS.Utilities.markSupportedForProcessing function. This is a required step for security reasons. We want this control to be created inside HTML with the data-win-control custom data attribute, so we have to explicitly tell WinJS that this function is supported for it to process during the processAll function call and similar calls.
We use this just as we would use any WinJS.UI control. Consider the HTML markup:
<div data-win-control="SimpleCustomControl"></div>
The actual code for the SimpleCustomControl function takes an HTML element and the options. The processAll function processes the previous div element and instantiates an instance of SimpleCustomControl. It then passes in the div element to the element parameter of the function. If a data-win-options attribute were present, it would pass that as well. We look at how that works shortly. Because the div element is passed to our function from WinJS, it is used. This control can be created through JavaScript where no element is being passed in. When that happens, the control creates a div element itself (we illustrate this soon).
After making sure the element is set, the textContent on that element is set. In this case, we are simply providing the text "Global Space Hello World Control!". The last two lines create a two-way reference so that we can access the control from the element (by setting element.winControl to the control itself) and also access the element from the control (by setting the element property of the control to the element).
That’s all there is to creating a custom control that we can treat just as if it were a WinJS UI control. This control is extremely simple in nature. It does no styling and lives in global space.
Next, we work on the namespace issue. Inside the
amespacecustomcontrol
amespacecustomcontrol.js
, we see that the core bit of the code is the same as the simplecustomcontrol. However, it is created using our friend WinJS.Namespace.define:
(function () {
"use strict";
//Example of hello world control inside the STYWin.UI namespace
//By using WinJS.Namespace.define we get access to processAll functionality
WinJS.Namespace.define("STYWin.UI", {
NameSpaceCustomControl: WinJS.Utilities.markSupportedForProcessing(
function (element, options) {
element = element || document.createElement("div");
element.textContent = "Namespace Hello World Control!";
element.winControl = this;
this.element = element;
})
});
})();
All of this code should seem familiar. We simply wrap the code we just looked at inside the STYWin.UI namespace. This control is created in HTML as follows:
<div data-win-control="STYWin.UI.NameSpaceCustomControl"></div>
It is almost identical to something like WinJS.UI.DatePicker. We still haven’t styled the control, nor have we created any options for it. We can see how to do both with the code in /customdatecontrol/customdatecontrol.js. This control has an additional JavaScript file called utility.js. It isn’t needed, but it demonstrates how our controls could call out to shared resources. This control also utilizes a CSS file called customdatecontrol.css. The actual page that uses this control needs to reference the CSS in the web page, just as when referencing the ui-light.css or ui-dark.css for WinJS. It is bad practice to use inline styles (using style="" on the element itself), but it is an even worse practice with controls. If inline styles are used, the consumer of the control has no way to override the styling.
The content of the utility.js file that the customdatecontrol utilizes is as follows:
(function () {
"use strict";
function displayDate(fullYear) {
var d = new Date();
return addPrefix() +
(d.getMonth() + 1) + "-" +
d.getDate() + "-" +
(fullYear ? d.getFullYear() : d.getYear()-100);
}
//private function
function addPrefix() { return "Current Date is "; }
var myUtilityClass = WinJS.Class.define(null,
{ },
{ displayDate: displayDate });
WinJS.Namespace.defineWithParent(STYWin, "Utility", myUtilityClass);
})();
Another way of adding a class to the namespace involves assigning the class to a variable and then passing that variable to the defineWithParent (or define) function. This helper class simply has a single static function called displayDate. It calls a private method to add a message prefix to the beginning of the date. The function is private because it isn’t listed in the instance members or static members when defining the class.
The code for customdatecontrol.js comes next:
(function () {
"use strict";
WinJS.Namespace.define("STYWin.UI", {
CustomDateControl: WinJS.Utilities.markSupportedForProcessing(
function (element, options) {
//create an element if one wasn't passed to us
element = element || document.createElement("div");
//Use WinJS setOptions helper to turn options
//into actual objects
WinJS.UI.setOptions(this, options);
//dynamically create div we need to work with
var ctl = document.createElement("div");
ctl.classList.add("customdatecontrol");
//check option passed in to see how we should
//effect this control
if (options.yearFormat === 4) {
ctl.textContent = STYWin.Utility.displayDate(true);
}
else {
ctl.textContent = STYWin.Utility.displayDate(false);
}
//add the div to the element
element.appendChild(ctl);
//create a two-way reference so
//we can access this control from the div
//or acecss the div from the actual control itself
element.winControl = this;
this.element = element;
})
});
})();
The fully qualified name of this control is STYWin.UI.CustomDateControl. After setting the element parameter to a newly created div if no element is passed in, we see a new call to WinJS.UI.setOptions. This is a helper function inside WinJS that turns the options passed to us (via the data-win-options attribute on the element) into actual objects.
Next, we create a div and assign it to the variable ctl. We then add the customdatecontrol class to the element. We can look at the option that was passed to us, thanks to the setOptions helper function. We have determined that the only option on this control is a yearFormat option. We require the consumer of our control to pass in 4 if he wants a four-digit year; otherwise, we display only a two-digit year. We then add the control we were just working with to the element passed in (or created). Finally, we create the two-way reference shown earlier.
The example HTML that calls this CustomDateControl is:
<div id="dateControl" data-win-control="STYWin.UI.CustomDateControl"
data-win-options="{ yearFormat: 4}" ></div>
Nothing too surprising emerges here. We create our control as we have in the past, but now we can also set the options on the control, as we did for the WinJS.UI controls.
The final piece of this control involves modifying the look and feel through CSS. The customdatecontrol.css is simple and has only one CSS rule:
.customdatecontrol {
color: red;
}
The JavaScript assigned this class to the control when it created it, which enables the consumer of this control to change the styling as desired. When creating a control, it is a good idea to create both a light CSS file and a dark CSS file, much like the ui-light.css and ui-dark.css that WinJS provides. This way, if the app that is using the control is a dark app or a light app, the consumer can link the appropriate CSS file.
Working with Custom HTML Controls
The final example of a custom control here is a custom HTML control. We created these during Hour 2, “Trying Out File | New | Project,” when we added page controls to our NavigationApp project. A custom HTML control is a page control.
To this point, we explicitly created all of our controls in JavaScript. This may suffice for some controls, but others need a lot more markup. Most likely, this is better done in HTML. In /customhtmlcontrol/customhtmlcontrol.html, we see the following code:
<!DOCTYPE html>
<html>
<head>
<title>Custom Date Control</title>
<script src="customhtmlcontrol.js"></script>
</head>
<body>
<div class="htmlcontrol_container">
<span class="htmlcontrol_welcomemessage">Welcome! </span>
<span class="htmlcontrol_content"></span>
</div>
</body>
</html>
This could be complicated markup, but in this demo, we simply create a div that has an htmlcontrol_container class. The div contains two spans, each with its own class: htmlcontrol_welcomemessage and htmlcontrol_content. The first span always gets the text “Welcome!”. We include a reference to the JavaScript file, but we omit a reference to the CSS file. We do not want to include the CSS file inside the actual HTML. If we did, the user could not override any CSS style properties set by our CSS. The user could style properties we didn’t set, but our CSS would override any property that both the user and we set because it loads after the main page CSS loads.
The CSS we have associated to this control is in the customhtmlcontrol.css file:
.htmlcontrol_container {
border-radius: 25px;
border: 5px double green;
margin: 15px;
}
.htmlcontrol_welcomemessage {
font-weight: 800;
padding: 15px;
}
.htmlcontrol_content {
color: green;
font-weight: 400;
}
Pretty simple styling is in place. We have styled the overall control along with each span of the control. It is important to provide a way to style each piece of the UI of the control. Even if the default style of a section doesn’t different from the style of another section, it is important to provide unique classes for each section so that the consumer of the control can style each piece as desired.
The customhtmlcontrol.js file has the following code:
(function () {
WinJS.UI.Pages.define("/customhtmlcontrol/customhtmlcontrol.html", {
ready: function (element, options) {
var nodeList = document.querySelectorAll(".htmlcontrol_content");
for (var n = 0; n < nodeList.length; n++) {
nodeList[n].innerHTML = "Creating custom controls is easy.";
}
}
});
})();
This should look familiar: We created page controls earlier, and that is exactly what this custom HTML control is. The code simply finds the content span and sets the innerHTML to our text. It does this for all controls (querySelectorAll) that have the class assigned to it. Otherwise, if we used only querySelector, it would style only the first element. We simply loop through the node list we get returned, and on each element, we set the innerHTML text.
Now that we have created these controls, let’s see them in action. Figure 4.2 shows the end result of our custom control project example without any additional styling.
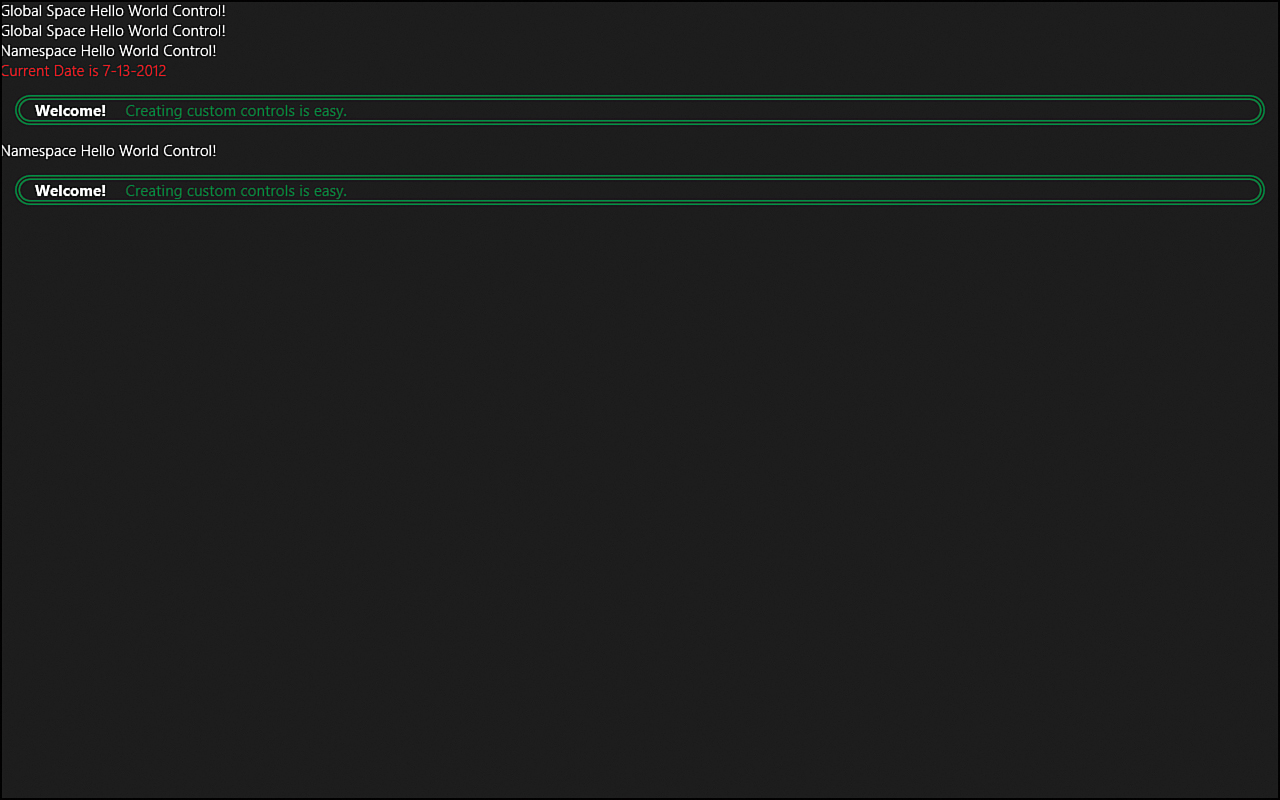
Figure 4.2. The CustomControl example project renders every control we have talked about. Some controls are rendered multiple times in different ways.
The following is the HTML from default.html that produces the results in Figure 4.2:
<!DOCTYPE html>
<html>
<head>
<meta charset="utf-8" />
<title>CustomControl</title>
<!-- WinJS references -->
<link href="//Microsoft.WinJS.1.0/css/ui-dark.css" rel="stylesheet" />
<script src="//Microsoft.WinJS.1.0/js/base.js"></script>
<script src="//Microsoft.WinJS.1.0/js/ui.js"></script>
<!-- Simple Custom Control Written in Global Space -->
<script src="simplecustomcontrol/simplecustomcontrol.js"></script>
<!-- Simple Custom Control in a Namespace-->
<script src="namespacecustomcontrol/namespacecustomcontrol.js"></script>
<!-- Custom Date Control with referenced Utility class -->
<link rel="stylesheet" type="text/css"
href="customdatecontrol/customdatecontrol.css" />
<script src="customdatecontrol/utility.js"></script>
<script src="customdatecontrol/customdatecontrol.js"></script>
<!-- Custom HTML Control stylesheet -->
<link rel="stylesheet" type="text/css"
href="customhtmlcontrol/customhtmlcontrol.css" />
<!-- Our App references -->
<link href="/css/default.css" rel="stylesheet" />
<script src="/js/default.js"></script>
</head>
<body>
<div data-win-control="SimpleCustomControl"></div>
<div id="placeholder"></div>
<div id="namespacecustomcontrol"
data-win-control="STYWin.UI.NameSpaceCustomControl"></div>
<div id="dateControl" data-win-control="STYWin.UI.CustomDateControl"
data-win-options="{ yearFormat : 4}" ></div>
<!-- HTML Control -->
<div data-win-control="WinJS.UI.HtmlControl"
data-win-options="{ uri: '/customhtmlcontrol/customhtmlcontrol.html' }">
</div>
</body>
</html>
As expected, we are referencing our CSS and JavaScript files for each control. The pages that consume the controls must load the CSS: If they were loaded with the control, this would override any CSS settings that the app set for those controls.
The first control we created is the SimpleCustomControl that exists in global space. We have a placeholder where we dynamically load the next control. We cover that next when we look at the JavaScript code. After the placeholder, we create the NamespaceCustomControl. Next, we create the dateControl and pass 4 into the yearFormat option. Finally, in the markup, we declaratively create the HTML control. The URI option is required for page controls.
Now we can look at the default.js file to see the controls we created programmatically:
(function () {
"use strict";
var app = WinJS.Application;
var activation = Windows.ApplicationModel.Activation;
WinJS.strictProcessing();
app.onactivated = function (args) {
if (args.detail.kind === activation.ActivationKind.launch) {
var simpleControl = new SimpleCustomControl(
document.getElementById("placeholder"));
//call the namespace control without an element
var anotherSimpleControl = new STYWin.UI.NameSpaceCustomControl();
//style it the way we want
anotherSimpleControl.element.classList.add("mystyle");
//now that the element has been created for us,
//dynamically add it to the end of the body
document.querySelector("body").appendChild
(anotherSimpleControl.element);
var htmlControl = WinJS.UI
.Pages.get("/customhtmlcontrol/customhtmlcontrol.html");
var div = document.createElement("div");
var hc = new htmlControl(div,
{ uri: "/customhtmlcontrol/customhtmlcontrol.html" },
function (ctl) {
ctl.element.id = "mynewhtmlcontrol";
document.querySelector("body").appendChild(ctl.element);
}, null);
args.setPromise(WinJS.UI.processAll());
}
};
app.start();
})();
Inside the app.onactivated event handler, we create another global space SimpleCustomControl dynamically by passing in the placeholder div we created in the HTML file. We don’t pass anything as the second (options) parameter. The SimpleCustomControl constructor takes the placeholder div and then sets the textContent of that div, as we saw at the beginning of this section. This produces the second line in Figure 4.2.
After creating that control, the JavaScript code creates the NamespaceCustomControl. In this example, nothing is passed into the constructor, so the constructor creates the element. The code then adds a class to the element that the constructor just created. (Figure 4.2 doesn’t show any styling because the code was run purposefully without any app styling.) Finally, the element is added to the end of the document. This produces the next-to-last line in Figure 4.2.
Next, we create the HTML control (page control) programmatically. The rest of the controls we just instantiated and the constructor functions were called. WinJS.UI page controls work a little differently. Instead of “newing them up,” we call the WinJS.UI.Pages.get function. This returns the object that we can instantiate. We do this after creating a div element. The constructor for the object takes the actual element we are associating the control to, along with the options.
Finally, let’s add some custom styling to these controls so they don’t look so bland. The default.css content follows:
body {
margin-left: 120px;
margin-top: 60px;
}
/* override html control */
.htmlcontrol_container {
margin: 5px;
padding: 10px;
width: 400px;
text-align: center;
border: 5px double yellow;
}
#mynewhtmlcontrol .htmlcontrol_container {
border: 5px double purple;
}
#mynewhtmlcontrol .htmlcontrol_content {
color: orange;
}
#mynewhtmlcontrol .htmlcontrol_welcomemessage {
color:#b200ff;
}
#placeholder {
color: orange;
font-weight: 900;
font-size: large;
}
.mystyle {
color: blue;
}
For this simple example, the entire body was moved to the right and down so that the content wasn’t right up against the edge. There are better ways to handle this, as we see during Hour 5, “Understanding Microsoft Design Style Principles.” The first control we style is htmlcontrol_container. It styles both the declaratively created HTML control and the dynamically created HTML control; it overrides the margin and then sets new style properties.
The dynamically created HTML control added an id (#mynewhtmlcontrol) to the control. We style that second control by modifying some style properties on each piece. We modify the container by changing the border color to purple. We set the actual content to orange and make the welcome message a different shade of purple. The placeholder id we saw before is being styled as large, bold, and orange. Finally, the .mystyle class that the programmatic creation of the namespace control used sets the color of the text to blue. Figure 4.3 illustrates all of these style rules.

Figure 4.3. The CustomControl example project, complete with the app styling the controls.
Adding intelliSense to Namespaces, Classes, and Controls
The last piece we will talk about during this hour is intelliSense, which can definitely drive productivity. When we create our own controls (or any function), we can add comments to the code in a particular way that instructs Visual Studio to display the comments as intelliSense. The bottom of the simplecustomcontrol.js file shows an example:
function TestIntelliSense(name, number, childObject) {
/// <signature helpKeyword="TestIntelliSense">
/// <summary locid="TestIntelliSense">Summary for TestIntelliSense function
///</summary>
/// <param name="name" type="String" locid="TestIntelliSense_p:name">
/// The name of the thing.
/// </param>
/// <param name="number" type="Number" locid="TestIntelliSense_p:number">
/// The number of stuff for TestIntelliSense to do.
/// </param>
/// <param name="childObject" type="Object"
/// locid="TestIntelliSense_p:childObject">
/// The child object to passed into the function so stuff can happen.
/// </param>
/// <returns type="Number" locid="TestIntelliSense_returnValue">Returns the
/// number of items in the object that matter.</returns>
/// </signature>
return 0;
}
Simply adding the three forward slashes to comment the XML provides the intelliSense. We just need to add these comments immediately after the function is defined. Most importantly, the XML contains the summary, param, and returns elements. The summary should contain the overall summary of what the function does. Each param should have information about its parameter in the function, including the parameter name and parameter type. Finally, the returns should also have a type.
Figure 4.4 shows the resulting intelliSense in the Visual Studio IDE.
Figure 4.4. Visual Studio uses the comments as intelliSense.
Further Exploration
When discussing defining classes, no mention was made of deriving from existing defined classes. We do not write any classes that derive from another class during the course of this book. Mix-ins are another concept that we didn’t touch on. Both of these concepts are explored at http://msdn.microsoft.com/en-us/library/windows/apps/br229776.
We also ran out of pages to discuss the page life cycle. We discuss the app life cycle during Hour 15, “Handling Our App Life Cycle Events,” but the WinJS.UI pages have their own life cycle. More information resides in the following MSDN documentation: http://msdn.microsoft.com/en-us/library/windows/apps/jj126146.
The Windows SDK sample of interest for this hour is the HTML SemanticZoom for custom controls sample. We discuss Semantic Zoom during Hour 10, “Binding Data to Our Apps,” but the sample shows how custom controls are created and used.
Summary
During this hour, we discussed how to utilize the functionality in WinJS to define our own namespaces and classes. We created custom controls through JavaScript and also by with custom HTML controls.
Finally, we explored how to add comments in such a way that Visual Studio picks it up for intelliSense. Using this technique, we were able provide intelliSense for those controls.
Q&A
Q. Should I use WinJS to define my classes and namespaces, or should I use the common patterns in modern JavaScript development?
A. Having choices is good, and this question has no right answer. This book exclusively uses WinJS to define namespaces and classes. If you are utilizing existing code, modifying it to use WinJS doesn’t make sense unless everything is currently in global space.
Q. Is polluting the global space really all that bad?
A. For simple apps, it might not present a problem. A performance benefit even might arise from having items in global space. However, using the module pattern is a great way to make sure you don’t introduce hard-to-find bugs later when utilizing a third-party library.
Q. When creating a custom HTML control, can’t I just reference the CSS file in the control itself instead of requiring the consumer of the control to include it in the page?
A. Technically, yes. That will work, but it will prohibit the consuming page from being able to easily style the control. If the page includes the CSS file, it can create rules that override the style. Otherwise, there is no consistent way to override the rules that are loaded after the top-level rules have been loaded.
Workshop
Quiz
1. What is the primary job of a namespace?
2. When creating custom controls, the consumer of the control can still style the control a different way. True or false?
3. Creating custom controls is difficult and should be left to the professionals. True or false?
4. How do you cause Visual Studio to show intelliSense for JavaScript functions you create?
Answers
1. The primary job of a namespace is to prevent naming collisions. The secondary job of a namespace is to group related functionality even when the functionality resides in entirely different physical files.
2. True. As long as we assign a class to each piece of our control, any apps that consume the control can easily style the control to fit the style of the app.
3. False. Writing custom controls for WinRT is simple. Different options are available.
4. Visual Studio displays intelliSense for a function when the comments under the function definition have three slashes instead of two and conform to the appropriate XML with the elements summary, param, and returns.
Activities
1. Create a new Windows Store Blank App project and create your own namespace. Inside the namespace, create a class with a constructor, an instance members, and static members.
2. Create a new Windows Store Blank App (or use the one just created), and create a HTML custom control, complete with its own CSS and JavaScript files. Have the consuming page style the control differently than the default you created.