
Let's get that kart moving! In the previous project, we learned how to control a game using the mouse. In this section, we will control the game using the keyboard.
The controls for this game will be divided between the kart sprite and a separate control sprite. The kart sprite will be attached to this control sprite. The kart sprite will only concern itself with displaying a pretty and logical image. It tells the player where the kart is on the track and in which direction it is facing. The control sprite will manage all things "under the hood", such as movement speed and collision checks.
Separating these two functions allows us to have the imagery behave somewhat independently from the game rules and mechanics. It allows more room for animation and special effects without hindering the continuation of the game. It also allows easy replacement of the graphics altogether. One controller could "wear" different sprite costumes at any given time; for example, to represent a different character in the game.
Let's first create the control object. This is a sprite just like any other:
- Create a new sprite with the Paintbrush icon.
- Name the sprite
player1. - Draw a small red circle with the Ellipse tool. Remember to hold Shift for a perfect circle.

We'll write a script for the control sprite next:
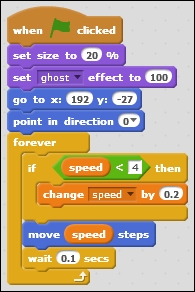
- Start with a when <green flag> clicked block.
- Attach a set size to () % block. Fill in the value
20to make the circle very small. We should barely be able to see it, as long as the computer can still check collisions with it later. - Next, add the set <ghost> effect to () % block (with the value
100) to make the control sprite completely transparent. It is still there and will interact with all of the other objects on the stage. It has just become invisible. - Place the control sprite at its starting position with a go to x: () y: () block. Aim for the first starting bracket at the right side of the track. I used the values
192and-27respectively. - Insert a point in direction () block with value
0or straight up. The control sprite is now ready to start moving. To move forward, we will use a speed variable that will make the kart move automatically. - Navigate to Make a variable and make a variable named
speed1. - Grab a forever block and place it underneath the script we already wrote.
- Inside the loop, place an if () then block. We will use this to check if we have reached top speed.
- Inside the condition slot, place a speed1 < () block (with the value
4). - If the speed is not yet
4, we will increase it using the change <speed1> by () block (with the value0.2). - Attach a move () steps block underneath the if () then block and place the
speed1variable in the vacant slot to set the kart in motion. - Add a wait () secs block (with the value
0.1) to keep the kart under control. It responds way too fast if the script is not reduced by a bit.
The following screenshot shows the final script:
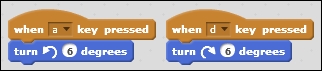
The player will be able to steer left and right with the keyboard keys:
- Get two key () pressed blocks and place them next to each other.
- Select the d key for one block.
- Underneath it, attach a turn <clockwise> () degrees block; fill in the value
6. - Select the a key for the other block.
- Attach a turn <counterclockwise> () degrees block to it; fill in the value
6.
The following screenshot shows the final script:
That's all you need to do to make the control sprite turn left and right. Now, we need to attach the kart sprite, so we can actually see where the control sprite is going:
- Drag-and-drop both key control scripts onto the kart sprite to copy them there.
- Click on the kart sprite to see its Scripts view.
- Before we go on with the scripts, we need to change a sprite property, so we press the i icon on the sprite.
- We change the rotation style to no rotation; this option is shown as a blue dot.

- This makes sure the sprite isn't responding directly to our rotation input. Instead of actually rotating the sprite, we are going to change its costume to correspond with the current angle.
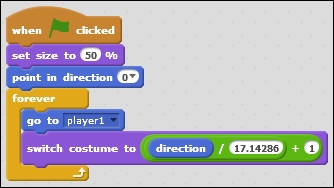
- Next to the key control scripts, start a new script with when <green flag> clicked.
- Attach the Set size to () % block and fill in
50. - Now add the point in direction () block with value
0or up. This synchronizes the kart sprite direction with the control sprite direction. - Add a forever loop.
- Make the kart sprite go to
player1using go to <player1>. As long as the loop runs, the kart sprite will follow the control sprite around.
We need a formula to calculate which costume to show. Each costume should correspond to a certain range in direction. We can convert the number for each direction into the number for each costume as follows:
- Place a switch costume to () block inside the forever loop.
- Put a () + () operator in the slot; the second empty slot of the operator block has to be filled in with
1. - The first empty slot of the operator block is filled with another operator: () / ().
- Place the direction variable from the Motion category in the left slot.
- Type the number
17.14286in the right slot. This is approximately 360 degrees divided by 21 or the range in degrees that each costume should occupy.
The following screenshot shows the final script:
We now have a controllable game character. Start the game by clicking on <green flag> and see the kart move forward. Steer the kart around the stage with the A and D keys. If you set up the scripts correctly, the kart sprite will change costumes as you change direction. Drive around the map to check whether the sprite animates properly.
Note the difference between using the ghost effect and hiding a sprite. When you use the ghost effect, a sprite is invisible but present. It will still interact with the other sprites on the stage. So, you can check collisions with an invisible ghost object.
When you hide a sprite, it is actually removed from the stage. Other objects can't collide with it anymore. This might be useful if you need an object only in a part of your program. You can show it when it's needed, and when it's not needed, you hide it to prevent it from interrupting any other processes.