
Although our kart can move freely about the stage, it isn't in any way restricted to the road. This doesn't make for much of a game. We need a way to check where the kart is driving, and if it hits the sandbox or a wall, we should see some effect on the kart.
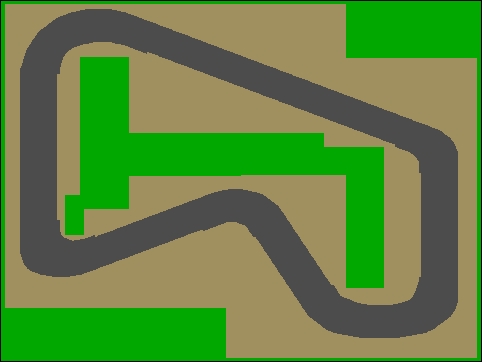
This means that we should start checking collision events. What do we check against? The background image describes the shape of the racetrack, but it's a single object filling the stage, so we can't check against the background by name. The kart drives on top of it, so it always hits the background.
We could check for color, but the background is a detailed image. This means that we would have to check for many different colors that would produce the same effect. It's hard to determine if similar-looking colors are, in fact, equal. Computers are very precise about this.
So what we will do is create a simplified map to check the collision. We will draw all of the important shapes, but leave out the details. Collision checks will be a lot less confusing this way. This collision mask will be hidden from view, but the scripts will work with it. In this way, it relates to the background in a way similar to how the control sprite relates to the kart sprite.
For this step, it will be really useful to have an external image editor. That would make it much easier to work with complicated shapes, such as the curves in the road. You can draw the collision mask in the Scratch editor too, but it will probably be less precise.
We will draw the collision mask in the Scratch Costumes editor. Let's see how to do so:
- Click on the Folder icon in the Sprites menu to import the background image as a sprite. We will use the original image as a base and paint over it.
- Let's make sure that we are working in Vector Mode. We can toggle between Vector Mode and Bitmap Mode in the lower-right corner of the Costumes tab.
- Ensure that the image fills the entire stage. It should be the same size as the Backdrop image. Use the Select tool to rescale the image, if necessary.
- Choose a green color and select the Rectangle tool.
- Draw green rectangles on top of all the grassy areas. Also include the blocked borders surrounding the grass. Be as precise as possible.
- Next, we switch over to a brown color.
- Paint over all of the sandy areas. Don't worry about being too neat. Once the entire sandy area is covered, we will push this layer to the back of the image with the Back a layer button. Hold Shift to send the layer all the way to the back with one click.
- Lastly, choose a gray color and set the Pencil size to the biggest size.
- In a fluid movement, follow the inner edge of the circuit.
- Click on the Reshape tool to make the circular reshape widgets appear on the line we just drew.
- Move the widgets around to fit the line around the curves as neatly as possible.
- You can add widgets to the line if you click on an empty place in the line.
- Draw another curved line for the outer border of the road.
- In case there are still some gaps left in the middle, we will fill those up too.
- When we're done with the drawing, we select the original background image with the Select tool and press Delete to remove it. This will make our brown background appear.
The following screenshot shows the road in the process of being shaped with the Reshape tool:
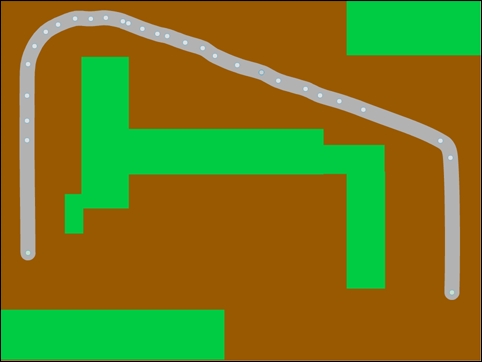
Once all of the shapes are in the proper place to be a simplified copy of the background image, our collision mask is complete.
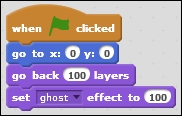
We will add a small script to the mask to properly place it and make it invisible. The scripts that we add soon will still respond to the collision mask, but the players will see the much better-looking Backdrop image:
- Go to the Scripts tab of the collision mask.
- Start the script with a when <green flag> clicked block.
- Place the mask at the center of the stage with a go to x: () y: () block; fill in the value
0for both the empty slots. If the placement looks off center after running the script, also check whether the center point of the sprite is placed at the absolute center of the image. - Add a go back () layers block; fill in the value
100. We use a high number to make sure that the collision mask is moved to the bottom. - As a final step, add the set <ghost> effect to () block with value
100to make the mask invisible.
The finished script will look like the following screenshot:
This step is simply in preparation for the next scripting step. We just drew a simplified copy of the background by hand, using whichever drawing skills and tools we had available.
It can be a bit tricky, depending on how accustomed you are with digital drawing tools. However, it is very worthwhile to spend some time on it. With each effort you will improve your drawing skills, and these skills will be very useful for all kinds of digital creations, from games to animation. You might even learn a bit about how to edit your holiday pictures.