
4. Writing in the Editor
You might be wondering when you actually learn to write using Scrivener. This is it! Scrivener offers a lot of tools and window dressing, but in the end it’s all about getting your words on the page.
The Editor is the element of Scrivener that most resembles a word processor, so it may feel familiar. As you will discover, it’s much more than just a word processor, but that’s a good starting point. To that foundation, this chapter adds an understanding of how to work in Split Screen mode, work on multiple documents at once, and how to access QuickReference panels and the Scratch Pad to keep you working efficiently.
To begin, select a document in the Binder. The document opens in the Editor window.
![]() Note
Note
There are other ways in which the Binder and Editor interact as you use other forms of navigation, split the screen, and use other modes, as is explained later in this chapter, but this should do for now.
Examining the Editor Window
The Editor consists of the following major components, as shown in Figure 4.1:
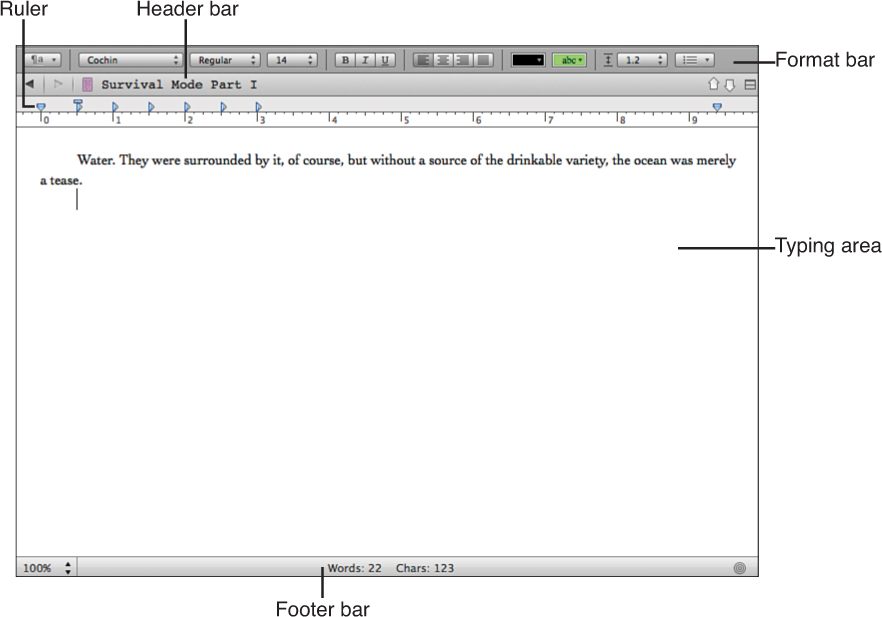
• The space where you type your document (or view the Corkboard or Outliner in other view modes). As you soon discover, you can split this area into two screens, each of which works as a fully functional Editor.
• The Format bar contains settings for the font, typeface, size, paragraph alignment, color, and spacing of your text. It also contains a Formatting Preset button that allows you to apply a preset combination of formatting options at once.
• The Header bar contains navigation buttons, the document title, and buttons to control splitting the Editor. It also includes an Item icon, which provides access to other commands.
• The Ruler controls the tab and indent settings for the Editor.
• The Footer bar provides different options depending on the type of document you want to view in the Editor. These include the Zoom menu, the document’s word and character count, and access to the word count target settings.
Understanding how each of these components works saves you considerable time as you navigate through your manuscript and format your work.
Using the Header Bar
At first glance, the Header bar, shown in Figure 4.2, is rather unassuming. It contains the title of the current document and a few buttons on either end, and that looks to be it. Those buttons can save you a lot of time navigating the Binder, however, so they’re worth a closer look.
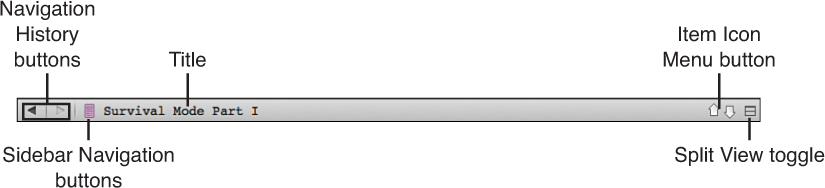
Even the title itself doubles as a tool. If you want to change the document name, select the title, type a new name, and then press Return (Enter). This change is immediately reflected in the Binder and Inspector.
Navigation History Buttons
As you work in the Editor, Scrivener saves a history of which documents you used. On the Mac, the Navigation History buttons on the left side of the Header bar let you access this history. Let’s say you were writing a scene in Chapter 5 and then went back to a scene in Chapter 1 in order to change the name of the protagonist’s dog. Rather than scrolling through the Binder to find the scene you left in Chapter 5, click the Back button. If you decide Isadora isn’t a good dog name, after all, click the Forward button to return to the scene in Chapter 1 once again.
If you want to skip around in the history, click and hold either the Back or Forward button, then select a document from the pop-up menu. Scrivener maintains the history every time you open the project, not just from the current session, so you can use the history menu to access a document you worked on days ago.
 Caution
When you use the Navigation History buttons, the Binder remains focused on the document you selected in the Binder, even if that is no longer the document open in the Editor. Always look at the title in the Header bar, as opposed to the selection in the Binder, to determine which document is active.
The Item Icon Menu
To the right of the Navigation History buttons is the Item Icon Menu button. This icon looks like the icon representing the file in the Binder. When you click it, the menu with the following options appears (shown in Figure 4.3):

Figure 4.3 The Item Icon menu aids in navigation and communication between the Editor and the Binder.
• Reveal in Binder: This option solves the problem noted in the Caution above. If you want to see where the active document is located in the Binder, select Reveal in Binder to move the Binder’s focus to that document. The keyboard shortcut for this option is Option-Cmd-R (Ctrl+Shift+8 in Windows).
• Path: When you select this option, a pop-out menu displays the hierarchy for the current document. You can use this to quickly determine which chapter a scene is located in or move to that container by selecting it.
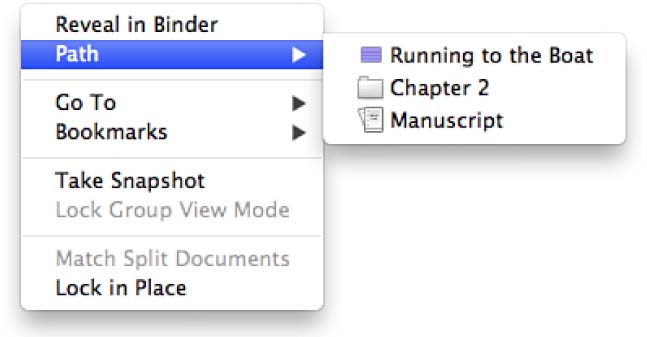
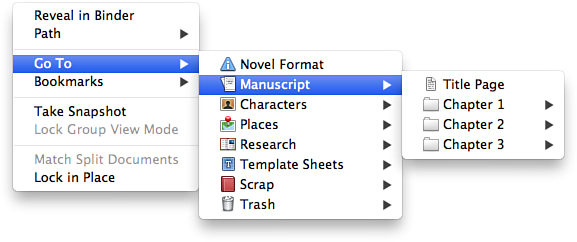
• Go To: Selecting this option opens a pop-out menu that allows you to navigate to any item in your project. As with the Navigation History buttons, the Go To option does not change the focus of the Binder, just the Editor.
![]() Note
Note
When you view multiple documents together in the same Editor pane, known as Scrivenings mode, the Go To menu only displays the items in the group being viewed. When you choose a document from the menu, the Editor focuses on that document’s position within the group. Scrivenings mode is covered in more detail later in this chapter.
• Bookmarks: In Chapter 16, “Searching Your Project,” you learn how to set bookmarks to make it easy to return to marked locations. If you created bookmarks in this document, they are accessible from this menu option.
![]() Note
Note
Scrivener for Windows does not have the Bookmarks feature, so this option does not appear in the Item Icon menu.
• Take Snapshot: This option takes a Snapshot of the active document. Snapshots are explained in Chapter 10, “Editing Your Manuscript.”
• Lock Group View Mode: On the Mac, this option appears when a container is loaded in the Editor. When selected, it locks the current view mode—Scrivenings, the Corkboard, the Outliner, or single text view—for that container. Whenever you load that container in the Editor, it will always appear in the locked view mode. A small lock icon appears over the selected view mode icon in the toolbar when the locked container is loaded.
• Match Split Documents: When you are in Split Screen mode, this feature puts the same document in both panes of the Editor. You can now look at one portion of the document while typing in another portion of the same document.
![]() Note
Note
This menu option is not available in Scrivener for Windows, although you can still view the same document in each split.
• Lock in Place: This option locks the Editor so you cannot change the active document by clicking in the Binder. The Header bar takes on a rust color (red in Windows) as a visual reminder that the Editor is locked.
![]() Note
Note
Although Lock in Place prevents you from changing the active document from the Binder, it does not prohibit using the Navigation History buttons or the Sidebar Navigation buttons to navigate to a different document. You can also still drag a document from the Binder into the Header bar to open it. If you use the Go To menu, however, it unlocks the Editor.
![]() Tip
Tip
Lock in Place is most commonly used when in Split Screen mode, as you discover in this chapter, but it can also be convenient if you’re working on a document and decide to add a new document or change the order of scenes in the Binder. With the Editor locked, you can make your changes in the Binder without losing your place in the active document.
Sidebar Navigation Buttons
The Sidebar Navigation buttons to the right of the title are used to select the next or previous document in the Binder’s hierarchy. These buttons not only change the active document in the Editor but also change the Binder’s focus.
![]() Tip
Tip
Remember, the Navigation History buttons explore the history of the documents you’ve written, whereas the Sidebar Navigation buttons rely upon and also affect the sidebar to determine the next or previous document to view. The affected sidebar is usually the Binder, but these buttons can be used to navigate search results and collections, as well. You can read about searching and collections in Chapter 16.
Splitting the Screen
The rightmost button in the Header bar is the Split View toggle. This button turns Split Screen on and off. Scrivener for Windows has two separate buttons to split the screen vertically or horizontally.
Split Screen mode lets you divide the Editor into two separate panes. Each pane becomes its own full-featured Editor, complete with Header and Footer bars, so you can work on two documents at once.
Splitting the Editor
To split the Editor, choose one of the following options:
• Click the Split View toggle in the Header bar to split the screen horizontally, divided into top and bottom panes. In Windows, click the Horizontal Split button.
![]() Tip
Tip
Scrivener for Mac splits the Editor horizontally by default the first time you split the screen using the Split View toggle. After that, it splits the screen either horizontally or vertically depending on which setting you last used.
• To split the Editor vertically, into side-by-side panes, press the Option key while clicking the Split View toggle. In Windows, click the Vertical Split button.
• Choose View, Layout, Split Horizontally (or Split Vertically) from the menu.
• Press Option-Cmd-= (Ctrl++ in Windows) to split horizontally or Cmd-” (Ctrl+Shift+’) to split vertically.
When you first split the screen, both panes contain the same document, as shown in Figure 4.4. The color of the Header bar indicates the status of the document—blue for the active pane and gray for the inactive pane.

Between the two panes is a window sizing handle. The panes are originally equal in size, but you can drag the handle to change the proportions. Each pane also has its own Footer bar, so you can adjust the zoom and see word count information for each document independently of the other.
Selecting an Item in Split Screen
When you first split the Editor, the document that was active in the Single Screen view becomes the active document in Split Screen view. Earlier in this chapter, you learned how to use the Header bar to navigate in your project. Those skills come to good use when you’re in Split Screen mode. The Go To option in the Icon Item menu provides a reliable method for opening a document in the desired Editor. You can also use the Navigation History and Sidebar Navigation buttons.
Another way to load a document into one of the Editor panes is to drag it from the Binder and drop it onto the Header bar of the desired pane.
Caution
On the Mac, if you drop the document into the Editor pane itself instead of onto the Header bar, the contents of the document are copied into the document that was previously open in that pane.
You can also click in an Editor pane and then click a document in the Binder. In most cases, the document opens in your chosen Editor pane. You can change this behavior, however, and combine several Scrivener options to create your ideal writing environment.
Binder Affects Menu
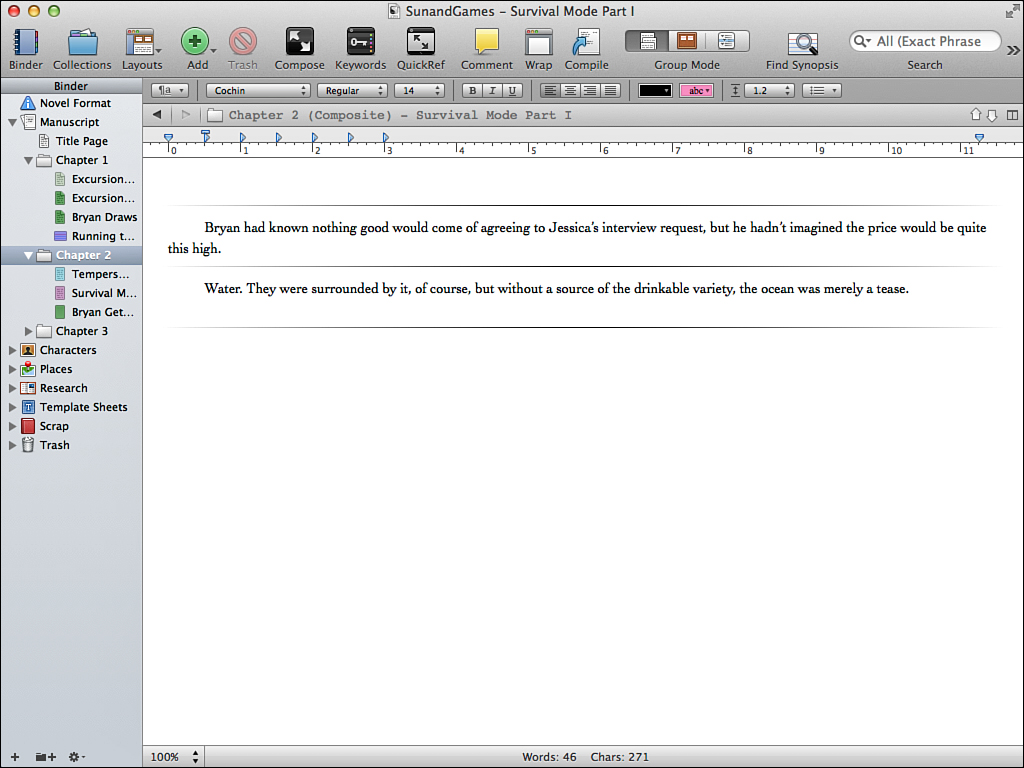
Let’s say that you like to keep a character sheet handy for the POV (point-of-view) character as you write, as shown in Figure 4.5. You use this to keep track of what you know about the character as you’re writing the scene, so you can stay in that character’s frame of reference. You then add to this character sheet as other traits become apparent.
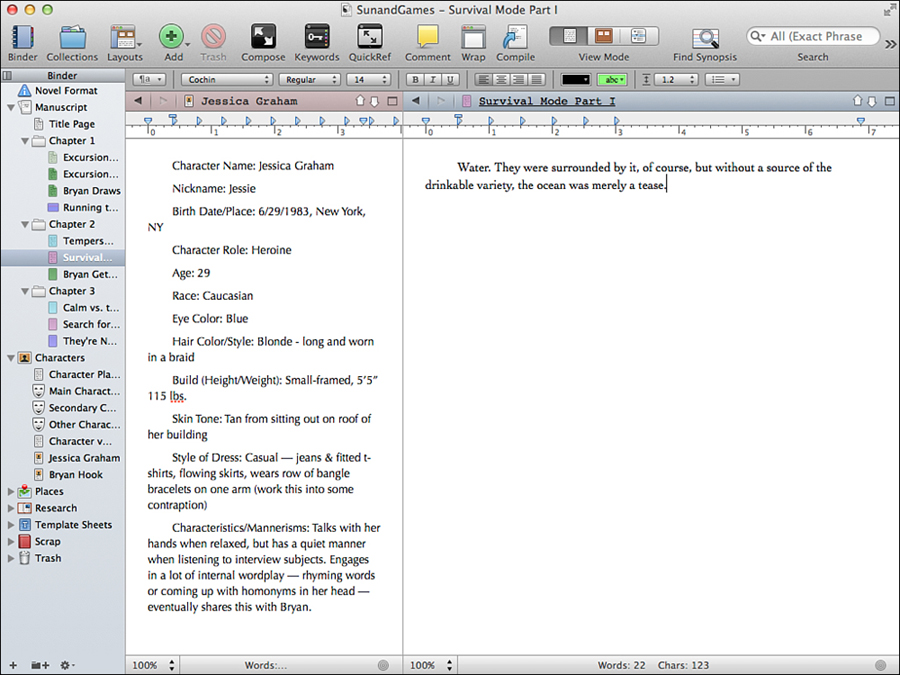
Figure 4.5 You can get creative with how you use the Split Screen mode. Here, a character sheet is in the left Editor pane while a scene is being written in the right pane.
No matter which Editor is active—whether you are writing a scene or adding new insight to the character sheet—you want that character sheet to remain in the Editor even as you move items in the Binder or select new documents to edit. To ensure this, use the Lock in Place option from the Icon Item menu, as described earlier. This prevents you from accidentally opening a document from the Binder in that pane even if it’s the active Editor.
![]() Tip
Tip
Remember that each Editor pane has its own Header bar, so if you plan to use the Lock in Place option, be sure to select it from the proper Icon Item menu.
But what happens when you click on a document in the Binder when the locked Editor is active? Scrivener has addressed this situation with the Binder Affects menu. If you select View, Binder Affects, you find the following options:
• Current Editor: The default setting; any time you select a document in the Binder, it opens in the currently active Editor pane. If the active pane is locked, the document does not open.
• Other Editor: This option always loads the selected document into the inactive Editor pane.
• Left Editor Only: When the Editor is split vertically, this option always loads the item selected in the Binder into the left Editor pane.
• Right Editor Only: When the Editor is split vertically, this option always loads the item selected in the Binder into the right Editor pane.
• Top Editor Only: When the Editor is split horizontally, this option always loads the item selected in the Binder into the top Editor pane.
• Bottom Editor Only: When the Editor is split horizontally, this option always loads the item selected in the Binder into the bottom Editor pane.
![]() Note
Note
The appearance of the Left, Right, Top, and Bottom options on the Binder Affects menu is determined by the type of split in the Editor. In Windows, the word Only does not appear on the menu options.
So to continue our example, if your character sheet is in the left Editor pane, select View, Binder Affects, Right Editor Only to ensure that clicking in the Binder only changes the document in the right Editor pane.
Scrivener for Mac users has an additional setting to control the Binder-Editor interaction in the Navigation tab of the Preferences settings. Select Binder Selection Affects Other Editor when Focused Editor Is Locked if you always want the selected document in the Binder to open in the unlocked Editor pane. If both Editors are locked, selecting a document in the Binder does nothing.
Closing a Split
If you want to return to Single Screen view, choose one of the following:
• On the Mac, click the Split View toggle button in the Header bar of the document you want to remain active in the Single Screen view. In Windows, click the No Split button.
• Choose View, Layout, No Split from the menu.
• Press Cmd-’ (Ctrl+’ in Windows).
Saving Your Layout
In Chapter 2, “Customizing Your Work Environment,” you learned how to use layouts. Once you have everything positioned the way you want in the Editor window, don’t forget to save the layout. The layout preserves the Split Screen view, the Binder Affects setting, the sizing of each pane in the Editor, and the visibility of the various Editor bars.
![]() Tip
Tip
To refresh your memory, select Window, Layouts, Manage Layouts on the Mac or View, Layout, Manage Layouts in Windows to access the Layouts window.
Formatting Text and Paragraphs
Although Split Screen view assigns a separate Header bar, Footer bar, and Ruler to each pane, there is only one Format bar, shown in Figure 4.6. If you want to change the appearance of your text or the alignment of a paragraph or list, you make those changes using the Format bar.
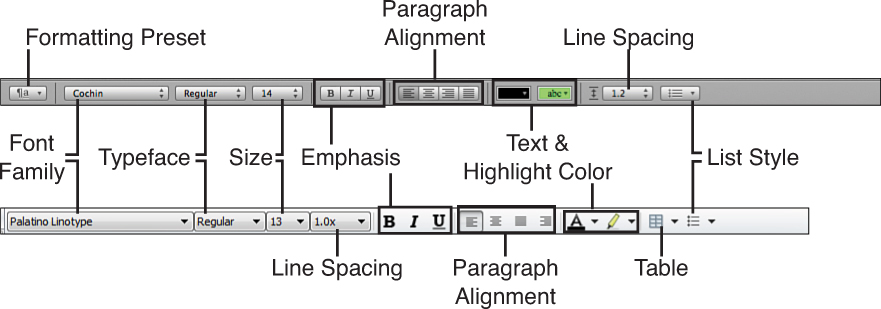
Figure 4.6 The top Format bar is from the Mac platform. The bottom Format bar is from the Windows platform.
![]() Note
Note
The Format bar is also used to apply formatting to the Notes pane in the Inspector. The font and size options can also be used to format comments and footnotes in the Inspector.
The Format bar contains the following options:
• Font family: You can choose from any font you have installed on your computer.
![]() Note
Note
Remember, the font you use while drafting your manuscript does not have to be the same font you choose when you compile. Use a font that’s comfortable for your eyes.
• Typeface: Some fonts have variations, such as Light or Condensed. If these are available for your chosen font, you can select one of these alternatives here.
• Size: Change the size of the font here.
![]() Tip
Tip
Instead of increasing the font size, consider using the Zoom feature in the Footer bar to increase the appearance of text on your screen. This gives you the option of decreasing the Zoom at other times during your writing process so you can see more words on the screen without having to adjust the font size.
• Emphasis: Choose from Bold, Italic, or Underline if you want to add emphasis to your text. Remember to check the submission guidelines for your publisher; some publishers prefer underlining while others accept italic in manuscripts. If you submit to multiple publishers, you can convert from one emphasis style to another in the Compile settings, as explained in Chapter 19, “Compiling Your Completed Work.”
Caution
On the Mac, if you cannot set bold or italics, it is likely because the font you are using does not have a bold or italic variant. You can confirm this by looking at the options in the Typeface drop-down menu. If this emphasis is necessary to your project, change to a similar font with those variants installed.
• Text color: Change the color of the text. Click the button to apply the displayed color. Click and hold the button to choose a different color from the available swatches, and then click the Show Colors option to open the Colors dialog box. Windows users, click the down arrow to the right of the Text Color button to access additional color swatches, then click the More button to access the Select Color dialog box.
• Highlight color: To highlight text so it stands out from the surrounding text, click the Highlight Color button. As with the Text Color option, you can choose from additional colors, if desired.
• Paragraph alignment: The Paragraph Alignment buttons allow you to choose left, center, right, or justified alignment. When you use the justify option, text is aligned to both the left and right margins.
• Line spacing: Line spacing adjusts the spacing between lines of text. The line spacing you choose while working on your project can be changed automatically when you compile it, so choose the spacing that is most comfortable for your eyes right now. Choose Other (More in Windows) to open additional options.
• List style: To create a bulleted (unordered) or numbered (ordered) list, click the List Style button and then select a list format. In Windows, click the down arrow to the right of the List Style button. Once you select a list style, you can type your list by pressing the Tab key to increase the indent of the bullet or number in order to demote the item or Shift-Tab to reduce the indent in order to promote the item. Press the Return (Enter) key twice to end the list and return to the previous paragraph style.
• Table: Windows users can select the down arrow to the right of the Table button and insert or adjust the properties of an existing table. You can also click the Table button itself to open the Table Properties dialog box, shown in Figure 4.7, for an existing table. Mac users can add a table from the Format, Table menu (which Windows users can also access). Mac users can also add a Table option to the toolbar (but not the Format bar) by choosing View, Customize Toolbar in the menu and then dragging the Table icon onto the toolbar.
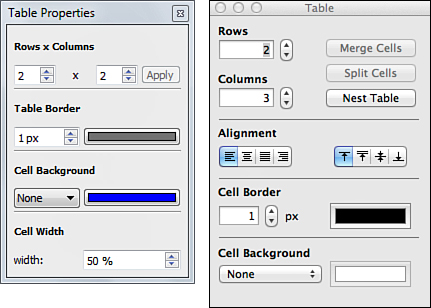
Figure 4.7 The Table Properties dialog box is accessible from the Format bar in Windows or the Format, Table menu on the Mac and Windows. The Windows dialog box is shown on the left and the Mac on the right.
![]() Note
Note
Table options are limited by the operating system. Scrivener is not intended to be a layout program, so more elaborate tables should be created in an appropriate third-party application.
To apply formatting, you can select the options you want and then start typing. You can also select a block of text and apply the formatting only to the selection. Paragraph alignment and line spacing are applied to entire paragraphs.
Preserving Formatting
If you have formatted a block of text with specific attributes that you want to preserve even when you compile your manuscript, you can designate it as exempt from any formatting changes during compilation. To do this, select the text and then choose Format, Formatting, Preserve Formatting. Preserved text is designated with a dashed outline and a light-blue background.
![]() Note
Note
This feature is not available in Windows.
To remove preserved formatting, select the text and choose Format, Formatting, Preserve Formatting to deselect that option.
Using Formatting Presets (Mac Only)
If you’re a Mac user, you can save time selecting formatting options. If you use the same combination of formatting options on a regular basis, consider saving them as a formatting preset. A preset applies several formatting options at once, such as adding a section heading in 14-point Helvetica, bold, with center alignment. Presets are also good for portions of your work that need to be set apart from standard paragraphs, such as a block quote.
Caution
Formatting presets do not work in the same manner as styles in Microsoft Word or other word processors. A formatting preset simply applies a group of formatting options at once for convenience. If you change the formatting preset, it will not update any text to which the preset was previously applied.
To apply a formatting preset:
1. Select the text to which you want to apply the preset.
2. Click the Presets button in the Format bar. This is the leftmost button on the bar.
3. Select a preset from the drop-down list, as shown in Figure 4.8.
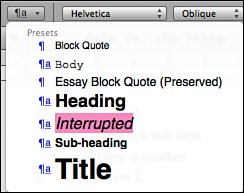
Figure 4.8 The Formatting Preset menu lists all of the presets included with Scrivener and that you create yourself.
Creating a Formatting Preset
Scrivener’s presets include a few common options, but the more complex your project, the more likely you will want to create your own presets. To create a preset:
1. Select text and format it as you require. If you already have a block of text formatted as you want, you can select that.
2. Choose Format, Formatting, New Preset from Selection. This opens the New Style dialog box, shown in Figure 4.9.
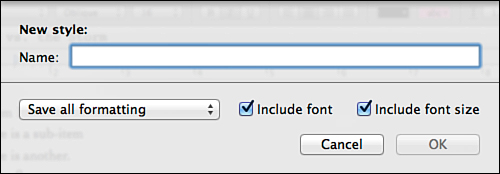
3. Enter a name for the preset.
4. Select an option from the drop-down menu at the lower left of the New Style dialog box:
• Save All Formatting: This is the default and saves both character and paragraph attributes.
• Save Character Attributes: Saves only the character attributes of the selected text.
• Save Paragraph Style: Saves only the paragraph attributes of the selected text.
5. Select the Include Font and Include Font Size check boxes if you want to preserve the font settings along with the other formatting attributes.
6. Click OK to close the New Style dialog box.
7. Click the Presets button in the Format bar to view your preset in the drop-down menu. Presets are automatically alphabetized.
![]() Tip
Tip
Presets that contain character attributes display a lowercase a before their entries. Presets containing paragraph styles display a paragraph icon (which resembles a backwards P). If a preset has both character and paragraph formatting, it displays both icons.
To make changes to a preset, adjust the formatting options on a block of text, select it, and then choose Format, Formatting, Redefine Preset from Selection from the menu. Choose the preset you want to redefine from the submenu.
Deleting a Formatting Preset
Once you create a formatting preset, it is available in all of your projects. If you no longer need a preset, choose Format, Formatting, Delete Preset from the menu, and then select the preset you want to delete from the submenu.
Caution
Deleting a preset does not change the formatting of any text to which that preset has been applied. It only prevents you from applying the same preset to additional text. If you delete a preset accidentally, you can simply re-create it.
Accessing the Ruler
Below the Format bar is the Ruler. You can choose whether or not to display the Ruler. If the Ruler is not visible, choose Format, Show Ruler or press Cmd-R (Ctrl+Shift+R in Windows). If you are in Split Screen mode, each Editor pane has its own Ruler, and you can show or hide each pane’s Ruler independently.
The Ruler, shown for both Mac and Windows in Figure 4.10, usually provides default tab stops every half-inch for the first few inches, although some templates may provide different tab stops.
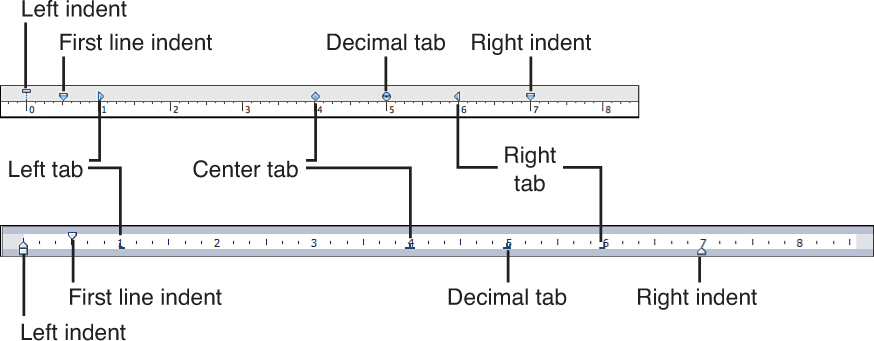
Figure 4.10 The Ruler gives you control over tabs and indents. The Mac Ruler is shown on top and the Windows ruler on bottom.
![]() Tip
Tip
You can change the default tabs and indents from the Formatting tab of the Preferences window on the Mac or the Editor pane of the Options window in Windows.
The Ruler can be completely modified. You can add or remove tab stops and adjust the types of tab stops. You can also adjust the location of tab stops and indents. If you want Ruler settings to apply to the entire document, set the tab stops and indents before you begin typing. Select paragraphs before modifying the Ruler to apply tab and indent changes to only those paragraphs without affecting the rest of the document. When you press Return (Enter) to begin a new paragraph, it takes on the Ruler settings of its predecessor.
![]() Tip
Tip
If you want to change the Ruler for the entire document after it has been typed, press Cmd-A (Ctrl+A in Windows) to Select All and then modify the Ruler.
Setting Tabs
To add a tab stop:
1. Right-click the position on the Ruler at which you want to add the tab stop.
2. Select one of the tab stop options from the pop-up menu.
To adjust the position of a tab stop, drag it to a new location on the Ruler. To remove a tab stop, drag it off the Ruler completely.
There are four types of tab stops available:
• Left: Aligns text to the left beginning at the tab stop. This is the most common tab stop.
• Center: Centers the text to the tab stop.
• Decimal: Aligns text with the decimal point at the tab stop, with text before the decimal point aligned to the right and text after the decimal point aligned to the left. Decimal tabs are most often used with columns of numbers, but they can also be used to interesting effect with poetry.
• Right: Aligns text to the right, with the right side of the text culminating at the tab stop.
Adjusting Indents
There are three types of indents in Scrivener:
• Left: Specifies how far the text is indented from the left margin. Unless you are typing a block quote or other exception to the margin, the left indent should generally be positioned at the margin itself.
• First line indent: Indicates how far the first line of a paragraph is indented from the left margin. To eliminate first line indents, move the first line indent marker to the left margin.
• Right: Determines how far the text is indented from the right margin. If you are creating a block quote or other exception to the margin, slide this marker to the desired position. In general, however, the right indent defaults to the right margin.
Using the Footer Bar
At the bottom of the Editor window, you find the Footer bar, as shown in Figure 4.11. If you are in Split Screen mode, each pane has its own Footer bar. In Document view, the Footer bar contains the following information:

Figure 4.11 The Footer bar displays your word count and controls the Zoom setting. Other options appear depending on your settings and mode—Document or Script.
• Text scale: This is the zoom control. A pop-up menu provides settings to make the text appear larger or smaller in the Editor window while preserving the actual font settings.
• Word and Character count: This shows the number of words and characters in the document. If you set a document target (as explained in Chapter 15, “Tracking Your Progress”), the word count displays as a fraction—the current number of words divided by the target. If you make a selection in Scrivener for Mac, the word and character count turn blue and reflect the counts for the selection.
![]() Tip
Tip
The word count displayed in the Footer bar includes all text displayed in the Editor, including inline annotations and comments. On the Mac, you can refine the word count by clicking the word count in the Footer bar and selecting Include Footnotes and/or Include Comments and Annotations. These options will include Inspector footnotes and Inspector comments and annotations as well as inline notations.
![]() Note
Note
If you are in Script mode, covered in Chapter 21, “Screenwriting in Scrivener,” the word and character count do not appear in the Footer bar. If you open a media or other nontext file in the Editor, the Footer bar displays the current playing time or provides other tools for working with that file type.
• Progress bar: If you set a document goal for the current document, a progress bar appears in the Footer bar to provide a visual cue of your progress. The bar fills as you reach your goal.
• Target icon: This button opens the Target for This Document dialog box, which enables you to set a document goal.
Checking Spelling
Even if you previously took first place at the National Spelling Bee, you will inevitably make typos as you work. Scrivener provides two methods for checking your spelling, either automatically as you work or manually whenever you choose.
Automatic Spell Checking
To turn on automatic spell checking for a project, choose Edit, Spelling and Grammar, Check Spelling While Typing. If you want to always check spelling automatically, choose Scrivener, Preferences from the menu, and then select the Corrections tab. From there, select the Check Spelling as You Type in New Projects check box. If you want Scrivener to also check your grammar, select the Check Grammar with Spelling in New Projects check box as well.
To enable automatic spell checking in Windows, choose Tools, Options to open the Options window, and then select the Corrections tab. From there, select the Check Spelling as You Type check box.
![]() Note
Note
Scrivener for Windows does not perform grammar checking. This is not necessarily a bad thing, however, particularly if you write fiction. Grammar checkers are rigid constructs that don’t adapt to the more conversational tone of fiction, particularly when it comes to dialogue.
With automatic spell checking enabled, Scrivener marks misspelled words with a red dotted underline. Right-click on the word to open a context menu, as shown in Figure 4.12. If Scrivener has spelling suggestions, they appear at the top of the menu. If the spelling is correct, click Learn Spelling to add the word to the dictionary. You can also Look Up or Ignore the spelling from this menu.
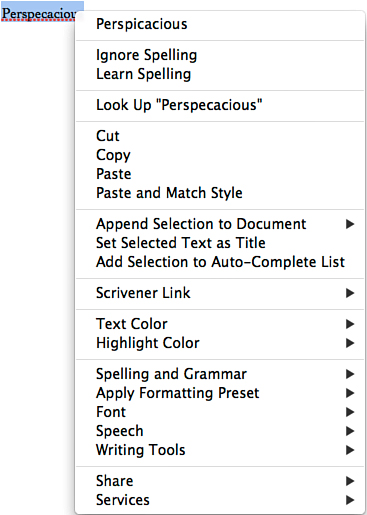
Figure 4.12 Did you misspell perspicacious? Scrivener points out the error and offers the correct spelling in the context menu.
![]() Tip
Tip
Both the Mac and Windows provide several other dictionary and search tools. On the Mac, choose Edit, Writing Tools to access the full Mac Dictionary app, perform a Spotlight search, or search Google or Wikipedia. In Windows, choose Tools, Writing Tools to look up words and other information from various research sites. In Windows, you can even access the Translator feature on the Reference.com site (http://translator.reference.com) to translate the selected word or phrase into another language.
Manually Checking Your Spelling
If you find automatic spell checking to be distracting, you can disable it in the Preferences/Options window so Scrivener no longer performs this service. In Windows, this disables automatic spell checking for all projects, but on the Mac you need to choose Edit, Spelling and Grammar, Check Spelling While Typing from the menu to turn it off on existing projects. You can still check spelling when you want.
On the Mac, choose Edit, Spelling and Grammar, Show Spelling and Grammar from the menu to open the Spelling and Grammar dialog box, shown in Figure 4.13. Scrivener moves through your document showing misspellings and allowing you to change each in turn.
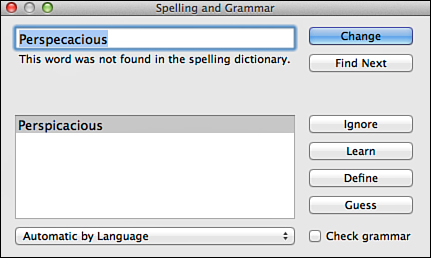
Figure 4.13 The Spelling and Grammar dialog box on Scrivener for Mac displays the misspelled word in the top pane and suggests corrections in the lower pane.
In Windows, choose Tools, Spelling from the menu to open the Spelling dialog box, shown in Figure 4.14.
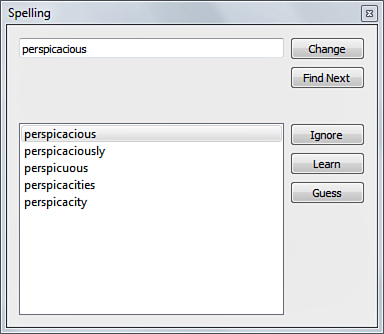
Figure 4.14 The Spelling dialog box on Scrivener for Windows tends to provide more suggested spellings than that of the Mac version.
![]() Tip
Tip
If you prefer to check spelling all at once before you compile your project, disable the automated spelling option. When you want to check the spelling, select the Draft folder in the Binder and choose View, Scrivenings to put the complete manuscript into the Editor as one long document. Then initiate the manual spell check. In Windows, the spell-check stops at the end of each document in Scrivenings. Click into the next document in the Scrivenings session in the Editor to continue spell checking.
Automating Corrections as You Type
Scrivener can automate certain common corrections as you type. Choose Scrivener, Preferences from the menu (Tools, Options in Windows) and then click the Corrections tab (see Figure 4.15). Most of the auto-corrections are selected by default. Among them are automatic capitalization of the first word in a sentence and the letter i when it’s alone in a word. Scrivener can also substitute smart quotes, em dashes, and ellipses for straight quotes, double hyphens, and triple periods, respectively.
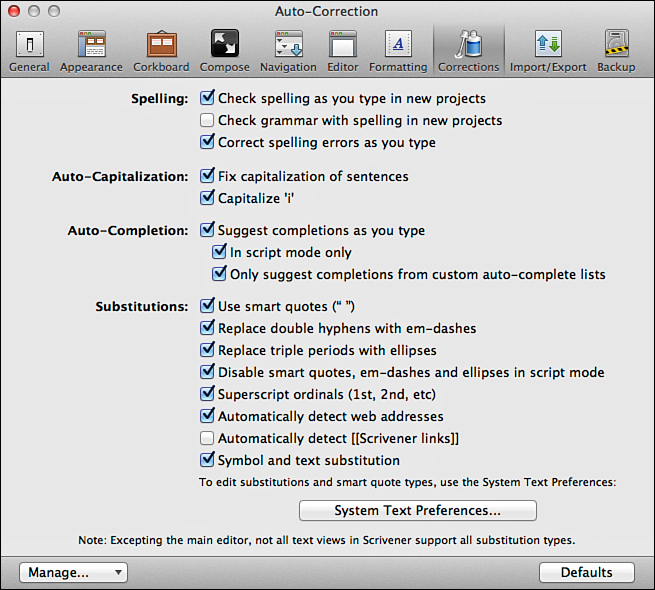
Figure 4.15 The Corrections tab in the Preferences window controls spelling and automatic substitutions.
Scrivener can also suggest word and phrase completions for you with custom phrases you add on a per-project basis. Let’s say your characters have long names or you use scientific terms in your project. Add those names and terms to the Auto-Complete List, and you no longer have to worry about typing those long words or spelling them correctly.
If you want to enter words or phrases to the Auto-Complete List as they arise, select the word or phrase in your document, then right-click and select Add Selection to Auto-Complete List. To add several words or phrases to the list at once:
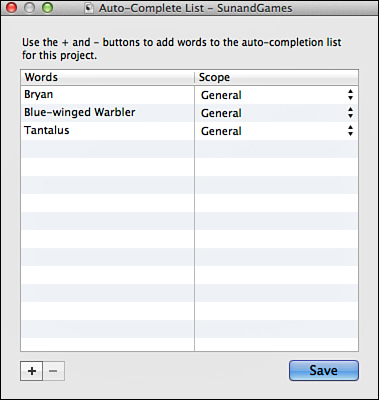
1. Select Project, Auto-Complete List from the menu. The Auto-Complete List dialog box for the current project opens, as shown in Figure 4.16.
2. Click the Add button (the plus sign).
3. Enter a word or phrase.
4. Select the Scope for the auto-completion on the Mac, as follows:
• General: This is the default and applies to all projects except screenwriting documents.
• All (Text & Scripts): If you work on a screenwriting project, this option makes the entry available in all scripting elements.
• Script: The remaining options apply to specific scriptwriting elements. Words and phrases are generally added to these scopes automatically as you work on your script. See Chapter 21 for more information about this feature.
5. Repeat steps 2–4 to add more words to the list.
6. Click Save (OK in Windows) to save your entries and close the dialog box.
![]() Tip
Tip
Although Auto-Complete Lists are project-specific, you can copy entries between projects by opening both projects simultaneously and then dragging and dropping terms from one Auto-Complete List dialog box to the other. This tip only applies to the Mac, however.
To use your list, Scrivener can automatically suggest completions as you type if you choose Suggest Completions as You Type in the Corrections tab of the Preferences/Options window. If these automatic suggestions distract you, you can use a keyboard shortcut to activate the completion menu when you want Scrivener to complete the word for you. On the Mac, use either the Esc key or Option-Esc to activate the completion menu. In Windows, press Alt+=.
Adding Images to a Document
Although fiction authors generally don’t have images in their manuscripts, nonfiction authors and academics often need to add figures and illustrations to their work. If you want to add an image to a document, choose from the following methods:
• Drag an image file from the Finder (Windows Explorer in Windows) or the desktop into the document.
• Paste an image from the clipboard.
• Drag an image from the Binder, Outliner, or Corkboard into the document.
• Choose Edit, Insert, Image from File from the menu.
When you place an image into a document, Scrivener creates a copy of the image, even if it was dragged into the document from another area in the project. This means, however, that if you modify or swap the original image, the change is not reflected in your document.
If you need to resize an inline image, double-click on it to bring up the Resize Image dialog box, shown in Figure 4.17. Use the sliders to increase or decrease the size of the image or enter an exact size in the dimensions fields. Click OK to save your settings and exit the dialog box.

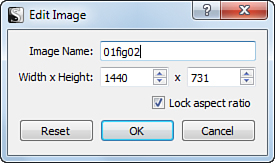
In Windows, right-click on the image and choose Edit Image from the context menu to open the Edit Image dialog box shown in Figure 4.18. Enter the new dimensions for the image and click OK to exit the dialog box.
Inserting Linked Images (Mac Only)
If you’re using Scrivener for Mac and you want the option of being able to change your image file without holding up your project, use linked inline images. Linked images use placeholders within your document so you can determine placement and size, but the actual image file remains outside your project. To create a linked image, choose the Edit, Insert, Image Linked to File command from the menu.
Caution
If you downloaded Scrivener from the Mac App Store, you may need to authorize Scrivener to access the directory where your image is stored. To do this, choose Scrivener, Authorize Directory Access from the menu.
When using linked images, Scrivener updates the placeholder with the current image. When you compile your draft, the current version of the linked image is embedded into the document.
Embedding PDF Images (Mac Only)
On the Mac, you can also embed PDF files into a document. Although you cannot embed a multipage PDF document, this option is useful for inserting graphics that have been saved in PDF format. As with other inline images, simply drag the PDF file from the Finder (Windows Explorer) or Binder into your document.
Caution
The PDF file must fit within the page margins of your document. If necessary, crop the PDF file using Preview or Adobe Acrobat Pro before embedding it into your document in Scrivener.
Viewing Scrivenings
When you write a scene, it’s generally enough to focus on just that one scene. When you write the transition from one scene or chapter to the next, however, or if you are editing your manuscript, you may want to see how all those bits and pieces in the Binder flow together. This is where Scrivenings comes in.
If you are working on one document on a single screen in the Editor, you’re in Document view. If you are working with two or more documents on a screen, you’re in Scrivenings view. To enter Scrivenings view:
1. Select a container or series of items in the Binder. Select the Draft folder (which may have been renamed to Manuscript or some other title) to see your entire manuscript in one long document.
2. Choose one of the following options:
• Click the Scrivenings icon in the Group mode of the toolbar.
• Choose View, Scrivenings.
• Press Cmd-1 (Ctrl+1 in Windows).
When you are in Scrivenings mode, as shown in Figure 4.19, the title displays the name of the container if you are viewing an entire container or the words Multiple Selection if you selected multiple separate items. As you move the insertion point on the Mac, the title is appended with the name of the current active file. On the Mac, files are divided by graphic horizontal rules. In Windows, files are divided by dashed lines.
You can edit in Scrivenings mode just as you would in single Document view. Changes are immediately reflected in the proper file. When you want to exit Scrivenings mode, select a single document in the Binder.
![]() Note
Note
If you select the Go To menu in the Icon Item menu while in Scrivenings, your options are limited to the containers and files in that view. When you make a selection, the insertion point is moved to the top of the selected file within the Scrivenings view.
Using QuickReference Panels (Mac Only)
You’re hard at work on a scene. You already have the Editor split into the Corkboard and the current scene, but you need to look up a piece of information in one of your research files or make a quick change to another scene. Open a QuickReference panel, and your problem is solved!
QuickReference panels are extra windows you can open to access additional files at once. Editable and repositionable, they are very flexible. Some writers may even prefer using QuickReference panels instead of splitting the Editor screen.
To open a QuickReference Panel (also referred to as QuickRef panels), choose one of the following options:
• Drag a file from the Binder, Corkboard, or Outliner onto the QuickReference icon on the toolbar.
• Select a file or files from the Binder, Corkboard, or Outliner and then click the QuickReference icon on the toolbar.
Caution
Selecting a file this way may change the active document in the Editor if the Editor pane is not locked in place.
• Select one or more files in the Binder, then press the spacebar to open a QuickReference panel for each file.
• Click the QuickReference icon on the toolbar to open the active document in a QuickReference panel.
• Choose View, QuickReference from the menu and then select a file from the submenu.
![]() Tip
Tip
This method bypasses the Binder, Corkboard, and Outliner, so you do not risk inadvertently changing the focus of your Editor pane.
QuickReference panels, shown in Figure 4.20, can appear as typical windows or as HUD panels (see Chapter 2 for details on changing this preference). When they are in the traditional window style, you can add a Format bar and Ruler to the display by choosing those options in the Format menu or using the appropriate keyboard shortcuts (Cmd-Shift-R and Cmd-R, respectively). In the HUD display, you can choose to add the Ruler, but not the Format bar. All the formatting options available on the Format bar are still available via the Format menu or keyboard shortcuts.
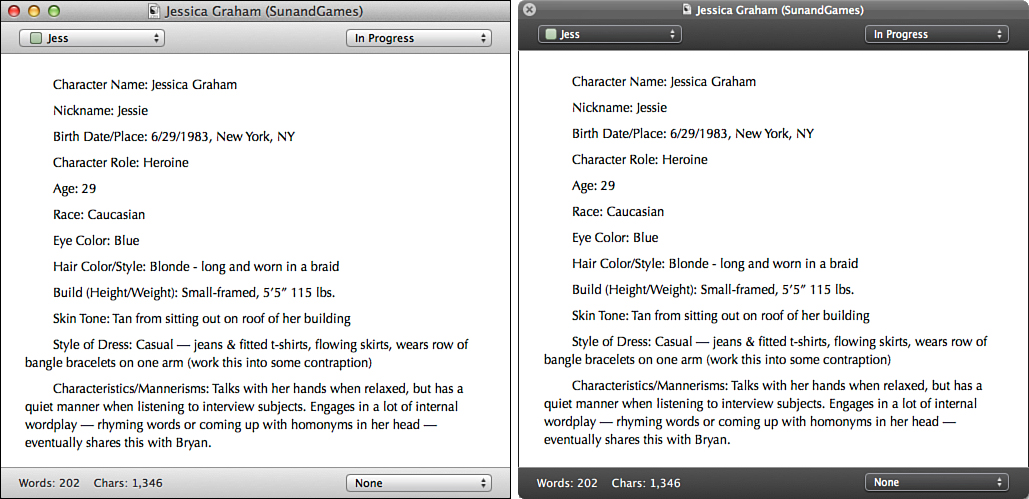
Figure 4.20 QuickReference panels are editable, repositionable, and provide access to a file’s meta-data. The panel on the left is the standard window, whereas the one on the right uses the HUD display setting.
The upper-left corner of the panel displays the label for the file. The upper-right corner displays the status for the file. You can change these settings here, and those changes are reflected in the Inspector for the file. The Footer bar of the panel displays the word and character count. The drop-down menu in the lower right provides access to additional meta-data, such as the Synopsis and Document Notes.
By default, QuickReference panels automatically hide behind the main Scrivener window when you return to the Editor. If you prefer to have them float on the screen, so that they can remain visible even if you return to the Editor, choose Window, Float QuickReference Panels or press Control-Cmd-Q.
Taking Notes in the Scratch Pad
Whereas QuickReference panels are linked to your project, the Scratch Pad is an editing area that is not project-specific. You can use it to jot down ideas about other projects, accumulate research from web pages and other applications, and later assign those notes to a specific project. Or use the Scratch Pad to write out your To Do list or notes about non-writing-related tasks, just to get them out of your head so you can continue working.
![]() Tip
Tip
On the Mac, an application can remain running even if no documents are open. Scrivener takes advantage of this by making the Scratch Pad available whenever the Scrivener application is open, even if you don’t have a project visible on the screen. To open the Scratch Pad, right-click the Scrivener icon in the Dock and choose Scratch Pad. You can also use the keyboard shortcut, Cmd-Shift-Return.
To open the Scratch Pad, choose Window, Show Scratch Pad or press Shift-Cmd-Return (Tools, Scratch Pad or Ctrl+Shift+0 in Windows). The Scratch Pad window is shown in Figure 4.21.
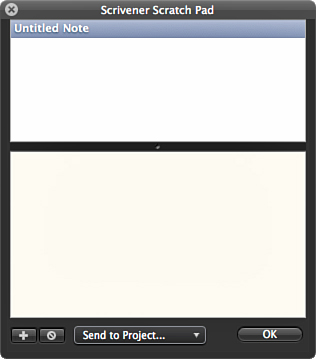
Figure 4.21 The Scratch Pad is not project-specific, so you can take notes on a wide range of topics and link them to a project later.
In Windows, the Scratch Pad (shown in Figure 4.22) contains options to change the split of the window from horizontal to vertical. You can also capture a screenshot.
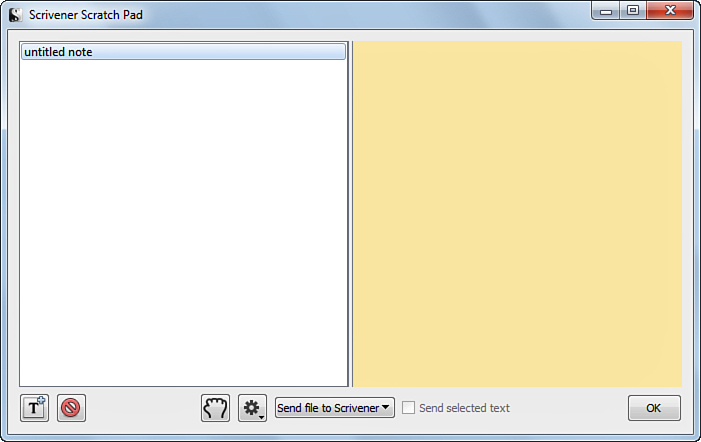
Figure 4.22 The Scratch Pad in Windows has some additional features, including the ability to change the split of the window to a vertical layout.
Adding and Deleting Notes
When you first open the Scratch Pad, your note is called Untitled Note. Double-click this name in the top pane of the window to change it. Enter the text of your note in the bottom pane. If you want to add another note, click the plus sign (+) at the bottom left of the window. The new note is added to the list in the top pane.
If you want to delete a note, select it and press the Delete key (Shift+Delete in Windows) or click the Delete button at the bottom of the Scratch Pad window.
Sending a Note to a Project
To send a note to a project:
1. Open the project (or projects) to which you want to assign a note.
2. Select the note from the list in the top pane of the Scratch Pad.
3. Click the Send to Project drop-down list.
4. Choose the appropriate project from your open projects.
5. Choose one of the following options:
• If you want to add the note to an existing file, choose Append Text To and then select the file to which you want to append the note’s content.
• If you want to create a new document for the content of the note, choose Import as Subdocument Of and then select the container to which you want to add the new file.
To close the Scratch Pad, click the Close box in the upper-left corner (the upper-right corner in Windows) or click the OK button at the bottom of the window.