
5. Writing in Full Screen
Scrivener has so many features and options that it’s easy to get caught up tweaking preference settings, moving index cards around on the Corkboard, and adding meta-data in the Inspector. If you ever sought an application that secretly supported your procrastination habit under the guise of getting work done, Scrivener is it. At some point, however, you must hone in on your manuscript.
Composition mode, called Full Screen mode in Scrivener for Windows, was made to eliminate onscreen distractions and provide a very simple interface—an editing screen and a cursor. So, get typing!
Using Composition Mode
Launch Composition mode by choosing View, Enter Composition Mode from the menu or press Option-Cmd-F. In Windows, choose View, Enter Full Screen or press the F11 key. On both Mac and Windows, you can also use the Enter Full Screen/Composition Mode button on the toolbar.
Composition mode opens whichever document or Scrivenings is in the active Editor. If you want to work on a single scene, select that scene in the Binder, Corkboard, or Outliner view before you launch Composition mode. If you want to work on a group of documents, select a container or a group of selected documents in the Binder and then click the Scrivenings button in the Group View Mode grouping on the toolbar (or select View, Scrivenings from the menu) before you launch Composition mode.
 Caution
If you select a container but enter Composition mode without first entering Scrivenings mode, only the text of the container itself appears.
![]() Tip
Tip
If you select multiple documents on the Mac but enter Composition mode without first entering Scrivenings mode, only one document is visible at a time. However, all of the selected documents are loaded into the Composition mode navigation history, so you can switch between them by pressing Cmd-[ and Cmd-] (the bracket keys).
Composition mode, shown in Figure 5.1, consists of a single Editor and a Control Strip. Notice the absence of menus, toolbars, sidebars, Rulers, or Format bars. After appearing on the screen when you initially enter the mode, even the Control Strip disappears, leaving you with just a large screen on which to type.
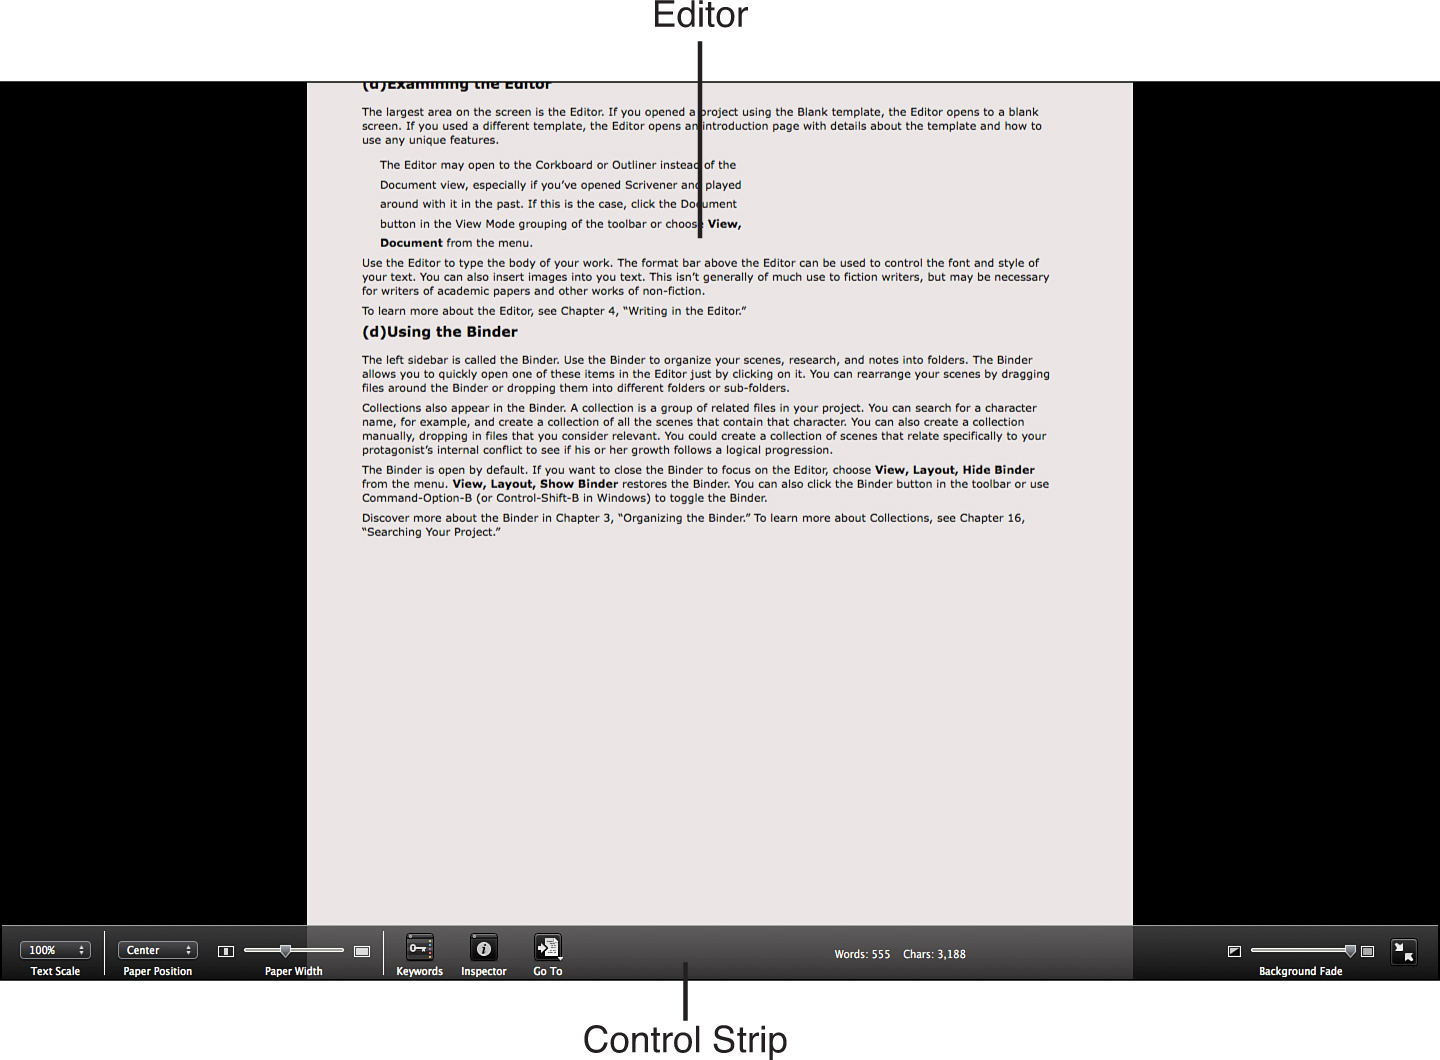
As you can see in Figure 5.1, the default background is solid black, with gray paper and black text. Although this certainly blocks everything out, it’s a rather bland working environment. Fortunately, you can customize the appearance of all the elements in Composition mode from the Compose tab in the Preferences window (the Appearance tab in the Options window in Windows). The Background can be customized with either a solid color or a texture. The Paper can be customized with a solid color in Windows or with a solid color or texture on the Mac. You can also change the text color to make it readable against a custom paper setting or in order to ease eyestrain.
![]() Tip
Tip
On the Mac, you can set a backdrop image on a per-project basis. Choose View, Composition Backdrop from the menu. Backdrop images do not tile; rather, they expand to fill the screen. When a backdrop is set, the Background Fade slider in the Composition mode Control Strip changes to a Paper Fade slider.
Caution
Changing the Text Color setting does not affect the font color of your text. When you view the document in the standard Editor window, the text returns to its actual color.
![]() Note
Note
If you need a refresher on how to customize colors or modify the other Composition mode preferences, see Chapter 2, “Customizing Your Work Environment.”
Composition mode uses typewriter scrolling by default. This means that the line of text you type remains vertically centered on the paper. Once your text is long enough to reach the middle of the screen, the preceding text continues to scroll up the screen, but your cursor remains centered. You can disable typewriter scrolling by pressing Control-Cmd-T (Windows Key+Ctrl+T in Windows) while in Composition mode.
Making Adjustments in the Control Strip
The Control Strip at the bottom of the screen allows you to make adjustments to the view and provides access to panels you may need while you work. The Control Strip automatically hides when not in use. To make it appear, move your mouse to the bottom of the screen and wait a moment.
![]() Tip
Tip
If you want to keep the Control Strip open, adjust your Paper Height, explained below, so the Control Strip doesn’t obscure the paper, and then leave your mouse pointer positioned at the bottom of the screen.
On the Mac, you can also access the menu bar while in Composition mode. Move your mouse pointer to the top of the screen, and the menu bar appears after a moment. You can access formatting tools and even turn on the Ruler without leaving Composition mode. Once you move the mouse pointer away from the top of the screen, the menu bar disappears.
Although Windows users can’t access the menu bar in Composition mode, many keyboard shortcuts still work for features that could logically be used within this mode, such as formatting, the Go To menu, and toggling the Ruler at the top of the screen.
The Control Strip, shown in Figure 5.2, provides the following options:

• Text Scale: Adjusts the size of the text on the screen. As with the Text Scale setting in the standard Editor, this does not change the font size itself. Only its appearance is affected.
• Paper Position: Positions the paper on the left, right, or center of the screen. If you plan to access QuickReference panels or the Inspector panel, you may want to move the paper to the right or left so you can leave the panels open without obscuring the paper.
• Paper Width: Adjusts the width of the paper. The paper can be expanded as wide as the entire screen or minimized to a very narrow column.
• Paper Height: Adjusts the height of the paper. Hold down the Option key (Alt key in Windows) to change the Paper Width slider into the Paper Height slider. By default, the paper is set to the full height of the screen, but you can make it much smaller, allowing the background to show around all four sides.
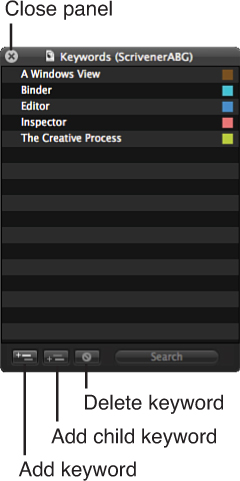
• Keywords: Opens the Keywords panel (see Figure 5.3) to enable you to add keywords to the document. You can also add and delete keywords for the project.
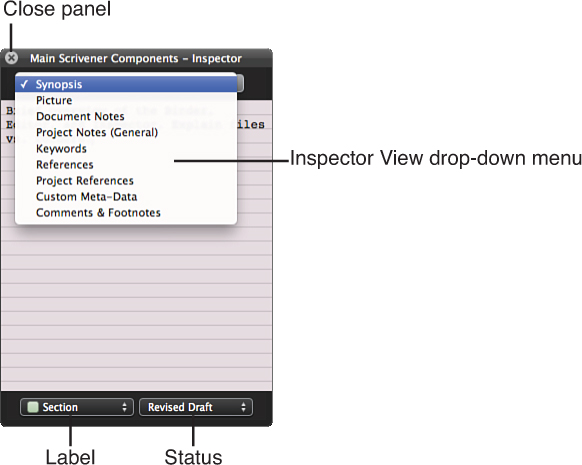
• Inspector: Displays the Inspector panel, shown in Figure 5.4. Click the drop-down menu to change the view from the Synopsis to Document Notes or one of the other Inspector screens. To view (or change) the label and status of the document, go to the bottom of the panel.
• Go To: Opens a pop-up menu to select a new document without leaving Composition mode.
• Word and Character Count: Displays the word and character count for the document. If you make a selection within the document on the Mac, the selection count turns blue and provides the word and character count for the highlighted text. In Windows, right-click to open the context menu; the selection count is visible at the bottom of the menu.
• Background Fade: When you use a background color, this slider controls how the background fades into the desktop behind it. At the lowest setting, the background becomes transparent so you can see your desktop and any open application windows. At the highest setting, the background color is completely opaque.
• Paper Fade: If you are using a background texture (image) instead of a solid color, the Background Fade slider is replaced with a Paper Fade slider to control the visibility of the background through the paper.
• Exit Composition (Full Screen) Mode: Returns to the standard Editor. You can also press the Esc (Escape) key or Option-Cmd-F (F11 in Windows).
![]() Tip
Tip
On the Mac, click the icons at either end of a slider to jump directly to the extreme end of the slider.
In Figure 5.5, notice just how much you can customize the Composition mode using a combination of the Compose tab in the Preferences window and the Control Strip in Composition mode. I’ve added a tiled image to the background and changed the paper color. In the Control Strip, I narrowed the paper height and width and increased the text scale. I can write for hours in this environment; and if ever I don’t like it, I can change it.
![]() Tip
Tip
On the Mac, after you have customized the settings on the Control Strip to your liking, you can set them as the default for new projects. Go to the Compose tab in the Preferences window and click the Use Current Composition Settings for New Projects button.
![]() Tip
Tip
If you are of an artistic bent and have Photoshop or some other graphics application, you can create your own background image, such as a collage of photos of how you envision your characters and setting. On the Mac, set this image using View, Composition Backdrop to avoid tiling. Scrivener automatically scales the backdrop image to fit the screen. In Windows, make the image dimensions the same as your screen resolution to avoid tiling.
Consider your paper height and width settings when creating your image so the elements of the collage flow well around your paper.
Using Composition Mode with Multiple Displays
If you are a Mac user and have dual monitors hooked up to your computer, you can configure Scrivener to use your secondary display for Composition mode while leaving other apps available in your primary display. In the Compose tab in the Preferences window, select Use Secondary Screen If Available. In addition, deselect Blank Out Other Screens.
If you want the standard Scrivener window to remain open while you’re in Composition mode, deselect Hide Main Window in Composition Mode. You can then use the Binder to open items in Composition mode by pressing the Option key while selecting items. To form a Scrivenings group in Composition mode, press Option-Cmd while selecting noncontiguous items or Option-Shift while selecting contiguous items in the Binder.
Using the Mac’s Full Screen Mode
In addition to Composition mode, Mac users also have a Full Screen mode. Full Screen mode hides the Dock and menu bar and expands the application window to fill the entire display.
![]() Note
Note
Full Screen mode is only available on Macs running OS X 10.7 (Lion) and higher. See Chapter 2, “Customizing Your Work Environment,” for details on setting Full Screen preferences in the Appearance tab of the Preferences window.
To enter Full Screen mode, choose one of the following:
• Click the double-sided arrow button in the upper-right corner of the Scrivener window.
• Choose View, Enter Full Screen from the menu.
• Toggle between Full Screen mode and the standard application window by pressing Control-Cmd-F.
![]() Note
Note
If you use multiple displays, Full Screen mode blacks out all your other displays. This is not a Scrivener problem; it’s inherent in the operating system.
Caution
Yes, the name of this feature is confusing! Scrivener’s Composition mode was originally called Full Screen mode, just as it is in Scrivener for Windows. When Apple came out with Mac OS X Lion, it introduced its own Full Screen mode for all applications. Scrivener changed the name of its own feature on the Mac, but Windows still uses the original naming convention.