
12. Putting Keywords and Meta-Data to Work
When you undertake a writing project, the words that will compose the finished work are of utmost importance. The journey from beginning to end can be made easier, however, by the tools you use behind the scenes. Meta-data is arguably the most powerful of these tools because it can be used in so many ways.
Meta-data is all of the information about your file. In Chapter 11, “Digging into the Inspector,” you learned how to work with the title, synopsis, document and project notes, and reference links in the Inspector. These are all forms of meta-data. This chapter takes meta-data a step further into the various types and methods of tagging your files with labels, status, keywords, and additional fields so they can be searched or categorized.
For those of you with a visual bent, this chapter also explains how to assign colors to each of these meta-data types and apply them to the Binder, Corkboard, and Outliner so you can take in all of this information at a glance.
Setting Status and Labels
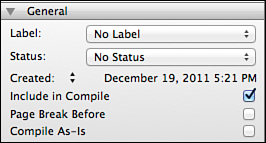
The General pane in the Inspector has two fields that were not covered in the previous chapter: the Label and Status. These fields are important for the following reasons:
• Labels have an associated color that can be applied to items in the Binder, Corkboard, and Outliner. The status can be applied as a watermark across index cards in the Corkboard.
• Label and Status values can be set from multiple interface elements.
• The list of values for both the Label and Status fields can be completely customized.
• The titles of the Label and Status fields can themselves be customized, and the terms Label and Status will be replaced throughout the interface to reflect your field names.
• You can search the project and make collections based on Label and Status values.
As you can see, the Label and Status fields are extremely flexible and accessible.
To assign a label or status to an item, choose from the following options:
• In the General pane of the Inspector, click in the Label or Status field and select a value from the drop-down menu.
• In the Outliner, be sure the Label and/or Status columns are visible (see Chapter 7, “Plotting in the Outliner”), and click the drop-down menu in that column for the item to which you want to assign a value.
• From the context menu in the Binder, Outliner, or Corkboard, right-click on the item and then choose Label or Status and select a value from the submenu. This option allows you to select multiple items using Shift-click or Cmd-click (Ctrl+click in Windows) and assign a label or status to all of them at once.
• In the QuickReference panel on the Mac, click the drop-down menus at the top of the panel and select a value.
• In the floating Inspector panel in Composition mode on the Mac, click the drop-down menus at the bottom of the panel and select a value. In the floating Inspector panel in Full Screen mode in Windows, click the Label and Status drop-down menus in the General pane.
Changing the Label and Status Titles
The Label and Status fields consist of two customizable parts: the field title and the values that can be assigned to the field. You can rename the field titles to suit your needs. When deciding how to use these fields, keep in mind that the Label field can apply color to items in the Binder, Corkboard, and Outliner, making it the most visually predominant option. The Status field appears as a stamp across index cards in the Corkboard and in a column of the Outliner, so it is powerful, but not as immediately eye-catching.
To change either the Label or Status field titles:
1. Open the Inspector if it is not already visible.
2. In the General pane, click either the Label or Status field to open the drop-down menu.
3. Select Edit to open the Meta-Data Settings dialog box (Figure 12.1).
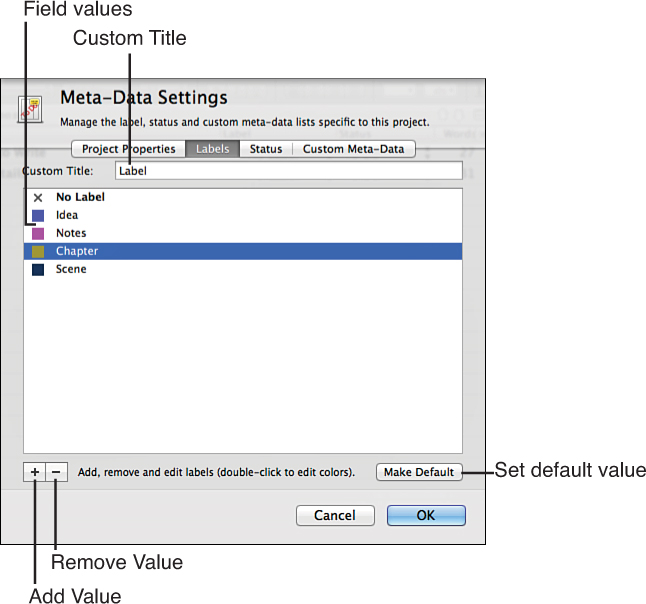
Figure 12.1 Change the Label and Status field titles and values in the Meta-Data Settings dialog box.
4. In the Custom Title field, enter a name for the field title.
5. If you want to change the field title for the other field, click the tab for Label or Status at the top of the Meta-Data Settings dialog box and repeat step 4. Otherwise, continue to step 6.
6. Click OK to close the window.
![]() Tip
Tip
You can also open the Meta-Data Settings dialog box by choosing Project, Meta-Data Settings from the menu or pressing Option-Cmd-, on the Mac or Ctrl+Shift+M in Windows.
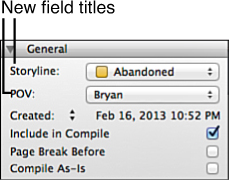
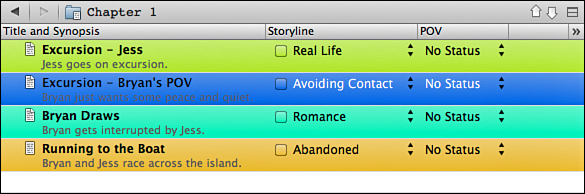
In Figure 12.2, you can see that the titles for the Label and Status fields have been changed. These title changes are universal throughout the Scrivener interface. The headings in the Outliner, the context menus, and the main Scrivener menus all reflect the new titles. If you open the View menu, for example, the Use Label Color In command has been updated with the new title for the former Label field (for example, Use Storyline Color In).
![]() Note
Note
For consistency, I will continue to refer to these fields as Label and Status. Remember that you may have changed them in your own project. Also note that the Meta-Data Settings dialog box continues to refer to Labels and Status in the tabs at the top of the dialog box.
Removing Status and Label Values
Once you have determined how you want to use the Label and Status fields, you can populate them with values that reflect their purpose. If you have decided to use the Label field to track storylines, for example, you’ll want to delete the default values and create a unique value for each subplot in your manuscript.
To delete the current values:
1. In the Inspector, click to open the Label or Status drop-down menu, as appropriate, and select Edit.
2. In the Meta-Data Settings dialog box, select the value you want to delete. On the Mac, Cmd-click to select multiple values at once. In Windows, you must select values one at a time.
3. Click the Remove (−) button at the lower left of the window.
4. Repeat step 3 as needed. You can switch from the Labels to the Status tab, or vice versa, to remove all of the unnecessary values from both fields.
5. Click OK to close the Meta-Data Settings dialog box.
![]() Note
Note
If you delete a value previously assigned to an item, the label or status for that item changes to the default value. You cannot delete the No Label and No Status values, although you can rename them.
You can remove values at any time. If you decide to eliminate a subplot when you are tracking storylines or realize that you are never going to participate in Wordless Wednesday on your blog, remove the unneeded values from your project.
Adding Status and Label Values
If you delete the default Label and Status values, you will want to add new ones. You can also add new values as you work. If you are tracking storylines and add a new subplot to your manuscript where the hero’s past catches up with him, for example, you will want to add a new value called “Hero’s Past.”
When you add values to the Status and Label fields, they appear in the drop-down lists for that field throughout the interface. To add a value:
1. Open the Meta-Data Settings dialog box using one of the methods described earlier in this chapter. If necessary, click the appropriate tab for either Labels or Status.
2. Click the Add (+) button at the lower left of the dialog box.
3. Enter the name of the new value, as shown in Figure 12.3.
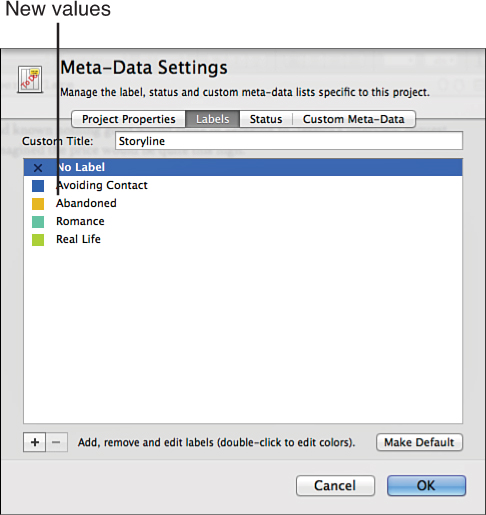
4. Repeat steps 2 and 3 to add more values. You can also use the Labels and Status tabs at the top of the dialog box to modify values for the other field.
5. Click OK to close the dialog box.
Writing projects tend to evolve. If you are keeping a blog, you may decide Wordless Wednesdays will now be called Witless Wednesday. If you’re writing a novel, perhaps you decide your protagonist hangs out at a pool hall instead of a coffeehouse. To modify existing values:
1. Open the Meta-Data Settings dialog box. If necessary, click the appropriate tab for either Labels or Status.
2. Double-click the value you want to modify. In the Label field, be sure to double-click the name of the value and not the color swatch.
3. Enter a new value.
4. Click OK.
![]() Tip
Tip
To rearrange the order of values, click and drag them to the desired location. The order in which values appear in the Meta-Data Settings dialog box is the order in which they appear on any of the drop-down lists for those fields (in the General pane of the Inspector, context menus, the Outliner, QuickReference panels, and the floating Inspector pane in Composition/Full Screen mode).
Setting a Default Status or Label
Every item is automatically assigned a default status or label. The default value for the Label field is initially No Label. The default value for the Status value is, you guessed it, No Status. Once you have populated the values for each field, however, you may want to change the default to the value you intend to use most often. For example, if you are writing a romance novel, the romance subplot is going to dominate your story. If you are writing a foodie blog, most of your posts are going to be about food, with only occasional forays into other events in your area or your personal life.
To set a new default value, open the Meta-Data Settings dialog box (use the drop-down menu for either the Label or Status field in the Inspector), select the value you want to choose as the default, and click the Make Default button at the lower right of the dialog box. The default value always appears in bold in the Meta-Data Settings dialog box.
![]() Note
Note
Existing items are not automatically updated when the default value is changed. Items with the No Status or No Label values remain designated as such until you manually change their values.
![]() Tip
Tip
There are two ways of thinking about the default values for the Status and Label fields. If you leave the defaults at No Status and No Label, you can see at a glance if you neglected to assign those fields to an item, particularly if you are in the Outliner. If you assign the most common value as the default, however, you will not have to manually set these fields for every file, as most of them correctly remain at the default values.
Associating Color with Labels
Every value in the Label field is automatically associated with a color. To change the color assigned to a value:
1. Click the Label drop-down menu in the General pane of the Inspector and select Edit.
2. In the Meta-Data Settings dialog box, double-click the color swatch to the left of the value you want to change. On the Mac, this opens the Colors dialog box, shown in Figure 12.4. In Windows, the Select Color dialog box opens (Figure 12.5).
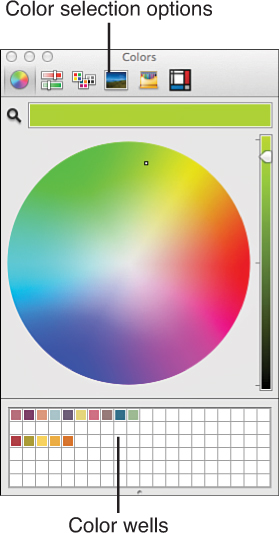
Figure 12.4 The Colors dialog box on the Mac provides multiple color selection options. Use the color wells to store favorite colors or create your own palettes.
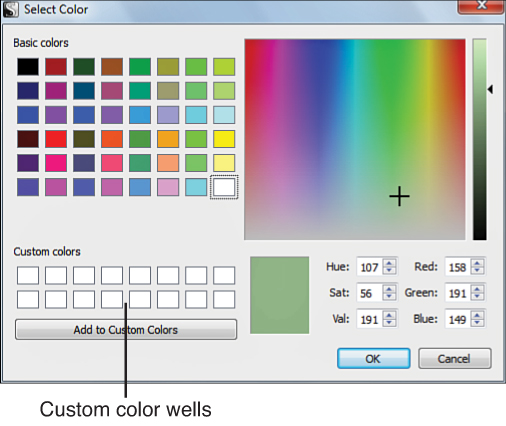
Figure 12.5 In Windows, use the custom color wells to store your favorite colors for use in other Scrivener appearance options.
3. Choose from the following, depending on your platform:
• On the Mac, choose a color selection option, such as the color wheel shown in Figure 12.4 or the Color Palettes tool described in Chapter 10, “Editing Your Manuscript,” and choose a color. You can also select a color from the color wells. Click the Close button in the upper-left corner to close the Colors dialog box.
• In Windows, click on one of the Basic Colors, choose from the spectrum and the color slider, select a Custom Color that has already been added to the dialog box, or enter the RGB values for a specific color. Click the Add to Custom Colors button to add a color to one of the empty color wells if you want to keep the color readily available to apply to other appearance options in the future. Click OK to exit the Select Color dialog box.
4. Repeat steps 2 and 3 to change the colors for other Label values.
5. Click OK to close the Meta-Data Settings dialog box.
Applying Label Color to Interface Elements
The color that is associated with each label can be applied to items in the Binder, Corkboard, and Outliner. This provides a visual cue to the item’s label, which in turn can help you analyze your project. If you use the Label field to track subplots, you can tell if one plot has been dominating the manuscript by the preponderance of that color in the Binder, Corkboard, or Outliner. Are you using Scrivener to draft your blog posts? You can tell at a glance if you’ve been avoiding Wordless Wednesday when the hot-pink color you assigned to that value is nowhere to be seen in this month’s posts.
To apply the label color, choose View, Use Label Color In from the menu, and then select where you want to use the color from the submenu. You can choose any or all of the four available options, as follows:
 Caution
If you changed the title of the Label field, this menu option reads Use [Title] Color In.
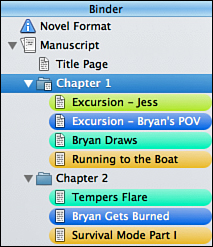
• Binder: Highlights the item name in the Binder, as shown in Figure 12.6.
• Icons: Adds the color to the item icon in the Binder (shown in Figure 12.7), the Corkboard, the Outliner, and the Header bar in the Editor.
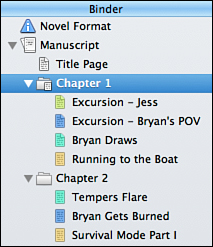
Figure 12.7 The label color has been applied to icons. Here, you can see how the icons appear in the Binder with this option selected.
• Index Cards: Adds the color to the background of index cards in the Corkboard, as shown in Figure 12.8, and the Inspector. If you opt to show pins on your index cards (see Chapter 6, “Storyboarding with the Corkboard”), the pin or chip also reflects the label color.
• Outliner Rows: Adds the color to the background of each row in the Outliner, as shown in Figure 12.9.
![]() Note
Note
Personally, I apply the label color to icons and the Corkboard. I find the bars of color to be distracting in the Binder, and seeing the color in the icon and in the Label column of the Outliner is plenty for me in that view. Your mileage may vary, of course!
Applying a Status Stamp to Index Cards
The Status field is not associated with a color, but it can be applied to items in the Corkboard as a watermark across the card. To add the Status field to your index cards, choose View, Corkboard Options, Show Stamps from the menu. You can also press Control-Cmd-S on the Mac or F10 in Windows.
Adjust the opacity of the status stamp in the Corkboard tab of the preferences/Options window (Scrivener, Preferences on the Mac or Tools, Options in Windows). Use the Status Stamp Opacity slider to make the status stamp fade into or stand out against the index card background. Change the color of the stamp in the Customizable Colors section (Colors in Windows) of the Appearance tab of the Preferences/Options window. Choose Index Cards and then Index Card Status Stamps (Index Card Status Stamp in Windows).
Using Glyphs as a Status Stamp on the Mac
If you don’t like the idea of a word appearing across the index cards, consider using symbols instead.
Caution
If you use glyphs to indicate status, don’t forget what each symbol means to you. If you are using the Status field to indicate POV, for example, and only have one male and one female POV character in your novel, it’s fine to use male and female symbols in place of the words Male and Female. If you have several POV characters, however, this gets more complicated. The glyph serves as the only character in the Status field value, so there is no key to what the symbols mean to you unless you create one—which you may want to do in a document in your Research or other non-Draft folder.
To add a symbol as a value in the Status field on the Mac:
1. Choose Edit, Special Characters from the menu.
2. In the Characters dialog box, shown in Figure 12.10, locate a symbol.
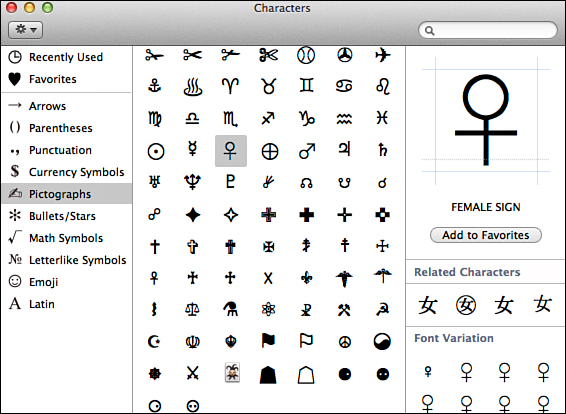
Figure 12.10 The Characters dialog box in Mac OS X 10.8 Mountain Lion displays symbols to use as glyphs.
![]() Note
Note
The Characters dialog box is a Mac tool rather than a Scrivener-specific tool. Thus, the interface might be slightly different depending on the version of OS X you are using.
3. Click the Status drop-down menu and select Edit to open the Meta-Data Settings dialog box.
4. Click the Add (+) button.
5. Double-click or drag and drop the symbol from the Characters dialog box into the empty Status field value.
6. Press Return.
7. Click the Close button on the Characters dialog box.
8. Click the OK button in the Meta-Data Settings dialog box to exit.
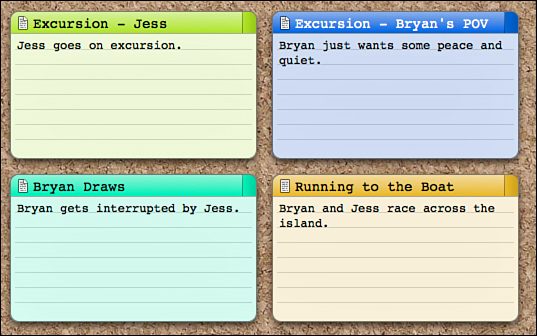
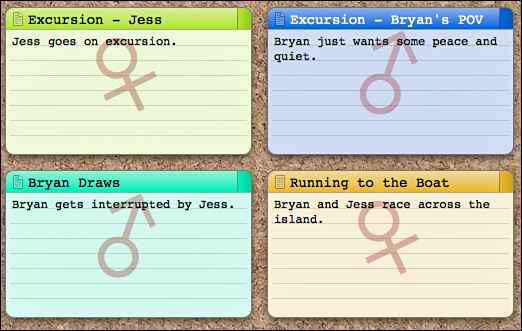
To see the glyph in action, open the Corkboard view for a container and apply the glyph as a status for one of the index cards, as shown in Figure 12.11.
The status stamp is automatically scaled to fit the index card. Certain fonts, however, appear larger or more noticeable than others. To change the appearance of the glyph:
1. Choose Scrivener, Preferences from the menu.
2. Click on the Corkboard tab.
3. In the Fonts area of the dialog box, click on the Status Stamp field.
4. In the Fonts dialog box, choose a different font family and typeface.
5. Click the Close button in the Fonts dialog box.
6. Click the Close button in the Preferences dialog box.
Adding Glyphs as a Status Stamp in Windows
To add a symbol as a value in Windows:
1. Choose Edit, Character Map from the menu.
2. In the Character Map dialog box, shown in Figure 12.12, click on the symbol you want to use. Make note of the font from which you choose the symbol, and as you add symbols as other values, be sure to select from the same font.
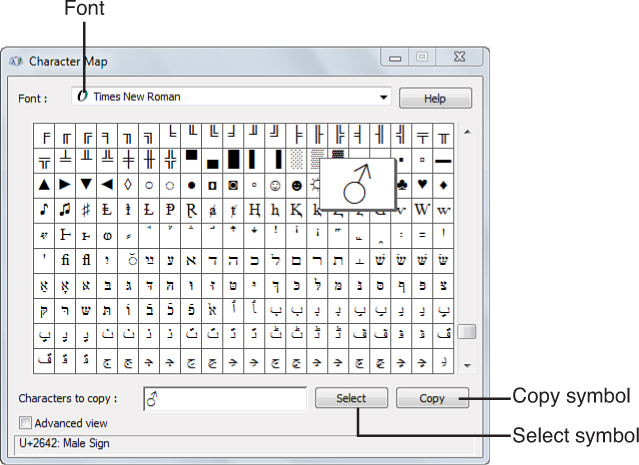
Figure 12.12 The Character Map in Windows allows you to choose symbols from any font installed on your system.
3. Click the Select button. The symbol appears in the Characters to Copy field below the Symbols list.
4. Click Copy to copy the symbol.
5. In Scrivener, click the Status drop-down menu and select Edit to open the Meta-Data Settings dialog box.
6. Click the Add (+) button.
7. Press Ctrl+V to paste the symbol into the empty Status field value.
8. Press Enter.
9. Click the OK button in the Meta-Data Settings dialog box to exit.
Once you have created the glyph values, you may have to adjust the status stamp font so the symbol renders properly on the index cards. To do this:
1. Select Tools, Options from the menu.
2. Click on the Appearance tab.
3. In the Fonts pane, click the disclosure triangle to the left of Corkboard, then select Status Stamp.
4. Click the Select Font button in the right column.
5. In the Select Font dialog box, choose the font in which the symbol(s) you chose originated.
6. Click OK to close the Select Font dialog box.
7. Click OK to close the Options window.
When you apply the new Status value to an index card in the Corkboard, the glyph should appear.
Caution
To ensure the widest support for your glyphs, choose Unicode characters rather than a symbol font, such as Wingdings. If you select a symbol font, the symbol will appear correctly on index cards, but it will not appear as that symbol in drop-down menus or in the Meta-Data Settings dialog box, which can make it very difficult to locate and apply the desired status.
Using Keywords
The Label and Status fields are useful when you only need to apply a single value to an item. If you need to apply multiple values to an item, however, keywords are a better option. You can create keywords to track any details you want, including multiple categories of information.
For example, if you want to track not only the POV character for each scene but all of the characters that appear in the scene, you need keywords to attach multiple characters to the scene. You can attach keywords to the same item to note the setting of the scene. Or if you are creating a recipe file, you can designate a recipe as being both Lunch and Pork.
You can search your project based on keywords (see Chapter 16, “Searching Your Project”). This gives you an advantage over searching the text of your documents. Let’s say you have a scene that affects a character’s story arc, but the character himself is not in the scene. If you attach the character’s keyword, the scene appears when you search for that name.
Like labels, keywords are color-coded. Keywords and their associated colors are used in the following elements:
• On index cards in the Corkboard, if you enable them (View, Corkboard Options, Show Keyword Colors or press Control-Cmd-K on the Mac or Ctrl+F12 in Windows)
• On the Mac, underlined in their associated color in the Keywords column of the Outliner, if the Keywords column is visible
• In the Keywords pane of the Inspector
Viewing the Keywords Inspector Pane
To view keywords in the Inspector, click the Keywords button at the bottom of the Inspector, as shown in Figure 12.13.
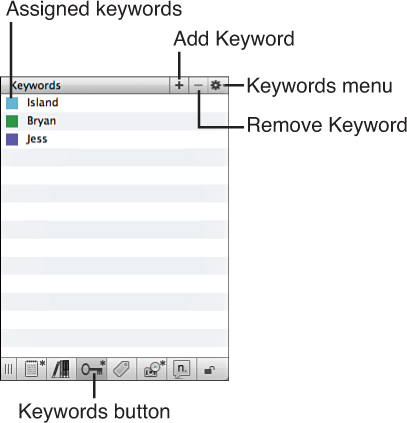
Any keywords that have been applied to the item are listed in the Keywords pane, along with the associated color.
Adding Keywords to Documents
To create keywords directly within the Keywords pane, apply them to the item, and add the keyword to the Project Keywords window in one process:
1. Open the Keywords pane in the Inspector if it is not already visible.
2. Click the Add Keyword button (+) in the header of the Keywords pane.
3. Enter the name you want to give the new keyword.
4. Press Return/Enter.
The keyword appears with a color swatch to the left of it. You can customize keyword colors, but only from the Project Keywords window, explained below.
You can also add keywords that have already been created, whether in another item or in the Project Keywords window. To add a preexisting keyword:
1. Open the Keywords pane in the Inspector.
2. Click the Keywords menu (the gear icon) in the header of the Keywords pane.
3. Hover over the Add Keyword option on the drop-down menu, and then select a keyword from the submenu.
Removing Keywords from a Document
As you enter a recipe into your cookbook project, you decide that it is more of a Lunch or Dinner meal than the Breakfast keyword with which you tagged it. Or suppose a scene to which you assigned the Boathouse keyword now takes place in the back room of a seedy bar.
If your document takes a turn and an assigned keyword no longer applies, remove it by selecting the keyword in the Keywords pane and either pressing Delete or clicking the Remove Keyword button in the Keywords pane header.
Although the keyword is removed from the document, it remains in the project. This holds true even if the keyword is not applied to any other item in the project. To manage keywords on a projectwide basis, you need to open the Keywords panel.
Using the Keywords Panel
The Keywords panel is the brain center of keyword meta-data. Here, you can add and remove keywords from your project, change the color associated with a keyword, group keywords into parent-child relationships in order to organize them, and search your project by keyword.
Open the Keywords panel using one of the following methods:
• Click the Keywords button in the toolbar.
• Choose Project, Show Project Keywords from the menu.
• Press Option-Shift-Cmd-H on the Mac or Ctrl+Shift+O in Windows.
• From the Inspector, click the gear icon in the Keywords pane header, and choose Show Project Keywords from the drop-down menu.
• In Composition/Full Screen mode, press the Keywords button in the Control Strip.
![]() Note
Note
Keywords are created on a per-project basis. If you want to preserve your keywords for other projects, save them as part of a custom project template. Learn how to create project templates in Chapter 14, “Creating and Using Project Templates.” You can also copy keywords from one project to another by opening the two projects side-by-side, opening the Keywords panel in each, and then dragging and dropping selected keywords from one panel to the other.
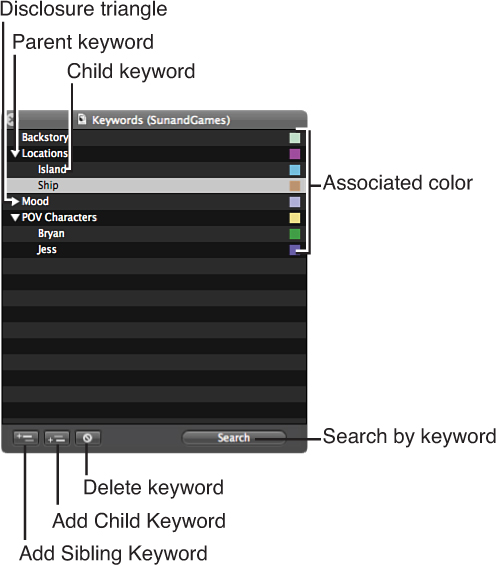
You can use the Keywords panel, shown in Figure 12.14, for all of your keyword-related tasks. To add a keyword to a document, drag and drop the keyword from the panel to the item name in the Binder, onto the index card in the Corkboard, onto the item’s row in the Outliner, or into the Keywords pane in the Inspector. To apply multiple keywords at once, Cmd-click (Ctrl+click in Windows) or Shift-click to select the keywords and then drag them to a document. To apply keywords to multiple documents at once, Cmd-click (Ctrl+Click in Windows) or Shift-click to select the documents and then select the keyword or keywords and drag them onto the selected documents.
Organizing Project Keywords
When you create keywords from the Keywords pane in the Inspector, they are immediately added to the Keywords panel. As you continue to add more keywords, the Keywords panel can become very disorganized, with some keywords relating to characters and others to setting, or other dissimilar ideas relating to your project. To add a measure of organization to the Keywords panel, create parent-child relationships to sort keywords by category. To do this:
1. Click the Add Sibling Keyword button at the bottom of the pane to create a new keyword.
2. Enter a descriptive name for the keyword, such as Locations.
3. Drag and drop any keywords relating to the category onto the new keyword. For example, in Figure 12.14, Island and Ship have been dropped onto the Locations keyword.
You can add new keywords directly into a parent category by selecting the category keyword and clicking the Add Child Keyword button at the bottom of the pane. To create another keyword on the same level as the selected keyword, click the Add Sibling Keyword button.
As the Keywords panel fills up, the disclosure triangles to the left of each parent keyword can be used to hide the child keywords for easier navigation. On the Mac, choose View, Outline, Expand All or Collapse All or press Cmd-9 or Cmd-0 to toggle the disclosure state of all of the parent items in the Keywords panel at once.
![]() Note
Note
In Windows, you can sort keywords in ascending or descending order. Click the Enable Sorting of Keywords check box at the bottom-center of the Keywords panel. This adds a header at the top of the panel, from which you can click to sort in ascending or descending order. Not only are parent keywords sorted, but any child keywords within them are also sorted in the same order.
![]() Tip
Tip
To change the color associated with a keyword, double-click on the color swatch and choose a new color from the Colors (Mac) or Select Color (Windows) dialog box.
Searching by Keyword
Once you add keywords to the items in your project, you can search by keyword to view only the documents that have a specific keyword applied. This can be helpful if you want to see how many blog posts covered a certain topic or how many recipes are tagged for a particular meal, if you have created keywords for those purposes.
To search for items by keyword:
1. In the Keywords panel, select the keyword you want to use for your search criteria.
2. Click the Search button at the bottom of the panel.
3. View the Search Results in the left sidebar of the Scrivener window, in place of the Binder, as shown in Figure 12.15.

Figure 12.15 Use the results of a keyword search to view the items individually or grouped as Scrivenings, in the Corkboard, or in the Outliner.
Use the Search Results in much the same manner as the Binder. On the Mac, click the Search Results heading and then select a Group View mode to see all of the search results grouped together as Scrivenings, in the Corkboard, or in the Outliner. In Windows, view the search results in a group by pressing Ctrl+A to select them all or press Ctrl+click or Shift+click to select specific items. You can also view items individually in the Editor.
When you are finished using the Search Results, click the X at the bottom of the Search Results list to return to the Binder.
Deleting Keywords from a Project
If you want to remove a keyword from your project, select the keyword in the Keywords panel and then click the Delete Keyword button at the bottom of the panel.
Caution
This action is permanent. If you delete a keyword that is in use, it is removed from all documents. A warning pops up to confirm the deletion if the keyword is in use. If you proceed and delete a keyword in error, you can re-create it, but you must manually reapply it to your documents.
Adding Custom Meta-Data (Mac Only)
With the Label, Status, and Keyword options, you might think you have enough meta-data fields to support any project, but there are always exceptions. The Label and Status fields are limited to the values you enter, which makes them too restrictive to use as a timeline. Because you can add multiple keywords to an item and those keywords can relate to multiple categories, they are not useful when sorting in the Outliner. Custom meta-data, on the other hand, can accept unlimited values that all relate to a common category.
Here are some uses for custom meta-data:
• Create a custom field for Events and populate it with the parties and social occasions your historical novel heroine attends during the Season year after year as she gets closer to being put on the shelf. Create a field for Cars and use it to track which automobiles your protagonist has stolen as he’s chased across the country by the mob. Create a field for Creatures and use it to track the different races your space traveler encounters (and reencounters). You get the idea!
• In a cookbook, create a custom field for Meal. This frees up your Label and Status fields to track information such as the completion status of each item (such as To-Do, In Process, Taste Tested, Directions Tested).
• Students, create Assigned Date and Due Date fields for assignments. This lets you use Scrivener as a planner as well as a place to write your essays and other assignments.
• Create a timeline.
Custom meta-data does not provide the same level of visibility within the Scrivener interface as other types of meta-data. You can view your custom fields in the Custom Meta-Data pane of the Inspector or in the Outliner. You can also use custom meta-data for searches and to create collections. You can then use these collections to filter items when compiling your project.
![]() Note
Note
Collections are explained in Chapter 16, “Searching Your Project.” Filtering your project as part of the compilation process is explained in Chapter 19, “Compiling Your Completed Work.”
Adding Fields
To add a custom meta-data field, you must first open the Meta-Data Settings dialog box:
1. Click the Custom Meta-Data button at the bottom of the Inspector to open the Custom Meta-Data pane, shown in Figure 12.16.
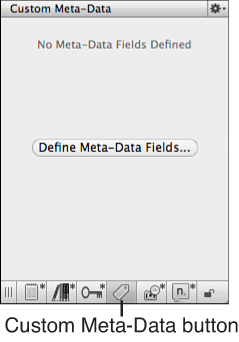
Figure 12.16 When the Custom Meta-Data pane in the Inspector is empty, it displays a button to begin the process of creating custom fields.
2. Choose one of the following options to open the Custom Meta-Data tab in the Meta-Data Settings dialog box:
• If this is your first custom field, click the Define Meta-Data Fields button in the center of the pane.
• Click the gear button in the Custom Meta-Data pane header; then select Edit Custom Meta-Data Settings from the drop-down menu.
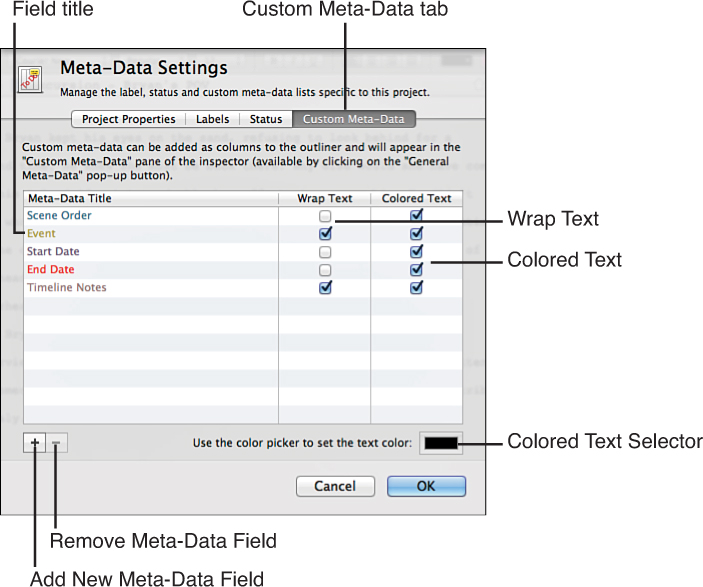
• Choose Project, Meta-Data Settings from the menu and then click the Custom Meta-Data tab at the top of the dialog box, shown in Figure 12.17.
• Press Option-Cmd-,.
3. Click the Add New Meta-Data Field (+) button.
4. Enter the title for the field.
5. Click the optional Wrap Text check box if the values for the field are likely to require more than one line.
6. Click the optional Colored Text check box if you want the field values to appear in a different color. If you select this option, click the Colored Text Selector at the bottom of the dialog box to open the Colors dialog box and select a color.
7. Repeat steps 3–6 if you want to add more custom meta-data fields.
8. Click OK to close the Meta-Data Settings dialog box.
Adding Values
Custom meta-data does not use a predetermined list of values. Instead, you enter a value directly in the field in either the Outliner or the Inspector. This allows you to enter a wide range of values, but it can also lead to inconsistencies and typos.
If you are entering values for multiple items at once, use the Outliner, as you can scroll down and enter a value for each item. To do this:
1. Select a container in the Binder to open in the Outliner.
2. Click the Columns menu button and select the custom meta-data fields you want to view.
3. Double-click in the empty field for the item to add a value to the field.
4. Press Return.
Figure 12.18 shows the Outliner with several custom meta-data fields visible. In this timeline example, the Scene Order field holds the position in which the scene appears in the story. The Event field is intended to describe the inciting incident in the flashback. The Start Date field provides the chronological timeline of events in the story. The Timeline Notes field can describe why the flashback is important to the story. Creating multiple fields intended to work together like this allows you to sort the Outliner by Scene Order or by Start Date. You can even sort by Event if you want to analyze whether there’s a good reason for certain flashbacks.
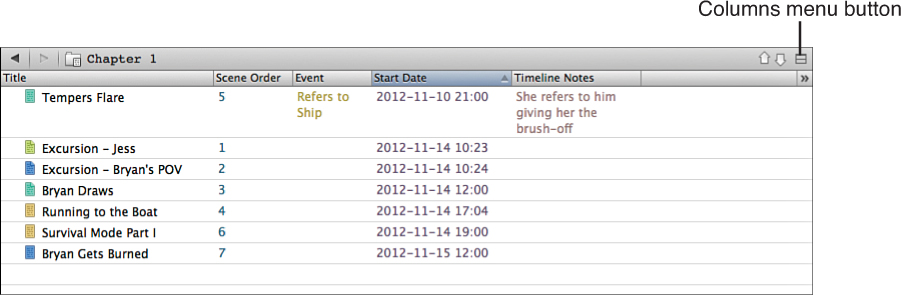
Figure 12.18 This Outliner demonstrates how custom meta-data can be used to create a rudimentary timeline.
![]() Tip
Tip
If you are creating a field to store time and date values, use the YYYY-MM-DD HH:MM convention. That way, when you sort on this field, the date goes from broadest unit of time, the year, to the month and day and then to the hour and the smallest unit of time, the minute. If you are using hours and minutes, be sure to enter the time based on a 24-hour clock so your daytime and nighttime events do not get confused.
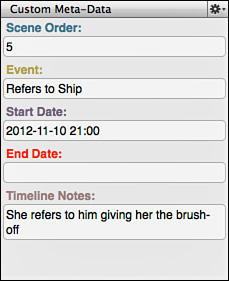
To add custom meta-data in the Inspector:
1. Click the Custom Meta-Data button at the bottom of the Inspector or press Control-Option-Cmd-M to open the Custom Meta-Data pane in the Inspector.
2. Click in the field into which you want to enter a value.
3. Enter a value and then press Tab to automatically move to the next custom meta-data field or Return to enter the value.
Figure 12.19 shows the Custom Meta-Data pane with values added.
Deleting Custom Meta-Data Fields
Creating custom meta-data fields can be quite empowering, but you may find that some of that power has gotten away from you. If you don’t use a custom field, delete the field with these steps:
1. Open the Custom Meta-Data tab in the Meta-Data Settings dialog box using one of the methods described earlier in this chapter.
2. Select the field you want to delete.
3. Click the Remove Meta-Data Field (−) button at the bottom of the dialog box or press Delete.
4. Click OK to exit the dialog box.
When you delete a custom meta-data field, any values entered into that field in any item are removed as well.