
6. Storyboarding with the Corkboard
From multicolored index cards and post-it notes to foam-core plotting boards and decoupage collages, the process of planning a story can become quite an artistic adventure. Seeing a visual representation of your story engages the creative side of your brain while also appeasing your logical side by potentially highlighting dangling plot threads, the balance of point-of-view (POV) characters, and other story elements.
If you like to storyboard your books before you begin writing, the Corkboard will prove to be an invaluable tool in your writer’s toolkit. Even if you are a pantser, you may find that viewing the Corkboard when you’re blocked can help you see the flow of your story to discover what should come next. It can also be used as an editing tool to analyze your completed draft before undertaking revisions.
Academic and nonfiction writers can also benefit from using the Corkboard. Viewing your project in such a visual manner can ensure you have established enough supporting elements for your thesis and put your sections in proper order to provide the most impact.
Scrivener’s Corkboard is based on the concept of index cards tacked up to a board, but without the mess of glue sticks or dropped pushpins. Each item in the Binder is represented by an index card, and cards can be color-coded and moved around the Corkboard, just like their nonvirtual counterparts. Unlike a physical corkboard, however, Scrivener’s Corkboard travels with your work in progress; anywhere you use Scrivener, you can view your Corkboard.
Opening the Corkboard
As with Scrivenings, the Corkboard is another way to view multiple items from the Binder together as a group. To open the Corkboard:
1. Select the container you want to view from the Binder.
2. Choose one of the following options:
• Click the Corkboard icon in the Group mode on the toolbar.
• Choose View, Corkboard from the menu.
• Press Cmd-2 (Ctrl+2 in Windows).
The Editor window displays the Corkboard view, as shown in Figure 6.1. The standard Corkboard displays a single level of your project hierarchy. Each file at that level is represented by an index card. Folders or file groups containing subdocuments are represented by a stack of index cards, indicating content at a lower level in the hierarchy.
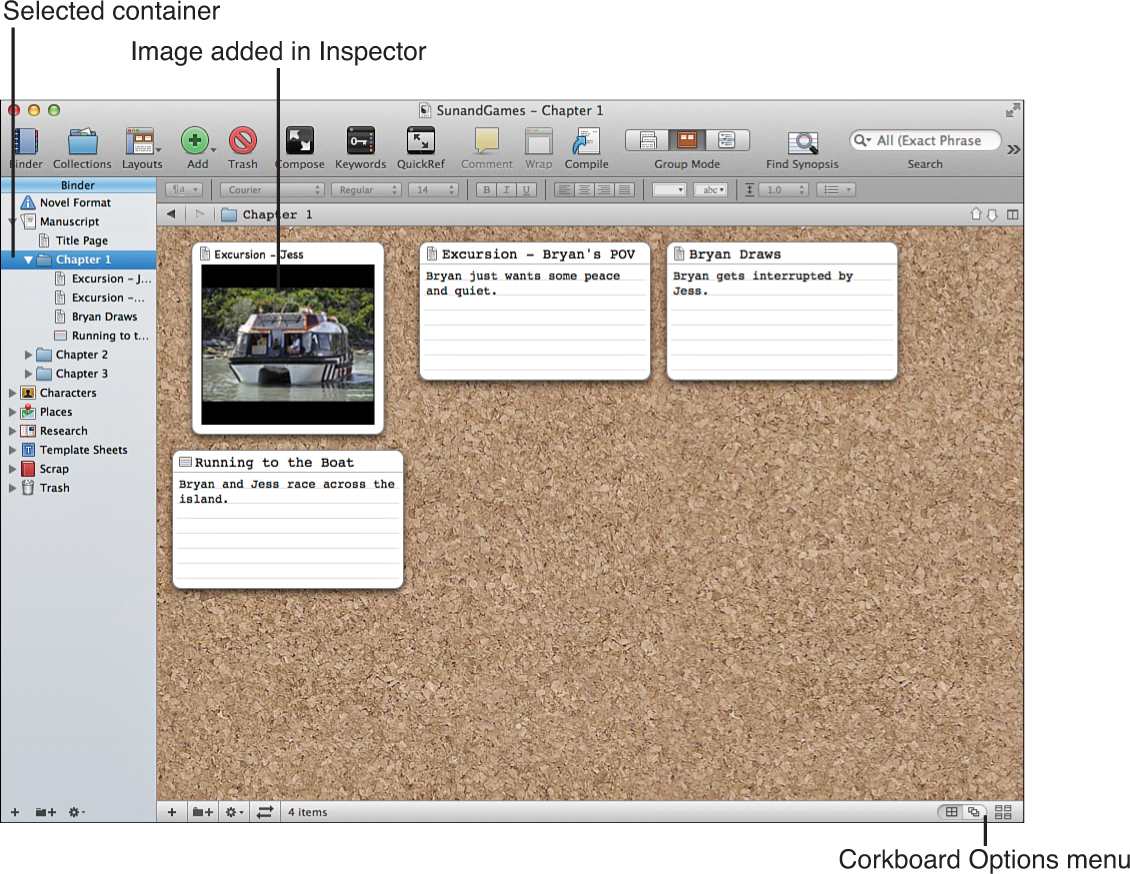
Figure 6.1 The Corkboard displays index cards of each document in the selected container. The Synopsis area displays either text or an image, as added in the Inspector.
 Caution
You can view multiple folders, file groups, or nonsequential files and folders. You can also select a collection (which are explained in Chapter 16, “Searching Your Project”). The appearance of the Corkboard and the actions you can perform with the index cards change depending on the selection. If you select a container, for example, you can rearrange the index cards, whereas you cannot move or add cards when the Corkboard displays a selection of multiple items from various folders.
![]() Note
Note
See Chapter 3, “Organizing the Binder,” for more information about establishing the file and folder hierarchy for a project.
The Corkboard is not a fixed view of your documents. If you loaded a container into the Corkboard, you can move cards around to change their order within the container, and these changes are reflected immediately in the Binder. To move a card, just click and drag it to its new location. You can also drag the card from the Corkboard into a different container in the Binder.
Viewing Multiple Containers in a Stacked Corkboard
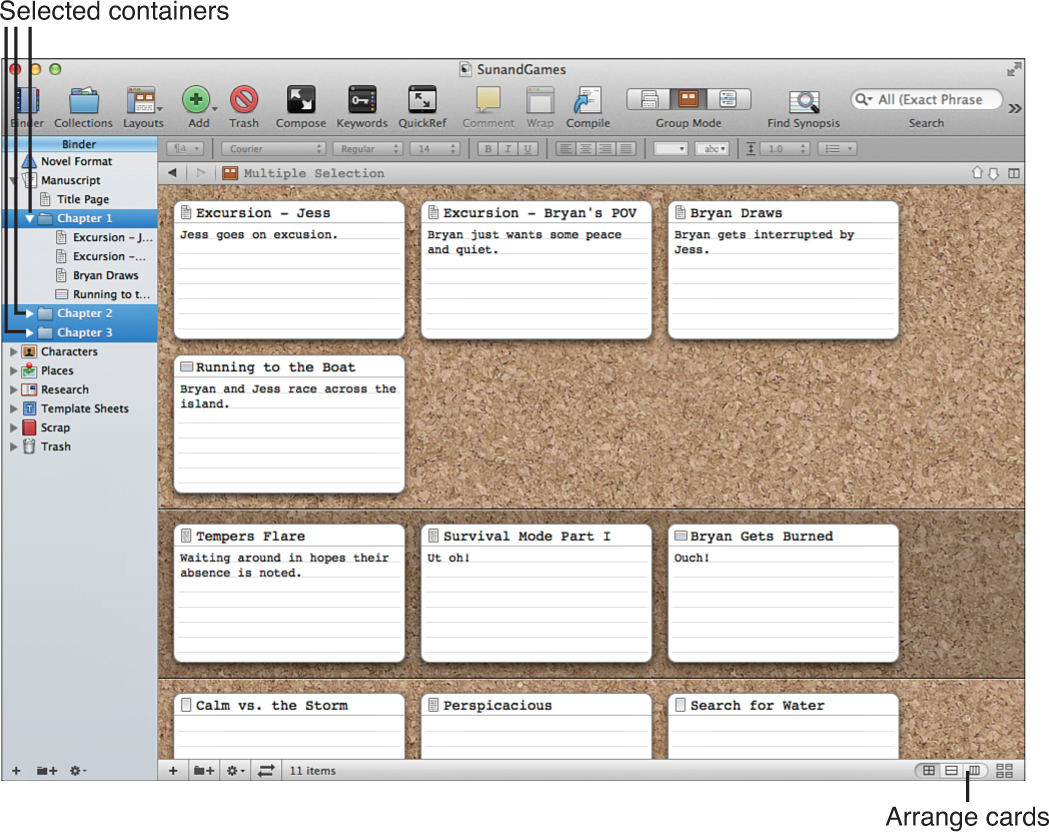
When you click on a single container in the Binder, the Corkboard displays all of the documents within the top level of that container. If you select multiple containers on the Mac, however, you can stack Corkboards in order to view them all at the same time, as shown in Figure 6.2. To do this, hold down the Cmd key on the Mac while clicking on multiple containers in the Binder.
Caution
Be careful not to click individual documents while making this selection. If any individual files are in the selection, the standard Corkboard appears, instead of the stacked Corkboard.
![]() Note
Note
Unfortunately, this feature is not available in Windows.
When the Corkboard is stacked, each container’s contents appear on the Corkboard. A line appears between the cards for each container, and the shading of the background changes. By default, the cards for each container wrap within the window, as you can see in Figure 6.2, and the containers are stacked horizontally. Change the arrangement of the cards using the three buttons on the right side of the Footer bar. Your options are as follows:
• Wrap Cards: The default view. The cards for the container wrap as they do in the standard Corkboard view, and the Corkboards are stacked horizontally on top of each other.
• Arrange Cards in Rows: The cards within a container appear in a single row, with the Corkboards stacked horizontally.
• Arrange Cards in Columns: The cards within a container appear in a single column, with the Corkboards arranged side by side vertically.
Adding Documents to the Corkboard
If you get an idea for a new scene or concept in your writing project, you can add a new document within the Corkboard. Click the Add button in the toolbar, and a new card appears on the Corkboard. You can also use any of the other methods for adding a new document you learned in Chapter 3. If you want to add a new card directly after an existing card, select that card before adding the new one.
Caution
You cannot add new items to the Corkboard when displaying a multiple selection.
When you are viewing a stacked Corkboard, if no card is selected when you add a new card, it gets added to the end of the final stack. If a card is selected, the new card is added immediately after it.
![]() Tip
Tip
If you use the Corkboard as a plotting/planning tool and frequently add new documents while in this view, change your Preferences/Options to add a new document when you double-click in the background. Open the Corkboard tab in the Preferences/Options window. On the Mac, click the Double-Clicking Corkboard Background drop-down menu and select Creates a New Card. In Windows, click the Empty Space Double-Click Will drop-down menu and select Create a New Card.
Examining Index Cards
Index cards represent your files, but they do not display the content of the document itself. Rather, the index card contains elements of the meta-data for the file. Imagine it as a physical index card you paper clip to each document describing its content.
As shown in Figure 6.3, there are three mandatory elements on every index card, as follows:
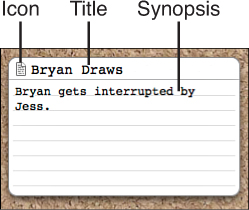
• Icon: The item’s icon, matching the one that appears in the Binder. You can easily see if the file contains document text or has been saved as a Snapshot, for example, by looking at the icon. The icon has a functional purpose, as well: to open a document in the Editor window in order to work on the document itself, double-click the icon on the index card.
• Title: The title of the document, as it also appears in the Binder. Double-click the title to highlight and rename it. If you change the title of the document on the index card, it is updated in the Binder and the Inspector.
• Synopsis: The synopsis of the document. Double-click to type or edit the synopsis on the index card. You can also enter the synopsis in the Inspector. If you want to use an image in place of a text synopsis, as shown in Figure 6.1, you must add it in the Inspector. You are not required to enter a synopsis; if you do not, this area of the card remains blank.
Caution
The synopsis is not the actual text of your document. Enter your document text by opening the document in the Editor. Do not enter your document text in the Corkboard or Inspector.
![]() Note
Note
Learn about the Inspector and adding an image in the synopsis in Chapter 11, “Digging into the Inspector.”
Adding Index Card Options
In addition to the three core index card elements, there are four optional elements. As shown in Figure 6.4, they are as follows:

Figure 6.4 With additional options, a single index card can tell you a lot about the document at a glance.
• Label indicator: Displays the color associated with the Label field in the Inspector. To add label indicators to your index cards, choose View, Corkboard Options, Show Pins from the menu or press Control-Cmd-P (F9 in Windows). If you add a label to the document, it can appear as either a colored chip or pushpin on the index card. To add or change a label on the index card, right-click on the card or cards, select Label from the context menu, and then choose from the submenu. You can also add or change the label in the Inspector, but only for one item at a time.
![]() Note
Note
On the Mac, the form of the label indicator—whether color chip or pushpin—depends on the shape of the index card. If the card is rounded, the indicator appears as a color chip on the upper-right side of the card. If the card is square, the indicator looks like a pushpin either on the top center or top right of the card. Change the shape of index cards and the position of the pushpin in the Corkboard tab of the preferences/Options window.
In Windows, the shape of the index card and form of the label indicator can each be set independently in the Corkboard tab of the Options window. Thus, you can have a rounded card with pushpins or a square card with chips, or vice versa. You cannot, however, change the location of the pushpins from the top center of the card.
![]() Tip
Tip
You can also apply the label color to the icon or the entire index card, or both. To do this, choose View, Use Label Color In, and select Icons or Index Cards from the submenu. As you can see in the menu, you can also apply the label color to the file in the Binder and the Outliner. If you apply the label color to the icon, the color is visible wherever the icon is used in Scrivener—the Binder, Corkboard, Outliner, and the Header bar in the Editor. If you apply the label color to the index card, adjust the tint in the Appearance tab of the Preferences window on the Mac or the Corkboard tab of the Options window in Windows.
• Status stamp: Displays the Status of the document as a watermark across the index card. Choose View, Corkboard Options, Show Stamps or press Control-Cmd-S (F10 in Windows) to enable this feature. Adjust the opacity of the stamp in the Corkboard tab of the Preferences/Options window.
![]() Tip
Tip
Chapter 12, “Putting Keywords and Meta-Data to Work,” offers a neat trick to assign symbols as a status indicator.
• Keyword indicators: Displays color swatches associated with keywords applied to the document. Keyword indicators are displayed by default on the Mac but need to be enabled in Windows. To disable or reenable keyword indicators, choose View, Corkboard Options, Show Keyword Colors or press Control-Cmd-K (Ctrl+F12 in Windows). Keyword indicators only appear if keywords have been assigned to the file. Assign keywords from the Inspector or directly on the Corkboard. To add a keyword, click the Keywords button on the toolbar to open the Keywords panel. Drag the desired keyword from the panel onto the index card. You can also select multiple index cards and then drag and drop one or more keywords onto the selection to assign them.
![]() Note
Note
On the Mac, index cards display up to five keyword indicators by default. In Windows, index cards display all keyword indicators by default. You can change this setting from the Corkboard Options menu accessible in the Footer bar, as explained in the next section of this chapter.
• Card number (Mac only): Assigns numbers to each card based on their order in the container. If you move cards around in the Corkboard, they are renumbered to reflect the new order, and they are reordered in the Binder. To display card numbers, choose View, Corkboard Options, Show Card Numbers from the menu.
![]() Tip
Tip
When you view a stacked Corkboard, card numbers continue sequentially throughout the visible containers. If you want to start the numbering over in each container, choose View, Corkboard Options, Number Per Section from the menu.
Setting Corkboard Options on the Footer Bar
Aside from the Corkboard options on the View menu, which primarily control the index card elements, the Corkboard Options menu on the Footer bar controls the layout of the index cards and Corkboard. By fine-tuning the size and spacing of the index cards, you can customize this view to maximize the use of your screen real estate. The options on the Corkboard Options menu, shown in Figure 6.5, are as follows:
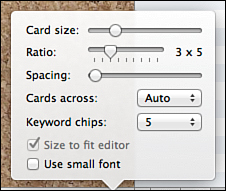
Figure 6.5 The Corkboard Options menu controls the size and positioning of index cards on the Corkboard.
![]() Note
Note
In Windows, click the Layout Options icon in the Footer bar to open the Corkboard Options menu.
• Card Size: Determines the size of index cards by using this slider and then letting the Corkboard determine how many cards fit across the window.
![]() Tip
Tip
Another method to determine card size is to set the number of cards you want in each row in the Cards Across option on this menu and let the Corkboard determine the size of the cards required to meet this criteria. In this case, the Size control is disabled.
• Ratio: Sets the ratio between the height and width of the cards. The default is 3×5, the ratio of a physical index card. On the Mac, cards displaying images are always 5×5.
• Spacing: Adjusts the space between columns and rows of index cards. If space is at a premium, move this slider to the left to minimize the space between cards.
• Cards Across: Determines the number of cards to place in each row on the Corkboard. Use Auto to allow the size of the cards to regulate this setting.
• Keyword Chips: Sets the maximum number of keyword indicators to be displayed on index cards. If this number is lower than the number of keywords assigned to a card, the additional keywords are ignored.
• Size to Fit Editor: Resizes cards to fit the current width of the Editor window if this check box is selected in conjunction with a fixed number set in the Cards Across option. If this option is deselected, you may need to scroll to see the contents of the Corkboard. If Cards Across is set to Auto, this option is disabled. If this option is selected, the Size slider is disabled.
• Use Small Font: Instructs the index cards to make use of the Small Text setting in the Corkboard tab of the Preferences window. To access this setting in Windows, choose the Appearance tab of the Options window, then select Corkboard in the Fonts pane and choose Index Text Small.
You can immediately see how changes on this menu affect the Corkboard, so it is easy to fine-tune your settings. To close the menu on the Mac, click outside it. In Windows, click the X button at the top of the menu.
Using the Corkboard in Split Screen
In Chapter 4, “Writing in the Editor,” you learned how to use Split Screen mode to divide the Editor window into two separate panes. If you’re a planner who likes knowing what’s coming next while working in a document, keeping the Corkboard visible in Split Screen mode, as shown in Figure 6.6, can help.

Figure 6.6 This split screen allows you to view the Corkboard in the top pane while working on a document in the lower pane.
To split the screen in Corkboard view:
1. Open a container in Corkboard view, if you don’t already have one open on the screen.
2. Click the Split View toggle in the Header bar of the Corkboard. The Corkboard appears in both panes.
3. Click in the pane in which you want to work in the Editor. The Header bar turns blue to indicate this is the active pane.
4. Choose one of the following options to open a file in the Editor:
• Select a file in the Binder.
• Select an item in the Binder or Corkboard and choose Documents, Open from the menu, then select the desired Editor from the submenu.
• Click the Item Icon button in the Header bar, then select Go To and choose a file from the submenu.
• Right-click on an index card in the Corkboard, then select Open and choose the Editor in which the document should open.
If you are currently in Document view in the Editor and want to split the screen and add a Corkboard to one pane, you can do this, as well. Split the screen and then open a container in one pane and choose Corkboard view from the toolbar or menu.
![]() Tip
Tip
You may need to adjust the Corkboard options to position your index cards exactly as you want in the smaller real estate of the Split Screen pane. You can also adjust the amount of space allocated to each pane by sliding the divider bar between panes.
In step 4 above, you had the option of using the Corkboard to control the Editor. You can automate this by clicking the Auto-load button in the Footer bar of the Corkboard. On the Mac, the icon turns blue to signify the feature is enabled. In Windows, the button appears depressed. Whenever you select an index card in the Corkboard, the document opens in the other Editor pane.
Caution
If you are clicking around in the Corkboard, it’s easy to lose track of which document is open in the other Editor. If you have the Auto-load option enabled, get into the habit of looking at the Header bar before typing in your document to ensure you are in the correct document.
Putting Split Screen to Work
You can combine your knowledge of several Scrivener options and commands to build a custom layout. Figure 6.7 shows my usual writing layout when drafting a project. This layout works well on a widescreen display because it makes use of the extra horizontal space while showing as much text in the document as possible.
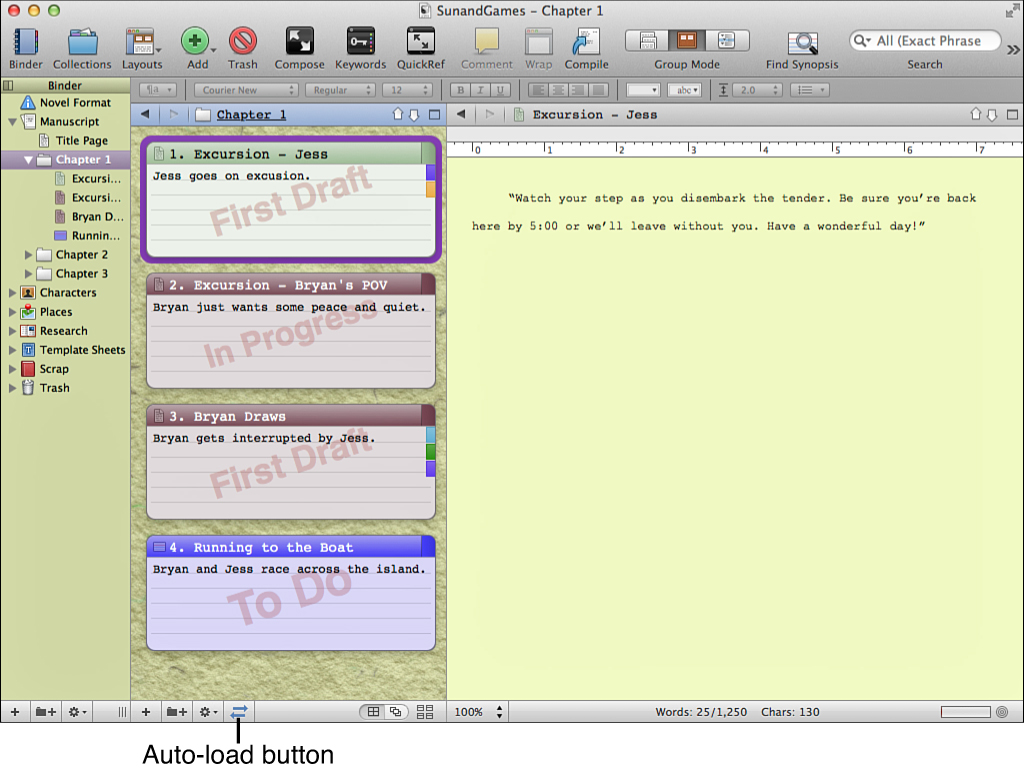
Figure 6.7 Using multiple settings in conjunction with each other allows you to create a unique workspace.
This is how it works:
• The screen is split vertically. Press the Option key while clicking the Split View toggle to change the orientation of the split on the Mac. In Windows, click the Vertical Split button.
• The Corkboard is loaded into the left pane. The width of the Corkboard pane has been adjusted to fit one index card across, and the Corkboard options have been adjusted to change the size and ratio of the index cards to suit the space.
• The Binder Affects (View, Binder Affects) option has been set to Left Editor, so anything selected in the Binder opens in the left Editor pane.
• The Auto-load option in the Footer bar of the Corkboard has been enabled, so any item selected in the Corkboard automatically opens in the right Editor pane.
• If you want to move items in the Binder without affecting the Corkboard, use the Lock in Place option (View, Editor, Lock in Place). This can be toggled as needed.
• To maximize screen real estate, you can hide the Binder completely (View, Layout, Hide Binder on the Mac or deselect View, Layout, Show Binder in Windows). You can also hide the toolbar (View, Hide Toolbar on the Mac or deselect View, Toolbar in Windows).
Your mileage may vary. Each of the options I set to suit my needs can be set differently to match yours. This is merely one example of how to work in Scrivener.
![]() Note
Note
As an example of how Scrivener’s features can work together, this figure also shows customized Appearance preferences and the application of the Label field to the color of the icons in the Corkboard and Binder and the background of the index cards. See Chapter 2 to learn how to customize colors and Chapter 12 to discover how to use the label color in various elements.
Caution
Don’t forget to save your layout and preferences settings when you get things arranged as you like!
Using Images to Your Advantage
If you add images to your synopsis in the Inspector (explained in Chapter 11), you can use the Corkboard as a reference tool of a different sort. Figure 6.8 shows a container from the Research folder in Corkboard view in the top pane and an open document in the bottom pane. The images aid in describing the objects in the document. If you need to access the content of the research document, right-click the index card and choose Open, As QuickReference from the context menu.
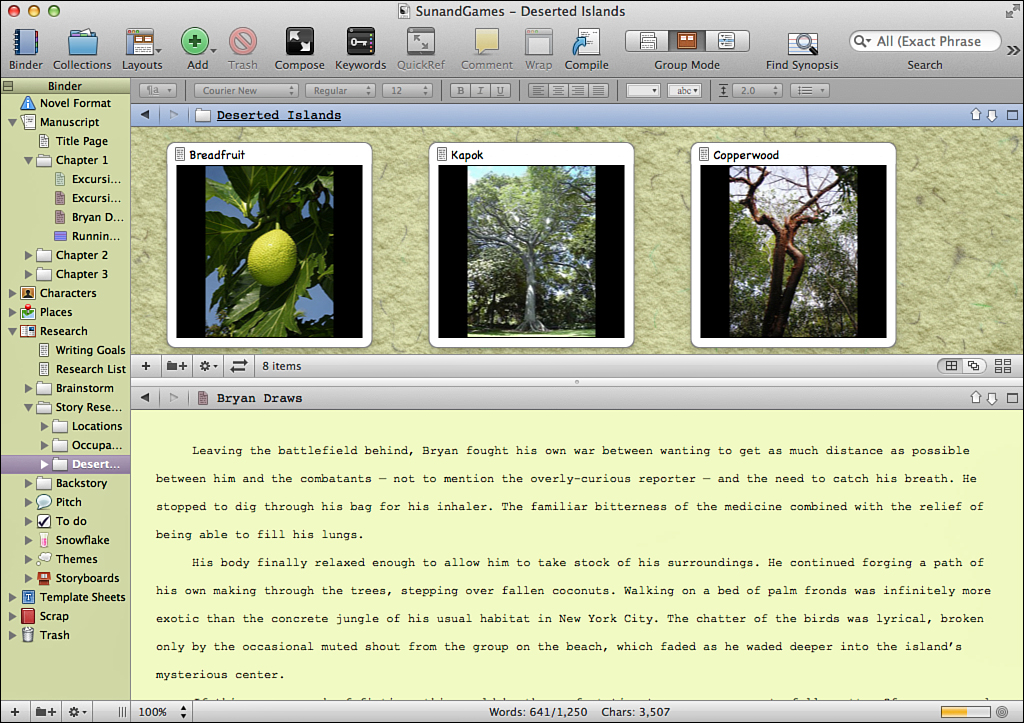
Figure 6.8 Using multiple settings in conjunction with each other allows you to create a unique workspace.
![]() Note
Note
Windows users, Scrivener for Windows does not provide QuickReference panels, but you can opt to open the document in either Editor window from the same Open submenu.
You can apply images to any item, not just Research documents. If you add images representing different characters or the action in your story to key scenes, you can view the Corkboard as a visual storyboard.
![]() Tip
Tip
Looking for images to use in your project? Use your Internet browser to do a web search for the object or theme you seek, and then select the Images link. Because you are downloading these images strictly for your personal reference and not to distribute as part of your completed project, you don’t need to worry about licensing or rights issues.
Locking the View Mode (Mac Only)
The Group View mode that is applied to a container depends on the last Group View mode you selected. For example, if you select a container and view it in the Outliner, the next time you select any container, it automatically opens in the Outliner. If you want to set a container to always open in a particular View mode, you can change this default behavior. Select View, Editor, Lock Group View Mode in the menu.
When Lock Group View mode is selected, it remembers the last Group View mode applied to the container you select while this command is enabled, and automatically reopens that container in the same view the next time it is selected. A lock symbol appears on the Group View mode icon in the toolbar to signify the container is locked to that mode. Scrivener remembers which containers have been locked to a Group View mode and which have not.

Working with the Freeform Corkboard (Mac Only)
The standard Corkboard is also called the Linear Corkboard because it displays items in a fixed order. Scrivener for Mac also offers a Freeform Corkboard. This view allows you to move cards around the background without the constraints of document order or a grid. Best of all, you can group your index cards into different arrangements without changing the order of the documents in the Binder. This gives you a different view of your project, without risking any permanent changes.
To access the Freeform Corkboard, shown in Figure 6.9, open a Corkboard for a single container and then select the Freeform Corkboard button in the Footer bar. You can also toggle the Freeform Corkboard by choosing View, Corkboard Options, Freeform from the menu. The background of the Freeform Corkboard is different by default so you can easily tell which type of Corkboard is active.
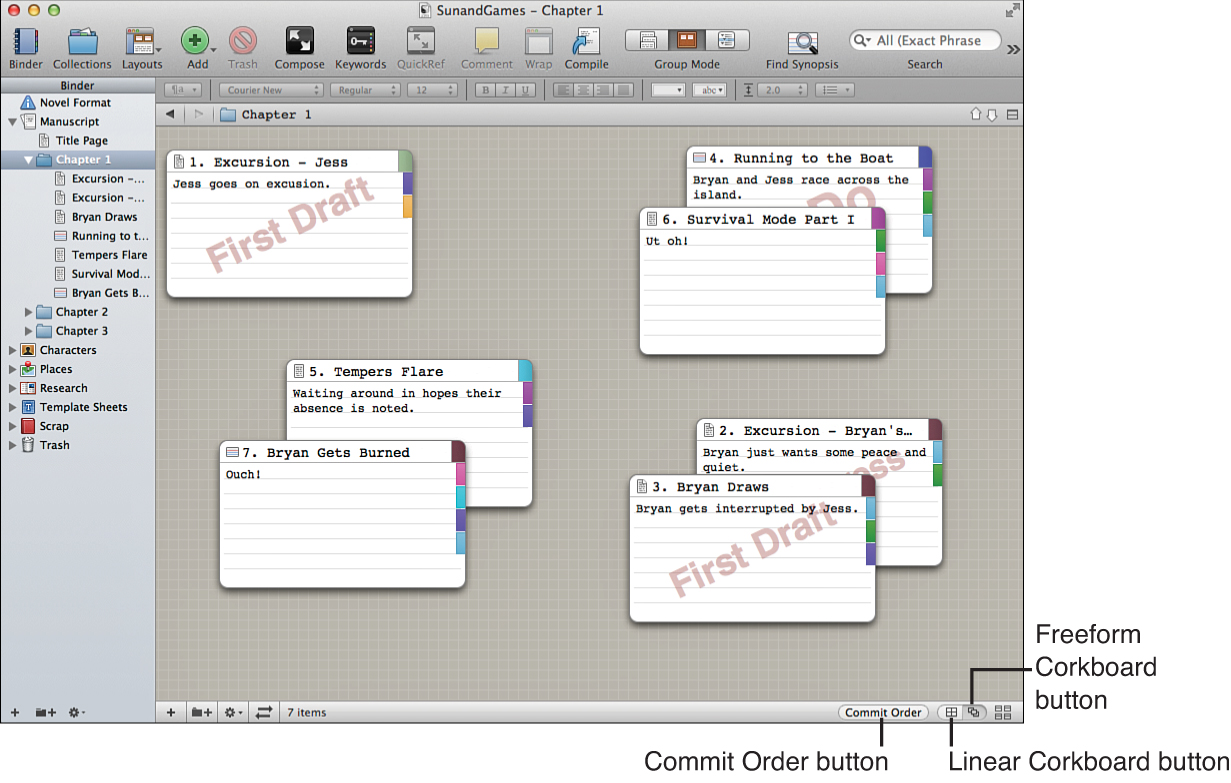
Figure 6.9 The Freeform Corkboard lets you move cards freely around the screen without committing to change the order of your documents.
![]() Note
Note
You can also use the Freeform Corkboard if you open a standard collection. Learn more about collections in Chapter 16, “Searching Your Project.”
Rearrange cards as you desire by dragging them around the Freeform Corkboard. If you want to return to the Linear Corkboard, click the Linear Corkboard button. Scrivener remembers the card position so you can return to the Freeform Corkboard later.
![]() Tip
Tip
Even if you don’t use card numbers on your index cards as a matter of course, you may want to turn them on when you are in the Freeform Corkboard. The numbering remains the same as you move cards around the Freeform Corkboard, so you can still tell where the scene falls in your project sequence.
You can also use the Reveal in Binder command (View, Reveal in Binder from the menu or right-click on an index card and choose Reveal in Binder from the context menu) to select the document in the Binder so you can see it within the context of your project hierarchy.
If you decide you like the order in which the cards appear in the Freeform Corkboard, you can commit this card order to the Binder. Take the following steps:
1. Click the Commit Order button in the Footer bar. The Commit Freeform Corkboard Order dialog box opens, as shown in Figure 6.10.
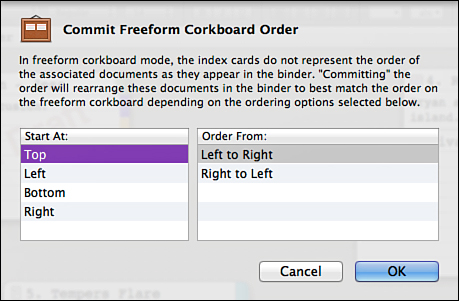
Figure 6.10 The Commit Freeform Corkboard Order dialog box confirms the order in which Scrivener should scan cards on the Freeform Corkboard to change the card order.
2. In the Start At column, select the location Scrivener should look for the first card in the new sequence.
3. In the Order From column, select the direction in which Scrivener should scan the index cards to determine the new card order.
4. Click OK.
If you enabled card numbers, you can see that the number assigned to each card has changed to reflect the new order. Your items are also reordered in the Binder. Confirm that each card was positioned as you want; you can rearrange items in the Binder if anything is out of place.
If you change your mind about committing the new card order, use the Undo command (Edit, Undo, or Cmd-Z).
Printing Index Cards
Although Scrivener provides great flexibility in the Corkboard, there is still something about the feel of holding a stack of physical index cards in your hands and quickly arranging them in various ways. You can print index cards directly from the Corkboard to bring the virtual into physical form.
![]() Note
Note
The instructions here are for the Mac platform. If you use Scrivener for Windows, see “A Windows View: Printing Index Cards from Scrivener for Windows,” later in this section.
The settings for printing index cards are optimized to work with Avery Perforated Index Card stock, but you can print on plain paper or card stock and cut the cards yourself.
Before printing index cards, ensure that the virtual index cards contain the proper titles and synopses you want to print. If a synopsis is too long for a 3×5 index card, the additional text prints on subsequent cards. If this is the desired behavior, you’re all set. If you want each virtual index card to be limited to a single physical index card, however, you may need to edit your synopses to fit. If an index card is displaying an image rather than text on the Corkboard, the image is used when printing. If this is not what you intend, use the Inspector to change the item to the synopsis text view.
![]() Tip
Tip
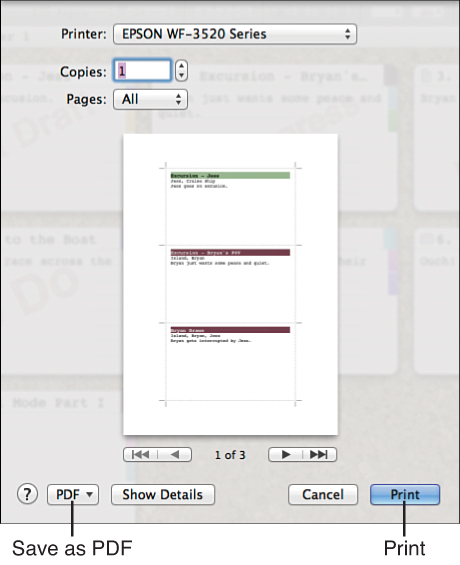
Before you potentially waste expensive card stock, you can save your index cards to PDF so you can view the layout exactly as it will appear on the printed cards. In the Print window, click the PDF button, then select either Save as PDF or Open PDF in Preview from the drop-down menu.
Before you print index cards, you need to set up the print options by doing the following:
1. Go to File, Page Setup.
2. In the Page Setup dialog box, click the Settings drop-down list and select Scrivener. The window changes to display margin settings.
3. Click Options below the list of margin settings.
4. In the Print Options dialog box, click Index Cards in the center, as shown in Figure 6.11.
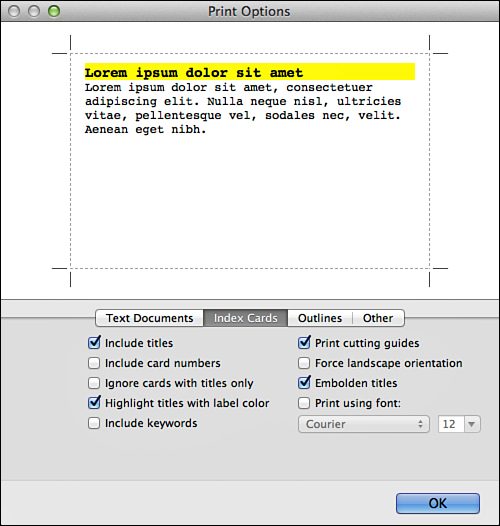
Figure 6.11 The Print Options dialog box displays a sample preview of your printed index cards based on the options you select.
5. Choose from the following options:
• Include Titles: Selected by default, this prints the document title at the top of each card.
• Include Card Numbers: This includes the card number with the title.
![]() Note
Note
Cards are numbered based on their order within the selected container on the Corkboard. Without this context, printing card numbers on physical index cards may be of limited use to you.
• Ignore Cards with Titles Only: If a card contains only a document title and no synopsis, the card will not be printed.
• Highlight Titles with Label Color: Selected by default, this uses the label color in the title. The label name is also added in parentheses after the title.
• Include Keywords: This adds keywords below the title. Keywords are underlined and separated by commas on the card.
• Print Cutting Guides: Selected by default, this adds dashed lines around the card to guide cutting them with scissors or a cutting block. This option is not necessary if you are printing on perforated card stock.
• Force Landscape Orientation: If you are printing to regular sheets of paper or card stock instead of perforated index cards, you can opt to print in landscape orientation. This increases the number of cards per page from three to four.
• Embolden Titles: Selected by default, this prints document titles in bold typeface.
• Print Using Font: This allows you to override the Corkboard fonts you set in the preferences window and print in a different font and font size.
6. Click OK to close the Print Options window.
7. Click OK to close the Page Setup window.
Once the print options are configured, you are ready to print your cards. If you are printing on perforated index cards or another specialty paper, load the stock into your printer’s paper tray. To print:
1. Select the container or files you want to print by loading them into the Corkboard.
2. Choose File, Print Current Document from the menu.
3. In the Print window, shown in Figure 6.12, click Print.
A Windows View: Printing Index Cards from Scrivener for Windows
The procedure for printing index cards in Scrivener for Windows is a bit different from that of the Mac. To print index cards in Windows, view the cards on the Corkboard and then choose File, Print Preview from the menu. The print settings use the last printer settings from your project. Thus, if you previously printed other portions of your project, the settings may not be conducive to printing index cards. Click the Page Settings icon to adjust the settings.
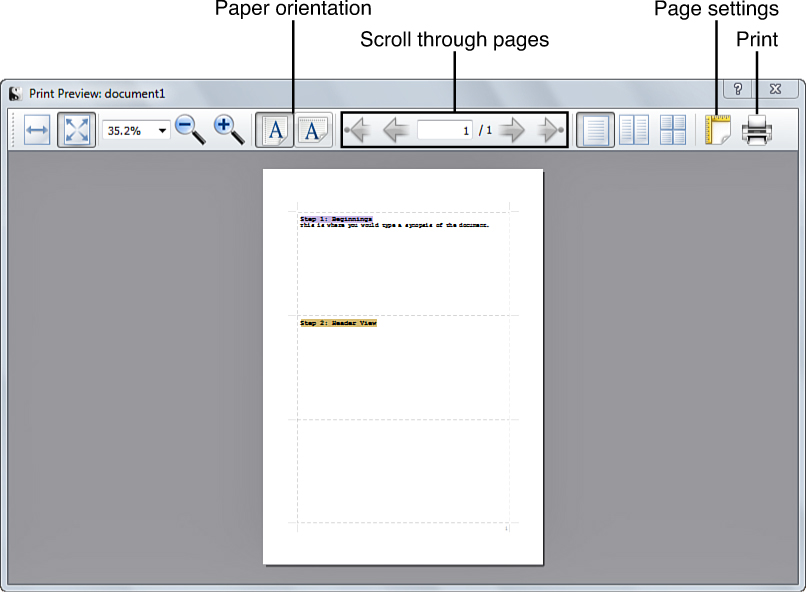
If you want to change the margins or print in landscape orientation, make those changes in the toolbar at the top of the Print Preview dialog box. When you are ready to print, click the Print button in the right corner of the Print Preview toolbar.