
3. Organizing the Binder
If Scrivener were a bakery, the Editor would be the baker. The Inspector would be the person responsible for labeling and describing the items. The Binder’s duties would include taking down all the orders and streamlining the workflow. Without the Binder, the bakery would be in chaos. This chapter covers the Binder, the management system of Scrivener.
As the manager of your project, you create the files for each scene or chapter and choose the order in which all of your documents and folders appear in the Binder. You also choose the order in which you complete each of those documents. One advantage Scrivener has over a word processor is that you don’t have to work in a top-down fashion. Before you can come up with a plan for writing your project, however, you need to understand how to use the organizational tools of the Binder.
Working with Files and Folders
As mentioned in Chapter 1, “Getting to Know the Scrivener Interface,” files and folders can both be used almost interchangeably to hold text and as a container with subdocuments. Folders are commonly used to provide structure to your project and designate chapters or parts when you compile your work. This is covered in Chapter 19, “Compiling Your Completed Work.”
The default icon associated with each type of item varies by its content, as shown in Figure 3.1.
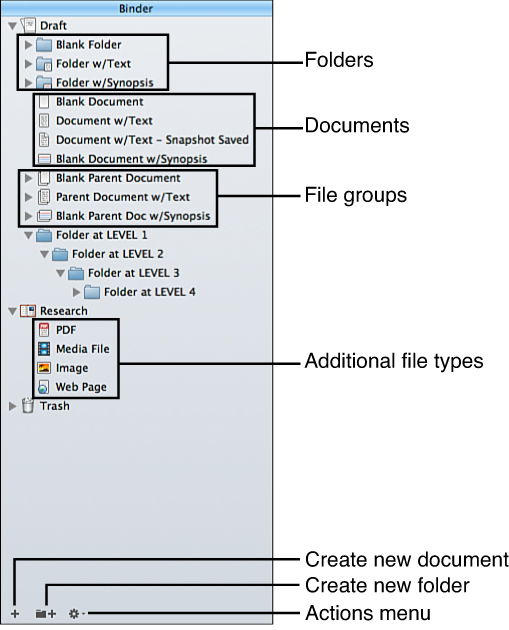
Figure 3.1 This Binder shows the various default icons you see for each type of content. The Actions menu (gear icon) at the bottom of the Binder can be used in place of the context menu.
You might discover that terminology of items in Scrivener is almost as fluid as the concept of files and folders itself. The following lists the ways in which you see files and folders referred to within this book, the Scrivener support documentation, and among the user community:
• Items: Files or folders of any type, whether empty or containing content.
• Containers: Any item that has subitems. This is also referred to as a parent, with any of its subdocuments or folders being referred to as children.
• Files: Also referred to as documents or text, these are items that are intended to hold text. In the Binder, the icon for an empty file is a blank sheet of paper. If the file contains a synopsis but no text, it appears in the Binder as an index card. Files with text have an icon showing a page of text; if the document has been saved with a Snapshot, the icon shows a corner of the icon folded down.
• Folders: A container for documents or subfolders. In the Binder, an empty folder displays a folder icon, whereas a folder with text displays a folder with a document. Folders with a synopsis but no text display an index card overlay.
• File groups: Files containing subdocuments or subfolders. The Binder icons for file groups are similar to those of files, but appear as a stack of papers rather than a single sheet.
![]() Note
Note
Folders and file groups can also appear with a folded corner, indicating that it has been saved with a Snapshot.
As you can see in Figure 3.1, the Binder indents files and folders to display the hierarchy of the items. There are three root folders that are present at the top hierarchy in every Scrivener project. These folders are as follows:
• Draft: This folder contains your actual writing project. For the most part, everything you put into this folder is compiled as part of your manuscript or other completed work.
![]() Note
Note
You can exclude files from the compiled work, as discussed in Chapter 11, “Digging into the Inspector.”
• Research: This folder is intended for research and supporting files related to your project. This may include PDFs, media files, images, and web pages, as well as your own notes and documents.
• Trash: This folder holds any item you delete so it is out of sight, but can still be restored.
You can rename these folders to suit your purposes. Some project templates rename the Draft folder to Manuscript, for example. You can also create additional root folders. Some project templates add root folders to store Character and Setting worksheets. On the Mac, you may also discover a Template Sheets folder in certain project templates. I like to add a Pitch folder to my projects so I can work on my synopsis and track submissions.
As you add nontext files to the Research folder (or any other folder with the exception of the Draft folder and its subfolders), you see additional file types, each represented by a different icon, as follows:
• Portable Document Format (PDFs): Documents formatted to appear the same on all platforms, complete with layout.
• Media: Audio/video files formatted as .mov, .mpg, .wav, or .mp3, and so on.
• Images: Photographs and graphic images formatted as .tif, .jpg, .gif, .png, .bmp, and so on.
• Web pages: Web archive documents (.webarchive) and HTML files.
• Unsupported formats: Files that cannot be viewed within Scrivener can still be imported into your Research or other (non-Draft) folder. When you select one of these files in the Binder, the Editor window displays a link to open the file in the appropriate application.
![]() Tip
Tip
Discover how to import nontext files into your Research folder in Chapter 8, “Organizing Your Research.”
 Caution
Nontext files cannot be directly placed in the Draft folder. You can, however, embed image files into your documents, such as adding figures to a nonfiction work or illustrations to a children’s book. See Chapter 4, “Writing in the Editor,” for details on adding images to a document.
![]() Tip
Tip
When you first set up your file structure, don’t worry too much about whether you use folders or file groups, as long as you’re consistent, because you can easily convert them from one to the other. Select the item or items you want to switch and then right-click to bring up the context menu and select Convert to Folder (or Convert to File, for the opposite). You can also select the items and click the gear button at the bottom of the Binder to bring up the same menu.
Adding Documents and Folders to the Binder
Once you’ve thought about how you want to set up your file structure, it’s time to start putting it into practice. As with most aspects of Scrivener, you can work in whatever order you want. If you already know your manuscript is going to be 20 chapters long or if you decide to set up your file structure to match the Hero’s Journey, you can set up all of your folders at once. If you write by the seat of your pants, you can create folders and documents as you need them.
![]() Tip
Tip
If you already have an existing manuscript created in another application, read “Importing an Existing Manuscript” later in this chapter before setting up your file structure.
The Blank project template creates an initial Untitled document in the Draft folder. Other templates create an initial folder and file. You can use these items as a starting point.
Adding Text Documents
To add a document:
1. Select the folder, file, or file group under which you want to add the document.
2. Choose one of the following:
• Press Return (Enter).
• Click the Add button in the toolbar.
• Click the Create New Document button, the plus sign (+), at the bottom of the Binder.
• Right-click the folder and select Add, New Text from the context menu.
• Choose Project, New Text from the menu.
• Press Cmd-N (Ctrl+G, N in Windows).
An Untitled document appears in the Binder, as shown in Figure 3.2.
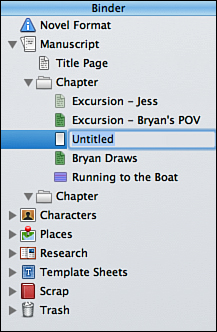
Figure 3.2 A blank new document has been added beneath an existing document. Notice that the Draft folder has been renamed Manuscript.
4. Press Return (Enter).
![]() Tip
Tip
As you can see in Figure 3.2, your filenames are not important. Choose a name that is meaningful to you, such as the key element of the scene.
![]() Note
Note
Figure 3.2 shows icons tinted in various colors. Learn how to associate colors with Label meta-data and apply it to various Scrivener interface elements in Chapter 12, “Putting Keywords and Meta-Data to Work.”
The position of the new document depends on which item you selected before adding the document. If you select a folder, the new document appears as the last item in the folder. If you select a file or file group, the new document appears right below the file/file group, at the same level in the hierarchy.
Adding Folders
Adding a folder is similar to adding a file. The easiest method for adding a folder is the following:
1. Select a file or folder in the Binder.
2. Choose one of the following:
• Click and hold the Add button in the toolbar and then select New Folder from the pop-up menu. In Windows, click the arrow to the right of the Add button.
• Click the Create New Folder button, the folder with plus sign (+), at the bottom of the Binder.
• Right-click and select Add, New Folder from the context menu.
• Choose Project, New Folder from the menu.
• Press Option-Cmd-N (Ctrl+Shift+N in Windows).
An Untitled folder appears in the Binder, as shown in Figure 3.3.

3. Enter a name for the folder.
4. Press Return (Enter).
On the Mac, when you select the Draft or Research folder before adding a folder, the new folder is created as a subfolder. When you select any other root folder before adding a folder, the new folder becomes a sibling of the root. When you select a subfolder, file, or file group first, the new folder is added at the same level as the existing item. In Windows, new folders are always created at the same level as the existing item, even if the Draft or Research folder is selected.
Adding a Folder at the Root Level
For some writers, the three default root folders are all you need to organize your project, possibly along with any extra folders included with one of the project templates. As I mentioned, I like to include a Pitch folder in my projects. I also add a Scrap folder to all of my projects so I can move unused scenes or other bits and pieces that I don’t want to risk permanently deleting in the Trash. I have accumulated dozens of worksheets at writing conferences over the years, many of which I use to help guide the evolution of my story, so I also create a Plotting folder to store those worksheets in progress (I rarely complete all or even most of them).
To add a root-level folder:
1. Right-click in the empty area of the Binder below the Trash.
2. Select Add, New Folder from the context menu.
3. Enter a name for the folder.
5. Drag the new folder to where you want it positioned in the Binder.
The new folder appears with the default icon. On the Mac, you can apply a custom icon to any item in the Binder. Even if you don’t opt to apply custom icons to the rest of your files and folders, you may want to use them with root folders.
Adding a File at the Root Level
Ninety-nine percent of the time, you will only create files within folders. You may notice some project templates, however, have a file at the very top of the Binder containing instructions and tips for using that template. You can add a similar document to your project, but you cannot simply create a text file outside a folder. Instead, use one of these methods:
• Create a new document anywhere in the Binder and drag it to the top of the Binder.
• Create a new root folder (or a folder anywhere in the Binder) and drag it to the top of the Binder. Then right-click on the folder and select Convert to File from the context menu.
• Because files and folders can function in the same way, you could also simply create a root folder, drag it to the top of the Binder, and then add text to it.
Grouping Documents and Folders
If you use a nonstandard file structure while writing your story—or perhaps just write all your scenes before sorting them into any sort of structure at all—you can create a new folder and populate it with selected files and folders in one fell swoop.
Group items into a folder using the following method:
1. Select the items:
• Click the first item and then Shift-click the last item to select consecutive items.
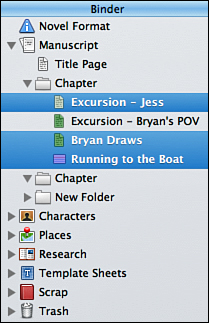
• Cmd-click (Ctrl+click in Windows) each item to select noncontiguous items, as shown in Figure 3.4.
2. Use one of the following commands:
• Right-click and choose Group from the context menu.
• Select Documents, Group from the menu.
• Click the gear icon at the bottom of the Binder and choose Group from the pop-up menu.
• Press Option-Cmd-G (Ctrl+G, G in Windows).
3. Enter a name for the new folder that appears.
4. Press Return (Enter).
The new folder appears at the same level in the hierarchy as the selected files or folders.
![]() Tip
Tip
This approach is useful when you import a manuscript you wrote in another application. Split your manuscript into scenes (described in the “Splitting and Merging Files” section later in this chapter) and then group appropriate scenes into chapter folders.
Organizing Documents and Folders in the Binder
When you create files and folders, items may not populate exactly where you want them. Others might need a name change somewhere down the road. You inevitably wind up with a handful of untitled files and folders that you created but never used. In short, creating items in the Binder isn’t enough; you need to organize and maintain it.
Moving Items
The easiest way to move items around in the Binder is to simply drag and drop them. As explained above in the “Grouping Documents and Folders” section, you can select multiple items at once. To drag and drop items within the Binder:
1. Select one or more items.
2. Holding down the mouse button (or clicking on your trackpad), drag the items over the file or folder into which you want to place them. A bubble appears around the target file or folder as you hover over it. A blue line shows you where the items will be dropped within that container. See Figure 3.5.
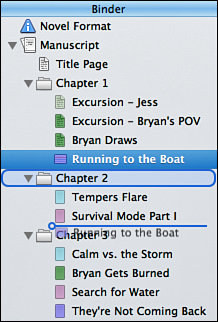
Figure 3.5 The bubble highlights the target container, while the line designates where the items will be dropped within that container.
3. Release the mouse button.
You can also move items by selecting them and choosing one of the following methods:
• From the menu, select Documents, Move, To, and then choose a location from the submenu. In Windows, select Documents, Move To and then choose a location from the submenu.
• Right-click and select Move To from the context menu; then choose a target location from the submenu.
• Click the gear icon at the bottom of the Binder; then select Move To and choose a target location from the submenu.
• From the menu, select Documents, Move and then Left, Right, Up, or Down to move the selection.
• Use the keyboard shortcuts for the previous commands: Left, Control-Cmd-Left Arrow (Ctrl+Left Arrow in Windows); Right, Control-Cmd-Right Arrow (Ctrl+Right Arrow); Up, Control-Cmd-Up Arrow (Ctrl+Up Arrow); Down, Control-Cmd-Down Arrow (Ctrl+Down Arrow).
These commands move the selection one position in the hierarchy. For example, if you move a selection left, it moves it up one level in the file hierarchy. You can use these commands in combination. Select a file and move it to the left, for example, then move it up. The file is moved above the container in which it was originally located.
![]() Note
Note
These commands cannot be used on selections of multiple documents that are at different levels or in different containers.
![]() Tip
Tip
On the Mac, hold the Option key while dragging in the Binder to prevent dropping the selection onto a noncontainer item. If you have set the Option key to duplicate items (in the Navigation tab of the Preferences window), however, this tip will not work. Choose the behavior that you anticipate needing most often.
Duplicating Items
Many project templates contain an initial chapter folder and scene document. A quick method for creating similar containers and items is to duplicate them. As with every other action in the Binder, there are several ways to duplicate items. First select the item, then choose one of the following:
• Select Documents, Duplicate from the menu. Select either With Subdocuments and Unique Title or Without Subdocuments from the submenu.
• Press Cmd-D (Ctrl+D in Windows) to duplicate the selection with any subdocuments, or press Shift-Cmd-D (Shift+Ctrl+D) to duplicate the selection without subdocuments.
• Right-click and choose Duplicate from the context menu to duplicate with subdocuments.
• Click the gear icon at the bottom of the Binder; then choose Duplicate from the pop-up menu to duplicate with subdocuments.
• On the Mac, press the Option key while dragging. This creates a duplicate of the original rather than moving it.
Caution
To enable duplicating a file and subdocuments using the Option-drag method, you first need to enable it in the Navigation tab of the Preferences window. Again, this feature is only available on Scrivener for Mac.
After you’ve duplicated an item, you can give it a unique name.
Renaming Items
As you work, you may decide to rename an item to distinguish it from a similar item elsewhere in the project. For example, in Chapter 1, you create a scene entitled On the Patio. This makes sense as you write Chapter 1, but what if you return to the patio in Chapter 5, and again in Chapter 7? Three scenes entitled On the Patio may cause confusion when you search your project or create collections (covered in Chapter 16, “Searching Your Project”). And of course, if you use the Duplicate command described in the previous section, you need to rename the duplicate items.
To rename an item, double-click the item to select the title and then type a new name. You can also right-click the item and select Rename from the context menu, then type the new name. If you don’t like your hands to leave the keyboard, select the item and then press the Esc key on the Mac or the F2 key in Windows, then type over the current name.
![]() Note
Note
If you want to navigate the Binder mouse-free, use the arrow keys to move around. The up- and down-arrow keys move as expected, up and down one item at a time. The left- and right-arrow keys toggle the visibility of a container’s subdocuments. Press the left-arrow key when viewing a child document to move the focus to the parent container. Press Control-Option-Up Arrow (Ctrl+Shift+Up Arrow in Windows) to go to the previous container or Control-Option-Down Arrow (Ctrl+Shift+Down Arrow in Windows) to go to the next container.
Deleting Items
As you work, you are bound to create unnecessary files and folders. If you are certain you will not need those items again, send them to the Trash.
![]() Tip
Tip
You never know when you’ll find a use for an abandoned scene or piece of research you think is unimportant. Instead of deleting items that contain text, put them into a separate Scrap folder (you learned how to create an additional root folder earlier in this chapter). Save the Trash can for items that you know are truly garbage, such as blank, untitled documents and folders or a spare duplicate of an item.
To delete one or more items, select the item; then do one of the following:
• Drag the item to the Trash folder.
• Right-click and select Move to Trash from the context menu.
• Select Documents, Move to Trash from the menu.
• Click the Trash icon in the toolbar.
• Press Cmd-Delete (Shift+Delete in Windows).
If you change your mind or move something to the Trash by mistake, you can rescue it. View the Trash folder just like any other folder in the Binder and move items out of it using one of the methods described earlier in this chapter.
The Trash folder can eventually become unwieldy and slow down your project with unnecessary items. To empty the Trash, right-click anywhere in the Binder and select Empty Trash from the context menu. You can also select Project, Empty Trash from the menu.
Caution
Always look through all the items in the Trash folder before emptying the folder! Once you use the Empty Trash command, you cannot recover your deleted files, and this step cannot be undone. Remember, Murphy’s Law states that the one file you accidentally deleted instead of moving to a scrap or other holding folder contains the critical piece of research or snippet of dialogue you need to make your story complete.
Adding Icons to Documents and Folders (Mac Only)
Mac users can customize the icons associated with any file or folder. Personally, I leave the file and folder icons in my Draft folder alone, as the default icons convey a lot of useful information. But I create several additional root folders in my projects, and I give each of them a unique icon. I have also personalized the icons for some of the worksheet files I create when brainstorming.
1. Select the item or items you want to customize. You can change several files or folders to the same icon at once.
2. Choose one of the following options:
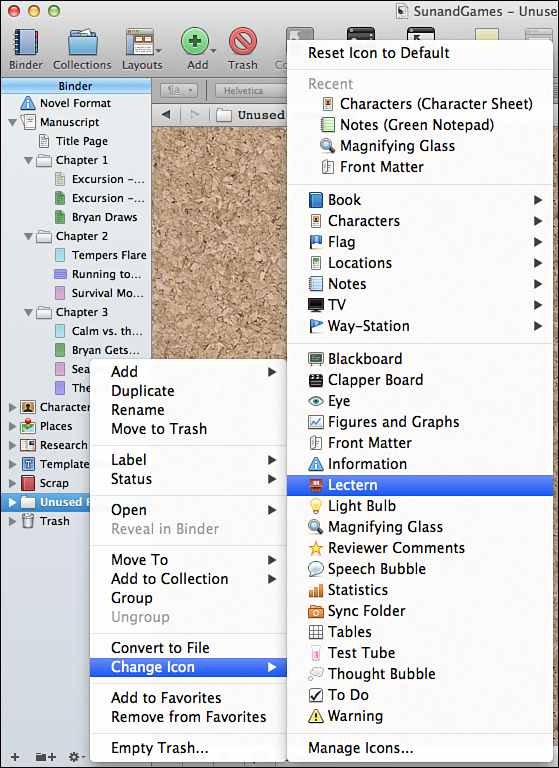
• Right-click and then select Change Icon from the context menu.
• Choose Documents, Change Icon from the menu.
3. Select an icon from the submenu, as shown in Figure 3.6.
Installing Additional Icons
If the preinstalled icons don’t quite suit your needs, you can install additional icons you download from the Internet or create yourself. Scrivener accepts files in .png, .tif, .jpg, or .gif format, and automatically resizes images to the 16×16 pixel icon size, if necessary. To install new icons:
1. Choose Documents, Change Icon from the menu, then select Manage Icons from the submenu.
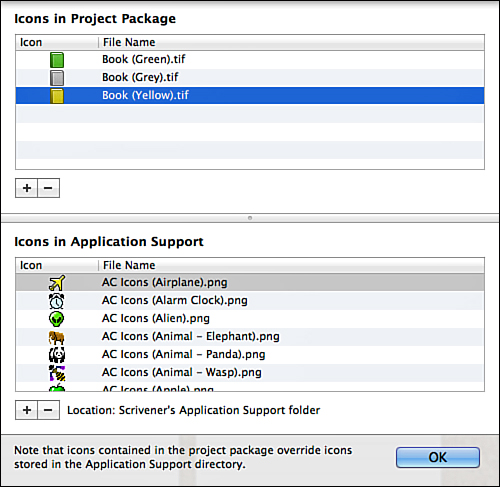
2. In the Manage Icons dialog box, shown in Figure 3.7, choose from the following:
• Icons in Project Package: Adds icons to the project file, but does not make them available to any other project.
• Icons in Application Support: Adds icons to the Application Support folder in order to make them available to all of your projects.
3. Click the Add (+) button beneath the appropriate list.
4. In the Open dialog box, select the icon or icons you want to add, and then click Open.
5. Click OK to exit the Manage Icons dialog box.
![]() Tip
Tip
The forum on the Literature & Latte website (http://www.literatureandlatte.com/forum) is a good source for writing-related icons. Many members have uploaded icon file packages. Search the forum for “custom icons.”
The new icons are added to the Change Icon submenu. To remove an icon, return to the Manage Icons dialog box, select the icon, and click the Remove (−) button.
Restoring Original Icons
If you are writing a book or blog article about Scrivener and need to show the default settings, or if you simply change your mind about a custom icon, restore the default icon as follows:
1. Select the item or items with the icon.
2. Choose Documents, Change Icon, Reset Icon to Default from the menu. You can also access this command from the context menu.
Importing an Existing Manuscript
If you’re new to Scrivener, you may want to import manuscripts you’ve written in other applications into Scrivener. When you import a manuscript, Scrivener makes a copy of it, leaving the original untouched.
Caution
Any changes you make to the imported manuscript in Scrivener are not updated in the original file. Once you import, you have two completely distinct files: the original document and the Scrivener project.
Scrivener converts the following file types in order to import them:
• Rich Text Format (.rtf): This is the most Scrivener-compatible option. Scrivener can convert the entire document, including footnotes and comments.
• Rich Text Format Directory (.rtfd): This Apple format is used for its proprietary applications, such as Pages. Unfortunately, because Apple does not share this format, other applications have a difficult time converting from it, especially such items as footnotes, comments, and images. If you created your document in Pages, it is best to save as .doc or .docx before importing into Scrivener. If you created your document in TextEdit, you may want to save your document in RTF before importing into Scrivener.
• Microsoft Word (.doc or .docx): When you import a Word document, Scrivener uses a converter to attempt to retain as much formatting as possible. If you encounter trouble importing in this format, return to Word and resave your document in RTF before importing.
• Open Document Text (.odt): Files with this extension were created in OpenOffice. As with Word documents, Scrivener attempts to convert the file, but you may need to try again in RTF if you lose too much formatting. Scrivener for Windows cannot import .odt files, so you should save to RTF or .doc if you are using that platform.
• Plain Text (.txt): Plain text documents don’t have much formatting in the first place, so importing them into Scrivener doesn’t present any problems.
• Outline Processor Markup Language (.opml): This format is most commonly used by outlining and mind map applications. When you import these files, Scrivener preserves the outline hierarchy in the Binder. If you have text notes attached to the items, Scrivener puts this material in the main text of the item.
• Mindmap (.mm): This format is used by Freemind and other mind map applications. When you import these files, Scrivener preserves the outline hierarchy in the Binder. This option is only available on the Windows platform.
• Index Card for iPad (.indexcard): This format allows you to import cards created in Index Card into your project. This option is only available on the Mac platform.
![]() Note
Note
You can also keep Index Card for iPad and Scrivener synced to use your iPad on your Scrivener projects. See Chapter 18, “Taking Scrivener Out and About,” for more about using iPad apps with Scrivener files.
• Final Draft 8+ (.fdx): This is the standard Final Draft format. Script writers can import scripts into the Binder to convert them to Scrivener’s script formatting.
• Final Draft 5-7 Converter (.fcf): This format converts scripts created in earlier versions of Final Draft into Scrivener. This option is only available on the Mac platform.
• Fountain (.fountain): This format allows you to import scripts created in Fountain and convert it to Scrivener’s script formatting. This option is only available on the Mac platform.
• No extension: On the Mac, if a document does not have a file extension, Scrivener attempts to import it as plain text. Scrivener treats documents with MultiMarkdown (.xml, .tex, .mmd, .md, or .markdown) extensions in the same way. In Windows, files without a file extension are treated as unsupported file types.
Setting Import Preferences
Before importing a document, examine the options in the Import & Export tab of the Preferences (Options) window, as shown in Figure 3.8. Look for the options for the type of file you want to import, paying particular attention to how footnotes and comments are imported.
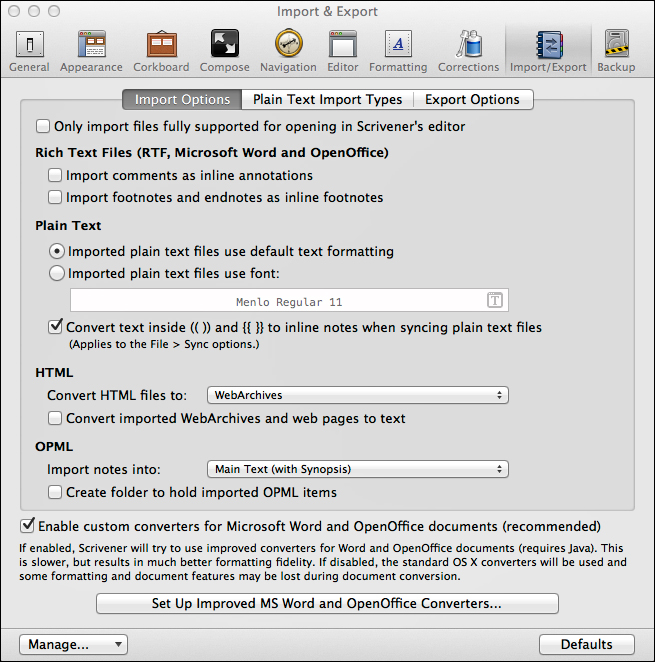
Figure 3.8 The import preferences tell Scrivener how to handle comments and footnotes and enable advanced converters for Word and OpenOffice documents.
In Windows, if you choose the Use Microsoft Word or Open Office for DOC and DOCX Conversions option, you must restart Scrivener before your selection takes effect. You must also have Word 2007 or higher or OpenOffice installed on your computer.
Importing Documents
The fastest way to import a text document is to drag and drop it into your Scrivener project. The first time you import a document, a warning dialog box pops up, shown in Figure 3.9. You can also use File, Import from the menu, and then choose a type of file from the submenu. This is best for importing various types of nontext research material because some of the submenu options offer additional options to facilitate the import of that type of data.
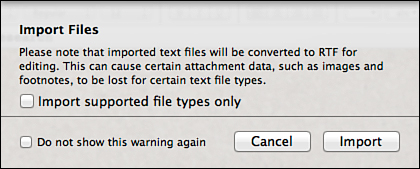
Figure 3.9 This warning pops up whenever you import a document into Scrivener unless you disable it.
You can also import items from one Scrivener project into another. To do this, select the items and then drag and drop them into the target project. To import an entire Scrivener project into another, choose File, Import, Scrivener Project from the menu. As with other types of imports, Scrivener creates a copy of the source material rather than removing or merely linking it from the source.
Splitting and Merging Files
When you import a manuscript created in a word processor, you’re left with a single file containing the entire work. Continuing to work with the manuscript in this way might be counterproductive now that you have all the tools of Scrivener at hand. Once imported, consider splitting the manuscript into multiple documents.
To manually split a document, you first need to select the document in the Binder. The text appears in the Editor pane. Then do the following:
1. Click in the Editor to position your cursor at the first spot where you want to split the manuscript.
2. Choose one of the following:
• Choose Document, Split, At Selection from the menu.
• Right-click and choose Split At Selection from the context menu.
• Press Cmd-K (Ctrl+K in Windows). This option is particularly useful as this is often a very repetitive task.
3. A new document is created with all of the content after the split point. Enter a name for the new file.
4. Press Return (Enter).
Repeat these steps throughout your manuscript, clicking to put the cursor at the next split point in the new document.
![]() Tip
Tip
You can also use the Split with Selection as Title command in the Documents, Split submenu. Select the first few words of text, then choose Documents, Split, With Selection as Title or press Option-Cmd-K (Ctrl+Shift+K in Windows). This splits the selection at the beginning of the selection and automatically uses the selection as the document title.
If you make a mistake and split the document at the wrong point, you can merge files together. Select the documents you want to merge and choose Documents, Merge from the menus or the keyboard shortcut Shift-Cmd-M (Ctrl+M).
Using Import and Split
If your original document already uses dividers between scenes, you’re in luck! As long as the separator character is on its own line between scenes, Scrivener can import and automatically split the document. Follow these steps to import and split:
1. Choose File, Import, Import and Split from the menu.
2. In the Import and Split window, shown in Figure 3.10, locate the file you want to import.
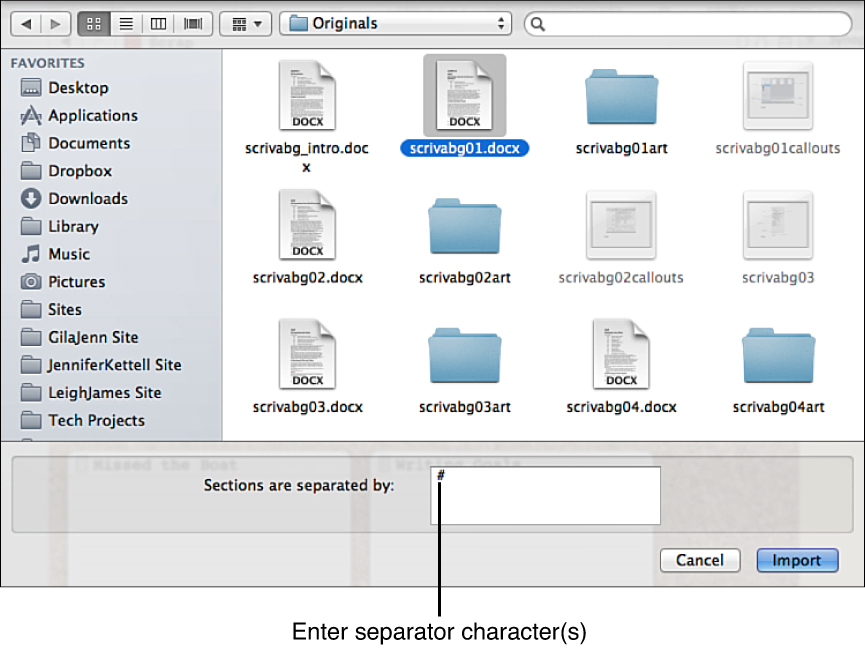
Figure 3.10 Locate the file to import and enter the separator character to import and split in one step.
3. The default scene divider is the pound (#) key. If your document contains a different separator character or a set of characters (such as ###), enter it in the Sections Are Separated By box.
4. Click Import.
The split documents are added to the Binder. The scene dividers are removed as part of the import and split process. It’s a good idea to check each of these documents to be certain everything is where you want. You can manually split or merge documents where necessary to clean things up.
Focusing on the Chapter at Hand
Much of this chapter focuses on the early stages of your work, setting up your initial file structure or importing an existing manuscript. Once everything is in place, you will want to focus on the work itself. The Binder can help keep you focused by allowing you to view only the items you currently need.
Revealing and Hiding Items
To the left of any item with subdocuments, you see a triangle. When the triangle points down, the folder or file group is expanded to see any items within it. Click on the triangle to toggle the visibility of items within the container. Use Option-click (Alt+click in Windows) to expand or collapse all of the items within a container.
![]() Tip
Tip
To expand every item in the Binder, select View, Outline, Expand All from the menu (or press Cmd-9 on the Mac). To collapse all of the containers in the Binder, select View, Outline Collapse All (Cmd-0 on the Mac).
If you are moving files and folders around in the Binder, collapsing unnecessary containers can help you pinpoint where to drop an item. You can also drop items into collapsed containers, which can prevent you from accidentally dropping them at the wrong level.
Hoisting the Binder (Mac Only)
When you really want to focus on just a particular chapter or portion of your manuscript, you can block out the distraction of the rest of your manuscript by hoisting the Binder. When you hoist the Binder, it isolates the selected folder or file group in the Binder, as shown in Figure 3.11. You can only access items within the selected container. The name in the Header bar changes from Binder to the name of the isolated container to help you identify which portion of the project you are viewing.
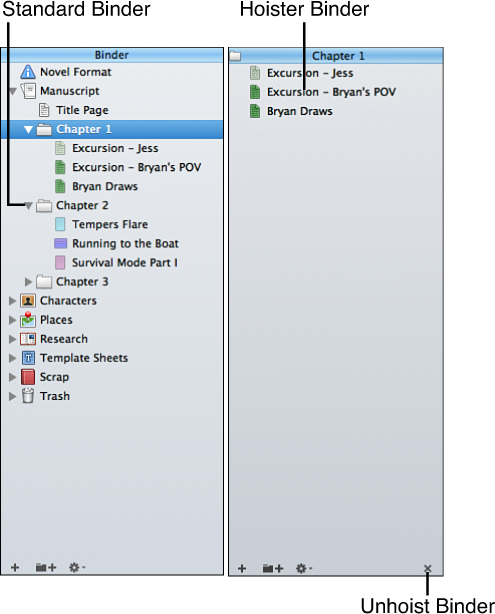
To hoist the Binder, select a folder or file group, then choose Documents, Hoist Binder from the menu.
To return to the rest of your project, click the X button at the bottom of the Binder. Alternatively, choose Documents, Unhoist Binder from the menu.