
9. Brainstorming with Scrivener
Although Scrivener can be used for all manner of writing projects, a large percentage of its user base is composed of fiction writers. With that in mind, this chapter is all about using brainstorming tools with Scrivener to come up with your story.
In Chapter 7, “Plotting in the Outliner,” you learned how to import and export Outline Processor Markup Language (OPML) files to work in conjunction with mind map applications. Mind mapping is one of many ways to brainstorm your plot and characters. Hopefully, this chapter gives you other ideas and shows you how to work both within and beyond Scrivener in a cohesive manner.
Using the Name Generator
To butcher Shakespeare, there’s a lot in a name. A name can make your character approachable (or not), convey a sense of time and place, motivate, or be a burden to its bearer. In some cases, the choice of name for your protagonist is one of the most important decisions you make at the start of your novel.
To help you with this task, Scrivener includes a Name Generator. This tool contains thousands of names ranging from the common to the unique. There are names from classic literature as well as regional and cultural names.
The Name Generator works very differently in the Mac and Windows versions, so each is covered separately here.
Searching for Names on the Mac
To open the Name Generator on the Mac:
1. Select Edit, Writing Tools, Name Generator from the menu. The Name Generator appears, as shown in Figure 9.1 (shown with the Options Drawer open).
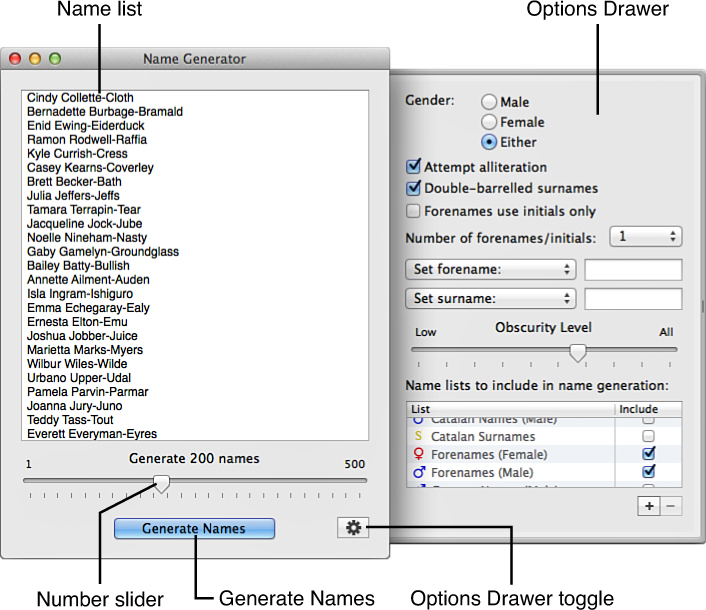
Figure 9.1 The Name Generator on the Mac utilizes an Options Drawer to narrow down the types of names you seek.
2. Click the Options Drawer toggle button (the gear) to open the Options Drawer.
3. Select options in the Options Drawer to hone in on the type of name you want to generate, as follows:
• Gender: The default setting is Either, but you can select to display only Male or only Female names.
• Attempt Alliteration: This option instructs the Name Generator to attempt to find alliterative names, such as Kelsey Clemson or Hector Hawkins. This option works best with Romance (Latin-based) languages because the sounds of the letters are more consistent among them, but try it with other languages and see what you get.
• Double-Barrelled Surnames: This option generates hyphenated surnames, such as Louise Minus-Peddle.
![]() Tip
Tip
Try using the Attempt Alliteration and Double-Barrelled Surnames options together. The results can be quite humorous. Dusty Danks-Dither makes me want to create a character that would have that name, just to figure out what makes him or her tick!
• Forenames Use Initials Only: Select this option in conjunction with the Number of Forenames/Initials drop-down below it to generate surnames preceded by one to three initials, such as S. A. Crabwise.
• Set Forename and Set Surname: These options limit the search for a forename and/or surname by allowing you to enter one or more letters in the name. Click the option to open a drop-down menu with additional settings, as follows:
• Set Forename/Surname: Enter a complete name. This allows you to enter a specific forename and use the Name Generator to match it with potential surnames, or vice versa.
• Forename/Surname Starts With: Enter one or more letters, and the Name Generator provides names that begin with those letters.
• Forename/Surname Ends With: Enter one or more letters, and the Name Generator provides names that end with those letters.
• Forename/Surname Contains: Enter one or more letters, and the Name Generator provides names that contain those letters anywhere within the name. If you enter more than one letter here, the Name Generator only returns names that contain those letters grouped together in the specified order.
• Obscurity Level: Use the slider to set the level of obscurity in the names you seek. If you want a common name, such as Bobby Walker, move the slider all the way to the left. If you want an obscure name, such as Cluny Ruscoe, move the slider all the way to the right. The obscurity of a name often resides in the eyes of the beholder, as names with a strong cultural or regional tie may appear more obscure to those outside that community.
• Name Lists to Include in Name Generation: The Name Generator has several name lists built in from a variety of languages and sources. To the left of each name list is an icon indicating whether it is a male or female list of names. Lists of surnames appear with a yellow S icon. To select or deselect a list, click the check box in the Include column for that entry. You may select multiple lists for a wider range of names or narrow down the lists to a specific type of name.
![]() Note
Note
You must select at least one list of the gender you chose at the top of the Options Drawer and at least one surname list in order to generate names.
4. Below the Name list pane on the left, use the number slider to limit the number of names generated.
5. Click Generate Names.
Names fitting the criteria you selected in the Options Drawer appear in the list pane. As you view the list, you will undoubtedly come up with your own combinations of forenames and surnames, as well.
![]() Tip
Tip
If you want to research the origin of a name, return to the main Scrivener interface—you can leave the Name Generator open in the background—and enter the name in the Editor. Select the name and use the search options in the Writing Tools submenu (Edit, Writing Tools or the context menu) to search for the name. You can search in Spotlight for files on your computer or search in Google or Wikipedia to open your web browser and access those sites. These search tools are helpful when conducting other project-related research, as well.
Adding Names to the Mac Name Generator
Although there are several lists from which to choose in the Name Generator, it is by no means complete. You can add your own name lists by creating a CSV (comma-separated value) file. All of the names in the file should be on one line, with each name separated by a comma but no spaces, such as
![]() Note
Note
Don’t worry if your application automatically wraps long lines, but do not add any manual line breaks or carriage returns.
Save the file with a .csv extension. If you have both male and female names, separate them into their own lists. Consider creating lists of names with a common cultural or regional origin, popularity during a particular historical period, or with a similar meaning. This makes it easier to select or deselect lists when generating names to meet specific criteria. Enter names in order from least to most obscure (that is, most common to least common) so you can use the obscurity slider on the list.
![]() Tip
Tip
You can find preformatted name lists created by other Scrivener users online. Search the forums on the Literature & Latte site (http://www.literatureandlatte.com).
To add lists to the Name Generator:
1. Open the Options Drawer in the Name Generator.
2. Click the Add (+) button below the Name lists.
3. In the Open dialog box, select the .csv file, then click Open.
4. In the Name List dialog box, shown in Figure 9.2, enter a descriptive name for the list.
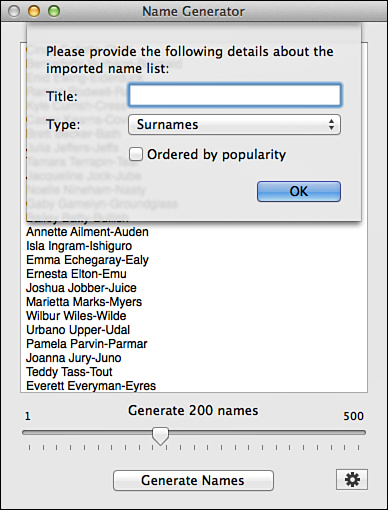
5. Select the list type, whether Male Forenames, Female Forenames, or Surnames.
6. If the list has been ordered from the most common to most obscure, select the Ordered by Popularity check box. This affects the Obscurity slider when using this list.
7. Click OK. The list appears in the Name lists options.
![]() Note
Note
If you want to delete a list, select the list and click the Remove Custom Name List (−) button. You cannot delete any of the built-in lists.
Searching for Names in Windows
Scrivener for Windows has many features that do not exist in the Mac version. In Windows, select Tools, Writing Tools, Name Generator to open the Name Generator, as shown in Figure 9.3.
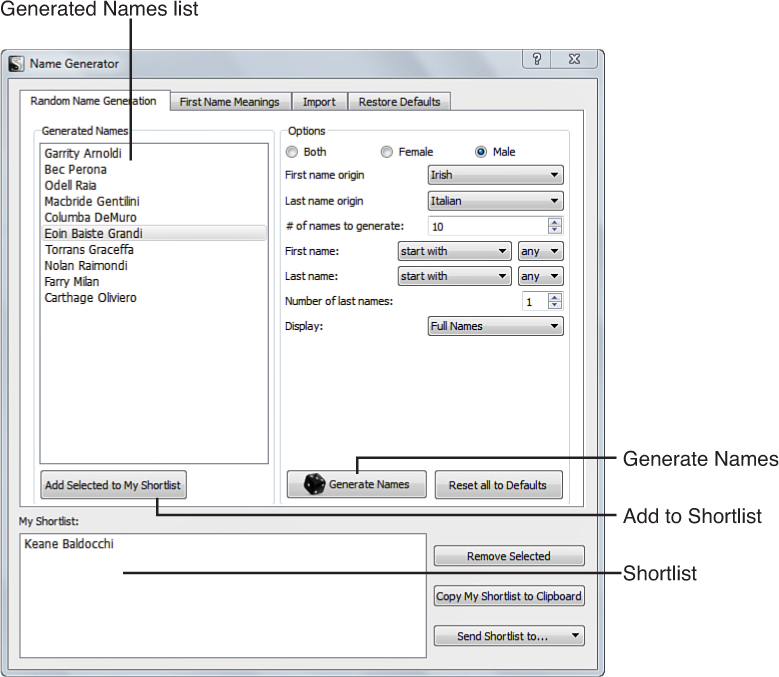
Figure 9.3 The Name Generator in Windows allows you to create a shortlist of names you want to consider for characters.
The Windows Name Generator has the following options:
• Gender: The default is Both, but you can choose to view only Male or only Female names.
• First/Last Name Origin: Open the drop-down menu for the first and last name to choose the language of origin for that name. If you have an Irish-Italian hero, for example, you can choose Irish for the First Name Origin and Italian for the Last Name Origin to come up with a unique name that explains your character’s heritage upon the reader’s first introduction to him. The default for both Name Origin options is All.
• Number of Names to Generate: This option controls how many names the Name Generator displays in the Generated Names list.
• First Name/Last Name Start With: Choose a letter from the drop-down list to limit the names to those that start with, end with, or both start and end with the chosen letter.
• Number of Last Names: This option determines the number of hyphenated surnames for each name in the list. Choose from 1 to 3.
• Display: Choose from displaying full names or only first or only last names.
Once you have set the options for your list, click Generate Names. The Generated Names list is populated with options that fit your criteria. When you discover a name you like, select it in the Generated Names list and then click Add Selected to My Shortlist. You can Shift+click to select multiple contiguous names at once from the list or Ctrl+click to select multiple noncontiguous names.
When you have created a shortlist of possible names, click Copy My Shortlist to the Clipboard to copy the list, and then open a document in your project to paste it. You can also paste the list from the Clipboard to a program outside Scrivener. Click the Send Shortlist To button to open a submenu of options in order to copy or append the list to a specific file in your Scrivener project.
 Caution
If you close the Name Generator, your shortlist is erased. Always copy or send your shortlist to a file before closing the Name Generator.
Often, the meaning of a name can be used as a characterization element. To view the meaning of a name in the Windows Name Generator, click the First Name Meanings tab, shown in Figure 9.4. Most, but not all, of the names in the database have defined meanings.
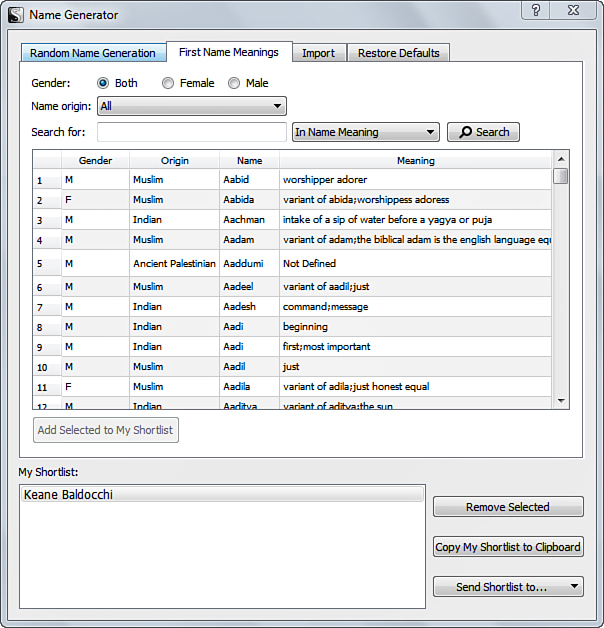
Figure 9.4 The origin of most names listed in the Name Generator in Windows can be found in the First Name Meanings database.
Each name in the database is listed by gender, origin, and meaning. Search for names using the following criteria:
• Exact Match: Searches for the specific name you enter.
• In Name Meaning: Searches for a term in the Meaning column of the database. For example, a search for the word flower brings up a list of all the names that include the word flower in their meaning, such as Ardath, which means flowering field.
• Anywhere in Name: Searches for names containing the letter or letters you enter, grouped together in the order you specify. Thus, entering “LP” as the search criterion causes the name Alphonse to appear among many others matching that criterion.
• At the Start/End of Name: Searches for names beginning or ending with the letter or letters you enter.
• Use Gender & Origin Only: Searches for names matching your search term and meeting the Gender and Origin criteria you set in the First Name Meanings tab.
![]() Tip
Tip
You can also search for name meanings and conduct other project-related research using the Writing Tools submenu (Tools, Writing Tools or the context menu). These options open your browser and automatically search for any term you select in the Editor using Google, Wikipedia, and various other sites. The Translate to Another Language option opens your default web browser and enters the search criteria on the Dictionary.com Translator website (http://translate.reference.com). Translating a name or common word to another language can help you come up with an interesting variation of a name.
Adding Names to the Windows Name Generator
You can add names to the Name Generator in Windows by formatting them in a .csv or .txt file. Create separate lists for first and last names. For Last Name lists, format them as follows, with each name on its own line followed by the origin of the name, separated by a comma:
Name1,English
Name2,Polish
For First Name lists, enter each name on its own line followed by M or F to indicate gender, the origin of the name, and the meaning. The meaning must appear in double quotations. The list should appear as follows:
Name1,M,English,”Meaning of Name”
Name2,F,Irish,”Meaning of This Name”
Caution
Because of the formatting differences, name lists for the Mac and Windows versions are not interchangeable.
To add the list to the Name Generator:
1. Open the Name Generator and click the Import tab, shown in Figure 9.5.

2. Click the Browse button for either First or Last Names.
3. Locate the file in the Open dialog box, then click Open.
4. Click the Import File button.
5. A message tells you how many names were added to the database. Click OK.
If you want to reset the Name Generator to the default list, open the Restore Defaults tab and click the Restore Defaults button.
Creating a Sketchpad
In Chapter 8, “Organizing Your Research,” you learned how to open a file in an external editor. You can take full advantage of this feature to connect brainstorming tools to your project. In this example, you see how to create a sketchpad. If you have an artistic bent and like to draw anything from house floor plans to sketches of your characters, this may be of use to you. You can also use a sketchpad to create collages with photographic images that represent elements from your book.
First, determine which drawing application you would like to use to create your artwork. I use AutoDesk SketchBook on both my Mac and PC. Then take the following steps:
1. Open your drawing application and create a blank file.
2. Save the file under a name such as sketchpad or whiteboard to remind yourself of its purpose.
3. Import the file into your Scrivener project by dragging it from the Finder or Windows Explorer into the project.
![]() Note
Note
On the Mac, I suggest dragging this file into your Templates folder. This makes it easily reusable. Template sheets are covered in Chapter 13, “Creating and Using Template Sheets.”
In Windows, you can create a root folder for documents like this and other pseudotemplates. To use them, select Documents, Duplicate (Ctrl+D) from the menu to duplicate the file and drag the duplicate into your Research or another folder.
4. To use the sketchpad, create a new sketchpad file in your Scrivener project, either using the template sheet on the Mac, as shown in Figure 9.6, or duplicating the file in Windows.
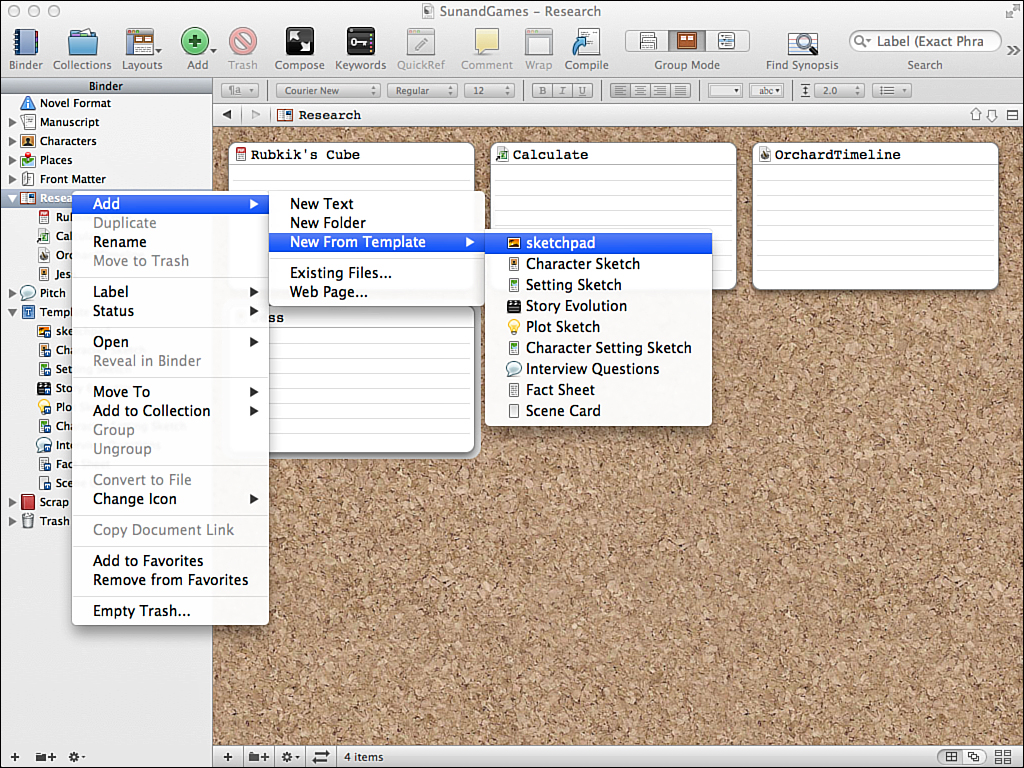
Figure 9.6 Create one blank file in a drawing app, and use it to create multiple sketchpads in your projects.
5. In the Editor, click and hold the Open in External Editor button in the Footer bar.
6. In the pop-up menu on the Mac, select the application in which you want to open the file.
7. Create your drawing or collage in your drawing application.
8. Save the file.
9. In Scrivener for Mac, click the Reload File button to update the link, as shown in Figure 9.7. In Windows, open a different file in the Editor and then return to the sketchpad document to reload it.
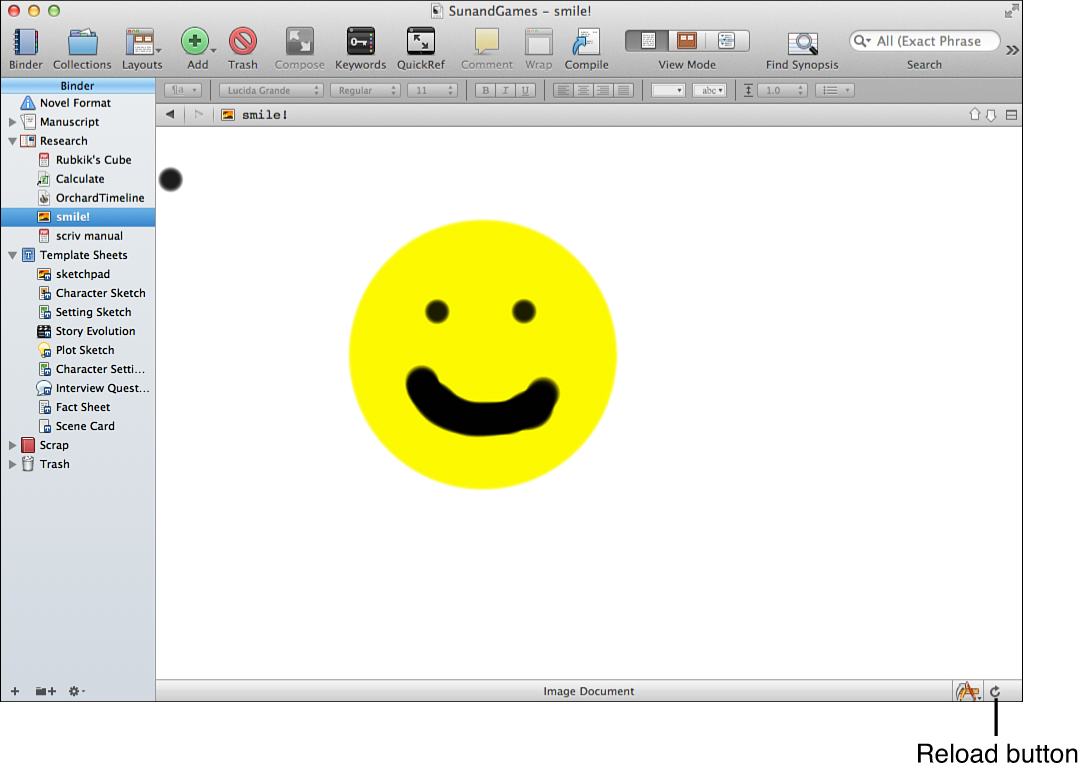
Figure 9.7 Your new sketchpad can be used to add drawings to brainstorm your project or just remind you to smile when you’re in the thick of it.
You can use this same process to create template sheets (or pseudotemplates in Windows) for other applications, such as mind maps and timelines, as well. If you save these items into a project template, as you learn in Chapter 14, “Creating and Using Project Templates,” you can have them immediately available whenever you begin a new project.
Using Aeon Timeline with Scrivener (Mac Only)
Although Scrivener offers many tools for writers, one area some authors find missing is the lack of a timeline feature. If you use a third-party timeline application, you can import a timeline into your project and open it in an external editor, but actually integrating your timeline’s components into your project requires considerable duplication of efforts.
One Mac timeline application has addressed this need for integration. Aeon Timeline was designed by Scribble Code, the company created by a Scrivener user with the express purpose of creating a writer-friendly timeline application that synchronizes with Scrivener. Much like importing an OPML file into your project, Aeon Timeline creates items in Scrivener based on timeline entries. Better still, it keeps these links synchronized. If you change a date in the custom meta-data in your Scrivener project, it is updated in Aeon Timeline, and vice versa. You can also view this meta-data in Scrivener’s Outliner, so you can sort files by date or other fields.
![]() Tip
Tip
Aeon Timeline was designed by a third party and is not included in Scrivener. You can obtain it from the Scribble Code website (http://www.scribblecode.com) or the Mac App Store for $40. Download a 30-day trial from the Scribble Code website. It is worth evaluating this application not just because of its Scrivener integration but because it is designed for use by writers. You can use it to create fantasy calendars, explore the relationships between characters and events, and create concurrent storylines and character arcs.
![]() Note
Note
Explaining the details of how to use Aeon Timeline is beyond the scope of this book, but the application provides a tutorial and a manual.
To synchronize an Aeon Timeline file with a Scrivener project:
1. Create your timeline in Aeon Timeline.
2. Either create a new project in Scrivener or determine which project you want to synchronize with Aeon Timeline.
3. Close the chosen project in Scrivener.
4. In Aeon Timeline, select File, Synchronize. The Synchronize Timeline dialog box opens, as shown in Figure 9.8.
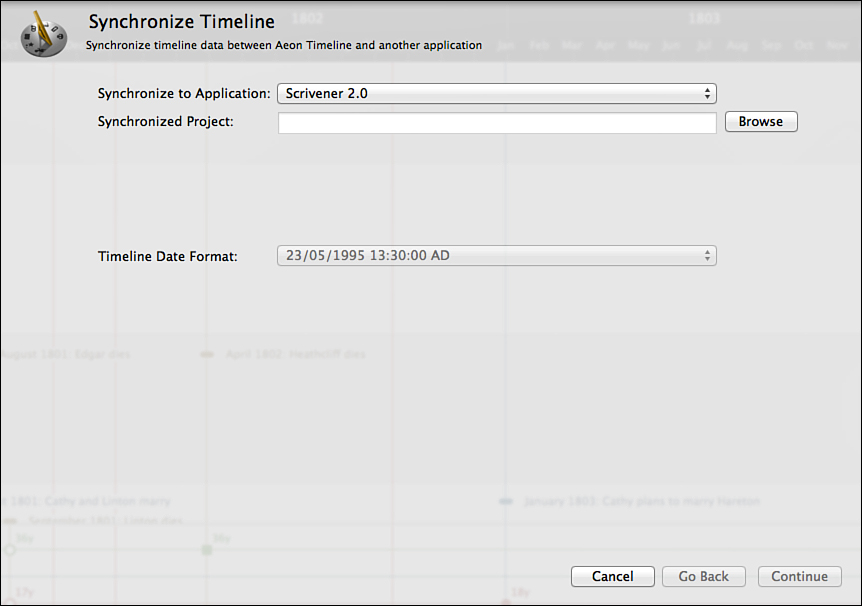
Figure 9.8 The Synchronize Timeline dialog box in Aeon Timeline creates the link between your timeline and your Scrivener project.
![]() Note
Note
The first time you select this option, you’ll see a warning to back up your timeline project before syncing. Click the Do Not Show This Again button to prevent the warning from reappearing.
5. In the Synchronize to Application drop-down menu, select Scrivener 2.0.
6. Click the Browse button to navigate to your Scrivener project.
Caution
If you did not close the project in Scrivener in step 3, a warning appears reminding you to close the project and try again.
7. Choose a date format from the Timeline Date Format drop-down menu.
8. Click Continue. This opens the Action window in the Synchronize Timeline dialog box, as shown in Figure 9.9.
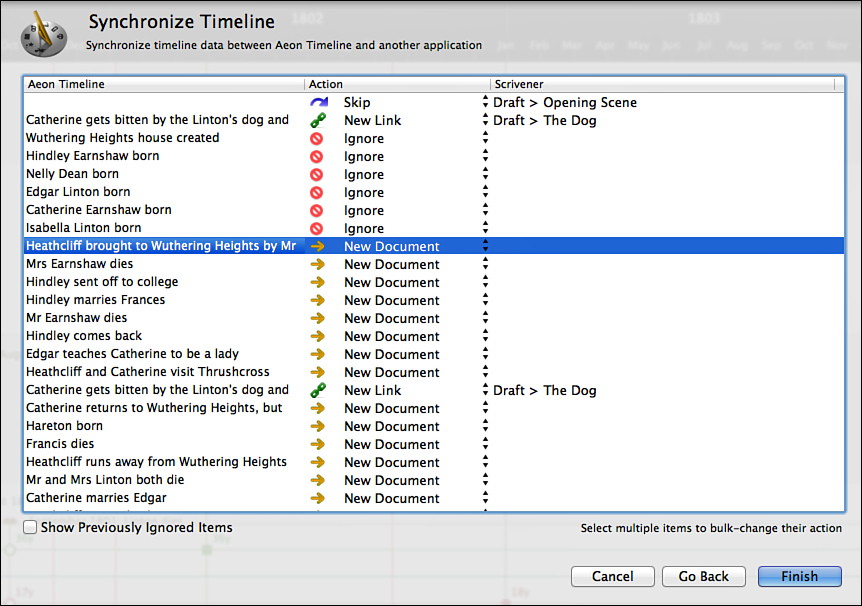
9. For each event in your timeline, click the Action setting and choose from the following options:
• New Document: Creates a new document in the Scrivener project to which the timeline entry is linked
• New Link: Creates a link between the timeline entry and an existing document in the Scrivener project, as selected from a sheet that appears with a list of documents
• Ignore: Ignores this timeline entry in the Scrivener project by not linking it to any document
• Skip: Does not link the timeline entry to a Scrivener document at this time, but continues to prompt for a link when you synchronize in the future
10. Click Finish. The selected timeline events and documents are linked.
When you reopen the project in Scrivener, if you open the Custom Meta-Data pane in the Inspector, you can see the custom fields added by Aeon Timeline, as shown in Figure 9.10. You can edit any custom field in Scrivener (with the exception of the Aeon ID and Aeon Sync fields), and your changes will be synced back to Aeon Timeline.

Figure 9.10 Aeon Timeline has synchronized with a document in Scrivener and created custom meta-data, which can be used in both applications.
A Windows View: A Scrivener for Windows Easter Egg
If you’re a Scrivener for Windows user who writes or simply appreciates science fiction, you’re in for a treat. Scrivener can be used in many languages, and localization efforts are always expanding. Scrivener user Pigfender took advantage of this effort to create a Science Fiction localization of the Scrivener interface. The menus, toolbar, dialog boxes, and tooltips all contain science fiction references.
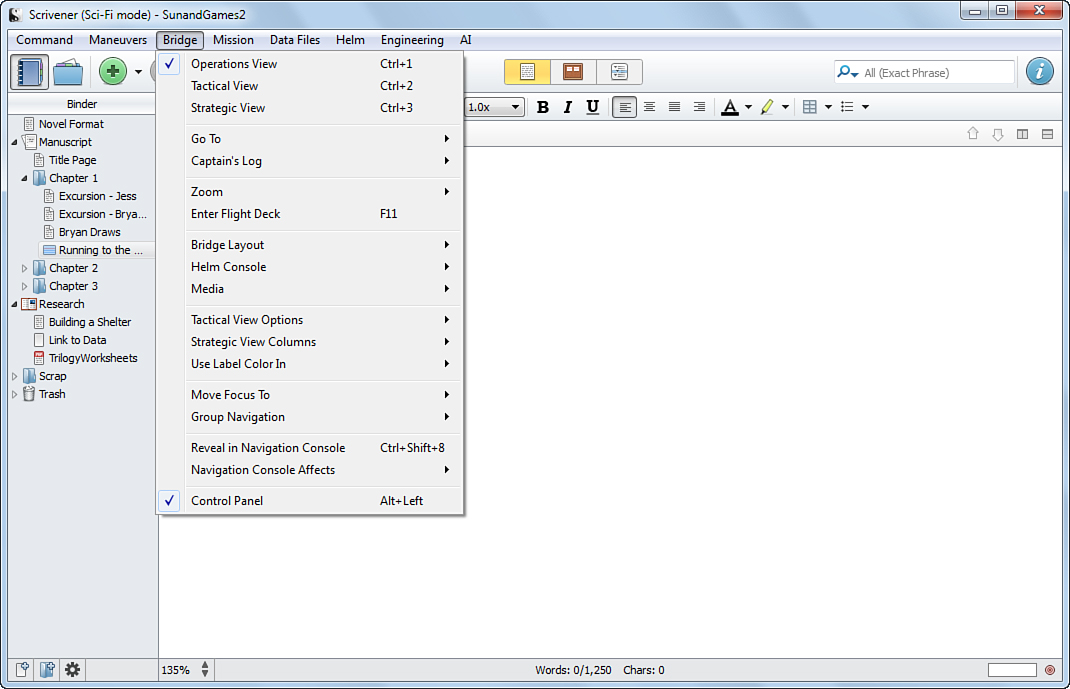
To access this Easter Egg, select Tools, Options from the menu. On the General tab, click the Languages drop-down menu and choose Science Fiction. Click OK to accept the change and close the Options window; then exit and restart Scrivener. To return to English or another language, select Engineering, Options to reopen the Options window.