
7. Plotting in the Outliner
Does your writing process lean more to the logical than the visual? Do you need more information about your project than a color-coded index card can provide? Do you want to see your entire project’s hierarchy at once instead of one container at a time? If so, the Outliner is the tool for you.
The skeuomorphic Corkboard can be very useful for storyboarding or when you want to hone in on a particular container, but the Outliner offers additional flexibility to give you an overview of your project.
Exploring the Outliner
As with the other Group View modes, Scrivenings and the Corkboard, the Outliner is used to view multiple items at once. Thus, before you can open the Outliner, you must select a container or group of files in the Binder. If you want to see your entire Draft (or Manuscript) folder at once, select this root folder in the Binder. Then choose one of these options to open the Outliner:
• Click the Outliner button in the Group Mode grouping on the toolbar.
• Choose View, Outline from the menu.
• Press Cmd-3 (Ctrl+3 in Windows).
The Outliner, shown in Figure 7.1, resembles a spreadsheet. Each row represents a document or folder. Each column displays meta-data associated with the item, such as Title, Synopsis, Label, and Status. On the Mac, the Title and Synopsis appear in one column, along with the item icon, with the synopsis appearing below the title.

On the Windows platform, the Title and Synopsis fields are in separate columns, as shown in Figure 7.2. The item icon appears by default with the title.

![]() Note
Note
You can also use the Outliner in Split Screen mode. Refer to Chapter 4, “Writing in the Editor,” and Chapter 6, “Storyboarding with the Corkboard,” to learn more about Split Screen mode. As with the Corkboard, if you want to open a document in the Editor, double-click its item icon in the Outliner.
Customizing the Outliner
By default, Scrivener displays the Title and Synopsis, Label, and Status fields, but you can customize the columns to add or remove fields. In fact, you can customize just about everything in the Outliner. You can expand and collapse folders and adjust the column width. On the Mac, you can also change the sort order of items.
Expanding and Collapsing Containers
As you can see in Figures 7.1 and 7.2, the Outliner displays the entire contents of the container you selected in the Binder. Items with subitems appear with a disclosure triangle next to the item icon. Toggle the triangle to expand and collapse the subfolder or file group in order to view its contents.
If you want to expand all of the items in the Outliner at once, choose View, Outline, Expand All. On the Mac, you can use the Cmd-9 keyboard shortcut. To collapse all of the items, choose View, Outline, Collapse All. The keyboard shortcut on the Mac for this is Cmd-0.
![]() Tip
Tip
If you want to set a keyboard shortcut for these commands in Windows, select Tools, Options from the menu and then select the Keyboard tab. Begin typing the word expand (or collapse) in the Filter text field at the top of the Keyboard options to narrow the list of menu commands, and then select the Expand All command (or the Collapse All command) and set a keyboard shortcut combination. Click OK to close the Options window.
You can also expand a single item and all of its subfolders and file groups. To do this, press the Option key (Alt key in Windows) while clicking the disclosure triangle.
Adding and Removing Columns
Arguably the most powerful feature of the Outliner is the ability to see all of the meta-data for an entire container on one screen. If you view your Draft folder in the Outliner, you can see all of the meta-data for your entire project, including every subfolder and file group. Of course, you won’t want to limit this power to just the title, synopsis, label, and status for your items.
To add or remove columns from the Outliner:
1. Click the Columns Menu button on the right end of the field headers, as shown in Figure 7.3. In Windows, the button is a single down-facing triangle on the far right of the header row.

2. Select the field you want to add to the Outliner or deselect the field you want to remove.
3. On the Mac, you can continue selecting or deselecting multiple items at once. In Windows, repeat steps 1 and 2 as needed.
4. Click outside the drop-down menu when you are finished.
Alternatively, you can configure Outliner headers by choosing View, Outliner Columns and selecting or deselecting from the submenu. On the Mac, you can also right-click anywhere in the Outliner column headers to select or deselect items from the pop-up menu.
You can display the following types of meta-data fields in the Outliner:
• Basic item information: On the Mac, the default first column is labeled Title and Synopsis and also displays the item icon. You can deselect the And Synopsis and With Icons options if you want to only see the Title field. As with the Corkboard, you can also choose to view the Label and Status. On the Mac, you can view Keywords, as well. You can edit the title and synopsis by double-clicking in those entries and modifying the text. Change the label or status of an item by clicking in the field (double-clicking in Windows) and selecting from the pop-up menu. Add keywords (on the Mac) by opening the Keywords panel and dragging keywords onto the Outliner entry.
 Caution
You cannot delete a keyword directly within the Outliner. To delete keywords from an item, open the Inspector, click the Keywords icon at the bottom of the sidebar, and then select the keyword and press Delete. See Chapter 12, “Putting Keywords and Meta-Data to Work,” to learn more about using keywords.
• File dates: If you want to see when files were created or last modified, choose Created Date and Modified Date.
• Statistics: If you select Word Count and/or Character Count, you can view these statistics for each item. Choose Total Word Count and/or Total Character Count to view the statistics for any subitems within a folder or file group. For example, if a folder (or file group) contains a paragraph of text of its own, that word count appears in the Word Count column. The total number of words in that folder plus all of its subfolders and subdocuments appears in the Total Word Count column.
![]() Note
Note
The two Word Count options are displayed on the Mac in the colors of the progress bar. You can see how close you are to reaching your target goal from the color of the number in these fields, even if you do not choose to display the project targets in the Outliner. To learn more about project targets, see Chapter 15, “Tracking Your Progress.”
• Compile instructions: The Include in Compile, Page Break Before, and Compile As-Is settings are used when compiling a project. They are based on the settings in the Inspector. You can modify them by selecting or deselecting the check boxes in either the Outliner or Inspector. Press the Option key on the Mac or Alt key in Windows while clicking to select or deselect all visible rows.
• Project targets: If you set document targets, as explained in Chapter 15, the project target fields display how close you are to reaching your goals in each item or container.
• Target: Displays the target goal for the item.
• Target Type: Displays whether the displayed target is a word or character goal. Click in this field and choose from the pop-up menu to change the Target Type.
• Progress: Displays a bar showing your progress toward your target goal. The bar changes color as you approach your goal.
• Total Target (Mac Only): Displays the target goal for the item plus any subitems based on the individual document targets set for these items.
• Total Progress (Mac Only): Displays a bar showing your progress toward your target goal for the entire folder or file group based on the individual document targets set for the container and its subdocuments.
• Custom Meta-Data (Mac Only): If you set up custom meta-data, as explained in Chapter 15, you can display these fields in the Outliner. Figure 7.3 shows two custom fields in the Columns menu. A common use of custom meta-data is to add a field to display the date of a scene to use the Outliner as a timeline.
![]() Tip
Tip
If you’re a lawyer using Scrivener to prepare case material, adding a custom field can help you track when you’ve filed briefs and motions or note references to case law.
You can return to the Columns menu whenever you want to reconfigure the Outliner. New columns are added to the right of previously selected columns, but they do not have to remain in that position.
Arranging Columns and Items
Once you determine which fields you want to display, you can arrange the columns in the header row. To move a column, click on the header and drag it to its new position.
To adjust the width of a column, position your cursor to the right of the column you want to modify. The cursor changes to a two-sided arrow. Click and drag the cursor to the new position. You can also double-click the cursor to automatically resize the column.
![]() Tip
Tip
If you use multiple configurations of Outliner columns, consider saving each configuration as a workspace layout, as explained in Chapter 2, “Customizing Your Work Environment.” Outliner columns and their arrangement are both saved in the layout.
Items can also be rearranged within the Outliner. Simply drag and drop the item to its new location. Changes within the Outliner are immediately reflected in the Binder. If you drop an item into a different folder or file group, you immediately see the statistics update in the Total Words field and the project targets if you have made those fields visible in the Outliner.
Hiding the Synopsis
The Outliner is great for giving you a broad overview of your project. You can look down the Status column, for example, and immediately see which items are unwritten, are in progress, or are ready for revision (if you use the Status field with the default settings and have not repurposed it to track some other aspect of your project). In those instances, you don’t need to see the synopsis for each item. In fact, the synopses may take up extra lines of screen real estate when you would prefer to see as many items as possible without scrolling.
There are two ways to hide the synopsis in the Outliner, as follows:
• As noted earlier, you can deselect the And Synopsis option in the Columns menu (deselect the Synopsis option in Windows).
• Click the Hide Synopses button in the Footer bar of the Outliner, as shown in Figure 7.1. This option is only available on the Mac.
To display the synopses again, reselect the option in the Columns menu or click the Show Synopses button (on the Mac).
Sorting by Outliner Columns (Mac Only)
Just as the Freeform Corkboard (on the Mac) allows you to manually group index cards together, the Outliner enables you to sort by any column. If you write your work out of order, for example, you may want to sort by Status to group items that are In Progress, To Do, or have been through a First Draft and are ready for revision.
![]() Tip
Tip
Because items may have multiple keywords attached, it is rarely useful to sort by the Keywords field.
To sort, click the header for the column by which you want to organize your items. As you can see in Figure 7.4, a triangular sort indicator appears in the header column to show by which field and in which order the Outliner is sorted. The triangle points upward to signify an ascending (A to Z) sort order and downward when the sort is descending (Z to A). As you can see in the figure, each container is sorted independently. In other words, all of the items in Chapter 1 are sorted, and then all the items in Chapter 2, and so on.
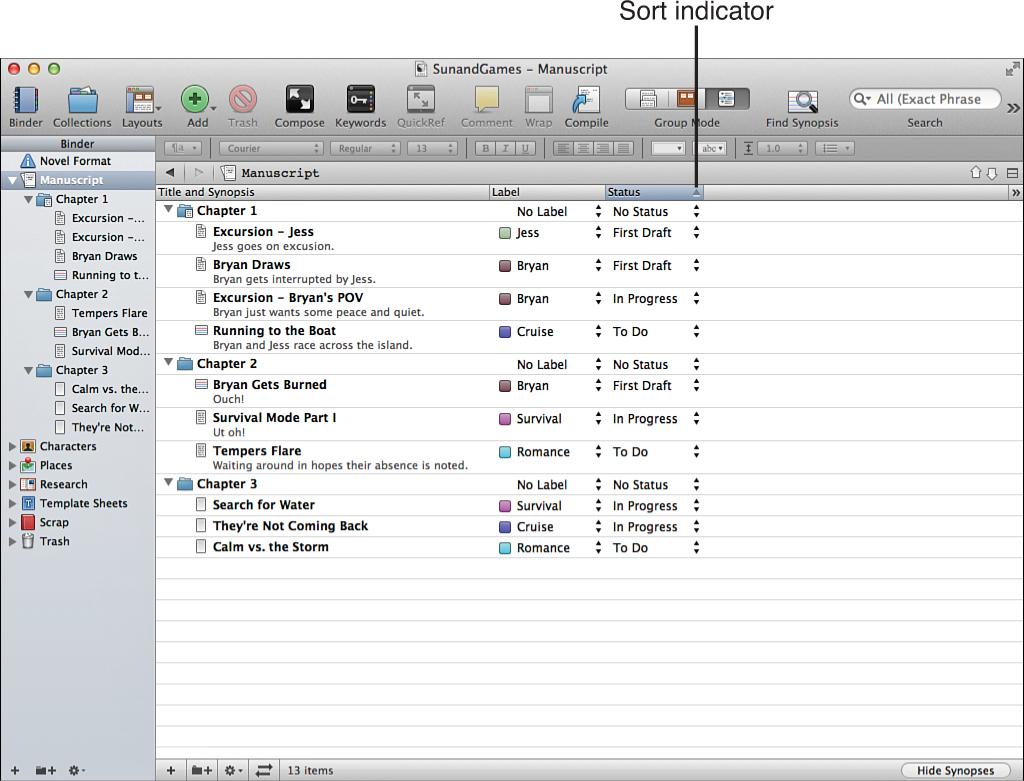
Figure 7.4 Sorting the Outliner by Status can help you determine which items need attention in order to finish a complete first draft.
![]() Tip
Tip
If you change the sort order of items in a container and want to make the change permanent, select the items in the Outliner and drag them back into their container in the Binder. You can also right-click on the selection and then choose Move To from the context menu and select the original container from the submenu.
![]() Note
Note
Changing the sort order does not change the arrangement of items in the Binder.
Printing an Outline on the Mac
Some writers like to do all their work on the computer. But for those times when you need to work the old-fashioned way, with pen and paper, it’s convenient to have your project outline available.
To print your outline on the Mac:
1. Select File, Page Setup.
2. Click the Settings option and select Scrivener from the drop-down menu. The dialog box displays margin settings.
3. Click Options. The Print Options dialog box opens.
4. Click Outlines to display the options for printing from the Outliner, as shown in Figure 7.5.

Figure 7.5 The preview pane of the Print Options window shows where each selected option appears in the entry.
5. Select from the following options. The top half of the dialog box displays a preview showing how the options you select will appear in the printout:
• Include Titles: Selected by default, this prints the document title for each item.
• Include Synopses: Selected by default, this adds the synopsis to each item.
• Include Label and Status: This option highlights the title in the label color and appends the label name in parentheses next to the title. It adds the status in parentheses below the synopsis.
• Include Keywords: This option adds the keywords beneath the document title. Keywords are underlined and comma separated.
• Include Custom Meta-Data: This option adds the field name and contents of any custom meta-data for the entry below the title and keywords.
• Indent by Level: Selected by default, this indents subitems for each container.
• Print File Name: This option adds the name of the selected container for the outline to the header of the printed outline. For example, if you select the Draft folder in the Binder to open in the Outliner, the header displays the word Draft along with the print date of the outline. If you choose a different container, the header displays the title of that folder or file group.
• Include Word Count: This option adds the word count below the synopsis, within the same parentheses as the status.
• Include Character Count: This option adds the character count below the synopsis, within the same parentheses as the status and word count.
• Include Targets with Counts: This option displays the word count for each item as a fraction of the target word count, such as 647/1,000. This item only affects the outline when selected in conjunction with the Include Word Count option.
• Prefix Titles with Numbers: This option prepends a number to the title of each item showing its order within the selected container. This number simply reflects the order in which the item appears within the parent container, not within the hierarchy of the project as a whole.
• Font: This option determines the font and font size for your printed outline.
6. Click OK to close the Print Options dialog box.
7. Click OK to close the Page Setup dialog box.
8. Choose File, Print Current Document (or press Cmd-P) from the menu to open the Print dialog box.
9. Click Print.
When you are in the Print dialog box in step 9, you have the option of printing a hard copy of the outline or saving it as a PDF file. To save as a PDF:
1. In the Print dialog box, click the PDF button in the lower-left corner of the window.
2. Select Save as PDF in the drop-down menu.
3. Name the file and navigate to where you want the file to be stored in the Save As dialog box.
4. Click Save.
You can also preview your outline as a PDF before printing. In step 2, above, select Open PDF in Preview from the drop-down menu. You can then print or save the file from within the Preview app.
![]() Tip
Tip
Another approach for both Windows and the Mac is to compile your project using the Outliner or Enumerated Outline compile presets. See Chapter 19, “Compiling Your Completed Work,” to learn how to use the Compile features in Scrivener.
Exporting an Outline
Another method for using your Outliner data outside Scrivener is to export it to a file. This file can be opened in other applications, such as a spreadsheet or mind map, where you can manipulate and format the data as you require. You can also print from these applications with more flexibility and control over formatting than the Scrivener Outliner options.
For Windows users, this is the only way to access the word count or target goal meta-data fields so you can print them in your outline. Even Mac users may find this approach is preferable, however.
Exporting to a Spreadsheet (CSV Format)
If you want to access your outline in a spreadsheet, such as Microsoft Excel, Apple Numbers, or OpenOffice Calc, you first need to export it to a CSV file. CSV stands for Comma-Separated Values, and that’s exactly what this file contains—a text document with each item on its own line and each field separated by a comma.
![]() Note
Note
You can also save your file in Tab-Separated Values (TSV) or Semicolon Separated Values (TXT) formats.
To export a file to a spreadsheet-accessible format:
1. Open the container you want to save in the Outliner.
2. If you only want to include specific fields in your spreadsheet file, select those columns from the Columns menu and hide any that you want to exclude.
3. Choose File, Export, Outliner Contents as CSV. This opens the Save As dialog box on the Mac or the Export Outliner dialog box in Windows, shown in Figure 7.6.

Figure 7.6 The Export Outliner Contents as CSV options appear in the Save As dialog box on the Mac and the Export Outliner dialog box in Windows.
4. Navigate to the folder where you want to store your file and enter a filename.
5. Click the Format drop-down list and choose from CSV, TSV, or TXT format.
6. You can include all possible meta-data fields in your file or only those currently visible in the Outliner. Select or deselect the Only Include Columns Visible in Outliner as necessary.
7. Click Export on the Mac or OK in Windows.
To view your outline, open the file within your spreadsheet application.
Exporting to OPML Format
You can also export your outline to a dedicated outliner or mind map application. A dedicated outlining program, such as OmniOutliner, is similar to the Scrivener Outliner, but with more flexibility for a wider range of projects. A mind map is a brainstorming tool whereby you start with a single idea and branch other concepts off of it, as shown in Figure 7.7. Most of these apps use OPML format. This format stores item headings and tracks the relationships between items, such as parent, child, and siblings.

![]() Note
Note
If you want to give mind mapping a try, FreeMind and XMind are free, cross-platform applications. There are also many Mac-specific applications, including Scapple or OmniOutliner. A more full-featured, yet pricier, option for Mac and Windows is MindManager.
To export your outline to OPML format:
1. Open the container you want in the Outliner.
2. Choose File, Export, OPML File (File, Export, OPML or Mindmap File in Windows). This opens the Export Save As dialog box, as shown in Figure 7.8.

Figure 7.8 The Export Save As dialog box provides options for saving only the title or the title plus either the synopsis, document text, or notes in OPML format.
3. Navigate to the folder where you want to store your file and enter a filename. In Windows, also select whether you want to save the file with the .opml or .mm (FreeMind) extension or save just the titles in an indented plain-text outline.
4. Select the Export Entire Binder option if you want your entire project exported into the OPML file.
Caution
The Export Entire Binder option includes all of the root folders from your entire project, including the Trash. This can result in an extremely crowded and ultimately useless mind map, so be sure this is the result you want before selecting this option.
5. Choose the information to be included in the OPML folder. The options are as follows:
• Titles Only: Includes only the titles of each document in the selected container.
• Titles and Synopses: Saves the titles and synopses for each item.
• Titles and Text: Saves the titles and document text for each item.
![]() Note
Note
The Titles and Text option only preserves the text of an item, not any images or formatting that may be included in the document. If you export the entire Binder, the titles of PDFs, images, and other file types in your Research folder will appear in the OPML file, but not the content of those items.
• Titles and Notes: Saves the titles and document notes for each item. Document notes are entered in the Inspector, as explained in Chapter 11, “Digging into the Inspector.”
6. Click Export on the Mac or Save in Windows.
Caution
Not all mind map applications allow you to view synopses, text, or notes. Some of these apps simply ignore this data while others cannot open files containing it. If you have trouble opening an OPML file with this data included, try exporting with the Titles Only option.
Importing an OPML or Freemind Outline
If you get hooked on mind mapping, you may choose to map out your story before using Scrivener. Just as you can export to OPML format (and MM for Freemind in Windows), you can also import from both OPML and Freemind into Scrivener. To import an OPML or Freemind file:
1. In your mind map or outlining application, save or export your file in OPML or MM format.
2. In Scrivener, open the project into which you want to import the file.
3. Select File, Import, Files (in Windows, choose File, Import, OPML or Mindmap File). This opens the Import dialog box.
4. On the Mac, navigate to the file and click Import. In Windows, browse to the file, select where you want Scrivener to place attached notes, and then click OK. The Windows Import dialog box is shown in Figure 7.9.

When you import a mind map, Scrivener creates a new item for each entry, organizing items into file groups according to the hierarchy of the mind map nodes. Figure 7.10 shows the mind map that was displayed in Figure 7.7 after being imported into Scrivener.
