
15. Tracking Your Progress
There’s an awful lot of math involved in writing. We worry about the upper word count of article and novel submissions. We calculate how many words a day we need to write to meet our deadlines. We think about overusing particular words, reading level, and how many words we can write per hour. Some of us even participate in an annual ritual to write 50,000 words in 30 days, which happens to coincide with the start of the holiday season, forcing many a poor soul to calculate how many hours he can spend with Grandma and Grandpa at the Thanksgiving table and still meet his writing goals.
Scrivener makes it easier to do the math by allowing you to set project and document targets. You can even view your progress in the Editor. You can also view project statistics to show word count, calculate estimated page count, and view a word frequency chart. Unfortunately, Scrivener still leaves it up to you to convince Grandma that NaNoWriMo is more important than green bean casserole.
Using Project Targets
Our first math problem involves performing calculations on the entire project. If you are participating in National Novel Writing Month (NaNoWriMo), your goal is to write 50,000 words in the month of November. How many words do you need to write per day if you write all 30 days of the month? What if you can’t write on Wednesdays? If you delete a paragraph, how far does that set you back? NaNoWriMo is one month out of the year. What about writing a 90,000-word manuscript in six months, when it’s more difficult to know exactly what will keep you away from the computer for a day or more?
Project targets allow you to set those limitations and calculate how many words you need to write in a day and how close you are to your goal. To access project targets, choose Project, Show Project Targets from the menu or press Shift-Cmd-T on the Mac. In Windows, choose Project, Project Targets or press Ctrl+,.
The Project Targets dialog box, shown in Figure 15.1, is divided into two goals:
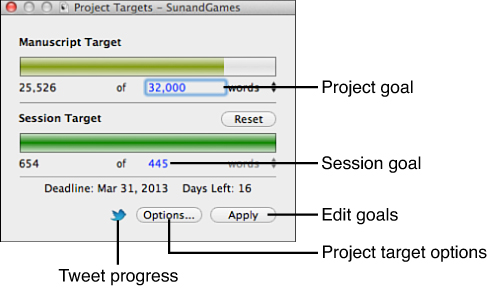
Figure 15.1 The Project Targets dialog box shows your progress toward completion of your project and your daily/session goals.
• Draft Target: Your goal for the complete project. This goal is usually referred to by the name of your Draft folder, such as Manuscript Target, as you can see in Figure 15.1. Only words you add to your Draft folder count in your progress toward your project target. Documents you import or move into the Draft folder are added to your progress toward the draft target. Documents in your Draft folder that are not included in your Compile settings are excluded from the draft target.
• Session Target: Your word count goal for the current day or writing session. You have to really work for these words, though. Documents you import or move into your Draft folder do not count, only text that you type or paste into a document. In Windows, text you add anywhere in the project counts toward your session target, although you still need to type or paste text for it to count.
These goals can be set independently of each other. In other words, if your goal is to write a 90,000-word novel, but you don’t care how many words you write a day, set only the draft target. If you want to write 1,000 words per day in order to develop a writing habit, but don’t yet know how long the project will be, set only the session target. You can also set these goals to work together. If your goal is a 90,000-word novel, and you want to write 1,000 words per session, set both fields.
Setting Target Options (Mac Only)
The options for project targets directly affect how Scrivener calculates your goal and your progress, so it is best to set these options before setting a target. To set the target options:
![]() Note
Note
These options are not available in Windows.
1. Open the Project Targets dialog box, as described above.
2. Click the Options button. The Project Targets Options pane opens, as shown in Figure 15.2.
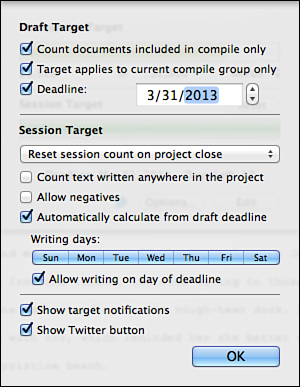
Figure 15.2 The Project Targets Options allow you to customize how Scrivener calculates your writing goals and progress.
The Project Targets Options for the draft target are as follows:
• Count Documents Included in Compile Only: When selected, as it is by default, this option limits progress tracking to those documents in your Draft folder that are marked to Include in Compile in the General pane of the Inspector. This setting is useful if you have files in your Draft folder that you do not want to include when you compile the project, such as notes or alternative scenes, and don’t want to include them in your project’s target progress.
![]() Note
Note
This option is available in Windows as a check box below the Draft target. It is deselected by default, however, so you must select it if you want to only count documents included in the compile group.
![]() Tip
Tip
This setting is not necessary if you keep your Draft folder free from documents that are not intended to be included in the compilation. If you need to take notes but want to limit your Draft folder only to documents you want to include in the compilation, use the Document or Project Notes options in the Inspector. If you prefer to use documents, store them in a non-Draft folder and use reference links to connect them to the appropriate documents in the Draft folder.
• Target Applies to Current Compile Group Only: This option limits progress tracking to only those files selected in the Contents pane of the Compile settings. If you only have the first three chapters set to compile at the moment, such as if you’re preparing a proposal for an editor or agent, only those chapters are tracked in the target progress.
 Caution
The Target Applies to Current Compile Group Only setting can become confusing unless you remember exactly which documents you have set to compile. It’s easy to forget that you last compiled only a single chapter for your critique group, and then be confused by the lack of progress in your project target. I suggest deselecting this option unless you have a specific reason to use it.
![]() Note
Note
This setting and the Count Documents Included in Compile Only setting work in tandem. If you select the Target Applies to Current Compile Group Only option without the previous option, and if you have documents that are not marked to Include in Compile but have been added to the current compile group, their word count is added to your progress. If you have selected both these options, the word count of documents that are not marked to Include in Compile is not considered even if they are part of the current compile group. Again, my recommendation is to avoid changing these settings unless you understand exactly what you are including and excluding, and how this affects your project targets.
• Deadline: If you have a deadline for this project, selecting this option adds a countdown to the bottom of the Project Targets dialog box. Type the deadline date or use the up-down button to increase or decrease the month/day/year settings.
The rest of the project target options apply to the session target, as follows:
• Session Target Reset: Click the drop-down menu to select when you want the session target to reset, as follows:
• If you want to track your daily progress, choose to Automatically Reset at Midnight. You may write at various intervals throughout the day, all of which contribute to that day’s session progress.
• If you want each instance in which you sit down to write to be considered a separate session, choose Reset Session Count on Project Close.
• If you are a night owl, select Reset Session Count on Next Day Opened. This compares the current time to the time when you last opened the project, and resets the session if it is the next calendar day. For example, let’s say you open the project at 11:00 p.m. on Monday and work until the wee hours of Tuesday morning. When you open the project again on Tuesday afternoon, the session resets because it is the next calendar day after the session you began on Monday. But if you open the project yet again late Tuesday evening, the session does not reset because you last opened it on the same calendar day.
• If you want to take control over your sessions, choose Never Automatically Reset Session Counts. A session continues until you manually reset it. The Reset button is in the Project Targets dialog box.
• Count Text Written Anywhere in the Project: When selected, this option counts text you add anywhere in the Binder, including non-Draft items. If this option is deselected, only documents in the Draft folder are included in your session progress.
![]() Note
Note
Although this option allows you to include text written outside the Draft folder in the session goal, this content does not increase your progress toward your draft target.
• Allow Negatives: When this option is selected, text you delete during a session is subtracted from your progress, even if this results in a net loss during the session. If you deselect this option, Scrivener does not track deletions once you reach zero, so even if you have a net loss of words during a session, Scrivener may inaccurately report it as a gain.
• Automatically Calculate from Draft Deadline: This option works in conjunction with the Deadline option above. If you set a deadline and a draft target, Scrivener automatically sets the session target based on how many words (or characters) you need to write per day to reach the deadline.
![]() Note
Note
If this option is selected, you cannot manually set a session target.
• Writing Days: Scrivener assumes you are writing every day by default. If you take weekends off or have other commitments on specific days of the week, click the days you are unavailable to deselect them. Scrivener can then calculate how many words you need to write per day (session) to reach your deadline based on the actual days you plan to write.
• Allow Writing on Day of Deadline: When this option is selected, Scrivener counts the day of your deadline as a writing day, unless it is a day of the week you deselected in the Writing Days setting. If you deselect this option, Scrivener calculates how many words you need to write per day assuming you complete the project by midnight the day before the deadline.
![]() Note
Note
The Writing Days and Allow Writing on Day of Deadline options are only available if the Deadline option is set and the Automatically Calculate Draft from Deadline option is enabled.
If you are using Mac OS X 10.8 Mountain Lion, you see two additional options, as follows:
• Show Target Notifications: Scrivener uses the operating system’s Notification Center to post a notice when you reach or fall below your project or session goal.
• Show Twitter Button: If you use Twitter, select this option to add a Twitter button to the Project Targets dialog box. When you click the Twitter icon (a blue bird, shown in Figure 15.1), you can send a tweet notifying your followers of your progress.
If you are using an earlier Mac OS, you can enable the Show Target Notifications option if you have Growl installed and running when Scrivener is launched. This option sends a Growl notification when you reach or fall below a target.
When you have finished setting the project target options, click OK to return to the Project Targets dialog box. You are now ready to set your targets.
Setting Draft Targets
To set the draft target goal:
1. Open the Project Targets dialog box, as described above.
2. Click in the Project Goal box (refer to Figure 15.1).
3. Enter the expected word, character, or page count of your completed project.
4. Click the Words drop-down menu if you prefer to measure your target in characters. On the Mac, you can also measure your target in pages.
Caution
If you use the Pages option on the Mac, be aware that the page count is not always accurate. The page count uses a characters per page calculation based on the compile settings when you open the Project Targets dialog box. When you actually compile your project, however, you may add page padding or other formatting that changes the final page count.
5. On the Mac, click the Apply button to set the goal; this step is not necessary in Windows.
If your project already contains text, the word count and progress bar immediately reflect this.
![]() Tip
Tip
The progress bar changes from red to green as you approach your goal. To change these default colors on the Mac, open the Appearance tab of the Preferences/Options dialog box. In the Customizable Colors pane, select Target Progress Bars and then change the Start, End, and Midway colors as you like.
Setting Session Targets
By default on the Mac, the session target tracks how many words you write in a day, resetting your progress to zero at midnight. Thus, a session can be multiple shorter periods of writing throughout a day. In Windows, the session is reset every time you close and reopen the project.
To set the session target:
1. Open the Project Targets dialog box, if it is not already open.
2. Click in the Session Goal box (refer to Figure 15.1).
3. Enter the expected number of words or characters you plan to write during a session. Keep in mind the option you chose for resetting the session if you’re on a Mac.
Caution
If you’re on a Mac and you set the Automatically Calculate from Draft Deadline option, you cannot manually set a session goal. Instead, this number is calculated by Scrivener.
![]() Tip
Tip
On the Mac, if you are over your word count and need to cut, select Allow Negatives and also set your session target for a negative number of words. Although the progress bar will not reflect your progress, the Project Targets dialog box will display the count.
4. Click the Words drop-down menu if you want Scrivener to track characters instead of words. Unlike the project target, you cannot set a session target to track pages.
5. On the Mac, click the Apply button to set the goal; this step is not necessary in Windows.
Resetting Target Sessions
If you want to manually reset a session, click the Reset button. This is a handy cheat if you need to cut material (such as everything you wrote after 3:00 a.m. the night before) at the start of the day, but don’t want to begin a session having to overcome a negative in your progress.
If you selected the Never Automatically Reset Session Counts option, Scrivener continues to add to an endless session until you click the Reset button.
![]() Tip
Tip
One limitation of project targets is that you cannot automatically save a record of your writing sessions. If you need to keep track of how many words you write per session to report to your critique partners or for your own edification, create a document in a non-Draft folder in your project and manually enter the date and word count of your session before closing the project. I also like to keep track of how long I write each session so I can calculate words per hour.
Using Document Targets
Whereas the project targets track your project as a whole, you can also set document targets for individual documents. This is convenient if you are writing a series of essays or articles, each with their own word count. You can also use document targets to attempt to keep the scenes in a novel relatively equal in length.
To set a document target:
1. Open the document for which you want to set the target in the Editor.
2. Click the Set Target button in the Footer bar, as shown in Figure 15.3.

3. Enter the target word or character count in the Document Target dialog box, shown in Figure 15.4.
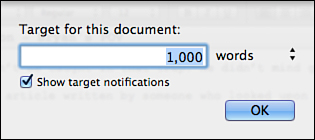
Figure 15.4 Enter a target word or character count for a document in the Document Target dialog box.
4. (Mac Only) Select Show Target Notifications if you want Scrivener to post a notification either in Growl or in the Notification Center when you reach or fall below your goal.
When you set a document target, a progress bar appears in the Footer bar of the Editor each time you open that document. The word count also changes to display your word count as a fraction of the document target.
You can also set and view document targets in the Outliner. To view document targets, open the Columns menu and choose the Target and Target Type columns. If you want to view the progress bars, as well, select the Progress column. To set a document target from within the Outliner, double-click in the Target column for an item and enter a number; then use the drop-down menu in the Target Type column to select either words or characters.
![]() Note
Note
The Total Words, Total Target, and Total Progress columns automatically tabulate the total word count and target for all of the documents in a file group or folder. Any text in the file group or folder itself is also included in this total.
![]() Tip
Tip
If you are a fan of NaNoWriMo, consider extending the challenge by participating in National Novel Editing Month (NaNoEdMo) in March. This group encourages writers to spend 50 hours editing previously written material, generally the novel you raced to complete in November. For more information, visit http://www.test.nanoedmo.net.
Using Project Statistics
If you want to see an overview of your project’s word, character, and page count, choose Project, Project Statistics from the menu. You can also press Option-Shift-Cmd-S on the Mac or Ctrl+. in Windows. The Project Statistics dialog box, shown in Figure 15.5, is divided into two sections. The top section reflects the statistics for the Draft folder, based on the current Compile settings. If your current Compile settings limit the compile to the first three chapters of your project, the project statistics only reflect those chapters.
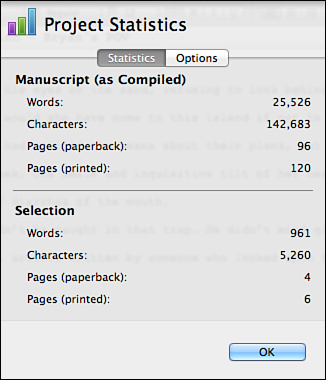
Figure 15.5 The Project Statistics dialog box displays the word, character, and page count of the entire project or a selection of items.
![]() Note
Note
See Chapter 19, “Compiling Your Completed Work,” for details on how to compile your project and select documents to include in the compilation.
The bottom half of the dialog box reflects Selection Statistics for the item or items selected in the Binder, Outliner, or Corkboard. These statistics can reflect non-Draft folder items if they are included in the selection.
The Pages (Paperback) is another example of where Scrivener does the math for you. The number of pages equals the total number of characters divided by the product of characters per word times the number of words per page. This is an industry standard formula, so you can generally rely on it if your project needs to fit a specific page count criteria.
The Pages (Printed) information is calculated based on the formatting and content options you select in the Compile settings. This statistic is recalculated whenever you open the Project Statistics dialog box, so it may take a few seconds for this information to appear if you have a large project.
Caution
If you are on a Mac and your project is more than 100,000 words, the Project Statistics no longer automatically update. Instead, an Update Printed Counts button appears at the bottom of the dialog box so you can recalculate the Pages (Printed) data. In Windows, the counts always recalculate when you open the Project Statistics dialog box.
The Options tab, shown in Figure 15.6, of the Project Statistics dialog box controls which elements of the project are included in the calculations.
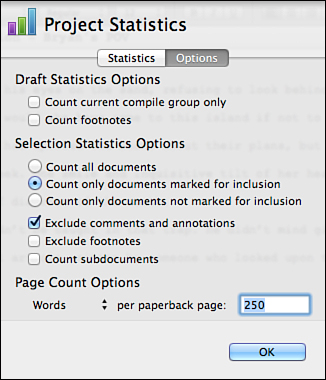
The Project Statistics Options are divided into three sections. The Draft Statistics Options on the Mac apply to the entire Draft folder and are as follows:
• Count Current Compile Group Only: When selected, this option limits the calculations to documents that have been chosen in the Contents pane of the Compile settings.
• Count Footnotes: Selected by default, this option includes footnotes in the counts.
The Selection Statistics Options apply to how items selected in the Binder, Corkboard, or Outliner are calculated, as follows:
• Count All Documents: This option includes all documents in the selection, even if the document does not have the Include in Compile setting selected.
• Count Only Documents Marked for Inclusion: This option includes only selected documents that are marked to Include in Compile in the General pane of the Inspector.
• Count Only Documents Not Marked for Inclusion: This option includes only selected documents that are not marked to Include in Compile.
• Exclude Comments and Annotations: By default, comments and annotations are not included in the statistics calculations. If you want to include them, deselect this option.
• Exclude Footnotes: By default, footnotes are included in the calculations. To exclude them, select this option.
• Count Subdocuments: With this option selected, the text in a selected container and any of its children are counted in the calculation. If it is deselected, only the text in the container itself is counted.
The Page Count Options sets the words per page number Scrivener uses when calculating Pages (Paperback). Scrivener uses 350 words per page by default, where a word is calculated as six characters (five plus a space).
Viewing Word Frequency
There are certain words you cannot avoid using in abundance, such as the and is. Every writer also has certain words in his arsenal that he turns to repeatedly out of habit. The Text Statistics dialog box, shown in Figure 15.7, displays a Word Frequency list to help you identify your habitual words.
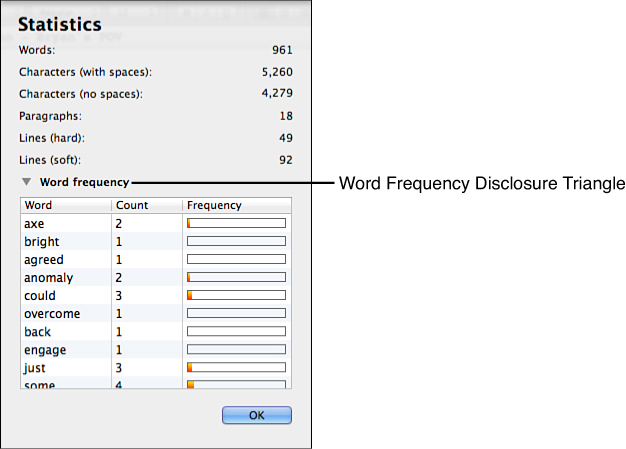
Figure 15.7 The Text Statistics dialog box displays the word, character, paragraph, and line count of a selected document, as well as a Word Frequency table.
Choose Project, Text Statistics from the menu to open the Text Statistics dialog box. You can also press Control-Option-Cmd-S on the Mac or Ctrl+/ in Windows. Click the disclosure triangle next to the Word Frequency title to expand the table. You can sort the table by clicking on a heading.
![]() Note
Note
The Text Statistics dialog box bases its calculations on the active document in the Editor, so you must first load a document into the Editor before opening the dialog box. The statistics are calculated based on the entire document; you cannot calculate only a selection within a document.