
21. Screenwriting in Scrivener
Scrivener is not just for fiction and nonfiction authors. If you are a playwright or screenwriter, Scrivener provides tools to format your script. In fact, Scrivener has a mode dedicated to scriptwriting to help you easily access the elements you need to complete your script rapidly.
Entering Scriptwriting Mode
The best way to learn about the tools in Scriptwriting mode is to see it for yourself. To write a document in Scriptwriting mode, choose Format, Scriptwriting from the menu, then select a format from the submenu. Scriptwriting mode can be set for individual documents in a project, so you can combine script documents containing your screenplay or documentary with standard documents containing your notes or research.
 Caution
You can only choose one scriptwriting format for each project, so you cannot create one document in Screenplay format and another document as a Stage Play.
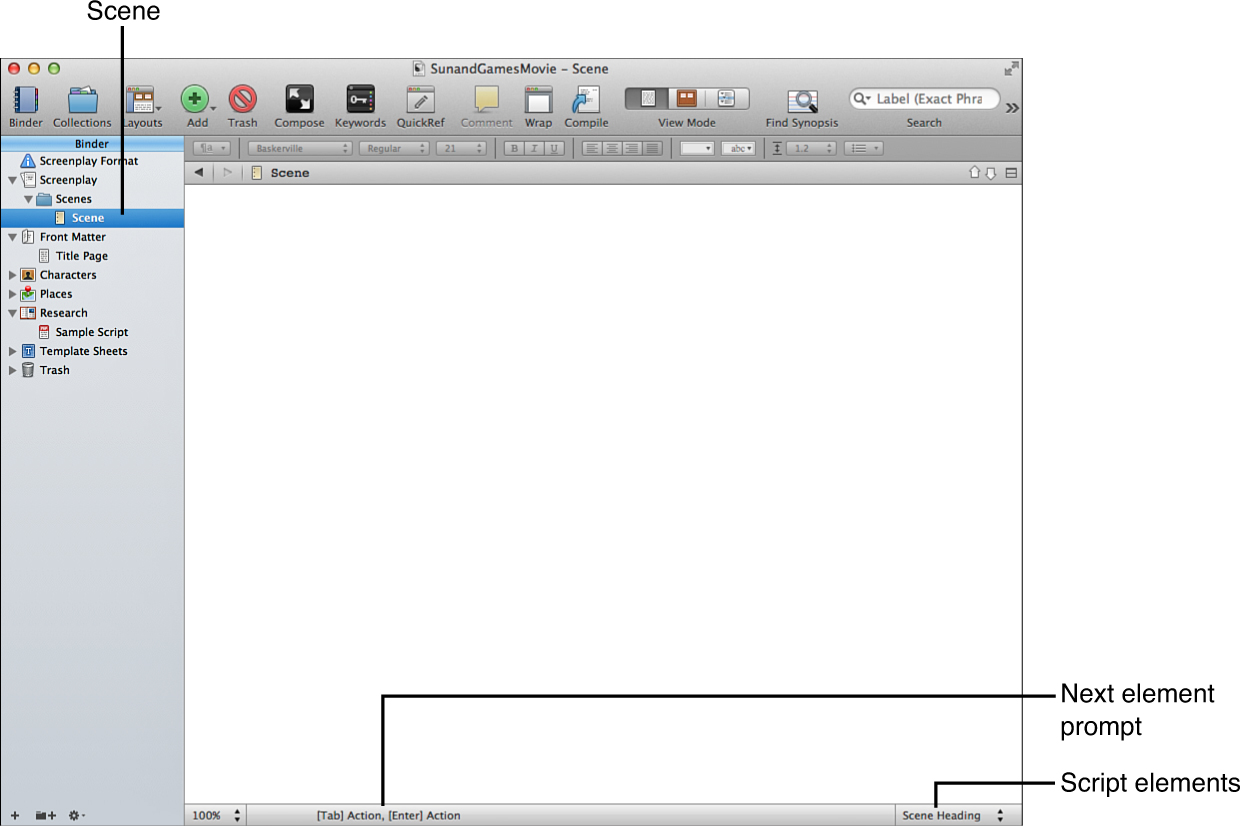
Scriptwriting mode is different from the standard Editor in several ways. As you can see in Figure 21.1, the most obvious difference is in the Footer bar. When you are in Scriptwriting mode, you see a drop-down menu containing the script elements for the format you selected. The center of the Footer bar prompts you for the next element to be created when you press Tab or Return (Enter). The item icon for the scene also changes, appearing as a yellow sheet of three-hole punched paper by default.
You can toggle Scriptwriting mode for a document by pressing Cmd-8 (Ctrl+4 in Windows). Scrivener remembers the current mode of each document in the project.
![]() Tip
Tip
If you use Scriptwriting mode frequently, you can add a Script button to the toolbar. See Chapter 2, “Customizing Your Work Environment,” to learn how to customize the toolbar on the Mac and in Windows.
Using a Scriptwriting Template
Project templates make it easy to create a script in any of the preinstalled scriptwriting formats. To create a project in a scriptwriting template:
1. Choose File, New Project or press Shift-Cmd-N (Ctrl+G, N in Windows).
2. In the Project Templates (New Project in Windows) dialog box, shown in Figure 21.2, click on Scriptwriting and select a template.
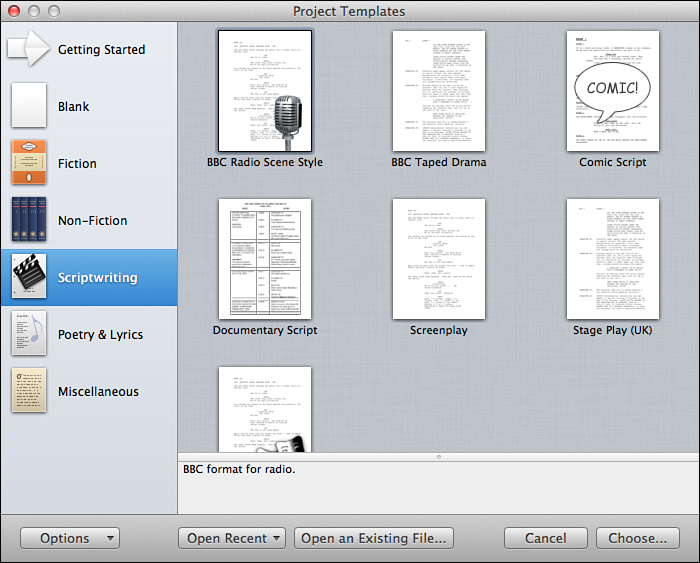
Figure 21.2 Scrivener provides a project template for the major scriptwriting formats. You can download additional templates from the Internet.
3. On the Mac, click the Choose box to open the Save As dialog box and name the project file. In Windows, enter the filename in the Save As field at the bottom of the New Project dialog box and choose a location to store the file in the Where field.
The scriptwriting templates create a scene in the proper script format for that template as well as provide additional information about creating your script. The Compile settings are preformatted to export to Final Draft 8 on the Mac. In Windows, select Final Draft (.fdx) as the output format.
Importing a Script from Final Draft
Scrivener can import files from Final Draft 8 or Final Draft 7 and earlier. If you use Final Draft 8, Scrivener can import the formatting from an FDX file before importing the script itself.
![]() Note
Note
If your script uses custom formatting, Scrivener must import the formatting from an FDX file before importing the script in order to establish the script format for the project, as Scrivener’s preinstalled script formats may not match your Final Draft script.
To import formatting from an FDX file:
1. Choose Format, Scriptwriting, Script Settings from the menu to open the Script Settings dialog box (shown in Figure 21.3).
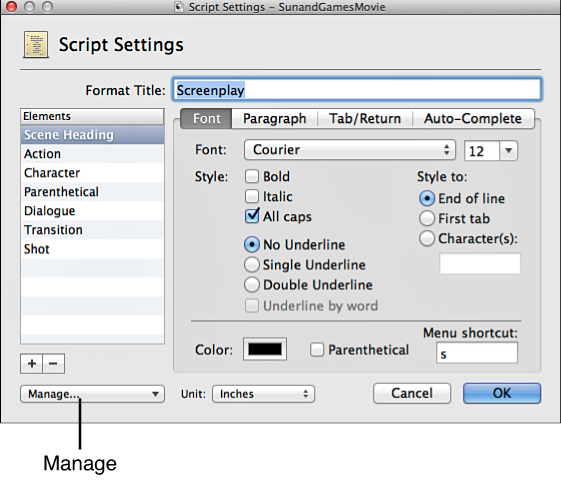
Figure 21.3 Click the Manage button in the Script Settings dialog box to load the formatting from an FDX file.
2. Click Manage to open the drop-down menu, and select Load from Final Draft FDX.
3. In the Open dialog box, select the FDX file that contains the formatting you want to use.
4. Click Open.
This procedure does not open the script itself, just its elements and formatting. To import the FDX file into Scrivener, choose one of the following options:
• Choose File, Import, Files from the menu.
• Drag and drop the file into the Binder.
• Choose File, Import, Import and Split from the menu.
When you import an FDX file, script notes are converted to footnotes and revisions are marked up in red. Highlighting is also retained.
If you are using Final Draft 7 or earlier, you need to export the script from Final Draft into an RTF file, then import the RTF file into Scrivener using one of the import methods mentioned above. Once you have imported the file, choose Format, Scriptwriting from the menu and select a script format from the submenu.
![]() Tip
Tip
You may need to capitalize scene headings and character elements when you import the RTF file. To do this, open the script in the Editor and click within it, then choose Format, Scriptwriting, Re-capitalize Script.
Caution
If the Script Elements area of the Footer bar does not change when you move to different areas of your script or if the Re-capitalize Script command did not work properly, then the script format you selected does not match the format of the imported script. Try to reimport the RTF file and select a different script format. If the script elements are not recognized, you should create custom formatting by entering a new title for the format in the Script Settings dialog box. Then update each element by placing the cursor in the element’s text in the Editor and choosing Use Current Font & Paragraph Settings in the Manage drop-down menu in the Script Settings dialog box.
Formatting Your Script
Scriptwriting mode is easy to use. Click the Script Elements pop-up menu in the Footer bar to select an element to apply, then type. Each element has a shortcut letter associated with it. You can open the pop-up menu and press the letter, such as A for Action. If you do not want to use the mouse at all, press Shift-Cmd-Y (Ctrl+ in Windows) and then the associated letter to select an element.
If you’re on a Mac, the first nine elements are assigned a number that can be used in conjunction with the Option-Cmd keys to assign an element. For example, in the default Screenplay format, press Option-Cmd-1 to apply the Scene Heading element. Choose Format, Scriptwriting, Change Element To to apply a Script Element and see the keyboard shortcuts.
![]() Tip
Tip
On both the Mac and Windows, press Return/Enter twice to open a pop-up list of elements, from which you can select a Script Element with the arrow keys or mouse.
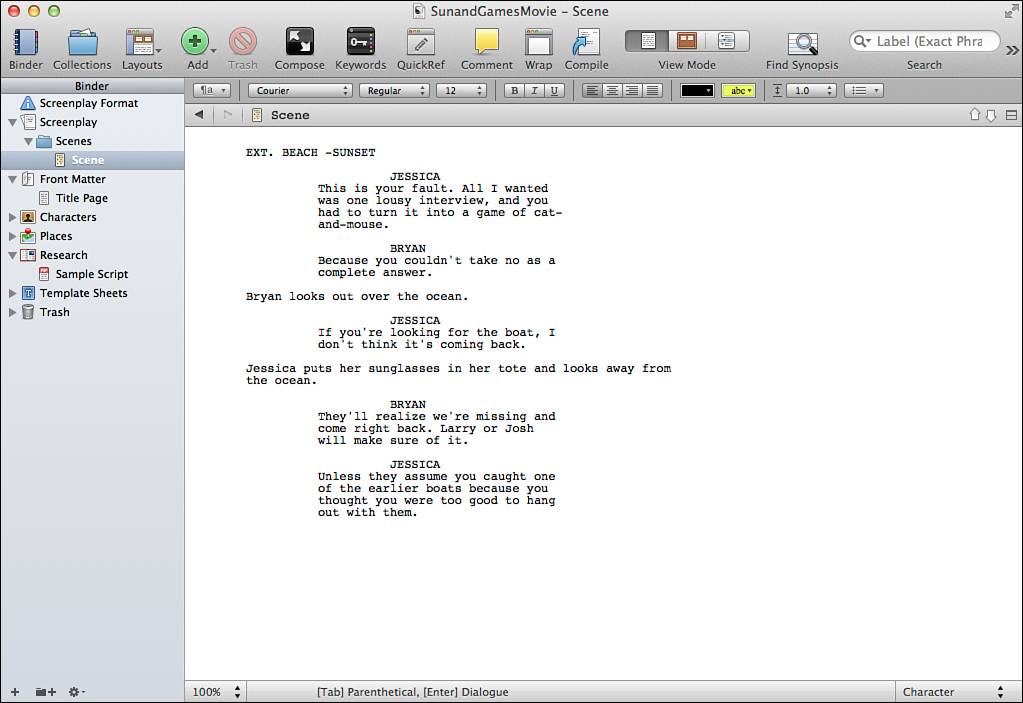
Elements may also be applied automatically if you press Tab or Return (Enter). The center of the Footer bar states which element will be created. Elements flow in a logical order. If you are in the Character element, for example, pressing Enter adds a Dialogue element, as shown in Figure 21.4. To change the element, press the Tab key. If you press the Tab key multiple times, you can cycle through the pertinent elements.
If you need to change a script element, place the insertion point within the element and choose one of the following options:
• Select a new script element from the Footer bar.
• On the Mac, choose Format, Scriptwriting, Change Element To from the menu, then select the new script element from the submenu. In Windows, use the Script Element pop-up menu in the Footer bar or the associated keyboard shortcuts to change script elements.
![]() Tip
Tip
If you change a script element, you may need to manually change the capitalization of the text. You can use the Format, Convert submenu to modify the capitalization.
Modifying the Script Settings
If none of the preinstalled script formats meet your needs, you can create your own in the Script Settings dialog box, shown in Figure 21.5. Open the dialog box by choosing Format, Scriptwriting, Script Settings from the menu, and then take the following steps:
1. In the Format Title field, enter a name for your script format.
2. The elements of the script format are listed in the left pane. Take one of the following actions:
• Click the Add (+) button to add a new element.
• Click the Delete (−) button to remove an element.
• Double-click the name of an element to change the name.
3. For each element, set the options you want it to assume on the right.
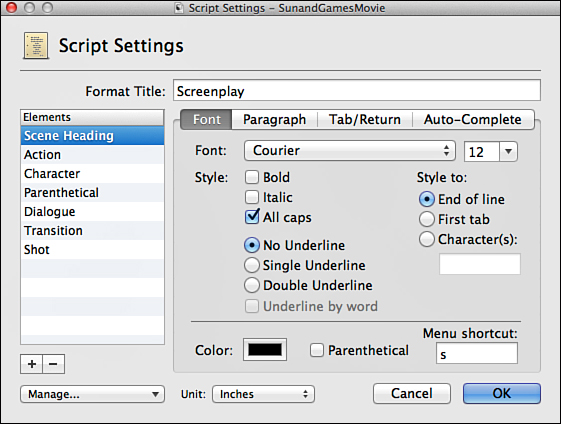
4. In the Font tab, set the following options to control the appearance of the element:
• Font: The font in which the element appears.
• Size: The font size for the element.
• Style: The style of the element, whether it appears in bold, italic, or underlined. You can also choose to format the element in All Caps.
• Style To: The portion of the element to which the Style options apply. The options are End of Line, First Tab, and Characters.
• Color: The color of the text.
• Parenthetical: Whether the element appears in parentheses.
• Menu Shortcut: The letter associated with the element in the pop-up menu in the Footer bar.
5. In the Paragraph tab, shown in Figure 21.6, set the following options to control the paragraph formatting for the element:

• Alignment: Sets the paragraph alignment to left, right, centered, or justified.
• Spacing: Sets the spacing between lines to single, double, or 1.5.
• Spacing Before: Sets the number of empty lines between the current element and the one before it. In Windows, this unit is set in points rather than lines. If you are using a 12-point font, set this option for 24 points to add two lines of spacing.
• Indents: Sets the first line, left, right, and first tab settings on the Ruler.
• Advanced (Mac Only): Sets the writing direction, fixed line height, and default tab interval, as well as widow/orphan control.
6. In the Tab/Return tab, shown in Figure 21.7, set the following options to control the tab settings for the element:
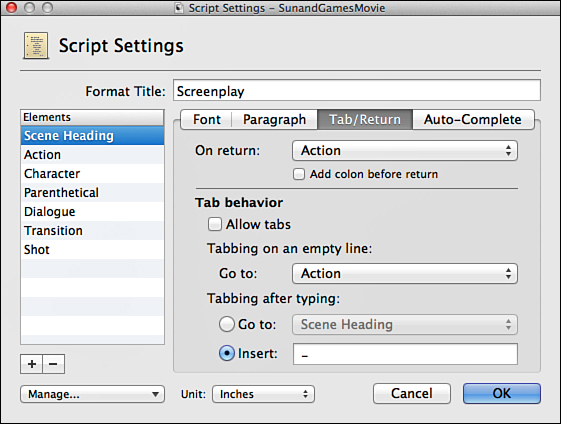
• On Return: Sets the element to appear when you press Return.
• Allow Tabs: Sets the behavior of the Tab key within the element. If this option is selected, the Tab key functions as a normal tab and none of the other tab behavior options are available.
• Tabbing on an Empty Line: Sets the element that appears when you press Tab.
• Tabbing After Typing: Sets what happens if you press the Tab key after typing in an element. If you select Go To, choose an element from the drop-down menu to instruct the Tab key to automatically switch to the next element. Select Insert to insert a series of characters.
7. In the Auto-Complete tab, shown in Figure 21.8, add and remove terms relating to the element to automatically complete as you type. Use the following options:
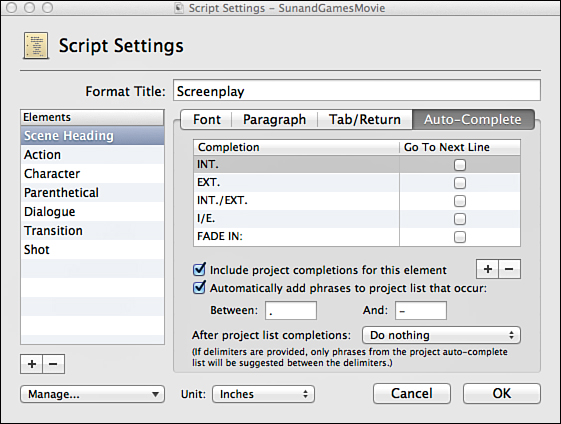
Figure 21.8 The Auto-Complete tab enables you to add element-related terms to automatically complete as you type.
• Include Project Completions for This Element: Includes words in the project auto-complete list with the current script format.
• Automatically Add Phrases to Project List That Occur: When enabled, takes text you enter in the Editor for a script element and adds it to the project auto-complete list, with the scope set for that element. For example, in the Screenplay settings, this option is enabled by default for the Character element, so when you first enter a character name in the script, it is added to the auto-complete list. The next time you begin typing that name in the Character script element, Scrivener suggests the complete name.
• After Project List Completions: Controls what happens after you use an auto-complete entry from the project list. You can choose to do nothing, go to the next line, or insert a tab.
8. Click the Manage button and choose Save to File to save your script settings to an external file that can be imported on other computers or Save for Use with Other Projects to save the settings as a script format. If you save a new script format, it is added to the Format, Scriptwriting submenu.
Compiling a Script
To compile a script, use the Compile dialog box, which was explained in Chapter 19, “Compiling Your Completed Work.” In most cases, you should set the output format (Compile For) to FDX or another format that you can import into a third-party screenwriting app, such as Final Draft or Celtx, so that you can make corrections and fine-tune the script before printing it out.
You can also export individual documents from your project into FDX format, which can be opened in Final Draft 8. To do this, select the files you want to export and then choose File, Export, Files. In the Save As dialog box (Export Files dialog box in Windows), choose Final Draft 8 (.fdx) from the Export Text Files As drop-down menu.