
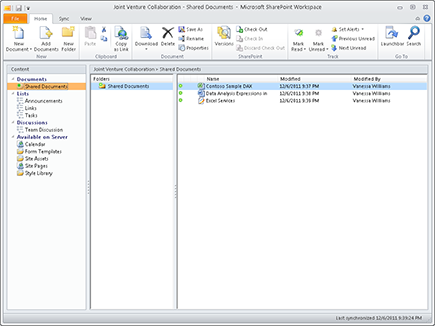
Figure 6-1: Viewing a team site in SharePoint Workspace.
Chapter 6
Working Offline with SharePoint Workspace
In This Chapter
![]() Synchronizing your team site
Synchronizing your team site
![]() Working with libraries and lists in workspaces
Working with libraries and lists in workspaces
![]() Using search to find documents and list items
Using search to find documents and list items
![]() Using OneNote in addition to workspaces
Using OneNote in addition to workspaces
Sometimes it’s nice to work with SharePoint lists and libraries without using the browser. Using SharePoint Workspace 2010, you can synchronize libraries and lists to your local computer and work with them outside of SharePoint 2010. For example, you can synchronize a team site so you can open Word documents or fill out an expense report without using the browser. You don’t even have to be connected to your corporate network. SharePoint Workspace saves all your changes locally and then synchronizes them when you are back online.
SharePoint Workspace is part of the Office Professional Plus 2010 suite, or it can be purchased separately. It is a Windows application that must be installed on your local computer in order for you to use it. Workspace replaces the Groove 2007 client application. You can check to see whether Workspace is installed by looking in the Microsoft Office folder in your Start menu.
 If you have Windows 7 or higher, you can type SharePoint in the Start menu search box. All programs related to SharePoint will appear in your Start menu.
Figure 6-1 shows a team site being viewed in SharePoint Workspace 2010. Everything should look familiar to you. There’s a Shared Documents library and an Announcements list, and Team Discussion board. The only difference is that you don’t have to be connected to SharePoint Server to work with these libraries and lists in SharePoint Workspace 2010.
SharePoint Workspace 2010 can be used to create peer-to-peer workspaces for sharing files, discussions, and whiteboards with other people. A peer-to-peer workspace doesn’t require SharePoint Server 2010. Using these workspaces is out of scope for this book.
Preparing for SharePoint Workspace
In order to use SharePoint Workspace, you must have an account on a Groove Server. If your company deploys Groove Server, your network identity should be configured by your administrator to use SharePoint Workspace. You will be given an account configuration code to use the first time you open SharePoint Workspace.
Alternatively, you can use Microsoft’s public Groove Servers. None of your content or files is accessible from these servers. It only saves your configuration information so you can synchronize settings across multiple computers.
To configure SharePoint Workspace for the first time:
1. Open SharePoint Workspace 2010 using your Start menu.
The Account Configuration Wizard appears.
2. Click the Next button to see the Create Account window.
Alternatively, if you have an account saved from another computer or Groove 2007, you can click Restore an Existing Account.
3. If you want to use Microsoft’s public Groove Servers, enter your name and e-mail address in the Create Account form. Otherwise, click the option for Create the Account Using an Account Configuration Code and enter the code provided by your administrator.
4. Click the Finish button.
Your account is provisioned, and you should see the Launchbar similar to Figure 6-2. The Launchbar gives you a bird’s eye view of all your workspaces and access to configuration settings.
Figure 6-2: Use the Launchbar to view all your workspaces.

If you use Microsoft’s public Groove Servers, by default your contact information is hidden from the Groove Public Directory. However, your contact information is available to people on your local network.
If you aren’t planning to use the peer-to-peer workspace capabilities of SharePoint Workspace, you probably don’t need your contact information listed in the public or local directories. However, if your company isn’t using an instant messaging platform such as Microsoft Lync, you could use Workspace as a kind of poor man’s messaging tool.
To manage the visibility of your identity and contact information:
1. From the Launchbar, click File.
2. Click Manage Account⇒Account Preferences.
3. In the Preferences window, indicate whether you want No Listing, Name Only, or All Contact Information in the public directory and the local network directory.
4. Click OK to save your preferences.
 If you set your preference to All Contact Information for the public directory, anyone with SharePoint Workspace can find you.
Synchronizing Your Team Site
I have found the easiest way to synchronize your SharePoint team site with SharePoint Workspace is to start in the browser at your team site. This process automatically launches Workspace and synchronizes all content that is capable of being synchronized.
To synchronize your SharePoint team site to your local computer using SharePoint Workspace 2010, do the following:
1. Open the team site you want to synchronize in the browser and click the Site Actions menu.
2. On the Site Actions menu, click Sync to SharePoint Workspace.
If you don’t see the Sync to SharePoint Workspace option, either you don’t have SharePoint Workspace 2010 installed or you are using a browser other than Internet Explorer. It is also possible that your server administrator has disabled synchronization using Workspace.
3. Depending on your browser configuration, you may be prompted to allow SharePoint Workspace to open or to enter your username and password.
4. In the Sync to SharePoint Workspace dialog box, click OK to synchronize all content.
Optionally, you can click the Configure button to manually choose which lists and libraries to download.
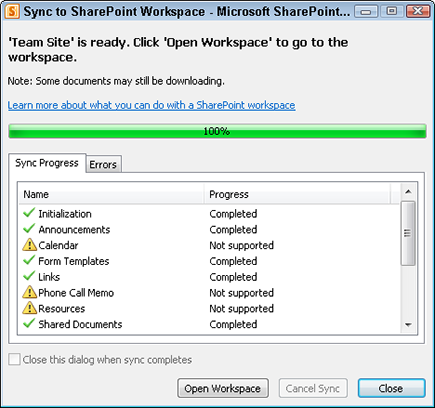
5. Review the Sync Progress and Errors to see which list and libraries downloaded.
Not all types of content are supported in SharePoint Workspace 2010, so you will see a status of Not Supported for some items. Figure 6-3 shows an example.
6. Click the Open Workspace button in the dialog to open the workspace.
SharePoint Workspace 2010 works equally well with Office 365 or a local SharePoint server. I like to use Workspace with Office 365 because it masks the slowness of uploading files to the Internet. I just drop my files in SharePoint Workspace and forget about it.
Figure 6-3: Review your synchronization progress.
SharePoint Workspace displays a hierarchy of your site’s content structure in the Content pane. Content is categorized by Documents, Lists, Discussions, and Available on Server. If you click on any item under the Available on Server category, you will see the message This List Type Is Not Supported by SharePoint Workspace along with a link to open the list in the browser. Figure 6-4 shows what happens when you click on a Calendar list.
Generally speaking, most native SharePoint lists such as announcements and tasks lists are supported. Document libraries that store anything besides document files probably won’t synchronize. Another key issue that I have found with SharePoint Workspace is that it doesn’t support all the same views and content types in the browser. Other types of content that won’t synchronize include
![]() Wikis and blogs
Wikis and blogs
![]() Portal sites and site page libraries
Portal sites and site page libraries
![]() Form libraries and slide libraries
Form libraries and slide libraries
![]() Document libraries with Information Rights Management enabled
Document libraries with Information Rights Management enabled
![]() OneNote notebooks (see the section “Synchronizing with OneNote” later in this chapter for more info on OneNote)
OneNote notebooks (see the section “Synchronizing with OneNote” later in this chapter for more info on OneNote)
Figure 6-4: Not all content is supported.

Working with Documents
SharePoint Workspace provides you with a local and personal copy of the documents in your team site’s document libraries. You have access to many of the same document management commands that you may use in the browser, such as viewing properties, check documents in and out, or copying a link to a document.
You can only view document properties with SharePoint Workspace, so be careful that you and those you work with are not under the impression that they can use Workspace to upload a bunch of documents to SharePoint and fill out all of the appropriate metadata on those documents. This also goes for Managed Metadata, which, like all document properties, must be set in the browser.
Managing documents
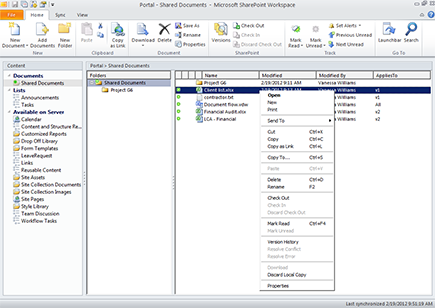
All the commands you need for managing documents are available in the Ribbon. By default, the workspace is arranged in three panes. When you click on a library, you can see that library’s folder structure and content on the right. The library displays as the root folder.
You can either right-click on any document to see a list of available commands, or you can access the commands from the Ribbon, as Figure 6-5 shows.
You can add new documents to your library by using the Add Documents command in the Ribbon, or you can drag and drop files into the workspace.
By default, SharePoint Workspace automatically synchronizes your changes back to the server. However, you can force synchronization at any time by clicking the Sync button on the Sync Ribbon.
SharePoint Workspace assumes a folder-centric view of documents, which may not mesh with how documents are organized in the browser. You can utilize public views; however, views that use grouping don’t work. Use the View Ribbon to select a different public view. Also, if you plan to use Metadata Navigation in your list or library, don’t count on using that feature in Workspace.
Figure 6-5: Manage documents in your workspace.
Accessing files directly
One of the features that I absolutely love about SharePoint Workspace is the ability to access my synchronized workspaces like they are folders on my hard drive. That’s right. You can use Windows Explorer or any Office client to save documents right into SharePoint Workspace. From there, Workspace handles getting the document uploaded to the server for you.
To use this feature in an Office client such as Excel 2010:
1. Create a new spreadsheet in Excel 2010.
2. Click File from the Ribbon and choose Save As.
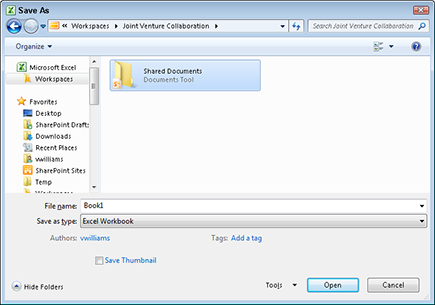
3. In the Save As dialog, locate the folder called Workspaces.
The list of workspaces you have synchronized to your computer appears, as Figure 6-6 shows.
4. Double-click the workspace where you want to save the document.
A list of compatible document libraries is shown.
5. Double-click the library and click Save.
Your file is saved to SharePoint Workspace.
Figure 6-6: Save your files directly to workspaces.
You can access the Workspaces folder in Windows Explorer and add shortcuts to libraries to your Windows desktop.
Finding your documents
SharePoint Workspace uses native Windows 7 desktop search to search for documents. Instead of navigating to specific documents through the library and folders, you can just search for the document.
To use SharePoint Workspace search:
1. Either from the Launchbar or a workspace, click the Search button on the Home Ribbon.
A search explorer window opens.
2. In the search box in the upper-right corner, type the terms you want to search for.
The search results appear.
3. To open an item from the search results, double-click on it.
Documents open in the appropriate client, whereas list items open in a SharePoint Workspace form.
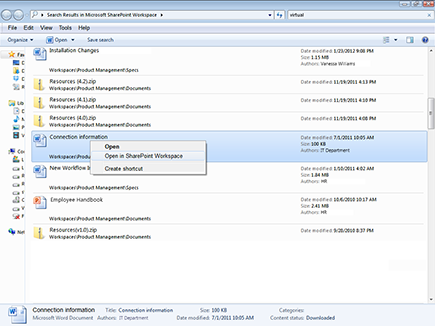
4. If the item is a document, right-click and select Open in SharePoint Workspace, as Figure 6-7 shows.
This option takes you to the workspace where the file is downloaded, so you can view its properties or check it out, for example.
Figure 6-7: Use search to find a document in its workspace.
You can also use the search box on the Start menu, which shows you results from all indexed locations on your computer, including SharePoint Workspace.
Taking Lists Offline
You may not always find it convenient or possible to work with SharePoint lists in the browser. Sometimes you aren’t connected to the network. Sometimes working in the browser is just a pain. SharePoint Workspace makes it easy to work with your lists offline.
I personally find that I’m more inclined to use lists now that I don’t have to fire up the browser when I need to add a new entry. As is the case with documents, not all column types (again, Managed Metadata is the red-headed stepchild) are supported. However, the underlying forms technology for Workspace is InfoPath 2010, so it’s possible to build robust forms.
To access your SharePoint lists offline using SharePoint Workspace 2010:
1. Start by synchronizing your team site to Workspace or launch an existing workspace using the Launchbar.
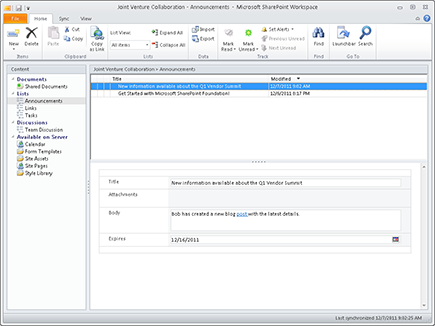
2. In the content pane, click on the list you want to work with, such as Announcements.
Existing list items appear on the right. You can view a list item’s content using the Reading Pane, as Figure 6-8 shows.
3. Double-click on an existing list item to edit it
4. To add a new list item, click the New button on the Home Ribbon.
Synchronizing with OneNote
Microsoft OneNote 2010 provides additional capabilities for working with content offline and synchronizing to the SharePoint Server. As I mentioned earlier in this chapter, you can’t synchronize OneNote documents to Workspace. That’s because it isn’t necessary. OneNote has its own very cool synchronization mechanism.
Figure 6-8: You can work with lists in SharePoint Workspace 2010.
If you aren’t familiar with OneNote, it is part of the Office 2010 suite and allows you to collect notes, ink, video and audio files, screen clippings, and files in a semi-structured electronic notebook. You can use tags to mark chunks of content and use search to find those tags later. Some of the cool things that you can do with OneNote include
![]() Print documents to notebooks and use an ink tablet to mark-up the document
Print documents to notebooks and use an ink tablet to mark-up the document
![]() Create a new hire orientation notebook that collects all the formal and informal tidbits of information necessary to help new hires feel welcome
Create a new hire orientation notebook that collects all the formal and informal tidbits of information necessary to help new hires feel welcome
![]() Capture research from the Internet using screen clippings, links, and text to share with your colleagues
Capture research from the Internet using screen clippings, links, and text to share with your colleagues
![]() Tracking all your client contacts in a free-form notebook and using the Tasks and To-Do tags to make sure you don’t forget to follow-up (Using a Tasks tag creates a task in Outlook.)
Tracking all your client contacts in a free-form notebook and using the Tasks and To-Do tags to make sure you don’t forget to follow-up (Using a Tasks tag creates a task in Outlook.)
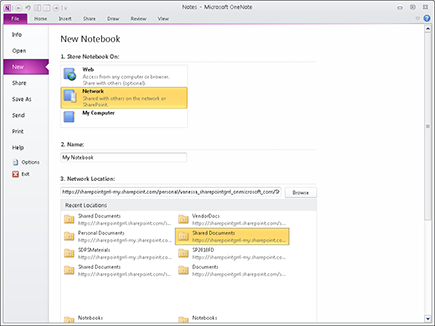
When you create a new OneNote notebook, you can specify to save it in a SharePoint site. SharePoint maintains a copy of the notebook locally on your computer and synchronizes it automatically with the SharePoint site. Multiple people can work in a OneNote notebook at the same time and will see each other’s changes reflected in near real-time.
Figure 6-9 shows the screen for saving a OneNote notebook to SharePoint.
Figure 6-9: Save OneNote notebook to SharePoint.
..................Content has been hidden....................
You can't read the all page of ebook, please click here login for view all page.