
Figure 25-1: Use the Term Store Management tool.
Chapter 25
Content Types and Metadata
In This Chapter
![]() Differentiating between intrinsic and extrinsic metadata
Differentiating between intrinsic and extrinsic metadata
![]() Understanding metadata and term stores
Understanding metadata and term stores
![]() Adding your own personal touches
Adding your own personal touches
![]() Getting familiar with content types
Getting familiar with content types
![]() Using and reusing site columns
Using and reusing site columns
Metadata is typically defined as data about data. But that sounds much more technical than it really is because “data” can take the form of any information or content. For any information, or any set of information (or content object in SharePoint), there are things you can say about it, and the stuff you can say about it is metadata. Attributes, labels, characteristics, location, and types are all examples of metadata.
So if metadata is information about content and SharePoint is a content management system, why did it take me ’til Chapter 25 to talk about metadata? Well, the reality is that you can happily use SharePoint without giving much thought to metadata. But if you want to get the most of your content, using metadata to manage your content will make a big difference.
Understanding Intrinsic and Extrinsic Metadata
Metadata can be intrinsic or extrinsic. Intrinsic metadata is the static metadata that relates specific qualities of what it describes, such as file type or creation date. Intrinsic metadata is impersonal and can be applied to the content object without regard to the object’s context or its relation to other content objects. Intrinsic metadata is pretty straightforward, and it can be useful for putting things in neat categories with other things that pretty much everyone can agree share intrinsic metadata traits (in fact, some intrinsic metadata, such as Save Date, can be determined by a computer without human input). Intrinsic metadata can provide a useful way to locate, filter, or group the data it describes. And intrinsic metadata often allows the consumer (person or system) to do something specific with or about the content object, like — in the case of file type — determine a software application that will open it. Simple search interfaces often make use of intrinsic metadata to facilitate the search process, and intrinsic metadata is sometimes very useful in finding information objects that display straightforward characteristics.
Extrinsic metadata is slipperier — it’s subjective metadata that can be applied to content objects by association; users associate some trait, label, or characteristic with the information object in a way that’s meaningful to them. Extrinsic metadata is more personal because it tends to rely heavily on context, and for a given content object, different people are likely to apply different extrinsic metadata to it. (Groups of people often demonstrate trends in applying extrinsic metadata when presented with the same content object. More about folksonomies in the “Getting Personal with Folksonomies” section, later in this chapter.) If you’ve ever tagged a photo on Flickr, for example, that tag was extrinsic metadata.
SharePoint 2010 gives you lots of ways to apply and use both flavors (intrinsic and extrinsic) of metadata. And a combination of both improves findability and consistency of content objects. For best results, I recommend that you use a combination of metadata strategies — some controlled (content types, for example) and others that let users roll their own (such as social tagging).
I Never Metadata I Didn’t Like
When clients complain to me about their search results (such as they can’t find anything or the search results aren’t relevant), that’s my cue to talk to them about metadata because how and where they handle metadata has a huge impact on the “findiness” of information.
If you have terms that you want to make sure everyone uses consistently, set those up as managed metadata terms. Managed metadata refers to a term or a set of terms that can be associated with multiple site collections. For example, if your company has four sales territories, you can set up a managed metadata term set to store that list of territories. Then, all sites can use these same terms each time they need to associate sales territories with content in your site.
Creating a term store
To create a new set of terms, your SharePoint site collection must be associated with a term store — a place to store and manage terms. The term store must be created by IT, but the management of the store and the terms within it can be delegated to you. In other words, it’s not really the role of your IT department to manage your company’s terms.
 Managed metadata is configured through the managed metadata service application (MMSA). A SharePoint deployment can have many instances of this service, each configured with different sets of terms. Web applications (the containers that store site collections) can be associated with zero to many MMSAs. Terms are stored in a database separate from the site’s content database.
Terms can be organized into a hierarchy. Additionally, terms can be grouped into term sets (which contain a hierarchy of terms), and each group assigned an owner. The owner can grant other people permission to manage the terms in that term set group. All this activity occurs in the Term Store Management tool, which is accessible from the Site Settings page of the top-level site in a site collection.
To open the Term Store Management tool:
1. Browse to any site collection associated with the term store you want to manage and then choose Site Actions⇒Site Settings.
The Site Settings page is displayed. Odd, no?
2. In the Site Administration group, click the Term Store Management link.
The Term Store Management tool appears, as shown in Figure 25-1.
If the site isn’t configured to use a term store, you see a message telling you so. Contact IT for assistance.
The Term Store Management tool is part of the SharePoint 2010 managed metadata service application. Like all service applications, MMSA is configured in Central Administration. To use the service, a Web application must be associated with at least one instance of an MMSA.
The Term Store Management tool is divided into two panes. The left pane shows a Tree View of the term hierarchy, and the right pane shows the properties for the current item selected in the tree.
Tree View is a little persnickety to navigate. To expand items in Tree View, you have to click the arrow next to the item.
To add new terms to an item in Tree View, you have to hover over the item until you see an arrow. Clicking the arrow opens a drop-down list, as shown in Figure 25-2.
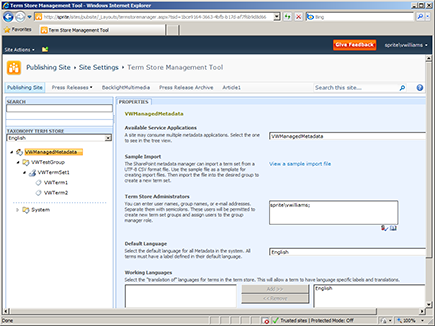
Figure 25-2: Click an item to view a drop-down list.

Importing a term set file
You can also import your term sets instead of manually entering terms. SharePoint 2010 provides a sample import file that you can use to see how to import terms. To get the ImportTermSet.csv file:
1. Browse to the Term Store Management tool, as I describe in the preceding section.
2. Click the View a Sample Import File link and then save the resulting file to your desktop.
The ImportTermSet.csv file downloads to your desktop. You can edit this file to create your own import term file.
3. Open the file in Excel or a text editor.
To import a term set file:
1. Click a term group in the hierarchy of your Term Store Management tool.
A term group is the highest level in your hierarchy. You can easily tell where you are in the hierarchy by clicking an item and viewing its properties in the right pane.
2. Click the arrow on the group and choose Import Term Set from the drop-down list.
3. Browse to the file you created in the preceding set of steps and click OK.
The terms are imported into the term set. Figure 25-3 shows the term set included with the sample import file.
Adding a managed metadata column to a list or library
When you have these metadata terms, how do you actually get them in your lists and libraries? You add a managed metadata column type to your list or library. Recall that SharePoint 2010 provides several kinds of column types — Single Line of Text, Number, and Date and Time being a few. The Managed Metadata column type allows you to add a column to your list that points to some place in your term set hierarchy.
Figure 25-3: Import the sample term set.

To add a managed metadata column to a list or library:
1. Browse to the list or library where you want to add the managed metadata column.
2. On the Ribbon, click the List (or Library) tab and then in the Manage Views group, click the Create Column button.
The Create Column box displays.
I discuss creating columns in more detail in Chapter 11.
3. Enter a name for your column in the Column Name text box.
4. Select the Managed Metadata radio button.
Additional options for configuring a managed metadata column appear.
5. In the Multiple Value field section, select the Allow Multiple Values check box.
Leave the check box deselected if you don’t want users to be able to select multiple terms. Note: A column with multiple values can’t be used for sorting.
6. In the Display Format section, select either the Display Term Label in the Field or the Display the Entire Path to the Term in the Field radio button.
Displaying the entire path is helpful to provide context for the term.
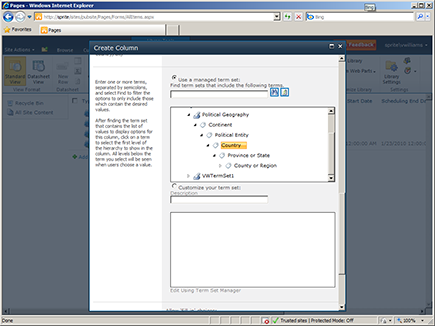
7. In the Use a Managed Term Set section, navigate to the section of the term set hierarchy you want to use in this column, as shown in Figure 25-4.
All term sets associated with your site appear in this section. Everything below the term you select appears for users to select as a value for the column.
Figure 25-4: Navigating to the term set.
8. (Optional) If you want users to be able to enter their own value instead of selecting one, select the Allow Fill-In Choices radio button.
Only term sets that you designate as open allow this option.
9. (Optional) Enter a default value for this column in the Default Value text field.
10. Click OK.
SharePoint adds the column to your list or library.
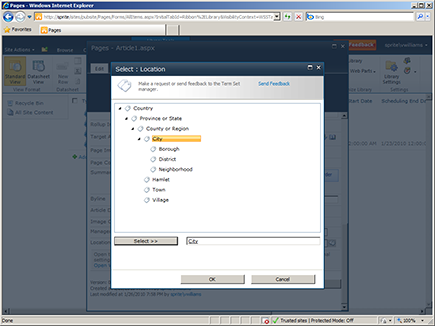
Figure 25-5 shows an example of the user experience when someone is selecting a term from a term set to use as a column value. The term set uses the hierarchy imported in Figure 25-3.
Figure 25-5: Using a term in a column.
Getting Personal with Folksonomies
A folksonomy is a taxonomy (or set of terms) that arises as a result of people applying their own tags (metadata) to content objects. People use the tags that make sense to them, so over a period of time as more people tag, the folksonomy becomes more and more appropriate for the audience by associating content objects with the words and concepts people use to think about them.
SharePoint provides another kind of metadata, keywords, that you can use to apply free-form terms to content. Unlike metadata terms, keywords aren’t organized into a hierarchy that users select from. Instead, users can enter any value into a keyword field. SharePoint 2010 provides an Enterprise Keywords column that’s configured already for use as a free-form keywords field.
The Enterprise Keywords field is a site column. I discuss site columns in more detail later in this chapter, in the “Using Columns” section. The column uses a Managed Metadata column type that’s configured to use the site’s default keyword store. Each site needs to be configured with one default keyword store in an MMSA. The site can be associated with multiple instances of an MMSA, each with its own configuration settings, but only one can be designated as the default keyword store.
Enterprise Wikis use a Managed Metadata column configured to accept fill-in values, similar to how keywords work. Figure 25-6 shows entering a keyword into a wiki page. When someone enters a fill-in value with a Managed Metadata field, that value is available for everyone else to use.
 Managed keywords provide a way to allow your users to enter their own free-form terms to a list item, document, or other library item. They’re a useful way to allow users to create a free-form taxonomy, or folksonomy, of your items. Social tags are a kind of keyword, but they’re used to vote or rate items.
One of the benefits of going through all the trouble of using a hierarchy of terms to classify content is that you can use that same hierarchy to navigate to content. Figure 25-7 shows metadata navigation in a library.
Figure 25-6: Entering a keyword in a wiki page.
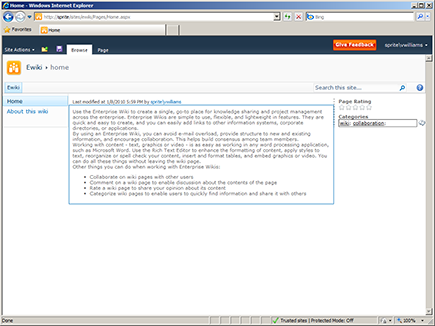
Figure 25-7: Using metadata to navigate in a site.

Understanding Content Types
What if you have a whole bunch of metadata that you want to reuse? For example, say you create a library for everyone to store documents related to a project. Over time, you develop a set of columns that allow you to track all the metadata for the documents. Then, you realize that you want to create a second library to store additional documents, but you want to use the same columns. Instead of manually recreating the library, you package your columns in a content type and then associate the content type with any library.
There’s one catch, of course. You must use site columns in your content type. So you need to create all your columns as site columns, add them to a content type, and then associate the content type with each library where you want to use it.
Creating a new site content type
Like site columns, content types have their own gallery where they’re stored. To create a new site content type:
1. Go to the top-level site in your site collection and then choose Site Actions⇒Site Settings.
The Site Settings page appears.
2. In the Galleries section, click the Site Content Types link.
A list of content types appears. Take a moment to scroll down the list. Notice that each content type has a parent. Your custom content type has to have a parent, too. The content type inherits the settings from its parent content type. Whatever columns are present in the parent content type automatically become part of your new content type, also.
What’s cool about this is that you can always be assured that you have the minimum columns required. In the case of a content type for a document, your content type knows that files must have a filename.
What stinks is that you have another thing to think about when creating your content type. A good starting point is whether your content type relates to items or documents. The Item content types are for things like contacts, tasks, and announcements. Document content types are things like documents, wiki pages, forms, and so on. Anything inherited from Document content type automatically gets a Name field to store the filename.
3. Click the Create link to create a new content type.
The New Site Content Type page appears, as shown in Figure 25-8.
Figure 25-8: Creating a new content type.

4. In the New Site Content Type page, type a name for your content type in the Name text box.
All the naming rules for lists, libraries, and columns apply here — namely, no spaces!
5. Type a description that indicates how you intend to use the content type in the Description text box.
6. Select a parent content type from the Select Parent Content Type From drop-down list.
Each content type is assigned to one group. For a document, choose Document Content Types; select List Content Types for a list item. If you want to store files, such as podcasts, short video clips, and images, choose Digital Asset Content Types.
Depending on the parent content type group you choose, a list of content types appears in the Parent Content Type drop-down list.
7. Select the content type you want to use as the parent, or starting template, for your content type from the Parent Content Type drop-down list.
8. In the Put This Site Content Into section, indicate into which group to place your content by selecting either the Existing Group or New Group radio button.
If you select the Existing Group radio button, select a group from the drop-down list. If you choose New Group, enter a name for the group in the New Group text box.
9. Click OK.
SharePoint creates the content type and presents you with the Manage Content Type page, but you aren’t done yet. Use this page to add columns and configure your content type.
10. (Optional) In the Columns section, click the Add from Existing Site Columns or Add from New Site Column link to add new or existing site columns.
You have two options here:
• You can add existing site columns.
• You can create new site columns and then they’re added automatically to your site.
11. (Optional) When you’re done adding site columns, you can assign an order to the columns by clicking the Column Order link. The Column Order page is displayed; click the drop-down list beside each column to assign a numbered order to it. When you’re done, click OK.
The column order is saved and you’re returned to the Site Content Type information page; your new site content type is ready to use.
In addition to adding columns to a content type, a content type can be used to store the additional configuration settings:
![]() A document template that’s used every time a new document is created with this content type: Say you have a standard template that you use for contracts. You can create a content type for contracts, add the columns that are relevant to contracts, and then upload your document template.
A document template that’s used every time a new document is created with this content type: Say you have a standard template that you use for contracts. You can create a content type for contracts, add the columns that are relevant to contracts, and then upload your document template.
![]() Associate workflows with the content type: If your workflows are related to approving contracts, you can associate them with your Contracts content type.
Associate workflows with the content type: If your workflows are related to approving contracts, you can associate them with your Contracts content type.
![]() Specify a custom form to display in Office documents: You can create a custom form using InfoPath that displays in the information panel in Office clients, such as Word and Excel. This form may specify properties for the user to fill out and provide instructions on using your document template. InfoPath forms are very powerful.
Specify a custom form to display in Office documents: You can create a custom form using InfoPath that displays in the information panel in Office clients, such as Word and Excel. This form may specify properties for the user to fill out and provide instructions on using your document template. InfoPath forms are very powerful.
![]() Specify information policy settings: These settings pertain to how long a document must be retained, what events are audited, and whether properties from your content type are inserted automatically as labels in a document.
Specify information policy settings: These settings pertain to how long a document must be retained, what events are audited, and whether properties from your content type are inserted automatically as labels in a document.
Information policy settings can also be configured at the top-level site to affect every document in your site.
Associating a content type with a list or library
Content types are an extremely powerful way to associate metadata and actions with your documents and list items.
The role of the content type is to separate the metadata, workflows, document template, and other settings from individual lists and libraries. However, content types by themselves aren’t useful without lists and libraries. So you have to associate them with the lists and libraries where you want to use them to describe content.
To associate a content type with a list or library:
1. Browse to the List Settings or Library Settings page for the list or library where you want to use the content type by selecting the List tab or Library tab and the List Settings or Library Settings button.
2. Click the Advanced Settings link.
3. In the Allow Management of Content Types section, select the Yes radio button and then click OK.
The Content Types section appears in the Settings page. All lists and libraries have at least one default content type associated with them, so this content type appears.
4. To add another content type to the list or library, click the Add from Existing Site Content Types link.
5. On the Select Content Types page, in the Available Site Content Types section, select the content types you want to add to the list or library and click the Add button to move them to the Content Types to Add list.
6. Click OK.
The new content type appears in the Settings page.
When you add a content type to a list or library, it appears in the New Document drop-down list, as shown in Figure 25-9. When a user selects this content type, the columns associated with the content type determine metadata the user can enter to describe the content.
Figure 25-9: Content types appear in the New Document button’s drop-down list.

Remove any content types from your list that you aren’t using. To do so:
1. In the List Settings or Library Settings page, click the content type you want to remove.
See the preceding steps for how to access the Settings page.
2. Click the Delete This Content Type link and then click OK at the confirmation prompt.
The content type is removed from the list or library. Note: You’re removing only this content type from the list or library; it still exists as a site content type.
Publishing site content types
You aren’t limited to using your content type in just your site collection. You can also publish your content type so that other site collections can use it. Conversely, you can consume content types published by other sites.
To publish your content types, your site must be designated as a content type publishing hub in SharePoint 2010. This is a task that your SharePoint administrator must perform.
To publish your content type:
1. Create your content type and then choose Site Actions⇒Site Settings.
The Site Settings page appears.
2. Click the Publish Content Type link.
3. Select the Publish radio button and then click OK.
Your content type is now available for other sites to consume.
You can consume a content type from another site by clicking the Content Type Publishing Hubs link in your site’s Site Settings page.
Using Columns
SharePoint 2010 has a site column entity that allows you to reuse columns across multiple lists. When you create a new column in your list, you create a list column — meaning the column can be used only in that list. Site columns are created at the top-level of your team site and can be reused in any list or library within your entire team site, including subsites.
All columns you see in a list are technically list columns. When you add a site column to a list column, SharePoint copies your site column to the list to create the list column. A link is maintained between the list column and the site column. If you update the site column, you can opt to push your changes down to the list column.
Creating a new site column
To create a new site column that you can use in a list or library:
1. Choose Site Actions⇒Site Settings from your top-level site.
The Site Settings Page appears.
2. In the Galleries section, click the Site Columns link.
A list of site columns appears.
3. Click the Create link to create a new column.
The New Site Column page appears.
4. In the Column Name field, enter the name for your site column in the Name text box.
When naming your column, don’t put any spaces in the name. The spaces make it hard to use your column later for queries. Instead, type the name using proper name casing, such as entering ArtifactType. You can rename the column later to Artifact Type, but the internal name remains as ArtifactType.
5. Select the column type you want to use for your column by clicking a radio button next to an option in the Type of Information in This Column Is list.
You have many column type options, as I discuss in Chapter 11. You also have the Managed Metadata column type, which I discuss earlier in this chapter.
6. In the Put This Site Column Into section, indicate into which group to place your column by selecting either the Existing Group or New Group radio button.
If you select the Existing Group radio button, choose a group from the drop-down list. If you choose New Group, enter a name for the group in the New Group text box.
A site column can be a member of one group. I like to use groups to help me quickly identify my custom site columns from those provided by the system.
7. Enter any additional column settings that may be required by your column type by selecting radio buttons in the Additional Column Settings section.
8. (Optional) In the Column Validation section, enter a formula to use to validate the values that are entered into this column in the Formula text box.
9. Click OK.
Your site column appears in the list of site columns.
Reusing site columns
You’ve probably already been using site columns. All the standard SharePoint lists — Calendar, Contacts, Announcements, and so on — use site columns. That’s why each time you create a new Announcements list, you always get the same columns every single time.
Instead of creating your own site columns, you can reuse the site columns provided by SharePoint. Site columns are stored in the Site Column gallery. The Site Column gallery is accessible from the Site Settings page in your site collection. You can browse around this gallery and see what site columns already exist.
Sometimes the site columns that Microsoft provides are intended for use that’s different than the name implies. For example, the Active Site column pertains to document routing. The actual internal name of the column is RoutingEnabled. Sometimes creating your own column is better than reusing Microsoft’s columns.
I like to use site columns in content types as a way to group several columns in a meaningful (and reusable) way. You can also associate site columns directly with lists and libraries using the List Settings or Library Settings page of your list or library. (See the steps in the section “Associating a content type with a list or library,” earlier in this chapter for details about accessing the Settings page.)
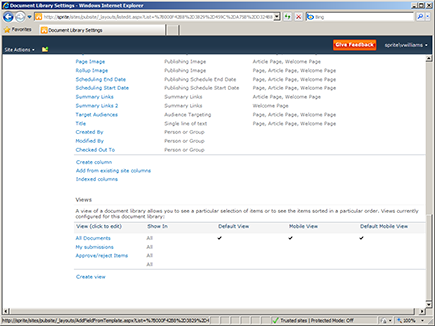
Figure 25-10 shows the columns section of a document library. Click the Add from Existing Site Columns link to add your custom site columns or the site columns provided by SharePoint to the list of columns that are available to your list or library.
Figure 25-10: Add existing site columns to a library.
..................Content has been hidden....................
You can't read the all page of ebook, please click here login for view all page.