
Figure 11-1: Options for creating custom lists.
Chapter 11
Creating Custom Lists
In This Chapter
![]() Planning, creating, and importing a custom list
Planning, creating, and importing a custom list
![]() Adding new columns to lists
Adding new columns to lists
![]() Renaming and hiding the Title column
Renaming and hiding the Title column
![]() Importing your spreadsheet as a list
Importing your spreadsheet as a list
![]() Creating calculated and lookup columns
Creating calculated and lookup columns
One of the neat features about SharePoint is the ability to add columns to the predefined lists and libraries as well as make entirely new custom lists. Custom lists make it possible for you to create a team site unique to your tasks and responsibilities. You can build your custom list from scratch or import a spreadsheet.
Think about all the spreadsheets you have for tracking and simple mathematics, like adding inventory! Creating or importing custom lists gives you a centralized location for this information and an easy-to-use form interface for data entry and display. Plus, if you use the supporting lists SharePoint provides — Links, Announcements, Issue Tracking, and Tasks — your team is a lean, mean, productivity machine!
 In Chapter 3, you can read about the lists included with SharePoint and how to use them. Even if you’re ready to jump into building your own custom list, don’t forget about the templates SharePoint provides — several come with special, premade Web Part views (Announcements and Links, for example) that take extra effort for you to create for a custom list.
The process for adding columns is the same in libraries and lists. However, in a library, your columns capture information about a file, such as its category or author. Lists generally are all data columns and are used for tracking and communication.
Planning Your Custom List
A long time ago, I worked at the distribution center for a company that makes private-label baby wipes. Each trailer of baby wipes that left the company dock was sealed with a metal seal. Each seal had a unique identifier that was entered on the bill of lading and written manually on a paper log. Once a month, I typed the log with a manual typewriter and sent the typewritten log to the corporate headquarters in New York. I’m not making this up; it’s all true.
When I automated that process, I used a Lotus 1-2-3 spreadsheet. Fast-forward 20 years; assume this company still has no way of tracking seal numbers with their orders and must use an Excel spreadsheet. Here I show you how to do this with a custom SharePoint list. I want to track the shipment’s date (date), bill of lading number (text), order number (text), trailer number (text), and the seal number (text). Note in this example, all these numbers are used as text, not mathematical values.
 Do the same for your custom list — identify the columns you need and think about the type of data that each column contains. Planning a custom list is similar to starting a new spreadsheet in Excel or a table in Access. In all cases, a little preplanning saves time in the long run. What order do you want the columns to be in? What options do you want in your drop-down lists?
Already have a spreadsheet that you think would make a good list in SharePoint? Make sure you check out the section “Importing a Spreadsheet as a List,” later in this chapter. That section can save you a lot of effort, and you’ll have a custom list in no time.
Columns can also be called fields (for those used to database terminology). When these columns are used to describe files (usually documents in a document library), they’re also referred to as metadata or properties.
Creating Custom Lists
You create a custom list using the same steps described for creating predefined lists from templates in Chapter 3. You simply click Site Actions⇒More Options in your team site. On the SharePoint Create page, you see a Blank & Custom list category, as shown in Figure 11-1. The list categories on the Create page include
![]() Custom List: A list with a Title column.
Custom List: A list with a Title column.
![]() Custom List in Datasheet View: A list with a Title column that displays in datasheet or spreadsheet view by default.
Custom List in Datasheet View: A list with a Title column that displays in datasheet or spreadsheet view by default.
![]() Import Spreadsheet: A dialog box opens that allows you to import a spreadsheet into a SharePoint list.
Import Spreadsheet: A dialog box opens that allows you to import a spreadsheet into a SharePoint list.

Follow these steps to create your custom list:
1. Select one of the three custom templates on the Create page, which I describe in the preceding list, and then enter a name for your list.
The name you type here is used in the list’s web address. Avoid using spaces in the name when you create the list. You can change the list’s name to a friendlier name after you create it.
2. Click the Create button.
SharePoint creates your new custom list and generously adds a single Title column to it. See the section “Adding Columns to Your List” later in this chapter for details on working with columns.
Choose the Custom List in Datasheet View template when you know users will use the datasheet (or spreadsheet) view as the default. This view is good for bulk-editing and copying/pasting as you would in Excel. In reality, all roads lead to Rome — regardless of which custom list template you choose, creating new columns is the same, and you can easily add or switch the view(s) of the list. (Chapter 4 discusses Datasheet views in more detail.)
Adding Columns to Your List
A new custom list displays a single text Title column. The list also contains several behind-the-scenes columns that you can’t see, such as ID and Version. To make the custom list your own, you have to add columns to the list.
Columns are like fields in a database table. When you add a column to your list, a data entry field appears in the list’s New Form to give you a place to enter data into that column.
A little planning goes a long way. You created a plan for your custom list, right? Because now is when you start adding the columns to your list that you listed in your plan.
You can also add columns to the predefined SharePoint lists that I discuss in Chapter 3.
Here’s a quick overview to add columns to your custom list:
1. With your list open in the browser, click the List tab on the Ribbon and then click the Create Column button (see Figure 11-2) in the Manage Views group.
The Create Column window appears.
You can also add new columns with the List Settings page.
Figure 11-2: Add a new column to your list.

2. Type a name for your new column in the Column Name field.
The name you type is what users will see, so pick a name that’s concise but meaningful. I don’t recommend using spaces in your column names when you first create them. You can always add spaces later.
 Spaces entered in a column name become a permanent part of that column’s internal name in SharePoint. Some of these internal names can get quite lengthy and downright nonsensical, which makes referencing them a real pain.
3. Select the type of information you want to store in the column.
The options given here are fairly intuitive — Single Line of Text, Number, Date and Time, and so on. See the section “Getting to know column types” later in this chapter for details on selecting the column type.
 Try to determine what kind of data you have when you first create the column. Changing the data type later may result in loss of data or you may not have as many options when you change the type.
4. In the Additional Column Settings section, select the options that further define your column’s type.
The column type you select in Step 3 determines what options you have available for configuring the column.
5. (Optional) If you want SharePoint to test the values entered into your column, use the Column Validation section to enter your formula.
6. Click OK.
SharePoint adds the column to your custom list.
You can change the column properties later and rearrange the order of the columns by using the List Settings page.
When you first create a custom list, use the List Settings page, where you have all the commands at your fingertips to power through the column creation — you can pick site columns, create your own, and rearrange them, as shown in Figure 11-3. After your list has been created and you need to add additional columns, the Create Column button on the list page is a handy way to add one or two columns without leaving the list page.
Figure 11-3: Columns section of the List Settings page.

Getting to know column types
Columns are used to store data, and unlike a spreadsheet, you need to define the type of column as you create it, as in Figure 11-4. For those who work with databases, this is a familiar concept. By defining the type of column, you gain extra functionality based on that type, and you help to control the type of information that can be entered into the column and how that information is presented onscreen. For example, users can enter only a number in a Number column; they can’t add miscellaneous text.
SharePoint provides a number of built-in column types that you can select for your lists, such as columns that know how to handle dates and URLs. Third-party companies and developers in your organization can also create custom column types that can be added to SharePoint. For example, if your company needs a column that handles a ZIP code plus four values, a developer could create it for you.
Table 11-1 lists common SharePoint column types and what they’re used for.
Figure 11-4: The Create Column page showing choices.

Table 11-1 SharePoint Column Data Types
|
Column Data Type* |
What It’s Used For |
Display on Form |
|
Single Line of Text |
Display text and numbers (such as phone or course numbers, or ZIP code) up to 255 characters. |
Single line text box (The text box may not show all 255 characters.) |
|
Multiple Lines of Text |
Display multiple lines of text. |
Select from Plain Text, Rich Text, or Enhanced Rich Text. Depending on the number of lines you select, this option shows as a text area of that size with additional toolbars to format text.** |
|
Choice*** |
A defined list of choices; for example, categories or departments. |
Drop-down list is the default and most common. |
|
Number |
Numerical values that can be used for calculations. |
You can identify a min/max value number with a choice of decimal options. |
|
Currency |
Numerical values that represent money. |
You can identify a min/max value currency. Includes options for decimal places and currency format. |
|
Date and Time |
Dates and times. |
Date and/or Time-Calendar Picker. |
|
Lookup |
Values from another list — for example, categories could be stored in a lookup list for document metadata. |
Drop-down list populated based on values from other list. |
|
Yes/No |
Boolean value of Yes or No. |
Check box. |
|
Person or Group |
Directory listing information from SharePoint. |
The person or group is shown as a hyperlink and can include presence information. |
|
Hyperlink or Picture |
Hyperlink (internal or external) or an image. |
Hyperlink or picture. |
|
Calculated |
Data that can be calculated by formula. |
Result of calculation; can be text or numerical. |
|
External Data |
Data stored in a data source; for example, a table or view in an enterprise database. |
Text. |
|
Managed Metadata |
Provides a common set of keywords and terms that can be used across the organization. |
Text. |
|
* Most columns also include property options for Required, Allow Duplicates, Default Values, and Add to the Default View. |
||
|
** Gotcha: Although you may set a number of lines for editing, this isn’t a defined limit. Users can type or cut/paste a large amount of text into this control. You may want to use column validation to restrict the length. |
||
|
*** Choice can also be shown on the form as radio buttons for a single choice or check boxes for multiple choices. |
||
In addition to the column data types in Table 11-1, other data types, such as Publishing HTML (an even richer form of text), can be selected when creating site columns in publishing sites. I discuss these additional column types in Chapter 18.
When you’re creating columns for your custom list, you can change the order of the columns as they’re shown in the Columns section of the List Settings page. Changing the column ordering in this section helps with organizing the list flow for owners and how they display on the lists form. However, changing the order on the List Settings page doesn’t change the order of columns in the default view — you must modify the view separately, which I discuss in Chapter 4.
Don’t underestimate descriptions! Creators of lists often carry a lot of information in their heads about the content in the list. Users aren’t mind readers. Type descriptions to help them understand the intent of the column and the data expected.
Validating data entry
Column validation options are new to SharePoint 2010 lists and allow you to define additional limits and constraints for your data. For example, you may want to ensure that a value in one Date column occurs after another Date column. (So for example, column validation can ensure that the date in the Date Finished column can’t be earlier than the date in the Date Started column — you can’t finish a project before it’s begun!)
To use column validation on your list:
1. In your list where you want to validate data entry, click the List Settings button on the List tab.
2. Under General Settings, click the Validation Settings link.
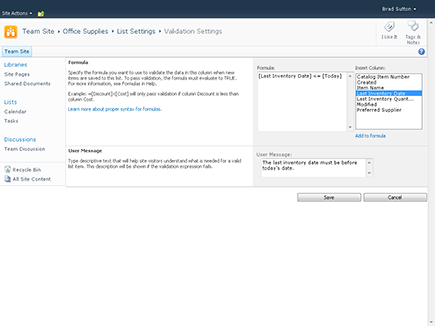
3. Type a formula in the Formula text box, as shown in Figure 11-5.
The result of the formula must evaluate to TRUE to pass validation. The formula syntax is the same as calculated columns, which is similar to Excel syntax.
Figure 11-5: Entering a formula for list validation.
4. Enter a user message that you want to appear when the validation formula fails.
The message should give the user an idea of how the formula works and how to fix the problem.
5. Click the Save button.
When users enter data into your form, the validation formula is evaluated. If the formula evaluates to FALSE, your user message appears on the form, as shown in Figure 11-6.
Figure 11-6: A user message appears when validation formula equals FALSE.

You can add column validation to columns created at the list or site level. Validation created for site-level columns applies everywhere that column is used, although the formula can be overridden at the list where the site-level column is used.
Working with the Title Column
Unlike SharePoint’s predefined lists, your custom list has only one column when you first create it — the Title column. Unfortunately, you can’t delete the Title column or change its data type, but you can rename it, hide it, or make it not required.
To rename the Title column:
1. Select the List Settings button on the List tab on the Ribbon.
2. Under the Columns heading, click the Title hyperlink.
3. Replace Title with your own title and make modifications to the other properties as desired.
The Title column is used by the list as a means to access the data entry forms to view and edit the list item, as I discuss in Chapter 3. You can opt to hide the Title column so that it doesn’t appear on any of the list forms.
To hide the Title column:
1. In your list, click the List Settings button on the List tab.
2. If the Content Types section isn’t visible, enable management of content types by following these steps:
a. Click the Advanced Settings link on the List Settings page.
b. Select the Yes radio button under Allow Management of Content Types? and then click OK. The Content Types section will be visible on the List Settings page.
3. In the Content Types section of the List Settings page, click the Item content type.
The List Content Type Information appears.
If you want to change the Title column in a document library, you click the Document content type. The Item content type applies to custom lists only. In a predefined list, such as a Tasks list, you click the Task content type.
4. Click the Title column.
The Title column’s properties appear.
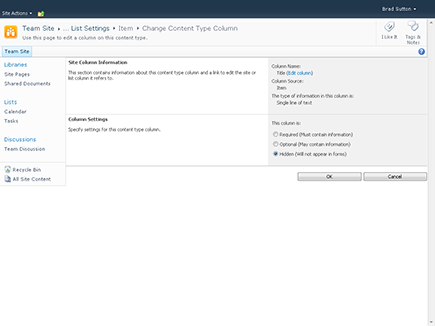
5. Under Column Settings, select the Hidden (Will Not Appear in Forms) radio button, as shown in Figure 11-7, and click OK.
The Title column doesn’t appear on forms.
Figure 11-7: Hide the Title column.
Importing a Spreadsheet as a List
Already have data in a spreadsheet that you want to be a SharePoint list? You’re halfway there! Before you start, make sure you do the following:
![]() Clean the list. Make sure your list looks like a table, with no blank columns or rows.
Clean the list. Make sure your list looks like a table, with no blank columns or rows.
![]() Make sure your list has headers. All columns should have a column title.
Make sure your list has headers. All columns should have a column title.
![]() Make sure your column data is consistent. For example, if a column has a comment in what would otherwise be a Date column, remove the text.
Make sure your column data is consistent. For example, if a column has a comment in what would otherwise be a Date column, remove the text.
![]() Make sure your first row is representative of the rest of the data. SharePoint reads that first row and makes assumptions about the information in that column. Figure 11-8 shows an example of a clean spreadsheet ready for importing.
Make sure your first row is representative of the rest of the data. SharePoint reads that first row and makes assumptions about the information in that column. Figure 11-8 shows an example of a clean spreadsheet ready for importing.
Figure 11-8: Cleaned spreadsheet ready for import into SharePoint.

SharePoint looks for what it believes is the first text column and uses it as the pseudo-title field (the primary field in the list that has the Edit menu attached to it). Therefore, try to place a text field with unique data in the first column position. Unfortunately, if your unique field is a number, such as a serial number, this can cause issues. To work around the problem, create the list and copy and paste the data from the spreadsheet.
A good example of a first column is a unique name of a person or an item, such as Event Name.
A bad example of a first column is the category of an item or a department of an employee.
To import your spreadsheet into a custom list:
1. Choose Site Actions⇒View All Site Content.
Other options include View All Site Content Link on the Quick Launch toolbar or the Create Option Link on the Site Actions menu.
2. Select the Create command and then select the Import Spreadsheet option from the List category and click the Create button.
3. In the Name text box, enter a name for your list.
Follow the naming conventions I outline for list names: Keep them short and eliminate spaces.
4. (Optional) In the Description text box, enter a description of the list.
5. Click the Browse button, browse to your spreadsheet, select it, and click the Import button.
A dialog box appears that asks how your range is designated. The default is Table Range, but other options are Named Range or Range of Cells. If you haven’t named your range in Excel or set as a table, select the Range of Cells option.
6. If you chose the Range of Cells option, click the Select Range field in the dialog box, and then click your spreadsheet and highlight the desired range.
7. Click the Import button in the dialog box.
After you import your spreadsheet, verify the column types SharePoint chose for you. Generally SharePoint assumes text, number, and dates. You may want to change some text fields to Choice, Yes/No, and so forth.
Don’t have the patience to create all your custom columns one by one — but you don’t have a current list in another format either? Create a spreadsheet with your column headers and at least one row of data, and then import this spreadsheet and modify the column properties as necessary.
Taking Your List to the Next Level: Calculated and Lookup Columns
Calculated columns are especially powerful for automatically generating data. Don’t be intimidated — the web is full of great formula examples for SharePoint calculated columns. Some common uses include
![]() Adding days to a date column to calculate an expired or due date column.
Adding days to a date column to calculate an expired or due date column.
![]() Adding Number or Currency columns to get a total.
Adding Number or Currency columns to get a total.
![]() Using the Me function to automatically add the username to a field.
Using the Me function to automatically add the username to a field.
Creating a calculated column
To create a calculated column, follow these steps:
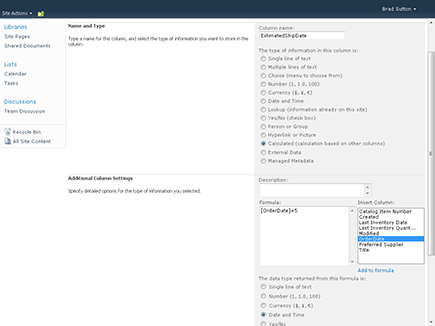
1. Select the Calculated column type in the Name and Type options in the Create Column dialog box.
The Additional Column Settings area changes to support entering a calculation (see Figure 11-9) and specifying column options.
2. Type your formula using the proper syntax in the Formula text box.
If you’re basing your calculation on another field in the list, you can reference that field using the square brackets reference syntax.
For example, to calculate a Shipping Deadline, you might want to add five days to the Order Date value in another column by entering [Order Date]+5 in the Formula text box.
3. Select the proper data type for the returned value and other data type property options, if available, from the Additional Column Settings section of the page.
Not all return values are of the same data type as the input columns. You subtract one date from another, but your returned value is a number (the number of days difference between the two dates).
Other examples include
• Adding the current username to a field. Simply type the constant [Me] in the Formula text box.
• Using today as a date in a calculation to create a new date by entering [Today]+7 in the Formula text box.
Figure 11-9: Column settings for a calculated column.
Using a lookup column
Maintaining all your options in a Choice field can be cumbersome and prone to error. SharePoint uses a similar model to relational databases by separating the lookup information from the transaction list. Think of all the lookup data that could be maintained in separate lists. For example, computer hardware inventory lookup lists could include hardware type, maintenance contract, and department location. These lists can be maintained independently of the transaction list — the inventory itself.
In the following example, I create a Customer custom list with a single field — Title — and populate it with the names of customers. I build the Order list (where I track orders that customers place), and Customer is a column in this list. Rather than build a Choice field, I use the Lookup data type to connect to my Customer list and use the Title field as data for the Customer column in the Order list.
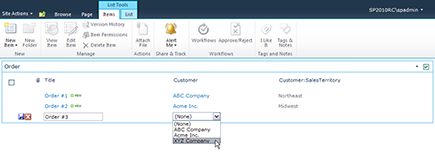
You can also add other columns from the lookup list to the drop-down list to help users select the proper choice. When a user selects the value from the drop-down list, values for the additional columns also display. Figure 11-10 shows a scenario that uses a lookup column to display a customer’s sales territory. The customer’s name and sales territory are stored in one list and displayed in another list using a lookup column. Figure 11-10 also shows the use of inline editing in a Web Part, which is discussed in Chapter 4.
For users familiar with databases and referential integrity, SharePoint 2010 now adds additional options to support this implementation. Lookup columns can also be used to create a chain of joined lists that can be used to query and display values from additional columns.
Figure 11-10: Selecting a value from a lookup column.
..................Content has been hidden....................
You can't read the all page of ebook, please click here login for view all page.