
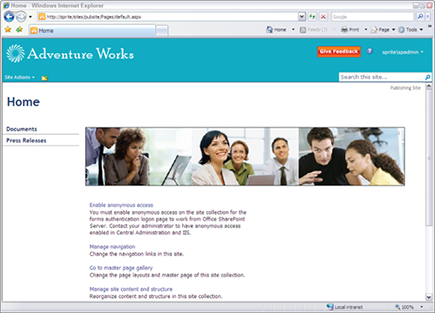
Figure 18-1: SharePoint’s publishing site.
Chapter 18
Getting Started with Portals and Web Sites
In This Chapter
![]() Mastering the basics of publishing sites
Mastering the basics of publishing sites
![]() Creating and fixing your pages
Creating and fixing your pages
![]() Choosing or changing a page layout
Choosing or changing a page layout
![]() Selecting the allowed page layouts for a site
Selecting the allowed page layouts for a site
![]() Changing the master page of a site
Changing the master page of a site
Nowadays everyone expects their web sites to have a content management system. SharePoint users are no different. People don’t want to have to type their content in multiple places. They want to enter it once and reuse it throughout their site. That’s the role of a content management system, and that’s what SharePoint’s publishing sites do.
SharePoint’s publishing sites are very useful for creating portals and public-facing web sites. For internal portals, the business community often stands up portals with very little or no IT intervention. Common uses for internal portals include sites that aggregate users and content based on geography, business units, or business service. Business service portals are very popular for things like a self-service human resources portal or internal communications portal. For smaller companies, their entire company portal may consist of a single publishing site.
 I usually recommend using a publishing site for the company portal with separate site collections for team collaboration sites. Although internal communication usually owns the company portal, team sites should usually be less restrictive.
Public-facing web sites may require some design assistance because these sites tend to have more stringent branding requirements. If the branding is implemented properly, business owners can maintain the site’s content on an on-going basis. A company may choose to put their entire web site in SharePoint, whereas others choose smaller micro-sites that they want the business to be able to maintain. For example, a marketing micro-site is a good use for SharePoint because the marketing group can maintain the branding and content.
SharePoint 2010 includes another site template, the Enterprise Wiki, that has similar content management capabilities of publishing sites. The Enterprise Wiki, however, is geared more for collaborative information publishing, similar to Wikipedia. (I discuss Enterprise Wikis in more detail in Chapter 26.)
This chapter introduces you to SharePoint’s publishing sites and shows you how to start adding your own content.
Exploring SharePoint’s Publishing Site
SharePoint provides a site template for creating web content management sites — the Publishing Portal template. The Publishing Portal template includes a number of interesting elements that you can use to kick-start your portal or web site project, including
![]() A branded master page that changes the site’s look and feel.
A branded master page that changes the site’s look and feel.
![]() Several variations of layouts for your site’s landing pages and subpages, referred to as Welcome pages and Article pages by SharePoint.
Several variations of layouts for your site’s landing pages and subpages, referred to as Welcome pages and Article pages by SharePoint.
![]() An enhanced Site Actions menu that provides access to commonly used administrative tasks in publishing sites, such as modifying site navigation and viewing reports on site content.
An enhanced Site Actions menu that provides access to commonly used administrative tasks in publishing sites, such as modifying site navigation and viewing reports on site content.
![]() A preconfigured Pages library with versioning and approval workflows enabled by default. (See Chapter 19 for more details on the Pages library and approval workflows.)
A preconfigured Pages library with versioning and approval workflows enabled by default. (See Chapter 19 for more details on the Pages library and approval workflows.)
![]() Search Center that provides basic and advanced search capabilities. (See Chapter 27 for more details on search.)
Search Center that provides basic and advanced search capabilities. (See Chapter 27 for more details on search.)
![]() Sample content including a home page and a subsite for managing press releases.
Sample content including a home page and a subsite for managing press releases.
The Publishing Portal site template can be used to create new site collections. Usually when you’re creating a new portal or public-facing web site, it should reside in its own site collection. Using a separate site collection allows the portal or web site to reside in its own database and makes it easier to manage permissions. The features used to customize a publishing site apply to all the content within the site collection. (I discuss creating new site collections in Chapter 7.)
You can add a publishing site to an existing site collection by using the Publishing Portal template. You have to enable publishing features for the site collection, which you can do on the Site Settings page of the top-level site.
 The functionality of publishing sites is delivered by Microsoft using several features. In the browser, you see two features — the SharePoint Server Publishing Infrastructure at the site collection level, and the SharePoint Server Publishing feature at the individual site level.
Figure 18-1 shows the home page of a site created using the Publishing Portal template.
Creating and Editing Pages
One of the first tasks you want to perform in a new publishing site is to create new web pages or edit the pages provided in the site template. Pages in a publishing site are created automatically in the Pages library. This library is preconfigured with approval workflows. See Chapter 19 for details on approval workflows.
 You can create new publishing pages only in the Pages library. This means all your pages have the word Pages in their web addresses. There’s no way around this if you want to use publishing pages. You can create folders in the Pages library, which is useful if you have a set of pages you want to manage separately but don’t want to create a new subsite.
To create a new page in a publishing site,
1. Browse to the site where you want to create the new page and then choose Site Actions⇒New Page.
The New Page dialog box appears, as shown in Figure 18-2.
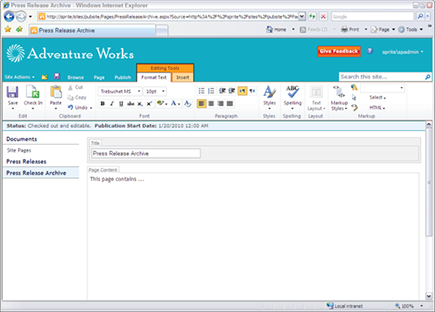
2. Enter a new filename for your page in the New Page Name field.
Any spaces are converted to a dash. I suggest that you do not use spaces in your filenames.
3. Click the Create button.
SharePoint creates a new page and displays it in Edit mode.
Figure 18-2: Creating a new page in a publishing site.

It helps to have a plan for the pages you want to create. See the sidebar, “Blank or publishing site?” for planning suggestions.
You can edit pages by choosing Site Actions⇒Edit Page. Alternatively, browse to the Pages library any time you want to manage multiple pages.
Adding Content to Your Page
SharePoint’s publishing site provides a rich editing experience that makes it easy for a non-technical person to create web pages. Adding your content to the page is a snap. SharePoint provides many kinds of content containers that you can use when creating your page, including
![]() Single-line text boxes for entering a simple text line, such as the page’s title
Single-line text boxes for entering a simple text line, such as the page’s title
![]() Multiple-line text boxes for entering paragraphs, bulleted and numbered lists, and tables
Multiple-line text boxes for entering paragraphs, bulleted and numbered lists, and tables
![]() Tools for adding images, video, and Web Parts
Tools for adding images, video, and Web Parts
The containers that you see on the page are determined by the page layout used to create the page. The page layout is the template or form that determines what type of content you can put on the page (text, image, and video) and where the content goes on the page.
SharePoint provides a number of page layouts, but you can also create your own (see Chapter 20). By default, a publishing site uses the Body Only page layout, which provides a single multiline container for adding all your content to the page.
SharePoint provides four types of page layouts. The type of layout you choose is determined by the information you need to display on the page. Within each kind of page layout provided, a number of layouts are available. Each layout provides a different way of displaying the same kind of information. Table 18-1 provides a summary of the layouts provided for each layout type.
Table 18-1 SharePoint Page Layouts
|
Layout Type |
Type of Information Displayed |
Example of Layouts Provided |
|
Article page |
Supports news content with images, bylines, and article dates |
Article with no image; article with image on the left or the right |
|
Enterprise Wiki page |
Supports community editing with rating and categorization |
Rich text box with rating stars and a Category drop-down list |
|
Redirect page |
Captures the web address of a page you want to automatically forward users to |
Hyperlink field for entering the forwarding address |
|
Welcome page |
Acts as the starting or landing page for a site |
Web site table of contents, “splash” page with an image and two areas for links |
Create a new page layout any time you want to present a new type of information or present that information in a new format on the page. (See Chapter 16 for details.)
Adding content to your page
Most page layouts include a multiline text box you can use for entering lots of different kinds of content. This text box includes plenty of formatting options and commands for inserting images and videos.
Depending on the page layout you’re using, your page may have several more containers for adding content. Some of these containers may be specialized; for example, just for adding an image or a hyperlink. (I discuss creating layouts using different kinds of containers in Chapter 20.)
To add content to your page, follow these steps:
1. Place your cursor inside the page’s text box.
This text box is often called Page Content, but it may be named differently depending on the page layout you’re using.
2. Enter your text into the page, applying formatting as desired.
The Ribbon displays several formatting options you can use for formatting your text. These options can be disabled, as I discuss in Chapter 20, so your Ribbon may look different from the one you see in Figure 18-3.
When your branding is properly implemented, you don’t have to apply formatting to content. For example, you can enter a bulleted list, and it formats automatically in a consistent way with the site’s branding. (See Chapter 23 for details about applying consistent styles across content.)
Figure 18-3: The Ribbon showing text-editing options.
3. To view the HTML mode for the content, click the Edit HTML Source button in the Markup group on the Format Text tab of the Ribbon.
The HTML Source appears in a separate window. You can use this option if you want to copy and paste HTML markup into the page.
4. Use the buttons on the Insert tab to insert other kinds of content into your page, such as tables, images, videos, links, and Web Parts.
You don’t have to upload your images and videos before inserting them. The insert process prompts you to upload your image or video to the site, as shown in Figure 18-4.
Figure 18-4: Insert videos, images, and links.

If you have content you want to give users to use on pages, consider adding it as reusable content. You just enter your content in the Reusable Content list in the root of your site. A user can insert the content into his page. Common uses for reusable content include privacy statements and copyright information.
Changing the page’s layout
For good practice, choose your page layout type before entering any page content; although you can change page layout types later, that sometimes leads to unexpected consequences.
To create a new page, choose Site Actions⇒New Page, give your new page a title, and click the Create button. Your new page appears, with the site’s default page layout applied. In publishing sites, this should be a Body Only Article page.
Follow these steps to choose and apply a new page layout to your new page:
1. Make sure you’re in Edit mode by looking for the Editing Tools tab.
If you aren’t in Edit mode, click the Edit icon above the Ribbon (it looks like a piece of paper and pencil).
You can also click the Page tab and then click the Edit icon. The Editing Tools tab appears with the Format Text and Insert tabs in it.
2. Locate the Page Actions section on the Ribbon.
The Page Actions section is on the Page tab. This section includes the Preview, Page Layout, Make Home Page, Incoming Links, and Draft Check options.
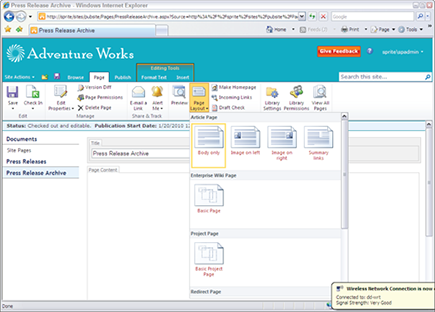
3. Click the Page Layout drop-down list and choose a page layout.
The page layouts available for this site are shown, grouped by type, with a thumbnail representation of each layout; see Figure 18-5.
Think about the contents of your page to make sure the layout is what you need.
4. Edit the content as you normally would, and be sure to select Save and Close or Check In on the Page tab when you’re done.
Your changes are saved and the page is no longer in Edit mode.
Figure 18-5: The Page Layout drop-down list on the Ribbon.
The steps to change the page layout after you enter page content are no different than those to choose the initial page layout. But you should choose the new page layout carefully; does it have the same containers as your current page? Will you need to rearrange a lot of the content?
If your current page uses Web Parts and the new page layout doesn’t have a corresponding Web Part zone, the Web Parts will either move to another zone or close. Content in controls (such as byline and date) will disappear if you apply a layout that doesn’t contain those fields.
However, simple changes, such as going from an Article Left page to an Article Right page (where the only difference is the location of the image), go very smoothly.
Setting Page Layout Defaults
The default page layout differs according to the type of site you’re in. And don’t confuse this default page layout (what you get when you select Site Actions⇒New Page) with the home page or default.aspx page, which is determined by the site template definition. So for example, the home page may be a Welcome Summary Links page, but the default page layout for new pages on the site may be an Article page layout.
The default page layout is the assumed most common page layout needed for the site. (This choice can be changed in the Site Settings by accessing the Master Pages and Page Layouts link, however — see the “Changing the Master Page of a Site” section, later in this chapter.) The default page layout for publishing sites is an Article page, Body Only.
If you choose Site Actions⇒New Page, your new page will have the site’s default page layout. (Likewise, if you use the New Page link in the Pages library.) If on the other hand, you select the New Document button on the Documents tab in the Pages library, you can choose a page layout type and then a specific layout, during the creation phase of the page.
In the interest of standardization and ease of use, define which page layouts users can use to create new pages. SharePoint 2010 gives you quite a few choices when it comes to controlling the default choices for site templates, page layouts, and inheritance of these settings in your site collection.
To define the page layouts available for use in a site:
1. Select Site Actions⇒Site Settings.
The Site Settings page is displayed, oddly enough.
2. Locate the Look and Feel section.
3. Click the Page Layouts and Site Templates link.
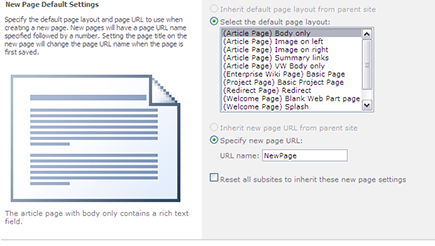
The Page Layout and Site Template Settings page appears. This page shows three sections: Subsite Templates, Page Layouts, and New Page Default Settings.
In the first and second section, you can inherit what’s been chosen at the parent level, choose any/all options, or select your own choices for this subsite on down.
The third section, New Page Default Settings, allows you to determine whether you want to inherit the default page layout of the parent or choose your own.
4. (Optional) Use the radio buttons and list items to specify options for site templates (refer to Figure 18-6).
You can specify that subsites inherit the same settings applied to their parent site (select the Subsites Inherit Site Templates from Parent Site radio button), permit subsites to use selected site templates (select the Subsites Can Only Use the Following Site Templates radio button), or you can allow a subsite to use any site template (select the Subsites Can Use Any Site Template radio button).
The Add and Remove buttons activate, depending on what’s allowed, and you can move site templates to the left (not allowed) or right (allowed) as desired. You can use the buttons or double-click a site template title to move the choice from box to box.
Select the Reset All Subsites to Inherit These Preferred Subsite Template Settings check box if you want subsites under this level to use these choices as well.
Figure 18-6: Select templates that can be used to create new sites.

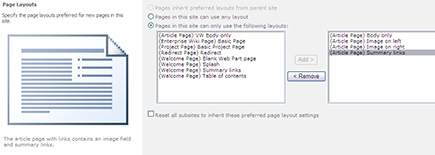
5. For Page Layouts, select the Pages in This Site Can Only Use the Following Layouts option.
The left (not allowed) and right (allowed) choice boxes become active. Use the Add and Remove buttons, or double-click, to place page layouts in the correct box (see Figure 18-7). Notice that the content type proceeds the page template title (in parentheses).
6. Select the Reset All Subsites to Inherit These Preferred Page Layout Settings check box if you want subsites under this level to use these choices as well.
Remember that this choice can be overridden by a site owner at a subsequent level.
Figure 18-7: Select page layouts you can use with this site.
7. In the third section, choose the Select the Default Page Layout option, if applicable.
If you choose the Select the Default Page Layout option, a list box appears with the page layouts listed. Choose the page layout you want as a default (see Figure 18-8). Usually this would be the most commonly used page layout for the site.
8. Select your options concerning the New Page URL and/or inheritance settings for new page settings.
Figure 18-8: Set the default new page layout.
9. Click OK to apply your choices.
Test your choices by creating and modifying several (or more!) new pages in your site before releasing to your editors.
Changing the Master Page of a Site
SharePoint 2010 includes two master pages: v4 and nightandday. By default, the master page of a publishing site is v4.master.
To apply a different master page, follow these steps:
1. Select Site Actions⇒Site Settings.
The Site Settings page is displayed.
2. Locate the Look and Feel section.
3. Click the Master Page link.
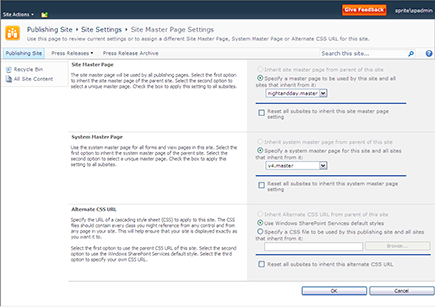
The Site Master Page Settings page appears. This page has three sections — Site Master, System Master, and Alternate CSS.
4. Choose to have the site inherit from the parent site master by selecting the Inherit Site Master Page from Parent of This Site radio button, or apply a specific master page by selecting the Specify a Master Page to Be Used by This Site and All Sites That Inherit from It radio button, and then selecting an option from the Site Master Page drop-down list (see Figure 18-9).
5. Select the Reset Subsites to Inherit This Master check box if you want subsites of the current site to use the same master page.
6. Set the site to inherit the system master page by selecting the Inherit System Master Page from Parent of This Site radio button, or specify a different System Master Page by selecting the Specify a System Master Page for This Site and All Sites That Inherit from It radio button and selecting an option from the System Master Page drop-down list.
The system master is applied to system-based pages, such as library pages. You don’t have to have the same master for the site pages and the system pages.
You can configure the site to inherit the alternate CSS of the parent, use the default SharePoint CSS, or use an alternate CSS. If you have a CSS attached to a custom master, you may not need an alternate CSS. On the other hand, if you’re using the v4.master or the Night and Day master and you just want to apply different colors, spacing, or images, you can point to an alternate style sheet.
7. Inherit the alternate CSS from the parent site by selecting the Inherit Alternate CSS URL from Parent of This Site radio button, or specify SharePoint Foundation default CSS by selecting the Use Microsoft SharePoint Foundation Default Styles radio button, or specify an alternative CSS option by selecting the Specify a CSS File to Be Used by This Publishing Site and All Sites That Inherit from It radio button and browsing to an existing CSS using the Browse button.
8. Click OK to apply your changes.
If you just chose a site master, you need to click a publishing page to see the results.
If you don’t like the predefined SharePoint 2010 master pages, you can create your own custom master for your site. (See Chapter 23 for an overview of what this involves.)
Figure 18-9: The Site Master Page Settings page.
..................Content has been hidden....................
You can't read the all page of ebook, please click here login for view all page.